SWELLPRO Spry+ User manual

User Manual V1.1
Check www.swellpro.com for
the latest version of this manual
and firmware updates for your
drone.
PIONEERS OF THE WATERPROOF DRONE
The world's only waterproof sport drone.

Thank you for purchasing the SwellPro Spry+. We have designed and manufactured the
Spry+ to the highest quality standards. Like any marine equipment, long-life and trouble-free
operation relies on due care and maintenance. With proper care and maintenance you
should enjoy your drone for many years. After flying in salt or contaminated water, always
thoroughly rinse and dry your Spry+ in fresh water immediately after use or before salt and
sediment can dry inside moving parts.
It is important to familiarize yourself with the features of this unique drone by carefully
studying this manual and particularly the priority sections indicated in the Table of Contents.
Before the first use, it is recommended to watch tutorial videos listed on official website or
youtube channel.
Check www.swellpro.com for the latest manuals, software and tips. Refer to the Version
Information section at the end of this manual, which details additions and corrections to this
manual.
Other Information
Visit and subscribe to SwellPro’s YouTube channel for instructional videos and product
information.
www.facebook.com/swellpro/

©2019 SwellPro All Rights Reserved 03
Contents
Product Overview
Drone Illustration
Remote Controller Illustration
FPV Screen OSD Illustration
Flight Modes
Battery Installation
Low Battery Alarm
Low temperature precautions
Flight
Basic knowledge before fly
Preparation Before your First Flight (or in a new location)
Gyroscope Calibration
Compass Calibration
Remote Controller
Battery
Product Overview
Charging Remote Controller Battery
Low Battery Alarm
Remote Controller Operation
Remote Controller Pairing
Camera
Camera Settings and Use
Camera Indicator
05
05
06
07
08
08
10
11
11
12
13
13
14
14
14
15
15
15
17
18
19
20
20
20
21
21
22
Drone Indication Lights
Propellers
Micro SD Card Installation
Return Home

©2019 SwellPro All Rights Reserved
04
IMU calibration
Starting / Stopping the Motors
Basic Flight Steps
Water Take-o and Landing
Take-o and Landing from a Boat
APP Control
Tap to Fly
Flight Path Setting
Specifications
Warranty & After Sale Service
Flight Safety
Battery Related
Maintenance
Trouble Shooting
Disclaimer and Warning
Appendix
Version Information
23
23
24
25
25
27
28
29
30
30
32
33
33
35
35
36
37

©2019 SwellPro All Rights Reserved 05
1. The Spry+ fuselage and remote controller are waterproof and suitable for all-weather,
all-terrain cruising.
2. The aerodynamic shape of the whole drone is designed to effectively minimize wind
resistance and improve flight speed.
3. Spry+'s camera uses a Sony 1 / 2.3 inch CMOS sensor matched to a lens that minimizes
fisheye distortion to obtain natural-looking scenes. Use your Spry+ to record stunning 4K
videos at 30 frames per second or take high-definition 12MP photos.
4. Adjustable lens angle: The Spry+’s camera can be tilted up and down with the remote
controller to frame your videos better.
5. Optional electronic stabilization system helps ensure smoother footage.
6. The Spry+ 4K waterproof camera is sealed in an optical glass dome to protect the camera
lens from damage. The specially designed dome has high transparency without distortion and
also helps avoid excessive glare.
7. Intelligent Follow Me: The Spry+ uses a built-in motion algorithm to follow the position of the
remote controller. The follow me functions supports leading or following camera positions.
8. Target orbit: the Spry+ can perform an autonomous orbit around a moving object.
9. Auto return: The Spry+ constantly monitors the location of the remote controller so that it can
return to the last-known position of the pilot in case of radio interference or a return-home
command.
10. APP smart control: One Key Take Off | Point to Fly | Orbit Fly | Auto Return | Flight Path
Settings
11. Compact, portable and easy to use.
Spry+ is the first-ever compact & portable waterproof sports drone. Its fully waterproof fuselage
and built-in camera helps you capture photos and 4K/30fps video in all weather conditions. The
competitive power system allows you to experience high-speed flight over water - enjoying true
freedom. This section introduces the various drone functions, how to assemble the drone, the
various part names of the drone, and its remote controller.
Product Overview
Highlighted Features

©2019 SwellPro All Rights Reserved
06
[01] Camera Dome
[02] Rubber Feet
[03] Drone Nose Lights
[04] CCW Propeller
[05] CCW Motor
[06] CCW Propeller Nut
[07] Drone Status Lights
[08] CW Motor
[09] CW Propeller Nut
[10] CW Propeller
[11] Power Button
[12] GPS Pod
Drone Illustration
[01]
[03]
[06]
[04]
[05]
[07]
[08]
[09]
[10]
[12]
[11]
[02]
[02]
[02]
[04]
[06]
[14]
[13]
[15]
[05]
[07]
[02]
[03]
[08]
[10]
[09]
[13] Waterproof Membrane
[14] Battery Cover
[15] Battery Cover Lock

©2019 SwellPro All Rights Reserved 07
[01] 2.4G Remote Antenna
For drone control signal
[02] Return-Home Switch
Commands the drone
to return automatically
[03] Camera Tilt Down Button
Tilts the camera down
[04] Follow Me Button
Controls the drone to follow
the remote controller
[05] Power Button + Controller
Status Light
Press and hold to power on
the remote controller.
The button will glow to indicate
remote controller status.
[06] Left Joystick
Control the drone’s ascent (up),
descent (down) and/or to rotate
the aircraft nose left or right.
[07] FPV Channel Button
Press and hold to search for the
best FPV channel
[08] FPV Screen
Displays flight data and FPV video
[09] Hanger Ring
Attachment point for neck
lanyard
[10]
[11] Camera Button
Used for controlling Video
and Photo functions.
[12] Camera Up Button
Tilts the camera up
[13] Flight Mode Switch
GPS / Circle / ATTI
[14] 5.8G FPV Antenna
Receives FPV live video
5.8GHz
[15] USB Port/Vent plug
For charging the remote
controller battery and
performing firmware
upgrades
Remote Controller Illustration
[01]
[03]
[02]
[04]
[05]
[06]
[07]
[15]
[09]
[08]
[10]
[11]
[12]
[13]
[14]
Before powering on the controller, please be sure to put all the toggle switches on the controller in the up
position.
Note: The default remote control configuration uses a left hand throttle. If you prefer to have right hand throttle,
please consult your local dealer.
Right joystick
Controls the drone direction
of flight
As the remote controller is completely sealed, the air inside is subject to changes in pressure and temperature.
If the rubber joystick seals balloon or suck in, simply equalize the pressure inside the remote by briefly
opening the USB charge plug.

©2019 SwellPro All Rights Reserved
08
The Spry+ utilizes a brand new flight control system which incorporates 6 of the best flight modes.
GPS mode: This mode uses the GPS module to achieve accurate and stabilized hovering, braking, intelligent
flight, intelligent return and other intelligent flight mode functions. In this mode, maximum flight speed is
10m/s, maximum ascent speed is 3m/s, and maximum descent speed is 3m/s.
Circle mode: The drone moves 10m from its current location and begins to circle with a radius of 10m with
the nose always facing the origin. During circling, the right-hand joystick controls the speed and size of the
orbit. Push up to increase the radius of the orbit, push down to reduce the radius of the circle (minimum
radius 10m), push the joystick left to speed up the orbit or push it right to slow down the orbit. If you
continue to reduce the orbit speed, the drone will change the direction of orbit and start to increase the
orbit speed again.
Flight Modes
P +02
R -01
M
O
D
T
:GPS
:049
:096
H
R
332
N
15
03.90
H
0000
+0.0
00.0
00.00
12.3
FPV Screen OSD Illustration
Display Interface
If [04] and [09] both point in the same direction, the drone is flying towards to remote controller/home
point.
[01] GPS satellites tracked
[02] Angle of aircraft pitch
[03] Angle of aircraft roll
[04] Flight direction
[05] Flight speed
[06] Flight time
[07] Drone battery voltage
[08] Distance from the take off point
[09] Home point direction relative to drone
[10] Vertical height
[11] Vertical speed
[12] Remote controller signal strength
[13] Current throttle
[14] Flight mode
[15] Compass bearing
[16] Flight attitude
[01]
[04]
[05]
[06]
[07] [10]
[11]
[12]
[13]
[14]
[15]
[9]
[8]
[16]
[03]
[02]

©2019 SwellPro All Rights Reserved 09
ATTI mode: This is a more advanced flight mode which does not use the GPS positioning function but still
maintains altitude stabilization. The drone will drift with any wind when hovering and will not brake when
the joysticks are released.
Follow Me: The remote controller has an inbuilt GPS module, and the Follow Me mode is based on the
relative position of this GPS module to the drone. The maximum Follow Me speed is 10 m/s (36 KM/H).
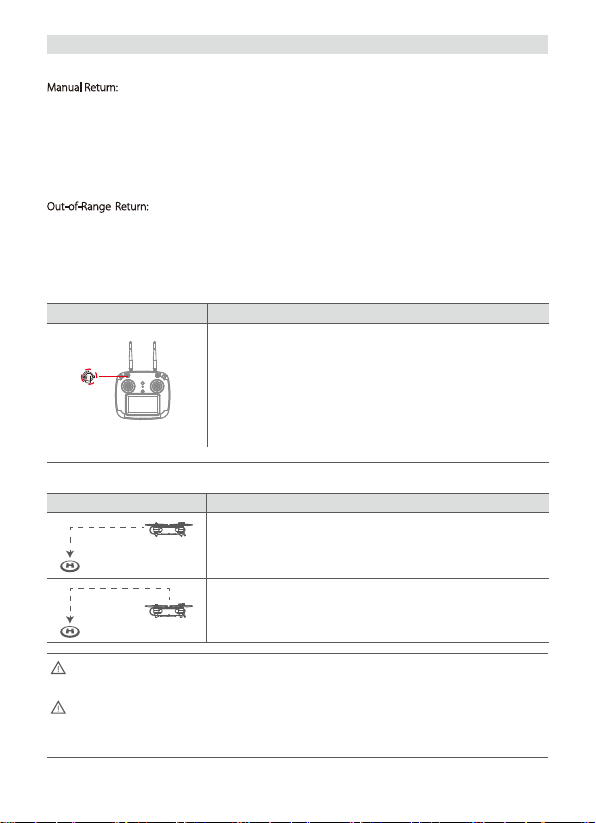
Auto-Return: The aircraft has a one-key return function as well as an auto-return if radio contact with the
remote controller is lost. When the remote control and GPS signal are good, the aircraft can be commanded
to automatically return to the current remote control position.
Circle & Follow Mode: Specifically designed for shooting moving objects, this mode is ideal for taking
pictures of moving boats. There are 2 ways to activate this mode: 1. enter the Circle mode, then push the
Follow Me button; 2. enter the Follow Me mode, then flick the mode stick. Working mode: When the aircraft
switch from Circle mode to Circle & Follow me mode, the aircraft will slowly circle the remote control with a
radius of 10 meters; when the aircraft switches from the Follow me mode to Circle & Follow me mode, the
drone will fly to a radius of 10 meters and start to circle. It is recommended the Follow Me speed is under 2
m / s, beyond this speed, it is possible to lose the aircraft.
In the GPS mode, the drone will not arm unless there are sufficient satellites to establish the home
point. This point is used if the drone cannot establish the location of the remote controller.
In ATTI mode, the drone’s top speed is faster than in GPS mode. When flying in a calm environment, the
pilot should allow a minimum of 30 meters of braking distance to ensure flight safety.
Flying in Atti mode requires more skill and caution. If you lose control of the drone in ATTI mode,
switching to GPS mode can help stabilize flight as long as there is sufficient GPS coverage.
In Follow Me mode, the joysticks are disabled. Press and hold the Follow Me button again to cancel
Follow Me - the Controller Status Light will flash red confirming Follow Me mode has been cancelled
and joystick function has been restored.
If the GPS module in the remote controller does not have an accurate fix, the controller status light will
flash red, Follow Me cannot be started.

©2019 SwellPro All Rights Reserved
10
SPRY+ has two Return Home modes: Manual Return and Out-of-Range Return.
Manual Return: When you activate return function of the Spry+, it will return to the remote controller. When
returning to the remote control 30 meters away, the aircraft will record the coordinates of the remote control
as the final return point. At this point, users can leave this location and let the aircraft land. (During the return
flight, if you operate the joystick, the aircraft will stop returning. If you stop operating the joystick, the aircraft
continues to return)
Out-of-Range Return: If the drone loses contact with the remote control for any reason, the aircraft will
execute an automatic return to the last-known position of the remote control. During the return flight, if the
aircraft is reconnected to the remote control signal, the automatic return will be cancelled and the Spry+ will
await instructions from the remote controller.
Return Home
Operation
DescriptionIllustration
Press and hold the Return Home switch for 2 seconds, the system will
beep and start the return process. At this point, the aircraft will
auto-return to the remote controller . “RTH” is displayed in the upper
right corner of the remote control screen.
To cancel the Return Home process, press and hold the Return Home
switch for 2 seconds, the system will beep and cancel the return process
after both joysticks have been moved.
Regardless of the vertical height, if the horizontal distance is <20 meters,
the drone will maintain its height and return.
Vertical height < 30metres and horizontal distance > 20metres, the
drone will ascend up to 30metres, and then return.
Return Process
Description
Flare Maneuver
Return Home
Regardless of the vertical height, if the horizontal distance is <20 meters, the drone will maintain its
height and return.
During automatic Return Home, when the remote control signal is restored, switch the Flight Mode
briefly between GPS and ATTI mode and move the right joystick to take control of the drone and
cancel automatic return.

©2019 SwellPro All Rights Reserved 11
Propellers
The fuselage of the drone includes a pair of Drone Nose Lights and Drone Status Lights on the rear arms.
Their positions are shown below:
The Red Drone Nose Lights are used to indicate the direction of the nose of the drone, they will be solid red
when the drone is powered on. The rear Drone Status Lights are green and indicate the status of the current
flight control system. Please refer to the following table for the different flash modes for the Drone Nose and
Status Lights.
Drone Indication Lights
Drone Nose and Status Light Messages
Aircraft initialization / horizontal calibration:
Drone power on/off
Alternating Red, Green slow flashing Aircraft initializing / horizontal calibration
Red Drone Nose Lights
Green Status lights
Green Status lights
GPS Status
Green Slow Flashing
Green ON
Poor GPS signal
Good GPS signal
Compass Calibration
Green Fast Flashing
Green Slow Flashing
Horizontal calibration
Vertical calibration
Red Fast Flashing Remote control connected but still locked
Low Battery Warning
Red Fast Flashing Low battery warning
Red ON Remote control connected and drone unlocked
Remote controller signal
Red Slow Flashing Remote controller signal lost
Spry+ comes with 6" 2-bladed propellers and is also compatible with 5” 3-bladed propellers. The 2 blade
speed is slower, but the flight time is longer than the 3 blade. You can choose propellers to suit your
requirements.

©2019 SwellPro All Rights Reserved
12
Installing and removing the propellers:
When selecting a microSD card for use with your camera, for best results always ensure that the card is rated
for 4K video throughput.
To insert the card, place the microSD card face-up in the recess inside the battery compartment. Carefully
slide the card towards the nose of the Spry+ until it clicks and locks into place.
To remove the card, push the card gently towards the nose of the Spry+ until it clicks and then ejects. Take
care to prevent the card from ejecting too fast out of the slot.
Micro SD Card Installation
Drone nose
CW propeller 6045R
CCW propeller 6045 CW propeller 6045R
CCW propeller 6045
1. Place each propeller onto the motor hubs according to the diagram below. The propeller
type is stamped on the top of the propeller blade. Propeller types that end with the letter
“R”are fitted to clockwise (CW) motors. If propellers are fitted incorrectly, the drone will
crash.
2. Hold the motor with one hand while tightening the propeller nut. Tighten the nut only until
the propeller does not turn on the motor. Overtightening the propeller nut will damage the
motor.
3. Before each flight, check that the propellers are smooth and undamaged.

©2019 SwellPro All Rights Reserved 13
The Spry+ is supplied with a high-voltage lithium battery (LiHV) and a corresponding charger.
To charge the drone battery: Plug in the charger. After 3 seconds, its four status lights will flash left and right
indicating the charger is ready. Connect the battery to the charger using the supplied adapter cable. The
larger plug on the cable is inserted into the top port of the charger. The plugs can only be inserted one way
and do not require force. If the plug is difficult to insert, try the other orientation.
After the battery is connected, the four battery status indicators show the level of charge: 25%, 50%, 75%,
and 100%. When all 4 lights are permanently ON, the battery is fully charged.
Battery
1.Twist open the battery hatch lock. Grasp the forward end of the battery cover with the
provided tool and pull the battery cover up.
2.Insert the battery vertically into the drone with the contacts towards the back of the drone
and press down until it is properly seated.
3.Check that the seals on the cover are clean and lightly lubricated. Insert the back of the
cover first, ensuring that the cover is securely under the clip at the base of the GPS dome,
then press down on the cover to seal the battery compartment.
Battery Installation
Note: If the four indicators flash at the same time, the charger or battery is faulty. Stop
charging and check all connections.

©2019 SwellPro All Rights Reserved
14
This section introduces the remote controller functions, including drone and camera operation.
Remote Controller
Low Battery Alarm
During flight when the voltage warning appears on the remote controller screen, prepare to return
and land the drone as soon as possible.
Power OFF the drone when not in use to prevent over-discharging and permanently damaging the
battery. Battery damage is not covered by warranty.
When the drone battery voltage drops to a low level (10.9V), the Drone Nose Lights will fast-flash red. The
pilot will simultaneously receive warnings on the remote controller. The screen will display “Aircraft Low
Battery” and the controller will beep and vibrate. Find a suitable place to land as soon as possible. If the
aircraft voltage drops to 10.7V, the aircraft will slowly and automatically land in place.
During auto-landing, the pilot can use the remote controller to alter the landing site, but this should be done
within one minute or the battery will be over-discharged and the drone may crash.
1. In low temperature environments (-0C degrees to 5C degrees) , flight time will be reduced.
Ensure batteries are fully charged and kept warm (20~30C) before use.
2. Also be aware that the low battery warnings will provide less warning time, so land the drone
as soon as the first battery warning appears.
3. After landing on cold water, the drone may need up to 15 seconds to stabilize its gyroscope
before being able to re-arm. Consider this before landing on water particularly if there are
waves.
Low temperature precautions
4. Twist the battery cover lock to lock the cover in place.

©2019 SwellPro All Rights Reserved 15
Low Battery Alarm
The Spry+ Remote Controller has a built-in battery and charging circuit. Charge the controller using the
supplied micro-USB cable and a regular 5V/2A USB charger. Normal charging time is ~90 minutes.
Some USB ports and some USB cables cannot provide the full 2 amps (2A) of power required. These
ports and cables can still be used to charge the Remote Controller but the charging time will be
longer.
During charging, the remote controllers power button will glow blue. When charging is complete the blue
light will turn off. Charging is possible during flight if necessary, but the remote must be connected to the
drone before connecting the charging cable.
The remote control has a built-in lithium battery and the operating time is about 2 hours. When the remote
controller battery is low, the remote control will beep and the battery power icon in the upper right corner
of the screen will be red. The remote control will then have approximately 10 minutes of power left. It is best
to return the drone and land as soon as possible or plug in the controller to charge the battery.
The Spry+ Remote Controller operates using two frequency bands, 2.4GHz and 5.8GHz. The 2.4GHz band is
used for drone control and 5.8GHz is for the FPV video signal. The remote control has a built-in 4.3-inch FPV
screen that displays real-time images and flight data of the aircraft.
Remote Controller Operation
Power Switch
One Key Return Home Switch
DescriptionIllustration
Power on: Long-press the power button for 3 seconds, the remote
controller will vibrate, beep and the screen will turn on.
Power off: Long-press the power button again for 3 seconds to turn off
the remote controller.
On: Long-press the Return Home switch until the the controller beeps.
The aircraft enters the return state, and the FPV screen will display“RTH”.
Cancel Return Home: Long-press the Return Home switch until the
controller beeps. and operate both joysticks to regain control.
Return Home
Charging the Remote Controller Battery

©2019 SwellPro All Rights Reserved
16
Please contact us if you need to change to right hand throttle.
Flight Mode Switch
Follow Me mode Switch
Follow Me
DescriptionIllustration
Drone Control
Left hand throttle- (American/ European configuration)
GPS:GPS mode
Circle Flight:Orbit mode
AT TI :ATTI mode
GPS
Circle Flight
AT T I
In the Follow Me mode, the joysticks are disabled. Long-press the“F” button again to cancel Follow Me
and resume joystick operation.
When the speed of the remote controller exceeds 10m/s during Follow Me operation, the drone will
continue to fly forward at the maximum speed. At this time, you can slow down or stop to wait for the
aircraft. If you’re out of the remote control's effective range, the aircraft will return to the position where
the GPS signal of the remote control that was final received.
If the remote controller’s GPS does not have a fix, the Follow Me function cannot be activated.
When the Controller Status Light is solid green, this indicates that the
GPS of the remote control has a fix and the Follow Me function is
available in GPS and Circle mode
To activate Follow Me, Long-press the Follow Me button “F” for 2
seconds until a beep sounds. The Controller Status Light will change to
solid red, indicating that the aircraft is in Follow Me mode.
Long-press the “F" button again for 2 seconds to cancel Follow Me.
Right Stick
Left Stick
U
p
T
u
r
n
R
i
g
h
t
D
o
w
n
T
u
r
n
L
e
f
t
U
p
T
u
r
n
R
i
g
h
t
D
o
w
n
T
u
r
n
L
e
f
t
F
o
r
w
a
r
d
R
i
g
h
t
B
a
c
k
w
a
r
d
L
e
f
t
F
o
r
w
a
r
d
R
i
g
h
t
B
a
c
k
w
a
r
d
L
e
f
t
Green Status light indicates good GPS fix.

©2019 SwellPro All Rights Reserved 17
Remote Controller Pairing
Always pair the remote controller and then select the FPV channel to match the best channels and
avoid interference.
DescriptionIllustration
FPV Channel Tuning
FPV Chennel Button
DescriptionIllustration
1. To pair the remote controller to the drone, while holding the
Return Home switch down, power on the remote controller.
2. The remote controller will vibrate and beep twice. The
Controller Status Light will flash red and green.
3. Power on the drone. After pairing has completed, the
Controller Status Light will turn green.
4. Long-press the FPV channel button (CH). The FPV screen
will display “RF SEARCHING” and automatically find the
best FPV channel.
There are 8 FPV channels available. Long-press the FPV channel button
(CH) and the system will automatically search for channels. (You can also
use short press to adjust frequency manually)
DescriptionIllustration
Camera Tilt Control
Camera up Camera down
Camera up: Tilt camera up
Camera down: Tilt camera down
In the absence of obstacles and interference the flight height can reach >80m and FPV
transmission range can reach 800m. For best reception, keep the left-hand (2.4GHz)
antenna horizontal and the right-hand antenna (5.8GHZ) vertical.

©2019 SwellPro All Rights Reserved
18
Camera
APP installation: The SwellCam2 app is available for iOS and Andoid devices. Android systems can download
the APK from either the Android Play Store or our website www.swellpro.com.
To connect the app to the Spry+’s camera, power on the drone, then press the WiFi switch on the underside
of the drone. The switch will begin flashing Red-Green. Connect your mobile device to the SwellPro... WiFi
hotspot, the password is 00000000.
Using the APP: Open the camera APP. The screen will show the camera preview. With the APP, you can set
the parameters for photos and video, you can also control the camera on the ground and take photos or
videos.
Spry+'s built-in camera can capture 4K videos and 12 megapixel still images. With its inbuilt WiFi function
you can also use a mobile app to change settings and download videos and photos. This section introduces
camera parameters and use.
The Spry+ will automatically save longer video files into chapter files of 4GB.
Always stop video recording before powering off the Spry+ or your video will be lost.
Camera Settings
WiFi switch
DescriptionIllustration
Camera Control
Photo/Video
Long-press the camera button (five beeps) to start or stop video
recording.
Short-press the camera button (two beeps) to take a photo.
You cannot take a photo if video recording is started.
After taking a photo, the camera information window will display a
camera icon and the resolution of the photo. The card icon
indicates the remaining number of photos the microSD card can hold.
In video mode, the card icon indicates the remaining hours and
minutes (hh:mm) the microSD card can hold.

©2019 SwellPro All Rights Reserved 19
00:05:20
8.5G2016/05/03 17:08
Camera Settings
Photo Settings
Picture Size
Burst Speed
Interval Shooting
Selfie-Timer
12M 16: 9 12M 4: 3
OFF 3P/S 5P/S 10P/S
OFF 3s 5s 10s 30s 60s
OFF 2s 10s
Video Settings
Resolution
Electronic Stabilization
Record Format
Video Format
3840x2160 30P 2704x1524 30P 1920x1080 120P/60P/30P 1280x720 240P
ON OFF
MP4 MOV
PAL NTSC
Camera Settings
EV
White Balance
Distortion Correction
Metering
Format
About this device
Restore Settings
+2.0 +1.7 +1.3 +1.0 +0.7 +0.3 0.0 -0.3 -0.7 -1.0 -1.3 -1.7 -2.0
AUTO, cloudy, sunny, Incandescent lamp, Fluorescent lamp
ON OFF
Global metering, Center-weighted, spot
Confirm Cancel
firmware details
Confirm Cancel
Picture Settings
Video Settings
Camera Settings
Picture Button
Record Button
Playback Button
Record Time
Time Stamp Memory card capacity
Turn off the camera's WIFI before flight by pressing the WiFi button.
When the camera is recording video, turning off the drone without first stopping the video will cause
corruption of the video file. Always stop video recording before powering off the drone.
When electronic stabilization is on, distortion correction will also be turned on.

©2019 SwellPro All Rights Reserved
20
Alternating Green-Red fast flash
Green ON
WiFi ON
Camera in preview mode
Green slow flash Camera recording
If this is your first time flying a drone, please read this manual thoroughly and watch the instructional videos
on our YouTube channel. We recommend taking professional training and guidance. When flying, select an
environment appropriate to your skills. It is advisable for all drone pilots to become familiar with ying in
ATTI mode in case of GPS or magnetic interference, which can aect drone controls.
1. Although the Spry+ is waterproof, do not fly in heavy fog or if the wind is very strong or gusting above
Beufort Force 4.
2. Don't fly near metal frame walls or structures as this can affect the GPS and compass signals. It is
recommended to fly at least 10 meters away. Since the remote controller also has a GPS module inside,
please ensure the pilot remains 10 meters away from metal frame walls.
3. Flying in a complex electromagnetic environment, (e.g. boat) radio equipment may interfere with the
drone’s 2.4G signals which may cause the aircraft to react slowly or become uncontrolled. In these
situations, you can turn off the remote control for the aircraft to return automatically, or restart the
remote control, which can assist re-establishing control.
4.. When your drone is new, calibrate and fly several times over land to adapt the aircraft to the local
environment before flying over water.
5. When flying at altitudes above sea level, environmental factors including air density reduce the
performance of aircraft and therefore also the drone batteries.
6. When the temperature is below 10°C, the drone may not unlock. Power on the drone for a few minutes
to warm up and then the motors can be unlocked.
7. Normally, only the Compass Sensor needs to be calibrated when you have a new drone, check the
calibration section.
8. Aircraft does not support calibration on moving objects, such as boats.
9. Make sure the waterproof membrane is in good condition. The membrane prevents water from entering
the drone but allows air pressure to equalise the drone’s altimeter to operate correctly. Avoid touching
the membrane with your hands. If the membrane is dirty or completely soaked it will cause the altimeter
to work abnormally and the drone might not hover or fly well.
Camera Indicator
Flight
Basic flight knowledge
Table of contents
Other SWELLPRO Quadcopter manuals