Swiss Pro+ SP-BM550S User manual

1
Instruction manual
Bedienungsanleitun
g
Manuale di istruzioni
Gebruikershandleiding
Manual de usuario
Bread Maker
Model No.: SP-BM550S/SP-BM550P/SP-BM550G
Manuel d'utilisation

2
TABLE OF CONTENTS
English 3
Français 20
Deutsch 37
Italiano 54
Nederlands 71
Español 88

3
EN
IMPORTANT SAFEGUARDS
Before using the electrical appliance, the following basic precautions should always
be followed:
1. This appliance can be used by children aged from 8 years and above and persons with reduced
physical, sensory or mental capabilities or lack of experience and knowledge if they have been given
supervision or instruction concerning use of the appliance in a safe way and understand the hazards
involved. Children must not play with the appliance. Cleaning and user maintenance shall not be made
by children unless they are older than 8 years and supervised.
2. Keep the appliance and the power cord out of the reach of children under 8 years old.
3. If the power cord is damaged, it must be replaced by the manufacturer, its service agent or a similarly
qualified person in order to avoid a hazard.
4. CAUTION: Hot surfaces. Do not touch hot surfaces. Use handles or knobs. Do not let the power cord
hang over the edge of the table or hot surfaces.
5. This appliance is not intended to be operated by means of an external timer or separate remote
control system.
6. Clean surfaces that come into contact with food.
7. Before use, check that the voltage of the mains socket corresponds to the voltage on the rating plate.
8. To protect against electric shock, do not immerse the power cord, plug or housing in water or any
other liquid.
9. Unplug from outlet when not in use before installing and removing parts and before cleaning.
10. Do not place on or near a hot gas burner, electric burner, or in a heated oven.
11. Use extreme caution when moving the appliance that contains hot oil or other hot liquids.
12. Do not touch any moving or rotating parts of the machine while baking.
13. Never switch on the appliance without properly placing the bread pan with filled ingredients.
14. Never hit the bread pan on the top or edge to remove the pan, this will damage the bread pan.
15. Always connect the plug to the appliance first and then insert the plug into the socket. To remove the
plug from the socket, turn the switch to OFF and only then remove the plug from the socket.
16. The appliance is not intended to be operated by means of an external timer or separate remote
control system.
17. Do not use the appliance without the bread pan correctly installed to avoid damaging the appliance.

4
Product Features
1. LCD indicator controlled with a microcomputer.
2. Automatically making bread, glutinous rice, cake, kneading, jam and pastries.
3. Multiple flavours to choose from including sweet bread, baguette, etc.
Product Parts
View Window
Bread pan
Measuring Cup
Measuring
Spoon
Stirring Rod
Housing
Control Panel
Hook
Lid

5
Explanation about measuring cup
1. Cup of liquid. (See image on the right)
When you take some liquid with a transparent cup and try to
measure the desired amount, place the measuring cup on a flat
table at eye level.
If you need to add egg or milk, please mix them in water
before reading the scale.
2. Measure solid powder ingredient:
Hold the desired solid powder with this transparent measuring cup. Shake the cup lightly to flatten the
powder surface, then read the correct scale. Do not shake the cup for a long time or sharply otherwise
the powder may drop to the bowl which is lower than the amount requested.
Tip: 1 cup of flour weighs about 160 g.
Measuring spoon: Small spoon and large spoon. Can be used to measure ingredients.
Hook: Can be used to take the stirrer out of the bread.
QUICK IDEAS TO MAKE BREAD
Make soft bread on 750g and on a medium colour:
1. Requirements: Clean bread barrel, stirring rod, measuring cup and measuring spoon.
2. Align the flattened hole at the stir bar in the correct position of the rotating shaft in the bread bin and
then fix it in the correct position.
3. As recommended in the recipe book "Soft Bread" - 750g, ingredients can be added to the dish. Make
sure to add yeast powder above the flour and do not let the yeast powder come into contact with water.
4. Place the bread barrel in the bread maker container and set it in place. Keep the lid covered.
5. After the bread maker is plugged in, the standard menu is immediately displayed: 750g / medium
colour / soft bread.
6. Press "Start/Stop/Pause". After this, a buzzer will beep, the indicator light will flash and the bread
maker will start kneading.
7. The bread is ready once the countdown is over. At this point, the keep warm program will start
automatically.
8. Pressing "Start/Stop/Pause" for 3 seconds followed by a beeping sound will stop the keep warm
function.
9. After the bread is ready, wear gloves to lift and take out the bread barrel. Turn the barrel upside down
to take out the bread.
One cup

6
Tips
It is possible that the stirrer sticks in the bread when it is turned
over.
In this case, use the hook accessory as follows:
1) Insert the hook into the stirrer rod shaft (see figure A).
2) Gently pull to release the stirrer rod (see Figure B).
Attention: The above method of making bread is the easiest. There is no need to use "Menu", "Bread"
and "Colour". For more details, please refer to the "User's Guide".
INTRODUCTION OF CONTROL PANEL
1. “Menu”:
When a selection is made from menus 1-19 displayed in the control panel, the LCD indicator will display
the corresponding setting:
1. Soft bread
2. Sweet bread
3. Natural sourdough
4. French bread
5. Whole wheat
6. Quick bread
7. Sugar free
8. Multigrain
9. Milky loaf
10. Cake
11. Raw dough
12. Leaven dough
13. Jam
14. Bake
15. Yogurt
16. Gluten free
17. Sticky rice
18. Stir fry
19. Ferment
2. ”LOAF”: When setting the status, choose 500g or 750g as the loaf weight. Only for the numbers 1 to 9
and 16 "loaf" cannot be adjusted. Only the weights 500g or 750g can be chosen "loaf".
3. “COLOUR”: Is for brake colour selection in setting mode. Light/Medium/Dark colours will be displayed
and the selected colour will be indicated.
4. “START/STOP/PAUSE”: Press the button to switch the bread maker on, off or to pause. A buzzing
sound is given. When the bread maker is in operating condition, to prevent it from being touched
accidentally, the knob is secured against a false stop. That is, the bread maker will only stop working if
the button is pressed for 2 seconds and the buzzer makes a sound. After the bread maker has started, a
short press of the button will cause it to be paused and the current process will be automatically restored
after 3 minutes.
5. "+”: When setting this status, each press of this button adds 1.5 or 10 minutes of delay. If this button
is pressed without releasing, the program will quickly add up the delay time to the maximum delay time.
At this point, the program will then revert to the original minimum delay time and keep moving in circles.

7
6. “-” : In this setting state, each press of this button will reduce a delay of 1.5 or 10 minutes. If this
button is pressed without releasing, the program would quickly shorten the delay time to the minimum
delay time. At this point, the program will return to the original maximum delay time and keep moving in
circles.
7. Working status includes:
Reservation (if necessary) - Kneading 1 - Resting - Kneading 2 - Fermenting 1,2,3 - Baking - Keeping
warm - Complete
8. Working for start/pause/stop
★This bread maker (programs 1-9 and 12-16) has the "reserve" function. After setting the reservation
time, click the "start/stop/pause" button. The ":" icon starts flashing and the reservation function is
activated. The countdown will begin. If no reservation is needed, click on the "start/stop/pause" button.
The icon ":" will start flashing and the bread maker will start working.
★Programs 14, 15, 18, 19 without the "reserve" function can be adapted to your own time. Set the time
and click the "start/stop" button. The time display will stop flashing. This means things are going well.
Then click the "start/stop" button. The ":" icon starts blinking. The bread maker will start working.
★When the bread maker is halfway through operation or is reserved or if the bread maker needs to be
paused, click on the "start / stop/pause" button. A buzzer will sound and the time display will start
flashing. The toaster will then be interrupted. If you want to cancel the pause function, click the
"start/stop/pause" button again. To end the machine, press the "start/stop/pause" button for 2 seconds.
The buzzer sound goes off. The LCD screen will go to the default status and then the bread maker will
stop working.

8
OPERATING GUIDE
Please be careful before use:
★Check the power cord, outlet, and fuse box in the following order: Rating load is higher than 4A.
★The bread maker must be plugged into a grounded outlet. The ground wire and the neutral line must
be separated so that they cannot twist together through a three-pole connector.
Operation instruction on “Toast”
1. Remove the bread barrel from the inside of the container and place the stirrer in the barrel.
2. Add the right amount of water, egg and flour to the vessel. Then add yeast powder.
3. Place the bread vessel with the mixture of ingredients into the container and close the lid.
A. If the obstacle with barrel is encountered while pushing down, the barrel can be lifted again and the
shaft at the bottom of the barrel can be turned to the other corner.
B. After the bread barrel is placed in the container, turn the barrel clockwise and the barrel will be
secured.
4. Plug the bread maker into the mains socket. A buzzer will sound and the indicator will show: The
default value after starting the unit is 750g/medium colour/soft bread.
5. Select the bread recipe.
Press "Menu": The numbers will move in circles from 1-19. The numbers 1-9 are bread recipes.
Then place the semicircular
hole of the stirrer in the correct
position at the turning shaft.
Make sure the yeast powder is added
above the flour. Do not mix yeast
powder with water, sugar and salt.
Otherwise, the yeast activation will be
weakened or it will not be workable.
Yeast powder
Flour or other ingredients
Mixture of water, oil,
sugar and salt

9
6. Select the bread colour and bread.
7. Select “reserve” time
If you want to bake bread now, please skip the current step.
8. Start the bread maker and start making bread.
Press “START/STOP/PAUSE” and it will start counting down.
★After starting the bread maker, the appliance starts to stir flour. To avoid flour splashing, the program
can automatically set the stirring interval during the first 5-7 minutes. After 5-7 minutes, it
automatically switches to continuous stirring.
★After setting "Reserve", the icon ":" on the LCD indicator starts flashing and the bread maker starts.
When the countdown begins, so does the flour stirring.
FOR THE FIRST USE
The appliance may give off a little smoke and a characteristic odour when switched on for the first time.
This is normal and will stop soon. Make sure the device is adequately ventilated.
- Please check whether all parts and accessories are complete and free of damage.
- Clean all parts according to the chapter “CLEANING AND MAINTENANCE”.
- Set the bread maker to "BAKE" mode and bake the bread maker empty for about 10 minutes. Then let
it cool down and clean all loose parts again.
- Dry all parts thoroughly and reassemble them. The appliance is ready for use again.
Adjust to the desired time:
“Reserve Function” for counting extra time.
Press: ”Colour”
Press: ”LOAF”
Press: “+”
Press: “-”

10
9. The finish of bread making.
When the countdown is to 0:00, the buzzer sound is given to indicate that the bread is ready.
1) Keep Warm: Refer to chapter “Keep Warm”.
2) Non-heat: ①Press “Start/Stop” for 2 seconds.
②Remove the plug from the mains socket.
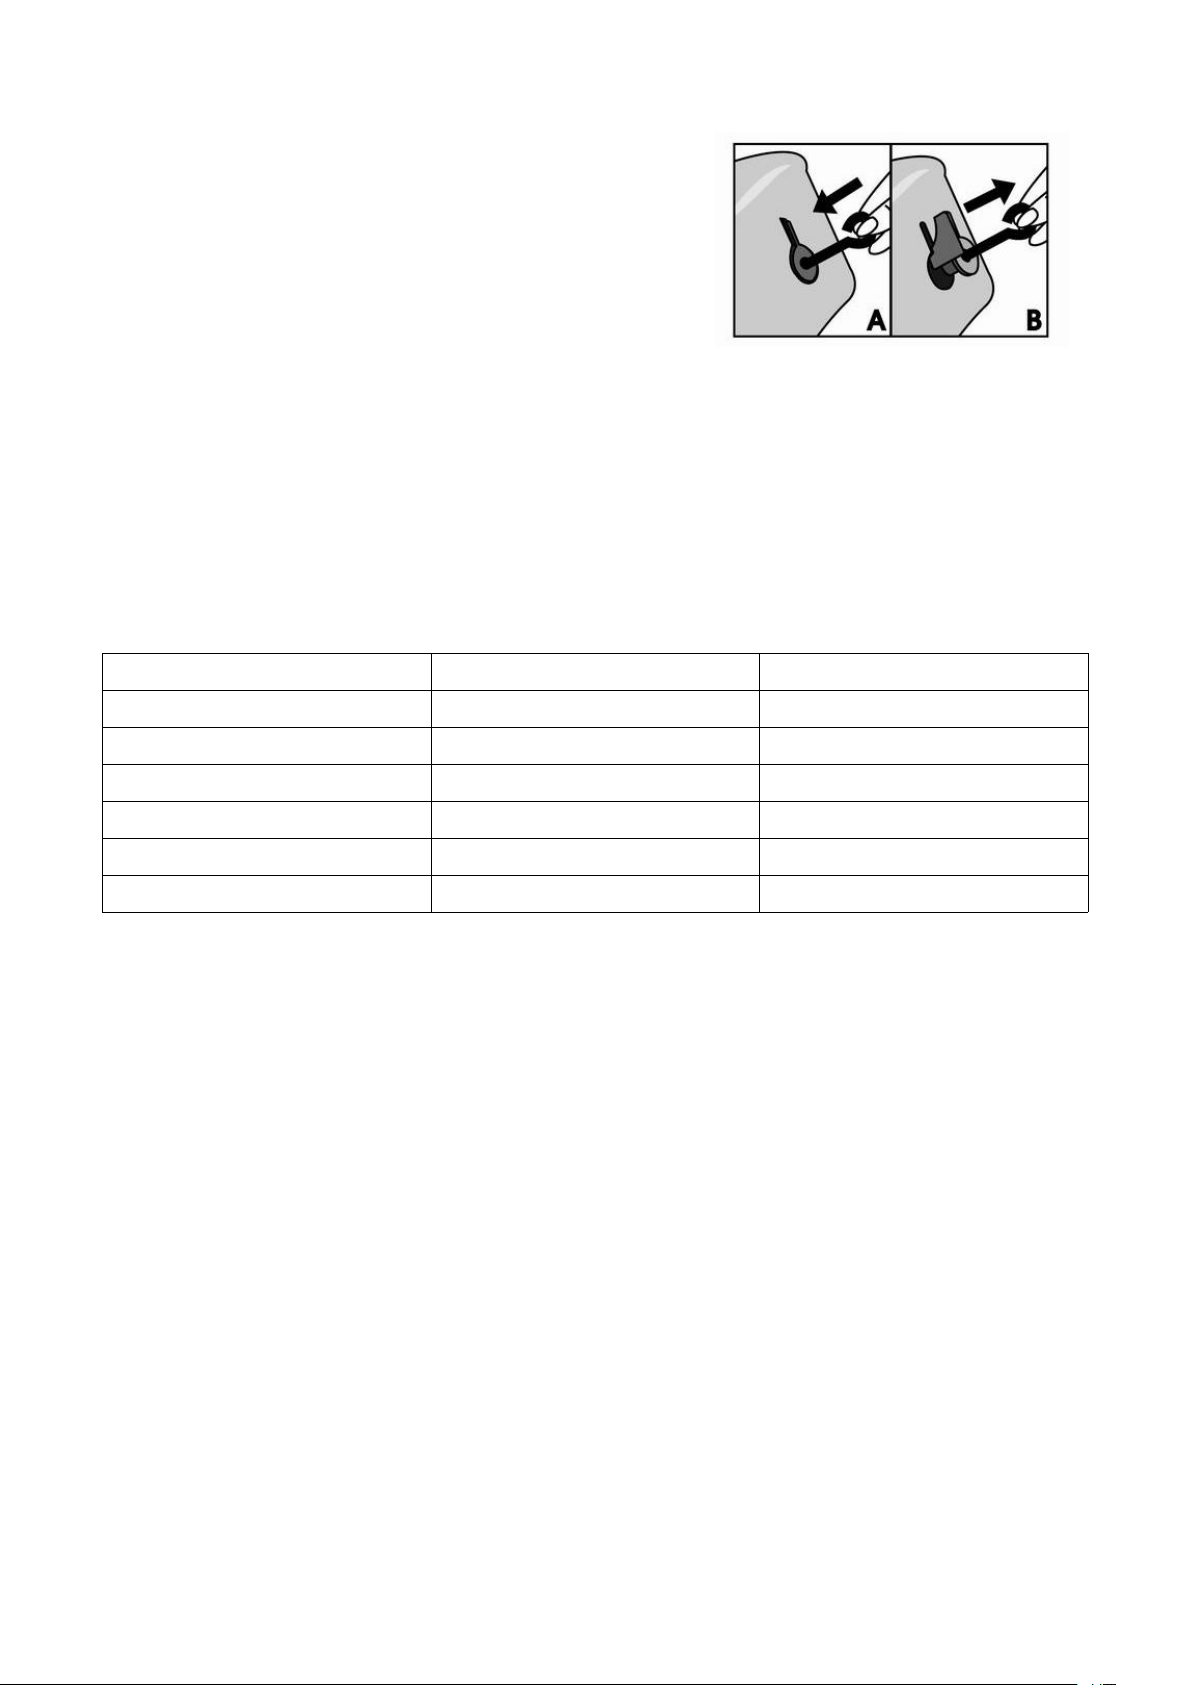
10. Take out the bread
Because the bread is very hot, gloves should be worn and the bread should be shaken lightly before
taking it out.
“Cake” operation instruction
The instructions of cake are similar to making bread. Look for the cake making ingredients mentioned
in the recipe book. Select "cake" to get started.
Press "menu" and select program 10. Program for “cake”.
The default time is 1 hour 33 minutes.
“Raw dough” operation instruction
The instructions for kneading dough are similar to making bread. Look for the ingredients for kneading
in the recipe book (no salt, sugar and milk powder). Select "raw dough" to get started.
Press “menu” and select program 11. Program for “raw dough”.
The default time is 23 minutes.
Colour and loaf cannot be selected with this program.
When the "Kneading" is completed, a buzzer will sound.
“Leaven dough” operation instruction
Fermented dough can be made. Look for the ingredients for kneading mentioned in the recipe book
(no salt, sugar and milk powder). Select "leaven dough" to get started.
Press “menu” and select program 12. Program for “leaven dough”.
The default time is 1 hour and 24 minutes.
Colour and loaf cannot be selected with this program.
When the "Kneading" is completed, a buzzer will sound.
“Jam” operation instruction
Many delicious fruit jams can be made with this bread machine.
When making jam, the desired fruits such as orange, pineapple, apple and strawberry should be
prepared in the amount recommended in the recipe book. First clean these fruits, peel them and
remove the core. Cut them into pieces about 3 CM in size and then squeeze them with a fruit blender
or crush them separately. Finally, select a few to mix according to the recipe book instructions. When
the preparation is done, press "jam" to start.
Press “menu” and select program 13. Program for “jam”.

11
The default time is 1 hour and 5 minutes.
Colour or time cannot be selected with this program.
When the jam making is completed, a buzzer will sound.
Remove the bread barrel and let it cool. Pour the jam out of the barrel.
Attention: Please keep children away from the freshly made jam in case of burning.
“Bake” operation instruction
This is a program with powerful practicality. Once you've figured out how to make bread, you can just
use "leaven dough" to control the stirring and rising time needed and even make many new breads or
find out what you love with the "bake" program.
Press “menu” and select program 14. Program for “bake”.
The default time is 10 minutes. Adjustable from 5 minutes to 1 hour 30 minutes.
“Yogurt” operation instruction
This is a program with powerful practicality. You can let the dough rise, make yogurt or rum.
Press “menu” and select program 15. Program for “yogurt”.
The default time is 8 hours. Adjustable from 5 hours to 13 hours.
“Sticky rice ” operation instruction
Sticky rice can also be made with this bread maker. Delicious, nutritious glutinous rice can be easily
made in just a few simple steps.
Press “menu” and select program 17. Program for “sticky rice”.
The default time is 1 hour and 15 minutes.
“Stir-fry ” operation instruction
This function is mainly for peanuts, soybeans, almonds and other nuts for stir-frying, easy to smoke,
and according to the amount of dried fruit and the amount of easy-cooked fried, you can set the
correct time.
Press “menu” and select program 18. Program for “stir-fry”.
The default time is 30 minutes. Adjustable from 1 minute to 2 hours.
“Ferment ” operation instruction
This unique program ensures only fermentation function. Especially for the user: First "dough", then
"fermentation" and then "baking". Meet the needs of individual users.
Press “menu” and select program 19. Program for “ferment”.
The default time is 30 minutes. Adjustable from 10 minute to 2 hours.

12
SPECIFIC FUNCTIONS DESCRIPTION
Reserve function
The purpose of this performance is that you have the fresh bread the next morning.
For example, it is now 8.30 in the evening and want to have ready-made bread at 7.00 in the morning.
1Calculate the reservation time: It should be 10 hours and 30 minutes from 8:30 in the evening to 7:00 the
next morning.
2Set reservation time: Press the “+” and “-” . After setting the time, press the "Start" button. Note: The time
displayed on the screen is set to 10 hours and 30 minutes. This time includes the time to bake bread, at 7:00 the
bread is ready.
Reservation function Tips:
1When using the reservation function, do not put eggs in it, because eggs spoil too quickly. This affects the
taste of the bread.
2Cover the yeast under the flour to maintain the activity of the yeast.
Buzzer sound
(1) A buzzer sounds when the electricity is connected.
(2) A buzzer sounds when bread, colour, menu or time setting is pressed.
(3) A buzzer sounds when the "start/stop/pause" button is pressed.
(4) During the kneading process, the buzzer sound is continuously given to remind of adding material.
(5) A buzzer will sound when the operation is complete.
(6) The intermittent buzzer sound is given when the keep warm function is closed.
Memory function to occasional electricity disconnection
(1) This bread maker has a 15-minute memory for the occasional disconnect from the electricity. After starting the
bread maker if there is an occasional power outage and the duration does not exceed 15 minutes,
reconnecting the electricity would keep the bread maker working. After the electricity is reconnected, the
working time may be changed and not equal to the original time set before. The actual working time is the
electricity disconnection time plus the original working time set earlier.
(2) If the duration of the power cut exceeds 15 minutes, the bread maker cannot continue for the working time.
Keep Warm
To make it easier to use, this bread maker is supported with heat retention performance. When bread or other
snacks run out and are not taken out in time, the "keep warm" function can keep them fresh at a certain
temperature.
★After the bread is ready, the program automatically goes to "keep warm" function with flashing icon ":". The
maximum storage time is 1 hour. The "keep warm" function closes until the buzzer sound is intermittent.
★Or directly press the On/Off button for 2 seconds until a buzzer sounds and then the "keep warm" function
stops.

13
RECIPES RECOMMENDED
★Fruits such as currants and walnut seeds can be put in the fruit box.
★Use of butter slices is preferred and alternatively vegetable oil can also be used.
★Use strong flour for bread making. Use low gluten flour for making cakes and cookies and make sure
the right flour is used for making delicious bread.
★In summer, when excessive fermentation may occur, please use less yeast powder.
1. Soft bread
Material
500g
750g
Water
130ml
180ml
Butter
2 big spoons
2 big spoons
Table Salt
1/2 small spoon
1 small spoon
Sugar
2 big spoons
3 big spoons
Flour
250g
330g
Yeast Powder
3/4 small spoon
1 small spoon
2. Sweet Bread
Material
500g
750g
Water
130ml
180ml
Butter
2 big spoons
2 big spoons
Table Salt
1/2 small spoon
1 small spoon
Sugar
4 big spoons
6 big spoons
Flour
250g
330g
Yeast Powder
3/4 small spoon
1 small spoon
3. Natural sourdough
Material
500g
750g
Water
120ml
180ml
Sugar
1 big spoon
1+1/2 big spoon
Butter
1+1/2 big spoon
2 big spoons
Table Salt
1/2 small spoon
3/4 small spoon
Flour
200g
300g
Yeast Powder
1/3 small spoon
1/3 small spoon
4. French Bread
Material
500g
750g
Water
130ml
180ml
Butter
2 big spoons
2 big spoons
Table Salt
1/2 small spoon
1/2 small spoon
Flour
250g
330g
Yeast Powder
1 small spoon
1 small spoon

14
5. Whole wheat
Material
500g
750g
Water
160ml
210ml
Butter
2 big spoons
2 big spoons
Table Salt
1/2 small spoon
1/2 small spoon
Flour
150g
200g
Whole wheat flour
75g
100g
Sugar
2 big spoons
3 big spoons
Yeast powder
1 small spoon
1+1/4 small spoon
6.Quick bread
Material
500g
750g
Water (40-50℃)
180ml
230ml
Butter
2 big spoons
2 big spoons
Table Salt
1/2 small spoon
1/2 small spoon
Flour
250g
330g
Sugar
2 big spoons
3 big spoons
Yeast Powder
2 small spoons
3 small spoons
7.Sugar free
Material
500g
750g
Water
180ml
230ml
Butter
2 big spoons
2 big spoons
Table Salt
1 small spoon
1 small spoon
Flour
250g
330g
Xylitol
3 big spoons
4 big spoons
Yeast Powder
3/4 small spoon
3/4 small spoon
8.Multigrain bread
Material
500g
750g
Water
170ml
230ml
Butter
2 big spoons
2 big spoons
Table Salt
1 small spoon
1 small spoon
Whole Wheat Flour
50g
75g
Oatmeal
50g
75g
Flour
200g
250g
Yeast Powder
1 small spoon
1+1/4 small spoon
9.Milky loaf
Material
500g
750g
Milk
150ml
230ml
Butter
2 big spoons
2 big spoons
Sugar
2 big spoons
3 big spoons
Table Salt
1/2 small spoon
1 small spoon
Flour
250g
330g
Yeast Powder
3/4 small spoon
1 small spoon

15
10. Cake
Material
Egg
4pcs
Butter
100g
Sugar
150g
Cake flour (weak flour)
380g
Table Salt
1 small spoon
Soda Powder
1 small spoon / 3.5g
Baking powder
4 small spoons / 14g
11. Raw dough
Material
Water
180ml
▲Vegetable oil
1 big spoon
▲Egg
1pcs
▲Table Salt
1/2 small spoon
▲Sugar
1 big spoon
Flour
300g
P.S. Select the recipes marked “▲” as your needs
12. Leaven dough
Material
Water
180ml
Vegetable oil
1 big spoon
Table Salt
1/2 small spoon
Sugar
1 big spoon
Flour
300g
Yeast Powder
1 small spoon
13. Jam
Material
Orange
700g
Sugar
260g
Gelatine or pudding powder
50g
15. Yogurt
Material
Milk
500ml
Yogurt
70ml
Sugar
4 big spoons
16. Gluten free
Material
500g
750g
Water
160ml
240ml
Butter
2 big spoons
2 big spoons
Table Salt
1/2 small spoon
1/2 small spoon
Sugar
1 big spoon
2 big spoons
Milk Powder
2 big spoons
3 big spoons
Gluten free flour
300g
400g
Yeast powder
1 small spoon
1 small spoon

16
17. Sticky rice
500g raw rice
300ml water or milk
Note: This program is baking and stirring at the same time. The cooked rice is heated and stirred. The
taste of noodles are flexible.
Tips:
1. According to individual taste, sugar, nuts, sesame seeds, etc. can be added;
2. According to personal preferences, different shapes can be made;
3. Cake preservation method: Poured in type, washed, wrapped with plastic bags, placed in the
refrigerator or freezer.
18. Stir-fry
Peanut 500g 30 minutes
Soybeans 400g 30 minutes
This function is mainly for stir-frying peanuts, soybeans, almonds and other nuts. Set the correct time
according to the amount of dry fruit.
19. Ferment
This unique design is only intended for function fermentation:
Step 1: Use program 11 "raw dough". Afterwards, make the dough sharp by hand.
Step 2: Use program 19 "fermentation".
Step 3: Use program 14 "baking".
Tips: It is used for someone who already knows a lot about the bread maker. Make a difference in the
food.

17
Precautions on bread recipe
Yeast powder:
Please do not replace yeast powder with soda powder. The yeast powder is expired or not activated
apparently affects the soft texture and appearance of bread. The advice is to test the activation of the
yeast powder before making bread.
1. Take half a cup of warm water (about 40-50℃).
2. Add a small spoon of sugar and stir and keep adding two small spoons of yeast powder above the
surface of water and keep it in a warm place.
3. After 10 minutes, the mixing in this cup should be increased to the level of a full cup otherwise you will
buy new yeast powder in case of making bad bread.
Mixing ratio of water and flour
Different flours have different water absorption. Please adjust water amount according to used flour type.
1When too much water is added, the dough becomes so soft that it cannot be rounded and even
becomes sticky. If so, the bread made would become very hard with a flat or rough surface and a larger
pore texture with no elasticity. The good bread must be semi-circular. 5 minutes after adding water, the
dough is still moist and sticky. Please keep adding one or two big spoons of flour and knead the dough
until you think the water content of the dough is suitable.
2If the added water is missing, after mixing for 5 minutes, you would see that the dry flour was left at
the bottom of the vessel and the dough would not be able to stick into a round shape. The dough would
have a flat or rough surface with no elasticity. If so, the bread made would also be very hard and have a
dense pore texture. 5 minutes after adding water, the dough is still too dry. Keep adding a large spoonful
of water and knead the dough until you think the water content of the dough is appropriate.
Other recipes
Sugar and eggs will make the bread more colourful. Add them as the amount recommended by the
recipe book. If they are added freely there will be a dark colour or burnt bread. It also eventually results
in the bread machine stopping working to avoid burning the bread. In addition if you want to add egg
as egg will make the mixture thinner make sure to put only one egg in the measuring cup and add
water to the specified level.
Too much water
Lacking of water
Suitable with
water

18
CLEANING AND MAINTENANCE
Keep the surface clean
1. Unplug the bread maker and disconnect the electricity before cleaning.
2. Apply a small amount of neutral cleaning solution to a clean and soft cloth and wipe the device. Then
dry it thoroughly with another dry cloth. Do not use gas oil, other abrasive cleaning agents and corrosive
liquids to clean it.
Keep the accessories clean
1. Clean all used accessories after each use to prevent the build-up of dirt.
2. If the stirrer is caught by the vessel and does not come off, pour a suitable amount of water to soak for
a while and remove the stirrer.
3. If the bread maker is not used for a long time, all accessories should be cleaned and allowed to cool
and stored in the barrel.
Environment for use
1. The relative humidity of the air should be less than 95% and the temperature should be 25℃.
2. The correct temperature for storage is -40℃~ 60℃.
3. No flammable gas, corrosive gas or conductive dust in the air.
TECHNICAL SPECIFICATION
Notice: The technical parameters specified here are subject to change without notice.
Rating Voltage
220-240V, 50/60Hz
Rating Power
550W
Rating capacity
750g

19
TROUBLESHOOTING
The answers corresponding to the questions mentioned below are for reference only. If there may be
serious problems or damage to the machine, please contact the maintenance service or call the
customer service for further assistance.
PROBLEM
POSSIBLE CAUSE
SOLUTION
Bread maker fails to mix
flour and ingredients.
Check whether the plug is in
the socket.
Press "Start/Stop" and the bread maker
will start working.
Check if the operation is
delayed.
Indicator “:” is flashing and the
countdown will start working.
Damage to parts.
Send to maintenance department.
Abnormal sound.
There are residues of hard
foods or crumbs in the
barrel.
Remove anything found in the bread
maker before restarting it.
Lock barrel in position
Put the bread barrel back in place.
Abnormal smell/taste.
Wire cable damaged.
Keep the cord away from heated
objects.
Something is left behind on
the heating pipe.
Remove the materials left on the
heating pipe.
LED indicates ”LLL”.
The temperature in the
bread maker is lower than
-10℃.
Use the bread maker under the
environment at -10℃~40℃.
LED indicates “HHH”.
Temperature in the bread
maker is higher than 50℃.
Allow to cool with an electric fan or cool
naturally to room temperature.
LED indicates “E00”
or ”E01”.
Defect with temperature
detector.
Sent to the maintenance department.
Bread is partly raw.
Bread is raw.
Use less water or the water
temperature is too high.
The rate of material is
incorrect.
Refer to recipes recommended.

20
FR
GARANTIES IMPORTANTES
Avant d'utiliser l'appareil électrique, les précautions de base suivantes doivent
toujours être suivies:
1. Cet appareil peut être utilisé par des enfants âgés de 8 ans et plus et des personnes ayant des
capacités physiques, sensorielles ou mentales réduites ou un manque d'expérience et de
connaissances s'ils ont reçu une supervision ou des instructions concernant l'utilisation de l'appareil en
toute sécurité et comprennent les dangers impliqué. Les enfants ne doivent pas jouer avec l'appareil. Le
nettoyage et l'entretien par l'utilisateur ne doivent pas être effectués par des enfants à moins qu'ils aient
plus de 8 ans et qu'ils soient surveillés.
2. Gardez l'appareil et le cordon d'alimentation hors de portée des enfants de moins de 8 ans .
3. Si le cordon d'alimentation est endommagé, il doit être remplacé par le fabricant, son agent de service
ou une personne de qualification similaire afin d'éviter tout danger.
4. ATTENTION: Surfaces chaudes. Ne touchez pas les surfaces chaudes. Utilisez des poignées ou des
boutons. Ne laissez pas le cordon d'alimentation pendre du bord de la table ou des surfaces chaudes.
5. Cet appareil n'est pas destiné à être utilisé au moyen d'une minuterie externe ou d'un système de
télécommande séparé.
6. Nettoyez les surfaces qui entrent en contact avec les aliments.
7. Avant utilisation, vérifiez que la tension de la prise secteur correspond à la tension indiquée sur la
plaque signalétique.
8. Pour vous protéger contre les chocs électriques, ne plongez pas le cordon d'alimentation, la fiche ou
le boîtier dans l'eau ou tout autre liquide.
9. Débranchez de la prise lorsqu'il n'est pas utilisé avant d'installer et de retirer des pièces et avant de le
nettoyer.
10. Ne pas placer sur ou à proximité d'un brûleur à gaz chaud, d'un brûleur électrique ou dans un four
chauffé.
11. Soyez extrêmement prudent lorsque vous déplacez l'appareil qui contient de l'huile chaude ou
d'autres liquides chauds.
12. Ne touchez aucune pièce mobile ou rotative de la machine pendant la cuisson.
13. N'allumez jamais l'appareil sans placer correctement le moule à pain avec les ingrédients remplis.
14. Ne frappez jamais le moule à pain sur le dessus ou le bord pour retirer le moule, cela
endommagerait le moule à pain.
15. Branchez toujours d'abord la fiche à l'appareil, puis insérez la fiche dans la prise. Pour débrancher la
fiche de la prise, mettez l'interrupteur sur OFF et retirez ensuite la fiche de la prise.
16. L'appareil n'est pas destiné à être utilisé au moyen d'une minuterie externe ou d'un système de
télécommande séparé.
17. N'utilisez pas l'appareil sans le moule à pain correctement installé pour éviter d'endommager
l'appareil.
This manual suits for next models
2
Table of contents
Languages: