switel D6005 User manual

Schnurlos Telefon
Téléphone sans fil
Telefono senza fili
Cordless telephone
Bedienungsanleitung
Mode d’emploi
Istruzioni per l'uso
Operating Instructions
D6005

- Contents -
45
1 General Information ..............................................................................46
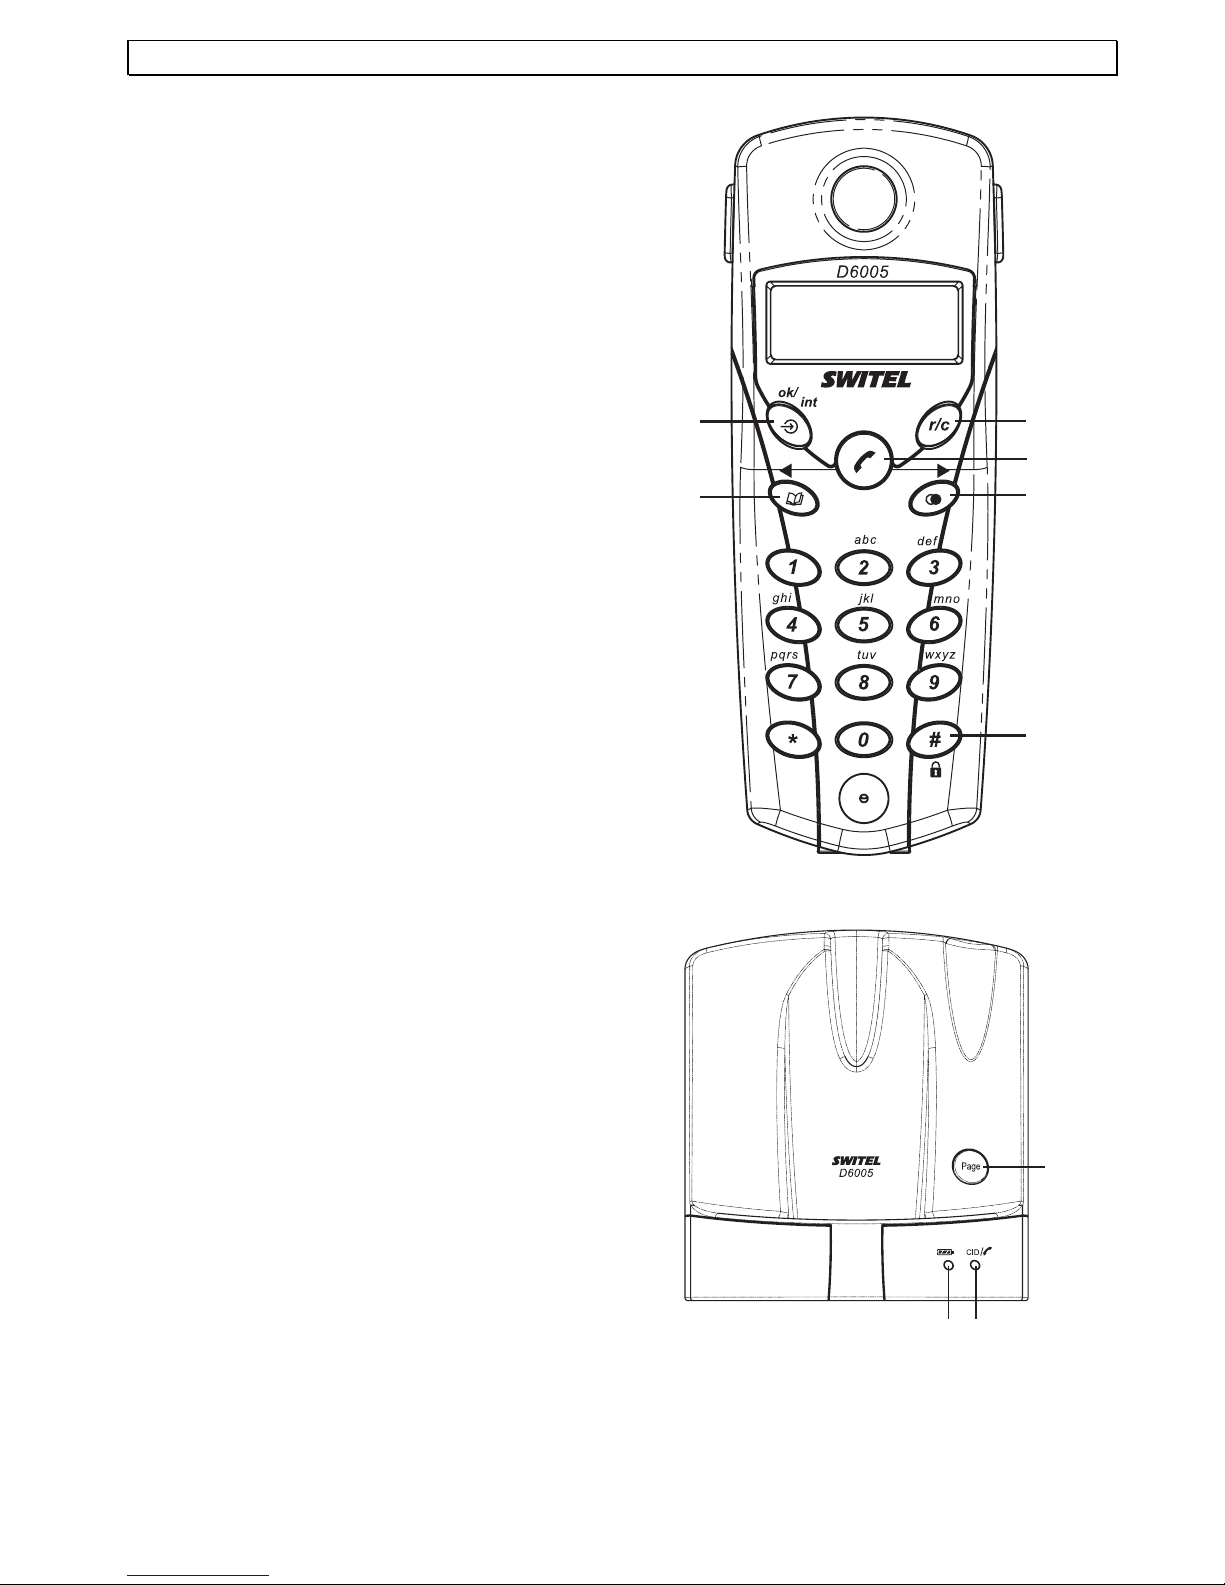
2 User controls .........................................................................................47
3 Setting up...............................................................................................48
3.1 Safety Information...............................................................................................48
3.2 Check contents of pack.......................................................................................48
3.3 Connecting the base station ...............................................................................48
3.4 Fitting standard batteries .................................................................................... 48
3.5 Charging the standard batteries.......................................................................... 49
4 Operation ...............................................................................................50
4.1 Receiving calls....................................................................................................50
4.2 Making calls ........................................................................................................50
4.3 Adjusting the receiver volume............................................................................. 50
4.4 Redial facility.......................................................................................................50
4.5 Muting the microphone .......................................................................................51
4.6 Keypad lock ........................................................................................................51
4.7 Range information .............................................................................................. 51
4.8 Paging from the base station to the handset.......................................................51
4.9 Temporary tone dialling ...................................................................................... 51
4.10 Private exchanges ..............................................................................................51
4.11 Inserting an automatic pause..............................................................................52
5 The phone book.....................................................................................53
5.1 Entering numbers in a phone book .....................................................................53
5.2 Dialling stored numbers from the phone book ....................................................53
5.3 Special number in memory location 0.................................................................53
6 Special functions ..................................................................................54
6.1 Setting ring tone and ringer volume ....................................................................54
6.2 Adjusting the base station ringer volume ............................................................54
6.3 Switching the button click on or off .....................................................................55
6.4 Setting the flash time ..........................................................................................55
6.5 Accepting calls automatically ..............................................................................55
6.6 Touch-tone (TTD) or pulse (PD) dialling .............................................................56
6.7 Changing the PIN code.......................................................................................56
7 Multiple handsets..................................................................................57
7.1 Making an internal call ........................................................................................57
7.2 Connecting external calls to another handset ..................................................... 57
7.3 Logging on handsets...........................................................................................57
7.4 Logging off handsets...........................................................................................57
8 Troubleshooting....................................................................................58

- General Information -
46
1 General Information
Standard rechargeable batteries - do not use any other rechargeable batteries or battery packs.
These could possibly cause a short circuit.
When changing batteries, always use standard batteries, Type AAA 1.2V 650mA.
Do not throw standard batteries into the fire or immerse in water. Do not dispose of old or defective
standard batteries with the normal household waste.
It is normal for the handset to become warm when charging and is not dangerous.
Do not use other manufacturer's charging equipment for charging the handset, as otherwise damage
could occur.
Position
There must be a 230 Volt mains socket near to where the telephone is positioned. Do not set up the
base station in the immediate vicinity of other electrical equipment such as microwaves or hi-fi systems,
as this may result in mutual interference. The location has a decisive influence on the trouble-free
operation of the telephone.
Place the base station on a flat and non-slip surface. The feet of the base station do not normally leave
any marks on the surface. However, due to the large number of varnishes and surfaces in use, it may
not be possible to prevent marks occurring on the surface due to the feet of the unit.
Do not use the handset in areas where there is a risk of explosion.
Excessive exposure to smoke, dust, vibrations, chemicals, moisture, heat or the direct rays of the sun
must be avoided.
Information regarding medical equipment - The telephone works with a very low transmission
power. This low transmission power prevents any risk to health according to the current state of
research and technology. However, it has been shown that portable telephones can interfere with
medical equipment when switched on. Therefore, please maintain a distance of at least one metre from
medical equipment.
Disposal
If the useful life of the standard batteries or the complete equipment has expired, please dispose of
these carefully in accordance with the statutory requirements and in a manner friendly to the
environment.
Temperature and Ambient Conditions
The telephone is designed for use in protected rooms with a temperature range of 10 °C to 30 °C.
The base station must not be installed in damp rooms such as a bathroom or laundry room. Avoid
proximity to sources of heat such as radiators and do not expose the unit to direct sunlight.
Cleaning and care - The surface of the case can be cleaned with a soft, dry, lint-free cloth. Never use
cleaning agents, particularly aggressive solvents. No attention is necessary apart from cleaning the
case occasionally. The rubber feet of the base station are not resistant to all cleaning agents. The
manufacturer can therefore not accept any liability for possible damage to furniture or the like.

- User controls -
47
2 User controls
1. "R" Signal button/Delete
2. Call button
3. Redial/Pause/
Selection button forwards
4. Keypad lock
5. Phone book/
Selection button back
6. Start programming/
Internal calls
1. Paging button.
2. Charge monitoring lamp
3. Call indicator
1
23
1
2
3
4
5
6

- Setting up -
48
3 Setting up
3.1 Safety Information
WARNING! Before setting-up, it is essential that you read the General Information at the
beginning of this manual.
3.2 Check contents of pack
The following items are supplied:
one base station with foot support one mains power supply
one handset two standard batteries
one telephone connecting cable one instruction manual
3.3 Connecting the base station
Position the base station near to your telephone connection socket and to a mains socket.
Your telephone works using Touch-Tone Dialling.
1. Insert the plug of the power supply into the socket on the rear of the base station and
plug the power supply into a properly installed 230 V mains socket. The plug-in power
supply for the base station must always be connected. For safety reasons, use only
the plug-in mains power supply provided.
2. Connect the telephone cable supplied to the telephone socket and the telephone jack
on the rear of the base station. Use only the new telephone cable provided.
3. Fix the foot support in position and run the cable through the opening to the rear.
3.4 Fitting standard batteries
To fit the standard rechargeable batteries supplied into the handset,
press on the upper edge of the battery compartment and slide it
downwards. Now insert the batteries taking care to ensure that the
polarity is correct. Close the battery compartment cover.
Important note: Place the handset in the base station with the display to the front for at
least 16 hours. The telephone may malfunction if the batteries are not properly charged.
The charging light on the base station will come on.
+
AAA
+
AAA

- Setting up -
49
3.5 Charging the standard batteries
The standard rechargeable batteries for the handset have a stand-by time of max. 100
hours at room temperature and a maximum talk time of 10 hours. To charge the batteries,
place the handset in the base station with the display to the front. The handset will be
charged in rapid charge mode for the first 30 minutes. While this is happening, the boxes in
the capacity display will come on one after the other. Charging will then switch to the normal
charging mode and the battery capacity display will be on constantly.
The current battery capacity is shown in the display.
If the battery capacity is too low, the symbol will appear in the display and you will
hear warning tones every 20 seconds.
Note: Exactly like your car battery, the standard rechargeable batteries are unavoidably
subject to a certain ageing. However, you can have an influence on this ageing process by
"training" the standard batteries to a certain extent. In regular use of the phone, if you
cyclically charge and fully discharge the standard batteries by using the telephone until the
symbol appears in the display, a demand is placed on the batteries and they will repay
you by giving maximum performance and a long life. Extended charging and extended
discharging on the other hand will both degrade the capacity and shorten the life of the
standard batteries.

- Operation -
50
4 Operation
4.1 Receiving calls
When an incoming call arrives, the ringing tone sounds on the handset. The EXT symbol
will flash in the display. Press the call button on the handset and the connection will be
made. The call will be automatically taken as soon as you lift the handset from the base
station. To end the call, replace the handset in the base station or press the call button
on the handset.
4.2 Making calls
1. Enter the required telephone number with a maximum of 25 digits using the number
pad. The numbers pressed are shown in the display.
2. Press the call button and the required connection will be made.
The call duration in minutes and seconds is shown in the display during a call. Ten
seconds after dialling, the display will switch from showing the number dialled to showing
the duration of the call. The call duration will still be retained in the display for a few
seconds after the call has been ended.
3. To end the call, press the call button or replace the handset on the base station.
Note: If you have entered a number incorrectly, you can delete the number by repeatedly
pressing the button. The number is completely deleted by pressing the button for a
long time.
You can also get a dialling tone by first pressing the call button . On entering the digits of
your required phone number, your telephone will dial the number directly. With this method
of making a call, it is not possible to correct individual digits in the number in the manner
described above.
4.3 Adjusting the receiver volume
There are three volume levels available to you if you should want to change the receiver
volume on the handset.
Press the button twice during a call. You can select the required volume using the
and buttons. The selected volume will be shown in the display.
[---] = Loud [-- ] = Medium [- ] = Soft
The display will go off after a few seconds.
4.4 Redial facility
Use Redial if the person called is engaged or does not reply.
1. Press the button and the last phone number dialled will be shown in the display.
2. Now press the call button and the telephone number displayed will be
automatically dialled.

- Operation -
51
4.5 Muting the microphone
In this way, you will be able to speak without the other person hearing you.
Switching off the microphone: Press the buttons - - one after the other.
The symbol will appear in the display.
Switching on the microphone again: Press the buttons - - again and you
will be able to continue speaking to the other party.
4.6 Keypad lock
With the keypad lock, you can prevent a button on the handset being pressed accidentally.
Incoming calls can be received as normal even when the keypad lock is switched on.
Activating the keypad lock: Hold the button pressed until you hear a signal tone.
The symbol will appear in the display.
Deactivating the keypad lock: Hold the button pressed again until you hear a
signal tone and you will be able to use the handset normally once more.
4.7 Range information
The range of the handset is ca. 50 m in closed rooms and ca. 300 m outdoors. When there
is a good contact with the base station, the symbol will come on in the display. The
symbol will disappear if you are too far away from the base station.
4.8 Paging from the base station to the handset
If you cannot remember where you have left the handset, press the paging button on the
base station. You will now hear the handset audible signal for 30 seconds and thus be
easily able to find it again.
You can cancel the audible signal by pressing any button on the handset.
4.9 Temporary tone dialling
If you can only use your telephone in Pulse Dialling mode, you do not have to forego the
facilities of Tone Dialling (e.g. interrogating an answering machine). Press the button for
two seconds during a call to switch temporarily to TONE dialling.
PULSE dialling will be reselected at the end of the call.
4.10 Private exchanges
You can use the "R" signal button on your telephone on private exchanges. If you have
connected your telephone to a private exchange, you can use all the facilities such as call
transfer, automatic recall, etc. The "R" signal button gives you access to these facilities. The
FLASH time "120ms", “250” or “600ms” will be required on a private exchange (Adjustment,
see 6.4 ).You can find out from the dealer from whom the equipment was purchased
whether your telephone will work on your private exchange without any problems.

- Operation -
52
4.11 Inserting an automatic pause
With some private exchanges, it is necessary to dial a certain number (e.g. "9" or "0") in
order, after a short pause, to obtain a dialling tone for an outside line on the extension.
An automatic dialling pause of ca. 3 seconds can be stored in the phonebook along with the
number. When entering the number, hold the button pressed at the required point until
the Pindicator appears in the display. Then enter the remaining digits of the phone number
and save the number in the usual way.

- The phone book -
53
5 The phone book
You can store 10 phone numbers, each with 25 digits, in the phone book of your handset.
The numbers 1 to 9 and 0 serve as memory locations and these numbers are also used
later to call the stored phone numbers.
5.1 Entering numbers in a phone book
1. Enter the required telephone number with a maximum of 20 digits.
2. Now press the button. The message STORE TO will appear in the display.
3. Now press the required storage location 1 to 9 or 0. You will hear a signal tone and
the phone number will be stored on the selected button.
In order to cancel the storing process, press the button briefly and then press and hold
the same button until no more numbers are shown in the display.
Phone numbers already stored will be automatically deleted when a new number is stored
on the same button. If a call is received during the storing process, entry of the number is
interrupted and will have to be repeated.
5.2 Dialling stored numbers from the phone book
After you have stored a few phone numbers, you can call these up very quickly and easily.
1. Press the phone book button . The message SELECT 0 – 9 will appear in the
display.
2. Now press the required memory button 1 to 9 or 0. The selected phone number will
be shown in the display.
3. Press the call button and the telephone number displayed will be automatically
dialled.
5.3 Special number in memory location 0
You can store a special phone number in memory location 0. Use this memory location for
a special dialling code or a special telephone number.
This number will be activated by pressing and holding the 0 button until a signal tone is
heard and can be dialled directly by means of the call button .

- Special functions -
54
6 Special functions
6.1 Setting ring tone and ringer volume
9 different tunes are available on the handset as ring tones. The ringer volume can be
adjusted in three steps. The ring tone can also be switched off completely.
PROGRAMMING STEPS DISPLAY
1. Press the button. 1-STORE MEM
2. Press the button. You will hear the current
ring tone once.
(Factory setting: Medium)
Current volume
[ - - - ][ - - ][ - ][ ]
Loud Medium Soft Off
3. You can now adjust the required volume in
three steps with the and buttons or
switch off the ring tone completely.
Selected volume
[ - - - ][ - - ][ - ][ ]
Loud Medium Soft Off
If the symbol appears, the
volume is switched off.
4. Press the button.
(Factory setting: Tune 2)
Current ring tone
MELODY 1 to 9
5. You can now select the required tune using
the and buttons.
Selected ring tone
MELODY 1 to 9
6. Confirm with and the entries will be
saved.
6.2 Adjusting the base station ringer volume
The base station ringer volume can be adjusted in two steps or switched off altogether.
PROGRAMMING STEPS DISPLAY
1. Press the button. 1-STORE MEM
2. Press the rbutton. You will hear the current
base station ring tone once.
(Factory setting: Medium)
Current volume
[ - - - ][ - - ][ - ]
Loud Medium Soft
3. You can now adjust the required volume in
three steps with the and buttons.
Selected volume
[ - - - ][ - - ][ - ]
Loud Medium Soft
4. Press the button.
(Factory setting: Tune 3)
Current ring tone
MELODY 1 to 9
5. You can now select the required tune using
the and buttons.
Selected ring tone
MELODY 1 to 9
6. Confirm with and the entries will be
saved.

- Special functions -
55
6.3 Switching the button click on or off
Each time a button on the handset is pressed, this is confirmed with a short signal tone
(button click).
PROGRAMMING STEPS DISPLAY
1. Press the button. 1-STORE MEM
2. Press the pbutton.
You will hear a signal tone and the indicator in
the display will go off.
(Factory setting: On => Beep On)
BEEP OFF or
BEEP ON
Repeat the procedure to switch the button click on or off again.
6.4 Setting the flash time
Three different flash times can be set by means of the R-signal button.
PROGRAMMING STEPS DISPLAY
1. Press the button. 1-STORE MEM
2. Press the sbutton.
(Factory setting: 100ms)
Current flash time
100 – 250 or 600
3. The required flash time can now be set using
the and buttons.
Selected flash time
100 – 250 or 600
4. Confirm with and the entries will be
saved.
6.5 Accepting calls automatically
Incoming calls are accepted automatically when you lift the receiver from the base station. If
you only want calls to be accepted by means of the call button , you can deactivate the
automatic acceptance facility.
PROGRAMMING STEPS DISPLAY
1. Press the button. 1-STORE MEM
2. Press the qbutton. You will hear a signal tone
and the indicator in the display will go off.
(Factory setting: On => Auto On)
AUTO OFF or
AUTO ON
Repeat the procedure to switch the function on or off again.

- Special functions -
56
6.6 Touch-tone (TTD) or pulse (PD) dialling
This feature enables you to use your telephone both on analogue exchanges (PD) and on
the new digital exchanges (TTD). The factory setting is TONE dialling.
PROGRAMMING STEPS DISPLAY
1. Press the button. 1-STORE MEM
2. Press the tbutton.
(Factory setting: Tone)
Current dialling method
TONE or PULSE
3. The required dialling method can now be set
using the and buttons.
Selected dialling method
TONE or PULSE
4. Confirm with and the entries will be
saved.
6.7 Changing the PIN code
New handsets can only be logged on to the base station with this PIN Code.
PROGRAMMING STEPS DISPLAY
1. Press the button. 1-STORE MEM
1. Press the ubutton. ENTER PIN
2. Now enter the current PIN code (factory setting
0 0 0 0) and press .
NEW PIN
3. Now enter the new PIN code with a maximum of 8
digits and press .
REPEAT
4. Enter the new PIN Code again and press .

- Multiple handsets -
57
7 Multiple handsets
One additional handset can be logged onto the base station. This additional handset can be
obtained from your dealer with the designation D6005A.
When you use multiple handsets you will have the following options:
-Internal calls between handsets.
-External calls can be forwarded between handsets.
-Incoming external calls are signalled on all handsets.
7.1 Making an internal call
Press the button for two seconds. The second handset will ring and the call can be
accepted with the call button on the handset called.
7.2 Connecting external calls to another handset
If you have accepted an external call on one handset, you can forward the external call to
the second handset. Press the button for two seconds. After the internal call has been
accepted at the other handset, you have the following options:
A. Consultation / Brokering: You can now speak to the internal subscriber and return to
the external caller by pressing the button for two seconds. You can switch between the
external and the internal call as many times as you like in this way.
B. Forward the call: The external call is forwarded to the handset called by pressing the
call button on the first handset.
If the call is not accepted by the second handset, press and hold the button for two
seconds to return to the external call.
7.3 Logging on handsets
PROGRAMMING STEPS DISPLAY
1. Hold the PAGE button on the base station pressed
until you hear a signal tone.
2. Press the button. 1-STORE MEM
3. Press the vbutton. SEARCHING
4. When the handset has found the base station, enter
the current PIN code (factory setting 0 0 0 0) and press
.
ENTER PIN
7.4 Logging off handsets
PROGRAMMING STEPS DISPLAY
1. Press the button. 1-STORE MEM
2. Press the mbutton. ENTER PIN
3. Now enter the current PIN code (factory setting
0 0 0 0) and press .
CONFIRM?
4. Confirm with .

- Troubleshooting -
58
8 Troubleshooting
If you have problems with your telephone, please check the following points first. For any
claims under the warranty, please refer to your dealer. The warranty period is 2 years and 1
year for the rechargeable batteries.
No calls possible oThe telephone line is not correctly connected or is faulty.
oUse only the telephone cable provided.
oTest whether your telephone connection is in order by using
another telephone.
oThe power supply is not plugged in or there is a total power
failure.
oThe rechargeable batteries are flat or defective.
oYou are too far away from the base station.
Connection is cut off
or drops out
oYou are too far away from the base station or the base
station is wrongly positioned.
The charging symbol
does not come on
while the handset is
on the base station.
oPlace the handset properly on the base station, clean the
contact surfaces on the handset and on the base station
with a soft, dry cloth.
The standard
batteries discharge
very quickly.
oCharge the handset. If this does not help, replace the
standard batteries.
Display dark oCaused by direct sunlight, allow the handset to cool down.

- Declaration of Conformity -
59
WE TELGO AG
Of Route d'Englisberg 17
CH-1763 Granges Paccot
Declare under our sole responsibility that the product
Model: D6005
Description: CORDLESS DECT TELEPHONE
Is in conformity with directives:
R&TTE Directive (1999/5/EC), EC Low Voltage Directive, EMC Directive
Compliance is achieved by conformity to the following:
EN 301 406 V1.4.1 (03-2001), EN 301 437 V1.1.1 (06-1999), EN 301 489-01 V1.3.1 (09-2001), EN 301 489-06 (09-2000),
TBR 10 (07-1999), TBR 38 (05-1998, EN 60950:2000
Test Reports:
ET92B-07079 (EN 301 406 for FP), ET92B-07-079-1 (EN 301 406 for PP), 60.860.3.052.01 (EN 301 437 for FP+PP),
60.860.3.052.01 (TBR 10 for FP + PP), 60.860.3.052.01 (TBR 38 for FP + PP), ET92B-07-079 (LVD for FP + PP),
ET92B-07-079-01 (EMC for PP), ET92B-07-079-02 (EMC for FP)
Authorised signatory:
Signature: ______________________
Name: Selim Dusi
Position in the company: Managing Director
Date of issue: 09.08.2003
Copies of this document will be held on file for a period of 10 years after the last production.
Supplier: TELGO AG, Route d'Englisberg 17, CH-1763 Granges Paccot
Product: SWITEL D6005
CE0681
This product is intended for connection to analogue PSTN lines within Switzerland.
However, due to differences between the individual PSTNs provided in the different countries, the approval does not, of itself,
give an unconditional assurance of successful operation on every PSTN network termination point.
ADDITIONAL INFORMATION
In the event of a mains power failure it will not be possible to dial emergency services numbers.

www.switel.com
Table of contents
Other switel Cordless Telephone manuals

switel
switel DE10 User manual

switel
switel DE103 User manual

switel
switel DF 1851 User manual

switel
switel DE 1702 User manual

switel
switel DCT427 User manual

switel
switel DC69 Series User manual

switel
switel DC421 User manual

switel
switel D8525 User manual

switel
switel DC 57 series User manual

switel
switel DF 1201 User manual

switel
switel DE3011 User manual

switel
switel DFT 917 series User manual

switel
switel CD738 User manual

switel
switel DF 130 series User manual

switel
switel DET147 User manual

switel
switel DCT407 User manual

switel
switel DFT 107 series User manual

switel
switel DE 23 series User manual

switel
switel DPF962 User manual

switel
switel DC462 User manual