Synetik ErgoCare SEGO User manual

User guide

2
Photo: Production Synop6

3
Overview
Intended Use
The SEGO Seating System is a positioning seat designed to provide children with a precise t adjusted to their
specic condition. The SEGO Seating System grows with the child. Indeed, its multiple adjustment capability
allows for the seat to accommodate a child from 1 to 4 years in age, oering the required postural support
while maintaining their comfort level. The maximum weight of the user must not exceed 50 lbs, the average
size of a child from 1 to 4 years of age. When secured onto its the Hi-Low Base, the SEGO Seating System
can be used in a number of contexts and environments such as at home, at the daycare as well as in a school
setting. It is also extremely versatile and can be installed on other types of bases such as mobility or stroller
frames. You will nd all the details in the Assembly Section of this Manual as well as on our website at www.
synetikergocare.com.
Declaration of Conformity
Synetik ErgoCare warrants and declares under its sole responsibility that the SEGO Seating System complies
with the applicable requirements:
Medical Device Establishment Licence, (MDEL) Canada
Food and Drug Administration, (FDA) United States
Warranty
Synetik ErgoCare warrants its products to the original purchaser for a period of two (2) years if used properly
and in accordance with its recommendations. Synetik ErgoCare reserves the right to repair or replace any
defective parts, as the case may be.
If you have any questions or comments, please contact our Customer Service Department via our website at
www.synetikergocare.com
Phone: 1-450-752-8818
Toll-Free: 1-888-752-8818
Legend
Caution !
This symbol indicates upcoming information important to the safety of the user, their family and
caregivers.
Important Note

4
Technical Training – Product
Safety Information
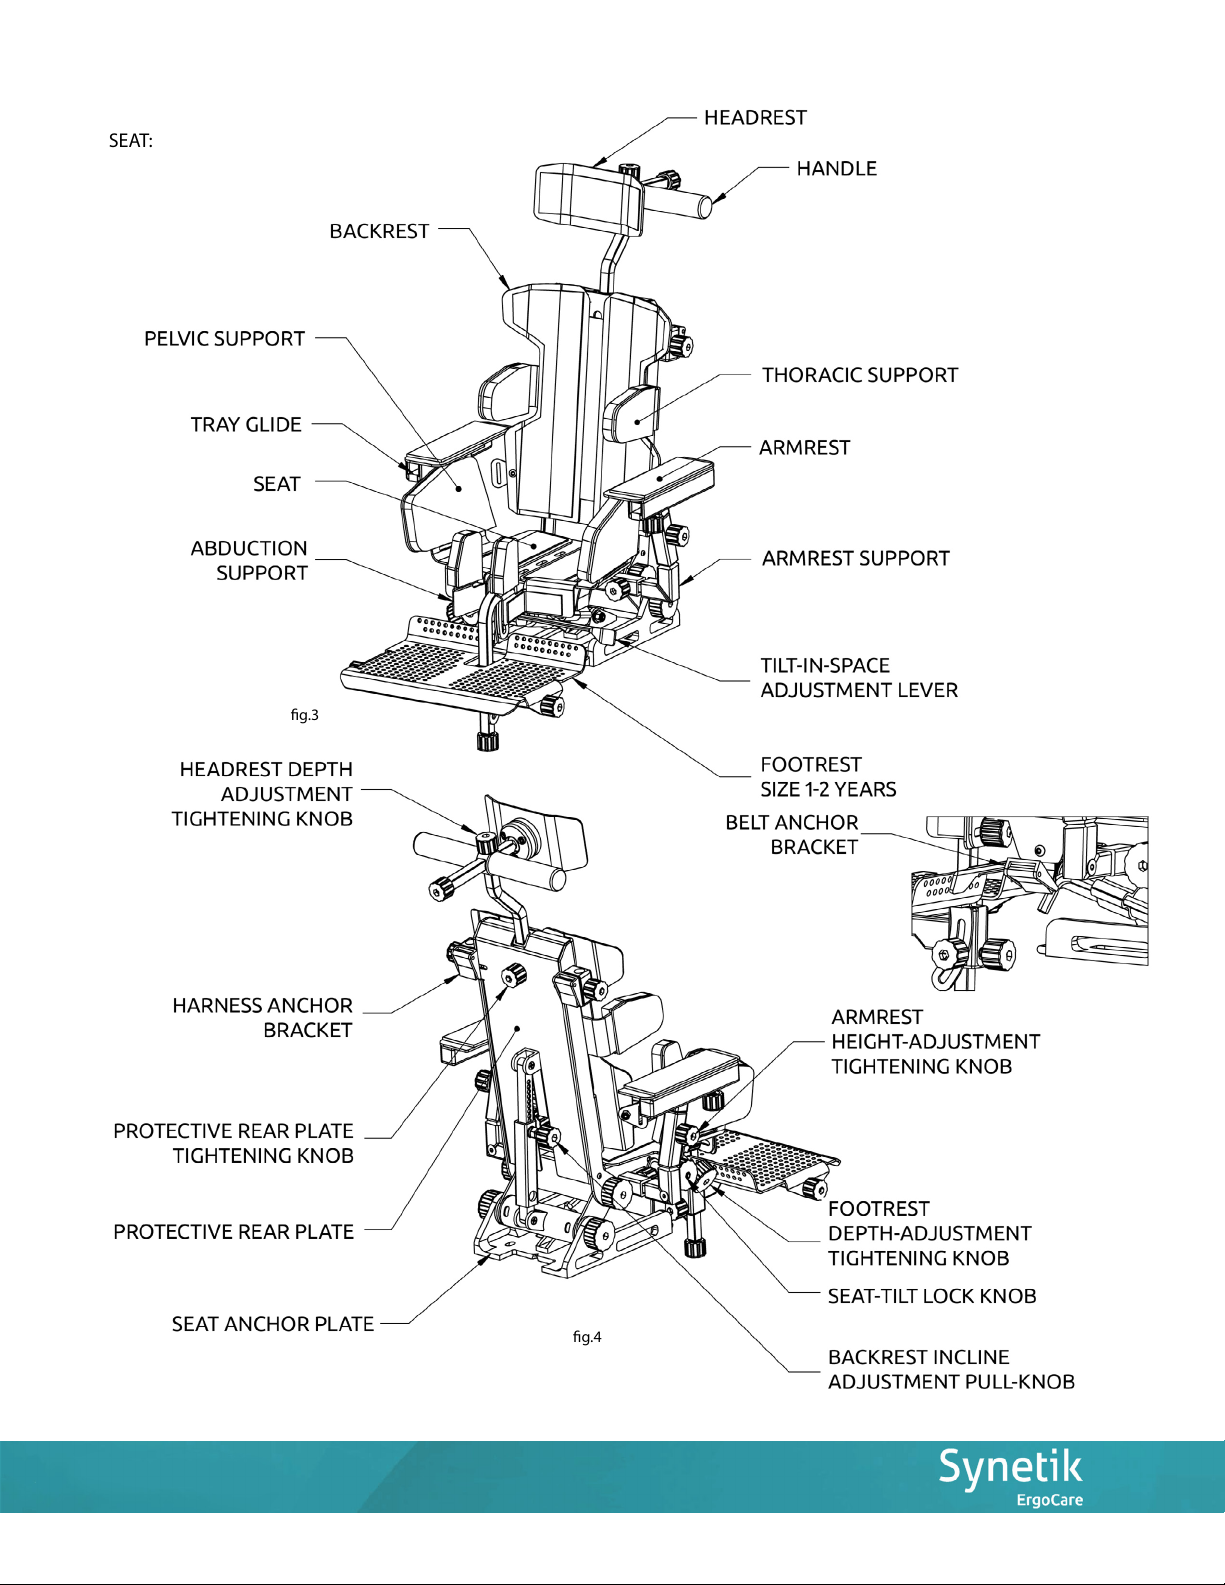
Safety considerations when the SEGO seat is installed on its Hi/Low Base or its adapted stroller
frame.
• Always read the instructions carefully before using the rst time. If for any reason you are unable to fully
understand any part of this document, please contact Customer Service for assistance.
• Ensure that all persons who operate the SEGO Seating System are aware of its operation and are familiar
with the User Manual.
• The SEGO Seating System must only be used after the recommendation and adjustment by a specialized
therapist.
• Never leave the user unattended when using this equipment.
• Always make sure that all the screws and bolts are securely tightened before seating the user in the
equipment.
• Ensure that the Sego positioning seat is securely connected to its base. If the system is incorrectly
positioned, the seat may become loose and injure the user or the person handling it.
• Never add weight other than that of the user.
• The maximum weight of the user is 50 lbs for the 1 to 4-year model SEGO Seating System.
• Be sure to secure the user into the seat before using the product. (belt and/or harness)
• Always lock the caster wheels on the base when the unit is not in motion.
• Never attempt to modify the product. Use only parts approved by Synetik ErgoCare to ensure user safety
and maintain the warranty.
• If uncertain about the safe use of the product, stop using and contact Customer Service.
• Do not allow the user to stand on the footrest.
• When the SEGO positioning seat is installed on the Hi-low Base, ensure the product is on a smooth, at and
even surface.
• Ensure that the foot-pedal lock is always activated on the Hi/Low Base.
• Parts of the SEGO Seating System may present a choking hazard to children. Ensure parts are always
securely fastened to the seat.
• Never go up or down stairs with the user seated in the equipment.
• Never use the SEGO Seating System on a slope steeper than 5 degrees. The user may fall out of the device,
the seat may roll or tip over.
• The product is designed to accommodate only one user at a time. Never place more than one person on or
in the SEGO Seating System at a time.
• After modifying the SEGO adjustment, be sure to tighten all screws and bolts securely before placing the
user in the product. Use the hex (Allen) key to tighten properly.
• The SEGO positioning seat is not designed or tested for use as a car seat. Never use as a car seat.
• Transfer the user from the SEGO positioning seat to a car seat specically designed for this purpose.
• Never use the SEGO Seating System on an escalator.
• Never leave the product in direct sunlight. Always verify the temperature of the metal and cushions before
seating the child.
• Be sure to support the weight of the child when adjusting the angle of the backrest or seat.
• Be sure have a rm grasp on the product before operating the seat tilt-in-space angle adjustment lever on
the frame of the adapted stroller.
• Immediately after placing the user into the SEGO seat, secure the positioning belt and/or harness.
• Always ensure the safety plate is installed on the rear of the backrest to prevent the risk of misalignment.

5
• Never move the Sego Seating System by pushing on the headrest or backrest. Always use the grip handles
specically designed for this purpose.
• Never place extremely hot items onto the tray.
• Clean the device regularly. Never use abrasive products. Always refer to the Cleaning and
• Maintenance section.
• Conduct regular product inspections to ensure proper operation. Refer to the "Daily and Annual
• Inspection" sections of this manual.
• Never leave the equipment outside when not in use.
• Always check that the plastic knob on the protective plate on the rear of the backrest is tightened before
lifting the seat.
Transit
Caution: Never use the Sego Seating System inside a vehicle.

6
g.2
Overview of the SEGO:
HI/LOW BASE:
g.1

7
SEAT:
g.3
g.4
g.4b

8
SEAT – ADJUSTMENTS:
g.5
g.6

9
SEAT – SMALLEST SIZE:
SEAT – LARGEST SIZE:
g.7
g.8

10
g.9

11
SMALL
MEDIUM
LARGE
SMALL
MEDIUM
LARGE
6.8" [173mm]
7.8" [198mm]
8.8" [224mm]
7.3" [186mm]
7.9" [201mm]
8.5" [216mm]
1.3" [32mm]
2.3" [57mm]
3.3" [83mm]
12.0" [306mm]
13.3" [337mm]
14.5" [369mm]
8.6" [217mm]
9.6" [243mm]
10.6" [268mm]
1.3" [32mm]
2.3" [57mm]
3.3" [83mm]
SMALL
MEDIUM
LARGE
SMALL
MEDIUM
LARGE
6.8" [173mm]
7.8" [198mm]
8.8" [224mm]
7.3" [186mm]
7.9" [201mm]
8.5" [216mm]
1.3" [32mm]
2.3" [57mm]
3.3" [83mm]
12.0" [306mm]
13.3" [337mm]
14.5" [369mm]
8.6" [217mm]
9.6" [243mm]
10.6" [268mm]
1.3" [32mm]
2.3" [57mm]
3.3" [83mm]
CENTRAL CUSHIONS
Sizes: Small, Medium, Large
g.10

12
Technical Specications
SIZE 1 to 4 Years
Seat Width 8" to 10" (203 mm to 254 mm)
Seat Depth 7" to 8 ½" (178 mm to 216 mm)
Thoracic Supports – Inside Width 6 ¾" to 8" (171 mm to 203 mm)
Backrest Height 12" à 14 ½" (304 mm to 368 mm)
Distance Between Seat and Footrest Footrest 1 to 2 years: 4 1/2" to 7"
(114 mm to 178 mm)
Footrest 3 to 4 years: 4 1/2" to 9 1/2"
(114 mm to 241 mm)
Backrest Angle From 10⁰ to 55⁰
Seat Angle From 10⁰ to 30⁰
Tray Dimensions 18" x 18"(457 mm x 457 mm)
Total Height ( Seat + Base ) 45’’ (1,143 mm)
Total Depth ( Base ) 31’’(787 mm)
Total Width ( Base ) 25’’(635 mm)
Footrest Angle 19⁰ Forward + 19⁰ Backward
Footrest Dimensions Size (1-2 yrs) : 10" x 6" (254 mm x 152 mm)
Size (3-4 yrs) : 11" x 8" (279 mm x 203 mm)
Seat Weight 18.2 lbs (8.3 kg)
Hi/Low Base Weight 16.2 lbs (7.4 kg)
User Weight (maximum) 50 lbs (22.5 kg)
Seat and Hi/Low Base Weight (combined) 34.4 lbs (15.4 kg)
Tom 5 Stroller Frame Weight 26.4 lbs (12.0 kg)
SEGO Seat with Tom 5 Stroller Frame Weight 44.6 lbs (20.3 kg)
Contents of the Boxes
The Synetik ErgoCare SEGO
Seating System comes in
three (3) boxes containing the
Positioning Seat, Hi/Low Base
and the Accessories. The only
tools required for assembly
are three hex (Allen) keys. The
most used (5/16 size) is located
underneath the seat portion
of the Sego System. Two (2)
other hex keys (3/32 and 5/32)
are required for the headrest
assembly (not included).

13
List of Items:
• Positioning Seat
• User Manual
• Hex (Allen) Key (5/16)
• Hi/Low Base (Optional)
• 3 Central Backrest Cushions (Black)
• 3 Central Seat Cushions (Black)
• Footrests (2 sizes)
• Lateral Seat and Backrest Cushions (Colour: Red or Blue)
• Covers for Postural Supports (Colour: Red or Blue)
• Tray (Optional)
• Canopy (Optional)
• Abduction Supports (2 Sizes)
• Thoracic Supports
• Interface Plate for Stroller Frame (Optional)
Unpacking Contents of Boxes
1. Remove the contents from the boxes and lay on a at surface.
2. AVerify that the material corresponds with what was ordered and that no damage occurred during
transport.
3. Follow the instructions in the next section (Assembly of the SEGO Seating System).
Caution: Certain parts are sealed in a plastic bag. Keep bags out of the reach of babies and children.
The thin material is a choking hazard that can obstruct nostrils and/or the mouth.
Caution: Certain SEGO Seating System parts are chocking hazards for children. Always ensure parts
are securely fastened to the seat.

14
Assembling the SEGO Seating System
The instructions in the User Manual will guide you through the process of assembling the SEGO Seating System.
However, it is recommended that all initial adjustments specic to the user be done by a therapist trained by a
Synetik ErgoCare representative.
Hex (Allen) Key
One main tool is required to assemble and adjust of the SEGO Seating System. The 5/16 hex (Allen) key is
located on the cylinder underneath the seat. Two (2) other hex keys (3/32 and 5/32) are required headrest
assembly (not included).
Installing the Backrest
To facilitate the shipping of the device, the backrest is completely unfolded and the tilt mechanism
disassembled (Fig.12).
To complete the assembly, you will need to:
1. Fold the backrest completely forward (Fig.12)
2. Insert rod Ainto tube B(Fig. 12).
3. Adjust to desired angle by pulling the tightening
knob C(Fig. 13) outward and inserting it into
the desired hole in the positioning rod.
Installing the Headrest System
The headrest system comes completely assembled.
To assemble the seat shell, unscrew the tightening
knob on the backrest A(Fig. 14). Insert the vertical
positioning rod of the headrest assembly into the
square opening at the top of the backrest (Fig. 15).
Caution: To ensure headrest remains
securely in place, plastic knob Cmust be retightened.
Note: The headrest assembly comes with the standard
SEGO headrest. If a dierent headrest was ordered, it will
be delivered separately and must be assembled as per
Figure 15, using a hex (Allen) key 5/32. (Key not included)
Installing the Armrests
1. Insert armrest stem Ainto support tube Blocated
on the side of the seat (Fig. 17). Make sure that
the armrest slide-housing is on the exterior of the
support bracket C(Fig.18).
2. Tighten the plastic knobs Dwith the hex (Allen) key
(Fig. 18).

15
Installing the Thoracic Supports
To assemble the two (2) thoracic supports, you will need to:
1. Loosen the two (2) central knobs on the backrest Ausing the 5/16 hex (Allen)
key. Do not remove them entirely (Fig.19).
2. Slide the thoracic support slats between the central knob screws A(Fig. 20).
3. Retighten the knobs using the 5/16 hex (Allen) key.
4. Repeat for the other thoracic support.
5. Reinstall the protective backplate,
securing it into place with the tightening
knob (Fig. 14).
Installing the Abduction Supports
(Small Size)
The Growth Kit supplied with the SEGO
Seating System includes two (2) sizes of
abduction supports. Select the size that best ts the user.
To complete the assembly of the small-sized abduction supports, you
will need to:
1. Unscrew tightening knob A(already installed at time of delivery)
(Fig. 21).
2. Insert the screw on the abduction support into slot B(Fig. 21).
3. Retighten plastic knob A on the screw.
4. Repeat for the other abduction support.
To complete the assembly of the large-sized abduction supports, you will need to:
1. Unscrew the tightening knob A(already installed at time of delivery) (Fig. 22).
2. Insert the two (2) screws on the abduction support into slot B(Fig. 22).
3. Retighten the plastic knob Aon the screw (Fig. 23).
4. Repeat for the other abduction support.

16
Installing the Footrest
The Growth Kit supplied with the SEGO Seating System includes two (2) footrest sizes. Each size includes a
support and a footplate. Choose the size that ts the user. To complete the assembly, you will need to:
1. Remove plastic cap Aat the end of support rod B(Fig. 24).
2. Loosen plastic knob Aand insert support rod into the footrest square support tube (Fig. 25). Tightening
knob B is to adjust the angle of the footrest. Retighten knob B.
3. Insert the footrest support rod into the tube under the seat between the abduction supports and retighten
knob A.
Caution: Do not allow the child to stand on the footrest
You now have an assembled SEGO System Positioning Seat.
Installing the Cushions
Open the plastic bag containing the cushions and covers. Take out all
the colour cushions to be positioned rst. A, headrest, B, backrest, E
seat (Fig. 27). They now can be installed. The black central cushions C
& Dare for the size adjustment. Use the pair that are appropriate for
the child’s size requirements. There are three dierent sizes included
for growth adjustment. (See Fig. 10)
Caution: Certain parts are sealed in a plastic bag. Keep bags out of the reach of babies and children.
The thin material is a choking hazard that can obstruct nostrils and/or the mouth.
Installation des housses sur butées

17
Installing the Covers
Install the covers as identied by a capital letter onto the corresponding
support part identied by a small letter:
Pelvic Supports A
Thoracic Supports B
Abduction Support – Large Size C(Exterior Knee Support)
Abduction Support – Large Size D(Pad for under the knee)
Abduction Support – Small Size E
Abduction Support – Large Size F(Pad for inside of the knee)
Armrests G
Note: The covers can be installed on either side (left or right), except the armrest covers.
Note: All the SEGO System cushions and covers are machine washable and go into the dryer. (See
section on Cleaning and Maintenance)
Installing the Belt
Slip the belt straps through the slot Ajust under the pelvic support (Fig. 29).
Thread the belt strap through the buckle beneath the seat (Fig. 30).
Repeat for the other side.

18
Installing the Harness
Slip the harness strap (without metal buckle) through the buckle located at the top, behind the backrest (Fig.
31). Follow Figures 31 to 36 to knot the bottom of the harness.
Installing the SEGO Seat onto the Synetik Hi/Low Base (if applicable)
To facilitate shipping, the Hi/Low Base is positioned at its lowest height. To
complete the installation of the base, you will need to:
1. Release the safety lock by pulling on the handle A(Fig. 37) and turning it one
quarter (¼) of a rotation. The handle will remain out.
2. Lock all 4 wheels.
3. Push down gently on the foot pedal to raise the base. Installation of the seat
is facilitated when the base is set at its maximum height.
4. Hold the SEGO seat and position it as per Figure 38. Tilt seat to a 45º angle to
facilitate its insertion.
5. Lower the back of the seat downward. When at and in place you will hear the lock click. If
no sound, pull the handle on the base interface A(Fig. 38).
6. Always check that the seat is properly secured in place by trying to push it forward.
Caution: Make sure the SEGO Seat is securely installed and fastened onto the Hi/
Low Base. If the seat is not correctly positioned, there is a risk of the Seat coming
o, injuring the user or the person handling the equipment.
Installing SEGO onto a Stroller Frame (if applicable)
1. Install the SEGO Seat interface onto the stroller frame:
• First slide tube Ainto the hooks B(Fig. 39).
• Push the interface into the slots and lower until the
lock clicks into position.
2. To install the SEGO seat onto the stroller interface, repeat steps 4, 5
and 6 of the installation instructions for the SEGO seat onto the Hi/
Low Base. (Fig. 38)
Caution: Make sure the SEGO Seat is securely installed and
fastened its base. If the seat is not correctly positioned, there
is a risk of the seat coming o, injuring the user or the person
handling the equipment.
Assembly of Accessories and Options
Installing the Tray
1. Loosen plastic knob C, adjust the tray rods Bto the same width as the
glides located under the armrests A(Figs 40 & 41).
2. Retighten tray rod knob C
3. Insert the metal tray rods B into the glides A(Figs 40 & 41).
4. To secure the tray, tighten knobs located under the glides A.

19
Installing the Canopy
1. Loosen plastic knobs A, and canopy anchoring blocks Blocated on the backrest
of the SEGO Seat (Fig.42).
2. Slide the canopy stems into the anchoring blocks Bto the desired height.
3. Retighten the plastic knobs.
Attaching the Sandals
Have the therapist position the sandals on the footrest.
Clinical Adjustment for Postural Alignment
Clinical adjustments are to be made by a person with the required knowledge and
skill sets. In addition, the person must be properly trained on how to use the SEGO
Seating System.
Note: Synetik ErgoCare recommends that an up-to-date log of all settings and adjustments made to
the product be kept.
Before placing the child in the seat, adjust the backrest height and width, seat depth and width, as well as the
height and width of the thoracic supports. All other adjustments can be completed once the child has been
seated and is properly secured into the SEGO Seating System.
Note: Use hex (Allen) key located under the seat section to adjust plastic knobs
1. Height and Width - Backrest
To adjust the height and width of the backrest you will need to:
1.1 Remove the black centre cushion from the backrest, if still in place.
1.2 Remove the protective backrest plate by
unscrewing the tightening knob A(Fig. 43).
Loosen but do not remove the eight (8)
tightening knobs Bon the rear holding the
slatted backrest plates in place (Fig. 44).
1.3 Remove the two (2) thoracic supports C
(Fig. 44).
1.4 Adjust the slatted backrest plates Dto the
desired width and height (Fig. 44). To do
this, slide the screws into the desired slats
E.
1.5 If you do not wish to install the thoracic
supports, go to Step 1.6 . If required, go to
Section 2 (Thoracic Supports: Height and
Width).
1.6 Retighten the knobs securely using the hex (Allen) key anchored to the cylinder beneath the
seat.

20
2. Thoracic Supports: Height and Width
1.7 Reinstall the backplate and retighten the plastic knob.
1.8 Reinstall the black centre cushion onto the backrest. Be sure to insert the correct cushion
size (Fig. 10). To do so, select the cushion that best lls the entire area between the two (2)
coloured cushions.
4.1 Remove the black centre cushion from the seat, if still in place
4.2 Loosen, but do not remove, the four (4) plastic knobs A(Fig. 47)
located underneath the seat plate.
4.3 Return the seat to its base.
4.4 Adjust to the required width and depth by sliding the metal slats
between the screws of the tightening knobs B(Fig. 47).
4.5 Partially retighten the knob.
4.6 Remove the seat again from its base (Hi/Low, mobility, stroller), place
it upside down on a table and retighten the knobs securely, using the
hex (Allen) key anchored to the cylinder beneath the seat.
4.7 Reinstall the black centre cushion onto the seat (Fig. 10). Be sure to
insert the correct cushion size. To do this, select the cushion that best
lls the entire area between the two (2) colour cushions.
2.1 Loosen the four (4) tightening knobs in the centre A(Fig. 45).
2.2 Adjust width and height as required by sliding the metal slats between
the screws of the tightening knobs B. (Fig. 45
2.3 Retighten the screws securely using the hex (Allen) key anchored to
the cylinder beneath the seat.
2.4 Reinstall the backplate and retighten the plastic knob.
3. Backrest Angle
To adjust the backrest angle, pull out the spring knob A(Fig. 46). Position the backrest
to the desired angle and release the knob
Caution: Be sure to support the weight of the child when adjusting
backrest angle or seat angle.
4. Seat: Depth and Width
To facilitate the adjustment of the seat itself, it is simpler to remove the seat section
from the base (Hi/Low, mobility, stroller), placing the seat section upside-down on a
table for easier access to the tightening knobs.
To complete the adjustment, you will need to:
Table of contents
Other Synetik ErgoCare Medical Equipment manuals