1 2 3
WARNING AND SAFEGUARDS
•This product may contain chemicals known to the state
of California to cause cancer and or birth defects or other
reproductive harm. Wash your hand after handling this
product.
•It is your sole responsibilities to verify that the plug and
the receptacle are clean and free of moisture and salt
build up at all times. The receptacle must be free of water,
salt, calcium, magnesium and dust. Failure to do so can
cause re, damage to property, permanent damage to the
product and personal injury not limited to loss of life.
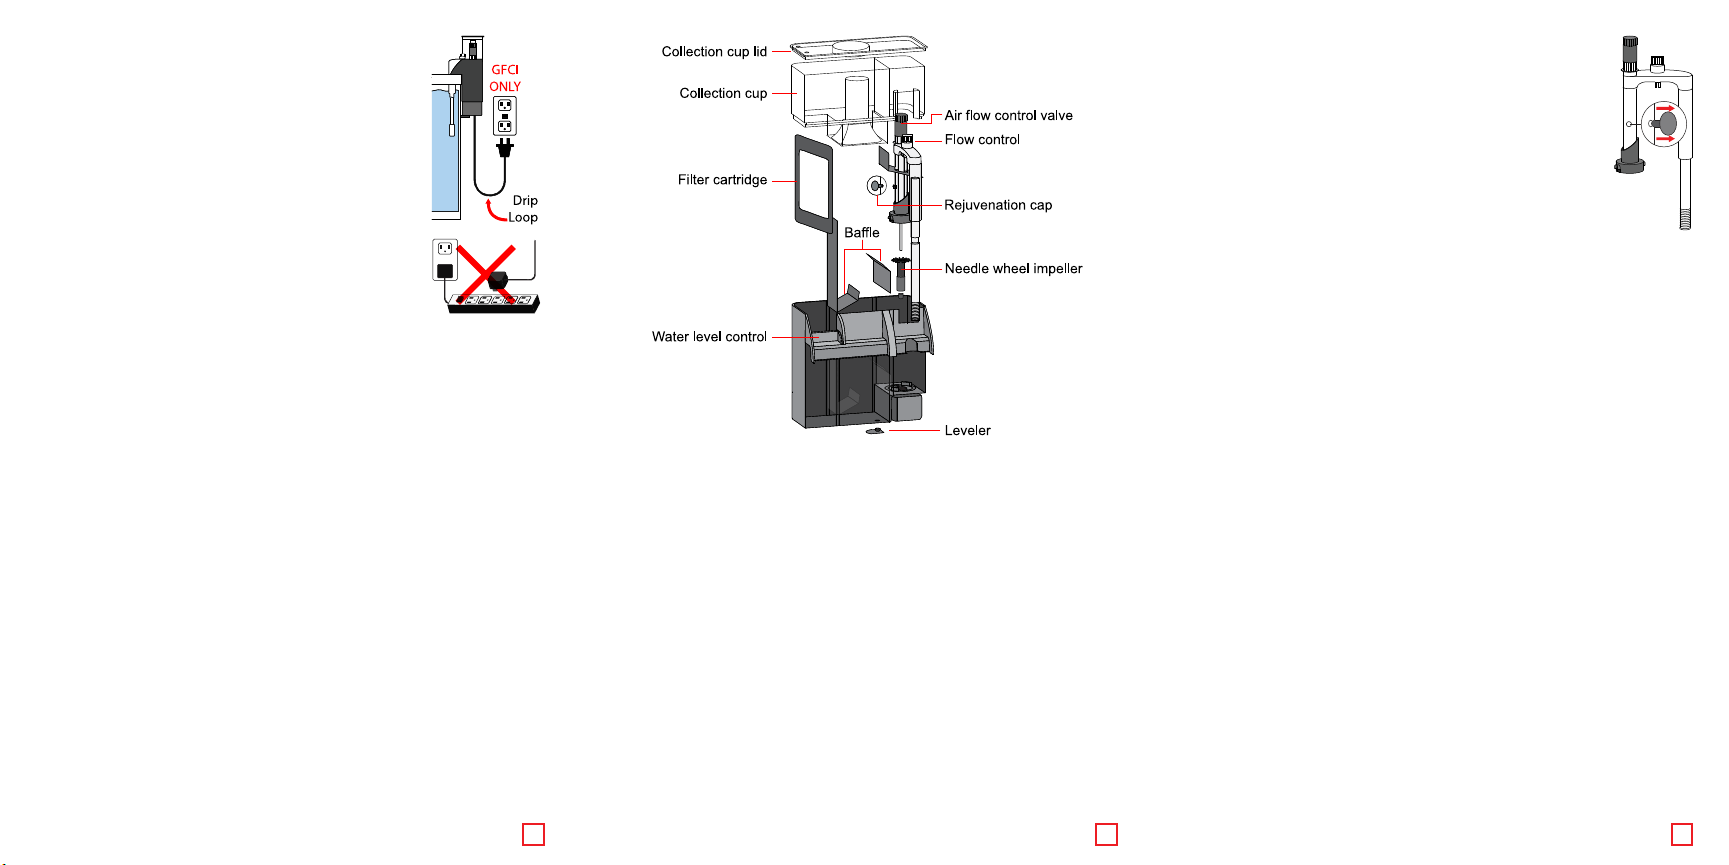
•Do not plug into extension cord/power strip.
•A drip loop must be used when plugging all electrical
aquarium devices. A drip loop is that part of the cord
hanging below the receptacle.
•The national code requires that a GFCI (Ground fault
circuit interrupter) be used in the branch circuit supplying
all power to water pumps and electrical aquarium
equipment. If you do not have a GFCI, have an electrician install one prior to
operating any aquarium component.
• Reads and follows all instructions.
• Use this product for its intended use only.
• Never yank or pull the cord from the electrical outlet.
• Do not operate if the plug or wire is damaged.
• Do not operate without water.
• Verify that hands are dry prior to disconnecting the power.
• To reduce the risks of electrocution, keep all connections dry.
• While working on the skimmer and/or aquarium, disconnect all aquarium
appliances from power supply.
• Iftheproductistofallintowater,donotreachforitrst.Unplugtheunitrst
then retrieve the unit from water. If any of the electrical components get wet,
unplug immediately.
INSTALLATION
The use of water conditioners (some de-chlorinator, aqua safe, stress coats,
algaecides, and red slime removers) will increase the surface tension. As
collectioncupllsdumpwaterandrepeatuntilskimmerisworkingproperly.Run
acarbonltertoremoveallimpurities.Checkwithyourlocalshstoreforwater
conditioner that will not affect the performance of the protein skimmer.
1. Remove the collection cup and wash well with a mild dish detergent and rinse
with warm water. Insure all the detergent is removed from the collection cup.
Replace collection cup.
2. Install water level control.
3. Removetheltercartridgefromtheplasticbag.
4. Fill the main body of the skimmer.
5. Verify the tank is full of salt water with a salinity of 1.020-1.025.
6. Remove the lid from the collection a cup. Plug in Rio®Nano Skimmer™
intoaGFCIoutlet.
7. ClosetheairowcontrolvalveandplugtheRioNanoskimmerintoa
GFCIoutlet
8. Theskimmerwillbegintoprime,keeptheairowcontrolvalvecloseduntil
waterllstheintaketubeandwaterbeginstocascadebackinto
the aquarium.
9. Opentheairowcontrolvalvetothatairbeginstoentertheskimmer,start
the skimmer so that the air bubbles just start to enter the skimmer. Do not
open the valve all the way. Replace collection cup
10.If after a 12 hour period of time there is not any organics collecting in the cup
increaseairvolumebyopeningtheairowcontrolvalvebysmallincrements
until the unit begins to skim.
11.Replace the collection cup.
NOTE: it may take 24 hours for the skimmer to start to work. It will not start to
foam/skim immediately.
TROUBLESHOOTING
Problem: Nothing will collect in the collection cup.
Solution:
• There is not a biological load in the aquarium.
• Verify the salinity is 1.020-1.025.
• Make sure the water level control is in its highest position.
• Decrease the amount of air by opening the air control valve.
When making adjustments to the air intake wait a min. of 15-30
minutes to see changes.
• The variable venturi needs to be cleaned (2’ piece of airline
tubingand1cupofwarmwater).Connecttheairlinetubingtothe
intake of the venturi place the other side in the warm water allow
the venturi to suck the warm water through the intake.
• It may take up to 24 hours for a Skimmer to start to work. Set up
and wait without any adjustments.
• The foam is unable to climb into the collection cup due to oils
from your hands, lotions, tank additives and/or foods feed. Run
carbonltertoremoveanyimpurities.
• Remove the collection cup and wash well with a mild detergent and rinse with
hot water. Insure all the detergent is removed from the collection cup. Replace
collection cup.
• If the aquarium is new and there is not any live stock in the aquarium the
skimmer will not skim.
Problem: Only water is collecting in the collection cup.
Solution:
• The salinity is too high. Adjust salinity to 1.020-1.025.
• The use of additives such as water conditioners, medications, red slime
remover and/or use of synthetic sea salt are causing the bubbles to bond
longerthusthewaterinthecup.Ascollectioncupllsdumpwaterandrepeat
until skimmer is working properly. The problem will persist until the agent
causing the problem is removed.
• Decreasewaterowwiththevalveontheintaketubeby20%.
• The aquarium was just cleaned and/or water change was done. As collection
cupllsdumpwaterandrepeatuntilskimmerisworkingproperly.
• The rate of speed is too fast. Increase the amount of air by opening the air
controlvalve,moreair=lesswaterow
• Decrease the water level by lowering the water level control.
Problem: Small air bubbles are discharging back into the aquarium.
Solution:
• Thelterpadiscloggedortosoiledandwater/airbubblesareescapingover
theltercartridge.Replacelterpad.
• The salinity is too high. Adjust salinity to 1.020-1.025.
• Decreasewaterowwiththevalveontheintaketubeby20%.
• The use of water conditioners (de-chlorinator, stress coats, algaecides and red
slime removers) will increase the surface tension.
• Connectapieceofairlinetubingtotheintakeofthevariableventuriand
submersetheoppositeendintheaquariumsotheunitisjustapowerlterfor
24 hours and resume operation.
• New tanks with the addition of uncured live rock will cause very poor water
quality20%ofthewaterdailyuntilwaterqualityimproves.
• Oncetheskimmerisoperatingproperly,youmaychoosetonetunetheair
bubbles/skimmer,netuningtheskimmerforthedriestfoam.