Taga Harmony TRS Series User manual

TRS Series
OUTDOOR SPEAKERS
Instruction manual
Edition 09-2022

2
Introduction
Thank you for purchasing this TAGA Harmony speaker.
The TRS series is designed for installation in gardens, patios, terraces and other
outdoor spaces.
Durable enclosures, which are weather, UV and water-resistant imitate natural rocks
allowing to perfectly blend in the architecture of the surrounding environment.
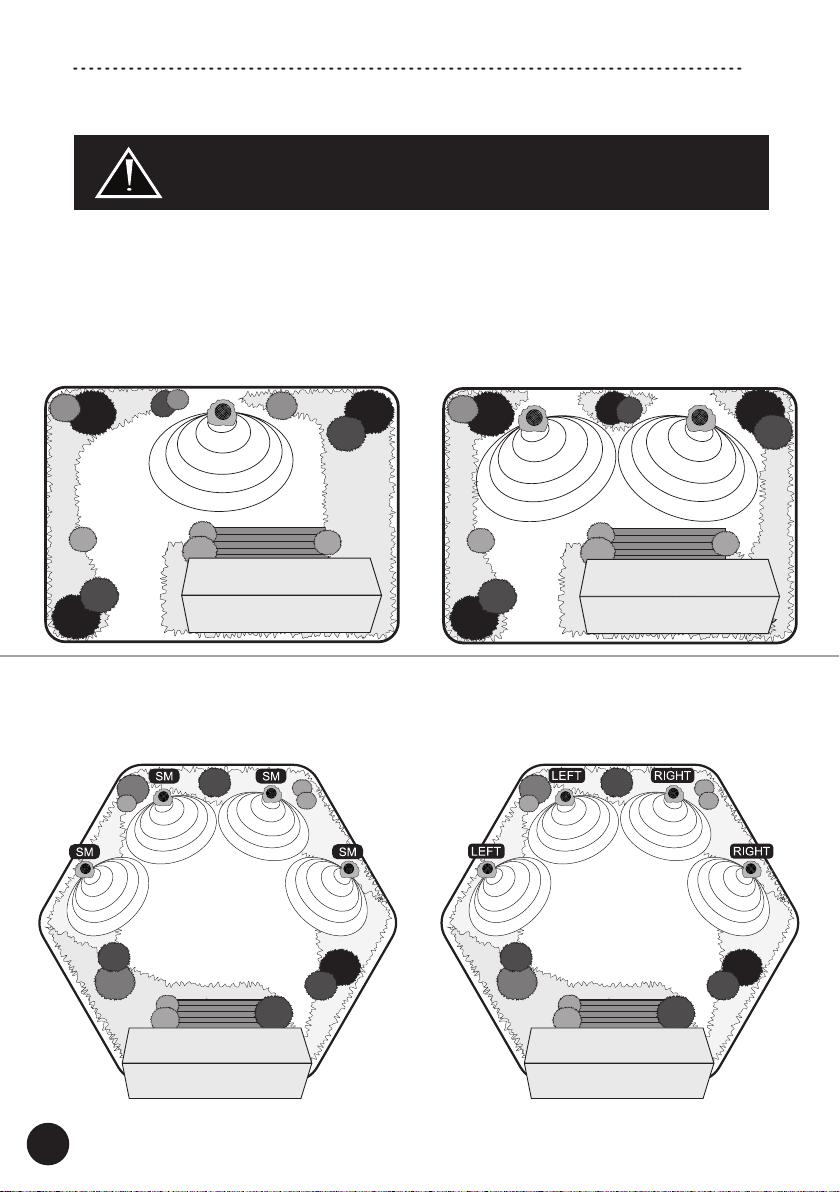
The SM (Stereo / Mono) models ensure high quality, dual-channel sound from a single
speaker.
The SM models can provide much wider dispersion than traditional speakers as well as
eliminate sound imbalances which can be heard once listeners move around the area.
The TRS series is an efcient, cost-effective solution to bring high quality sound and
easy installation for outdoor sound systems.
Important remarks!
Please read this instruction manual carefully before installation and keep it for future
reference.
• Please do not dismantle any parts of the speaker as this may void your warranty –
servicing should be performed only by a qualied TAGA Harmony repair center.
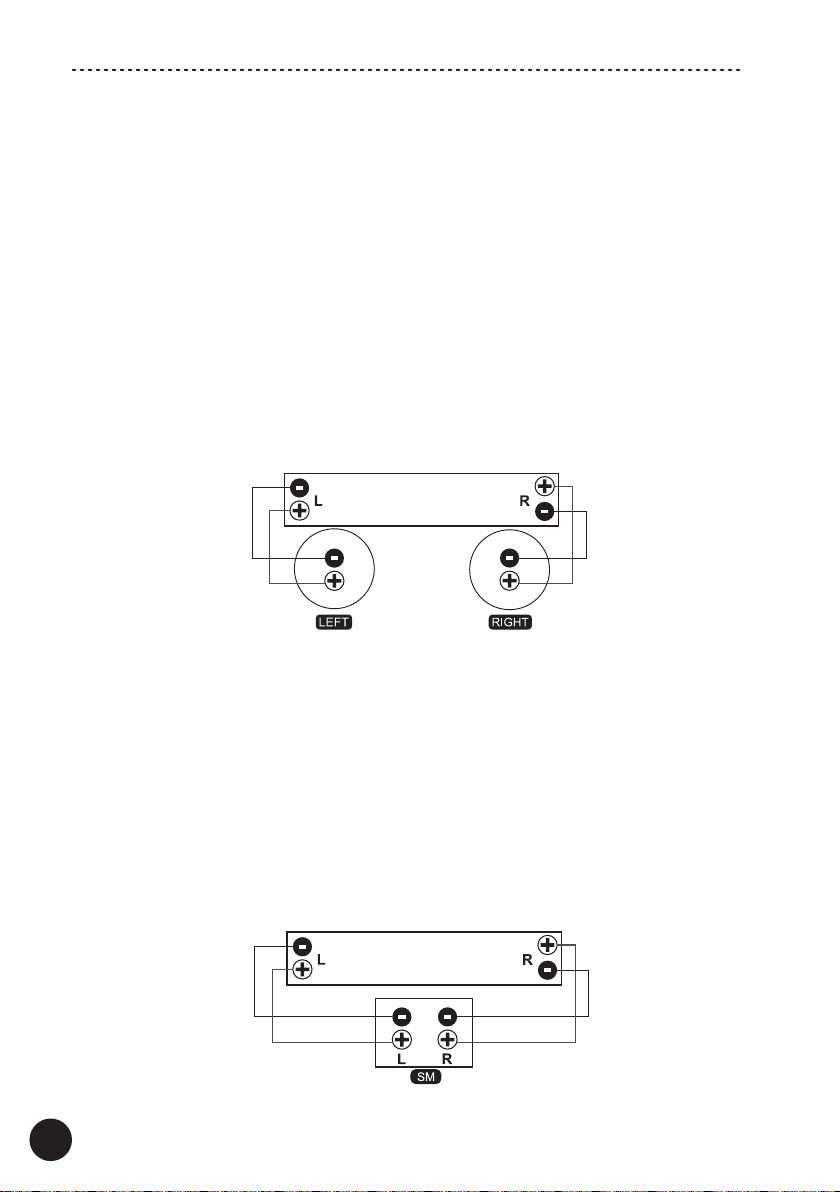
• When connecting the speaker make sure to power off your audio equipment
(amplier, power mixer, sound processor etc.).
• Make sure that all connections are done according to this manual and a manual
provided with your audio equipment.
• Make sure that your audio equipment output power and working impedance are
compatible with this speaker. Using unsuitable audio equipment may damage the
speaker and/or audio equipment and void your warranty.
• The speaker may be damaged by too high output power as well as by an
underpowered output signal [distortions of sound].
• Do not use very high volume levels for a long period of time – this may damage the
speaker and void your warranty.
• When switching on and off your audio equipment, turn down the volume to avoid
strong electrical impact to be delivered to the speaker.
Specications and the latest instruction manual edition
Full technical specications and the latest edition of the instruction manual are
available on www.TagaHarmony.com.

3
Contents
Unpacking The Speaker 3
Placement And Installation 4
Running Speaker Cable 5
Hooking Up Speaker Cable 6
Anchoring The Speaker 7
Kit Content 8
Unpacking The Speaker
If you notice any damages in transportation, report it immediately to your dealer/ installer.

4
When designing and installing the sound system make sure to review
safety and performance aspects of the installation which are applicable
in the place of installation.
Placement And Installation
We recommend that your sound system is designed and installed by a licensed
professional engineer or designer (installer).
Install the speaker on a stable and hard surface.
The placement and installation method for the speaker varies on the intended application.
SMALLER AREAS
Use a single SM (Stereo / Mono) speaker or a pair of MONO speakers for wide sound
dispersion and coverage.
SM speaker MONO speakers
LEFT RIGHT
The speaker placement shown in the gures is just an example and depends on the area
size and shape and the objects located in it.
LARGER AREAS
Use multiple SM (Stereo / Mono) or MONO speakers for ultra-wide sound dispersion
and coverage.
MONO speakersSM speakers

5
Running Speaker Cable
Before running the speaker cable through walls, under sidewalks,
roads, patios etc., make sure to review safety aspects which are
applicable in the place of installation.
Before digging to hide the speaker cable or attaching it to the
ground, make sure to review location of gas and water pipes,
electricity cables and others with local utility providers.
Use high-quality, moisture-resistant speaker cable for outdoor use.
1. Measure and mark the path from your audio equipment to the speaker to determine
the length of required cable.
2. It is recommended to leave about 150 cm (5 feet) of extra cable at the speaker end
to facilitate positioning and installation of the speaker.
3. Cut the required cable length.
4. Run the speaker cable from the audio equipment to the speaker.
If the cable is to run on the ground then we recommend to attach it with stakes.
If the cable is to run underground then it must be rated for direct burial and/or hidden
in a PVC pipe.

Hooking Up Speaker Cables
MONO TRS speaker
A pair of short speaker cables is located at the bottom of your TRS speaker (may be
protected by an external black sleeve): one cable is + (RED or WHITE color) and one is
- (BLACK or BROWN or BLUE color). Use the previously cut speaker cable to connect
TRS speaker cables with your audio equipment. Each channel of your audio equipment
should be connected to a single speaker. The audio equipment output speaker terminal
marked with + should be connected with + TRS speaker cable and the one marked
with – should be connected with – TRS speaker cable.
AUDIO EQUIPMENT
MONO Speaker
SM (Stereo / Mono) TRS speaker
2 pairs of short speaker cables are located at the bottom of your TRS SM speaker
(each pair may be protected by an external black sleeve). The pair for Left channel is
marked with L on the speaker’s cabinet, the pair for Right channel is marked with R
on the speaker’s cabinet. For each channel: one cable is + (RED or WHITE color) and
one is - (BLACK or BROWN or BLUE color). Use the previously cut speaker cable to
connect TRS speaker cables with your audio equipment. Both channels of your audio
equipment can be connected to a single SM speaker. The audio equipment Left output
speaker terminal marked with + should be connected with Left + TRS speaker cable,
and the audio equipment Left output speaker terminal marked with - should be connec-
ted with Left - TRS speaker cable. The same should be done for the Right channel.
AUDIO EQUIPMENT
Speaker
6
Note! Make sure to power off your audio equipment before connecting this speaker.
Consult your local TAGA Harmony dealer/installer for further information about cables
and connection options.
Each channel of your audio equipment is equipped with 2 speaker output terminals:
one is + (usually RED color) and one is - (usually BLACK color).
Check your audio equipment’s instruction manual for more information.

Connecting the speaker cables
For each conductor:
1. Remove approximately 10 mm (3/8”) of insulation from the end of the conductor from
the speaker and connecting speaker cable side.
2. Twist the bare wires of the speaker and the speaker cable rmly together, or use a
cable connector.
3. Protect the connection with waterproof tape or other protection cover against
moisture and water.
Hooking Up Speaker Cables
TRS SPEAKER
CABLE
If your speaker is wired incorrectly it will be out of phase and it will sound indistinctly
and with a weak bass.
Re-check your connections and correct the polarity by reversing the connections.
7
Anchoring The Speaker
As safety precautions to avoid movement of the speaker we recommend to anchor it to
a permanent construction.
We recommend to use a safety cord and to rmly attach one end to the speaker
cabinet and the other end to the permanent construction.
This is recommended even if it is not required by local construction and safety
regulations.
Note! An anchoring system nor a safety cord are not provided with this speaker.
They should be purchased and installed by yourself.

www.TagaHarmony.com
TAGA EUROPE
POLPAK POLAND Sp. z o.o.
AL.JEROZOLIMSKIE 331A
05-816 REGUŁY k/WARSZAWY, POLAND
Email: Sales@TagaHarmony.com
Disposal of old electrical & electronic equipment
(applicable in the European Union and other countries with separate
collection systems)
This symbol on the product or on its literature and packaging indicates that this
product shall not be treated as household waste. Instead it shall be handed over
to the appropriate collection point for the recycling of electrical and electronic
equipment. By ensuring that this product is disposed of correctly, you will help
to prevent potential negative consequences for the environment and human
health, which could be caused by inappropriate waste handling of this product.
The recycling of materials will help to conserve natural resources. For more
detailed information about recycling of this product, please contact your local
government ofce, your household waste disposal service or the shop where
you purchased the product.
Disposal of the product
Your product is marked with the symbol shown on the left.
As its manufacturer, hereby we declare that the product is in compliance with the
following EU directives and regulations:
2014/30/EU (EMC) & 2011/65/EU (RoHS)
The full text of the EU declaration of conformity is available from the
manufacturer.
EU declaration of conformity
We strongly advise to contact a professional installer or dealer in order to install
TAGA Harmony products.
We recommend using high quality TAGA Harmony cables and other installation
accessories.
Kit Content:
Speaker 1 EA
Instruction Manual 1 EA
Other manuals for TRS Series
1
This manual suits for next models
2
Table of contents
Other Taga Harmony Speakers manuals

Taga Harmony
Taga Harmony Platinum F-90 SL v.2 User manual

Taga Harmony
Taga Harmony iMPACT 2.0 Reference manual

Taga Harmony
Taga Harmony Pro Audio PSL User manual

Taga Harmony
Taga Harmony TAV-500B User manual

Taga Harmony
Taga Harmony Platinum IW LCRS Series User manual

Taga Harmony
Taga Harmony TRS Series User manual

Taga Harmony
Taga Harmony Diamond Series User manual

Taga Harmony
Taga Harmony TOS Series User manual

Taga Harmony
Taga Harmony TCW Series User manual