TAIFUN BT User manual

User Manual
english
®
BT

english Taifun® BT –User Manual
2
Important
Please read these instructions carefully, before using your
Taifun® BT rebuildable tank atomizer. The manufacturer is not
liable for damage caused by improper use.
General information
With the Taifun® BT you have purchased a high quality
rebuildable tank atomizer, which has been designed exclusively
for use with e-liquid.
Before use it is necessary to install a piece of mesh according to
the instructions of this manual. Furthermore, it is required to fill
the atomizer with e-liquid after setup. If you are having trouble
installing the mesh, or if you have no previous experience with
rebuildable atomizers, please contact your supplier or
www.smokerstore.de.
After the attachment the mesh, the resistance should be
measured. To do this, use a multimeter or a suitable battery
device with resistance measurement. If a short circuit is
detected, the atomizer must never be put into operation. Short
circuits can cause damage to the battery device and/or batteries.
In this case, check if the mesh is in contact with the base or the
wall of the atomizer and replace it with a new piece of mesh.

Taifun® BT –User Manual english
3
Important notes on use and storage
The Taifun® BT is intended exclusively for use with fluids as
required for e-cigarettes. The device can be used with both
nicotine-containing and nicotine-free fluids.
The mesh develops very high temperatures (glowing) during use.
Do not use the device without liquid.
Do not use the Taifun® BT in areas, which could be enriched with
flammable gases, vapors or dusts. Risk of explosion!
Do not connect the device to additional or external voltages. Only
connect the Taifun® BT to a voltage supply specified for
atomizers.
This device is not a medical product!
Always keep the device out of the reach of children.
For all damages to persons and property which occur from
inappropriate use, the liability is only subject to the operator.
The use of the Taifun® BT is at your own risk.

english Taifun® BT –User Manual
4
Warnings
This device is not intended for use by persons under the age of
18 years, pregnant or breast-feeding women, persons with
cardiovascular disease, persons with respiratory illness, persons
with allergies to the ingredients of the used liquids, and persons
with limited comprehension. Keep the device away from this
persons.

Taifun® BT –User Manual english
5
Recommendations
For the operation of the atomizer we recommend the use of the
mesh included in the scope of delivery with a mesh width of 300.
We recommend using the Taifun® BT in the resistance range
between 0.25 and 0.5 Ohm. The resistance depends on the
surface and the mesh width of the used mesh.
Please note that the device can heat up during use. We
recommend allowing the unit to return to its ambient
temperature after use. Due to the large heating surface, we
recommend firing the evaporator with at least 30 watts. For
better results, higher power is required (from approx. 60 watts).
We recommend the use of a regulated mod with rechargeable
batteries / cells, which are designed for appropriate amperage.
Three pieces of stainless steel rope are included in the delivery.
These are 7x7 ropes with a diameter of 3 mm. These can
generally remain permanently in the evaporator and do not have
to be replaced.
All consumable materials can be purchased online at
www.smokerstore.de, in all SmokerStore stores or in authorized
e-cigarette stores.

english Taifun® BT –User Manual
6
Maintenance, cleaning and care
The Taifun® BT is made of high-quality materials and has been
cleaned before delivery. Intensive cleaning is not necessary.
Visible moisture residues result from the cleaning which has
already taken place, or the pretreatment of the O-rings with
glycerol. Already in the delivery state are several stainless steel
ropes, installed in the tank. These can usually be used
permanently. Replacement is not necessary when used properly.
If you wish to clean the device after long term use, it is usually
sufficient to rinse all parts under warm water.
Please allow all parts to dry well after cleaning, before
reassembling the device. We also recommend to moisten the o-
rings with some liquid or glycerin before reassembling. This
increases the durability of the o-rings and simplifies assembly. If
an o-ring or an insulator is damaged, please replace it. The
required spare parts are included in the scope of delivery and/or
can be purchased at www.smokerstore.de, at all SmokerStore
stores or at the authorized e-cigarette dealer.
Please use only original accessories from SmokerStore.
SmokerStore does not warrant the use of components from
other manufacturers.
Taifun® BT –User Manual english
7
Scope of delivery Taifun® BT
1 x Rebuildable atomizer Taifun® BT
1 x Info card for authenticity verification
1 x Drip Tip BT
1 x Sealing rings (spare parts)
3 x Stainless steel rope 7x7, 3mm Ø –length approx. 28 mm
1 x Gift box
Specifications
Diameter: 23,0 mm
Length: 62,5 mm
Weight: approx. 66 g
Capayity: approx. 5 ml
Material: Stainless steel (1.4301),
Borosilicate glass,
POM

english Taifun® BT –User Manual
8
Insert the stainless steel wire
If the stainless steel wires are not installed, these must
be inserted into the tank before the mesh is installed.
For this purpose, they are pushed gently through the
wicking holes of the evaporator cover with slight
rotational movements.
.
The ends of the rope must stick out slightly above the
deck, so that they get good contact with the cotton.
The pieces should have a length of approx. 28 mm.
.
Alternatively, rolled mesh (see photo), cotton, or
cellulose fibers (e.g., Fiberfreaks Original Yarn) are also
possible.

Taifun® BT –User Manual english
9
Installing the mesh
On the base are holding bolts, which are used to attach
the mesh (in the plus and minus pole). The mesh must
not be damaged, it must be attached in an arc and must
not touch the surrounding metal parts (short-circuit
danger).
A detailed guide to attaching the mesh can be found at the end of
this manual.
Insert the holding bolts
When inserting the holding bolts, it is of great
importance to ensure that the marking points in the
direction of the mesh to be clamped. At this point, the
holding bolt is a little narrower, so that it can be easily
inserted into the pole.
Clamping the mesh
The mesh is clamped by the rotating movement of the
holding bolts. It is important that a uniform and good
contact is produced over the entire clamping surface
between the poles and the mesh.
If it is not possible to apply sufficient force to rotate the
holding bolts with your fingers (for example, if the mesh
is too thick), you may also use a pair of pliers.

english Taifun® BT –User Manual
10
Installing the cotton
When installing the cotton, it is necessary to press the
cotton with pressure. The cotton should not lie loosely
on the wicks or between the mesh.
To do this, you can press the cotton with your finger or,
if necessary, with a small screwdriver.
Regulating the airflow
The top cap has a total of 8 notches, which allow a 360 ° air
supply. The openings can be opened or closed at the same
time by twisting of the top cap in the tank cover.

Taifun® BT –User Manual english
11
Filling the tank
To fill the tank, first remove the top cap from the top.
.
The tank of the Taifun® BT is filled via the holes within
the holding bolts. Due to the conical opening, various
liquid bottles can be placed directly. Press on the liquid
bottle to get the liquid into the tank. The air, which is
still in the tank at this time, can escape through the
hole in the second holding bolt.
.
The filling level can be seen through the sight glass
in the tank cover.
As soon as the tank is filled, the top cap can be
replaced again.

english Taifun® BT –User Manual
12
Emptying the tank
The tank can also be emptied easily via the filling
opening (for example, when changing the liquid).
For this purpose, an empty liquid bottle is placed on
the filling opening. Now press the bottle together.
.
Now turn the davice upside down and slowly reduce
the pressure on the liquid bottle.
As a result, the liquid bottle expands again. The
liquid contained in the tank is sucked out by the
vacuum.
In the tank, dozens of air bubbles rise during the
emptying process.
.
Repeat this process until the liquid is in the bottle
and the tank is completely empty.
Now you can refill the tank.

Taifun® BT –User Manual english
13
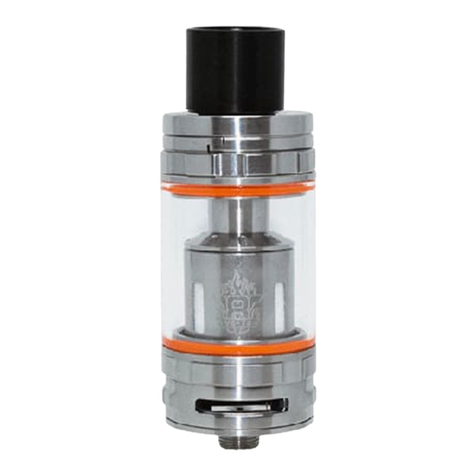
Parts Taifun® BT
1Tank base
2Lower base plate
3Glass tank
4Tank cover
5Upper base plate
6Top cap
7Holding bolt
8Drip tip
9Positive pole screw
10 3x O-Ring NBR 50 / 17 x 1,5 mm
11 1x O-Ring NBR 50 / 17 x 1,0 mm
12 2x O-Ring NBR 50 / 15 x 1,0 mm
13 1x O-Ring VMQ 70 / 5 x 1,0 mm
14 Insulators (Deck)
15 Insulator (Pluspol)

english Taifun® BT –User Manual
14
Assembly Taifun® BT
The o-ring [12] is attached to the
tank base [1].
The o-ring must be evenly sit in the
recess.
The second o-ring [12] is attached to
the lower base plate [2].
Place the o-ring [12] in the recess
provided for this purpose.
Now the glass tank [3] can be placed
on the tank base [1].
Now the lower base plate [2] can be
placed on the tank base [1].
The lower base plate [2] is now
screwed to the tank base [1]. The
glass tank [3] is now fixed.
The o-ring [12] seals the glass tank
[2] and hold it in position.
In the next step, the insulators [13,
14] are placed on the lower base
plate [2].
The insulators [13, 14] must be fully
seated in / on the lower base [3].
Now the o-ring [11] is attached to
the lower base plate [3].
Place the o-ring [11] in the recess
provided for this purpose.
The upper base plate [5] can now be
placed on the lower base plate [2].
The atomizer should now look like
this.
The insulator [15] is then pushed
onto the positive pole screw [9].
The wide end of the insulator [15]
must point towards the screw head.

Taifun® BT –User Manual english
15
Assembly Taifun® BT
The positive pole screw [9] is pushed
through the tank base [1]. Hold the
upper base plate [5].
The positive pole screw [9] is now
tightened. This fixes the upper base
plate [5].
The o-ring [10] is now attached to
the upper base plate [5].
Place the o-ring [10] in the recess
provided for this purpose.
The holding bolts [7] can now be
inserted into the poles.
At this point the mesh will be
clamped.
Now the tank cover [4] can be
attached.
The tank cover [4] is first put on ...
... and then screwed onto the tank
base [1].
The deck should now look like this.
Now the o-rings [10] are attached to
the top cap [6].
There are two recesses in the top
cap [6] on the upper side.
The drip tip [8] is screwed into the
top cap [4]. Alternatively, a 510 drip
tip adapter (optional accessory) can
be used.
The top cap [4] is now assembled ...
... and can be placed on the device.
By rotating the top cap [4] the air
flow can now be regulated.
It is recommended to wet the o-rings with liquid during assembly. This allows the individual
parts to be screwed on and/or moved much better.

english Taifun® BT –User Manual
16
Replacing the tank
To dismantle the tank, the pole screw must be removed first
This loosens the upper base plate. The tank can now be
unscrewed.
positive pole screw tank base holding bolt tank cover top cap

Taifun® BT –User Manual english
17
Edelstahlsiebgewebe (Mesh) anbringen
In the first step the tank cover has to
be unscrewed. The three stainless
steel ropes (supplied) are inserted
into the tank.
In order to be able to install the
mesh, the holding bolts must first be
removed from the poles.
There are two slots in each pole.
These are used to insert the mesh.
The mesh should have a maximum
wide of 8 mm and a length of about 5
cm.
The mesh is placed through the slots
of the first pole.
The holding bolts have a visible mark
in the form of a notch on one side.
Carefully insert the holding bolts with
the marking in the direction of the
mesh. The mesh must not be kinked
or damaged.
Rotate the holding bolt and lightly
clamp the mesh.
The mesh should be horizontal.
Use the mesh to form an arc. The arc
should not go beyond the edge of the
pole. Insert the end of the mesh into
the second pole.
Insert the second holding bolt with
the marking in the direction of the
mesh.
Turn the bolts on both sides in the
indicated direction to clamp the
mesh at the front.
Remove the excess mesh with a pair
of scissors.
In a glow test the mesh strips should
now glow evenly.
There shouldn’t be any hot spots.
Cut a small piece of cotton (about 1x2
cm)
Place the cotton from above through
the arch onto the deck.
Use a tweezers to gently spread the
cotton over the deck. The mesh must
not be damaged.
Fill the cotton completely into the
recess of the deck. The recess must
be completely sealed by the cotton.
Tip: Moisturize the cotton with liquid to
make it easier to spread.

english Taifun® BT –User Manual
18
Prepare a piece of cotton (approx.
1x5 cm).
Roll the cotton to a plug.
Carefully push the plug from above
into the mesh arch.
The mesh must not be moved or
damaged.
Stuff the cotton into the mesh arch.
The mesh must always be in contact
with the cotton.
Moisten the cotton well with Liquid
Place the tank cover over the base
and screw it on.
The view from above shows how the
mesh strips should be.
It must not touch the outer wall.
The liquid is pressed into the tank
with light pressure through the bolt.
The air from the tank can escape
through the opening in the second
bolt.
Finally, put the top cap on the
atomizer.
The air flow control can now be
adjusted with slight rotational
movements.

Taifun® BT –User Manual english
19
SMOKERSTORE
ELECTRONIC VAPING PRODUCTS
SmokerStore GmbH
www.smokerstore.de
Table of contents
Other TAIFUN Electronic Cigarette manuals