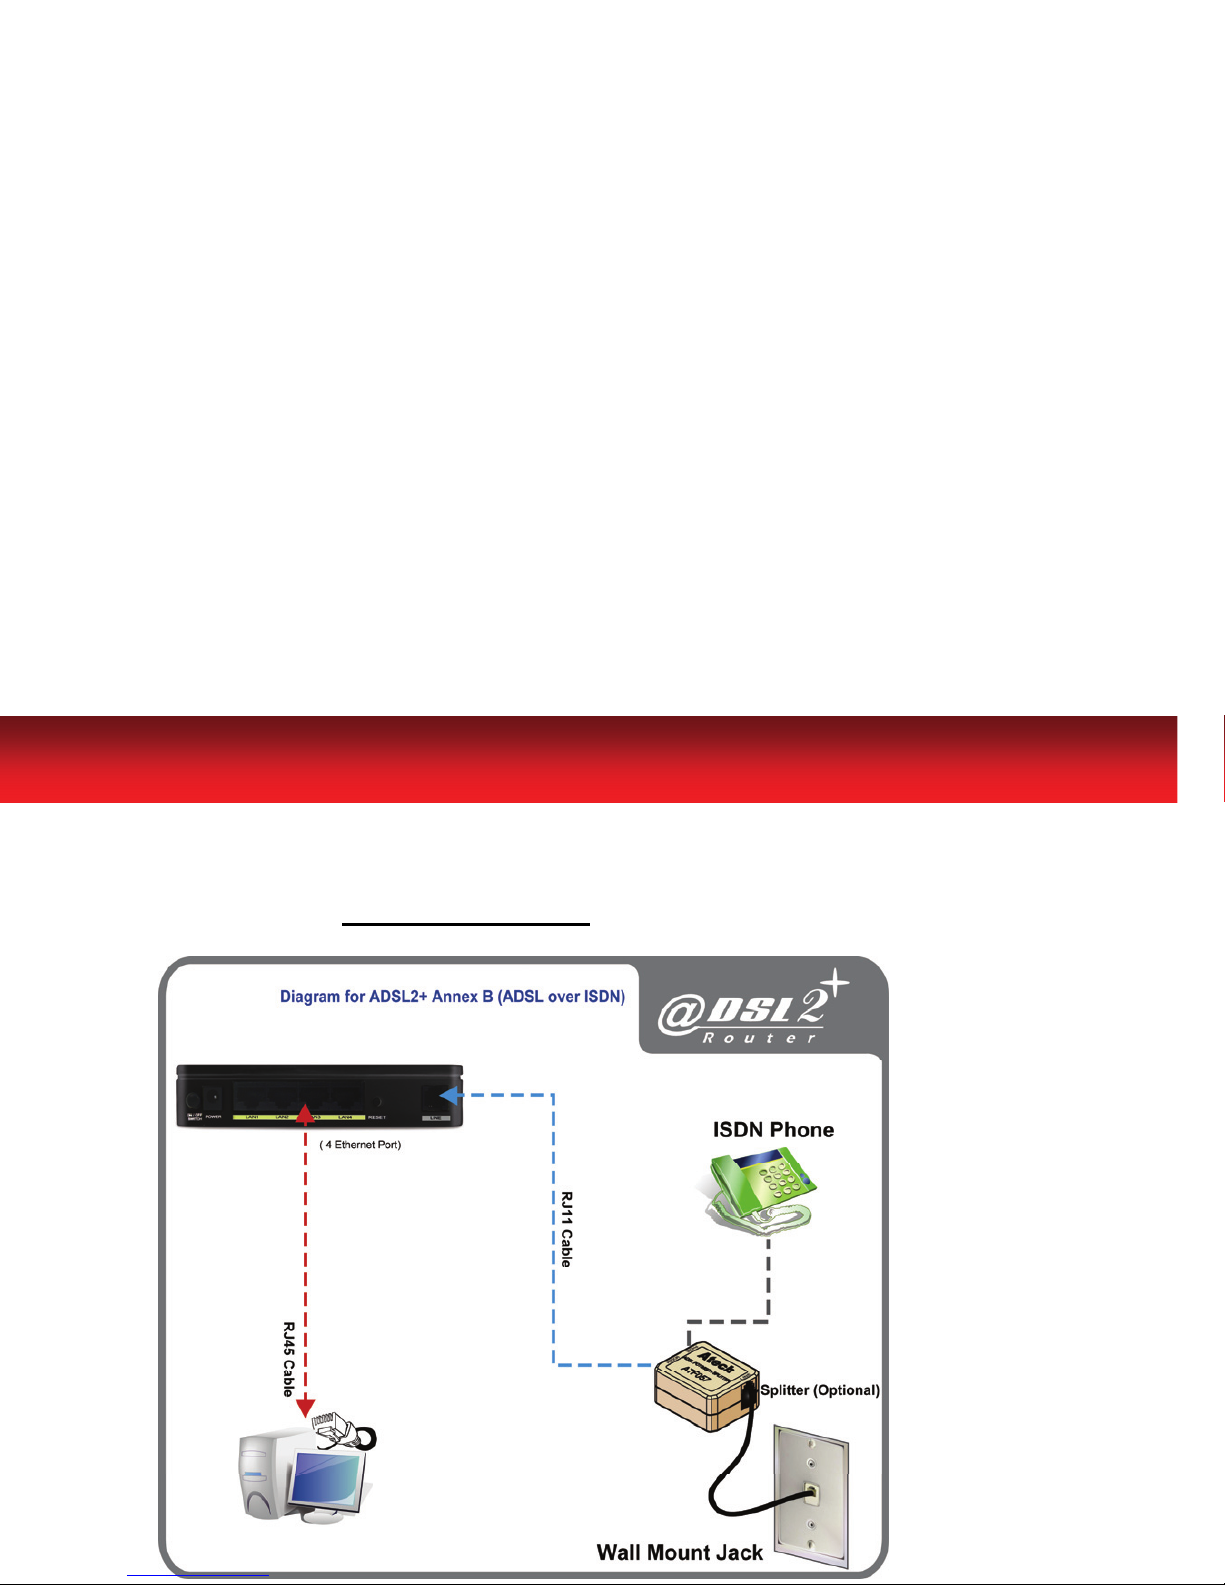
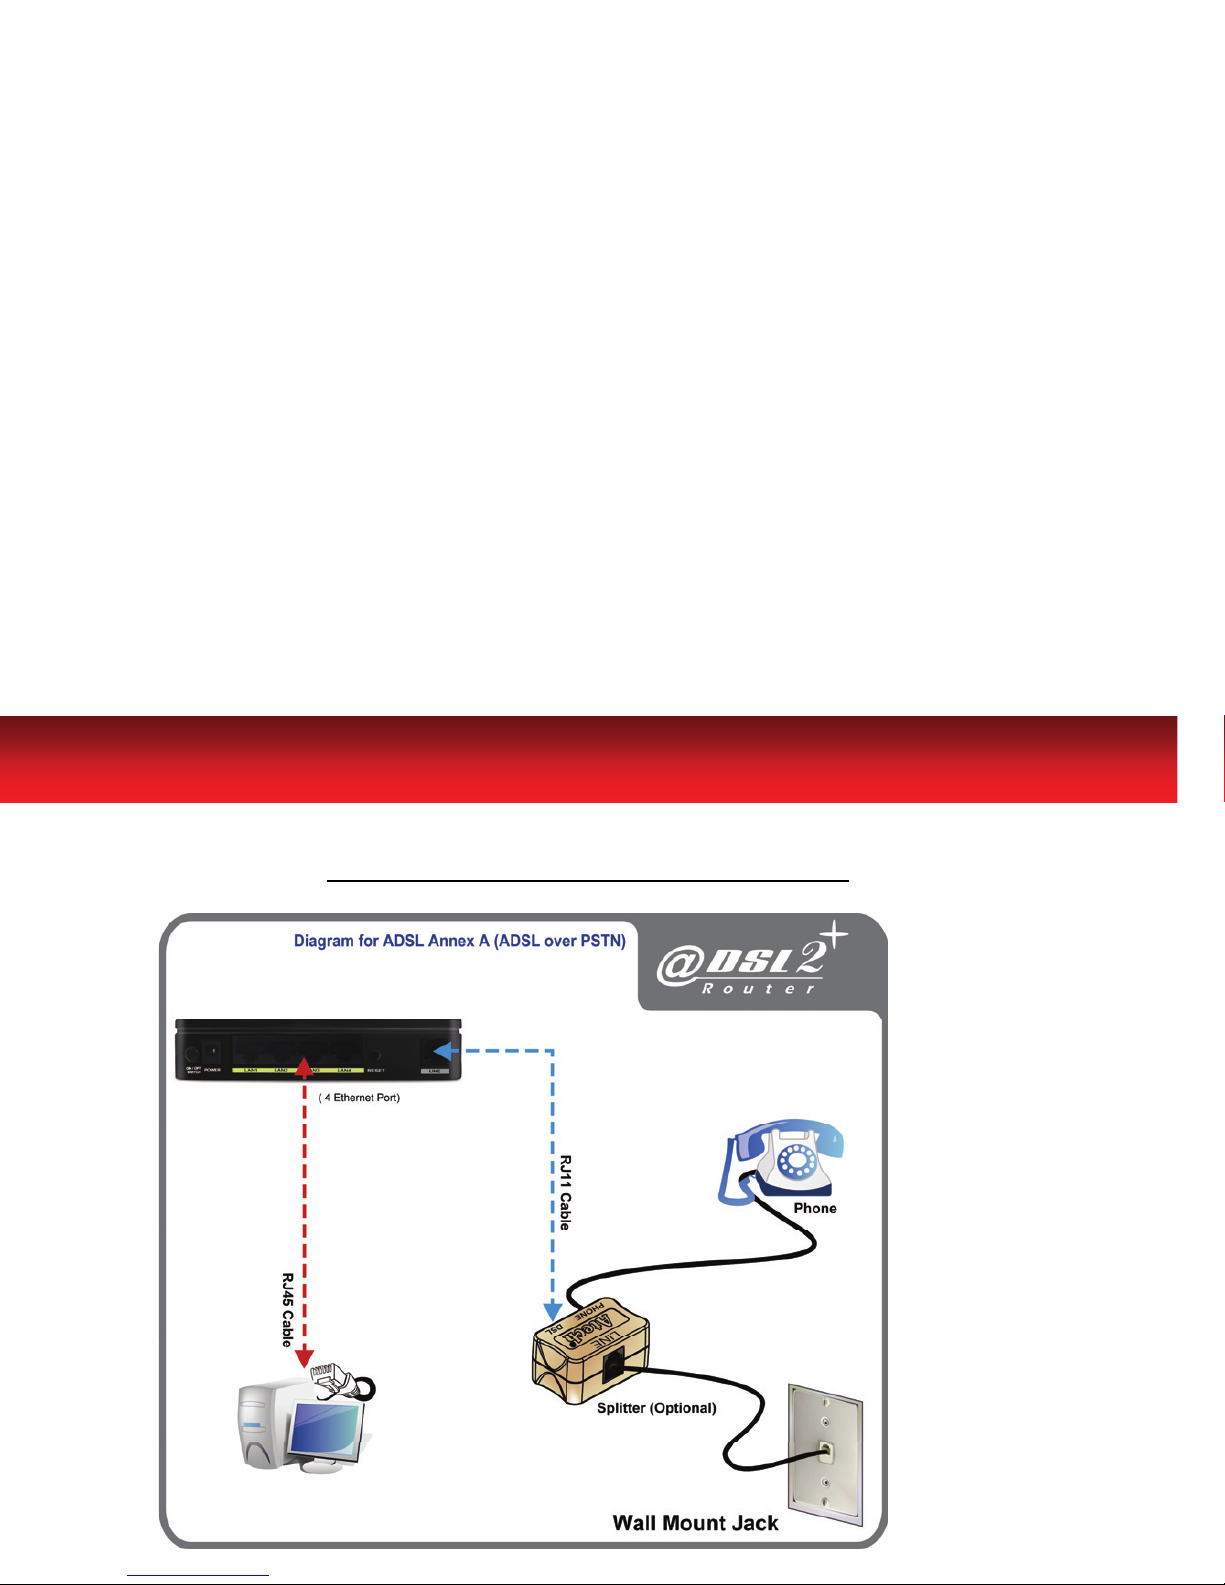
Talent LT804-A User manual

0
ADSL2+ Router

1
ADSL2+ Router
System Requirement
1. Pentium 200 MHz processor or above
2. Windows 98SE, Windows Me, Windows 2000, Windows XP, Windows
Vista and Windows 7.
3. 64 MB of RAM or above
4. 25 MB free disk space
Package Contents
For Annex-A ADSL2+ Router
1. ADSL2+ Router
2. CD-ROM (Software & Manual)
3. Quick Installation Guide
4. 1 x Telephone Cable (RJ-11)
5. Ethernet Cable (RJ-45)
6. Power Adaptor
7. Annex A ATF085A1R Splitter (Optional, with an extra RJ-11 Telephone
cable)
For Annex-B ADSL2+ Router
1. ADSL2+ Router
2. CD-ROM (Software & Manual)
3. Quick Installation Guide
4. 1 x Telephone Cable (RJ-11)
5. Ethernet Cable (RJ-45)
6. Power Adaptor
7. Annex B ATF057R Splitter (Optional, with an extra RJ-11 Telephone
cable)

2
ADSL2+ Router
Installation & Setup
LAN Connection:
Connect an Ethernet cable from your PC's Ethernet port to ADSL2+ Router's
LAN Port.
WAN Connection:
Connect the telephone cable from your home's telephone jack to the
telephone port (LINE) of the ADSL2+ Router, if there is no Splitter applied.
Power Adapter Connection:
Connect the power adapter to the power inlet (POWER) of the ADSL2+
Router and turn the power switch (ON/OFF SWITCH) on.
Figure 1: Rear View of the ADSL2+ Router

3
ADSL2+ Router
Connection of ADSL2+ Router
If you have an ISDN telephone line connected the router as shown below:
(Annex-B ADSL2+ Router)
1. Connect the supplied RJ45 Ethernet cable from your PC's Ethernet port
to the ADSL2+ Router's “LAN” Port.
2. Connect the supplied RJ11 telephone cable from your home's telephone
jack to the “LINE” port of the supplied splitter. Connect the other supplied
RJ11 telephone cable to the “MODEM”port of the splitter and connect
the other end of this cable to the “LINE”port of your ADSL2+ Router. (If
there is no option Splitter, please connect the supplied RJ11 telephone
cable from your home's telephone jack to the “LINE” port of your
ADSL2+ Router.)
3. Connect a RJ11 telephone cable to the “PHONE” port of the splitter and
connect the other end to the telephone.
4. Connect the power adapter to the power inlet “POWER” of the ADSL2+
Router and turn the “ON/OFF SWITCH” switch of your ADSL2+ Router
on.

4
ADSL2+ Router
If you have a PSTN telephone line (normal analog line) connected the
router as shown below: (Annex-A ADSL2+ Router)
1. Connect the supplied RJ45 Ethernet cable from your PC's Ethernet port
to ADSL2+ Router's “LAN” Port.
2. Connect the supplied RJ11 telephone cable from your home's telephone
jack to the “LINE” port of the supplied splitter. Connect the other supplied
RJ11 telephone cable to the “DSL” port of the splitter and connect the
other end of this cable to the “LINE” port of your ADSL2+ Router. (If
there is no option Splitter, please connect the supplied RJ11 telephone
cable from your home's telephone jack to the “LINE” port of your
ADSL2+ Router.)
3. Connect a RJ11 telephone cable to the “PHONE” port of the splitter and
connect the other end to your telephone.
4. Connect the power adapter to the power inlet “POWER” of the ADSL2+
Router and turn the “ON/OFF SWITCH” switch of your ADSL2+ Router
on.

5
ADSL2+ Router
LED Meaning
Your ADSL2+ Router has indicator lights on the front side. Please see below
for an explanation of the function of each indicator light.
Power indicator
ADSL Link indicator
Internet Active indicator
Ethernet Active indicator
Table 1, LED function
Label Color On Flash Off
Green Ready Not Ready Power Off
Green Connect to
DSLAM Disconnect to DSLAM N/A
Green Connect to
Internet/IDLE
Transmit / Receive
Data
Disconnect to
Internet
Green Ethernet
Connected
Transmit / Receive
Data
Ethernet
Disconnected
The icons appear on the products are for application indication only.
The trademark or intellectual property is belonging to their respective owners.

6
ADSL2+ Router
Configuration Procedures
Before starting the ADSL2+ Router configuration, please kindly configure the
PC computer as below, to have automatic IP address / DNS Server.
For Windows 98SE / ME / 2000 / XP
1. Click on “Start” -> “Control Panel” (in Classic View). In the Control
Panel, double click on “Network Connections” to continue.
2. Single RIGHT click on “Local Area connection", then click
"Properties".

7
ADSL2+ Router
3. Double click on "Internet Protocol (TCP/IP)".
4. Check "Obtain an IP address automatically” and “Obtain DNS server
address automatically” then click on "OK" to continue.
5. Click "Show icon in notification area when connected" (see screen
image in 3. above) then Click on "OK" to complete the setup procedures.

8
ADSL2+ Router
For Windows Vista-32/64
1. Click on “Start” -> “Control Panel” -> “View network status and tasks”.
2. In the Manage network connections, click on “Manage network
connections” to continue.

9
ADSL2+ Router
3. Single RIGHT click on “Local Area connection", then click
"Properties".
4. The screen will display the information “User Account Control” and
click “Continue” to continue.
5. Double click on "Internet Protocol Version 4 (TCP/IPv4)".

10
ADSL2+ Router
6. Check "Obtain an IP address automatically" and “Obtain DNS server
address automatically” then click on "OK" to continue.

11
ADSL2+ Router
For Windows 7-32/64
1. Click on “Start” -> “Control Panel” -> “View network status and tasks”.
2. In the Control Panel Home, click on “Change adapter settings” to
continue.

12
ADSL2+ Router
3. Single RIGHT click on “Local Area connection", then click
"Properties".
4. Double click on "Internet Protocol Version 4 (TCP/IPv4)".

13
ADSL2+ Router
5. Check "Obtain an IP address automatically" and “Obtain DNS server
address automatically” then click on "OK" to continue.

14
ADSL2+ Router
ADSL2+ Router Configuration
1. Please insert the supplied CD into your CD-ROM drive.
2. The CD should auto-start, displaying as below. Please click “Run
autorun.exe” to continue. If your CD does not start automatically go to
Windows Explorer, Select your CD drive and click “autorun.exe”.
3. Please click “Easy Configuration”.

15
ADSL2+ Router
4. Enter the VPI, VCI, Username and Password your ISP (Internet Services
Provider) provided, and Protocol mode.
5. Please click “Setup” button, when the procedure is completed, it will start
to configure the device for a while.
6. Now, checking ADSL 2+ Router hardware connection, ADSL2+ settings,
and ADSL2+ Line connection status.

16
ADSL2+ Router
7. Easy setup configuration completed. The connection to the Internet
Service is ready to use. Click on " Exit " to exit this program.
8. Easy setup configuration completed. The connection to the Internet
Service is ready to use. Click on " Exit " to exit this program.
Now, the ADSL2+ Router has been configured completed, and suitable for
Internet Connections.

17
ADSL2+ Router
7435-0Q23-00
Table of contents
Other Talent Network Router manuals