Talon AT341822 User manual

1
GENERAL SAFETY RULES GB
9096-340001
Meaning of symbols marked on the product
Read the user manual before using the machine
Wear safety goggles to protect your eyes
Wear ear protector to protect against noise
Wear gloves to protect your hands
Wear safety boots to protect against electric shock
Do not expose to rain
Wear dust mask to protect against dust
WARNING! When using gas tools, basic safety precautions, including the following, should always be followed to
reduce the risk of serious personal injury and/or damage to the unit.
Read all these instructions before operating this product and save these instructions.
This unit can be dangerous! Operator is responsible for
following unit manual instructions and warnings. Read
entire operator’s manual before using unit! Be thoroughly
familiar with the controls and the proper use of the unit.
Restrict the use of this unit to persons who read, under-
stand, and follow unit, manual instructions and warnings.
Never allow children to operate this unit.
1. Wear close fitting, tough work clothing that will
provide protection, such as long slacks or trousers,
safety work shoes, heavy duty work gloves, hard hat,
a safety face shield, or safety glasses for eye protec-
tion and a good grade of ear plugs or other sound
barriers for hearing protection.
2. Store in a safe place.
Open fuel cap slowly to release
any pressure which may have formed in fuel tank. To
prevent a fire hazard, move at least 10 feet (3 meters)
from fueling area before starting.
3. Turn unit off before setting it down.
4. Always hold unit firmly with both hands, the
thumb and fingers encircling the handles.
5. Keep all screws and fasteners tight. Never operate
your equipment when it is improperly adjusted or not
completely and securely assembled.
6. Keep handles dry, clean and free of fuel mixture.
7. Check area you will be trimming for debris that
may be struck or thrown during operation.
8. Stop the engine or disconnect from mains before:
- cleaning or when clearing a blockage.
- checking, maintenance or working on the machine.
9. Store equipment away from possible flammable
materials, such as gas-powered water heaters,
clothes dryers, or oil-fired furnaces, portable
heaters, etc.
10. Always keep the debris shield, stringhead, and
engine free of debris build-up.
11. Operation of equipment should always be restricted
to mature and properly instructed individuals.
12. Never allow children to use the machine.
13. Avoid operating while people, especially children are
nearby.
14. While operating the machine always be sure of a safe
and secure operating position especially when using
steps or a ladder.
15. Handle fuel with care; it is highly flammable. Never
add fuel to a machine with a running or hot engine.
Do not inhale fuel fumes as they are toxic.
16. Do not attempt to repair the machine unless you are
qualified to do so.
17. Do not operate the machine with a damaged or
excessively worn cutting device.
18. To reduce fire hazard keep engine and silencer free
of debris, leaves, or excessive lubricant.
19. A warning of noise level and the need for ear protec-
tion.
20. Always ensure all handles and guards are fitted when
using the machine. Never attempt to use an incom-
plete machine or one fitted with an unauthorized mod-
ification.
21. Where a hedge trimmer is provided with more than
one handle always use two hands to operate it.
22. When transporting or storing the machine always fit
the cutting device guard.
23. Always be aware of your surroundings and stay alert
for possible hazards that you may not hear due to the
noise of the machine.
1. DO NOT USE ANY OTHER FUEL than that recom-
mended in your manual. Always follow instructions in
the Fuel and Lubrication section of this manual.
Never use gasoline unless it is properly mixed with 2-
cycle engine lubricant. Permanent damage to engine
will result, voiding manufacturer’s warranty.
2. DO NOT SMOKE while refueling or operating
equipment.
3. DO NOT OPERATE UNIT WITHOUT A MUFFLER
and properly installed muffler shield.
4. DO NOT TOUCH or let your hands or body come in
contact with the muffler. Hold unit with thumbs and
fingers encircling the handles.
5. DO NOT OPERATE UNIT IN AWKWARD POSITIONS,
off balance, outstretched arms, or one-handed.
Always use two hands when operating unit with
thumbs and fingers encircling the handles.
6. DO NOT RAISE BLADE above ground level while
unit is operating. Injury to operator could result.
7. DO NOT USE UNIT FOR ANY PURPOSES OTHER
than trimming lawn or garden areas.
8. DO NOT OPERATE UNIT FOR PROLONGED
PERIODS. Rest periodically.
9. DO NOT OPERATE UNIT WHILE UNDER THE
INFLUENCE OF ALCOHOL OR DRUGS.
10. DO NOT ADD, REMOVE OR ALTER ANY COMPO-
NENTS OF THIS PRODUCT. Doing so could cause
personal injury and/or damage the unit voiding the
manufacturer’s warranty.
11. DO NOT operate your unit near or around flammable
liquids or gases whether in or out of doors. An explo-
sion and/or fire may result.
WHAT NOT TO DO
USER MANUAL
Petrol Hedge Trimmers
WARNING • PLEASE READ
For your own safety please read this manual before attempting to operate your new unit. Failure to fol-
low instructions can result in serious personal injury. Spend a few moments to familiarize yourself with
your blower before each use.
MODEL NO. AT341822/AT341825/AT342025/AT342225
SAFETY OPERATION MAINTENANCE

2
GB
1. Blades
2. Protect Guide
3. Shield
4. Front Handle
5. Choke Lever
6. Ignition Switch
7. Starting Foot Brace
8. Fuel Cap
9. Primer Bulb
10. Air Filter Cover
11. Starter Handle
12. Rear Handle
13. Throttle Lock
14. Throttle Trigger
15. Muffler Cover
GENERAL IDENTIFICATION
1
3
4
56
7
8
9
10
11
13
12
14
15
SPECIFICATIONS
AT341822 . . . . . . . . . . .AT341825 . . . . . . . . . . .AT342025 . . . . . . . . . .AT342225
Engine Type . . . . . . . . .Air-cooled, 2-Cycle, . . .Air-cooled, 2-Cycle, . . .Air-cooled, 2-Cycle, . .Air-cooled, 2-Cycle,
. . . . . . . . .Chrome Cylinder . . . . . .Chrome Cylinder . . . . . .Chrome Cylinder . . . . .Chrome Cylinder
Displacement . . . . . . . .22cc . . . . . . . . . . . . . . . .25cc . . . . . . . . . . . . . . .25cc . . . . . . . . . . . . . .25cc
Dry Weight . . . . . . . . . .6.4 Kg . . . . . . . . . . . . . .6.4 Kg . . . . . . . . . . . . . .6.5 Kg . . . . . . . . . . . . .6.6 Kg
Fuel Capacity . . . . . . . .600ml . . . . . . . . . . . . . . .600ml . . . . . . . . . . . . . .600ml . . . . . . . . . . . . .600ml
Blade Length . . . . . . . .45cm . . . . . . . . . . . . . . .45cm . . . . . . . . . . . . . . .50cm . . . . . . . . . . . . . .55cm
Max Cutting Thickness .25mm . . . . . . . . . . . . . . .25mm . . . . . . . . . . . . . .25mm . . . . . . . . . . . . .25mm
Ignition . . . . . . . . . . . . .Electronic . . . . . . . . . . . .Electronic . . . . . . . . . . .Electronic . . . . . . . . . .Electronic
2
•ASSEMBLE FRONT HANDLE
Hold front handle in position and then screw securely as
shown in Fig. 1A & 1B.
•ASSEMBLE SHIELD
Assemble shield as shown in Fig. 2A & 2B.
•FUEL
Use regular grade unleaded gasoline mixed with 2-cycle
engine oil in 25:1 ratio for best results. Use mixing ratios
in Section FUEL MIXING TABLE.
•MIXING FUEL
Mix fuel with Talon brand 2 cycle oil in an approved con-
tainer. Use mixing table for correct ratio of fuel to oil.
Shake container to ensure thorough mix.
•FUEL AND LUBRICATION
•FUEL MIXING TABLE
•RECOMMENDED FUELS
Some conventional gasolines are being blended with oxy-
genates such as alcohol or an ether compound to meet
clean air standards. Your Talon engine is designed to
operate satisfactorily on any gasoline intended for auto-
motive use including oxygenated gasolines.
•STARTING A COLD ENGINE
Fill fuel tank with proper gas and oil mixture. See Fuel and
Lubrication. Set unit on ground and extend starting foot
brace.
1. Place trimmer on firm flat surface.
2. Place left foot on brace and stand behind rear handle
of unit. Pull starter rope with right hand.
3. Move ignition switch to the “RUN (I)” position (Fig. 3A).
4. Your unit is designed with a 2 position choke: CLOSE
“” and OPEN “ ”. Move choke lever (A) to CLOSE
“” position (Fig. 3B).
5. Prime the carburetor. Pump the prime bulb (B) 10
times (Fig. 3C).
6. Grip handle firmly – depress safety trigger (C) & throt-
tle trigger (D) to the FULL THROTTLE position (Fig.
5E). (Fig. 3D).
7. Pull starter rope out a short way until resistance is felt
(approximately 4") (Fig. 3E). A smooth rapid pull is
required for a strong spark. Pull starter rope briskly 4
times.
8. Once engine starts allow to run for 10 seconds.
9. Move the choke to OPEN “ ” position (Fig. 3F).
10. If engine fails to start, repeat steps 1 through 8.
NOTE: If engine fails to start after repeated attempts, refer
to Troubleshooting section.
NOTE: Always pull starter rope straight out. Pulling starter
at an angle will cause rope to rub against the eyelet. This
friction will cause the rope to fray and wear more quickly.
Always hold starter handle when rope retracts. Never
allow rope to snap back from extended position. This
could cause rope to snag or fray and also damage the
starter assembly.
3
GB
ASSEMBLY INSTRUCTIONS
Fig. 1A Fig.1B
Fig. 2A Fig.2B
FUEL AND LUBRICATION
WARNING: Never use straight gasoline in your
unit. This will cause permanent engine damage
and void the manufacturer’s warranty for that
product. Never use a fuel mixture that has been
stored for over 90 days.
WARNING: If 2-cycle lubricant other than Talon
Custom Lubricant is to be used, it must be a pre-
mium grade oil for 2-cycle air cooled engines
mixed at a 25:1 ratio. Do not use any 2-cycle oil
product with a recommended mixing ratio of
100:1. If insufficient lubrication is the cause of
engine damage, it voids the manufacturer’s
engine warranty for that occurrence.
WARNING:
Lack of lubrication voids engine
warranty. Gasoline and oil must be mixed at
25:1.
Gasoline and
Oil Mix 25:1
GASOLINE 25:1 Ratio Lubricant
5 Liters 6.7 oz. 200ml (cc)
1 lmp. Gal. 6.1 oz. 180ml (cc)
Mixing 25 Parts Gasoline
Procedure to 1 part Lubricant
1ml = 1cc
OPERATING INSTRUCTIONS
Fig. 3A Fig. 3B
A

GB
5
4
GB
•STOPPING THE ENGINE
Emergency Stopping Procedure. When it is necessary
to stop engine immediately, DEPRESS the switch to stop.
Normal Stopping Method. For normal stopping, release
trigger and allow engine to return to idle speed. Then
DEPRESS and HOLD the “OFF” switch until the engine
stops completely.
•STARTING A WARM ENGINE (Engine has
been stopped for no more than 15-20 minutes)
1. Pull starter rope again. Engine should start with ONE or
TWO pulls. If engine fails to start after 6 pulls, repeat
steps 2 through 8 .
2. If engine does not start, or starts and then stops after 5
rope pulls, follow procedure “STARTING A COLD
ENGINE”.
•ADDITIONAL SAFETY PRECAUTIONS
Before operating your unit, review ALL SAFETY PRE-
CAUTIONS in this manual.
WARNING / CAUTION
•IF UNFAMILIAR WITH TRIMMING techniques,
practice the procedures with ENGINE in “OFF”
position.
•ALWAYS CLEAR WORK area of debris such as cans,
bottles, rocks, etc. Striking objects can cause serious
injury to operator or bystanders and also damage
equipment. If an object is accidentally hit, immediately
TURN ENGINE OFF and examine equipment. Never
operate unit with damaged or defective equipment.
•ALWAYS TRIM OR CUT AT HIGH ENGINE SPEEDS.
Do not run engine slowly at start or during trimming
operations.
•DO NOT use equipment for purposes other than
trimming or mowing weeds.
•DO NOT operate unit with other people or animals in
the immediate vicinity. Allow a minimum of 50 feet (15
meters) between operator and other people and
animals when trimming or mowing. Allow a distance of
100 feet (30 meters) between operator and other
people and animals when SCALPING with blade cutter.
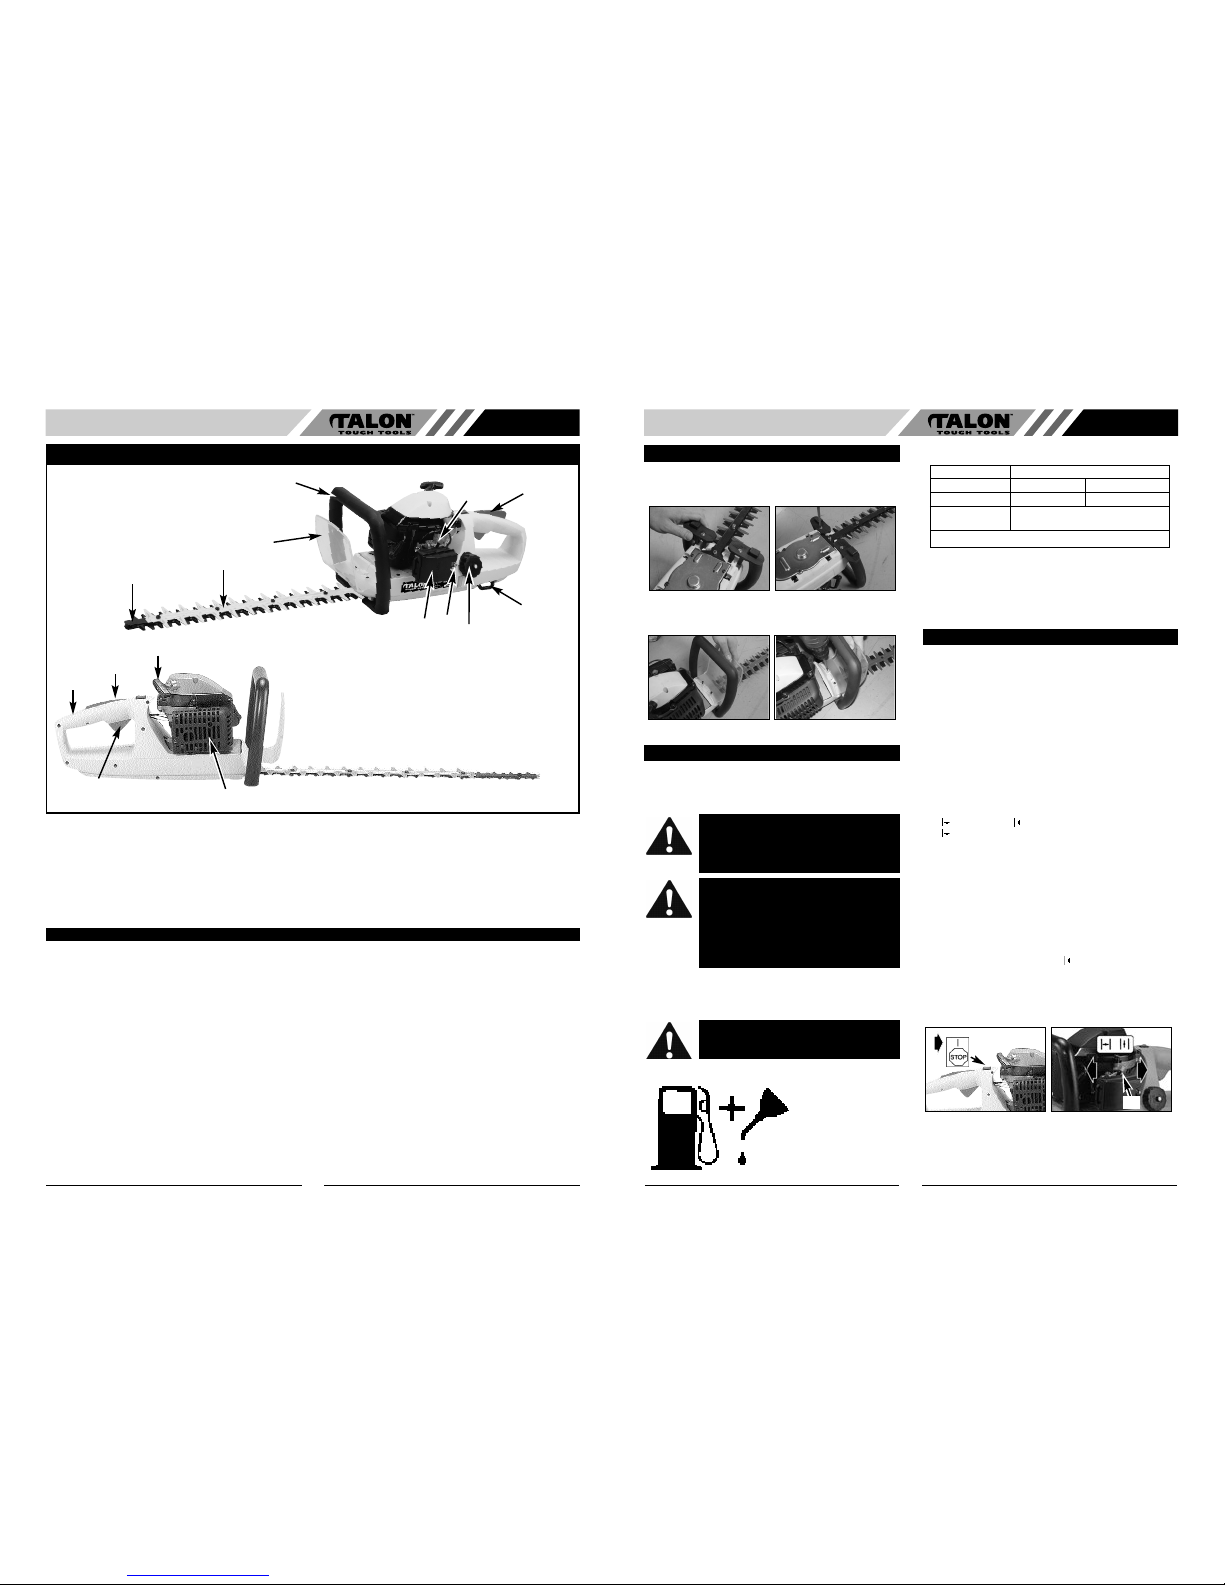
• TRIMMING INSTRUCTIONS
1. WORKING POSITION. Maintain proper footing and
balance and do not overreach. Wear safety goggles,
non-skid footwear and rubber gloves when trimming.
Hold the tool firmly in both hands and turn the tool ON.
Always hold the trimmer, as shown in the illustrations,
with one hand on the body handle and one hand on the
front handle. Never hold the tool by the blade guard.
2. TRIMMING NEW GROWTH. A wide, sweeping
motion, feeding the blade teeth through the twigs is
most effective. A slight downward tilt of the blade, in
the direction of motion gives the best cutting. (Fig. 4A)
3. LEVEL HEDGES. To obtain exceptionally level
hedges, a piece of string can be stretched along the
length of the hedge as a guide.
4. SIDE-TRIMMING HEDGES. Hold the trimmer as
shown and begin at the bottom and sweep up. (Fig.
4B)
Your trimmer should be stopped, disconnected and oiled
occasionally during use.
1. The cutting blades are made from high quality, hard-
ened steel and with normal usage, they will not require
resharpening. However, if you accidentally hit a wire
fence, stones, glass or other hard objects, you may put
a nick in the blade. There is no need to remove this nick
as long as it does not interfere with the movement of
the blade. If it does interfere, unplug unit and use a fine
toothed file or sharpening stone to remove the nick.
Fig. 3C Fig. 3D
B
C
D
Fig. 3E Fig. 3F
TRIMMING INSTRUCTIONS
Fig. 4A
CAUTION: Do not use the trimmer for cutting
stems greater than 25mm. Use the trimmer
only for cutting normal shrubbery found around
houses and buildings.
Fig. 4B
MAINTENANCE
2. If you drop the trimmer, carefully inspect it for dam-
age. If the blade is bent, housing cracked, or handles
broken or if you see any other condition that may affect
the trimmer’s operation contact an authorized service
center for repairs before putting it back into use.
3. Fertilizers and other garden chemicals contain agents
which greatly accelerate the corrosion of metals. Do
not store the tool on or adjacent to fertilizers or chemi-
cals.
4. With the unit unplugged, use only mild soap and a
damp cloth to clean the tool. Never let any liquid get
inside the tool; never immerse any part of the tool into
a liquid.
• BLADE LUBRICATION
For easier operation and
longer blade life, lubricate the
blade before and after each
use. Apply light machine oil
along the edge of the blade
bar. (Fig. 5)
•AIR FILTER
To Clean Air Filter:
1. Press down on tab (A) holding air filter cover in place,
remove cover (B) and lift filter (C) from air box (Fig. 6).
2. Wash filter in soap and water. DO NOT USE GASO-
LINE!
3. Air dry filter.
4. Reinstall filter.
NOTE: Repla
•CARBURETOR ADJUSTMENT
The carburetor was pre-set at the factory for optimum per-
formance. If further adjustments are necessary, please
take your unit to the nearest professional.
•SPARK PLUG
1. Spark plug gap = .025 in. (.635mm) (Fig. 7).
2. Torque to 105 to 130 inch pounds (12 to 15 N•m).
Connect spark plug boot.
•STORING A UNIT
1. Perform all the general maintenance recommended
in the Maintenance Section of your User Manual.
2. Clean outside surface of unit.
3. Drain fuel from the fuel tank.
4. After fuel is drained, start engine.
5. Run engine at idle until unit stops. This will purge the
carburetor of fuel.
6. Allow engine to cool (approx. 5 minutes).
7. Using a spark plug wrench, remove the spark plug.
8. Pour 1 teaspoon of clean 2-cycle oil into the combus-
tion chamber (Fig. 9). Pull starter rope slowly several
times to coat internal components. Replace spark
plug.
9. Store unit in a cool, dry place away from any source
of ignition such as an oil burner, water heater, etc.
•REMOVING A UNIT FROM STORAGE
1. Remove spark plug.
2. Pull starter rope briskly to clear excess oil from com-
bustion chamber.
3. Clean and gap spark plug or install a new spark plug
with proper gap.
4. Prepare unit for operation.
5. Fill fuel tank with proper fuel / oil mixture. See Fuel
and Lubrication Section.
WARNING: Before lubricating, be sure your
unit is switched offand blades have come to a
complete stop.
Fig. 5
CAUTION: NEVER operate unit without the
air filter or dust and dirt will be sucked into the
engine and damage it. The air filter must be
kept clean. If it becomes damaged, install a
new filter.
Fig. 6
AC
B
Fig. 7 Fig. 8
WARNING: Failure to follow these steps may
cause varnish to form in the carburetor and
difficult starting or permanent damage follow-
ing storage.
This manual suits for next models
3
Other Talon Trimmer manuals