TAMCO, Inc. • 27 Iber Road, Stittsville, Ontario, Canada, K2S 1E6 • Toll Free: 800.561.3449 • Toll Free Fax: 800.668.8476 • www.tamcodampers.com
EBTRON, Inc. • 1663 Hwy. 701 S., Loris, SC USA 29569 • Toll Free: 800.2EBTRON (232.8766) • Fax: 843.756.1838 • www.ebtron.com
AIR-IQ INSTALL GUIDE_R3
CALL TAMCO CUSTOMER SERVICE WITH ANY QUESTIONS CONCERNING TAMCO DAMPERS
1-800-561-3449
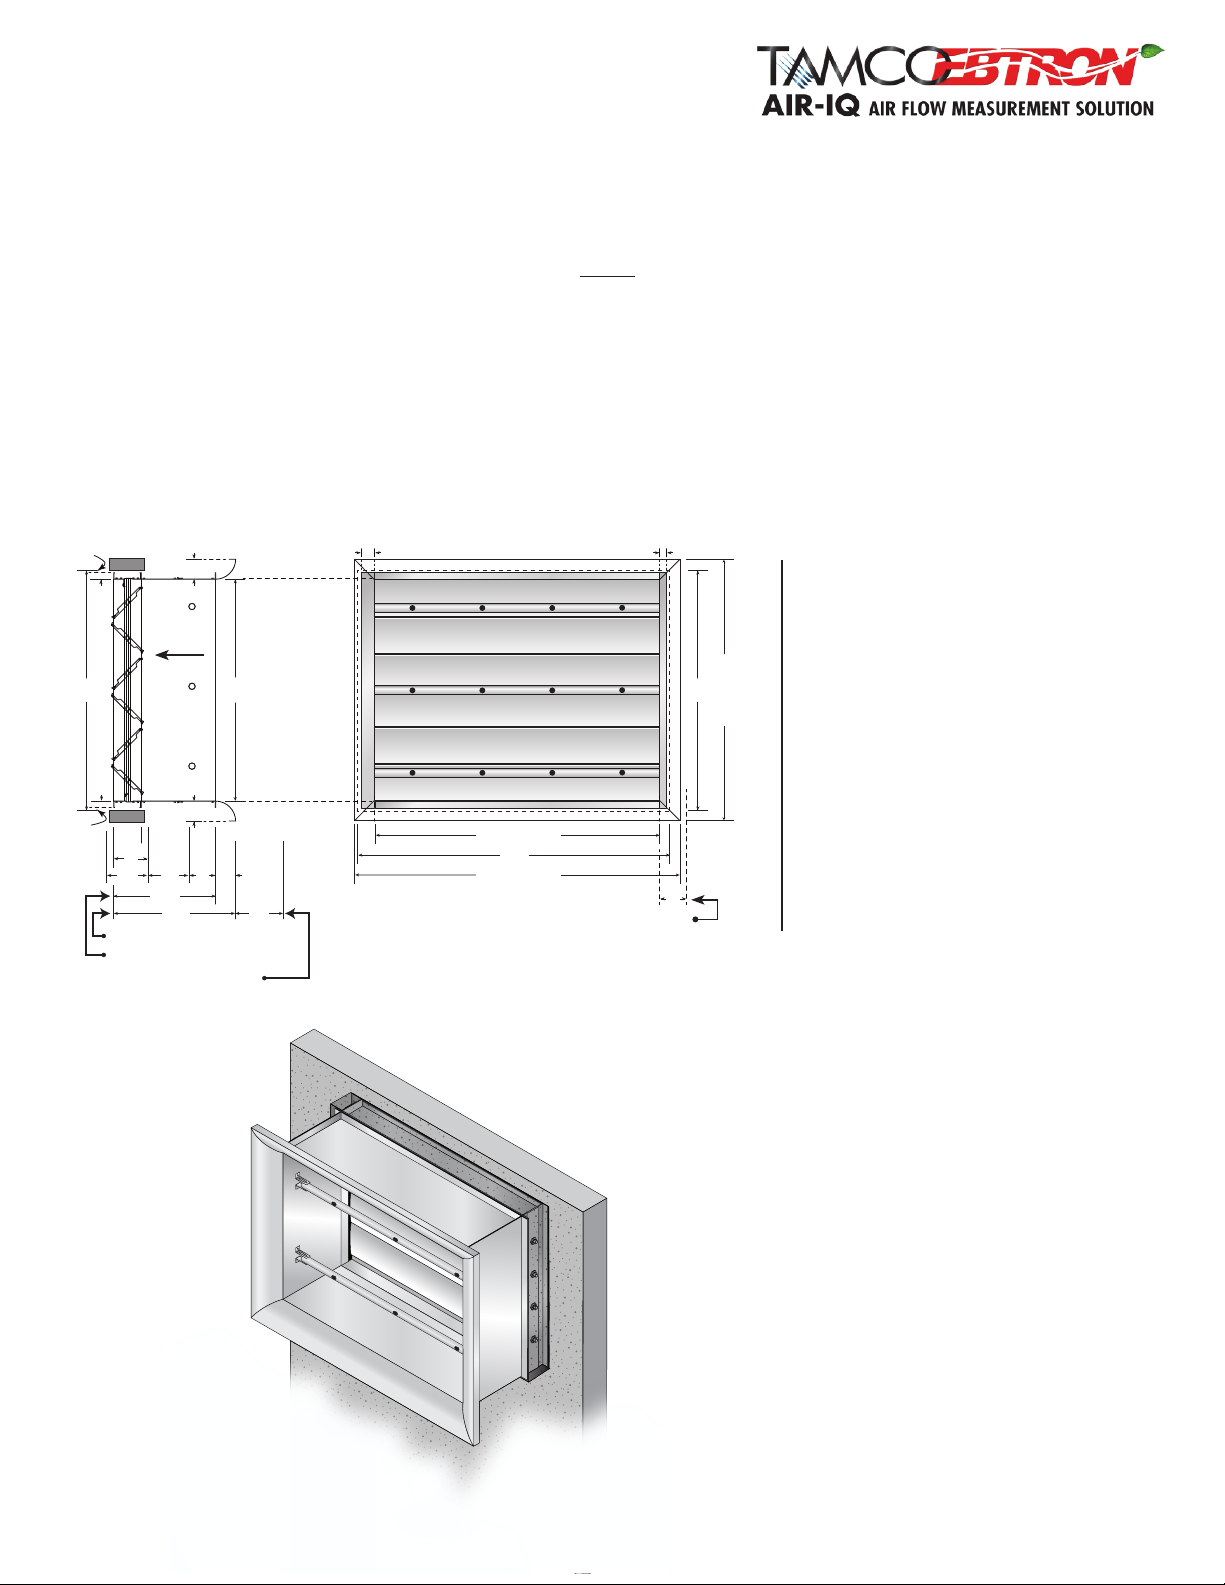
FRONT / TOP END UP / RIGHT HAND
(viewed from damper side)
INSTALLATION GUIDELINES
• When the AIR-IQ unit is viewed from damper side and labels on blades are right side up, unit orientation is Front/Top end up.
• When viewed as Front/Top end up, right hand (RH) has drive rod as shown. Left hand (LH) has drive rod on left.
• The complete AIR-IQ unit can be installed vertically with the damper orientation being right side up, or lying at.
• Ensure that the AIR-IQ Unit is installed allowing for future access to the Ebtron transmitter, probes, damper side linkage, as well as the damper
jumper bracket.
• Duct work construction and bracing must be sufcient to support the AIR-IQ unit. Do not use the AIR-IQ unit to square up the duct. The system
must support the AIR-IQ unit. The AIR-IQ unit cannot support the system. For AIR-IQ units with two damper sections, ensure that each section
is properly braced and supported.
• For single-section, vertical blade applications, the AIR-IQ unit must be installed so that the linkage and probe cables are located at the top.
• A 12" long, hexagonal steel drive rod is provided as standard. Units are shipped with the drive rod inserted in the drive blade. Drive rod
may be extended up to 8" beyond the outside edge of the frame by loosening the U-bolt, drawing out the rod to the desired length and then
retightening the U-bolt.
• If required, 24" and 36" long zinc-plated steel drive rods can be ordered.
• Before installing, inspect the AIR-IQ Unit for possible damage caused in shipping.
• If minor damage has occurred to frame corners or anges, correct by bending them back into position gently, taking care not to disturb the
EBTRON sensor probes and transmitter.
• Do not install the AIR-IQ Unit if damage is more than supercial, if uncertain as to extent of damage, or if the damper does not seal correctly.
Call TAMCO customer service at 1-800-561-3449.
• Operate the damper section manually (on a at section of oor) to verify correct blade action and sealing.
1. To correctly verify sealing action, loosen the hex nuts of the U-bolt located on drive blade. Extend the steel drive rod to maximum of 8"
beyond the outside edge of the frame. Re-tighten the hex nuts on U-bolt.
2. Using the drive rod, slowly apply closing torque, while ensuring that the damper frame does not twist due to torque being applied.
(Larger units may require an additional person to hold the damper frame square and true.)
3. If possible, use daylight or an inside light source as a backdrop to the verication procedure. No light should be visible through the damper.
CAUTION SHOULD BE EXERCISED TO ENSURE FINGERS ARE NOT IN THE WAY OF MOVING LINKAGE PARTS OR BLADES.
VERIFY BEFORE INSTALLATION!
WARNING:
DO NOT ADJUST DAMPER LINKAGE
MECHANISM. TAMPERING WITH
LINKAGE WILL VOID DAMPER
WARRANTY. IF PROBLEM STILL
EXISTS AFTER COMPLETING PRE-
INSTALLATION VERIFICATION,
CALL TAMCO CUSTOMER SERVICE.
4
TAMCO’s all aluminum dampers are constructed with maintenance-free bearing and linkage components.
CAUTION: NEVER USE ANY LUBRICANTS, SUCH AS GREASE OR SILICONE ON TAMCO DAMPERS.
In applications where the humidity level is unusually elevated, or where there are extremely high levels of dust
and dirt particles, TAMCO recommends that the damper linkage and bearing system should be cleaned once a
year. This can be done easily with the use of a domestic strength steam cleaner. The loosened dirt and water
droplets can then be blown out with compressed air.
CAUTION: TO PREVENT DAMAGE TO EBTRON SENSORS OR TRANSMITTER, NEVER APPLY STEAM, CLEANSER OR
COMPRESSED AIR TO THEM.
CAUTION: DO NOT USE PROBES AS HANDLES TO LIFT AND/OR POSITION DAMPER. DAMAGE TO THE PROBES MAY OCCUR.
⚠