T&S B-1200 Series User manual

Limited One Year Warranty
T&S warrants to the original purchaser (other
than for purposes of resale) that such product
is free from defects in material and workman-
ship for a period of one (1) year from the date
of purchase. During this one-year warranty
period, if the product is found to be defective,
T&S shall, at its options, repair and/or replace
it. To obtain warranty service, products must
be returned to…
T&S Brass and Bronze Works, Inc.
Attn: Warranty Repair Department
2 Saddleback Cove
Travelers Rest, SC 29690
Shipping, freight, insurance, and other
transportation charges of the product to T&S
and the return of repaired or replaced product
to the purchaser are the responsibility of the
purchaser. Repair and/or replacement shall be
made within a reasonable time after receipt by
T&S of the returned product. This warranty does
not cover Items which have received secondary
finishing or have been altered or modified after
purchase, or for defects caused by physical
abuse to or misuse of the product, or shipment
of the products.
Any express warranty not provided herein,
and any remedy for Breach of Contract which
might arise, is hereby excluded and disclaimed.
Any implied warranties of merchantability or
fitness for a particular purpose are limited to
one year in duration. Under no circumstances
shall T&S be liable for loss of use or any special
consequential costs, expenses or damages.
Some states do not allow limitations on
how long and implied warranty lasts or the
exclusion or limitation of incidental or conse-
quential damages, so the above limitations or
exclusions may not apply to you. Specific rights
under this warranty and other rights vary from
state to state.
P/N: 098-016883-45 Rev.2
Date: 04-26-12
Drawn: TEH
Checked: JRM 04-30-12
Approved: JHB 05-01-12
Installation and
Maintenance
Instructions
B-1200 Series
Soft-Touch Glass Fillers
B-1200
B-1210

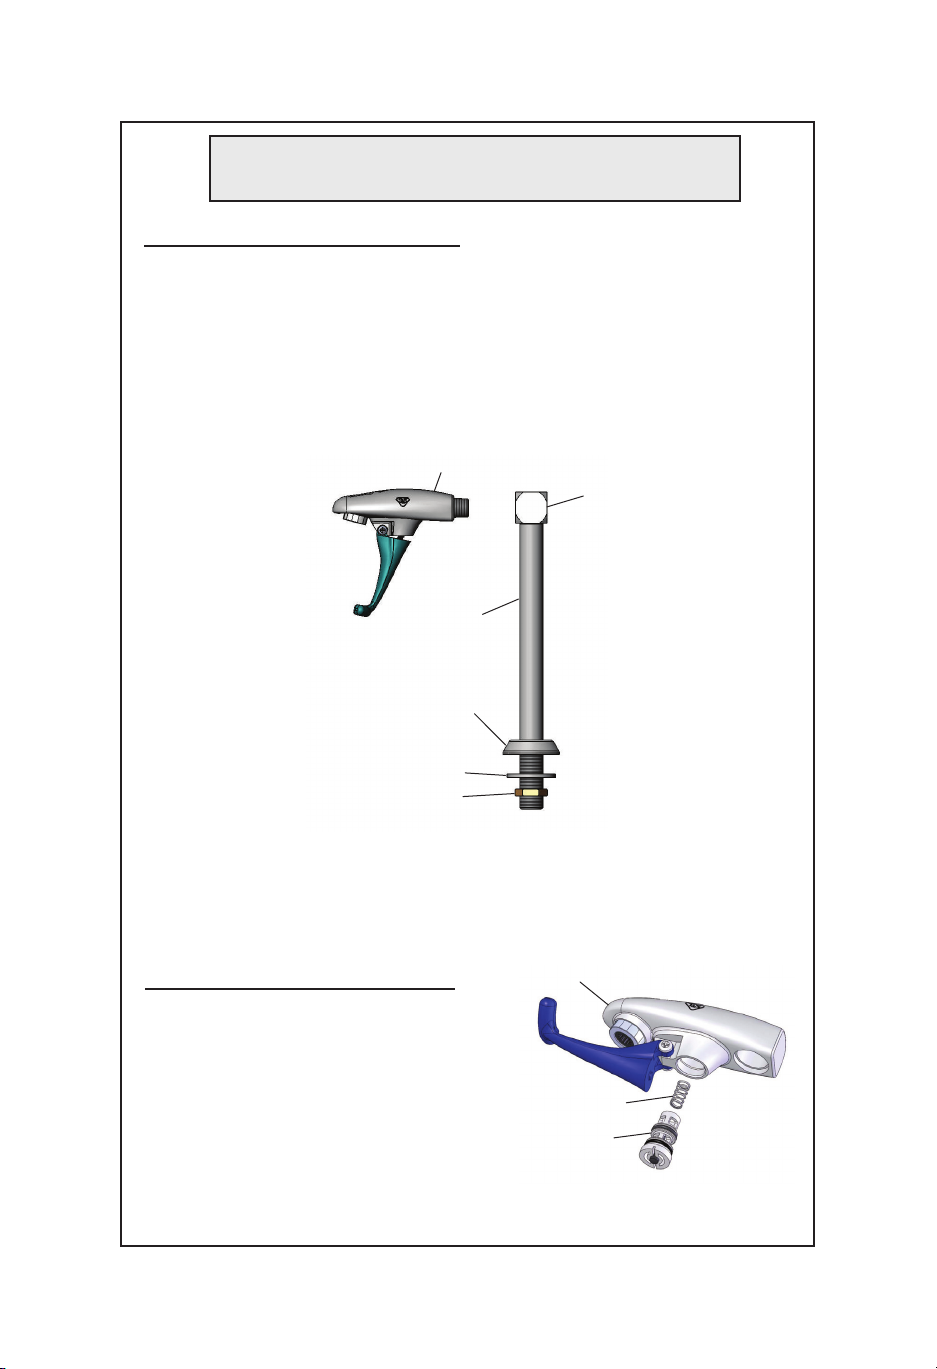
Exploded View
6
3
5
1
2
7
14
16
17
13
21
4
9
19
10
8
18
20
15
11
12
2
Wall Flange
Repair Kit
Lever
Repair Kit
Deck Flange
Repair Kit
Valve Repair
Kit

Glass Filler Assemblies
Item
1
2
3
4
5
6
8
9
10
11
12
13
14
15
16
17
18
19
7
21
20
Description
Tailpiece, 1/4” Sweat
Locknut
Nut, Coupling
Nipple, 3/8” Supply
Washer
Body, Glass Filler
Glass Filler Lever Repair Kit
Lever Arm
Screw, Handle
Nut, Handle
Adapter, 3/8” NPT-M x 7/8-18-M / 3/8” NPT-F
Glass Filler Wall Flange Repair Kit
Adjustable Wall Flange
Locknut, B-1200
Pedestal, 4”, 8”, 10”, 12” or 16”, Varies by Model
Glass Filler Deck Flange Repair Kit
Flange, B-1210
Washer, Pedestal
Locknut, Shank
Nipple, 3/8” Close
Adapter, 3/8” NPT x 1/2” NPT
Glass Filler Valve Repair Kit
Spring, Valve Stem
Valve Assembly
Glass Filler Outlet Repair Kit
Sales No.
000852-20
000716-20
000715-20
000379-20
N/A
N/A
015550-45
N/A
N/A
N/A
N/A
016782-40
N/A
N/A
N/A
016783-40
N/A
N/A
N/A
002535-25
N/A
015589-40
N/A
N/A
015588-40
Part Number Guide
3
Specific items used for B-1200: 12, 13, 18
Specific items used for B-1202: 1-5, 11-13
Specific items used for B-1204: 19
Specific items used for B-1205: 18
Items 14-17 used for models: B-1210 - 8” Pedestal
B-1210-01 - 10” Pedestal
B-1210-12 - 12” Pedestal
B-1211 - 4” Pedestal
*B-1256 includes Lever, Valve and Outlet Repair Kits
*
*
*

4
Installation: (B-1200)
1. Turn off water supply and drain
lines. Hand tighten no.12 firmly
against no.6and remove no.13 from
no.11.
12
Installation: (B-1210)
1. Turn off water supply and drain
lines.
2. Unscrew and remove no.16 and
no.17 from no.14. Position no.15 to
cover threads of no.14.
3. Place no.14 through 7/8” hole in
countertop. Replace no.16 and no.17
onto no.14 and tighten with a wrench
at bottom side of countertop.
11 13
2. Drill 7/8” hole in sheet metal.
Insert no.6through hole and screw
no.13 on back of no.6, leaving no.12
free to turn.
3. Apply teflon tape or pipe joint
compound to threads of water supply
line. Connect no.6to water supply
line outlet, tightening as far as pos-
sible.
4. Tighten no.12 and no.13 so they
are flush against surface of sink back.
5. Turn on water supply and check
for leaks.
Flow Adjustment:
To adjust water flow, use included
T-45 Torx wrench & inserting it into
no.20 turn clockwise to increase
water flow, turn counterclockwise to
reduce water flow.
14
15
17
16
4. Apply teflon tape or pipe joint
compound to threads of no.14,
connect to water supply line inlet.
5. Turn on water supply and check for
leaks.
To adjust water flow see flow
adjustment note for B-1200 model.
6
General Instructions
sink back
6
20
20
For Retro-Fit of Glass Filler Only
1. Turn off water supply and drain lines.
2. Heat cube & unscrew glass filler from cube.
3. Apply Loctite 680, teflon tape or joint compound to the threads of no.6.
Screw into cube of no.14, then align and tighten no.6. Let Loctite 680 sit for 20
minutes.
4. Turn on water supply and check for leaks.
General Instructions
14
15
17
16
6
5
cube
For Glass Filler Valve Repair Kit
1. Unscrew no.21 with flathead screwdriver.
2. Remove no.7spring.
3. Place new no.21 and no.7into no.6.
4. Screw no.21 until flush with no.6.
6
7
21

RELATED T&S BRASS PRODUCT LINE
B-1215
Double Glass Filler
B-1225
Combo Glass &
Pitcher Filler
B-1222
8” Pedestal Glass
Filler
B-1230
Water Station with
Pedestal Glass Filler
B-1235
Water Station with
Pedestal Glass Filler
and Backsplash
T&S BRASS AND BRONZE WORKS, INC.
A rm commitment to application-engineered plumbing products
2 Saddleback Cove, P.O. Box 1088 T & S Brass-Europe
Travelers Rest, SC 29690 ‘De Veenhoeve’
Phone: (864) 834-4102 Oude Nieuwveenseweg 84
Fax: (864) 834-3518 2441 CW Nieuwveen
Other manuals for B-1200 Series
1
This manual suits for next models
2
Table of contents
Popular Dispenser manuals by other brands
Kimberly-Clark PROFESSIONAL
Kimberly-Clark PROFESSIONAL ICON 53691 quick start guide

corob
corob D800 HD user manual

Franke
Franke F3D3S Service manual

Dolphin
Dolphin BC632 Installation and maintenance guide

Yaesu
Yaesu zcut-3150 instruction manual

Stocks AG
Stocks AG ROTOR METER Vari Speed 65 Original Operating Manual and parts list


Graco
Graco PrecisionSwirl Instructions-parts list

Server
Server Touchless Express SE-SS-TDP1.3 manual

Franke
Franke FRK202067N Mounting instructions

Georgia Pacific
Georgia Pacific GP PRO Dixie Ultra SmartStock Tri-Tower Mounting instructions

U-Line
U-Line Purell Healthy Soap FMX-20 manual

Klarstein
Klarstein Biggie Digital manual