Taramp's Tarsafe TMA 10 G4 User manual

MANUAL
MOTORCYCLE ALARM
TMA 10 - TMA 20 - TMA 30

Setting
1
2
3
4
5
Alarm Response
Sensor Sensitivity
+20%
+10%
STANDARD
-10%
-20%
1 Beep
2 Beeps
3 Beeps
4 Beeps
5 Beeps
Decrease
Increase
2) INCLINATION sensor
The TMA G4 Alarm has a central accelerometer which records the inclination of the motorcycle every time the
alarm is activated from the remote.When changing the inclination of the motorcycle with the alarm is activated,
it activates the siren and the indicators.The standard sensitivity of the inclination sensor is setting 3, you can
change the sensitivity through programming.
- Turn on the ignition.
2 Beeps = Sensitivity+10%
- Put the OR/BLK wire to GND until beep 12.
- The alarm will sound with the current setting:
Set inclination Sensor Sensitivity
1 Beep = Sensitivity+20%
3 Beeps = Sensitivity Standard
5 Beeps = Sensitivity -20%
4 Beeps = Sensitivity -10%
Select Beep function 12
OR/BLK
to
GND
Settings
1X = +20%
2X = +10%
3X = Standard
4X = -10%
5X = -20%
To change, touch the OR/BLK wire to GND the number of times related to the
desired setting. At each touch, the alarm confirms with 1 beep. After turning off
the ignition, beeps confirm the new setting.
•T he installation of the product must be carried out by a qualified professional;
•For its perfect operation , the +12V signal with ignition on, needs to be connected to the alarm;
•T his product is only intended to prevent or inhibit motorcycle theft;
•Place the alarm central away from metal parts, modules, cables and ignition coil. Clean the installation area of the
alarm central very well well;
•The TARAMPS motorcycle alarm has an inclination sensor and for its perfect operation it is necessary that the
central unit is correctly placed.
•Before contacting TARAMPS technical support, read the manual, which contains all the information necessary for
the i nstallation and use of the product;
•During installation, use a multimeter to measure signals from the motorcycle;
ATTENTION: We recommend the complete reading of this manual before proceeding with the
installation of this product.
1) Before starting
Attention: To prevent false triggers from the inclination sensor, the alarm
centralmust be well placed and fixed with double-sided tape.
01

4) Record NEW control in the alarm Central
possible to record up to 4 controls, when recording the 5th ,it removes the first.
PROCEDURE:
- touch the OR/BLK wire on GND until beep 3.
- When releasing, 1 long beep and the turning signals will stay on;
To exit setup, turn off the ignition.
Press the ACTIVATE + DEACTIVATE keys of the control simultaneously,
3 Beeps confirm the recording.
Select Beep 3 function
OR/BLK
to
GND
3 flashes = line G1 to G3
A - Hold down the Home and Auxiliary keys;
B - Release after the LED turns off;
4 flashes = G4 line ahead
Change G3 / G4 codes - of TR2 and TR2-P controls
C - The LED flashes indicating the new code system:
Controls manufactured after June/2019.
ATTENTION: This function only applies to
3) Remote Controls*
ŸOperating Frequency 433.92MHz
ŸAnti-ClonningTechnology (Hopping Code)
ŸTransmission System Against Jammer
Ÿ1 Battery 3V - CR 2032 LITHIUM
Illustrative images and may be
different from the real one.
* See item 18 which remote control belongs to which model of the Alarm.
Any control model can be purchased separately.
‘‘This equipment operaters in a secondary mode, that is, it does not
have the right to protection against harmful interference, even from
stations of the same type, and it cannot cause interference in systems
that work in a primary mode.’’
Changing the Control Battery.
USE A GOOD
QUALITY
BATTERY
Open the plastic box carefully on the
sides.
Use CR2032 batteries.
Replace the battery, observing the
polarity (+) and (-).
Control
TR2 Control with
PRESENCE
TR2-P
G4 controls functions (made from June 2019)
Jammer is when there is another control transmitting near the alarm central, making it impossible to activate or
deactivate the alarm through the control that is recorded in the central.
- Code G3 (for alarms TARAMPS G1 to G3).
- Anti Jammer function. EXCLUSIVITY IN THE G4 TARAMPS LINE.
-G4 code (exclusive to the TARAMPS G4 line).
02
HOME
ON OFF AUXILIARY

See item 9.4
Press
14 - HOME
FUNCTION ACTION
2 - Disable Alarm Press
2 lights Flashes + 2 siren beeps
Note: 4 flashes in the lights + 4 beeps, indicate
that alarm triggering has occurred with the alarm
activated. Item 9.2
See item 13
Press for 2 seconds with the
alarm off
11 - Auxiliary Output 2
use relay
1 - Activate Alarm Press 1 Flash of lights + 1 siren beep
Th e s e nso r o p e rat es agai n i n t h e n ext
activation.Item 9.3.3
1 long beep, confirm.
9 - Cancel the
inclination sensor
Press then for 2 seconds.
Keeping the button pressed, keeps the output
activated. GRAY wire
Press for 2 seconds with the
alarm off
10 - Auxiliary Output 1,
use relay
12 - Automatic Presence
Transmission
See item 7.1
Only for the TR2-P control
Press + for 2 seconds
Only for the TR2-P control
See item 7.2
Press + for 2 seconds
13 -Range test
presence function
Cancel siren and lights. The alarm remains
activated.
Press with the alarm
triggered
7 - Cancel Trigger
4 - Disable alarm
without beep Press then
2 lights Flashes
Note: 4 flashes inthe lights + 4 beeps, indicate that
a alarm triggering has occurred with the alarm
activated. Item 9.2
Trigger the siren and the lights flash for 45
seconds. To cancel, press the button
Press for 2 seconds with the
alarm activated
6 - Trigger the alarm
Lights flash for 20 seconds. To cancel, press the
button
Press for 2 seconds with the
alarm activated
5 - Locate Motorcycle
3 - activate alarm
without beep 1 Flash at the lights
Press then
5) Remote Control Functions
ALARM RESPONSE
03

Turn on the ignition and touchthe ORANGE/BLACK wire on the
GND until the Beep of the desired function. The alarm will sound
the Beep of the current setting, to change it, touch the OR/BLK
wire to the GND the number of times of the desired setting.
3 - CONTROL RECORDING See item 4
5 - Assault mode by PRESENCE item 7
1 beep = ENABLE
2 beeps = DISABLE
7 - INCLINATION SENSOR item 2
item 9.3
1 beep = ENABLE
2 beeps = DISABLE
9 - TIME TO LOCK 31 beep = 1 minute
2 beeps = 2 minutes
3 beeps = 3 minutes
11 - ACTIVATES ALARM WHEN YOU WALK AWAY
See Item 15 11 beep = DISABLE
3 beeps = Only Activates WITH Beep
4 beeps = Activates and Deactivates WITHOUT Beep
5 beeps = Activates and Deactivates WITH Beep
15 - See item 12
13 - ORANGE WIRE Setting
See Item 13 11 beep = SECRET BUTTON
2 beeps = AUXILIARY Output 2 Pulse
3 beeps = AUXILIARY 2 Output Retention
3 LONG BEEPS = END OF PROGRAMMING WITHOUT CHANGING THE SETTINGS
16 - FACTORY RESET 1 beep LONG
factory settings restored
1 - ENABLE/DISABLE the alarm 1 beep = ENABLE
2 beeps = DISABLE
14 - GREEN WIRE Setting
See Item 11 11 beep = trunk button
2 beeps = HIGH BEAM signal
3 beeps = gearshift neutral
3
12 - Adjust SENSITIVITY INCLINATION Sensor To change, see item 2
10 - Motorcycle battery SAVING mode - SLEEP 1 beep = ENABLE
2 beeps = DISABLE
8 - TURN SIGNALS on/ 1 beep = ENABLE
2 beeps = DISABLE
Assault mode by SECRET BUTTON
6 - item 8
1 beep = ENABLE
2 beeps = DISABLE
4 - Change IGNITION PASSWORD Standard = 33 See item 14.1
2 - BEEP activate/deactivate 1 beep = ENABLE
2 beeps = DISABLE
!
!
6) Programming
= Enabled = Disabled
ATTENTION: When configuring the Orange wire as Auxiliary Output 2, the Secret Button Lock function cannot
be enabled. To enable it, configure as 1st beep = secret button.
!
Select function
OR/BLK
to
GND
Setting
Example
1x enable
2x cancel
04
CLONE GATE CONTROL

- Turn on the ignition.
1 Beep =Block in 1 minute
Assault mode time setting, 1, 2 or 3 minutes
- touch the OR/BLK wire on GND until beep 5.
- The alarm will sound with the current setting:
2 Beeps = Block in 2 minutes
3 Beeps =Block in 3 minutes
- Press and hold the Power and Auxiliary keys;
Activate the Presence Function in the TR2-P control
- Release after the LED turns off;
- The LED will flash informing:
2 flashes = automatic transmission off
1 flash = automatic transmission activated
Operation:
With the engine running, moving the TR2-P control away from the motorcycle, it automatically activates the assault
mode. After the programmed time (Beep 9 of the configuration), it triggers the siren and lights, another 10 seconds
the engine starts to fail until it turns off. To cancel, move the TR2-P control close to the motorcycle and wait for
automatic transmission or press the TR2-P control OFF button.
1 Beep = ENABLE
Enable assault mode by Presence in the Alarm Central
- Turn on the ignition.
2 Beeps = DISABLE
- Touch the OR/BL wire on GND until beep 5.
- The alarm will sound with the current setting:
To change, place the OR/BLK wire on the GND the number of times related to the desired
configuration. At each touch,the alarm confirms with 1 beep. After turning off the ignition,
beeps confirm the new setting.
To change, place the OR/BL wire on the GND the number of times related to the desired
configuration. At each touch the alarm confirms with 1 beep. After turning off the ignition,
beeps confirm the new setting.
Attention: In the TMA G4 line, the standard configuration of the assault by presence mode is ENABLED,
and it can be CANCELED in Beep 5 of the configuration.
IT IS NECESSARY TO ACTIVATE THE AUTOMATIC TRANSMISSION OF THE CONTROL TR2-P
Attention: When the 2 assault modes are enabled together, by Presence and Secret Button,
the sound of the siren is different, so you know which one has been activated and cancel
correctly. The TR2P control only cancels Presence Assault mode and the button only cancels
Secret Button Assault mode.
7) Lock function by presence
Select the Beep 5 function
OR/BL
to
GND
Setting
Example:
1x Enable
2x disable
Select Beep function 9
OR/BLK
to
GND
Setting
Example:
1x 1 minute2x
2 minutes3x
3 minutes
05

7.2) Test the range of the Presence Transmission
Low BATTERY warning.
When you turn on the ignition, the alarm indicates with 1 BEEP the need to replace the
TR2-P control battery
- Hold down the Active and Auxiliary keys;
- Release after the LED turns off;
- The LED flashes indicating the new configuration:
1 Flash = Automatic Transmission ON
Disable the Presence Function in the control
2 flashes = Automatic transmission DISABLED
- Press the Deactivate and Auxiliary buttons together;
- LED flashes every 2 seconds, alarm sounds with Beep:
Activate the RANGE test
- Ignition off
- Release after the LED turns off;
- To cancel, press any button on the control.
It is not necessary to move the control away from the motorcycle, just deactivate the automatic transmission of the
TR2-P control, turn on the ignition and wait for the programmed time, beep 9.
How it works:
It is used to test the range of the automatic transmission in Presence assault mode.
With the automatic transmission activated on the control, the function activated on the alarm control panel and the
ignition off, press the DISABLE and AUXILIARY buttons on the TR2P control, until the LED turns off. After releasing, the
LED flashes every 2 seconds, with each flash, the alarm will sound a BEEP, confirming that it received the transmission.
Move the TR2-P control away from the motorcycle until it is confirmed no more. To cancel, press any button on the
remote control.
Attention: In the TMA G4 line, the standard configuration of the assault by presence mode is
ENABLED, and it can be CANCELLED in Beep 5 of the configuration.
IT IS NECESSARY TO ACTIVATE THE AUTOMATIC TRANSMISSION OF CONTROL TR2-P
7.1)Test Assault Mode by Presence
06

Assault mode time setting, 1, 2 or 3 minutes
2 Beeps = Block in 2 Minutes
3 Beeps = Block in 3 Minutes
- Turn on the ignition.
1 Beep = Block in 1 minute
- Put the OR/BLK wire on GND until beep 5.
- The alarm will sound accordingto the current setting:
To change, touch the OR/BLK wire one the GND the number of times related to the desired
configuration. At each touch, the alarm confirms with 1 beep. After turning off the ignition,
beeps confirm the new setting.
Select Beep function 9
OR/BLK
to
GND
Setting
Example:
1x 1 minute
2x 2 minutes
3x 3 minutes
Attention: Function Disabled in the Standard configuration, it is necessary to enable it in Beep 6 of the
configuration. In G4 alarms, the assault mode by Secret Button, Beep 6, and the assault mode by
Presence, Beep 5, can be enabled together
8) Secret Button Assault Mode - disabled in standard configuration.
8.1) Parking Function (only for Assault Mode by Secret Button)
How it works:
With the ignition on, press the Secret Button for 1 second. If not, Assault mode is activated. After the programmed
time, (according to the Beep 9 setting), it triggers the siren and turn signals, another 10 seconds the engine starts to
stop until it turns off. To cancel the blocking, press the SECRET BUTTON.
ATTENTION: The control does not cancel the assault mode by SECRET BUTTON.
Enable Assault Mode by Secret Button
2 Beeps = DISABLE
- Turn on the ignition.
1 Beep = ENABLE
- The alarm will sound with the current setting:
- Put the OR/BLK wire on GND until beep 6.
without having to indicate the position of the Secret Button.
How it works:
Turn off the ignition and press the Secret Button 3 seconds.
It is used to leave the motorcycle in a parking lot, for example,
Lights flash 3 times confirming activation.
To cancel the Parking function, turn on the ignition and press
the Secret Button for 1 second.
+
IGNITION
OFF
ON
START
OFF
SECRET
BUTTON
3 Seconds
Attention: If the Orange wire is configured as Auxiliary Output 2, the Secret Secret Button Assault mode
cannot be enabled. Change settings for 1st Beep - item 13
To change, touch the OR/BLK wire on the GND the number of times related to the desired
configuration. At each touch, the alarm confirms with 1 beep. After turning off the
ignition, beeps confirm the new setting.
Select Beep function 6
OR/BLK
to
GND
Setting
1X Enable
2X Disable
07

3 Beeps Ignition
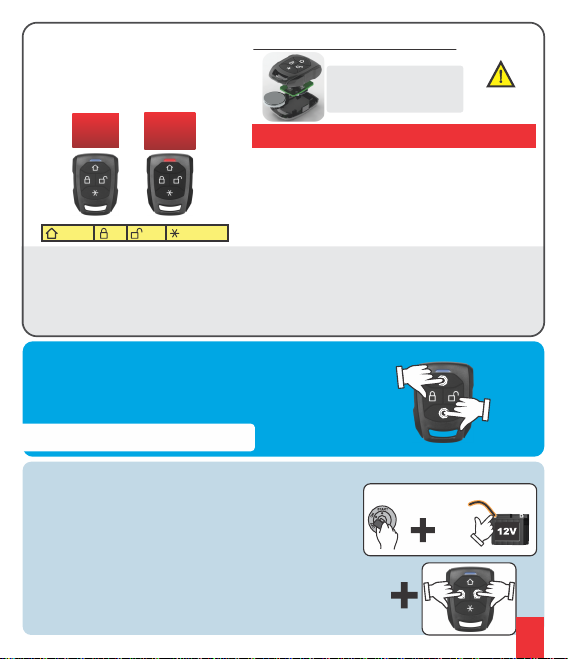
9.4 HOME function TR2 and TR2-P control:
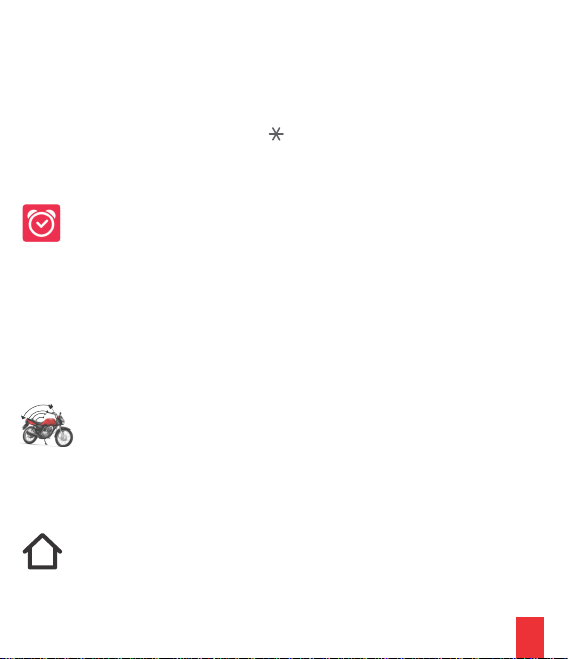
9.2 TRIGGERING REPORT: Deactivating the alarm with 4 Beeps, it reports that a triggering has
occurred. To know the cause, press right after deactivating the alarm by the control. The
number of beeps reports the cause.
Use the HOME button of the TR2 or TR2-P controls, it is possible to activate the automatic gate or
residential alarm, without having to use the auxiliary module, only recording the control in the gate or
alarm central.
Compatible with CODE LEARNING fixed code system.
The inclination sensor in saving mode does not trigger with a simple change of the position of the
motorcycle. A strong touch, such as sitting on the motorcycle seat, is required to exit economy mode.
Disable the alarm via remote control as soon as the lights flash.
1 Beep Inclination Sensor
9.3.2 INCLINATION SENSOR IN SAVING MODE.
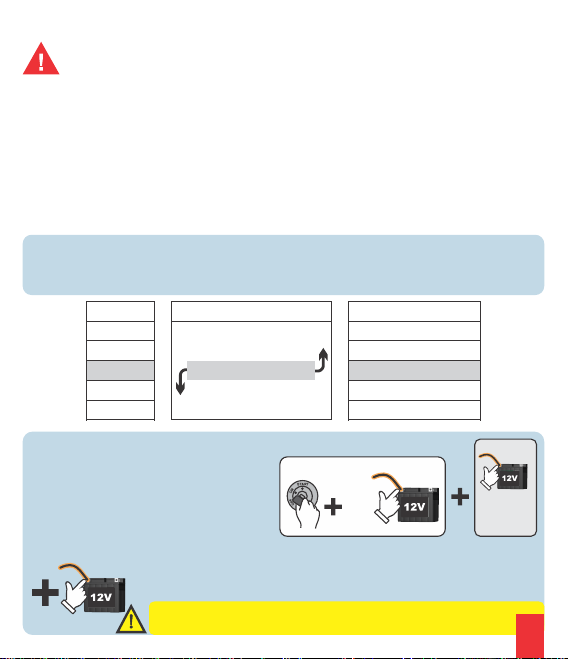
ALeaving the motorcycle stationary with the alarm activated or not, for more than 24 hours, the BATTERY
SAVING mode ‘Sleep’ is activated. In this mode, the motorcycle's battery consumption is reduced 17 times
compared to normal consumption. All sensors remain active and trigger the alarm in case of any change in
the signals. For this saving to happen, the RF system (Remote Control Receiving System) is disabled, so the
alarm will not respond to remote control commands.
Obs.: Ignition has no triggering limitation.
9.1 SHUTDOWN - TRIGGERING LIMITATION: In the event of an alarm triggering, the alarm activates
the SIREN and the light flashes for 45 seconds. Another 5 seconds, check the sensors again. Four
triggerings from the same sensor cancel it, keeping the others active. The sensor will be activated the
next time the alarm is activated by the remote control.
9.3.1 HOW TO DEACTIVATE THE ALARM IN SAVING MODE?
9.3 SLEEP FUNCTION / SAVING (save motorcycle battery)TARAMPS Alarms exclusivity. Function
enabled in the standard configuration Beep 10.
Turn on the ignition or move the motorcycle (with the inclination sensor enabled), the alarm will return
to normal operation, activating the RF system (remote control reception). Disable the alarm via remote
control as soon as the lights flash. Otherwise, another 5 seconds activates the siren, flashes the lights
and shuts off the engine. If the remote control cannot be used, the alarm can be disabled by the
ignition password. item 14
2 Beeps Auxiliary Sensor
9.3.3 DISABLE THE INCLINATION SENSOR: By activating the alarm and disabling the inclination
Sensor (accelerometer) through the control, , lThe alarm does not go off when the motorcycle is ítem 5.9
inclined, but when the ignition is switched on or the trunk is opened, if installed. To return to normal
operation, disable and enable the alarm by remote control.
Record the TR2 or TR2-P control according to the manufacturer's instructions, as if it were a control of the
same brand of gate or residential alarm.
08
9) Alarm Functions

Suporte Técnico
Technical Support / Apoyo Técnico
+55 18-3266-4050 / +55 18 99627-3364
suportetecnicotaramps WhatsApp
For correct operation, check the battery voltage with the motorcycle turned off. If the battery is less than 12V, please
recharge or replace it. Make sure that the battery is charging with the motorcycle on.
Auxiliary Output
8 and 9 - Green / Black
Dedicated Siren + 12 Vcc
Turning Signal
11 - Red
12 - Gray
10 - Gray
6 - Gray
5 - Orange/ Black
4 - Orange
Programming
press to GND
3 - Black
GND
2 - Blue
Ignition
1 - Green
ENGINE BLOCK
MAX. 20A
7 - Black/ Yellow
According to Configuration:
1- Trunk/Trunk Button
2- High Beam Signal to activate
the GATE - only in the TMA30
3- Gearbox NEUTRAL sensor.
According to Configuration:
1- Secret Button
2- Auxiliary 2 PULSE
3- Auxiliary 2 HOLD
- IT IS NECESSARY TO ACTIVATE THE AUTOMATIC TRANSMISSION OF THE TR2-P CONTROL
- In the TMA G4 line, the standard configuration of the assault by presence mode is ENABLED, and it can be
CANCELED in Beep 5 of the configuration.
- To prevent false triggers due to the inclination sensor, the alarm central must be well fixed, through the
double-sided tape.
Attention:
Alarm basic operation: When activated by remote control,
the control unit records the inclination of the motorcycle.
Another 10 seconds, changing the inclination or turning on
the ignition triggers the alarm.
10) Installation Scheme
09

- Turn on the ignition.
To exit setup, turn the ignition off .
3 Beeps confirm recording.
- Put the OR/BLK wire on GND until beep 15.
- When releasing, 1 long beep and the turning signals
will remain turned on;
Press the keys that activate the Gate
Programming:
With the ignition on, give 2 touches of high beam, to open or close the automatic gate.
Attention:Connect the GREEN wire to the HIGH LIGHT signal before cloning the control, so the alarm will
automatically set. Cloning the automatic gate control will change the configuration of the GREEN wire when opening
and closing the gate.
INSTALLATION SEQUENCE
Operation:
No programming or installation in the automatic gate control unit is necessary.
- Connect the GREEN wire to the HIGH BEAM signal.
- Clone the original GATE control in the TMA G4 alarm central.
Attention: Function compatible only with fixed code systems, CODE LEARNING.
12) Clone Automatic Gate Control
3 Beeps = Gearshift Neutral Sensor
- Turn on the ignition
2 Beeps = High Beam Signal to activate gate
- Put the OR/BLK wire on GND until beep 14.
- The alarm will sound according to the current setting:
Programming
1 Beep = Trunk Button
To change, place the OR/BL wire onthe GND the number of times related to the desired
configuration. At each touch, the alarm confirms with 1 beep. After turning off the ignition,
beeps confirm the new setting.
Connect the GREEN wire to the button. The alarm triggers when the trunk is opened with the alarm activated.
3) Gearshift Neutral Sensor.
1) Trunk button.
Installation and setup required, when configured to start the engine via the control, on a motorcycle with an original
system that allows starting without the gear being in neutral.
Connect the GREEN wire to the High Light signal, to open and close the automatic gate. item 12.
2) High Beam signal.
11) GREEN wire configuration
Select the Beep function 14
OR/BLK
to
GND
Setting
Select the Beep function 15
OR/BLK
to
GND
Clone
Example:
1x Trunk
2x High Beam
3x Neutral Gear shift
10

alarm off.
Activate Auxiliary output 2
- Press the OFF button on the remote with the ignition off and the + than 2
seconds
Programming
- Turn on the ignition.
- The alarm will sound according to the current setting:
1 Beep = Secret Button
- Touch the OR/BLK wire on GND until beep 13.
3 Beeps = AUXILIARY Output 2 Hold
2 Beeps = AUXILIARY Output 2 Pulse
In this configuration, with alarm and ignition off, pressing the remote control DISABLE button for more than 2
seconds, activates the output, when releasing the DISABLE button the output will remain activated.
1) Assault Mode by Secret Button
Configuration for installation of the button for the ASSAULT MODE BY SECRET BUTTON. Enabling the Secret item 8.
Button automatically changes the setting of the Orange wire.
2) AUXILIARY 2 output - pulse.
In this configuration, with alarm and ignition off, pressing the remote control's DISABLE button for more than 2
seconds, it activates the output and when the button is released, it deactivates.
3) AUXILIARY 2 output - retention
To turn off the output, press the remote's OFF button again.
Operation Example.:
To start the motorcycle, connect the ORANGE wire to the relay to turn on the ignition and the GRAY wire to the relay for
the start button.
- Press the OFF button on the control until the ignition is on, and press the AUX button until the engine starts.
Since the ORANGE wire (Auxiliary 2 output) is in hold mode, the ignition reamains on, keeping the engine running.
- To turn off the engine, press the OFF button on the control again.
To change, touch the OR/BLK wire on the GND the number of times related to the
desired setting. At each touch, the alarm confirms with 1 beep. After turning off
the ignition, beeps confirm the new setting.
ATTENTION: Risk of accidents in the event of incorrect installation.
For motorcycles where it is possible to start with the gear out of neutral, it is essential to install and
configure the GREEN wire connected to the neutral signal, so that accidents do not happen.
13) Setting Auxiliary Output 2 - ORANGE wire
Select Beep function 13
OR/BLK
to
GND
Setting
Example:
1x secret button
2x Aux. 2 pulse
3x Aux. 2 retention
11

14) Ignition Password - Disarm Alarm without the Control
1 beep enables;
2- Turn the contact on and off according to the second digit, (standard 3)The alarm will respond
after 2 seconds:
How to use:
2 beeps disable.
Wait 3 seconds;
1- Turn the contact on and off according to the first digit, (standard 3).
In case of problems with the remote control (low battery, damage or loss), it is possible to disable the alarm by the
ignition password, even with the alarm triggered. Disabled, the alarm does not work until enabled by the ignition
password.
14.1) Change ignition password
5- Wait 2 seconds (1 beep confirms);
6- Turn the contact on and off according to the second digit;
Standard password _3_ : _3_ NEW PASSWORD ____:____
1- Turn on the ignition;
3- When releasing the alarm, it sounds 4 beeps and the turning signals will remain on.
4- Turn the contact on and off according to the first digit;
After a few seconds, a long beep confirms that the new password has been entered. If there are 2 beeps, there was a
recording error, you have to do the whole process all over again.
2- touch the OR/BL wire on GND until beep 4
7- At the end leave the ignition off.
ON
START
OFF
ON/OFF
1
ON
START
OFF
ON/OFF
2
ON
START
OFF
ON/OFF
3
+3 SECONDS +
STANDARD PASSWORD
NEW PASSWORD
Select Beep 4 function
OR/BLK
to
GND
ON
START
OFF
+ 2 Seconds, 1 Beep + + 2 Seconds, 1long Beep
programming OK
ON
START
OFF
ON/OFF
on/off
1° digit
??
ON
START
OFF
ON/OFF
on/off
2° digit
??
ON
START
OFF
ON/OFF
1
ON
START
OFF
ON/OFF
2
ON
START
OFF
ON/OFF
3
12

Programming
- Turn on the ignition.
- Put the OR/BLK wire to GND until beep 11.
- The alarm will sound according to the current setting:
1 Beep = Canceled
4 Beeps = Activate and Deactivate without BEEP
3 Beeps = Activate with BEEP and Deactivate by Control
2 Beeps = Activate without BEEP and Deactivate by Control
5 Beeps = Activate and Deactivate with BEEP
15)Activate alarm when walking away
This function is used to activate the alarm when moving the TR2P remote control away from the motorcycle.After
turning off the ignition and moving the TR2P control away, beyond the transmission range, the alarm will activate in
up to 15 seconds.
1st Beep = Canceled function, the alarm only activates/deactivates by remote control.
2nd Beep = Activates the alarm, Without BEEP and the TURN SIGNALS do not flash when the control is moved away,
and only Deactivates when pressing the Deactivate button on the control.
Alarm activation settings:
3rd Beep = Activates the alarm With BEEP and the TURNING SIGNALS do not flash when the control is moved away,
and only Deactivates when pressing the Deactivate button on the control.
4th Beep = Activates the alarm without Beep and the TURN SIGNALS do not flash when you move the control away,
and Deactivates the alarm without BEEP as soon as you receive the automatic transmission of the control or press
the Deactivate button on the control.
5th Beep = Activates the alarm With BEEP and the TURN SIGNALS do not flash when the control is moved away, and
Deactivates the alarm With BEEP as soon as receiving the automatic transmission of the control or pressing the
Deactivate button on the control.
To change, touch the OR/BLK wire on he GND the number of times related to the desired
setting. At each touch, the alarm confirms with 1 beep. After turning off the ignition, beeps
confirm the new setting.
Change NEGATIVE signal of the
alarm (200mA) for POSITIVE +12V
alarm wire 85 30
+12V
87
86
+12V output
Turn on the Ignition through the OR wire
Start the engine through the GR wire
alarm wire
ORANGE
alarm wire
GR
85 30
+12V
+12V IGNITION on
on start button
87
86
85 30
87
86
+12V Ignition
wire connected to
starting engine
Battery negative
Change NEGATIVE signal of thealarm
(200 mA) into NEGATIVE of higher power
30
85
87
Alarm wire
negative output
86 +12V
Battery
positive
Select Beep function 11
OR/BLK
to
GND
Setting:
1X = Cancel
2X = only Activates without Beep
3X = only Activates with Beep
4X = Activate and Deactivate
without beep
5X = Activate and Deactivate
with Beep
16) Relay Connections
The AUXILIARY 1 and 2 outputs are
NEGATIVE outputs and handle a maximum
of 200mA.
For higher consumption or POSITIVE signal,
use relay.
13

18) Composition
In the event of a malfunction within the guarantee deadline, TARAMPS' responsibility is limited to the repair of the equipment
manufactured by it.
• Cases where the product is not used under normal conditions;
This warranty excludes:
• Water infiltration;
• Natural wear components, such as battery;
• Transport and reinstallation costs;
• Damages of any kind resulting from problems with the product, as well as losses caused by interruption of use.TARAMPS is not
responsible under any circumstances for theft of the motorcycle or its accessories.
• Removed Warranty seal ;
• Damage resulting from drops , impacts or actions of agents of nature (floods, lightning, etc.);
• Damage caused by accessories, modifications or equipment attached to the product;
• Warranty statement not filled out or scratched;
TARAMPS, with address at Abílio Daguano Street, 274 Res. Manoel Martins - Alfredo Marcondes - SP, ZIP 19.180-000, warranties
this product against eventual manufacturing defects or product component defects for a 24-month deadline, from the date of
the purchase.
• Products damaged by improper installation or installation by unauthorized individuals;
Warranty Term
TR2-P
with presence function only
TR2 TR5
TMA 10 G4
Control TR2
Control TR5
Control TR2 P
Control the Gate
Presence
Secret Button
2 Auxiliary Outputs
Consumption
Engine Block
Turning signal Outputs
Auxiliary Outputs 1 and 2
Siren Output
Sleep 0,3 mA / normal 5 mA
Max. 20 A
2 x 4A c/ digital protection
Max. 200 mA - (Negative Signal)
Dedicated Siren Only
Operating voltage 9 a 16 Volts
17) Electrical Features
Taramps reserves the right to modify the content of this manual without prior notice and does not undertake to apply
changes to previously produced units. 14
TMA 30 G4TMA 20 G4
1
1
1 1 2

MN_016030_R01
This manual suits for next models
2
Table of contents
Other Taramp's Motorcycle Accessories manuals