Targa Visionary XP-210 User manual

i - 1
Manual English
TARGA Visionary XP 210

i -2
Notice
The information in this user’s manual is subject to change without notice.
THE MANUFACTURER OR RESELLER SHALL NOT BE LIABLE FOR ERRORS
OR OMISSIONS CONTAINED IN THIS MANUAL AND SHALL NOT BE LIABLE
FOR ANY CONSEQUENTIAL DAMAGES, WHICH MAY RESULT FROM THE
PERFORMANCE OR USE OF THIS MANUAL.
The information in this user’s manual is protected by copyright laws. No part of this
manual may be photocopied or reproduced in any form without prior written
authorization from the copyright owners.
Copyright August, 2003
All rights reserved.
Microsoft and Windows are registered trademarks of Microsoft Corporation. DOS,
Windows 95/98/ME/2000/NT/XP are trademarks of Microsoft Corporation.
Product names mentioned herein may be trademarks and/or registered trademarks
of their respective owners/companies.
The software described in this manual is delivered under a license agreement. The
software may be used or copied only in accordance with the terms of the agreement.
This product incorporates copyright protection technology that is protected by
method claims of certain U.S. patents and other intellectual property rights owned by
Macrovision Corporation and other rights owners. Use of this copyright protection
technology must be authorized by Macrovision Corporation, and is intended for
home and other limited viewing uses only unless otherwise authorized by
Macrovision Corporation. Reverse engineering or disassembly is prohibited.
Rev 1.0

i -3
TABLE OF CONTENTS
PREFACE
Symbols and Conventions
Protecting Your Computer - Avoid Abusive Handling and Adverse
Environment
Chapter Summaries
1. GETTING TO KNOW THE BASICS
Performance Features (1-2,3)
System at a Glance (1-4)
Front View (1-4,5,6,7,8)
Rear View (1-9,10,11)
Bottom View (1-12,13)
AC Adapter (1-14)
LED Status Indicators (1-15)
Keyboard Features (1-16)
Function (Quick) Keys (1-16)
Windows Keys (1-17)
Embedded Numeric Keypad (1-17)
Touch Pad with Page Up / Page Down Function (1-18)
Graphic Subsystem (1-19)
Adjusting the Display Brightness (1-19)
Extending the Life of the TFT Display Panel (1-19)
Opening and Closing the Display Panel (1-20)
Audio Subsystem (1-21)
Adjusting the Volume Manually (1-21)
Adjusting the Volume in Windows (1-21)
Adjusting the Audio Volume via the Volume Dial (1-21)
Voice Recording (1-21)
Modem and Modem Setting (1-22)
Ethernet Adapter (1-23)

i -4
2. TROUBLE-SHOOTING
First Step (2-2,3)
Audio Problems (2-4)
Hard Disk Problems (2-5,6)
CD-ROM, DVD-ROM, CD-RW, or Combo Drive Problems (2-7)
Display Problems (2-8)
Keyboard and Mouse Problems (2-9)
CMOS Battery Problems (2-10)
Memory Problems (2-11)
Modem Problems (2-12)
Network Adapter / Ethernet Problems (2-13)
PC Card / PCMCIA Problems (2-14)
Performance Problems (2-15)
Printer Problems (2-16)
Firewire (IEEE1394) and USB2.0 Problems (2-17)
APPENDIX A Product Specification
APPENDIX B Agency Regulatory Notices

i -5
Preface
Using This Manual
This User’s Manual contains general information about your
computer, hardware and software setup information,
troubleshooting, and technical specifications.
Symbols and Conventions
The following conventions and symbols are used in this manual:
When keys are to be pressed at the same time, a plus (+)
symbol is used. For instance, Fn+F7 means holding Fn and
F7 keys at the same time.
When a series of clicking actions is needed in Windows O/S, [ ]
and > symbols are used. For instance, [Start > Settings >
Control Panel > Display] means clicking the Start icon first,
then the Settings, then the Control Panel, then the Display
icon.
When you need to make a selection with the touch pad (or
mouse), you will be asked to ’select’ or ‘click’ or ‘double-click’,
‘right-click’ the item.
Note: Text in this format and symbol means specific instructions, commentary,
sidelights, or any additional information or notes that you should be aware of.
Warning: Text is this format and symbol means that failures to comply with the
given instructions or information could result in damage to your computer or could
cause bodily harm or loss of life.

i -6
Protecting Your Computer - Avoid Abusive Handling and
Adverse Environment
Follow the advice below will help ensure that you get the most out
of your Investment.
Your computer will serve you well if you take good care of it.
Do not expose the computer to direct sunlight or place it near
sources of heat.
Do not subject it to temperatures below 0oC (32oF) or above
50oC (122oF).
Do not expose the computer to magnetic fields.
Do not expose the computer to moisture or rain.
Do not spill water or liquid on the computer.
Do not subject the computer to adverse shock and vibration.
Do not expose the computer to dust and dirt.
Do not place objects on top of the computer to avoid damaging
the computer.
Do not place the computer on rocky surfaces.
Do not block the ventilation airway of the computer
Here are some ways of taking care of your AC adapter.
Do not connect the adapter to any devices other than your
computer.
Do not let water get into the adapter.
Do not block the ventilation airway of the adapter.
Keep the adapter in a cool and ventilated place.
Do not step on the power cord or place heavy objects on top of
it.
Carefully tuck away the power cord and any cables away from
pedestrian traffic.
When unplugging the power cord, do not pull on the cord itself

i -7
but pull on the plug.
Keep the adapter away from children.
The total ampere ratings of the equipment plugged in should
not exceed the ampere rating of the cord if you are using an
extension cord.
The total current rating of all equipment plugged into a single
wall outlet should not exceed the fuse rating.
Do not connect other AC adapter to your notebook. This
Notebook uses exclusively the AC adapter LITE-ON PA-1121-02
(120W) LITE-ON PA-1121-01 (120W) or LISHIN 0227A20120 (120W) or
LSE0110A20120-01 (120W)
When cleaning the computer, observe these steps:
1. Power off the computer and remove the battery pack.
2. Disconnect the AC adapter.
3. Use a soft cloth dampened with water. Do not use liquid or
aerosol cleaners.
Contact your dealer or see your service technician if any of the
following occurs:
Computer has been dropped or the body has been damaged.
Liquid has been spilled into the product.
The computer does not operate normally.

i -8
Chapter Summaries
The following is a summary of the available chapters and
appendices in this manual.
Chapter 1: Getting to Know the Basics
In this chapter, you will learn the basic operations and features
of your computer. It gives you a general understanding of the
components of your computer.
Chapter 2: Trouble-Shooting
In this chapter, you will learn how to solve common hardware
and software problems.
Appendix A: Product Specification
In this section, you will find a list of the computer’s system
specifications.
Appendix B: Agency Regulatory Notices
In this section, you will find the general electro-magnetic and
safety regulatory information.

႑chapter1gettingtoknowthebasics
1-1
CHAPTERႭONE
GETTING TO KNOW THE BASICS
This chapter introduces the features and
components of the computer.

႑chapter1gettingtoknowthebasics
1-2
Performance Features
High Performance Processor
The notebook PC is equipped with a powerful AMD Mobile
Athlon XP-M processor of the latest sub-micron process,
processor technologies, and high bus bandwidths.
Advanced Graphic Engine
The system is built with a high performance ATI Radeon
9600 video processor with a dedicated frame buffer (of
64MB.) The advanced graphic engine is DirectX 9
compatible and delivers the fastest-performing 3D graphics
supporting the latest games, cinematic-quality video, and
features that dramatically enhance all aspects of the visual
experience in every application.
Large LCD Display
The computer is equipped with a large 15-inch TFT
high-resolution display panel for clear text and brilliant
colors.
Built-in Multifunction Card Reader
Some system comes with a multiple card reader, which
supports SD, MS, MMC, and SM Card formats. This allows
user to access a wide array of portable memory devices
available today.

႑chapter1gettingtoknowthebasics
1-3
Communication Features
The system provides built-in Ethernet network adapter for
local network and 56K modem.
Firewire (IEEE1394 / 1394a) and USB2.0 ports
In addition to a full array of built-in I/O ports, the computer
offers IEEE1394 for ultra high-speed connection to high
bandwidth digital video devices and USB2.0 ports to
connect to any USB-based peripheral devices.
Built-in SuperDJ MP3 Player
The system comes with a standalone MP3 player. You can
playback MP3 tracks in the DC/DVD-ROM disc or in the
hard disk drive (C:\MP3).
႑chapter1gettingtoknowthebasics
1-4
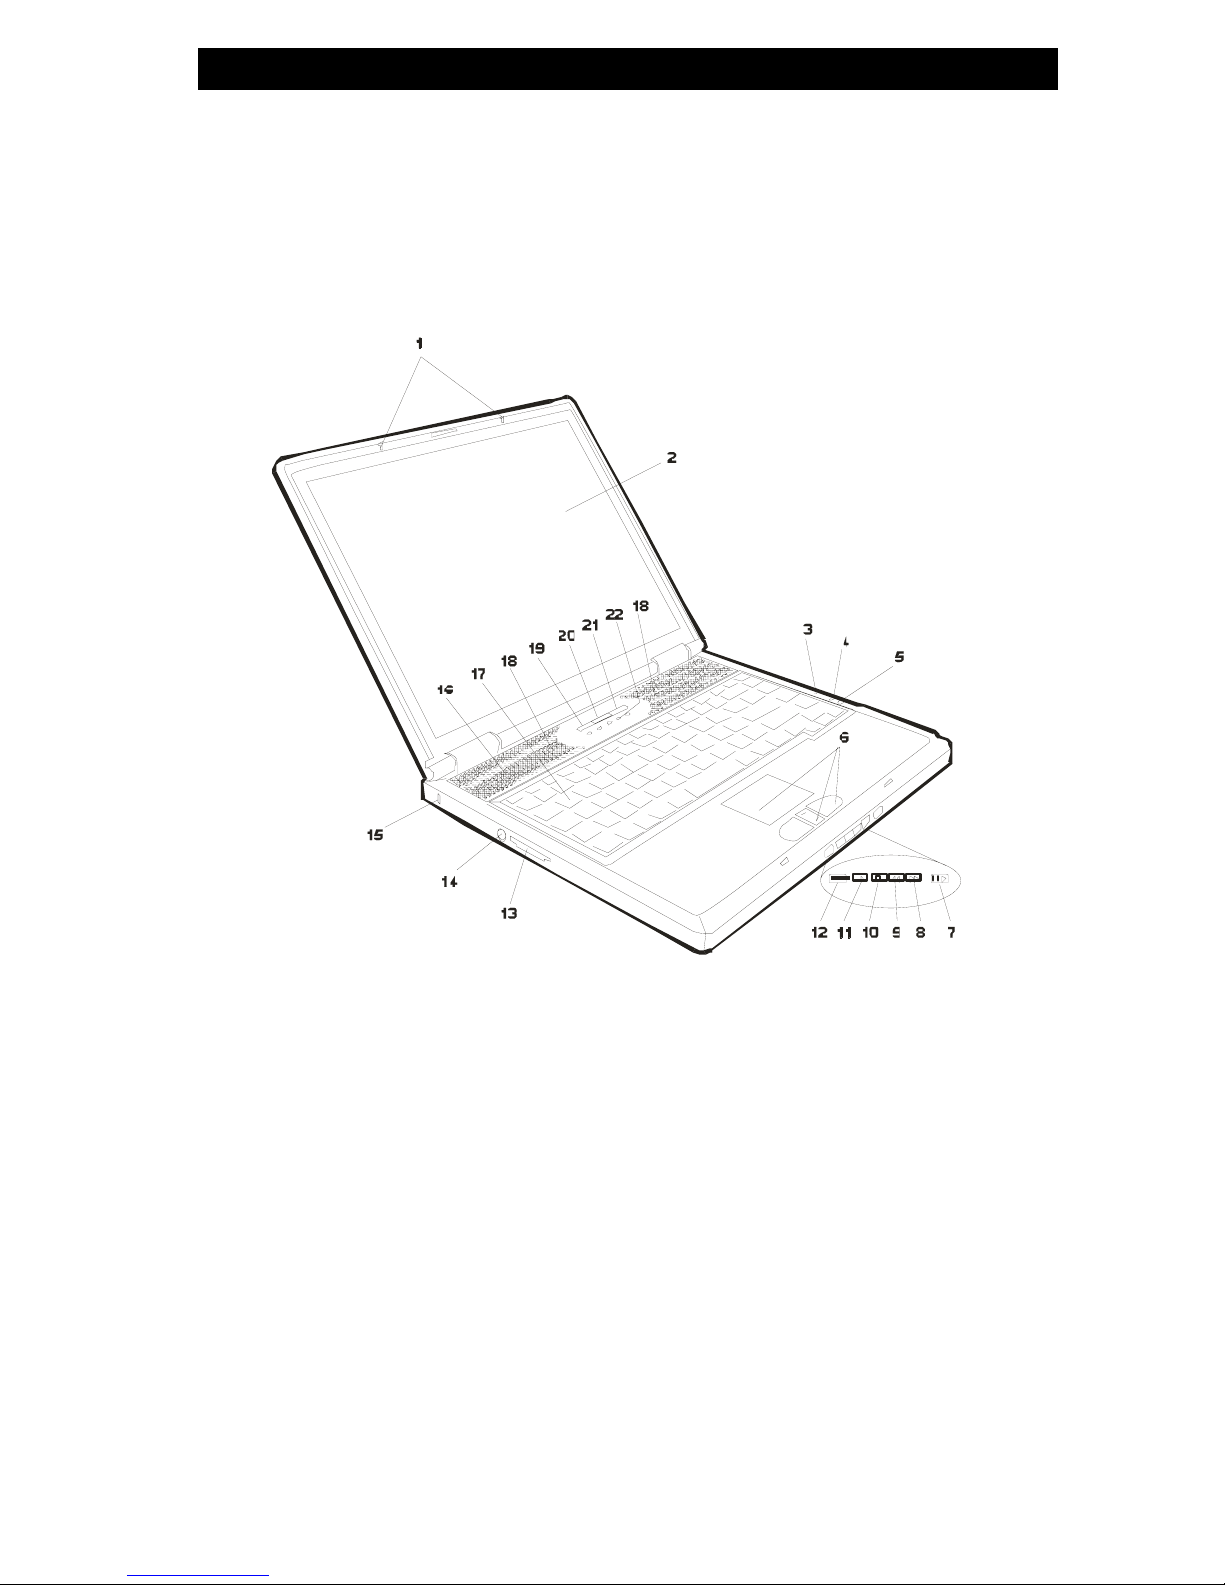
System At A Glance
Front View
1. LCD Latch
The LCD latches lock / unlock the LCD panel.
2. LCD Display
The panel is where the system content is displayed.
3. Built-in Microphone
The built-in microphone records sound.

႑chapter1gettingtoknowthebasics
1-5
4. Suspend Status LED
Flashing green light indicates the notebook is in suspend mode.
(See the LED Status Indicator Section for details.)
5. Power Status LED
The multi-color LED indicates the power status of the notebook.
(See the LED Status Indicator Section for details.)
6. Touch Pad with Page Up / Down Function
The touch pad is a built-in pointing device with functions similar
to a mouse. Use the Page Up or Down key to move one page
up or down in Windows.
7. Quick Key Lock Out
To prevent accidental pressing of the quick keys, you may slide
the button to the left position (locked position) to disable all
quick key functions. To reverse lock-out, slide the button toward
the right.
8. Next / Fast-Forward Key
Press the key once to go forward to the next audio track. Press
and hold the key to perform a fast-forward search of the current
track.
9. Previous / Fast-Backward Key
Press the key once to go back to the previous audio track.
Press and hold the key to perform a fast-backward search of
the current track.
10. Stop Key
Press the key once to stop an audio track during playback.
Press stop twice to eject the CD/DVD-ROM disc.

႑chapter1gettingtoknowthebasics
1-6
11. Playback / Pause Key
Press the key once to start playback an audio track. Press
again to temporarily stop an audio track during playback. Press
again to resume playback.
12. MP3 Player On/Off Button
Press the MP3 Player Button to turn on the stand-alone MP3
player without having to boot to Windows. Press again to turn
off the MP3 player.
Note: When first turned on and playback, the SuperDJ player will choose to
play songs in the CD/DVD-ROM disc first and then songs stored in HDD under
directory C:\MP3.
Note: How to Switch between CD/DVD drive and HDD: Stop the player and
press Fast-Forward and Fast-Backward keys at the same time.
Note: A utility program must be installed to make full use of the MP3 player in
standalone (non-Windows) mode. (E:\utility\SuperDJ)
13. Multifunction Card Reader
The built-in multifunction card reader allows you to access
portable memory devices such as SD, MS, MMC, and SM
Cards.
14. PS/2 Serial Port
This is where you connect PS/2-type mouse or keyboard.
15. Kensington Lock Key Hole
A Kensington-type security lock latches to this keyhole for
anti-theft purpose.

႑chapter1gettingtoknowthebasics
1-7
16. Ventilation Grill
The fan grill is where air is expelled to dissipate the internal
heat. Do not block this airway completely.
17. Keyboard
The keyboard is used to enter data. It has an embedded
numeric keypad and cursor control keys. (See Keyboard
Section for details.)
18. Built-in Stereo Speakers
The built-in speakers output the sound in stereo.
19. Internet Quick Key
The Internet Quick Key launches the Internet Explore
automatically in Windows XP or 2000.
Note: To enable the Internet Quick Key and Email Quick Key in Windows O/S
other than XP / 2000, you must install the special Quick Keys application
contained in the factory CD-ROM (e:\Utility\Qkeys\SETUP.EXE).
20. Email Quick Key
The Email Quick Key launches the MS Outlook Express in
Windows XP or 2000.

႑chapter1gettingtoknowthebasics
1-8
21. Power / Suspend Button
The power/suspend button turns the notebook on and off and it
also acts as a system suspend key. Press momentarily to turn
on the system. Press and hold for at least 3~4 seconds to turn
off the system. How this key behaves can be defined in [Start >
Settings > Control Panel > Power Options > Advanced] menu.
Press the power / suspend button again to return from the
suspend mode.
22. LED Status Indicator
The LED Status indicators reveal the locking/unlocking of
certain key functions - numeric keypad enable/disable, cap lock,
and scroll lock - and HDD and optical drive status. (See the
LED Status Indicator Section for details.)

႑chapter1gettingtoknowthebasics
1-9
Rear View
Warning: Do not place any heavy objects on the top of notebook. This may
damage the display
1. Ventilation Grill
The fan grill is where air is exchanged to dissipate the internal
heat. Do not block this airway completely.
2. Parallel Port
The 25-pin parallel port connects to any parallel-port devices
such as a printer.
3. External VGA Port
The 15-pin VGA analog port is for connecting the external CRT
monitor or projector.
4. Firewire / IEEE1394 / 1394a Port
This is a high-speed serial data port. You may connect any
Fire-wire-ready device to this port.

႑chapter1gettingtoknowthebasics
1-10
5. Ventilation Grill
The fan grill is where air is exchanged to dissipate the internal
heat. Do not block this airway completely.
6. TV (S-Video) Port
The S-Video port permits you to redirect the screen output to a
television set or any analog video playback device. This TV
Port is Macrovision-compliant; when DVD movie is played, the
output is scrambled to prevent analog recording.
7. Power Jack (DC-in)
The DC-out jack of the AC Adapter connects here and powers
the computer.
8. Modem Port
This is where you plug the phone jack (RJ-11) for fax/modem
functions.
9. Ethernet / LAN Port
The port connects to a network hub via the RJ-45 cable and
also conforms to 10/100Base-TX transmission protocol.
10. USB2.0 Port (x3)
The Universal Serial Bus (USB2.0-compliant) port allows you to
connect a wide variety of devices to your computer at a rate of
up to 480 Mbps. This port conforms to the latest USB2.0
plug-and-play standards.
11. Stereo Headphone / SPDIF-out Jack
The stereo headphone jack (3.5-mm diameter) is where you
connect the headphones or external speakers.
Alternatively, you may connect the SPDIF output to an external
DTS, AC3, or PCM sound processor / decoder in your home
stereo system.

႑chapter1gettingtoknowthebasics
1-11
12. Microphone Jack
The microphone jack (3.5-mm diameter) is where you connect
a microphone.
13. Audio Volume Dial
Use the volume dial to control the loudness of the speakers.
14. Optical Drive (CD-ROM or DVD-ROM or CD-RW or Combo
or DVDrR/rRW) and Disk Eject Button and Manual Eject
Key Hole
If your computer comes with DVD-ROM, you may play DVD
movies or regular CD-ROM disk. If it comes with CD-RW drive
or Combo drive, you may save data onto a CD-R / CD-RW disk.
Press the eject button to eject the disk tray. The manual eject
keyhole allows you to manually eject a jammed disk.
15. PC Card Slot (Type II PCMCIA) and Card Eject Button
The slot is where PC Card (Type II PCMCIA) is inserted. Press
the eject button to release the PC Card.
Note: Some system may not have the PC Card Slot option.
16. Power Status LED
The multi-color LED indicates the power status of the notebook.
(See the LED Status Indicator Section for details.)
17. Suspend Status LED
Flashing orange light indicates the notebook is in suspend
mode. (See the LED Status Indicator Section for details.)
18. Built-in Microphone
The built-in microphone records sound.
႑chapter1gettingtoknowthebasics
1-12
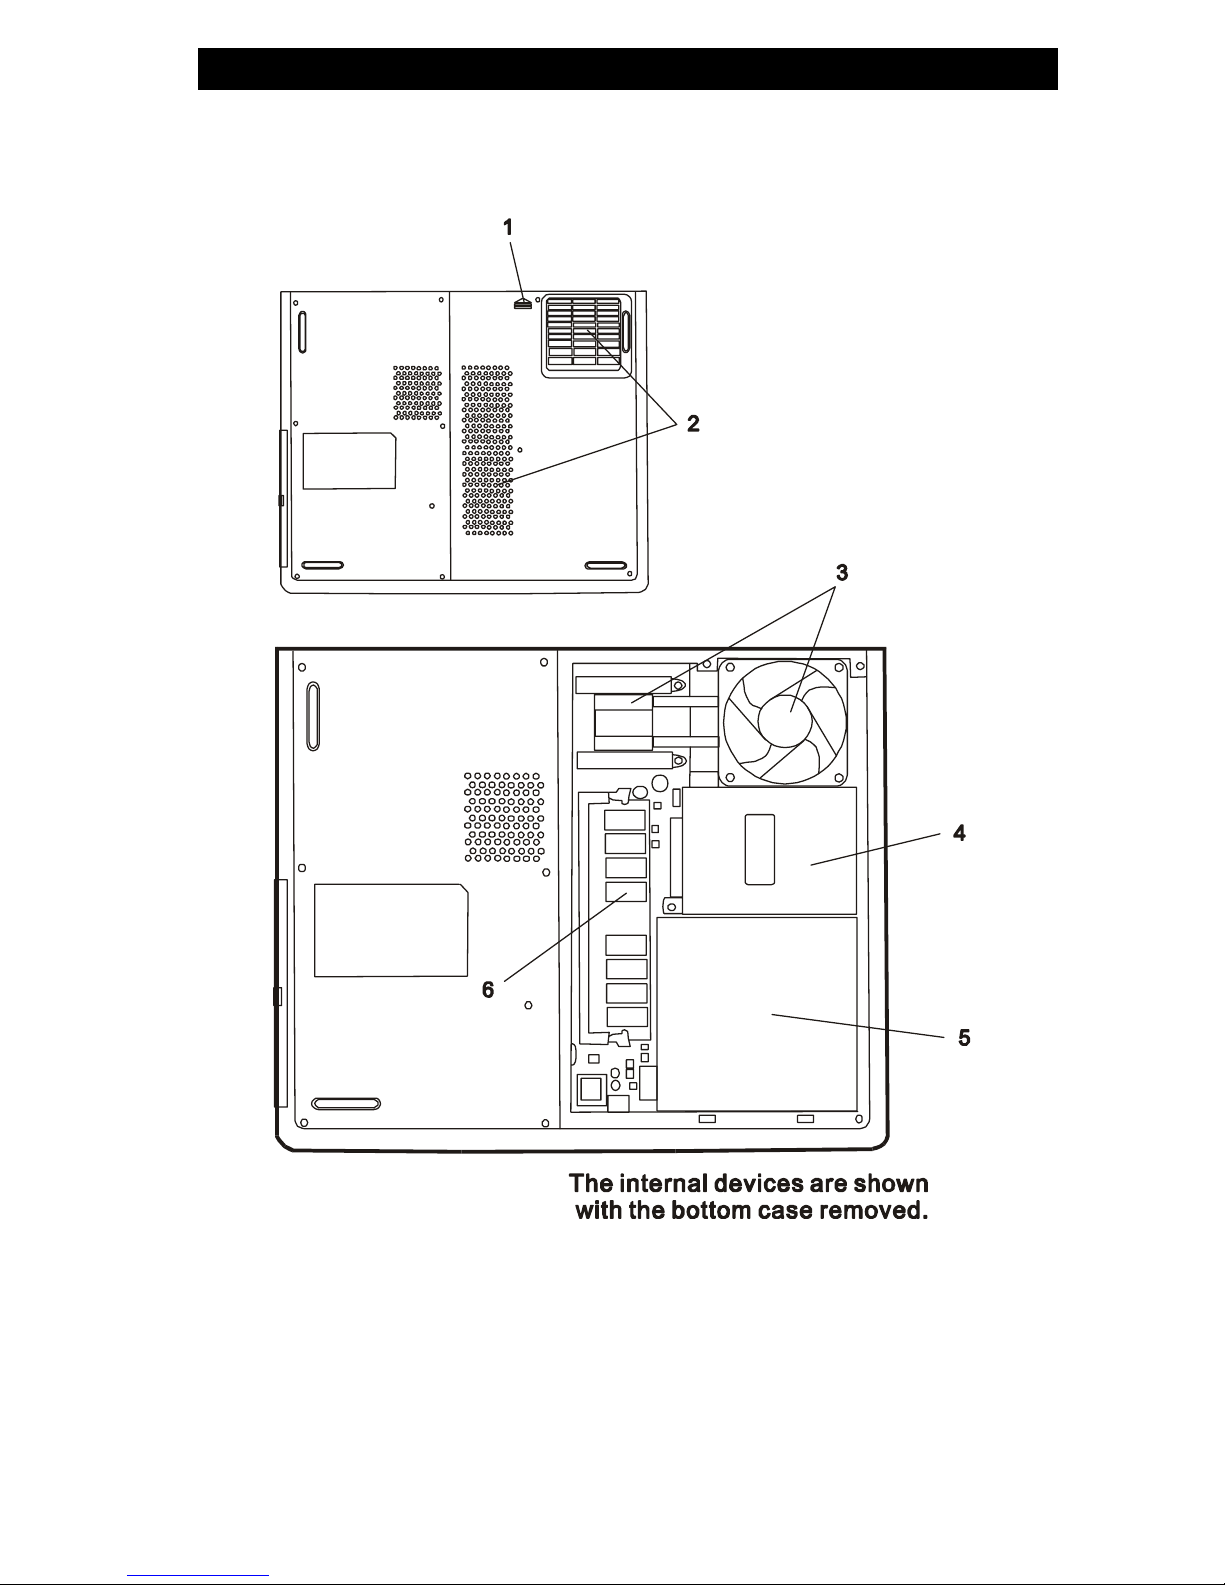
Bottom View
Table of contents
Other Targa Laptop manuals


