manuals.online logo
Brands
  1. Home
  2. •
  3. Brands
  4. •
  5. Tarptent
  6. •
  7. Tent
  8. •
  9. Tarptent MoTrail Manual

Tarptent MoTrail Manual

7. Repeat Step 6 for the second front corner (Image 2B).
 •Thetentshouldnowbestanding.
8. Slidepolestoverticaltogiveadditionaltension(Image2B--solidlines).
 •Adjustguylinetightenersandstakeplacementasneeded.
 •Adjustbathtuboorlinetightenersasnecessary(Image2B).
9. Ifpitchingwithonefrontpole,rstlocatethemiddlegrommetunderthe
 frontventap.Makesuretocenterthefrontofthetentbetweentherear
 corners,creatingsymmetricalridgelinesforanevenpitch(Image3B).
(Continued on the back)
Tarptent MoTrail Setup
Withpractice,setupislessthan2minutes.Foradditionalphotosandvideos
visit:http://www.tarptent.com/motrail.html
YourMoTrailorderincludes:stuffsack,tentbodyand4bluestakes.Youwill
needtrekkingpolesORsubstitutepoleswhichcanbeorderedfromTarptent.
I. Layout and Positioning
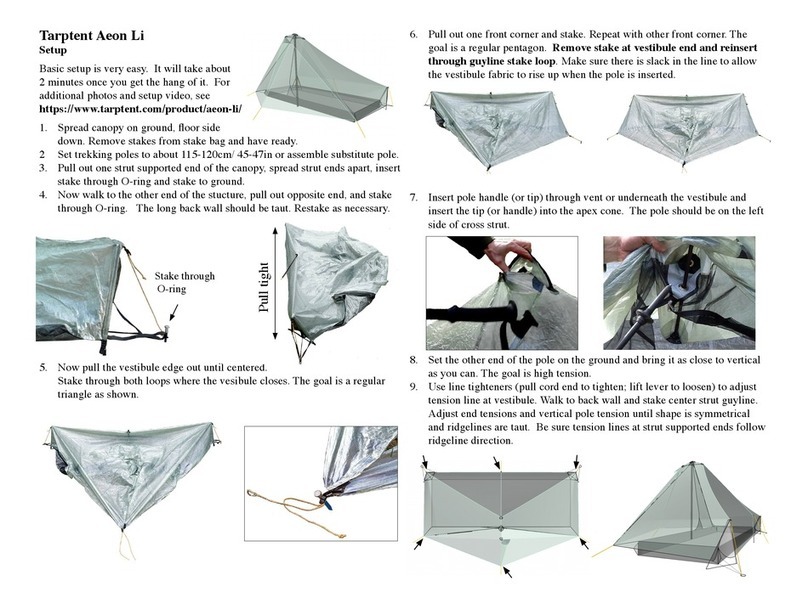
1. BeforepitchingyourMoTrail,spreadoutthetentbodywiththebathtub
oorfacingtheground.Ifusingagroundsheet,layitdownrst.
2. Remove4bluestakesfromthebagandhavethemready(2stakesinfront
and2inback).
3. Setonetrekkingpoletoalowsetting(~29in/~74cm)--thiswillbeyour
backpole(Image1).
4. Youcanuseoneortwopolesforthefrontsetup(use2polesformaximum
stability).Setthefrontpole(s)to~47in/120cm(Image1).
•Ifyouarenotusingtrekkingpoles,assemblesubstitutepoles.
II. Pitching the MoTrail
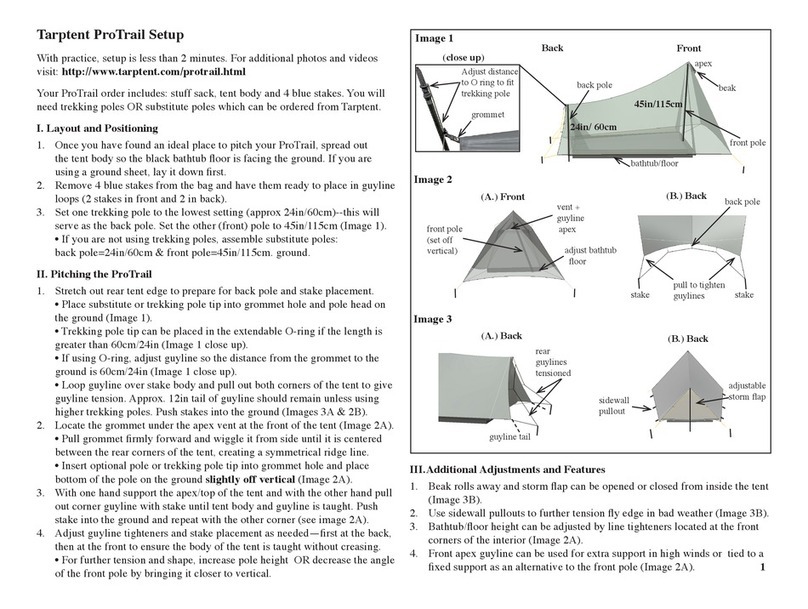
1. Startingatthebackofthetent,placethebackpoletipintothegrommet
holeandplacethepolehandle(orhead)ontheground(Image1-Back).
 •Ifyoucannotadjustyourtrekkingpoleto~29in/74cm,placethepole
 tipinsteadintotheextendableO-ring(Image1--closeup).
 •Adjusttheguylinesothedistancefromthegrommettothegroundis
 ~29in/74cm(Image1closeup).
2. Usingonehandtostabilizethepole,usetheotherhandtostretchoutone
backcornerandstakewhenthefabricisfullytaut.
 •Repeatwiththesecondbackcorner.Ideallytherewillbe~6in/15cmof
guylinetail/slack(Image2A).Thebackshouldnowbestanding.
3. Walktothefrontofthetent.Youcanuseoneor twotrekking(oroptional)
polesforthefrontsetup. If using one pole, skip to step 9.
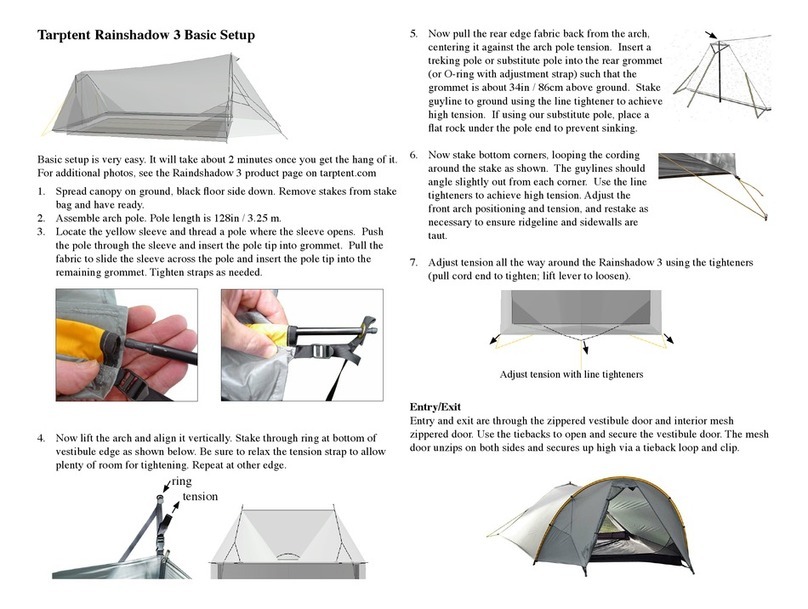
4. Ifpitchingwithtwofrontpoles,locatethetwoouter grommetsunderthe
frontventap(Image2B).
 •Pullgrommetsrmlyforwardandcenterthefrontofthetentbetweenthe
rearcorners,creatingsymmetricalridgelinesforanevenpitch(Image2B).
5. Placeonepoletipintoeachoftheoutergrommetsandpositionthepole
 handlesonthegroundnexttoeachother.ThisV-formationallowstwo
 polestofunctionasonepole.(Image2B-dottedlines).
6. Withonehandstabilizingthepoles,usetheotherhandtostakeoutthe
 adjacenttentcorner.Avoidmovingortiltingthepolesandkeepthe 
 ridgelinecenteredforanevenpitch(Image2B).   
Front
removeable
strut
Adjustdistance
toOringtot
trekkingpole
grommet
bathtuboor
Image 1
backpole
Image 2
(A.) Back (birds eye view)
stake stake
~29 in / 74 cm ~ 47 in / 120 cm
pulltotightenguylines
(idealguylineslack~6in/15cm)
Image 3
adjustable
stormap
(A.) Back
sidewall
pullouts
Back
(close up) ridgeline
(B.) Front
adjustbathtuboor
doublepole
setup
(B.) Front
singlepole
setup
frontguyline
backpole
ventap
ventap
stake stake
1
Tarptent MoTrail Setup (continued...)
10. Placepoletipintothemiddlegrommetandplacehandleontheground.
11. Withonehandstabilizingthepole,usetheotherhandtostakeoutthe
 adjacenttentcorner.Avoidmovingortiltingthepoleandensuretheridge
 lineremainscenteredforevenpitch(Image3B).
 •Repeatforthesecondfrontcorner.Thetentshouldnowbestanding.
12. Adjustguylinesandstakeplacementasnecessary,startingfronttoback.
13. Adjustbathtuboorlinetightenersasnecessary(Image2B).
III. Additional Adjustments and Features
1. Stormapcanbeopenedorclosedfrominsidethetent(Image3A).
2. Usesidewallpulloutstofurthertensionyedgeinbadweather(Image3A).
3. Topstrutcanberemovedifdesiredforpackability(Image1-Front).
4. Usefrontvestibuleguylineforextrasupportinhighwinds(Image1-Front).
5. Theclipbelowthefrontventapcanbeusedfortyingupmeshdoors.
6. Stabilizing Strap:Togivetheonepolefrontsetupadditionalstability,use
 thestabilizingstrap(Image4).
 •Werecommendapplyingtape,oralineofglue~6in/15cmbelow
 thetipofyourpole.Thiswillpreventthestabilizingstrapfrommovingup
 thepole(Image4D--whitearrow).
 •Locatethestabilizingstrapunderthetopventap.
 •Twistthestrapandrunyourfrontpolethroughtheopeningsothatthe
 strapistwistedaroundthetrekkingpole,belowthetip(Image4A,B,C).
 •Pushthetwistedstrapdownthepoleasfaraspossible,awayfromthe
 tip.Thestrapshouldbebelowthetapeorgluethatyoupreviouslyplaced
 aroundyourpole(~6in/15cmbelowthepoletip)(Image4D).
 •Afterthestrapiscorrectlypositioned,placethepoletipintothemiddle
 grommentholeandplacethepolehandleontheground(Image3B).
 •Finally,usethelinetightenerstofurthersecurethestabilizingstrap,
 effectivelyreducingfrontpolesidesway(Image4E).
IV. Condensation and Sag
• Forashort,animationaboutcondensationandwheretopitchyourtent
visit:https://www.youtube.com/watch?v=zCQuY_lAL1Y
• Nylonstretches(andsags)whenthehumiditygoesup,duringthenight,
and/orwhenitstartstorain.Usethelinetightenersand/orboosttrekking
polestotightenthefabric.
V. Key Points to Consider
• Thefabricwillresistmuchstressbutneitheramenorabrasion.Treatit
accordingly.
• Topreventtherearpolefromsinkinginlooseorwetsoil,placeitonathin,
atrock.
VI. Seam-Sealing
Tarptentsheltersneedtobeseam-sealedwithsiliconeonly!
•Pleaserefertotheseam-sealinginstructionalvideo:
http://www.tarptent.com/ttvideos.html
To Seam-Seal your MoTrail:
1. Setuptentinacool,dry,wellventilatedarea.
2. Inawellventilatedlocationpreparesiliconesealantbysquirtingapprox.3
tablespoonsofsiliconeintoatunacan(orasimilardisposablereceptacle)
andmixwithapprox.6tablespoonsmineralspirits(paintthinner)or
Colemanfuel/whitegas.Mixuntilthesolutionhastheconsistencyofa
thickoliveoil.
3. Usingasmallfoambrushorrolleduppapertowel,paintthesolutiononto
theseams.Afterthesolutionisapplied,runapapertowelovertheseams
tohelppushthesolutionintotheseamholesandtowipeuptheexcess
solution.
4. Werecommendpaintingseveralthicklinesofsiliconeontheinterior
bathtuboortoformananti-skidmat.
WehopeyouenjoyyourMoTrail!Feedbackisalwayswelcome.
Tarptent
12213KoswynCt.
NevadaCity,CA95959USA
e-mail:[email protected]/ph:(650)587-1548 2
BCD
line tighteners
E
A
Image 4
Other Tarptent Tent manuals

Tarptent Aeon Li User manual

Tarptent

Tarptent Aeon Li User manual

Tarptent Notch Li User manual

Tarptent

Tarptent Notch Li User manual

Tarptent Scarp 1 User manual

Tarptent

Tarptent Scarp 1 User manual

Tarptent Rainshadow 3 Manual

Tarptent

Tarptent Rainshadow 3 Manual

Tarptent Double Rainbow Manual

Tarptent

Tarptent Double Rainbow Manual

Tarptent Cloudburst 3 Manual

Tarptent

Tarptent Cloudburst 3 Manual

Tarptent Cloudburst 3 Manual

Tarptent

Tarptent Cloudburst 3 Manual

Tarptent StratoSpire Li User manual

Tarptent

Tarptent StratoSpire Li User manual

Tarptent Bowfin 2 User manual

Tarptent

Tarptent Bowfin 2 User manual

Tarptent Rainbow Manual

Tarptent

Tarptent Rainbow Manual

Tarptent Notch User manual

Tarptent

Tarptent Notch User manual

Tarptent ProTrail Manual

Tarptent

Tarptent ProTrail Manual

Tarptent Saddle 2 Manual

Tarptent

Tarptent Saddle 2 Manual

Popular Tent manuals by other brands

Crua Outdoors Culla Haul instruction manual

Crua Outdoors

Crua Outdoors Culla Haul instruction manual

Umbrosa INFINA FISETS300 RO Series manual

Umbrosa

Umbrosa INFINA FISETS300 RO Series manual

Sierra Designs FLASHLIGHT 1 Pitching instructions

Sierra Designs

Sierra Designs FLASHLIGHT 1 Pitching instructions

Wenzel 36512 Assembly instructions

Wenzel

Wenzel 36512 Assembly instructions

Skandika Saturn 4 Setup & maintenance

Skandika

Skandika Saturn 4 Setup & maintenance

Bestway NuCamp X4 owner's manual

Bestway

Bestway NuCamp X4 owner's manual

Bliss Hammocks BHT-A38ca manual

Bliss Hammocks

Bliss Hammocks BHT-A38ca manual

skandika outdoor HAMMERFEST 6 Setup Instruction

skandika outdoor

skandika outdoor HAMMERFEST 6 Setup Instruction

Celina 30’ x 45’ ETS FRAME TENT Instructions for use

Celina

Celina 30’ x 45’ ETS FRAME TENT Instructions for use

Ozark Trail W418.1S Assembly instructions and rules

Ozark Trail

Ozark Trail W418.1S Assembly instructions and rules

Dancover Multipavillon 6x6m manual

Dancover

Dancover Multipavillon 6x6m manual

Outwell PEBBLE 420A quick start guide

Outwell

Outwell PEBBLE 420A quick start guide

Vango BLADE 100 Pitching instructions

Vango

Vango BLADE 100 Pitching instructions

Boutique Camping ADVENTURE LUNA EMPEROR BELL TENT instruction manual

Boutique Camping

Boutique Camping ADVENTURE LUNA EMPEROR BELL TENT instruction manual

encompass ETP2-1414 instruction manual

encompass

encompass ETP2-1414 instruction manual

Boutique Camping TUAREG instruction manual

Boutique Camping

Boutique Camping TUAREG instruction manual

Coleman Tent 9250-147 instructions

Coleman

Coleman Tent 9250-147 instructions

X-METAL 37911 Assembly instructions

X-METAL

X-METAL 37911 Assembly instructions

manuals.online logo
manuals.online logoBrands
  • About & Mission
  • Contact us
  • Privacy Policy
  • Terms and Conditions

Copyright 2025 Manuals.Online. All Rights Reserved.