manuals.online logo
Brands
  1. Home
  2. •
  3. Brands
  4. •
  5. Tarptent
  6. •
  7. Tent
  8. •
  9. Tarptent Notch User manual

Tarptent Notch User manual

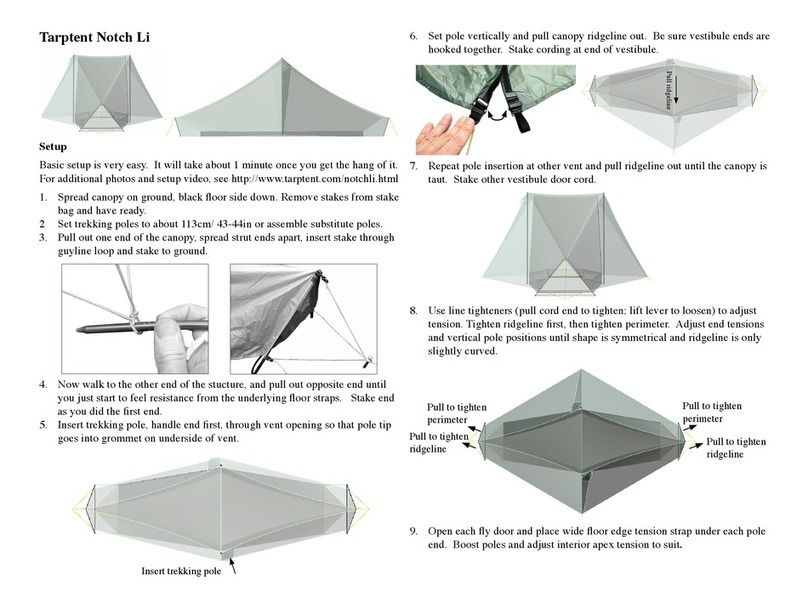
6. Set pole vertically and pull canopy ridgeline out. Be sure vestibule ends are
hooked together. Stake cording at end of vestibule.
7. Repeat pole insertion at other vent and pull ridgeline out until the canopy is
taut. Stake other vestibule door cord.
8. Use line tighteners (pull cord end to tighten; lift lever to loosen) to adjust
tension. Tighten ridgeline rst, then tighten perimeter. Adjust end tensions
and vertical pole positions until shape is symmetrical and ridgeline is only
slightly curved.
9. Open each y door and place wide oor edge tension strap under each pole
end. Boost poles and adjust interior apex tension to suit.
Tarptent Notch
Setup
Basic setup is very easy. It will take about 1 minute once you get the hang of it.
For additional photos and setup video, see http://www.tarptent.com/notch.html
1. Spread canopy on ground, black oor side down. Remove stakes from stake
bag and have ready.
2 Set trekking poles to 110-115cm/ 43-45in or assemble substitute poles.
3. Pull out one end of the canopy, spread strut ends apart, insert stake through
guyline loop and stake to ground.
4. Now walk to the other end of the stucture, and pull out opposite end until
you just start to feel resistance from the underlying oor straps. Stake end
as you did the rst end.
5. Insert trekking pole, handle end rst, through vent opening so that pole tip
goes into grommet on underside of vent.
Insert trekking pole
Pull ridgeline
Pull to tighten
perimeter
Pull to tighten
ridgeline
Pull to tighten
perimeter
Pull to tighten
ridgeline
Seam-sealing and Repair
If you did not order the seam-sealing kit or service, you can make your own
seam-sealing solution. Please refer to the seam-sealing instructional video:
http://www.tarptent.com/ttvideos.html
Seams must be sealed with a silicone-based sealer such as GE Silicone II clear
sealer. In a well-ventilated location, mix about three tablespoons into a tuna can
with about 3 tablespoons mineral spirits (paint thinner) or Coleman fuel/white
gas. Stir to dissolve and form a semi-viscous solution. Set up the tent and seal
the outside/topside seams over your living space. Paint the solution on with a
small foam brush for easy, smooth application. It’s also a good idea to paint
thicker swaths of silicone on the compartment oor in the area of your sleeping
pad to help reduce sliding, especially if you use an inatable pad.
Small fabric tears can be patched with pure silicone and scrap fabric (available
free on request).
Condensation and Sag
Ventilation and fabric warmth are your best defenses against condensation.
Keep doors open as much possible and try to set up where it’s breezy. Look for
warmer and drier microclimates under trees and out of valleys and lake basins.
Nylon stretches (and sags) when the humidity goes up, night is falling, and/or
when it starts to rain. Use the line tighteners and/or boost trekking poles from
inside to tighten the fabric.
Key points to consider
• Stake the apex pullouts for enhanced wind or snow performance and to
enable full side opening..
• The fabric will resist much stress but neither ame nor abrasion. Treat it
accordingly.
Thank you for your purchase and we sincerely hope that you enjoy your Notch.
Feedback is always welcome.
Tarptent
12213 Koswyn Ct.
Nevada City, CA 95959 USA
e-mail: [email protected]
ph: 650-587-1548
Venting
Fly end vents can be adjusted to suit conditions using the interior tieups. For
milder conditions and maximum ventilation, leave them open. For more severe
conditions, close using the velcro strips.
For more ventilation, each y door has a tie-back for full open venting. Use the
apex pullout to allow for complete vestibule rollback and full side venting.
Perimeter venting can be adjusted by raising or lowering trekking poles.
Inner Compartment
The inner compartment attaches to the outer y structure via clips and rings.
The compartment is completely detachable and both the outer y and inner
compartment can also be used standalone.
1. Unclip interior from y and spread on ground, black oor side down. Stake
all 4 corners.
2. Insert the trekking pole tips into the elastic loops.
3. Secure the two trekking poles as shown with extra cord and stakes to
tension the interior canopy.
4. Lift and tension each end using a strut--removed from y--or available
stick.

Other Tarptent Tent manuals

Tarptent MoTrail Manual

Tarptent

Tarptent MoTrail Manual

Tarptent Rainshadow 3 Manual

Tarptent

Tarptent Rainshadow 3 Manual

Tarptent Double Rainbow Manual

Tarptent

Tarptent Double Rainbow Manual

Tarptent Rainbow Manual

Tarptent

Tarptent Rainbow Manual

Tarptent Saddle 2 Manual

Tarptent

Tarptent Saddle 2 Manual

Tarptent Notch Li User manual

Tarptent

Tarptent Notch Li User manual

Tarptent Aeon Li User manual

Tarptent

Tarptent Aeon Li User manual

Tarptent Cloudburst 3 Manual

Tarptent

Tarptent Cloudburst 3 Manual

Tarptent Bowfin 2 User manual

Tarptent

Tarptent Bowfin 2 User manual

Tarptent StratoSpire Li User manual

Tarptent

Tarptent StratoSpire Li User manual

Tarptent Scarp 1 User manual

Tarptent

Tarptent Scarp 1 User manual

Tarptent Cloudburst 3 Manual

Tarptent

Tarptent Cloudburst 3 Manual

Tarptent ProTrail Manual

Tarptent

Tarptent ProTrail Manual

Popular Tent manuals by other brands

Coleman 9391A133 instruction manual

Coleman

Coleman 9391A133 instruction manual

23zero WOOF-DEN user manual

23zero

23zero WOOF-DEN user manual

Tempo Fitness S11 manual

Tempo Fitness

Tempo Fitness S11 manual

U-Line H-9236 manual

U-Line

U-Line H-9236 manual

ShelterLogic Peak Style 8' W x 8' H Assembly instructions

ShelterLogic

ShelterLogic Peak Style 8' W x 8' H Assembly instructions

Quest Engineering Signature Emperor instructions

Quest Engineering

Quest Engineering Signature Emperor instructions

RioOutdoors 4F-QH installation instructions

RioOutdoors

RioOutdoors 4F-QH installation instructions

TMG TMG-GH1240 product manual

TMG

TMG TMG-GH1240 product manual

Inalto ARBC90TPS user manual

Inalto

Inalto ARBC90TPS user manual

Dancover 5m PE Series quick start guide

Dancover

Dancover 5m PE Series quick start guide

V-TAC 80133970 instruction manual

V-TAC

V-TAC 80133970 instruction manual

Coleman CRESCENT RIM 9'x9' installation manual

Coleman

Coleman CRESCENT RIM 9'x9' installation manual

Vango SOUL Pitching instructions

Vango

Vango SOUL Pitching instructions

GigaTent Katahdin FT020 owner's manual

GigaTent

GigaTent Katahdin FT020 owner's manual

Outer Limits OLT-BAC-07 owner's manual

Outer Limits

Outer Limits OLT-BAC-07 owner's manual

Anthem SportPod A00-212 quick start guide

Anthem

Anthem SportPod A00-212 quick start guide

Eureka Timberline user manual

Eureka

Eureka Timberline user manual

gaviota VERTIKO Assembly instructions

gaviota

gaviota VERTIKO Assembly instructions

manuals.online logo
manuals.online logoBrands
  • About & Mission
  • Contact us
  • Privacy Policy
  • Terms and Conditions

Copyright 2025 Manuals.Online. All Rights Reserved.