Tascam GT-R1 User manual

»
GT-R1
Portable
Guitar/Bass
Recorder
D01035410B
OWNER’S MANUAL
This device has a serial
number located on the rear
panel. Please record it and
retain it for your records.
Serial number:
__________________

2TASCAM GT-R1
Table of Contents
1–Introduction 5
Main functions . . . . . . . . . . . . . . . . . . . 5
Supplied accessories . . . . . . . . . . . . . . . . 5
Recycling the rechargeable battery . . . . . . . . . 6
Copyrights . . . . . . . . . . . . . . . . . . . . . 6
Notes about this manual . . . . . . . . . . . . . . 6
2–Preparation 7
About SD cards . . . . . . . . . . . . . . . . . . . 7
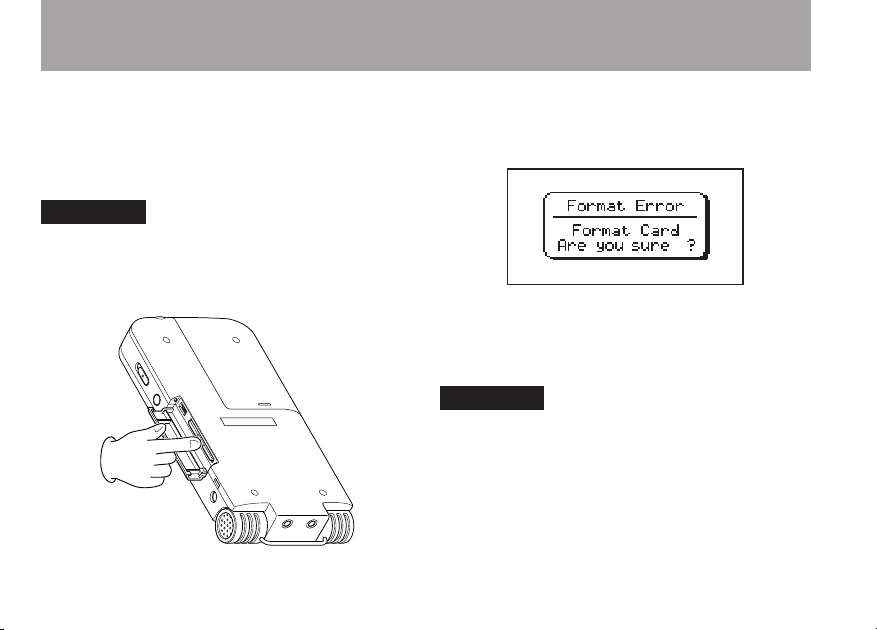
Inserting the SD card . . . . . . . . . . . . . . . 7
Removing the SD card . . . . . . . . . . . . . . 8
Inserting a new card . . . . . . . . . . . . . . . 8
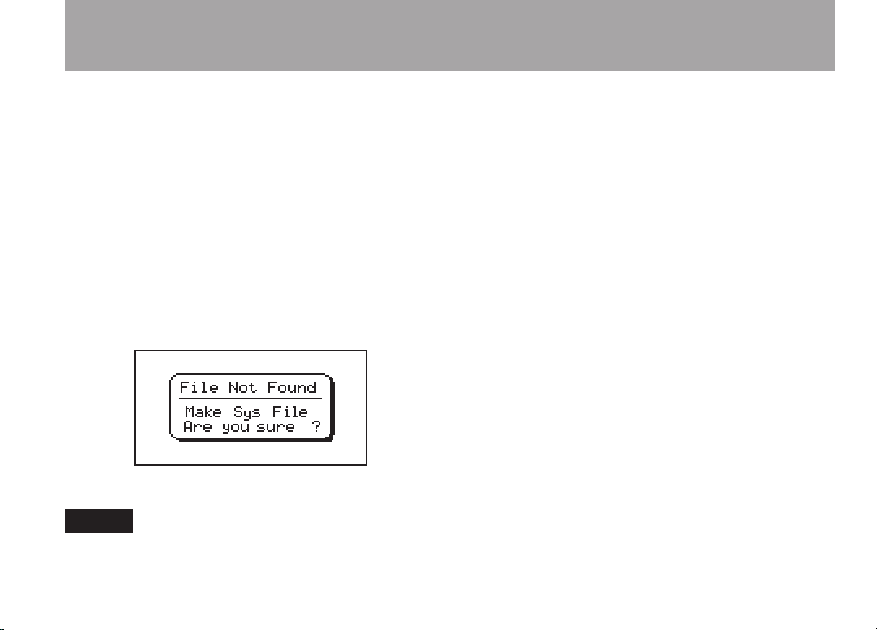
Other cases that require formatting . . . . . . . . 9
Powering the unit. . . . . . . . . . . . . . . . . . 9
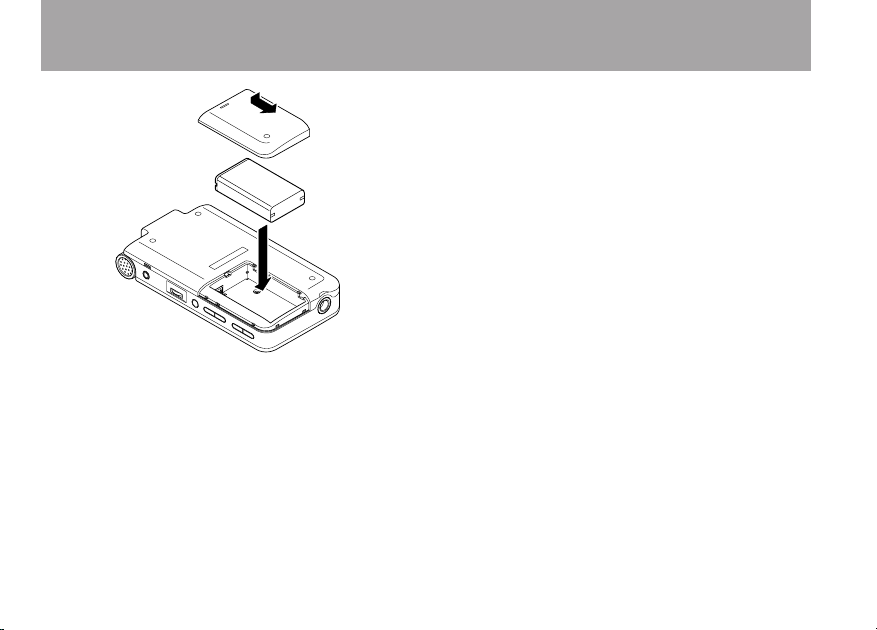
Installing the battery . . . . . . . . . . . . . . . 9
Changing the battery . . . . . . . . . . . . . . 10
Charging the battery . . . . . . . . . . . . . . 10
Turning the power on and off . . . . . . . . . . 11
Setting the date and time . . . . . . . . . . . . . 12
Resetting the unit. . . . . . . . . . . . . . . . . 12
3–Part Names and Functions 13
Top panel . . . . . . . . . . . . . . . . . . . . 13
Right side panel . . . . . . . . . . . . . . . . . 17
Left side panel . . . . . . . . . . . . . . . . . . 19
Front panel . . . . . . . . . . . . . . . . . . . . 20
Rear panel . . . . . . . . . . . . . . . . . . . . 20
Bottom panel. . . . . . . . . . . . . . . . . . . 21
4–Screen Overview 22
Home Screen . . . . . . . . . . . . . . . . . . . 22
Record Screen . . . . . . . . . . . . . . . . . . 25
Rhythm Screen . . . . . . . . . . . . . . . . . . 26
Setting Screens . . . . . . . . . . . . . . . . . . 27
Setting screen structure . . . . . . . . . . . . . 27
Operation basics . . . . . . . . . . . . . . . . 27
Operation example . . . . . . . . . . . . . . . 30
5–Practicing Music with this Unit 32
Select the input . . . . . . . . . . . . . . . . . 32
Use input monitoring . . . . . . . . . . . . . . . 32
Tune instruments . . . . . . . . . . . . . . . . . 33
Use effects . . . . . . . . . . . . . . . . . . . 33
Learn musical phrases. . . . . . . . . . . . . . . 33
Play along with the rhythm machine . . . . . . . . 33
Use a metronome. . . . . . . . . . . . . . . . . 33
Record as you play with the rhythm machine . . . . 34
Perform along with a track . . . . . . . . . . . . 34
Repeat and loop playback . . . . . . . . . . . . 34
Change track pitch . . . . . . . . . . . . . . . 34
Change track speed . . . . . . . . . . . . . . 35
Reduce guitar or bass sounds . . . . . . . . . . 35

3TASCAM GT-R1
Table of Contents
Overdub . . . . . . . . . . . . . . . . . . . . . 35
6–Making Connections 36
Connecting monitors . . . . . . . . . . . . . . . 36
Connecting with a computer. . . . . . . . . . . . 36
Disconnecting from a computer . . . . . . . . . . 37
Connecting a guitar or bass . . . . . . . . . . . . 38
Connecting mics and other audio devices . . . . . 38
Connecting an external mic . . . . . . . . . . . 38
Connecting mixers and other audio equipment . . 39
7–Recording 40
Selecting the file type and sampling frequency . . . 40
Setting the maximum file size . . . . . . . . . . . 41
Selecting the input source . . . . . . . . . . . . . 42
Setting the INT/MIC IN input functions. . . . . . . 43
Display of input functions on the Record Screen . . 45
Adjusting the built-in microphone angle . . . . . . 46
Adjusting the input level . . . . . . . . . . . . . 47
About recording modes . . . . . . . . . . . . . . 49
Ordinary recording . . . . . . . . . . . . . . . . 49
Overdubbing . . . . . . . . . . . . . . . . . . . 50
Preparation for overdubbing . . . . . . . . . . . 50
Overdub recording . . . . . . . . . . . . . . . 51
8–Playback 54
Starting and stopping playback . . . . . . . . . . 54
Selecting tracks. . . . . . . . . . . . . . . . . . 54
Search forward and backward . . . . . . . . . . . 55
Using the wheel to change the playback position . . 55
Adjusting the volume . . . . . . . . . . . . . . . 56
9–Playback Area and Playlist 57
Setting the playback area . . . . . . . . . . . . . 57
Selecting a folder for the playback area . . . . . . 58
Selecting a file to set the playback area . . . . . . 59
Playlist . . . . . . . . . . . . . . . . . . . . . . 60
Adding tracks to the playlist . . . . . . . . . . . 60
Editing the playlist . . . . . . . . . . . . . . . 61
10–Browse Screen 63
Screen navigation. . . . . . . . . . . . . . . . . 63
Icons on the BROWSE screen . . . . . . . . . . . 64
File operations . . . . . . . . . . . . . . . . . . 64
Folder operations . . . . . . . . . . . . . . . . . 65
11–Special Playback Control Functions 66
Setting the playback control functions . . . . . . . 66
Changing the speed. . . . . . . . . . . . . . . . 67
Changing speed without changing pitch . . . . . . 67
Changing pitch without changing speed . . . . . . 68
Reducing guitar and bass sounds . . . . . . . . . 68
12–Loop, Repeat and Single Playback 70
Loop playback . . . . . . . . . . . . . . . . . . 70

4TASCAM GT-R1
Table of Contents
Repeat and single track playback modes . . . . . . 71
13–Copying Tracks from a Computer 72
Preparing audio files on a computer . . . . . . . . 72
Copying audio files from a computer . . . . . . . . 72
Managing the Music Folder from a computer . . . . 73
14–Using the Effects 74
Turning the effect ON and OFF. . . . . . . . . . . 74
Setting the effect . . . . . . . . . . . . . . . . . 74
Effect modules . . . . . . . . . . . . . . . . . . 76
Closing the Effect Screen . . . . . . . . . . . . . 76
15–Using the Tuner 77
Preparation. . . . . . . . . . . . . . . . . . . . 77
AUTO (chromatic tuner mode) . . . . . . . . . . . 77
GUITAR (guitar tuner mode). . . . . . . . . . . . 78
BASS (bass tuner mode). . . . . . . . . . . . . . 78
OSC. (oscillator mode) . . . . . . . . . . . . . . 78
16–Using the Rhythm Machine 80
Rhythm mode . . . . . . . . . . . . . . . . . . 80
Rhythm Screen features . . . . . . . . . . . . . . 81
Setting the rhythm machine . . . . . . . . . . . . 83
Playing along with the rhythm machine . . . . . . 85
Preparation. . . . . . . . . . . . . . . . . . . 85
Practicing with a rhythm . . . . . . . . . . . . . 87
Record playing with a rhythm . . . . . . . . . . . 87
Apply effects to the rhythm machine. . . . . . . . 89
17–System Settings and Formatting 90
Making System Settings. . . . . . . . . . . . . . 90
Restoring the factory settings . . . . . . . . . . . 91
Formatting the SD card . . . . . . . . . . . . . . 91
Using QUICK FORMAT. . . . . . . . . . . . . . 92
Using FULL FORMAT . . . . . . . . . . . . . . 92
18–Viewing File Information 93
File information page . . . . . . . . . . . . . . . 93
Memory information page. . . . . . . . . . . . . 94
System information page . . . . . . . . . . . . . 94
19–Effects Preset List 95
20–Effect Module Parameters List 98
21–Rhythm Pattern List 102
22–GT-R1 Messages 104
23–Specifications 108
Audio Input and Output . . . . . . . . . . . . . .108
Audio performance . . . . . . . . . . . . . . . .109
Other specifications. . . . . . . . . . . . . . . .109
Computer requirements . . . . . . . . . . . . . .110
Dimensions. . . . . . . . . . . . . . . . . . . . 111

5TASCAM GT-R1
Thank you very much for purchasing the TASCAM
GT-R1 Portable Recorder. Please read this Owner’s
Manual carefully in order to maximize your use of
all the unit’s features. We hope that you will enjoy
using this recorder for many years to come. Please
make copies of this manual and keep them in safe
places for future reference.
Main functions
Portable recorder designed for guitar and bass
•
players
Uses an SD card as the recording media
•
Record with the built-in microphones or by
•
connecting a guitar, bass, CD player or other
audio device
Choose MP3 (32 kbps–320 kbps, 44.1 kHz or
•
48 kHz) or WAV (16-bit or 24-bit, 44.1 kHz or
48 kHz) audio file types for recording
Mix and record the input signal with the
•
playing audio track (overdubbing)
Practice and record along with the built-in
•
rhythm machine
Special playback functions include decreasing
•
playback speed without changing pitch and
reducing the sound of a recorded guitar or bass
during playback
Built-in effects can be applied to the input
•
signal, rhythm machine or playback signal
Copy audio files from a computer to this unit’s
•
SD card by USB connection
Supplied accessories
Soft case
•.............................1
SD card (in unit; contains copy of manual)
•. 1
USB cable
•...........................1
Quick Start Guide
•.....................1
Warranty card
•........................1
BP-L2 (lithium ion battery)
•..............1
BP-L2 manual
•........................1
BP-L2 warranty card
•...................1
Please contact the store where you purchased this
unit if any of these accessories are missing or have
been damaged during transportation.
1–Introduction

6TASCAM GT-R1
Recycling the rechargeable
battery
This device uses a lithium ion battery. Please
do not throw away the battery when it is no
longer necessary.
If you have any questions, please contact us
(see the last page of this manual for contact
information).
Li-ion00
Trademarks
Windows, Vista, Windows XP and Windows 2000
are trademarks of Microsoft Corporation.
Macintosh, Mac OS, and Mac OS X are trade-
marks of Apple Inc.
The SD Logo is a trademark.
Notes about this manual
Font use conventions
Controls, keys and other parts on the GT-R1
•
are written like this: MENU.
Messages shown on the display are written like
•
this:
Are you sure?
We use the term “key” to describe the push-
•
button controls on the GT-R1.
Tracks and files are the same
Tracks are les, and les are tracks.
In this manual, we usually use the word “track”
when we are describing the playback of a song, for
example, just as we would if talking about songs
on a CD or a portable music player. However,
when we talk about their data properties, such as
sampling frequencies and ID3 tags, we often refer
to the same “tracks” as “les” because they can be
manipulated in ways similar to les on a computer.
1–Introduction

7TASCAM GT-R1
About SD cards
Since this unit uses an SD card for recording and
playback, you must insert an SD card into the unit
before use. You can use 64 MB–2 GB SD cards
and 4 GB–32 GB SD HC cards with this unit.
Please see the TASCAM web site (www.tascam.
com) for information about cards that have been
tested with the GT-R1.
NOTE
When new, this unit comes with a 1GB SD card
inserted. This card can be used for recording
and playback as is. There is no need to reinsert
or format it.
Inserting the SD card
The SD card slot and the USB connector are under
the cover on the left side of the unit.
Press the cover down in the direction of the arrow
to open it. Insert the included SD card in the SD
card slot and push it until it clicks fully into place.
2–Preparation

8TASCAM GT-R1
Removing the SD card
Press the inserted SD card in gently and it will
disengage from the unit so that you can pull it
out completely.
CAUTION
Do not remove the SD card during recording or
playback, or when the unit is connected to the
computer by USB.
Inserting a new card
The following pop-up screen appears if you insert
a new card in the unit.
Press the ¥/π key to format the card so that it can
be used with this unit.
Wh
en formatting nishes, the Home Screen ap
pears.
CAUTION
Formatting an SD card erases all files that are
on it. Make certain that you have copied any
files that you want to save from the card before
formatting it.
2–Preparation

9TASCAM GT-R1
Other cases that require formatting
• The above “
FORMAT ERROR
” screen also
appears if you install an SD card that was
formatted by a device other than the GT-R1.
Reformat the card to use it with this unit. However,
SD cards that have been formatted by TASCAM
DR-1 units are compatible with the GT-R1, so you
can use such cards as is and the above screen does
not appear.
• The following pop-up screen appears if a system
le or other crucial le was accidentally erased
from the SD card when used with a computer
In either case, press ¥/π to reformat the card.
TIP
Always make backup copies of important files as
soon as you can.
Powering the unit
The GT-R1 can be operated using a special lithium
ion battery (BP-L2) or an AC adapter (PS-P520).
One battery is included with the unit and the AC
adapter and additional batteries are available for
purchase separately. You can charge the battery by
connecting the unit to a computer by USB or using
an AC adapter. When shipped new, the included
battery is not sufciently charged, so it must be
charged before using the unit. Charge the battery
or connect the AC adapter before using the unit.
Installing the battery
Slide the battery case cover on the back of the unit
to open it, and insert the GT-R1 battery that was
included in the box.
2–Preparation

10 TASCAM GT-R1
Changing the battery
You can purchase additional batteries (BP–L2)
that are identical to the one included with the unit.
You might want to purchase extra batteries if you
expect to use the GT-R1 for recording or other
applications for long periods of time when you will
not be able to recharge or use an AC adapter (also
sold separately).
To change the battery, slide and remove the battery
case cover on the bottom panel.
Charging the battery
Charging with a computer
Open the cover on the left side panel, and use the
included USB cable to connect the unit’s USB port
to a USB port on a computer.
Please connect this unit directly to a computer.
Proper charging and operation cannot be assured
when using a USB hub.
Even if the power for the unit is off, the battery
charges when connected to a computer by USB.
The computer may need to be ON to charge the
battery.
Complete charging by USB takes about 6 hours
(when the unit’s power is OFF).
If you connect this unit and a computer when the
unit’s power is ON, the unit automatically enters
USB connection mode. (See “Connecting with a
computer” on page 36).
2–Preparation

11 TASCAM GT-R1
Charging with an AC adapter
(purchased separately)
Connect an AC adapter to the DC IN 5V jack to
charge the unit.
Complete charging with the adapter takes about 3
hours (whether the unit’s power is ON or OFF).
You can use this unit normally as it is charged by
the connected AC adapter.
NOTE
The charging indicator to the right of the display
lights orange during charging. The indicator
turns off when charging is complete.
Charging
indicator
Turning the power on and off
To turn the power ON, press and hold the POWER
key on the left side panel until “
TASCAM
G T- R1
” appears on the display.
The Home Screen appears when the unit starts up.
To turn the power OFF, press and hold the POWER
key until “
PORTABLE GUITAR/BASS
RECORDER
” appears on the display.
2–Preparation

12 TASCAM GT-R1
Setting the date and time
Follow these procedures to set the date and time
of the built-in clock. When you create an audio
le, date and time information is included in the
le data.
1 Press the MENU key to open the Menu
Screen.
2 Use the wheel to select
DATE/TIME
and press the ¥/ π key to open the
Date/Time Screen.
The clock stops while this screen is displayed.
3 Use the µand ≤keys to move the cursor
(the part highlighted in inverse)
and use the wheel to set the values.
4 After making the setting, press the ¥/ π key
to restart the clock from the newly set value.
The display returns to the Menu Screen.
Resetting the unit
The back panel of the unit has a reset hole.
If the unit is operating abnormally, push the end of
a paperclip, ne pin or similar item into this hole to
press a button inside the unit. This turns the power
OFF and resets the GT-R1’s system.
CAUTION
Do not press the reset button when the unit is
functioning properly.
2–Preparation

13 TASCAM GT-R1
Top panel
1Built-in stereo microphone
To use this stereo electret condenser
microphone as the input source, select “
IN T/
MIC
” on the input setting screen. If you
connect an external microphone to the MIC IN
jack on the rear panel, the built-in microphone
becomes inactive.
2Display
In addition to the Home Screen, this shows the
recording screen, various setting screens, and
other operation information. (See “4–Screen
Overview” on page 22.)
3MENU key
When the Home Screen is displayed, press
this key to open the Menu Screen.
Press this key to return to the Menu Screen
from the various setting screens.
When the Menu Screen is displayed, press this
key to return to the Home Screen.
3–Part Names and Functions

14 TASCAM GT-R1
4LOOP key
Press this key to turn loop playback mode ON
and OFF, allowing you to repeat playback of
a selected interval. (See “Loop playback” on
page 70.)
5I/O key
Use this key to set the IN (start) and OUT
(end) points of the interval that you want to
set for loop playback. When the IN and OUT
points are already set, press this key to erase
them. (See “Loop playback” on page 70.)
6µkey
Press this key to return to the beginning of a
track that is playing or stopped in the middle.
If you press this key when a track is stopped
at its beginning, the unit will skip to the
beginning of the previous track.
Press and hold this key to search backwards.
On the setting screens, use this key to move
the cursor left. On the Browse Screen, press
this key to move up a level.
When the Rhythm Screen is open, use this
button to select patterns.
7≤key
Press this key during playback or when
playback is stopped to skip to beginning of the
next track.
Press and hold this key to search forward.
On the setting screens, use this key to move
the cursor right.
On the Browse Screen, press this key to move
down a level.
When the Rhythm Screen is open, use this
button to select patterns.
NOTE
Keys 6and 7may not work for all VBR
MP3 files. For some VBR MP3 files, operating
these keys may cause the sound to be not
synchronized with the elapsed time shown on
the display and the end parts of the file being
played back may be repeated at the end of the
track. In this case, stop playback to return to
normal operation.
3–Part Names and Functions

15 TASCAM GT-R1
8PB CONTROL key
Press and hold this key to open the Playback
Control (
PB CONTROL
) Screen. When the
Playback Control Screen is open, press and
hold this key to return to the Home Screen.
(See “11–Special Playback Control Functions”
on page 66.)
Briefly press this key to turn the speed control
that is set on the Playback Control Screen
(VSA and/or SPEED) ON and OFF. When
ON, the icon appears at the top of
the Home Screen as light letters on a dark
background.
When the Rhythm Screen is open, press
the PB CONTROL key to open the Rhythm
Setting Screen.
9FX key
Briefly press this key to turn the effect
function ON and OFF.
Press and hold this key to open the Effect
Setting Screen. When the Effect Setting
Screen is open, press and hold this key to
return to the Home Screen. (See “14–Using
the effects” on page 74.)
NOTE
When the Home Screen is open, press the PB
CONTROL and FX keys at the same time to open
the Rhythm Screen and enter rhythm mode. To
end rhythm mode, press the PB CONTROL and
FX keys at the same time to return to the Home
Screen.
0¥/π key
When the Home Screen is displayed and
playback is stopped, press this key to start
playback. During playback, press this key to
stop playback at the current position.
When using a setting screen, use this key,
for example, to confirm a selection, advance
a level in a menu and answer “YES” to a
confirmation message
When the Rhythm Screen is open, use this key
to start and stop the rhythm machine.
3–Part Names and Functions

16 TASCAM GT-R1
qWheel
When a setting screen is open, use the Wheel
to change the setting of the selected item.
When the Home Screen is open, use the wheel
to adjust the file playback position.
When the Rhythm Screen is open, use this to
set the tempo.
wSTOP/HOME key
Press this key to stop recording and playback
or to end recording standby.
When a setting screen is open, press to return
to the Home Screen.
On a setting screen, use this key to respond
“NO” to a confirmation message.
eREC/PAUSE key
When playback is stopped, press this key to
put the unit into recording standby. When
in standby, this key flashes. If the Input
Setting Screen
MONITOR
item is ON, the
Overdubbing ON/OFF pop-up appears. (See
“7–Recording” on page 40.)
When in recording standby, press this key
to start recording. The key lights while
recording.
When recording, press this key to pause
recording.
When the Rhythm Screen is open this works
in the same way. Press this key to put the
rhythm machine into record standby, and
press it again in record standby to start
recording. (See “Record playing with a
rhythm” on page 87.)
rPEAK indicator
This lights when the selected input signal
exceeds the maximum level.
tCharge indicator
This indicator lights orange when the lithium
ion battery installed in this unit is charging.
The light turns OFF when the battery is fully
charged.
3–Part Names and Functions

17 TASCAM GT-R1
3–Part Names and Functions
Right side panel
yOUTPUT VOLUME (+, –) keys
Use these keys to adjust the signal level output
from the /LINE OUT jack. The volume level
appears on the display during adjustment.
uMIX BALANCE (–, +) keys
When the Input Setting Screen’s
MONITOR
item is set to
ON
, use these keys to adjust the
volume of the playback signal (including the
rhythm machine when in rhythm mode) that is
mixed with the input signal.
The playback volume appears on the display
during adjustment. Use the +key to raise the
volume and the – key to lower the volume.
When
MONITOR
is set to
OFF
, “
MONITOR
OFF
” appears on the screen and these keys
have no effect.
iSETTING key
Press this key to open the Input Setting
Screen where you can select the input, make
INT/MIC IN
settings and turn
MONITOR
ON and OFF.

18 TASCAM GT-R1
3–Part Names and Functions
oINPUT volume
Use this to adjust the input signal level of the
built-in microphone, the GUITAR IN jack and
the MIC IN jack. This does not affect the input
signal level of the LINE IN jack
p/LINE OUT jack
Use this to connect with headphones or the
line input jack of an amp or other equipment.
Depending on the
MONITOR
setting and
recorder operation status, this outputs the
input signal, the playback signal or a mix of
both signals.

19 TASCAM GT-R1
3–Part Names and Functions
Left side panel
aDC IN 5V jack
Connect a TASCAM PS-P520 AC adapter
(purchased separately) to this jack.
sSD card slot
Insert an SD card into this slot. (See “About
SD cards” on page 7.)
dUSB port
Use the included USB cable to connect with a
computer USB port. (See “Connecting with a
computer” on page 36.)
CAUTION
Please connect the unit directly to a computer
without using a USB hub.
fPOWER key
Press and hold this key to turn the unit’s
power ON and OFF.
gHOLD switch
Slide this to the left to turn the hold function
ON. All keys are inoperative when hold is ON.

20 TASCAM GT-R1
Front panel
hGUITAR IN jack
Use this standard mono phone jack to connect
a guitar or bass.
NOTE
We call this the Front Panel because this is the
end that faces the operator of the unit when
placed on a table with the built-in mic directed
toward the sound source. Likewise, the Rear
Panel is the end that faces away from the
operator in this situation.
Rear panel
jMIC IN jack
Use this input jack to connect a stereo
mini-jack microphone. This jack provides
plug-in power when set to do so on the
Input Setting Screen.
kLINE IN jack
Use this stereo mini-jack for line input.
The input level is fixed at –10 dBV.
3–Part Names and Functions
Other manuals for GT-R1
2
Table of contents
Other Tascam Music Equipment manuals

Tascam
Tascam CD-BT2 User manual

Tascam
Tascam TM-AM1 User manual

Tascam
Tascam MP-GT1 User manual

Tascam
Tascam TM-AM3 User manual

Tascam
Tascam CD-VT2 User manual

Tascam
Tascam MP-GT1 User manual

Tascam
Tascam HS-4000 Owner's manual

Tascam
Tascam CD-GT2 User manual

Tascam
Tascam CD-GT1 User manual

Tascam
Tascam CD-GT1mkII User manual
Popular Music Equipment manuals by other brands

Comfort audio
Comfort audio Comfort Digisystem Programmer DT05 user manual

BOSSCO
BOSSCO RC-30 owner's manual

Audio Control
Audio Control Richter Scale 3 Series owner's manual

HH Scott
HH Scott 296 operating manual

W. A. Production
W. A. Production CHORDS Pro + NOTES quick start guide

digi-tech
digi-tech Artist 2120 manual