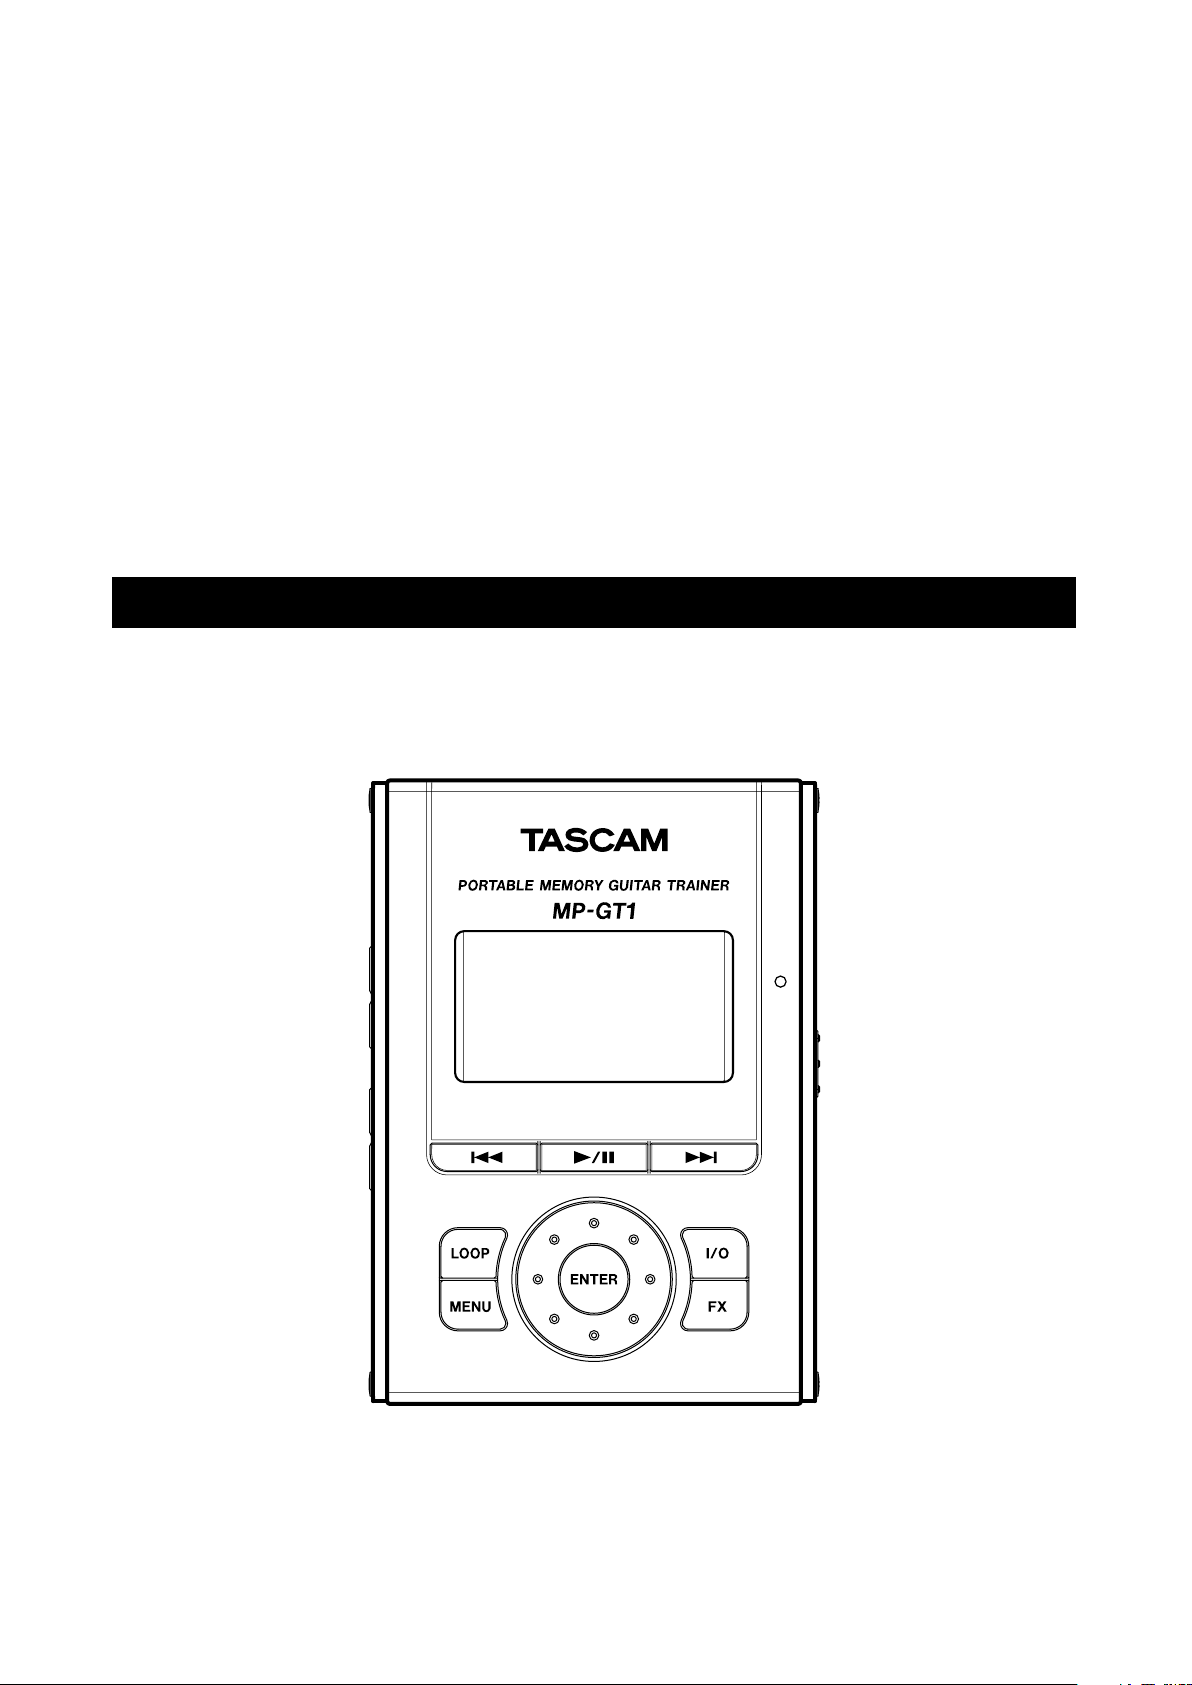
Tascam MP-GT1 User manual

D00980301A
MP-GT1
Portable Memory Guitar Trainer
»
OWNER'S MANUAL

2 TASCAM MP-GT1
Contents
1 – Introduction...................................................... 3
Supplied accessories.................................................... 3
Manual conventions .................................................... 3
Precautions for placement and use.............................. 3
Beware of condensation............................................... 3
About the power supply.............................................. 4
Recharging the battery................................................. 4
Recharging with a computer ......................................... 4
Recharging with a PS-P520 AC adapter ............................ 4
Turning the power on and off........................................ 4
To turn the MP-GT1 power on........................................ 4
To turn the MP-GT1 power off ....................................... 4
2 – Part names and functions .......................... 5
Top Panel..................................................................... 5
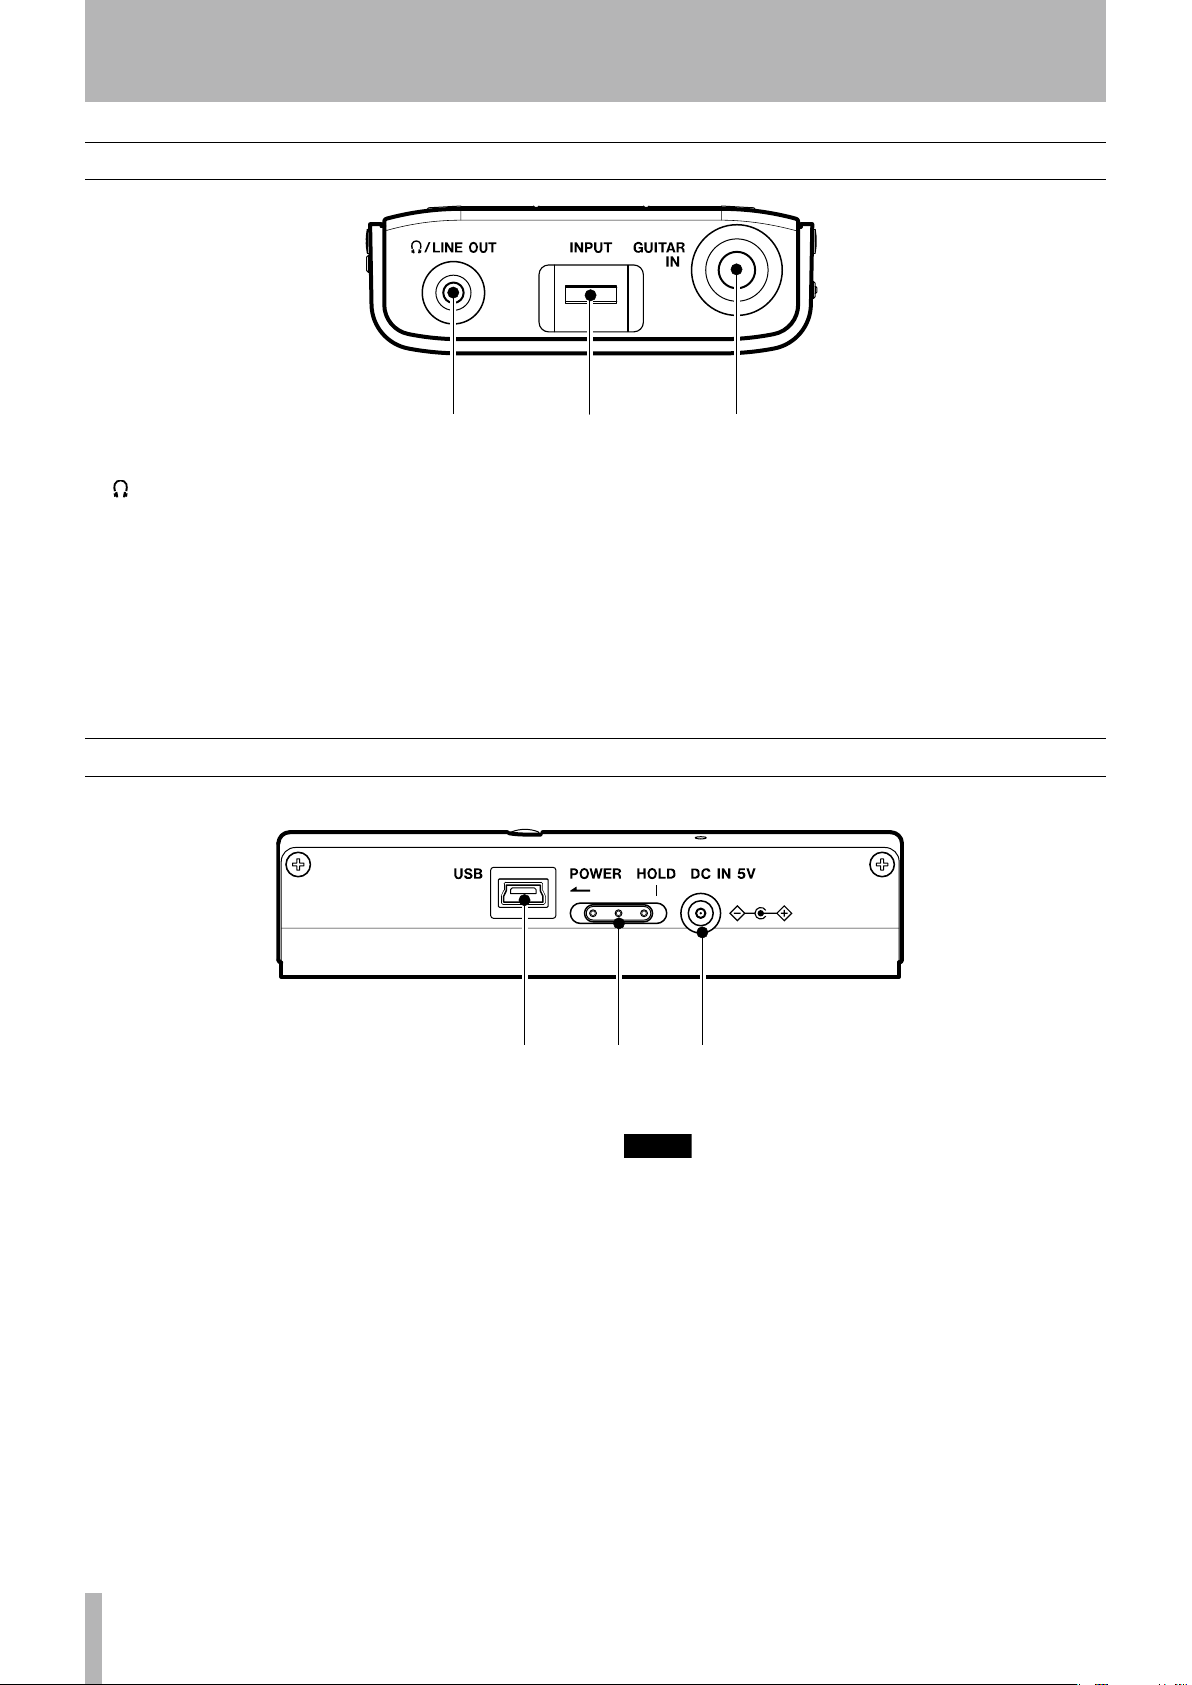
Front Panel.................................................................. 6
Right Side Panel .......................................................... 6
Left Side Panel............................................................. 7
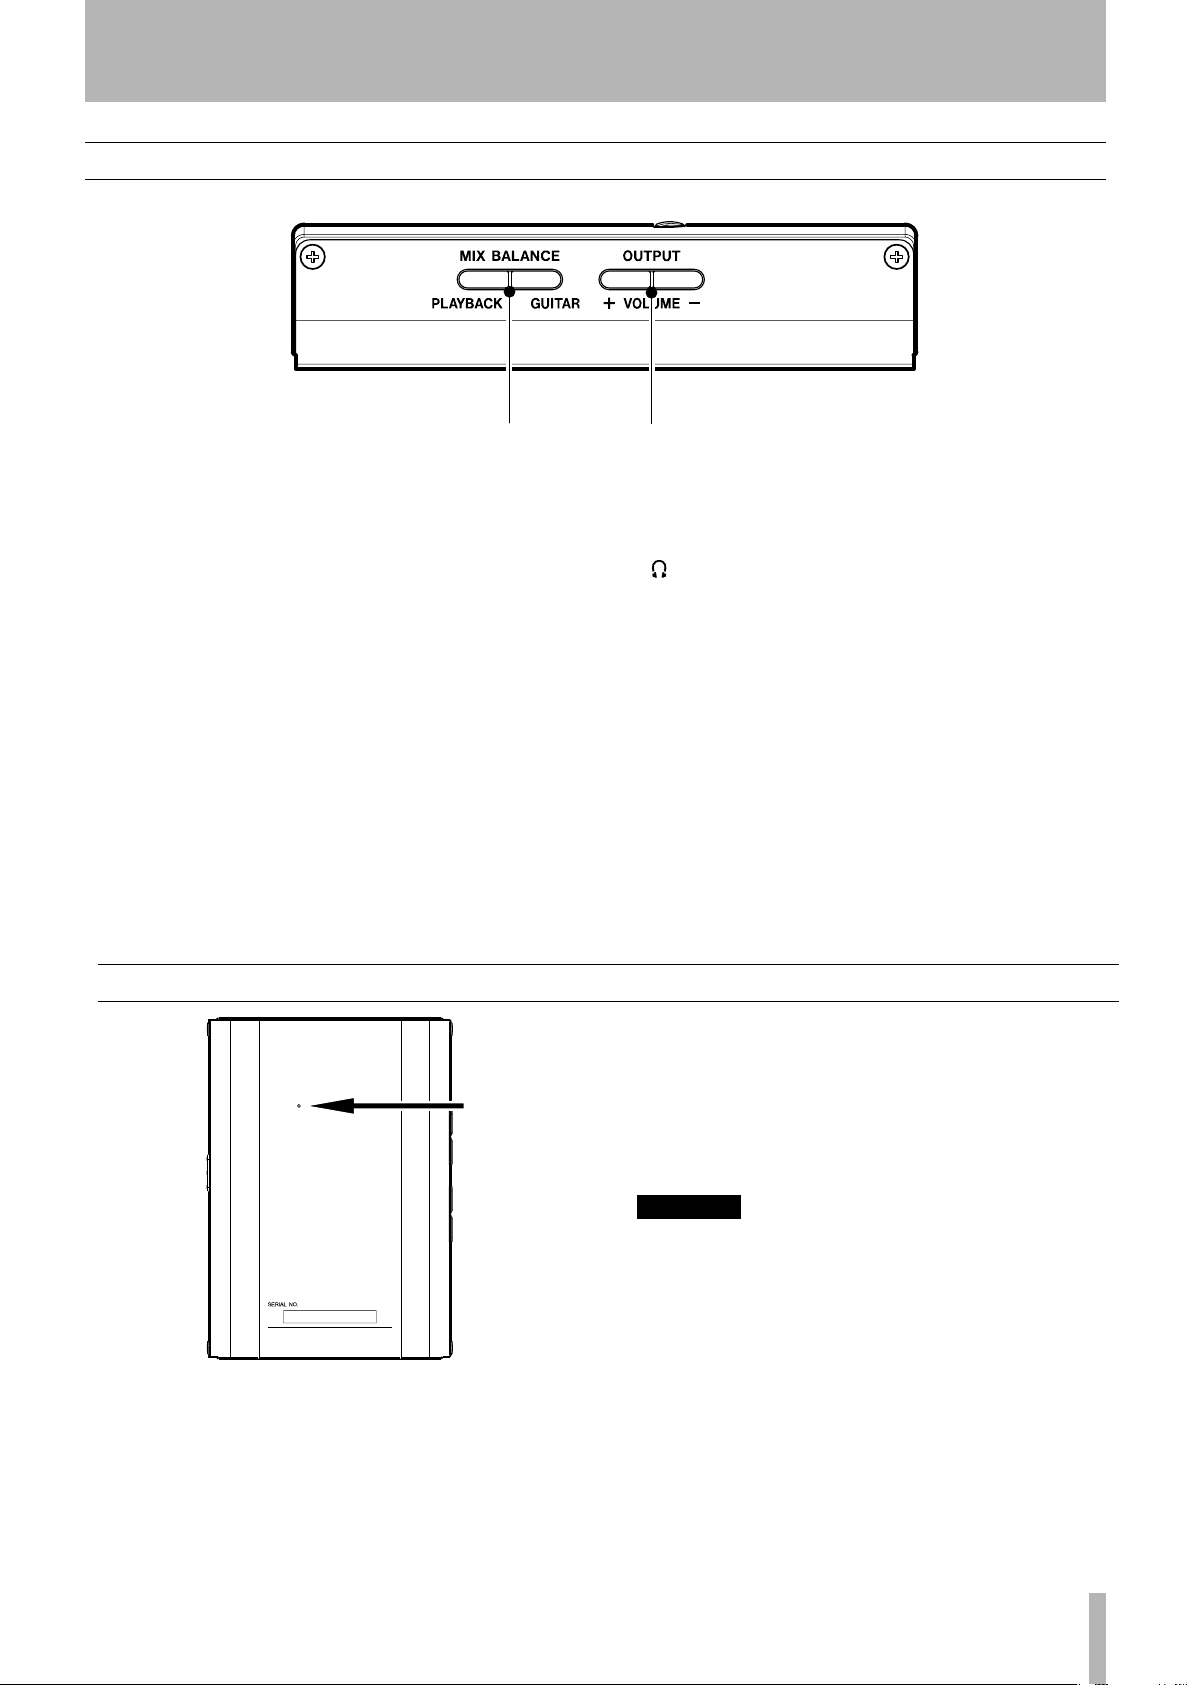
Back Panel................................................................... 7
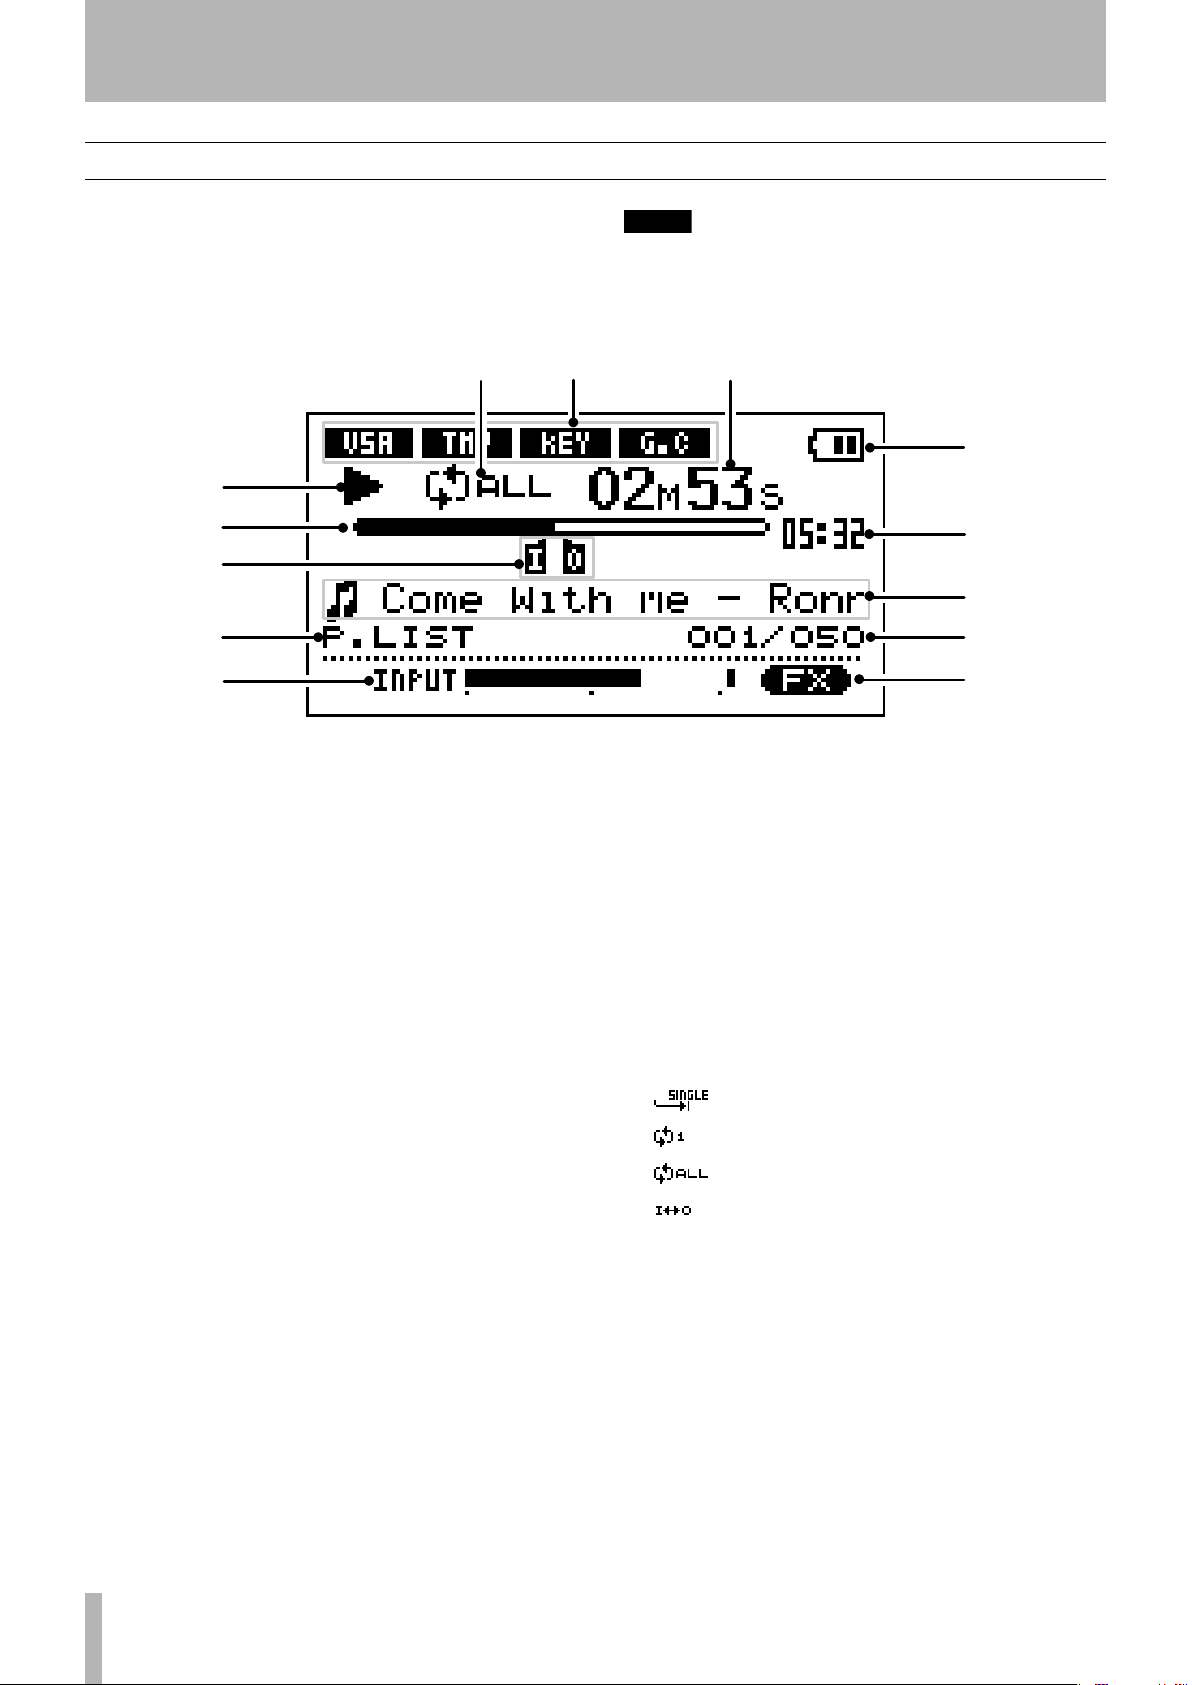
Home screen................................................................ 8
3 – Connections & MP3 Transfer................... 10
Making connections .................................................. 10
Connecting headphones or speakers ............................ 10
Connecting a guitar................................................... 10
Connecting to a computer ...........................................11
Disconnecting from a computer ....................................11
Moving MP3 files to the the MP-GT1 .........................11
Copying tracks from a computer ...................................11
Preparing MP3 files on a computer ...............................11
4 – Menus & Settings........................................ 12
Menu items ............................................................... 12
Menu overview ......................................................... 12
Using the Menus....................................................... 12
5 – Playing and Selecting Tracks................... 14
Basic track playback functions................................... 14
Playing a track......................................................... 14
Pausing a track........................................................ 14
Selecting a track ..................................................... 14
Searching a track ..................................................... 14
Adjusting the volume ................................................ 14
Selecting a track to play ............................................ 14
Using the Browse screen to select tracks................... 14
Setting the play area ................................................. 15
Using the playlist....................................................... 16
Adding tracks to the playlist........................................ 16
Editing the playlist..................................................... 16
ALL CLR: Remove all tracks from the playlist .................... 16
DELETE: Remove one track from the playlist .................... 16
MOVE: Change the order of tracks .................................17
Repeat and single-track playback (PLAY MODE) ........17
6 – Practice Functions......................................... 18
Changing playback pitch and tempo ........................ 18
Changing the tempo (TEMPO)..................................... 18
Change tempo without changing pitch (VSA)................. 18
Change key without changing tempo (KEY) ................... 18
Canceling guitar sounds (GUITAR CANCEL) .............. 18
Repeat playback of a selected loop ........................... 19
Connecting a guitar to practice ................................. 19
Practicing with tracks as they play ............................ 19
Using the metronome (METRONOME) ...................... 19
Turning the metronome ON and OFF ............................. 19
7 – Using Effects................................................... 20
8 – Using the Tuner............................................. 21
Chromatic tuner mode (AUTO) ..................................... 21
Guitar tuner mode (GUITAR) ....................................... 21
Oscillator mode (OSC.) .............................................. 21
9 – Setup Menu Options................................... 22
Cue and review speed ............................................... 22
Automatic power off.................................................. 22
Automatically turning off the backlight ......................... 22
Display contrast ........................................................ 22
Backlight brightness .................................................. 22
Initializing the unit..................................................... 22
Formatting the unit quickly ......................................... 23
Formatting the unit completely.................................... 23
10 - Using the Information Pages................. 24
File information page (FILE)......................................... 24
Memory information page (MEMORY)............................ 24
System information page (SYSTEM) ............................... 24
11 – Effect Lists ..................................................... 25
Effect preset list ........................................................ 25
Effect module parameters ......................................... 26
12 – Messages ....................................................... 27
13 – Recycling the Battery............................... 28
How to remove the rechargeable battery....................... 28
14 – Specifications............................................... 29
Rated audio input and output ...................................... 29
Audio performance .................................................. 29
Other specifications .................................................. 29
Minimum computer requirements ................................. 29
Stored settings .......................................................... 30
Dimensions................................................................ 30

TASCAM MP-GT1 3
Precautions for placement and use
The MP-GT1 may be used in most areas, but to maintain
top performance, and prolong operating life, observe the
following notes, precautions and environmental condi-
tions:
Avoid exposing it to extremes of temperature and
humidity and avoid mechanical shocks and vibration.
Keep the unit away from strong magnetic fields (TV
sets, computer monitors, large electric motors, etc.).
The nominal temperature should be between 0°C and
40°C (32°F and 104°F).
Relative humidity should be 30 to 80 percent.
•
•
•
•
As the unit may become hot during operation, always
leave sufficient space above the unit for ventilation.
Do not install this unit in a confined space such as a
bookcase, and do not put anything on top of the unit.
Avoid installing this unit on top of any heat-generat-
ing electrical device such as a power amplifier.
Make sure that the unit is mounted in a level position
for correct operation.
The voltage supplied to the unit should match the
voltage as printed on the rear panel. If you are in any
doubt regarding this matter, consult an electrician.
•
•
•
•
Manual conventions
In this manual, we use the following conventions:
Controls and keys on the MP-GT1 are written like
this: MENU.
Messages shown on the display are written like this:
Are you sure? .
•
•
If a fixed onscreen indicator (i.e. one which cannot
change) is shown, it is written like this: VSA.
We use the term “key” to describe the push-button
controls on the MP-GT1.
•
•
Supplied accessories
In addition to this manual, the following accessories are
supplied.
Quick Start Guide.......................................................1
Mini-B USB cable ......................................................1
An insertion sheet.......................................................1
Warranty card.............................................................1
•
•
•
•
Please contact the store where you purchased this unit
if any of these accessories are missing or have been
damaged during transportation.
NOTE
We recommend that you keep the original box and
packing materials for transportation of this unit.
Thank you very much for purchasing the TASCAM
MP-GT1 Portable Memory Guitar Trainer. Please read
this Owner’s Manual carefully before using the unit in
order to maximize your use of all its features. We hope
that you will enjoy using this trainer for many years to
come.
The MP-GT1 is a flash memory (1 GB) music player
that has been optimized for practicing guitar. If you
run into a phrase on a recording that is too difficult
for you to learn by ear at ordinary speed, you can play
and loop the music at a slower speed to study the part.
Furthermore, the dedicated guitar input allows you to
use the unit’s built-in effects as you play along with the
music. Using a computer, you can also transfer music as
MP3s easily from audio CDs and other sources to the
MP-GT1.
Beware of condensation
If the unit is moved from a cold to a warm place,
or used after a sudden temperature change, there
is a danger of condensation; vapor in the air could
condense on the internal mechanism, making correct
operation impossible. To prevent this, or if this occurs,
let the player sit for one or two hours at the new room
temperature before using.
1 – Introduction

4 TASCAM MP-GT1
The MP-GT1 uses a built-in lithium ion battery that can
be recharged by connecting the unit to a computer with
the included USB cable. You can also use an AC adapter
(sold separately) to power the unit and recharge the
battery.
When new, the battery charge lasts about 8 hours.
NOTE
When you purchase the MP-GT1, the battery is not fully
charged. Please charge it before use or use it with an AC
adapter (sold separately).
Recharging with a computer
To charge the battery using a computer, connect the unit
to the computer using the included USB cable and turn
the computer on if it is off and not transmitting power to
the unit.
Connect the MP-GT1 directly to the computer.
Recharging cannot be guaranteed if a USB hub is used
between the computer and the MP-GT1.
Recharging takes about 6 hours (when the MP-GT1
power is OFF).
If the MP-GT1’s power is turned ON when it is being
recharged from a computer, it is automatically treated
by the computer as a connected USB drive. (See
“Connecting to a computer” on page 11.)
Recharging with a PS-P520 AC adapter
(sold separately)
Connect the AC adapter to the MP-GT1’s DC IN 5V jack
and plug the adapter into a working power outlet.
Recharging takes about 3 hours.
You can use the MP-GT1 when it is connected to an AC
adapter and recharging.
Furthermore, the recharging time is the same whether
the MP-GT1 power is ON or OFF.
NOTE
The indicator at the right side of the display shows the
battery’s charging status. It lights orange while charging
and goes out when charging is complete.
Battery
indicator
About the power supply
Recharging the battery
To turn the MP-GT1 power on
Slide the POWER switch in the direction of the arrow
and hold it until “TASCAM” appears on the screen.
Release the switch.
The MP-GT1 starts and the home screen appears.
To turn the MP-GT1 power off
Slide the POWER switch in the direction of the arrow
and hold it until “Trainer series” appears on the screen.
Release the switch. The MP-GT1 then shuts down.
Turning the power on and off
1 – Introduction

TASCAM MP-GT1 5
2 – Part names and functions
1Display (LCD)
The display shows the Home screen and the
menus related to using the metronome and making
operation and effect settings. (See “Home screen” on
page 8.)
2Wheel
Use to select items and change values when using
menus and the effect section.
3ENTER key
Press this key to confirm a selection when using
menus and the effect section and to advance to the
next screen.
4LOOP key
Press this key to start loop playback mode and
automatically repeat playback of a section of a song
that you select. The indicator appears on the
display. (See “Repeat playback of a selected loop”
on page 19.)
Press this key again to exit loop playback mode.
5MENU key
When the home screen is open, press this key to
open the MENU screen.
During use of menus or the effect settings screen,
press this key to return to the previous screen.
Repeated presses eventually returns to the home
screen.
6FX key
Press this key to open the EFFECT screen. When the
EFFECT screen is open, press this key to return to the
home screen.
7I/O key
Use this key to set the IN and OUT points to set a
section for loop playback.
When both IN and OUT points are set, pressing
this key again will clear these points. (See “Repeat
playback of a selected loop” on page 19.)
8¥?π key
Press this key to start playback or to pause playback
at the current position.
When the METRONOME screen is open, press this to
start and stop the metronome.
9≤ key
Press this key to skip to the next track.
Press and hold to search forward.
0µkey
Press this key to return to the beginning of a track
that is playing or paused.
When at the beginning of a track, press to skip to
the previous track.
Press and hold to search backward.
Top Panel
1
2
3
4
56
7
8
9
0
Other manuals for MP-GT1
1
Table of contents
Other Tascam Music Equipment manuals

Tascam
Tascam CD-BT2 User manual

Tascam
Tascam MP-GT1 User manual

Tascam
Tascam GT-R1 User manual

Tascam
Tascam US-16X08 User manual

Tascam
Tascam CD-BT1 mkII User manual

Tascam
Tascam TM-AM3 User manual

Tascam
Tascam CD-GT1mkII User manual

Tascam
Tascam TM-AM1 User manual

Tascam
Tascam HS-4000 Owner's manual

Tascam
Tascam CD-GT2 User manual