Tascam DR-10L Pro User manual

D01419820A
DR-10L Pro
32-Bit Float Field Recorder and Lavalier Mic
OWNER'S MANUAL
V1.00

2TASCAM DR-10L Pro V1.00
Contents
1 - Introduction...................................................................................... 3
1 - 1 Features ............................................................................................3
1 - 2 Conventions used in this manual.................................................3
1 - 3 Trademarks and copyrights ..........................................................3
1 - 4 Accessories sold separately...........................................................4
microSD cards............................................................................................4
Precautions when handling microSD cards ...................................4
Formatting of microSD cards...............................................................4
USB cables (for communication or data transmission) ..............4
Monitoring equipment ..........................................................................4
1 - 5 Optional accessories (sold separately) .......................................4
AK-BT1 Bluetooth adapter overview.................................................4
1 - 6 Beware of condensation................................................................4
1 - 7 Cleaning the unit.............................................................................4
1 - 8 Precautions for placement and use.............................................4
1 - 9 About TASCAM customer support service .................................5
2 - Names and functions of parts ......................................................... 6
2 - 1 Front ..................................................................................................6
2 - 2 Bottom ..............................................................................................6
2 - 3 Sides ..................................................................................................7
2 - 4 Top .....................................................................................................7
3 - Preparation ....................................................................................... 8
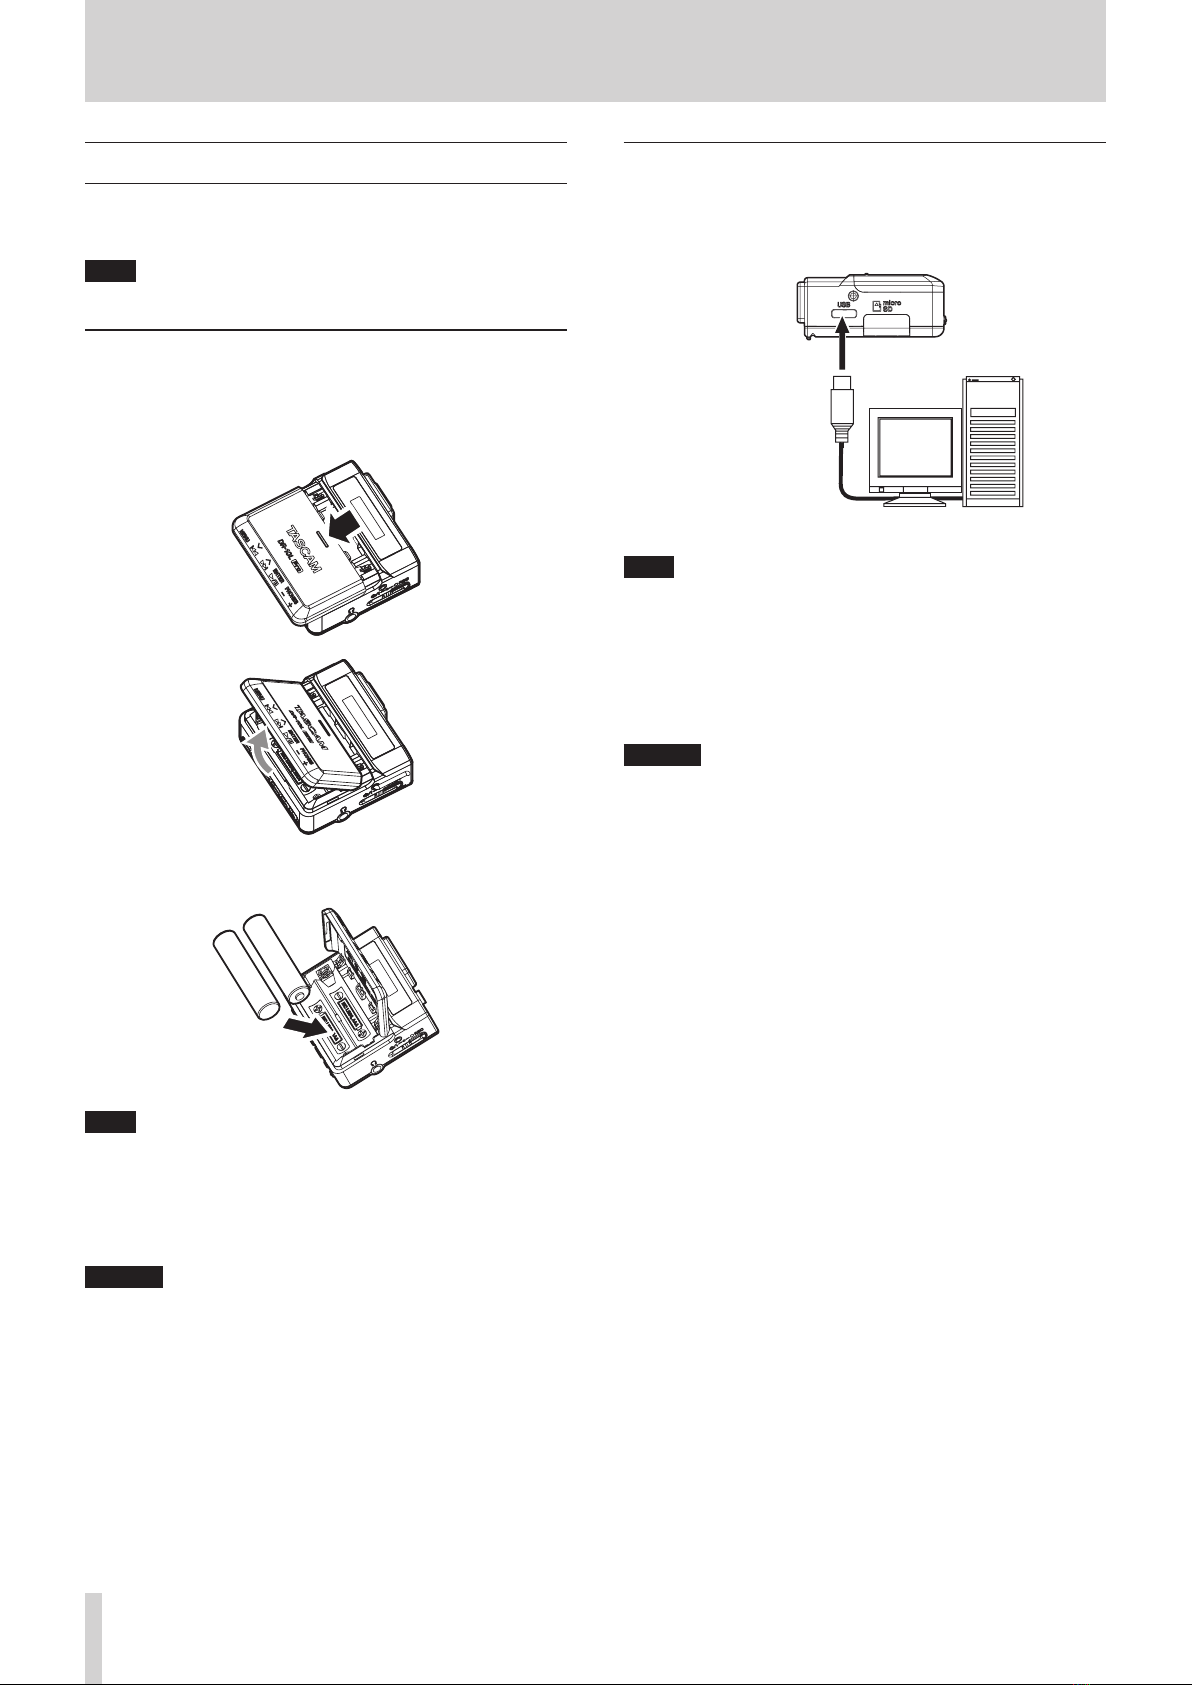
3 - 1 Power sources..................................................................................8
Using AAA batteries (sold separately)..............................................8
Using USB bus power .............................................................................8
3 - 2 Connecting the microphone.........................................................9
3 - 3 Inserting and removing microSD cards (sold separately).......9
Inserting microSD cards ........................................................................9
Removing microSD cards......................................................................9
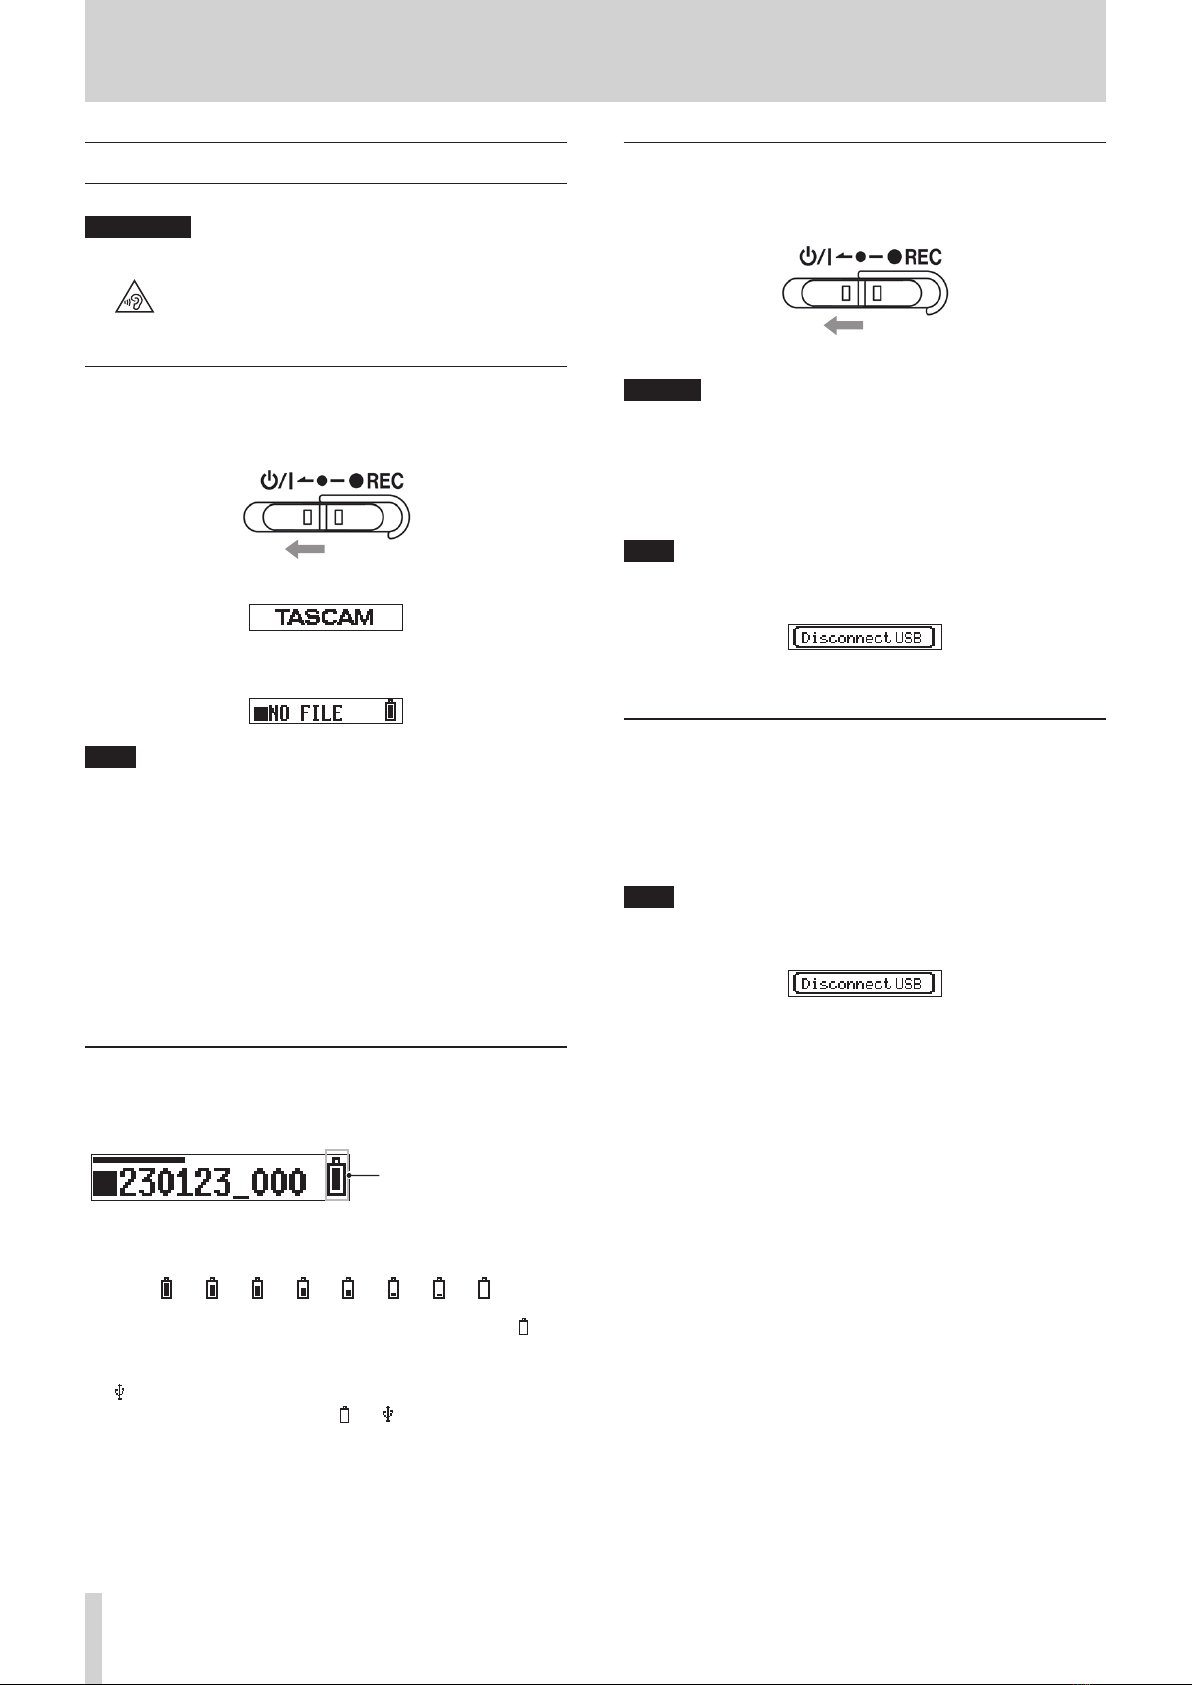
3 - 4 Turning the unit on and off.........................................................10
Turning the unit on ..............................................................................10
Power status display ............................................................................10
Turning the unit off ..............................................................................10
Turning off automatically...................................................................10
3 - 5 Setting the date and time ...........................................................11
3 - 6 Formatting (initializing) microSD cards (sold separately).....11
3 - 7 Connecting monitoring equipment ..........................................12
3 - 8 Installing an AK-BT1 Bluetooth adapter (sold separately)....13
4 - Screen overview ............................................................................. 14
4 - 1 Home Screen..................................................................................14
4 - 2 Menu Screen ..................................................................................15
Basic Menu Screen operation procedures ................................... 15
5 - Recording and playing files........................................................... 16
5 - 1 Starting and stopping recording ...............................................16
Ordinary recording...............................................................................16
One touch recording............................................................................ 16
Stopping recording ..............................................................................16
Monitoring input sound.....................................................................16
Recording data overview...................................................................16
Checking the available recording time......................................... 17
5 - 2 Playing back, skipping and searching backward/forward....17
Starting and stopping playback ......................................................17
Skipping ................................................................................................... 17
Searching backward and forward................................................... 17
5 - 3 Adjusting the headphone output volume...............................18
6 - File operations ................................................................................ 19
6 - 1 File and folder overview ..............................................................19
FILE .............................................................................................................19
Folders.......................................................................................................19
6 - 2 Deleting files ..................................................................................19
7 - Various settings .............................................................................. 20
7 - 1 Recording settings........................................................................20
Setting the recording level................................................................ 20
Setting the low-cut filter ....................................................................20
Setting the limiter................................................................................. 21
Setting the auto level function ........................................................21
Setting the phase.................................................................................. 22
7 - 2 Recording file settings .................................................................22
Setting the recording file format.....................................................22
Setting the WAV recording file type ............................................... 23
Setting the sampling frequency......................................................23
Setting the quantization bit depth.................................................24
7 - 3 Setting recording file names ......................................................24
Characters set by user ......................................................................... 24
Setting TEXT............................................................................................25
Setting the file number.......................................................................25
File format overview ............................................................................ 25
7 - 4 GENERAL SETTINGS......................................................................26
Setting the automatic power off function...................................26
Setting the backlight ........................................................................... 26
Formatting the SD card....................................................................... 27
Setting the battery type ..................................................................... 27
Setting the built-in clock....................................................................28
Initializing settings ...............................................................................28
8 - Menu item list ................................................................................. 29
9 - Mark functions................................................................................ 30
9 - 1 Mark types......................................................................................30
9 - 2 Time marks .....................................................................................30
Setting the time mark function........................................................ 30
9 - 3 Peak marks .....................................................................................30
Setting the peak mark function.......................................................30
9 - 4 BOF marks ......................................................................................30
9 - 5 Manual marks ................................................................................30
10 - Connecting with a computer using USB..................................... 31
10 - 1 Connecting with a computer......................................................31
10 - 2 Accessing microSD cards from a computer .............................31
Switching to USB mass storage mode...........................................31
Exchanging files with computers.................................................... 31
Ending USB mass storage mode......................................................31
11 - Remote control functions............................................................ 32
11 - 1 Turning on remote control function..........................................32
11 - 2 Installing the dedicated control app.........................................32
11 - 3 Connecting with the dedicated control app............................32
12 - Timecode functions...................................................................... 35
12 - 1 Turning on the timecode function.............................................35
12 - 2 Pairing with supported Atomos products ...............................35
12 - 3 Ending pairing with supported Atomos products .................35
12 - 4 Pairing with a different supported Atomos product .............36
Initializing pairing data.......................................................................36
12 - 5 Using remote control with timecode running free.................36
13 - Messages....................................................................................... 37
14 - Troubleshooting ........................................................................... 38
15 - Specifications ............................................................................... 39
15 - 1 Ratings ............................................................................................39
Recording media................................................................................... 39
Recording/playback formats............................................................. 39
15 - 2 Input/output ratings ....................................................................39
Analog input........................................................................................... 39
Analog output........................................................................................ 39
15 - 3 Audio performance ......................................................................39
15 - 4 General............................................................................................39
Mic bias voltage.....................................................................................39
Power.........................................................................................................39
Battery operation time (continuous operation).........................39
Recording times when using microSD cards .............................. 40
15 - 5 Dimensional drawings .................................................................40

TASCAM DR-10L Pro V1.00 3
1 - Introduction
Thank you very much for purchasing this TASCAM product.
Before using this unit, read this Owner's Manual carefully so that you will
be able to use it correctly and enjoy working with it for many years. After
you have finished reading this manual, please keep it in a safe place for
future reference.
1 - 1 Features
o Lightweight, compact and wearable design
o Includes 32-bit float recording and dual AD converter technologies,
enabling high resolution to be retained when recording voices at all
levels from whispering to shouting
o Supports capturing metadata (WAV file BEXT and iXML) when recording
o Supports high-capacity microSDXC cards (up to 512 GB)
o Records at least 15 hours using two AAA batteries*
o TM-10L pin (lavalier) mic included
o The DR-10L Pro CONNECT remote control app can be used to control
and monitor up to 5 of these recorders if they have AK-BT1 Bluetooth®
adapters (sold separately) installed.** Moreover, wireless timecode
synchronization with products made by Atomos is supported.
* The battery operation times could vary depending on the settings,
batteries and media being used.
**
The number of recorders that can be connected could vary depending
on the surrounding environment and radio wave conditions.
1 - 2 Conventions used in this manual
The following conventions are used in this manual.
o The area of the display that is shown in inverse (light on dark) is
referred to as the cursor or as being highlighted.
o The term “microSD/microSDHC/microSDXC memory card”is
abbreviated as“microSD card”.
o Information shown on a computer display is written like this: “OK”.
o References to“iOS”in this document also include“iPad OS”.
o As necessary, additional information is provided under TIP, NOTE and
CAUTION headings.
TIP
These are tips about how to use the unit.
NOTE
These provide additional explanations and describe special cases.
CAUTION
Failure to follow these instructions could result in damage to equip-
ment or lost data, for example.
VCAUTION
Failure to follow these instructions could result in injury.
1 - 3 Trademarks and copyrights
o TASCAM is a registered trademark of TEAC Corporation.
o microSDXC Logo is a trademark of SD-3C LLC.
o MPEG Layer-3 audio coding technology licensed from Fraunhofer IIS
and Thomson.
o Supply of this product does not convey a license nor imply any right to
distribute MPEG Layer-3 compliant content created with this product in
revenue-generating broadcast systems (terrestrial, satellite, cable and/
or other distribution channels), streaming applications (via Internet,
intranets and/or other networks), other content distribution systems
(pay-audio or audio-on-demand applications and the like) or on physical
media (compact discs, digital versatile discs, semiconductor chips, hard
drives, memory cards and the like). An independent license for such use
is required. For details, please visit http://mp3licensing.com.
o The Bluetooth® word mark and logo are the property of Bluetooth
SIG, Inc. and are used by TEAC Corporation with permission.
o Microsoft and Windows are either registered trademarks or trademarks
of Microsoft Corporation in the United States and/or other countries.
o Apple, Mac, macOS, iOS, iPad, iPadOS and iTunes are trademarks
of Apple Inc. in the United States and other countries. The iPhone
trademark is used under license from Aiphone Co., Ltd.
o App Store is a service mark of Apple Inc.
o IOS is a trademark or registered trademark of Cisco Systems, Inc. in
the U.S. and other countries and is used under license.
o Android and Google are trademarks of Google LLC.
o Other company names, product names and logos in this document
are the trademarks or registered trademarks of their respective
owners.
Information is given about products in this manual only for the
purpose of example and does not indicate any guarantees against
infringements of third-party intellectual property rights and other
rights related to them. TEAC Corporation will bear no responsibility
for infringements on third-party intellectual property rights or their
occurrence because of the use of these products.
Properties copyrighted by third parties cannot be used for any
purpose other than personal enjoyment and the like without
the permission of the right holders recognized by copyright law.
Always use this equipment properly. TEAC Corporation will bear
no responsibility for rights infringements committed by users of
this product.

4TASCAM DR-10L Pro V1.00
1 - 4 Accessories sold separately
The following items must be used with this product to record and to
monitor playback/input sound. Please purchase them separately.
o A microSD card
o 2 AAA batteries
o Monitoring equipment (headphones, earphones, etc.)
microSD cards
A card is necessary to record and play files with this unit. Prepare one for
use.
This unit uses microSD cards for recording and playback.
This unit can use microSD cards that are compatible with microSD,
microSDHC or microSDXC standards.
A list of microSD cards that have been confirmed for use with this unit
can be found on the TASCAM website. You can also contact TASCAM
customer support service for information.
TASCAM website
DR-10L Pro
https://tascam.jp/int/product/dr-10l_pro/docs
Precautions when handling microSD cards
microSD cards are delicate media.
In order to avoid damaging microSD cards, take the following precautions
when handling them.
o Do not leave them in extremely hot or cold places.
o Do not leave them in extremely humid places.
o Do not let them get wet.
o Do not put things on top of them or twist them.
o Do not hit them.
o Do not remove or insert them during recording, playback, data
transmission or other access.
o Always put memory cards in cases when transporting them.
Formatting of microSD cards
microSD cards formatted by this unit are optimized to improve perfor-
mance during recording. Use this unit to format the microSD cards to be
used with it.
Errors might occur when recording with this unit using a microSD card
formatted by a computer or other device.
USB cables (for communication or data transmission)
Use a USB cable to connect this unit to a computer (Windows/Mac).
This unit has a USB Type-C port and is shipped with a Type-A to Type-C
cable.
Prepare a USB cable suitable for the USB port of the computer being
used. USB cables designed only for charging cannot be used.
Connecting to a computer with a USB Type-A port
Use the included Type-A to Type-C cable.
Connecting to a computer with a USB Type-C port
A commercially-available Type-C to Type-C cable is necessary.
1 - Introduction
Monitoring equipment
Use monitoring equipment to monitor playback/input sound with this
unit.
This unit has a 1/8”(3.5mm) stereo mini headphone jack. Please prepare
headphones, earphones or other monitoring equipment.
1 - 5 Optional accessories (sold separately)
Optional accessory (sold separately). Please purchase this separately if
needed.
o AK-BT1 Bluetooth adapter
AK-BT1 Bluetooth adapter overview
Installing an AK-BT1 in this unit enables timecode synchronization with
products made by Atomos as well as wireless remote control* using
smartphones and tablets.
* The DR-10L Pro CONNECT remote control app can be used to simulta-
neously control and monitor up to 5 of these recorders.
1 - 6 Beware of condensation
Condensation could occur if the unit is moved from a cold place to a
warm place, it is used immediately after a cold room has been heated or
it is otherwise exposed to a sudden temperature change. If this occurs,
let the unit sit for one to two hours before turning it on.
1 - 7 Cleaning the unit
Use a dry soft cloth to wipe the unit clean. Do not wipe with chemical
cleaning cloths, thinner, alcohol or other chemical agents.
Doing so could damage the surface or cause discoloration.
1 - 8 Precautions for placement and use
o The operating temperature range of this unit is 0–40 °C.
o Do not install this unit in the following types of locations. Doing so
could degrade the sound quality and/or cause malfunctions.
o Places with significant vibrations
o Next to a window or in another location exposed to direct sunlight
o Near heaters or other extremely hot places
o Extremely cold places
o Very humid or poorly ventilated places
o Very dusty places
o Places exposed directly to rain or other water
o To enable good heat dissipation, do not place anything on top of the
unit.
o Do not place this unit on top of a power amplifier or other device
that generates heat.

TASCAM DR-10L Pro V1.00 5
1 - 9 About TASCAM customer support
service
TASCAM products are supported and warrantied only in their country/
region of purchase.
To receive support after purchase, on the TASCAM Distributors list page
of the TEAC Global Site (https://teac-global.com/), search for the local
company or representative for the region where you purchased the
product and contact that organization.
When making inquiries, the address (URL) of the shop or web shop
where it was purchased and the purchase date are required. Moreover,
the warranty card and proof of purchase might also be necessary.
1 - Introduction

6TASCAM DR-10L Pro V1.00
2 - Names and functions of parts
2 - 1 Front
1 Display
Shows a variety of information.
2Battery compartment and cover
Install 2 AAA batteries in this compartment to power the unit.
2 - 2 Bottom
3MENU button
o When the Home Screen is open, press this to open the Menu Screen.
o When a Menu Screen is open, press this to return to the Home Screen.
o When a setting item is shown, press this to return to the Menu Screen.
4 .[j] button
o During playback or when stopped in the middle of a file, press this to
return to the beginning of the file.
Press this when located at the beginning of a file to skip to the
previous file.
o Press and hold this during playback to search backward.
o Press this when the Menu Screen is open to show the previous menu
item.
o When a setting item is shown, press this to move the cursor left.
o When inputting file names, use this to select characters.
5 /[k] button
o During playback or when stopped in the middle of a file, press this to
skip to the next file.
o Press and hold this during playback to search forward.
o Press this when the Menu Screen is open to show the next menu item.
o When a setting item is shown, press this to move the cursor right.
o When inputting file names, use this to select characters.
6 7’9 [ENTER] button
o When the Home Screen is open, press this to start file playback.
o When the Menu Screen is open or a setting item is shown, press this
to confirm the selected item.
o Use this to verify confirmation messages.
7PHONES +/– buttons
Use these to adjust the volume output from the headphone jack.

TASCAM DR-10L Pro V1.00 7
2 - Names and functions of parts
2 - 3 Sides
8USB Type-C port
This port is for connecting with a computer using a USB cable.
9microSD card slot
Use this slot to insert and remove microSD cards.
0Belt clip attachment points
Attach the included belt clip to these holes on the left and right.
Belt clip
Main unit
Installation guide
q
¤?o
−
0REC switch
o Slide this switch toward ¤and hold it for about one second to
turn the unit on/off.
o Slide and hold this toward 0REC for about one second to start
recording.
o When recording, slide and hold this toward 0REC for about one
second to stop recording.
NOTE
The one-second delay is intended to prevent accidental operation.
wHeadphone jack (1/8” (3.5mm) stereo mini, dual mono
output)
Connect stereo headphones to this stereo mini jack. The same signal
is output to left and right (dual mono output).
2 - 4 Top
e Input jack (1/8” (3.5mm) mini TRS (with screw lock))
This is an input for connecting a mic with a 3.5mm plug.
(Tip: MIC (BIAS), Ring: Open, Sleeve: GND)
r Bluetooth adapter connector
(with cover and cover lock)
This is for connecting an AK-BT1 Bluetooth adapter (sold separately).
Connector cover
Cover lock

8TASCAM DR-10L Pro V1.00
3 - 1 Power sources
This unit can operate on 2 AAA batteries (sold separately) or USB bus
power using the included USB cable.
NOTE
This unit can use alkaline, Ni-MH or lithium AAA batteries.
Using AAA batteries (sold separately)
1. Open the battery compartment cover on the back of the unit.
While gently pressing the battery compartment cover, slide it and
lift it slowly to open the compartment.
2. Install 2 AAA batteries with their ¥and ^marks as shown in the
battery compartment, and close the cover.
¥
^
^
¥
NOTE
When using AAA batteries, set the type of battery in order to accurately
show the amount of power remaining and allow the unit to accurately
determine whether power is available for proper operation. This is set to
ALKALINE when shipped new from the factory. See “Setting the battery
type”on page 27 for procedures to change settings.
CAUTION
o AAA manganese dry cell batteries cannot be used with this unit.
o This unit cannot recharge AAA Ni-MH batteries. Use a commercially-available
recharger.
Using USB bus power
Use the included USB cable to connect the unit to a USB port on a
computer.
USB Type-C port
USB cable
Computer
NOTE
o If a computer is going to be used only to supply power, settings do
not need to be made on this unit.
o If USB bus power is supplied to this unit when its power is off, it will
automatically turn on.
o If both batteries and USB bus power are provided, the USB bus power
supply will be used first.
CAUTION
o If this unit is run only on USB bus power without batteries installed, it
will turn off if the USB bus power supply is interrupted.
If the power turns off during operation, the equipment could be
damaged and data could be lost, for example. We highly recommend
installing batteries in the unit even when using USB bus power.
o The unit should be connected directly to the computer, not through
a USB hub.
o Operation is not guaranteed when using a portable USB battery.
3 - Preparation

TASCAM DR-10L Pro V1.00 9
3 - 2 Connecting the microphone
1. Connect the plug of the included lavalier (pin) mic to the 1/8”(3.5mm)
mini TRS input jack (which has a screw lock) on this unit.
2. After connecting the mic jack, lock the connector using its screw
lock.
NOTE
o Refer to the illustration below to attach the included mic clip and
windscreen.
Clip
Windscreen
Lavalier microphone
o Wind noise could impact affect recording when outside or in other
environments with strong wind. Use a windscreen designed for a
small mic (available commercially).
o Do not apply excessive force to the jack.
o When connecting a mic other than the included lavalier (pin) mic, set
the phase according to the type of mic. (see“Setting the phase” on
page 22)
o Suitable recording might not be possible if a mic made by a different
manufacturer is used.
3 - 3 Inserting and removing microSD
cards (sold separately)
Inserting microSD cards
1. Open the microSD card slot cover on the left side.
2. Insert the microSD card in the direction of the arrow as shown in
the illustration below until it clicks into place.
NOTE
o A screen encouraging formatting will appear if a microSD card that is new
or has been formatted by a different device is inserted. (see “Formatting
(initializing) microSD cards (sold separately)” on page 11)
o If no microSD card has been inserted, the following message will
appear on the display when the unit is turned on.
o See the following for precautions related to handling microSD cards.
(see “Precautions when handling microSD cards”on page 4)
Removing microSD cards
To remove a microSD card, press it in gently and then release it to allow
it to come out.
CAUTION
Never remove a microSD card during recording or playback, when
being formatted or when writing data with a computer. Doing so
could cause the equipment to be damaged or data to be lost, for
example.
Be certain that the microSD card is not being accessed before
removing it.
NOTE
The following will appear on the display if the microSD card is
removed while the power is on.
3 - Preparation

10 TASCAM DR-10L Pro V1.00
3 - Preparation
3 - 4 Turning the unit on and off
VCAUTION
While wearing headphones, do not connect or disconnect
them or turn the unit on or off.
Doing so might cause sudden loud noises, which could
harm hearing.
Turning the unit on
When the unit is off, slide the ¤?o−0REC switch toward ¤and
hold it for about one second.
The unit will start up and TASCAM (the Startup Screen) will appear.
The Home Screen will appear after the unit starts up. (see “Home Screen”
on page 14)
NOTE
o When the unit is started up for the first time or when the built-in
clock has been reset after being left unused without batteries, a
screen will appear after the Startup Screen where the date and time
can be set. (see “Setting the date and time”on page 11)
o A screen encouraging formatting will appear after the Startup Screen
if the power is turned on while a microSD card that is new or has
been formatted by a different device is inserted. (see “Formatting
(initializing) microSD cards (sold separately)” on page 11)
o Supplying USB bus power to this unit when its power is off will auto-
matically turn it on.
Power status display
When the power is turned on, a power status icon is shown at the right
side of the display on the unit.
Power status display
A battery icon appears when batteries are being used.
The battery icon shows 8 levels of remaining power.
eeeeeee
The battery is almost dead and the power will soon turn off if the icon
with no bars blinks.
When USB bus power is being supplied, the remaining battery indicator
and appear alternately.
If no batteries are installed in the unit, and will appear alternately.
Turning the unit off
When the unit is on, slide the ¤?o−0REC switch toward ¤and
hold it for about one second.
The unit power will turn off and the display will become unlit.
CAUTION
o Always use the ¤?o−0REC switch to turn the unit off.
o When the unit is on, do not remove the batteries or disconnect the
USB cable if using USB bus power. Doing so will cause all recordings,
settings and other data to be lost. Lost data and settings cannot be
restored.
NOTE
When using USB bus power, the display will not become unlit.
Instead, the following screen will appear.
If the USB cable is disconnected, the unit power will turn off and the
display will become unlit.
Turning off automatically
If using batteries and the 15: POWER SAVE item on the Menu Screen
is set to ON, the unit will turn itself off automatically when the unit is
stopped and no operation has occurred for about 10 minutes.
The factory default setting is OFF. See “Setting the automatic power off
function”on page 26 for procedures to change settings.
NOTE
When using USB bus power, the display will not become unlit.
Instead, the following screen will appear.
If the USB cable is disconnected, the unit power will turn off and the
display will become unlit.

TASCAM DR-10L Pro V1.00 11
3 - Preparation
3 - 5 Setting the date and time
When the unit is started up for the first time or when the built-in clock
has been reset after being left unused without batteries, a screen will
appear after the Startup Screen where the date and time can be set.
NOTE
To set the date and time again, see “Setting the built-in clock”on
page 28.
YY-MM-DD hh:mm
YY: year, MM: month, DD: day, hh: hour, mm: minute
1. Use the .[j] and /[k] buttons to change the numbers
and use the 7’9 [ENTER] button to move the cursor.
Press the 7’9 [ENTER] button to move the cursor between the
items from left to right: YY qMM qDD qhh qmm.
2. When the cursor is at mm on the far right, press the 7’9 [ENTER]
button to confirm the date and time and restart the unit.
NOTE
o The cursor cannot be moved back to a previous item (from right to
left).
o To redo the setting, restart the unit before confirming the date and
time.
3 - 6 Formatting (initializing) microSD
cards (sold separately)
A screen encouraging formatting will appear if a microSD card that is
new or has been formatted by a different device is inserted.
or
In order to use a microSD card in this unit, it must first be formatted by
this unit.
CAUTION
Formatting will erase all data on a microSD card. Back up to a com-
puter, for example before formatting a card.
NOTE
See “Formatting the SD card”on page 27 for formatting procedures
if the screen encouraging formatting does not appear or to reformat a
microSD card that has already been formatted by this unit.
If “Format Error” is shown
This is shown if the formatting of the SD card is not suitable for this unit.
1. Press the 7’9 [ENTER] button.
2. When “Format Card?” is shown, press the 7’9 [ENTER] button.
3. When “Are You Sure?” is shown, press the 7’9 [ENTER] button.
This will start formatting.
After formatting completes, the following screen will appear.
If “File Not Found” is shown
This is shown if there is a discrepancy in the system file structure used
by this unit.
1. Press the 7’9 [ENTER] button.
2. When “Make System File?” is shown, press the 7’9 [ENTER]
button.
3. When “Are You Sure?” is shown, press the 7’9 [ENTER] button.
This will start formatting.
After formatting completes, the following screen will appear.

12 TASCAM DR-10L Pro V1.00
NOTE
o To prevent formatting, remove the microSD card while the confirmation
message is open. The Home Screen will appear.
o See “Inserting and removing microSD cards (sold separately)”on
page 9 for information about inserting microSD cards.
3 - Preparation
3 - 7 Connecting monitoring equipment
Connect monitoring equipment to the headphone jack in order to monitor
playback/input sound with this unit.
Headphones
VCAUTION
While wearing headphones, do not connect or disconnect
them or turn the unit on or off.
Doing so might cause sudden loud noises, which could
harm hearing.

TASCAM DR-10L Pro V1.00 13
3 - Preparation
3 - 8 Installing an AK-BT1 Bluetooth
adapter (sold separately)
Install an AK-BT1 Bluetooth adapter (sold separately) to connect this unit
with other Bluetooth devices.
1. Remove the Bluetooth adapter connector cover from the unit.
Cover lock
2. After removing the connector cover, insert the AK-BT1 into the unit.
Connector cover
AK-BT1
Insert the connector toward the unit’s display.
3. Reattach the cover in its original position.
See “Remote control functions”on page 32 and“Timecode functions”
on page 35 for Bluetooth connection and use procedures.

14 TASCAM DR-10L Pro V1.00
4 - Screen overview
4 - 1 Home Screen
The Home Screen appears after the unit starts up.
Level meter
Power status display
Connection status of timecode reception function
Operation status Connection status of remote control function
File name/elapsed time/file count/timecode
Level meter
This shows the input sound level.
Operation status
Indicator Operation status
8Stopped
9Paused
tPlaying
,Searching forward
mSearching backward
pRecording
/Skipping to the beginning of the next file
.Skipping to the beginning of the current or previous file
Connection status of timecode reception function
Indicator Operation status
Blinking
Waiting for connection with timecode
device
Blinking (1-second cycle)
Timecode being received
Lit
Timecode running independently
Power status display
Indicator Operation status
eeeee
ee
Indicator with 8 levels
Using batteries
This will blink when at the lowest level.
e
d
Shown alternately
Using USB bus power
Connection status of remote control function
Indicator Operation status
Lit
Remotely connected with dedicated
control app
Blinking
Waiting to connect with dedicated
control app
File name/elapsed time/file count/timecode
Indicator Operation status
File name*
230123_0001.wav**
Stopped
When changing tracks
When starting recording/playback
Elapsed time
[hh:mm:ss]
(Hours: minutes: seconds)
When recording/playing back
File count
[0001/0020]
Current file/total number
of files
This will appear for one second after the
following operations.
o Skipping files when stopped
o When stopping recording/playback
Timecode***
[hh:mm:ss:ff]
(Hours: minutes: seconds:
frames)
When timecode is enabled
*If no files that can be played back are saved on the microSD card,“NO
FILE” will be shown. If a microSD card is not loaded,“NO CARD”will be
shown.
**
When the Home Screen is open, the file name, including the file format
(extension), will scroll once and be shown.
***To switch to timecode display, press and hold the 7’9 [ENTER]
button.

TASCAM DR-10L Pro V1.00 15
4 - Screen overview
4 - 2 Menu Screen
Press the MENU button to open the Menu Screen.
Various settings can be changed for this unit on the Menu Screen.
See “Menu item list” on page 29 for a list of menu items.
Basic Menu Screen operation procedures
1. When the Home Screen is open, press the MENU button to open
the Menu Screen.
c
2. Use the .[j] and /[k] buttons to select the menu item to
set and press the 7’9 [ENTER] button to show the setting items.
c
c
3. Use the .[j] and /[k] buttons to change the setting
value/item.
c
4. Press the 7’9 [ENTER] button to confirm the setting and return
to the Menu Screen.
c
5. Repeat steps 2 to 4 as necessary to set each item.
6. When finished, press the MENU button to return to the Home Screen.
c
NOTE
o After showing the last menu item, the first menu item will be shown
next.
3c
3c
(etc.)
3c
3c
Example when “28: FILE DELETE” is the last menu item
o When there are multiple setting items that cannot be shown on a
single line, arrows will be shown at the ends of items as in the screen
examples below. Use the .[j] and /[k] buttons to change
the setting item.
e
d
e
d

16 TASCAM DR-10L Pro V1.00
5 - Recording and playing files
5 - 1 Starting and stopping recording
Ordinary recording
To start recording when the unit is on, slide the ¤?o−0REC switch
toward 0REC for about one second.
One touch recording
Recording can be started with a single operation even when this unit is
off.
When the unit is off, slide and hold the ¤?o−0REC switch toward
0REC
for about one second until TASCAM (the startup screen) appears
and recording starts.
Stopping recording
Slide the switch toward 0REC when recording for about one second to
stop recording.
The following appears on the display when recording and when
stopped.
Recording
Elapsed time
Stopped
File name
NOTE
o The one-second delay is intended to prevent accidental operation.
o When recording, the only possible operations are stopping, changing
the PHONE jack output volume and showing the available recording
time. If other operations are attempted, “KEY LOCKED!” will appear in
a pop-up message on the display for about one second.
o A new file will be created automatically without pausing recording
when the file size reaches 4 GB.
(Track incrementing)
o To record at the optimal volume, in addition to adjusting the
mic orientation and distance from the sound source, change the
recording level settings.
(see “Setting the recording level”on page
20)
Monitoring input sound
Monitoring input sound when recording or stopped is possible with this
unit.
The effects of the recording level, low-cut filter, limiter and other functions
can be checked.
The settings of each function can be set individually from the Menu Screen.
For details, see “Recording settings”on page 20.
To adjust the volume when monitoring, press the PHONES +/– buttons
to adjust the level output from the headphone jack. For details, see
“Adjusting the headphone output volume”on page 18.
Recording data overview
Recorded data is saved as audio files on the microSD card. Files are
named according to the following rules.
Characters set by user File format
YYMMDD_0001.wav
File number
Example with factory default settings
Characters set by user
Characters set by the user are added to the file name.
TIP
When recording a TV drama or play, for example, setting user characters
to the individual names of each performer can make identification easier
when managing files and editing.
The factory default setting is “DATE” (6-digit date).
See “Characters set by user” on page 24 for procedures to change settings.
File number
The order recorded is added to the file name.
The factory default setting is “0001”.
See “Setting the file number”on page 25 for procedures to change
settings.
File format
The recording format is added to the name of the recorded audio file.
.wav: WAV format used for recorded audio file
.mp3: MP3 format used for recorded audio file
The factory default setting is WAV format.
See “Setting the recording file format” on page 22 for procedures to
change recording format.
NOTE
If a file with the same user-set characters and file number already exists
at the time of recording, “[---]” will be added after the file number. (--- is
a three-digit number, starting with “001”.)
Example: YYMMDD_0001[001].wav

TASCAM DR-10L Pro V1.00 17
5 - Recording and playing files
Checking the available recording time
When the unit is stopped or recording, press and hold the MENU button
to show the remaining available recording time on the loaded microSD
card for about 1 second.
5 - 2 Playing back, skipping and searching
backward/forward
Starting and stopping playback
When the Home Screen is open and playback is stopped, press the
7’9 [ENTER] button to start playback of the file currently shown on
the display.
Press this button again to stop playback.
The display appears as below when playback starts and during playback.
When play-
back starts
File name
During play-
back
Elapsed time
NOTE
o During playback, press and hold the MENU button to show the
remaining time of the playing file.
o Only files (.wav or .mp3) in the SOUND folder on the microSD card
can be played back. Files put in a folder created using a computer, for
example, cannot be played back.
Skipping
During playback or when stopped in the middle of a file, press the .
[j] button to return to the beginning of the file.
Press this when located at the beginning of a file to skip to the previous
file.
During playback or when stopped in the middle of a file, press the /
[k] button to skip to the next file.
Searching backward and forward
During playback, press and hold the .[j] button to start searching
backward. Continue pressing and holding the .[j] button to accel-
erate the search speed.
Release the .[j] button to resume playback.
During playback, press and hold the /[k] button to start searching
forward. Continue pressing and holding the /[k] button to acceler-
ate the search speed.
Release the /[k] button to resume playback.
NOTE
While searching, gg or tt will be shown.

18 TASCAM DR-10L Pro V1.00
5 - 3 Adjusting the headphone output
volume
Use the PHONES +/– buttons to adjust the volume output from the
headphones jack.
Pressing a button will adjust the volume by one level.
Pressing and holding a button will adjust the volume continuously.
Minimum value: 0
Maximum value: 30
This is set to 8 when shipped new from the factory.
NOTE
The volume is shown on the display. The screen will return to normal
1 second after button operation.
Large
Small
5 - Recording and playing files

TASCAM DR-10L Pro V1.00 19
6 - File operations
6 - 1 File and folder overview
FILE
Recorded data is saved as audio files in the SOUND folder on the microSD
card.
Folders
Formatting microSD cards with this unit will create SOUND and UTILITY
folders.
Folder hierarchy example
This illustration is an example of the folder hierarchy on a microSD card
used with this unit.
¥ (root folder)
SOUND
DR0000_0001.wav (recording file)
DR0000_0002.wav (recording file)
230123_0003.wav (recording file)
DR-10LPro_0004.wav (recording file)
DR0000_0005.wav (recording file)
...
DR0000_0014.wav (recording file)
...
UTILITY
Firmware update files
o The maximum total number of files is 1000.
o These recording file names are examples.
6 - 2 Deleting files
Use menu item 28: FILE DELETE to delete recorded files with this unit.
This deletes the file currently shown on the display.
CAUTION
Deleted files cannot be restored. Be careful not to make a mistake
when deleting files.
1. When the Home Screen is open, use the .[j] and /[k]
buttons to show the file to be deleted on the display.
2. Press the MENU button to open the Menu Screen.
3. Use the .[j] and /[k] buttons to select 28: FILE DELETE,
and press the 7’9 [ENTER] button.
4. Use the .[j] and /[k] buttons to select YES, and press the
7’9 [ENTER] button.
This deletes the file.
After deletion completes, the Menu Screen reappears.
When the Home Screen is reopened, the file after the deleted file
will be shown on the display. If there was no file after it, the file that
was before it will be shown.
TIP
Files can also be deleted by connecting a computer by USB to this unit
and accessing the microSD card loaded in it. See “Connecting with
a computer using USB” on page 31 for details about connecting
computers.

20 TASCAM DR-10L Pro V1.00
7 - Various settings
7 - 1 Recording settings
Setting the recording level
The audio signal level recorded in recording files can be set.
Setting items (default value underlined)
HIGH / HIGH-MID / MID / MID-LOW / LOW
1. When the Home Screen is open, press the MENU button to open
the Menu Screen.
2. Use the .[j] and /[k] buttons to select 01: REC LEVEL,
and press the 7’9 [ENTER] button.
3. Use the .[j] and /[k] buttons to select the setting item,
and press the 7’9 [ENTER] button.
Check the level meter on the Home Screen, and change the setting
so that it exceeds the center slightly.
NOTE
If the 04: AUTO LEVEL item on the Menu Screen is set to ON, it will be
reset to OFF when the 01: REC LEVEL setting is changed.
When this happens,“AUTO LVL Cancel” will appear in a pop-up message
for about one second.
To use the auto level function, after setting the 01: REC LEVEL item,
set the 04: AUTO LEVEL item to ON again.
Setting the low-cut filter
The cutoff frequency of the low-cut filter used on the mic input can be set.
This cuts audio below the selected frequency.
The low-cut filter can reduce bothersome noise, such as from wind,
air-conditioners and projectors.
Set the cutoff frequency of the low-cut filter to match the noise.
Setting items (default value underlined)
OFF / 40Hz / 80Hz / 120Hz / 220Hz
1. When the Home Screen is open, press the MENU button to open
the Menu Screen.
2. Use the .[j] and /[k] buttons to select 02: LOW CUT, and
press the 7’9 [ENTER] button.
3. Use the .[j] and /[k] buttons to select the setting item,
and press the 7’9 [ENTER] button.
Other manuals for DR-10L Pro
1
Table of contents
Other Tascam Recording Equipment manuals

Tascam
Tascam 102i Series User manual

Tascam
Tascam 246 User manual

Tascam
Tascam IF-MTR32 User manual

Tascam
Tascam PORTASTUDIO 788 Reference guide

Tascam
Tascam 12 User manual

Tascam
Tascam BB-800 User manual

Tascam
Tascam CD-RW4U User manual

Tascam
Tascam MX-2424 User manual

Tascam
Tascam DP-24SD User manual

Tascam
Tascam DP-008 User manual

Tascam
Tascam CD-RW750 User manual

Tascam
Tascam HD-R1 User manual

Tascam
Tascam CD-RW900SL Guide

Tascam
Tascam Sonicview 16XP User manual

Tascam
Tascam DR-10X User manual

Tascam
Tascam CC-222MKIV User manual

Tascam
Tascam HS-2000 User manual

Tascam
Tascam MSR-16 Troubleshooting guide

Tascam
Tascam MX-2424 User manual

Tascam
Tascam SS-CDR1 Guide