Deutsch
Induktionskochplatte
Darkre Daily
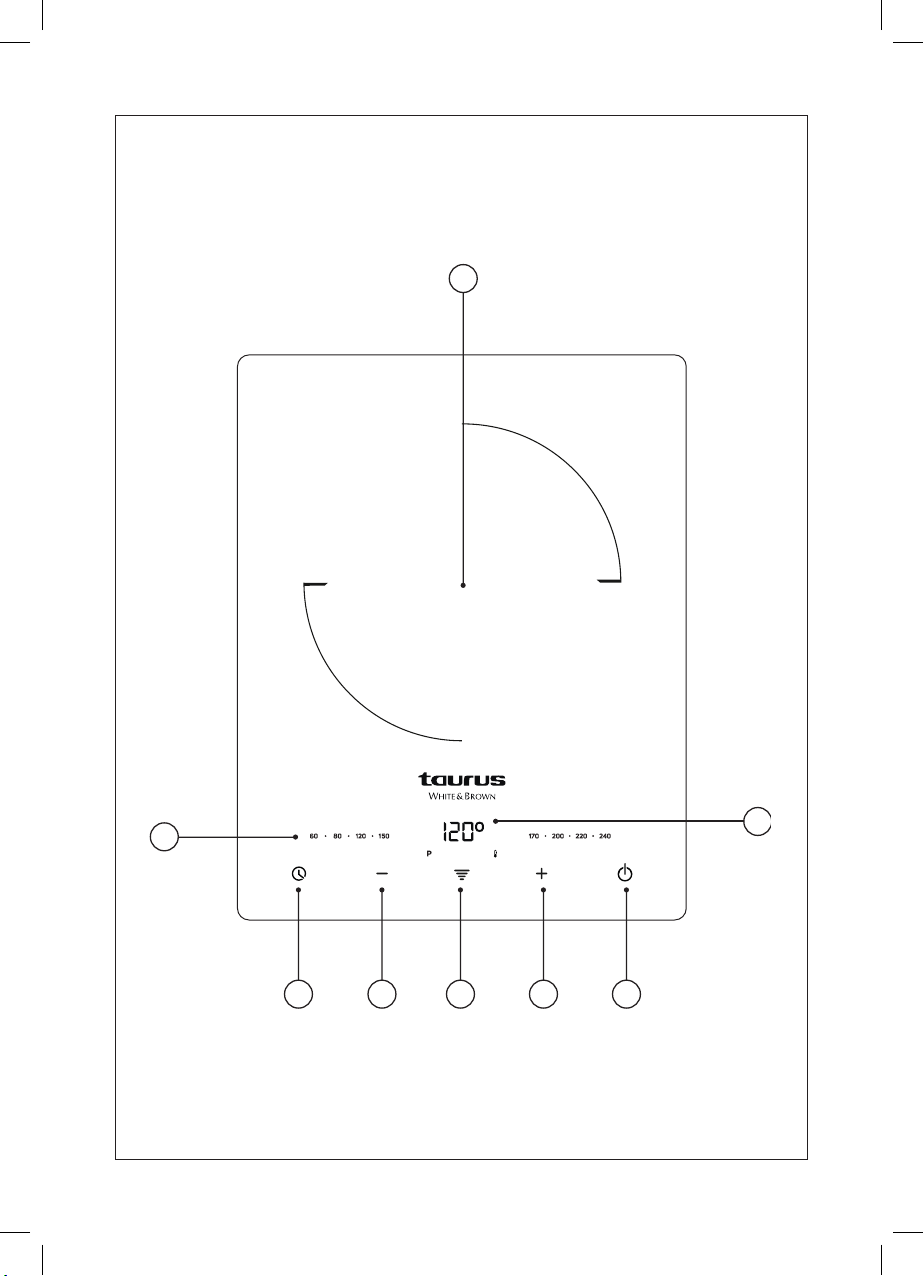
BEZEICHNUNG
A Induktionsamme
B Timer
C Taste -
D Funktionstaste
E Taste +
F Ein-/Aus
G Display
H Temperaturanzeige
- Wenn Sie meinen, dass das Gerät nicht mit
dem oben angeführten Zubehör ausgestattet
ist, können Sie die Teile auch einzeln beim
Technischen Dienst erwerben.
PRAKTISCHE RATSCHLÄGE
- Verwenden Sie Kochgeschirr, das der Größe
der Kochzone entspricht.
- Kochen Sie die Lebensmittel nicht mit zu viel
Wasser. Je mehr Wasser Sie verwenden, desto
mehr Energie wird benötigt.
- Verwenden Sie den Druckkochtopf, wann
immer dies möglich ist, Sie sparen Zeit und
Energie.
- Schalten Sie die Kochzonen erst ein, wenn die
Töpfe vorbereitet sind, und schalteten Sie sie
ab, bevor Sie die Töpfe entfernen.
- Die Böden des verwendeten Kochgeschirrs
müssen ach sein.
- Benutzen Sie Töpfe und Pfannen, die der zu
kochenden Lebensmittelmenge entsprechen.
Die Verwendung von zu großem Kochgeschirr
erhöht den Energieverbrauch.
- Das Kochen ohne Deckel erhöht ebenfalls den
Energieverbrauch.
BENUTZUNG UND PFLEGE
- Vor jedem Gebrauch des Geräts das Stromka-
bel vollständig abwickeln.
- Benützen Sie das Gerät nicht, wenn der An-/
Ausschalter nicht funktioniert.
- Ziehen Sie den Stecker heraus und lassen Sie
das Gerät abkühlen, bevor Sie mit der Reini-
gung beginnen.
- Das Gerät außerhalb der Reichweite von
Kindern und/oder Personen mit eingeschränk-
ten körperlichen, sensorischen oder geistigen
Fähigkeiten bzw. Personen ohne ausreichende
Erfahrung und Kenntnisse aufbewahren.
- Das Gerät nicht wegräumen, wenn es noch
heiß ist.
BENUTZUNGSHINWEISE
VOR DER BENUTZUNG
- Vergewissern Sie sich, dass Sie das gesamte
Verpackungsmaterial des Produkts entfernt
haben.
- Das Gerät für die von Ihnen bestimmte Funkti-
on vorbereiten.
BENUTZUNG
- Schließen Sie das Gerät an das Stromnetz an.
- Die Utensilie, mit welcher Sie kochen werden,
auf die Induktion stellen.
- Stellen Sie das Gerät an, indem Sie den An-/
Ausschalter betätigen.
- Der Bildschirm zeigt 4 Balken an, was bedeu-
tet, dass sich das Gerät im StandBy-Modus
bendet.
MIT LEISTUNGSMODUS KOCHEN
- Die +-Taste drücken, um den Kochvorgang zu
starten. Der Bildschirm zeigt P6 an, dies ist die
anfängliche Leistungsstufe.
- Drücken Sie die +- oder die --Taste, um die
Leistungsstufe zu ändern.
HINWEIS: Das Gerät verfügt über 6
Leistungsstufen, die folgenden Wattzahlen
entsprechen:
P1: 200 W, P2: 500 W, P3: 800 W, P4: 1000 W,
P5: 1200 W, P6: 1400 W, P7: 1600 W, P8: 1800
W, P9: 2000 W
MIT TEMPERATUR-MODUS KOCHEN
- Die Funktionstaste zweimal drücken, um zum
Temperatur-Modus zu wechseln. Der Bild-
schirm zeigt, 200 an, was 200 ºC bedeutet.
- Um die Temperatur zu wechseln, verwenden
Sie die +- und --Tasten.
- Die Anzeige der ausgewählten Temperatur
blinkt und die Anzeige der niedrigsten Tempe-
ratur leuchtet auf. Diese wird sich steigern, bis
die ausgewählte Temperatur erreicht wurde.