tbs electronics AROFLY Power Meter User manual

Quick Start Guide
Intelligent Dynamic Pressure Technology

Package Box LINK Transmitter
AROFLY Power Meter Cadence Sensor
LINK Holder
LINK Holder-Rubber Tie x 6
PACKAGE CONTENTS
Wrench toolPresta Valve Adaptor
Micro USB CableCadence-Rubber Tie x 2
INSTALLING AROFLY POWER METER ON CYCLE
REAR VALVE ONLY
Before using AROFLY power meter, twist open the cap, then remove the
INSULATION TAB, from between the battery contact.
Tips:
Before installing AROFLY power meter to the rear tire valve, please inflate the
bike tires to appropriate tire pressure as marked on the tire. Suggest the road
bike to be 90~120psi (6~8bar); Mountain bike to be 35~65psi (2.4~4.5bar)
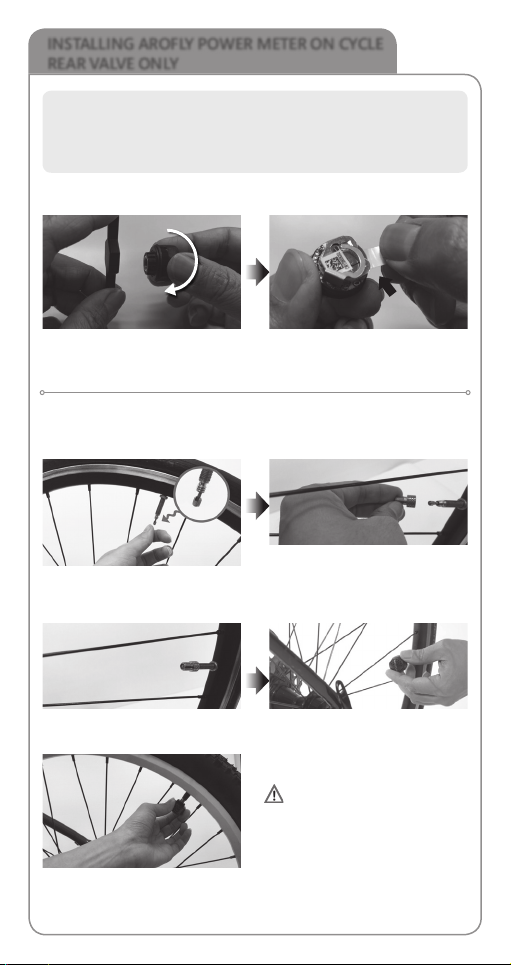
Place Wrench onto the AROFLY Base.
Twist counter-clockwise to open
AROFLY Cap.
Pull and remove Insulation Tab from
AROFLY to connect battery. Replace
the cap to AROFLY.
Insulation Tab
Installing AROFLY to the cycle rear valve: If it is a Schrader valve, please install
directly; If it is a Presta valve, please use the Presta valve adaptor first, included
in the kit, before installing the AROFLY power meter.
If it is a Presta valve, please loosen
"the valve pin" to the top-end of the
Presta valve shaft.
Install "Valve Adaptor" on Presta
valve.
Ensure the correct side of the
Adaptor to the Valve.
Twist Adaptor firmly on the Presta
valve.
If it is a Schrader valve, AROFLY can
be installed directly onto the rear
valve (no need for any adaptor).
Install AROFLY on the Adaptor.
Be sure to twist tightly to avoid
air leakage, and to ensure good
contact with valve pin.

Tips:
Insert the battery to
Cadence Sensor
Using the rubber ties to secure the "LINK" to the cross bar of the bike.
MOUNTING THE LINK TRANSMITTER
Buttons, ON/OFF
LED Showing Connection With Other Bike
Computers Or With The "AROFLY 2" APP
AROFLY LED
Cadence LED
INDOOR/OUTDOOR
Mode LED
INDOOR/OUTDOOR
Mode Button
Power ON/
OFF button
• Power ON: Press and hold the Power button for 3 seconds.( )
• Power OFF: Press and hold the Power button for 3 seconds.( )
• INDOOR/OUTDOOR Mode: On the "LINK", press once on the INDOOR/
OUTDOOR mode button to switch.( )
• Paring: On the "LINK", simultaneously press and hold the INDOOR/
OUTDOOR mode button and the Power ON/OFF button.( + )
Installation direction
INSTALLING CADENCE SENSOR ON CYCLE LEFT CRANK ONLY
Using the rubber ties included, secure the cadence sensor to the inner side of
the cycle left crank.
Attach the cadence sensor to the inner side of the
cycle left crank for best performance
LINK TRANSMITTER: BUTTONS AND LED STATUS
LINK Holder
LINK Holder - Rubber Tie
Cycle Cross Bar

TO CONNECT WITH THE "AROFLY 2" APP AND TO
SETUP THE LINK TRANSMITTER
1. Turn power ON the "LINK" and turn on Bluetooth, on your phone.
2. The LINK TRANSMITTER code will show on the "AROFLY 2" APP,
click it to connect.
LINK TRANSMITTER: BUTTONS AND LED STATUS
LED STATUS
• Solid green: "LINK", not connected
with the AROFLY power meter.
• Solid blue: "LINK", connected with
the AROFLY power meter.
• Flashing red: On the "LINK", indicates
the battery of the AROFLY power
meter is low.
• Solid red: On the "LINK", it is a
warning message, please check the
status on the "AROFLY 2" APP.
• Alternating green, blue, and red: The
"LINK" is attempting to pair with the
AROFLY power meter.
AROFLY LED Activity On The
LINK TRANSMITTER
• Solid green: "LINK", not connected
with the Cadence sensor.
• Solid blue: "LINK", connected with
the Cadence sensor.
• Flashing red: On the "LINK", indicates
the battery of the Cadence sensor is low.
• Alternating green, blue, and red:
The "LINK" is attempting to pair with
the Cadence sensor.
Cadence LED Activity On The
LINK TRANSMITTER
• Solid blue: On the "LINK", indicates
Indoor mode, when riding indoor,
please select the correct bike trainer
on the "AROFLY 2" APP.
• Blue OFF: On the "LINK", indicates the
"LINK" is on Outdoor mode.
INDOOR/OUTDOOR Mode,
LED Activity
• Flashing red: On the "LINK", indicates
the battery of the "LINK" is low.
• Solid red: On the "LINK", indicates the
"LINK" battery is charging.
• Red OFF: On the "LINK", indicates the
"LINK" battery has been completed
charged.
• Solid blue: On the "LINK", indicates
transmitting ANT+ and BLE signals
simultaneously. Check the connection
status on the devices (Bike Computers
or the "AROFLY 2" APP).
LED Activity On The LINK
TRANSMITTER Showing
Connection With Other Bike
Computers Or With The
"AROFLY 2" APP.

5. Display real-time riding data
Press to start the ride and display data.
Press to end the ride.
Data Display:
• Speed
• Cadence
• Power
• Trip Time
• Trip Distance
• Rear Tire Pressure
• Ascent
• Left/Right Pedal Ratio
• Heart Rate
3. If connected with Heart Rate Monitor, click the "Heart Rate Monitor"
in the Main page to pair.
4. Enter Set Up page, input requested details and then click to start
your ride.
TO CONNECT WITH THE "AROFLY 2" APP AND TO
SETUP THE LINK TRANSMITTER
Reminder:
If using other GPS bike computers, Heart Rate Monitor should be paired
with other GPS bike computers, not with "AROFLY 2" APP

Tips:
• When riding outdoor, please confirm the INDOOR/OUTDOOR mode LED
on LINK Transmitter is OFF.
• AROFLY measures power by tire pressure variation. When riding indoor,
it only works on the bike trainer with rollers, for the rear tire of the bike.
• AROFLY, performs better on rollers without any resistance.
Roller Trainer
Reminder:
When riding indoor, the Bike Trainer or Roller must be selected correctly on
the "AROFLY 2" APP.
INDOOR/OUTDOOR MODE
On the LINK Transmitter, press once on INDOOR/OUTDOOR mode button
to switch the modes.

When AROFLY LED activity is solid red, please check below errors on the
"AROFLY 2" APP and resolve.
• LOW TIRE PRESSURE: Action, inflate your tire pressure
• INDOOR MODE STILL ON: Action, switch the INDOOR mode OFF on the
"LINK"
• CHECK VALVE: Action, correctly install AROFLY power meter again
AROFLY Power Meter
Product Name AROFLY Power Meter
Size Diameter 20mm/ Height 20 mm
Weight 7.2g (Battery excluded)
Battery CR 1632
Working Hours 1500 Kilometers
Water Proof IPX6
Transmission By Bluetooth
LINK Transmitter
Product Name LINK Transmitter
Size 92.3 mm x 30.3 mm x 21.1 mm (without holder)
Weight 42g
Battery Rechargeable Battery
Working Hours 15 hours
Water Proof IPX6
Transmission By Bluetooth / ANT+
Cadence Sensor
Product Name Cadence Sensor
Size 37.6 mm x 33.3 mm x 10.3 mm
Weight 10.3g
Battery CR 2032
Working Hours 350 hours
Water Proof IPX6
Transmission By Bluetooth
WARNING MESSAGES
SPECIFICATION
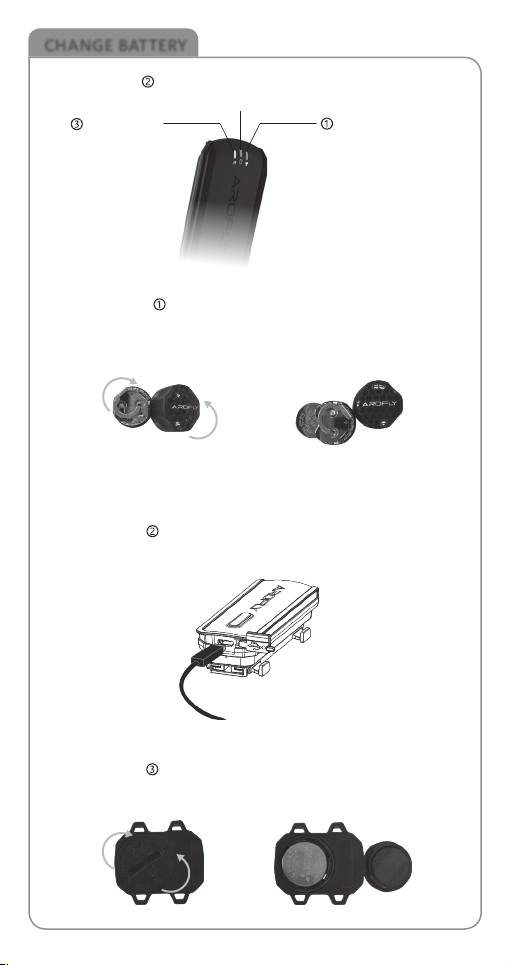
CHANGE BATTERY
LINK Transmitter
When LED activity is flashing red, it means the "LINK" battery is low. Please
use the USB cable included in the package to charge the "LINK".
Cadence Sensor
When LED activity is flashing red, it means the "Cadence Sensor" battery is
low, replace with new battery.
AROFLY Power Meter
When LED activity is flashing red, it means the "AROFLY Power Meter"
battery is low, replace with new battery.
C
l
o
s
e
O
p
e
n
C
l
o
s
e
O
p
e
n
Take out batteryOpen Arofly Cap
LED Showing Connection With Other Bike
Computers Or With The "AROFLY 2" APP
AROFLY LED
Cadence LED
ATTENTION
1. Please follow the bicycle manufacturer's instructions to regularly check your
cycle tire-pressure, that it is at optimum level before installing AROFLY on the
tire valve.
2. AROFLY is compatible with most Presta & Schrader cycle valves, but may not
fit on other types of cycle valves.
3." AROFLY 2" APP is compatible with most iOS and Android systems for smart
phones, but does not guarantee to work with other operating systems due to
the diversity.
4.Because of the system diversity, we can not guarantee compatibility with
certain heart-rate monitors
5. AROFLY power meter is NOT suitable on tubeless tires, because the sealant
inside the tube, will damage the AROFLY sensor.
6. Please be sure to update the "LINK" software to the latest version.
WARRANTY
1. AROFLY comes with a 12 month warranty against manufacturer's defects, or
failure to work within the 12 months, from date of original purchase. Warranty
cannot be transferred.
2.Warranty does not cover failure from, neglect, accidental damage, due to
dropping, crushing, misuse, and failure to follow the instruction manual.
3.If the AROFLY is opened without the manufacturer's assistance or any
tampering with the electronic components, it will COMPLETELY VOID the
WARRANTY.
Design & Manufacture by
TBS Group Corporation
www.arofly.com / Made in Taiwan
This manual suits for next models
2
Table of contents
Popular Measuring Instrument manuals by other brands


AST
AST A250+ PL/TL/Video user manual

HunterLab
HunterLab Vista quick start guide

palintest
palintest PT155 instruction manual

PEAK INSTRUMENTS
PEAK INSTRUMENTS C-7000 Series operating manual

Swan Analytical Instruments
Swan Analytical Instruments AMI Sodium P Operator's manual

Vaisala
Vaisala DEWCAP DM500 user guide


