Tchibo Cafissimo CLASSIC User manual

Original instructions for use and guarantee
for Cafissimo CLASSIC
Find it only at Tchibo
Welcome to

Experience the world of coffee with Cafissimo
We are happy to know that you have chosen Cafissimo, because
Cafissimo alone offers you ultimate Tchibo coffee quality in combina-
tion with an easy-to-use capsule machine. You can now enjoy your
coffee whenever and however you like - perfect espresso, caffè crema
and filter coffee.
Just press a button and your Cafissimo CLASSIC will do the rest.
Our team of experts have optimally harmonized the machine and
capsules so that your coffee develops its full aroma.
or anyone who enjoys drinking cappuccino and latte macchiato, the
Cafissimo CLASSIC is equipped with a milk frothing steam nozzle of
Barista quality. This means that in next to no time you can delight
both yourself and your guests with freshly brewed coffee specialities.
Thank you for your confidence.
Your Cafissimo team

The features of your Cafissimo C ASSIC at a glance:
•Unique three pressure level system:
Intelligent interaction between machine and capsule means every
coffee is automatically perfect, as each type of coffee is prepared
at the correct pressure.
•Individually programmable beverage size:
Brew however strong a cup you like according to your personal taste.
•Energy saving with a descaling reminder.
•We are there for you:
To show you that we are completely convinced
of the quality of our products, we grant you
a full 40-month guarantee for the machine.
page
10
page
19
page
35
page
41

4Contents
5 At a glance
6 Control panel in detail
functions of the buttons
7 Overview of the indicator lights
9 Overview of the acoustic signals
10 The unique three pressure
level system
10 The Cafissimo aroma capsules
11 Intended use and location
11 About these instructions
12 Safety warnings
14 Initial operation
- Before first-time use -
15 Tips for use
15 Coffee strength
15 Interrupting/stopping the brewing
process
15 ull aroma
15 Residues of coffee grounds
and capsule bases
15 Changing the water
after 2 days of non-use
16 Brewing coffee
19 Adjusting the strength
of the coffee
19 Adjusting the strength for the
current brewing procedure
(without saving the setting)
19 Setting the strength permanently
(saving the setting)
19 Restoring the factory settings
20 Frothing milk
20 Tips for a perfect milk froth
20 Dispensing steam
23 rothing milk
24 After frothing — let off steam
26 Brewing and frothing
temperatures / heating and
cooling the machine
26 Steam button displays
26 Have you accidentally pressed
the steam button?
26 Cooling the machine down quickly
- brewing coffee after frothing
milk
27 Hot water to preheat cups
28 Preparing coffee specialities
28 Espresso Macchiato
28 Cappuccino
29 Coffee Mocha
29 Latte Macchiato
Contents
30 Rinsing with water after
a long period of non-use
31 Automatic switch-off
32 Cleaning
32 requency of cleaning
32 Cleaning the capsule holder
33 Cleaning the steam wand and
frother nozzle
33 Cleaning the floater, drip tray
and grid
34 Cleaning the hinged tray
34 Cleaning the water tank
34 Cleaning the casing
35 Descaling
35 How often must the machine
be descaled?
35 Descaling agent
37 Problems / Solutions
39 Technical specifications
40 Declaration of Conformity
40 Disposal
41 Guarantee
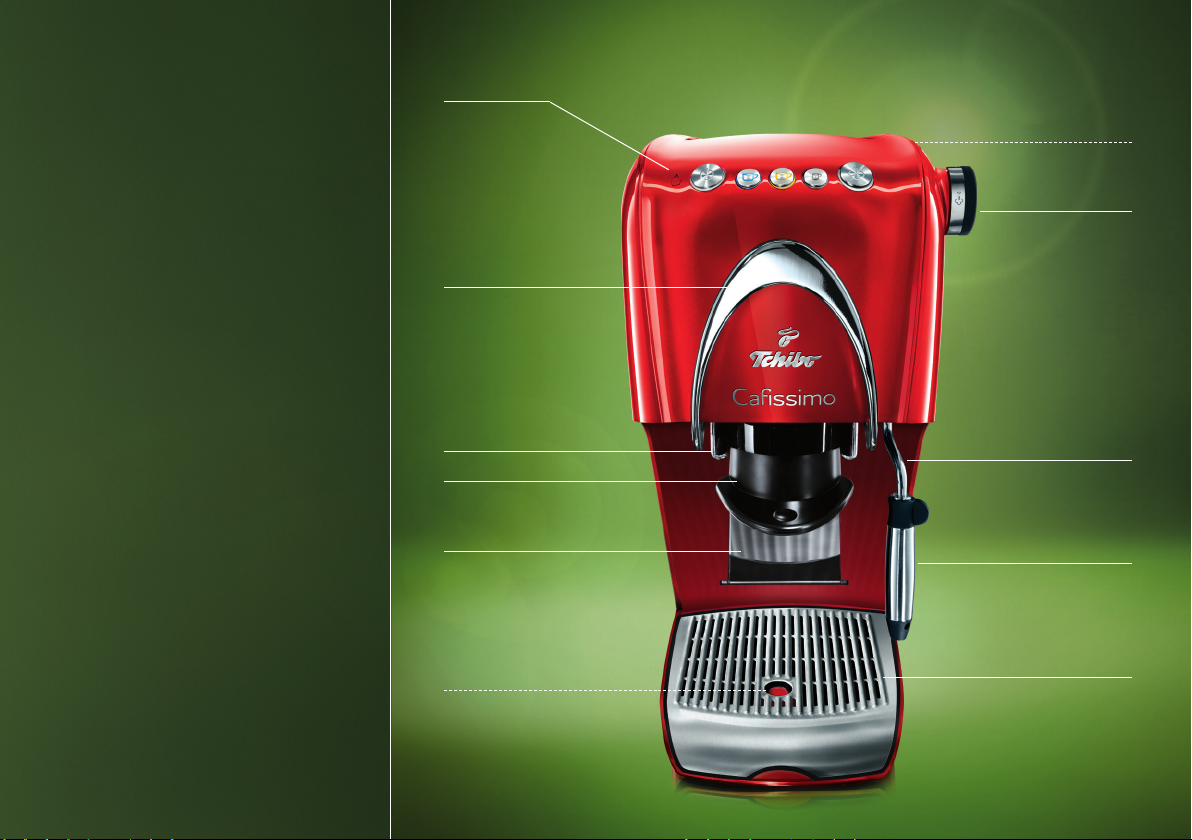
At a glance
Water tank
Steam wand
Steam knob for
steam and hot water
Frother nozzle
Capsule holder
Stop lever
(metal bracket)
Drip tray with grid
Hinged tray
for small cups
Red floater
(indicates liquid in the drip tray)
Control panel
Capsule holder retainer

Making filter coffee
(blue cup for blue capsule)
Making caffè crema
(yellow cup for yellow capsule)
Making espresso
(small grey cup for black capsule)
Coffee machine
On/Off
The colours of the buttons are visible when the
machine is switched on.
lashing buttons indicate that the machine is
heating up, cooling down or preparing a beverage.
Permanently lit buttons indicate that the machine
is ready for use.
The steam button can light up (or flash) in white or
red, all others in white. You can find an overview on
the right.
Indicator light
“water tank empty“ or
“machine needs to be
descaled“
Steam On/Off
Lights up in red = steam
Lights up in white = hot water
Steam is required for
frothing milk.
You can use hot water to
preheat cups.
Control panel in detail — functions of the buttons

7Ove view of the indicato lights
Overview of the indicator lights
*Machine is heating up to brew coffee
Machine is ready to brew coffee/dispense water
*
or or Brewing cycle is running
*Machine is heating up to produce steam (for milk froth)
*Machine is ready to dispense steam (for milk frothing)
*The machine is cooling down from steam production
temperature to lower coffee brewing temperature
Start-up is being carried out
Water indicator light flashes evenly Water needs to be replenished
Water indicator light flashes 3 times briefly
every 3 seconds Machine needs to be descaled
or or Water level decreases to below MINimum during use
* = depending on water level

8Ove view of the indicato lights
* = depending on water level
*Descaling programme:
waiting for the cleaning phase to start
(capsule holder is not fitted, stop lever is not pressed down,
steam valve is open, water tank empty, button not yet
pressed)
*Descaling programme:
waiting for the rinsing phase to start
(capsule holder is not fitted, stop lever is not pressed down,
steam valve is open, water tank empty, button not yet
pressed)
*Descaling programme: cleaning phase, rinsing phase
Cleaning phase: progress bar from right to left
Rinsing phase: progress bar from left to right
Error

9Ove view of the acoustic signals
Overview of the acoustic signals
The machine will indicate when it is ready to begin a process or when it has finished one.
Heating up / cooling down is completed
1 short acoustic signal
5 seconds after coffee has been brewed
1 long acoustic signal
Automatic switch-off after 2 hours of non-use
1 short acoustic signal
Water level decreases to below MIN mark during use
1 short acoustic signal
Descaling programme: refill the tank with water
1 long acoustic signal
Descaling is completed
2 long acoustic signals

10 P essu e level system / Cafissimo a oma capsules
In each and every Cafissimo aroma capsule you find the
unique Tchibo Arabica quality. Sealed airtight, they pre-
serve their full aroma until they are brewed. This means
you can enjoy perfect coffee, cup after cup.
The advantages of the capsules:
• the airtight seal ensures aromatic, fresh coffee
• different varieties of taste
• individual portions
• quick and clean preparation
• immediately ready for use (insert the capsule just
as it is)
Try our Grand Classés as well as the large variety of coffee
types from our permanent product range. These limited
choice selections are available from us several times a
year.
Capsules can be purchased from Tchibo.
The Cafissimo aroma capsules
The unique three pressure level system
The Cafissimo CLASSIC has a unique three pressure level
system meaning that it is optimally designed to brew your
favourite type of coffee. This individual brewing pressure
allows the respective types of coffee to unfold their full
taste and aroma.
The three coffee selection buttons each represent a dif fer -
ent brewing pressure. The colour of the cups matches the
colour of the capsules. You can tell by just the colour of
the capsule which button to press for preparation:
blue = filter coffee
yellow = caffè crema
small grey cup = espresso

11 Intended use and location / About these inst uctions
Intended use and location
he machine is equipped with safety features. Never-
theless, read the safety warnings carefully and only use
the machine as described in these instructions to avoid
accidental injury or damage.
Keep these instructions for future reference.
If you pass the machine on to another person, remember
to give them these instructions.
Symbols in these instructions:
Signal words:
DANGER warns of potential severe injury and danger to life,
WARNING warns of injury and severe material damage,
CAUTION warns of minor injury or material damage.
his indicates additional information.
his symbol warns you of the danger of injury
caused by electricity.
his symbol warns you of the danger of injury.
he coffee machine has been devised for the following uses:
• Brewing filter coffee, caffè crema and espresso with
chibo capsules.
• Frothing milk.
• Dispensing hot water.
It has been designed for use in households or for similar
applications such as
• in shops, offices or other areas of work,
• in agricultural buildings,
• by customers in hotels, motels, bed and breakfast estab-
lishments or other places offering accommodation.
If the machine is used in a commercial setting, it must be
supervised and cleaned by trained staff. Besides being
cleaned regularly, the machine does not require any further
servicing.
Do not use the machine outdoors. Set up the machine in
a dry indoor room. Avoid rooms with a high air humidity or
high dust content.
he machine is suitable for use at ambient temperatures
of +10 to +40°C.
About these instructions

12 Safety wa nings
DANGER to child en and people with a est icted
capability of ope ating appliances
• Children must not be allowed to play with the appliance.
Keep the appliance and mains cord away from children.
• his appliance can be used by children aged 8 and over
or by people with reduced physical, sensory or mental
capab ili ties, or who lack experience and/or knowledge,
provided they are supervised or have been instructed in
the safe use of the appliance and understand the poten-
tial dangers.
• Children must not be allowed to clean the appliance
unless they are over 8 years of age and supervised by
an adult. his appliance is maintenance free.
• Set up the machine out of the reach of children.
• Keep the appliance and packaging material out of
children’s reach. here is a danger of suffocation!
DANGER due to elect icity
• Never immerse the coffee machine, mains plug or mains
cord in water, as this could cause an electric shock. he
machine must not be cleaned with water jets. ake care
not to place it near water jets where it could be sprayed
or splashed with water. Never touch the mains plug with
damp hands. Do not use the machine outdoors.
• Never leave the machine to operate unattended.
• Only connect the machine to a properly installed,
grounded wall socket. Its mains voltage must comply
with the technical specifications of the machine.
• he mains cord must not be kinked or squeezed. Keep it
away from sharp edges and sources of heat.
• Do not use the machine if the machine, mains cord or
mains plug is damaged or if the machine has been dropped.
• Do not make any modifications to the appliance, mains
cord or other parts. Electrical appliances must only be
repaired by qualified electricians, as improper repairs
can cause considerable damage. Only have repairs
carried out by a specialist workshop, or contact the
customer care service.
• Remove the mains plug from the wall socket...
... if a fault occurs,
... if the machine will not be used for any length of time,
... before cleaning the machine.
Always pull the mains plug, not the mains cord.
WARNING – isk of scalds/bu ns
• Hot steam and hot water can cause scalds. Never expose
Safety warnings

13 Safety wa nings
any part of the body to the steam or hot water jet. Do not
touch any hot parts of the machine, such as the steam
wand o the metal of the f othe nozzle. Only use the
steam/froth functions when a suitable receptacle has
been placed beneath the frother nozzle.
• Do not fold up the stop lever while the machine is being
used, and do not pull out the capsule holder.
• Never place any drinks or other objects on top of the
machine.
CAUTION – isk of inju ies o mate ial damage
• Only use original chibo Cafissimo capsules. Neither
use capsules from other manufacturers, nor damaged
or misshapen capsules, and never fill capsules or the
machine with ground coffee or instant coffee, as this
would damage the machine. In these cases, any neces-
sary repairs due to damage are not covered by the
guarantee.
• Only use the machine with the drip tray and grid inserted,
as otherwise water will leak out.
• Always pour fresh, cold tap or other drinking water into
the water tank. Do not use carbonated mineral water or
any other liquids.
• Descale the machine as soon as the machine indicates
that this is necessary.
• here is one sharp point in the capsule holder and one in
the capsule holder retainer. Both these points pierce
through the capsule from the bottom and the top while it
is being inserted. Never touch these sharp points.
• If you want to move the machine, hold it by the outer
casing. Allow the machine to cool down before moving it.
• Place the machine on a solid, level surface which is well
illuminated and resistant to water and heat.
• o ensure the casing does not melt, do not place the
machine on a hob, immediately next to a hot oven,
radiator or anything similar.
• Route the mains cord so that it cannot be tripped over.
Do not let the mains cord hang down from the surface
the machine is put on so that the machine cannot be
pulled down by it.
• he machine is equipped with non-slip feet. Work sur-
faces often have varnished or plastic finishes and are
treated with a variety of care products. Some of these
may contain substances that react adversely to the non-
slip feet and soften them. Place a non-slip mat under the
machine, if necessary.
• he machine must not be exposed to temperatures below
4°C. Residual water in the heating system could freeze
and cause damage.
• Sound pressure level <70 dB(A).

14 Initial ope ation
IMPORTANT!
Before you can use the machine, water must be pumped
into the piping system.
The separately enclosed leaflet explains how you should
proceed.
Initial operation – Before first-time use -

15 Tips fo use
Tips for use
Coffee strength
• Each capsule is portioned for one cup of filter coffee,
caffè crema or espresso.
• How to adjust the strength of the coffee to suit your
personal taste is described in the section “Adjusting the
strength of the coffee”.
Interrupting/stopping the brewing process
• You can take a pause at any time during preparation
by pressing the (now flashing) button again.
This may be necessary, for example, if you have in -
advertently pressed the wrong button, or if you wish to
use less water for brewing without changing the water
quantity for subsequent occasions.
• If the coffee is too strong, press the button again to
allow some more water to flow through. Press the
button once again to stop the procedure.
Full aroma
• Insert a capsule only when you require it. The capsule
is pierced as it is inserted. If it is not then used imme-
diately, the aroma will fade.
• Espresso tastes best when served in a preheated cup.
Also read the section ”Hot water to preheat cups”.
Residues of coffee grounds and capsule bases
There are two features particular to this system:
• A small residue of coffee grounds always remains at
the bottom of the cup.
• The bases of the capsules vary in fabrication.
Changing the water after 2 days of non-use
If you have not used your machine for longer than 2 days,
stale water will be trapped in the system. ill fresh water
into the water tank and let one cup of water flow through –
see the section ”Rinsing with water after a long period of
non-use”.
If the machine has not been used for an even longer
period, the water in the system will evaporate. In this case,
also proceed as described above.

Brewing coffee
16 B ewing coffee
1. Press the On/Off button .
The button flashes and the heating up process starts.
As soon as all the indicator lights remain permanently lit
the machine is ready. Additionally, a short signal will
sound.
If the indicator light “Water tank empty” flashes, fill
water into the tank.
2. Insert a capsule into the capsule holder.
The capsule must be intact:
do not pierce it and do not remove the lid!
3. The stop lever must be folded up.
Slide the capsule holder into the machine and press the
stop lever down as far as it will go.
While the machine heats up a few drops
of water may drip from the capsule holder.
This is normal and harmless.
1.
2.

17 B ewing coffee
4. Place the cup on the centre of the round opening of the
drip tray.
old down the hinged tray if you are using small cups.
The tray is held by a magnet when it is folded up.
5. Press the button that corresponds to the capsule you
have inserted.
Which coffee selection button you press depends on the
capsule you have inserted. or example, if you have
inserted a yellow capsule you must press the button with
the yellow cup (caffè crema).
After you have pressed a button it will begin to flash and
preparation will start.
As soon as preparation has been completed the buttons
will light up permanently. A signal will sound approximately
5 seconds after the brewing process has ended.
You can now enjoy a cup of freshly brewed coffee.
ilter coffee Caffè crema Espresso

18 B ewing coffee
Always remove used capsules from the machine.
If you should happen to forget a capsule in the machine for a number of days, clean the capsule holder as
described in the section ”Cleaning” and carefully wipe the sharp point in the capsule holder retainer.
Floater
Disposing of used capsules
1. Press the stop lever upwards. The capsule holder will
be released and slightly lowered.
2. Now pull the capsule holder to the front out of the
machine. If necessary, hold a dish underneath to catch
possible drips.
3. Empty out the capsule holder by turning it upside down
over a rubbish bin. The used capsule will fall out.
After use
1. If you do not wish to brew any further cups of coffee,
press the On/Off button to switch off the machine.
2. Clean the capsule holder as described in the section
“Cleaning”.
3. Reinsert the capsule holder, but keep the stop lever
folded up. This prevents unnecessary strain to the
machine.
4. The floater indicates when the drip tray is full. If it
protrudes above the grid opening, empty the tray.
2.
1.

19 Adjusting the st ength of the coffee
Adjust the strength of the coffee to suit your personal
taste by adjusting the quantity of water.
Adjusting the strength for the current brewing
procedure (without saving the setting)
If the coffee is too weak, you can stop the water flow by
pressing the flashing coffee selection button.
If the coffee is too strong, start the brewing procedure
again without inserting a new capsule.
Press the flashing coffee selection button as soon as
sufficient water has run through.
Setting the strength permanently (saving the setting)
The factory settings for the water quantities used by the
machine per capsule can be changed. This enables you to
make a stronger or weaker brew of your favourite coffee.
Please note that only one individual setting is possible for
each coffee type.
Default setting when the machine is bought:
filter coffee: 125 ml
caffè crema: 125 ml
espresso: 40 ml
You can adjust the beverage quantity in the range of
30 — 300 ml.
1. Proceed as you would do for brewing coffee: insert a
capsule, press the stop lever down, place a cup under-
neath.
2. As soon as all the buttons remain permanently lit,
press the corresponding coffee selection button
(depending on the capsule inserted) and keep the
button pressed down.
3. Release the button as soon as the desired quantity has
been dispensed into the cup. The chosen quantity will
be stored.
4. If the setting is not to your taste, simply repeat the
procedure to change it again.
Restoring the factory settings
After you have changed the quantity for one or more
beverages, you can restore the original water quantities
as follows:
1. Press the On/Off button to switch the machine off.
2. Press and hold the left and right
coffee selection buttons and
switch the machine on by pressing
the On/Off button .
3. Release the buttons.
The factory settings have been restored.
m
m
Adjusting the strength of the coffee
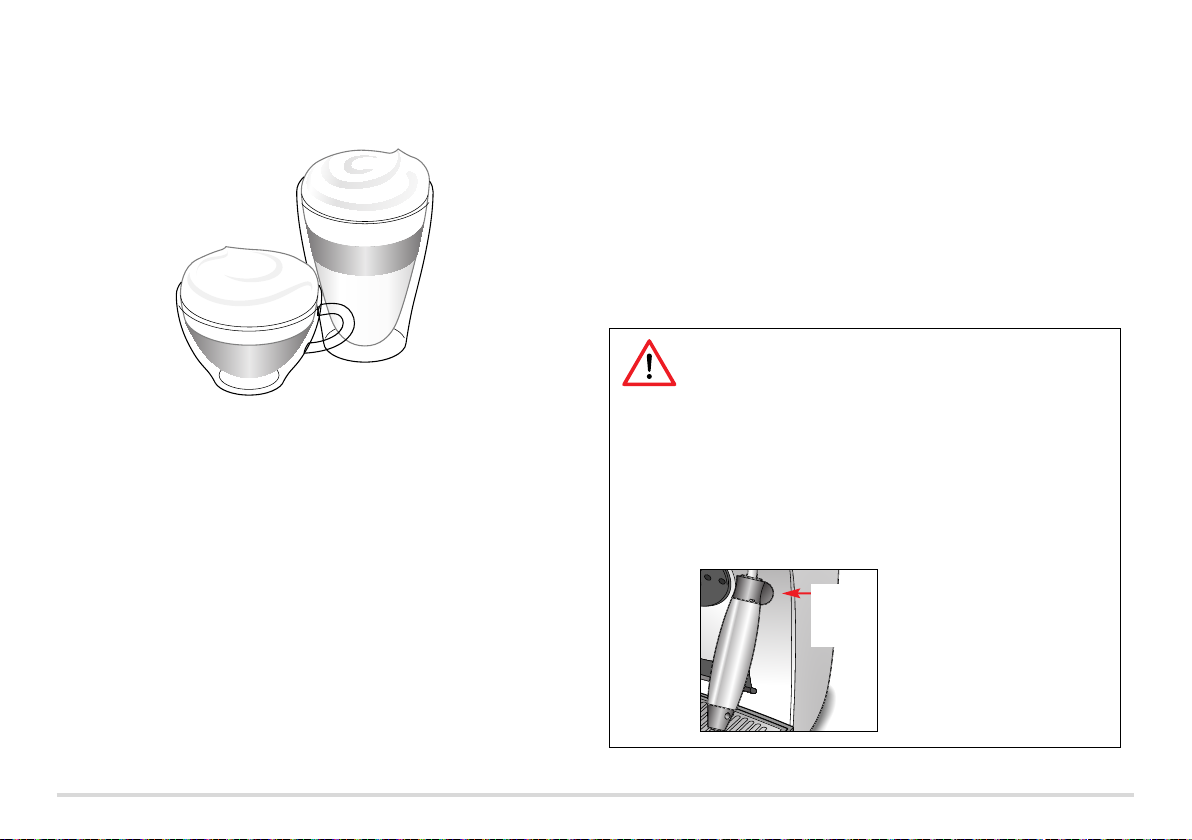
20 F othing milk
Tips for a perfect milk froth
• The milk has to be well cooled.
• Depending on your individual taste, use milk with a fat
content of up to 3.5%.
• Milk that has already been warmed does not froth well.
Dispensing steam
You will need steam to froth the milk.
WARNING – risk of scalding due to hot water
or steam
• Never expose any part of the body to the
steam or hot water jet. Do not touch any hot
parts of the machine such as the steam wand
or the metal parts of the frother nozzle.
Only use the steam/froth functions when a
suitable receptacle has been placed beneath
the steam nozzle.
• Only take hold of the
frother nozzle by the
black upper end.
The metal parts become
hot!
touch
here
only
Frothing milk
Table of contents
Other Tchibo Coffee Maker manuals

Tchibo
Tchibo Cafissimo SUP028R User manual

Tchibo
Tchibo Cafissimo PICCO User manual

Tchibo
Tchibo Cafissimo 370 635 User manual

Tchibo
Tchibo Esperto Pro User manual

Tchibo
Tchibo Cafissimo pure+ MCA21102 User manual

Tchibo
Tchibo Esperto Caffe User manual

Tchibo
Tchibo CAFISSIMO MINI Guide

Tchibo
Tchibo 280997 User manual

Tchibo
Tchibo Cafissimo PICCO User manual

Tchibo
Tchibo 398 498 Installation guide


