TCL 65C825 User manual

To enjoy all smart features and services on your TCL Google TV, a free Google account, a free
TCL account, and a reliable broadband internet connection, are required.
Figures and illustrations in this User Manual are provided for reference only and may differ from
actual product appearance. Product design and specifications may be changed without notice.
65C825

2
Table of Contents
Chapter 1: Introduction
Precautions ...............................................................3
Warning ...................................................................3
Product ....................................................................3
Power and Plug .......................................................3
Power Cord and Signal Cable .................................3
Use Environment .....................................................3
Cleaning ..................................................................3
Sockets and Connections ........................................4
Remote Control Functions ...................................... 5
Chapter 2: Getting Started
Switching On .............................................................7
Switching Off .............................................................7
Network Connection .................................................8
TV Buttons.................................................................9
Initial Setup ...............................................................9
Chapter 3: Basic TV Operations
Accessing Channels ..............................................10
Watching Connected Devices ...............................10
Adjusting Volume ...................................................10
Accessing Google TVHomepage ..........................10
Accessing TCL Channel .........................................10
Using Settings Menu ...............................................10
Chapter 4: Using More of Your TV
Installing Channels .................................................11
Using Subtitles ........................................................11
Turning On/Off Subtitles .........................................11
Enabling Subtitle Languages on Digital TV Channels
................................................................................11
Selecting a Subtitle Type on Digital TV Channels ...11
Using Teletext .........................................................11
Selecting Decoding Page Language ......................11
Digital Teletext Language .......................................11
Using Quick Start Funtcion ....................................12
Network Wake Up ................................................12
Consumer Electronic Control (CEC) ....................12
Enabling or Disabling CEC ....................................12
Using Auto PowerOn .............................................12
Using Auto Standby................................................12
21................)ediuGmargorPcinortcelE(GPEgnisU
Bluetooth Function .................................................13
Time Shift .................................................................13
PVR (Personal Video Recorder) .............................13
MagiConnect ...........................................................14
Reset Shop ..............................................................14
41.........
Password in Parental Control ................................14
Using the Hands-free TV Voice Control .................14
Gesture Control ......................................................14
51..............................................................lausiVitluM
Chapter 5: TV Installation
Mount the Stand ......................................................16
Mount to the Wall ....................................................17
Chapter 6: Other Information
Problems & Solutions.............................................18
Troubleshooting .....................................................19
Legal Statement ......................................................20

3
IntroductionChapter 1
Precautions
Read all of the instructions before operating the set.
Keep these instructions well for future use.
Warning
A television set may fall, causing serious personal injury
or death. Many injuries, particularly to children, can be
avoided by taking simple precautions such as:
-ALWAYS use cabinets or stands or mounting
methods recommended by the manufacturer of the
television set.
-ALWAYS use furniture that can safely support the
television set.
-ALWAYS ensure the television set is not overhanging
the edge of the supporting furniture.
-ALWAYS educate children about the dangers of
climbing on furniture to reach the television set or its
controls.
-ALWAYS route cords and cables connected to your
television so they cannot be tripped over, pulled or
grabbed.
-NEVER place a television set in an unstable
location.
-NEVER place the television set on tall furniture
(for example, cupboards or bookcases) without
anchoring both the furniture and the television set to
a suitable support.
-NEVER place the television set on cloth or other
materials that may be located between the television
set and supporting furniture.
-NEVER place items that might tempt children to
climb, such as toys and remote controls, on the top
of the television or furniture on which the television
is placed.
If the existing television set is being retained and
relocated, the same considerations as above should be
applied.
This symbol indicates that high voltage is
present inside. It is dangerous to make any
kind of contact with any internal part of this
product.
N
This symbol indicates that the fuse may
be in the neutral, and that the mains shall
be disconnected to deenergize the phase
conductors.
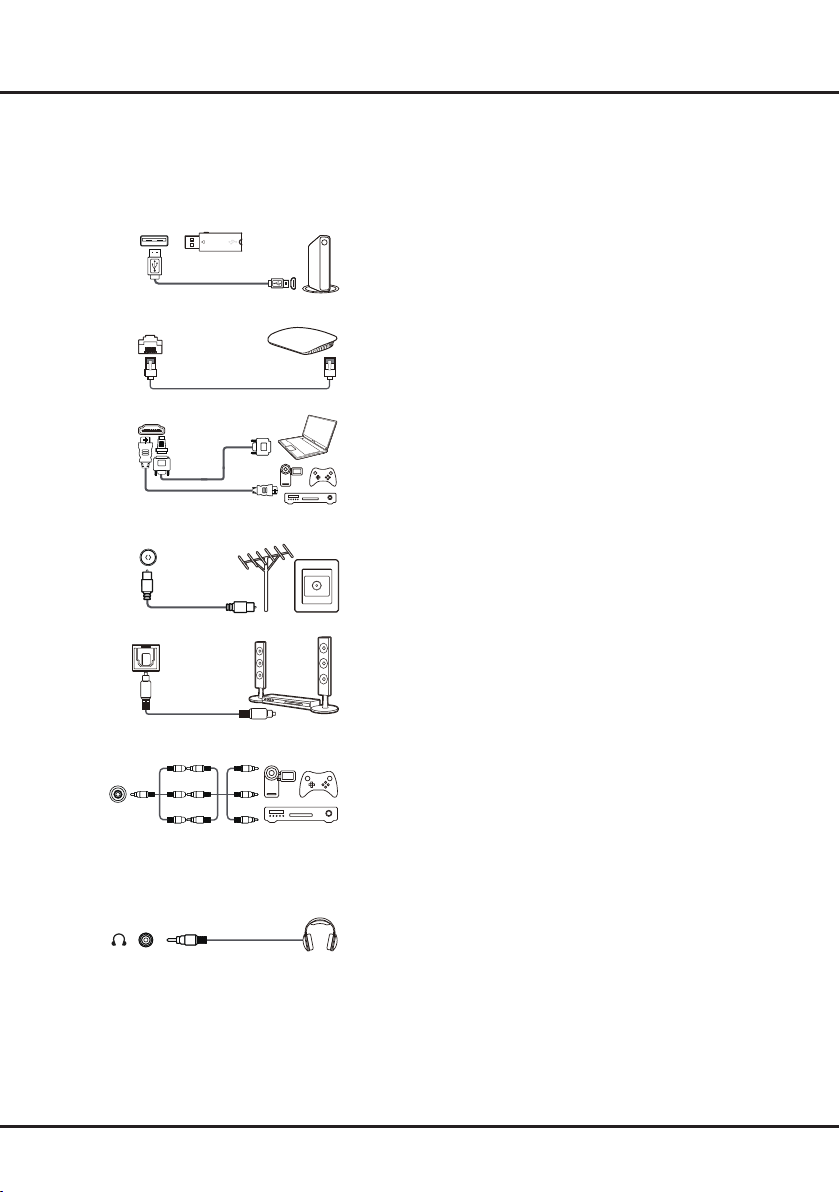
If an outside antenna or cable system is connected to
the product, be sure the antenna or cable system is
grounded by a skilled person so as to provide some
protection against voltage surges and built-up static
charges.
Product
• Do not block or cover the ventilation openings on the
back cover.
• Do not push objects of any kind into this unit through
the cabinet slots as they could touch the current
carrying parts or short-circuit parts, resulting in re,
electric shock, or damage to the unit.
• Do not attempt to open the cabinet as this may cause
damage. There are no parts inside you can service by
yourself. Refer all servicing to qualied personnel.
• Do not touch the screen surface with ngers as this
may scratch or mar the TV screen.
• Do not impact the TV screen with hard pressure as
this may damage the TV screen severely.
Power and Plug
• Unplug the set under the following conditions:
-If the set will not be used for a long period of time.
-If the power cord or the power outlet/plug is
damaged.
-Follow the instructions to install and adjust the
product. Adjust those controls that are covered in
these operating instructions as improper adjustment
of other controls may result in damage. If this
happens, unplug the set and refer to the service
personnel.
-If the set is subject to impact or has been dropped
and the cabinet has been damaged.
• Where the mains plug or an appliance coupler is used
as disconnect device, the disconnect device shall
remain readily operable.
(*Where an all-pole mains switch is used as the
disconnect device, the switch shall remain readily
operable.)
Power Cord and Signal Cable
• Do not allow anything to rest on or roll over the power
cord and the signal cable.
• Protect the power cord and the signal cable from
being trampled.
• Do not overload the power cord or the power outlet.
• Do not expose the power cord and the signal cable to
moisture.
Use Environment
• Do not place the set on an unstable cart, stand, or
table.
• Place the set on a place that allows good ventilation.
• Do not use the set near damp, and cold areas.
• Do not expose the set to excessive heat such as direct
sunlight, re, or the like and no naked ame sources,
such as lighted candles, should be placed on the
apparatus.
• Do not expose the set to dripping or splashing and
no objects lled with liquids, such as vases, shall be
placed on the apparatus.
• Do not use the set in dusty environments.
• Operating Temperature: 5°C to 35°C (41°F to 95°F)
Operating Humidity: 20% to 80%, non-condensing
Storage Temperature: -15°C to 45°C (5°F to 113°F)
Storage Humidity: 10% to 90%, non-condensing
Cleaning
• Dust the set by wiping the screen and the cabinet with
a soft, clean cloth or some special liquid cleaner.
• Do not apply excessive force to the screen when
cleaning.
• Do not use water or other chemical cleaner to clean
the screen as this may damage the surface of the TV
screen.
All other safety instructions about our TV sets are
also applicable here. (Note: Certain TV model is not
designed to be mounted to the wall.)

4
Introduction
Sockets and Connections
Note: The location and names of the sockets on the TV may vary according to TV model, and not all sockets
available on all models.
USB 2.0 or USB 3.0 socket (input)
The USB socket(s) can be used to connect a USB 2.0 or USB 3.0
device.
Note: The number of USB sockets on the TV may vary according
to TV model.
LAN
This socket can be used to connect to external modem or network
access equipment.
HDMI, HDMI (SERVICE) or HDMI (eARC/ARC) socket (input)
The HDMI (High-Denition Multimedia Interface) socket can be
used to connect a Blu-ray player, PC with a compatible video
card installed, certain DVD players or a high-denition compatible
digital satellite decoder. This socket provides an uncompressed
digital connection that carries both video and audio data by way
of an integrated mini-plug cable.
ANTENNA/CABLE IN socket (input)
This socket can be used to connect the outside aerial or cable
network.
DIGITAL AUDIO OUT (OPTICAL) socket
This socket can be used to connect a compatible digital audio
receiver.
AV IN adapter socket
This socket can be used to connect a range of equipment,
including video recorders, camcorders, decoders, satellite
receivers, DVD players, or games consoles.
Note: You must connect the attached AV adapter cable with
three color jacks to this socket rst, and then use the yellow jack
for VIDEO connection and the red and white jacks for AUDIO
connection.
Headphone socket (output)
This socket can be used to connect headphones or stereo
earphones.
Note: When the Headphone socket is connected, the speakers
will be muted.
Warning: Excessive sound pressure from earphones and
headphones can cause hearing loss.
DIGITAL
AUDIO OUT
(OPTICAL)
ANTENNA
/CABLE IN
AV IN
adapter
V L R
V L R
V L R
LAN
Router / Modem
USB 2.0
or USB 3.0
HDD
HDMI
or HDMI
(eARC/ARC)
(SERVICE)
or HDMI

5
Remote Control Functions
Most of your television's functions are available via the menus that appear on the screen. The remote control(s)
supplied with your set can be used to navigate through the menus and to congure all the general settings.
Notes: 1. Figures and illustrations in this operation manual are provided for reference only and may differ from actual
product appearance. 2. The remote control type may be changed without notice, please refer to your acutal remote
conrtol supplied with your TV. 3. Certain function may not be available for some models.
Introduction
To switch the sound off and back on.
Standby / quit standby.
Add an entity to Watchlist. (Available only in Google
TV mode.)
Press the Assistant button on your remote to talk
to the Google Assistant. (Available only in Google
TV mode and when the network connection works
normally.)
To display the dashboard menu.
Circular D-Pad Navigation direction buttons (Up/Down/Left/Right).
OK To conrm an entry or selection.
To return to the previous menu or quit an app.
To access the Google TV homepage.
To access Electronic Program Guide. (only available
for digital channels.)
To select input source.
/ To control the volume.
P+/P
-
To change channels.
To perform the corresponding function as indicated on
screen.
To display the quick panel.
To pop up the virtual remote control keyboard when
available.
To open TCL home on screen.
To access Netix.
To access Prime Video.
To access Safety Guard.
To access Media Player. (Not available for some models.)
To access YouTube.
To access TCL Channel.
Notes:
- Certain function may be accessed from the virtual remote control keyboard
only, please press button on the remote to display it and operate
accordingly.
- The App buttons may differ depending on the model. The App button is used
for accessing the corresponding App.
- The Google Assistant is not available in certain languages and countries.
Circular
D-Pad OK
Google and Google TV are
trademarks of Google LLC.

6
Introduction
-Installing Batteries
1. Push to open the back cover as illustrated.
2. Insert two AAA batteries according to the polarities marked on the battery case.
3. Replace the back cover as illustrated.
-How to Use the Remote Control
a. Before using the Google Assistant button, you must nish pairing the remote with the TV rst.
b. This Google Assistant function is only available for content search from certain apps.
c. Set languages in the (Settings) > System > Language to your local language or ofcial language to en-
hance voice search successfully.

7
Chapter 2 Getting Started
Switching On
Follow the instructions on this page on how to switch on your TV set
and the remote control before going on to following pages describing
how to use the channel set-up procedure.
1. Insert two AAA batteries in the remote control.
Precautions on using batteries:
- Only use the battery types specied.
- Make sure you use the correct polarity.
- Do not mix new and used batteries.
- Do not use rechargeable batteries.
- Do not expose batteries to excessive heat such as sunshine,
re or the like, throw them in a re, recharge them or try to open
them, as this could cause them to leak or explode.
- Remove the batteries from the remote control if you are not using
it for a long period of time.
- Attention should be drawn to the environmental aspects of battery
disposal.
2. Connect the power cable FIRST to the television, THEN to a mains
socket. (Note: If the power cable is connected to the television,
please only connect the power cable to the mains socket.)
Your TV set should only be connected to an AC supply. It must
not be connected to a DC supply. If the plug is detached from the
cable, do not, under any circumstances, connect it to a mains
socket, as there is a risk of electric shock.
Note: The gures are for representation only, the location of power
socket of the television may differ depending on the model.
3. Connect an outside aerial to the ANTENNA/CABLE IN socket at
the back of the TV set.
The aerial socket (75 OHM - VHF / UHF / cable) can be used for
connecting an external aerial or other equipment tted.
Note: If you want to receive the signal from your cable or cable
box, please connect a coaxial cable to the ANTENNA/CABLE IN
socket at the back of the TV set.
4. When powered on, the TV will be turned on directly or be in
standby mode.
If the power indicator lights up, the TV set is in standby mode.
Press the button on the remote control or on the TV set to turn
on the TV.
Switching Off
• To put the TV set into standby mode, press the button on the
remote control. The TV set remains powered up, but with low
energy consumption.
• To switch off the TV set, unplug the mains socket from the mains
outlet.
Note: In order to save energy and protect environment, certain models
are designed with a relay switch. It is a normal phenomenon if you
hear the sound of the relay when you turn on or off the TV set.

8
Getting Started
Network Connection
Your TV will require an internet connection to operate all functions. Data usage charges may apply.
Please refer to your Internet Service Provider (ISP) for additional information.
To access the Internet, you must subscribe to high speed broadband Internet service with your Internet service
provider (ISP).
Your TV can be connected to your home network in two ways:
• Wired, using the RJ45 (LAN) connector on the back panel.
• Wireless, using the internal wireless and your home wireless network.
Note: Instructions below are just the usual ways to connect your TV to the wired or wireless network. The connection
method may be different depending on your actual network conguration. If you have any questions about your
home network, please refer to your ISP.
Connecting to a Wired Network
To connect to a wired network:
1. Ensure you have:
• An Ethernet cable long enough to reach your TV
• A router or modem with an available Ethernet
port
• A high-speed Internet connection
• An Ethernet (LAN) port on the back of the TV
2. Connect your Ethernet cable to the router and to
the Ethernet port on the back of the TV.
3. Use the Network and Internet menu to configure
the TV.
Connecting to a Wireless Network
To connect to a wireless network:
1. Ensure you have:
• A router broadcasting a high-speed wireless
signal
• A high-speed Internet connection
2. Use the Network and Internet menu to configure
the TV.
Notes: Please follow below steps to enter the Network and Internet menu.
1. Press on the remote control to display the dashboard menu.
2. Select (Settings) and press OK to enter the settings menu.
3. Press Up/Down to select Network and Internet, then press OK to enter the submenu and follow the on-
screen guidance to set up your network.
Router
Modem Internet
LAN port
Modem Internet
Wireless router

9
Getting Started
Initial Setup
The rst time you switch the set on, the Welcome wizard appears, which guides you through the initial setup
process. Follow the on-screen instructions to nish the initial setup process such as selecting the language, pairing
your remote, connecting to the network, and more. During each step, either make a choice or skip the step. If you
skip a step, you can perform the setup later from the settings menu.
Notes:
- It's recommended to select Set up Google TV and finish its setup to enjoy more features during the initial setup
process. If you have finished basic TV's setup, you can reaccess Google TV by pressing on the remote control,
selecting (Settings) > Set up Google TV and pressing OK to confirm.
- When you pair your remote, keep the remote control and TV within 1 meter, and follow the on-screen guide for
pairing. After finishing pairing the remote, you can use the Google Assistant button. If you skip remote pairing, you
will be prompted to pair the remote with the TV again when you use the Google Assistant button for the first time.
TV Buttons
-Power button
If the batteries in your remote control are run down, you can use the button on your TV set.
The model has only one button. It may work just as Power on/Standby button, or as a multi-function controller.
You can turn on the TV by pressing the button at the bottom left of the TV back case.
While the TV is on, press the button to display the multi-function menu. For more information about how to use
the multi-function menu, please refer to the figure below.
CH+ CH- Volume+ Source OKVolume-
Standby
Tips: Short click to change, long click to select.
• Press to move the highlight to the next function selection
• Press and hold the button for more than 2 seconds to conrm your selection.
Note:
You can follow the on-screen guide to operate. Figures and illustrations are provided for reference only and may
vary depending on the model.
-MIC switch
The MIC switch is located next to the power button. If you want to use the feature of hands-free TV voice control,
turn on the switch.

10
Chapter 3 Basic TV Operations
Accessing Channels
Using the Up/Down buttons: Press the Up/Down
buttons on the remote control to scroll through the
channels.
Using the OK button: Press the OK button to display
the channel list and press Up/Down/Left/Right and OK
to select channels.
Using the P
+
/P
-
buttons: Press the P
+
/P
-
buttons on
the remote control to scroll through the channels.
Using the button: Press to display the virtual
remote control keyboard, then you can use the numeric
buttons or the List button to operate accordingly.
Watching Connected Devices
Press on the remote control to display the source
list. Press Up/Down to select TV or other input sources
and press OK to conrm.
You can also press on the remote control to display
the dashboard menu, select the (Inputs) option, and
press OK to enter. Then press Up/Down and OK to
select the input source.
Adjusting Volume
Volume control: press the /buttons on the remote
control to increase or decrease the volume.
Sound mute: press the button to temporarily mute
the sound. Press this button again or the button to
restore the sound.
Accessing Google TV Homepage
Allows you to enjoy the entertainment you love with
a little help from Google. Google TV brings together
movies, shows and more from across your apps and
subscriptions and organizes them just for you.
Note: If you intend to use (online) video communication
applications, an appropriate camera will be
needed. Cameras need to be purchased
seperately. For details, please consult TCL
Customer Service or your place of purchase.
WARNING:
• Congure the network settings before using Google
TV applications.
• Slow responses and/or interruptions may occur,
depending on your network conditions.
• If you experience a problem using an application,
please contact the content provider.
• According to circumstances of the content provider, an
application’s updates or the application itself may be
discontinued.
• Depending on your country's regulations, some
applications may have limited service or not be
supported.
• Changes in application content may be made without
prior notice by the service provider.
1. Press on the remote control to display the Google
TV homepage.
2. Press Up/Down/Left/Right and OK to enter the
desired apps, functions or settings.
3. Press to return to the homepage.
4. To exit the homepage, press on the remote
control to display the source list and use Up/Down
and OK to select your desired input source.
Note: Since the connection with Internet takes time, it’s
recommended that you wait a few minutes to use
the Google TV feature after activation of TV from
standby.
Accessing TCL Channel
Allows you to enjoy more VOD (Video on Demand)
contents or featured applications.
1. Press
on the remote control to enter TCL
Channel, or access through the TCL Channel icon
on homepage.
2. Press to exit.
Using Settings Menu
Allows you to not only adjust settings, such as Picture,
Network and Internet, Accounts and sign-in and Apps,
etc., but also set preferences.
1. Press on the remote control to display the
dashboard menu.
2. Select (Settings) and press OK to enter the
settings menu
3. Press Up/Down to select the desired item and press
OK to enter the corresponding submenu.
4. In submenus, press Up/Down to select menu
options, then press OK to enter the option list or the
corresponding submenu, or press OK to toggle on or
off, or press Left/Right to adjust the setting.
5. Press to return to previous interface and exit.
Note: Setting LED motion clear on will make fast
moving images clearer by controlling the LED
backlight, but the picture will be darker and more
ickering than with LED motion clear off.
(* not available for some models)

11
2. Select the Subtitle option, and press OK to toggle
between on or off.
3. Press to return to the previous menu.
Enabling Subtitle Languages on Digital TV
Channels
1. Press on the remote control, select (Settings)
>Channels and inputs >Channel > Subtitle >
Digital subtitle language 1st and press OK/Right
to enter.
2. Press Up/Down to select a subtitle language as your
preferred language and press OK to conrm.
3. Press Up/Down to select Digital subtitle language
2nd and press OK/Right to enter.
4. Press Up/Down to select a secondary subtitle
language and press OK to conrm.
5. Press to return to the previous menu.
Selecting a Subtitle Type on Digital TV
Channels
1. Press on the remote control, select (Settings)
>Channels and inputs >Channel > Subtitle >
Subtitle type and press OK/Right to enter.
2. Press Up/Down to select a subtitle type and press
OK to conrm. You can select Hearing impaired
to display the hearing impaired subtitles with your
selected language.
3. Press to return to the previous menu.
Using Teletext
Selecting Decoding Page Language
1. Press on the remote control, select (Settings)
>Channels and inputs >Channel > Teletext >
Decoding page language and press OK/Right to
enter.
2. Press Up/Down to select a proper type of language
in which Teletext will display and press OK to
conrm.
3. Press to return to the previous menu.
Digital Teletext Language
On digital TV channels, depending on the broadcaster,
you may be able to enjoy a service with multiple initial
Teletext pages in different languages. This function
allows you to select an available language as primary
language, which relates to different initial Teletext
pages.
1. Press on the remote control, select (Settings)
>Channels and inputs >Channel > Teletext >
Digital teletext language and press OK/Right to
enter.
Installing Channels
This section describes how to search and store
channels automatically. This may be done in either of
the cases below:
-you are prompted that there are no channels in TV
mode;
-you want to update your channels.
1. In TV mode, press on the remote control, select
(Settings) >Channels and inputs >Channel >
Channel scan and press OK/Right to enter.
2. The TV installs and arranges channels according
to your country or region. Press Up/Down to select
Country/Region, and press OK to enter. Enter
the default password 1234 or your own password
in case you have changed the password in the
(Settings) >System >Lock menu. Press Up/Down
to select your country or region and press OK to
confirm.
3. Press Up/Down to select Automatic search and
press OK to enter.
4. Press Up/Down to select Tuner mode and press
Left/Right to select Cable or Antenna.
5. Press Up/Down to select other options and use
Left/Right to configure.
6. After configuration is completed, press Down to
select Search and press OK to start scanning
channels.
7. The channel search may take a few minutes. After
the automatic search, channels are arranged in
a preset order. If you wish to hide, edit or delete
channels, press on the remote control, select
(Settings) >Channels and inputs >Channel >
Channel organizer and press OK to enter.
Note: If the channel search retrieved only the analog
channels it could be caused by poor broadcasting
and therefore is not covered by manufacturer
warranty. Manufacturers cannot be held
responsible for lack of or poor broadcasting in
some areas.
Using Subtitles
You can enable subtitles for each TV channel. Subtitles
are broadcast via Teletext or DVB-T/DVB-T2/DVB-C
digital broadcasts. With digital broadcasts, you have
the additional option of selecting a preferred subtitle
language.
Note: Some options are available only when Subtitle is
set to on.
Turning On/Off Subtitles
1. Press on the remote control, select (Settings)
>Channels and inputs >Channel > Subtitle and
press OK/Right to enter.
Chapter 4 Using More of Your TV

12
Using More of Your TV
2. Select the HDMI control option, and press OK to
toggle between on or off.
3. Press to return to the previous menu.
Using Auto Power On
Enables the TV to automatically power on when you
power on a CEC device (e.g. DVD) with the device’s
remote. Press OK to turn it on to enable this function.
Using Auto Standby
Enables all CEC devices to automatically go to the
standby mode when you turn off the TV with the TV
remote. Press OK to turn it on to enable this function.
Note: The CEC functions depend on the devices
connected and it is possible that some devices
may not interoperate correctly when connected to
this TV. The user manual or the manufacturer of
the problematic devices should be consulted for
further information.
Using EPG (Electronic Programme
Guide)
EPG is an on-screen guide that displays scheduled
digital TV programmes. You can navigate, select and
view programmes.
1. Press on the remote control, select (Settings)
>Channels and inputs >Channel > EPG and
press OK to enter, or press directly (if available)
on the remote control, the Programme Guide menu
will appear, which allows you to get information
about the current or next programme playing
on each channel. Navigate through the different
programmes using the Up/Down/Left/Right buttons
on the remote control.
2. Use the related buttons shown at the bottom of the
screen to view EPG.
- Programme lter: Programme guide lter for
digital TV programmes.
• Press to display the type list of the programme.
• Navigate through the different types using the
Up/Down buttons on the remote control.
• Select one or more types, which you want to
highlight from the type list, press OK to select or
deselect. A checkmark will appear to the right of
the type when selected.
- Custom schedule: Press Up/Down to select a
programme, then press the RED button to set the
schedule, press OK to enter and use Up/Down to
select Schedule reminder or Schedule record-
ing.
- Select date: Press the GREEN button to select
date.
- Schedule list: Press the YELLOW button to view
your schedule list.
2. Press Up/Down to select a language and press OK
to conrm.
3. Press to return to the previous menu.
Using Quick Start Function
It enables you to turn on your TV faster from standby
mode than turning this function off, but it will also
increase standby power consumption .
1. Press on the remote control, select (Settings)
>System > Power and energy > Quick start and
press OK/Right to enter.
2. Select the Quick start option, and press OK to
toggle between on and off.
3. Press to return to the previous menu.
Network Wake Up
(* Not available for some models)
Note: This feature is only available in Google TV mode.
This function allows you to turn on your TV from standby
mode via a network. To use this function, please make
sure:
1. Your TV is connected to an effective wireless home
network;
2. The desired controller, such as a smartphone, is
connected to the same network as your TV;
3. An app which supports network waking up function,
such as YouTube, has been installed into the
controller;
4. Network Standby is set to on in the Network and
Internet menu. In Google TV mode, press on the
remote control, select (Settings) > Network and
Internet > Network Standby, and press OK to turn
it on.
When the TV is in network standby mode, you can use
the App to wake up the TV remotely.
Notes:
- This feature is disabled if you press and hold the
button on the remote control and confirm to shut the
TV down.
- Before using the feature of network wake up, make
sure Quick start is set to on.
Consumer Electronic Control(CEC)
Use this function to search for CEC devices connected
to the HDMI sockets in your TV and enable auto power
on and auto standby between the TV and CEC devices.
Enabling or Disabling CEC
1. Press on the remote control, select (Settings)
>Channels and inputs >Inputs > Consumer
Electronic Control (CEC) and press OK to enter.

13
Using More of Your TV
Notes:
- This feature is available only for digital channels.
- Before you plug the USB drive to TV, make sure
you have backed up the data on the drive to avoid
unforeseen malfunction and data loss.
- We recommend that you use a USB drive with at
least 1GB free space and a disk speed faster than
5.0MB/sec.
- The bigger the USB drive free space for live TV
pause, the bigger the recording length.
PVR (Personal Video Recorder)
Allows you to record your favourite TV programmes.
Before you use the function, connect a USB drive to the
TV rst.
Note: The feature is available only in selected products
and, due to specic TV network limitations and
country technical requirements, might not be
available in product or place of installation.
Feature might also be blocked by TV network due
to copyright protection (HD content, recording
protection).
1. Press on the remote control, select (Settings) >
Channels and inputs >Channel > PVR, then press
OK/Right to enter.
2. Select Record and press OK to confirm. It starts to
record automatically.
3. Press the blue button to access Settings and use
Up/Down/Left/Right to adjust the recording duration.
4. Press OK or to stop recording manually, the
recorded le will be saved. In normal operation, the
recording will stop automatically when the recording
duration expires.
Note: To access the blue button or , you need to press
button on the remote control to display the
virtual remote control
keyboard rst.
5. In recording, the PVR mini panel will also show on
the screen to indicate the recording progress.
6. To watch the recorded programme, exit PVR mode
rst. Then press on the remote control and select
(Settings) >Channels and inputs >Channel >
PVR >PVR list and press OK to enter. Select the
related record le and press OK to play. (It is the
same if you record a digital radio programme).
Notes:
- This feature is available only for digital non encrypted
channels.
- Before you connect the USB drive to the TV, make
sure you have backed up the data in the drive
to avoid the loss of your important data due to
unforeseen malfunction.
- The bigger the USB drive free memory for the PVR
function, the bigger the recording length.
- If you want to change channel or signal source
during recording, store the recording data before
Note: To access the color buttons, you need to press
button on the remote control to display the
virtual
remote control
keyboard first.
3. Press to exit EPG.
Bluetooth Function
(* Not available for some models)
Bluetooth®is a wireless technology standard for
exchanging data over short distance between Bluetooth
devices. You can connect Bluetooth audio device,
mouse or keyboard via the TV.
1. Press on the remote control to display the
dashboard, select (Settings) > Remotes and
accessories and press OK/Right to enter.
2. Select Add accessory and press OK to enter.
The TV will search nearby Bluetooth devices
automatically.
3. Select an available device, press OK and follow the
guides on the screen to connect it.
Note: Bluetooth technology (if available in your TV) uses
2.4GHz frequency thus close proximity to WiFi
access points, routers or microwave ovens might
interfere with Bluetooth audio streaming. If you
face interruptions in audio reception, you should
restart your Bluetooth device to nd frequency
with less interferences and if you continue to face
issues you should move closer to TV or increase
space between TV and source of interferences.
The Bluetooth®word mark and logos are registered
trademarks owned by Bluetooth SIG, Inc. and any use
of such marks by TTE Corporation is under license.
Other trademarks and trade names are those of their
respective owners.
Time Shift
Allows you to pause, fast forward and rewind live TV,
so you don’t have to miss any part of your favourite
programmes. Before you use the function, connect a
USB drive to the TV rst. For the rst time, you should
complete the disk setup for the USB drive.
Press on the remote control, select (Settings) >
Channels and inputs >Channel >Time shift, then
press OK to confirm.
1. Follow the directions on the screen to do the disk
setup if you use live TV pause for the first time.
2. After the disk setup is done, live TV pause will start,
and the live TV pause menu displays on the screen.
3. When the live TV pause menu disappears and
only the timing of the live TV pause remains on the
screen, you can press OK to call out the live TV
pause menu and operate according to the on-screen
prompt.
4. Press or to stop live TV pause and exit.

14
enter the super password to override any existing
codes.
Using the Hands-free TV Voice
Control
Note: This feature is only available in Google TV mode.
Before using the hands-free TV voice control, connect
the TV to the network and make sure it can access the
Google website rst. Then follow the steps below to
access.
1. Turn the built-in MIC switch (next to the power button)
to on before using this function.
2. In Google TV mode, press the Google Assistant
button on your remote.
3. Select “Yes, I'm in”.
4. Say “OK Google” or “Hey Google” to activate it.
Notes:
-The availability of hands-free TV voice control
depends on your region/country/language and your
model. For details, please refer to your local dealer.
-A quiet surrounding is required for better function
when using it. The recommended distance for using
the hands-free TV voice control is within 2 meters in
front of TV set.
-Turn the built-in MIC switch to off if you are not going
to use it.
-Standby power consumption will increase because
the built-in MIC is always listening when the Google
Assistant or voice control with the built-in MIC is
enabled.
Gesture Control
(*Not available for some models)
Allows you to control TV device by doing gestures in
some specic scenarios.
Notes:
-This feature is available only when TV is equipped
with a camera of the designated type. For details,
please consult TCL Customer Service or your place
of purchase.
-Ensure the normal connection between the camera
and TV and that the toggle switch is set to while
using this product.
-The camera powers on automatically when you start
corresponding applications on TV.
-The camera powers off automatically when you exit
corresponding applications on TV.
-You may keep the slide cover closed when you are
not using the camera to protect the lens from dust.
Press button on the TV remote control, select
(Settings) > Privacy > Gesture Control and press OK
to enter. Select your preferred gesture functions and
changing the channel or source.
- The TV cannot play files normally if the parameters
of the file exceed the limitations of the system, the
file format is not supported, the file is damaged, or
the file cannot be decoded.
- Do not disconnect the USB drive when the system
is reading a file or transmitting data, otherwise the
system or the drive may be damaged.
MagiConnect
MagiConnect, formerly named T-Cast, lets you enjoy
plenty of videos,rich of applications, and share great
contents on large screen. It also allows you to turn a
smart device into a sophisticated remote control, provid-
ing more features than your normal TV remote control.
You can then control your TV through your smart
device.
Follow the on-screen instructions to scan the QR code
on the TV screen and download MagiConnect.
Note: Make sure the smart device and your TV are
in the same home LAN (local area network) or
network segment to use TV remote function.
Reset Shop
Allows you to reset the TV to factory default settings.
1. Press on the remote control to display the
dashboard, select (Settings) >System >About
>Reset >Factory reset and press OK to enter.
2. Select the Factory reset option and press OK to
enter. Then select Delete everything and press OK
to confirm.
3. Enter 1234 or the PIN according to the on-screen
prompt.
4. Select OK and press OK to conrm.
5. The Initial setup wizard appears. Follow the
instructions in the section Initial setup.
Netix Settings
Netix provides on-demand movies and TV shows
delivered via the Internet. Netix is available in certain
countries.Unlimited membership is required. More
information can be found at www.netix.com <http://
www.netix.com/>.
Note: You can directly access Netix via clicking the
NETFLIX button on the remote control.
Password in Parental Control
• The default password is 1234. You can change it to a
new one.
• The super password is 0423. If you forget your code,
Using More of Your TV

15
press OK to turn it on or off. To enable the function, you
need to follow the on-screen guide.
Note: In order to get good gesture experience, it is
advised to do the gesture under bright circumstances and
within a distance of 2 meters from the TV.
Multi Visual
Allows you to enjoy different programs with your family on
one TV at the same time.
The multi visual function is enabled by default. To use
the function, make sure your phone is Android OS and
the WiFi on the phone is turned on. Then follow the steps
below to operate.
1. Press on the remote control, select (Settings) >
Network and Internet > Wi-Fi,and press OK to turn
it on.
2. Activate the cast screen function on your phone and
choose the TV’s name you want to connect in the
searching list.
3. For the rst time, depending on different types of
phones, there are two situations: 1) an invitation
prompt appears, select “Accept” and press OK to
connect. 2) enter a correct PIN code to connect as per
the PIN message on the phone.
4. Then dual views display and you can enjoy different
programs at the same time.
5. If you want to watch only one program, use Left/
Right to select your desired view and press OK to
enter the full screen.
6. To return to the previous dual view screen, press and
hold on the remote control.
7. To exit the multi visual function, press to display a
dialog box, then select OK and press OK to conrm.
Notes:
-This feature is not available in any of the cases below:
a) when TV is in Netix or Media Player.
b) if the video from phone/DTV is scrambled.
c) when the capacity of required video decoding
exceeds 4K 60Hz.
-When in full screen mode, due to the compatibility
of the third party’s Apps, there might occur failure to
return to the dual views.
-At most 2 phones can be cast to the TV at the same
time. When in dual view mode, use Left/Right to
move the focus to TV view and then cast another
phone to the TV.
-To disable the feature, select (Settings) > System
> Multi visual settings > Multi visual and press OK
to turn it off.
-To check all available history list, select (Settings) >
System > Multi visual settings > Connection list
and press OK to enter.
Using More of Your TV

16
TV InstallationChapter 5
Mount the Stand
Notes:
• If the table stand has been assembled, just ignore the following instructions.
• Follow the instructions accordingly based on the table stand supplied to you.
• Graphics contained within this publication are for representation only.
• Keep the screws and plastic parts away from grease and organic solvents to avoid damage, especially during the
assembly process.
• During installation, lay some soft materials below the screen to avoid scratching and damaging the screen.
• When the TV is faced down, do not impact the screen with sharp edges to avoid scratching the screen.
12

TV Installation
Mount to the Wall
Notes:
• If you want to mount the TV to the wall, please purchase an appropriate wall mount bracket.
• Refer to the instructions of the wall mount bracket to hang the TV on the wall.
12
3
Screw off the VESA screws on the back of
the TV.
Place the bracket on the TV. Then fix the
bracket with the four screws removed from
the TV in step 1.
Ready to be mounted to the wall.
17

18
Chapter 6Other Information
Problems & Solutions
Note:Problems & solutions 1 to 2 are for the TV models which have network functions, so users of non-connected
TV models can disregard them.
formats, which are not compatible with your TV.
6. Video stops playing midway.
-Mistakes may occur when videos are copied or
compressed, so they may automatically stop playing
during playback.
7. What should I pay attention to, when I do
software updating?
-No power cuts when software updating;
-Avoid any operations with your remote control when
software updating;
-Depending on your internet connection speed, the
software updating process may take some time.
8. There are no distinct changes of TV interface
after software updating.
-Under certain conditions, software updating may not
only update or add new functions but also improve
the performance of the TV set, without distinct
changes of interface. Also, there may be no changes
to the user interface at all.
9. What should I do when software updating
process stops due to a sudden power-off?
-If you do software updating by USB, do not pluck
the USB drive from your TV, and restart your TV
to continue software updating; If you do software
updating by Network, also restart your TV and check
if it is functioning correctly.
10. With a USB device being inserted into the TV in
advance, I am prompted that no USB devices are
detected after I access Media, why?
-There may be something wrong with your portable
hard drive(s), damaged or with low voltage. It's
recommended to provide an additional power supply
to the hard drive(s).
11. External device cannot be recognized.
-Some external devices (e.g. webcam, smart phone,
tablet, game handle, and external wireless adapter)
may not be compatible with the TV and cannot be
supported for certain functions (wireless display,
gesture control, face recognition, if any). Please try a
similar device. If it does not work, contact your local
dealer.
12. Voice search does not work.
-Check if your remote control has been successfully
paired with your TV.
-Check if the language setting is correct.
-Check if Google server is available and stable.
1. Fail to link to the network.
-Check if your TV is connected with the network;
-Reboot your TV;
-Consult your internet service provider, to conrm
if access of your router is supported. Refer to the
operation manual of your router, and activate its
DHCP function after linking the network to your TV.
-Make sure your TV is connected to a router, and
make sure your router is powered on. Check that
your router/modem has an internet connection, and
that your Ethernet cables/wireless connection is OK.
Test your connection with a computer to make sure it
is OK. Should the problem persist, contact customer
service.
-Check if TV system time is correct or not. Sometimes
TV system time is synchronized to the wrong time
from abnormal broadcast signal. In this case, please
set system time manually.
2. The video could not be played smoothly.
-Videos from your USB ash drive --- It may be
caused by abnormal data transmission, or its code
rate is far beyond the supported formats of this TV
set.
-Videos internet, or online videos.
a. It may be caused by the lower bandwidth of your
network. A high network speed is required to
handle online videos.
b. Peak internet usage times may affect the
bandwidth.
c. Check if any other computers on the same
network are also operating, as they may be using
up bandwidth. Especially if they are downloading
or playing online videos.
d. The video may not be smooth itself, it is not the
problem of your TV or network.
3. When two portable hard drives are connected
with the TV at the same time, they will not be
recognized sometimes.
-All portable hard drives consume a lot of power,
which may result in power supply problems. We
recommend inserting only one hard drive, or a low
power consumption portable hard drive.
4. The video from a portable hard drive (USB) is
playing with no sound.
-The audio format of the video in your portable hard
drive is not supported by the TV player.
5. Some videos fail to play.
-The formats of the videos may not be supported
by the TV, especially videos shot by certain kinds
of cameras, generally with their private protocol of

19
Other Information
Troubleshooting
Most problems you encounter with your TV can be corrected by consulting the following troubleshooting list.
Snowy dots and interference
If the antenna is located in the fringe area of a television
signal where the signal is weak, the picture may be
marred by dots. When the signal is extremely weak,
it may be necessary to install a special antenna to
improve the reception.
1. Adjust the position and orientation of the indoor/
outdoor antenna.
2. Check the connection of antenna.
3. Fine tune the channel.
4. Try another channel. Broadcasting failure may
happen.
Ignition
Black spots or horizontal streaks appear, or the picture
utters or drifts. This is usually caused by interference
from car ignition system, neon lamps, electric drills, or
other electrical appliance.
Ghost
Ghosts are caused by the television signal following
two paths. One is the direct path, the other is reected
from tall buildings, hills, or other objects. Changing the
direction or position of the antenna may improve the
reception.
Radio frequency interference
This interference produces moving ripples or diagonal
streaks, and in some case, loss of contrast in the
picture. Find out and remove the radio interference
source.
* To bring you better visual experience, please remove
all labels from TV front panel and screen before use.
No picture, no sound
1. Check if the fuse or circuit breaker is working.
2. Plug another electrical device into the outlet to make
sure it is working or turned on.
3. Power plug is in a bad contact with the outlet.
4. Check the signal source.
No color
1. Change the color system.
2. Adjust the saturation.
3. Try another channel. Black-white program may be
received.
Remote control does not work
1. Change the batteries.
2. Batteries are not installed correctly.
No picture, normal sound
1. Adjust the brightness and contrast.
2. Broadcasting failure may happen.
Normal picture, no sound
1. Press the button to increase volume.
2. Volume is set to mute, press the button to restore
sound.
3. Change the sound system.
4. Broadcasting failure may happen.
Unorderly ripples on the picture
It is usually caused by local interference, such as cars,
daylight lamps and hair driers. Adjust the antenna to
minimize the interference.
Other manuals for 65C825
1
Table of contents
Other TCL TV manuals

TCL
TCL 55D1620 User manual

TCL
TCL S5200 User manual

TCL
TCL 43P728 User manual

TCL
TCL 65S446 Installation instructions

TCL
TCL 21K8US User manual

TCL
TCL Roku TV 4-Series Specification sheet

TCL
TCL LE32HDF3010S User manual

TCL
TCL C32E320-MT10L-LA User manual

TCL
TCL 98R754 User manual

TCL
TCL L32D2710 User manual

TCL
TCL 40S5400A User manual

TCL
TCL 32ES560 User manual

TCL
TCL M28SPG8 User manual

TCL
TCL 3 Series Installation instructions

TCL
TCL LEDTVVJG32HH-ZMA User manual

TCL
TCL AT2127 User manual

TCL
TCL S410R User manual

TCL
TCL S410G Installation instructions

TCL
TCL 48D2700/MT56B-AP User manual

TCL
TCL C635 Series User manual