TDR URBAN User manual

URBAN 26” Electric Bicycle
©2020 TDRMOTO 1
TDR URBAN (Disc Brakes)
26” Electric Bike
User Manual
[Revision 1.0 MAR 2020]
READ THIS MANUAL CAREFULLY BEFORE USE –FAILURE TO DO SO MAY RESULT IN INJURY, PROPERTY DAMAGE AND MAY VOID
WARRANTY.
KEEP THIS MANUAL FOR FUTURE REFERENCE.
PRODUCTS COVERED BY THIS MANUAL MAY VARY IN APPEARANCE, ASSEMBLY, INCLUSIONS, SPECIFICATIONS, DESCRIPTION
AND PACKAGING.

URBAN 26” Electric Bicycle
©2020 TDRMOTO 2
Safety & Warning
•Riding can be a hazardous activity. Certain conditions may cause the equipment to fail without
fault of the manufacturer. The product can and is intended to move, and it is therefore possible to
lose control, fall-off and/or get into dangerous situations that no amount of care, instruction or
expertise can eliminate. If such things occur, you can be seriously injured or die, even when using
safety equipment and other precautions. RIDE AT YOUR OWN RISK AND USE COMMON-SENSE.
FAILURE TO USE COMMON- SENSE AND HEED ALL SAFETY WARNINGS AND
RECOMMENDATIONS INCREASES RISK OF INJURY. USE THE PRODUCT ONLY WITH
APPROPRIATE CAUTION AND SERIOUS ATTENTION TO SAFE OPERATION.
•Before riding on the road, take time riding in an enclosed area to familiarise yourself with the
controls and behaviours of an electrically assisted bicycle. Try all settings so you are familiar with
the results.
•Before every ride, check bicycle condition and ensure that no fasteners are loose, particularly
axles, pedals, seat and handlebars. Ensure that the tyres are inflated to within specification
(printed on the tyre sidewall), and that the brakes are operating correctly.
•Maximum load capacity = 120kg.
•Understand and obey any local laws or regulations which may affect locations where the product
may be used. Ride defensively.
•This product is manufactured for performance and durability but is not impervious to damage.
Stunts or other aggressive riding can over-stress and damage the product, and the rider assumes
all risks associated with how the product is looked after.
•Keep fingers and other body parts away from moving components.
•Always wear suitable protective equipment, such as an approved safety helmet (with chin strap
securely buckled). A helmet may be legally required by local law or regulation in your area. Wear
suitable footwear for bicycle riding and clothing that helps make you visible to others.
•Please read this instruction manual carefully before you ride the electric bike for the first time.
•Please always check the brakes prior to riding to make sure they are working correctly. Adjust
the brake sensitivity if needed. Only ride at a speed that the conditions permit, for example, slow
down on snowy or rainy days.
•Always hold the handlebars with both hands, except when you need notify others you are
turning.
•Use a light at night, or when visibility is not good. If you are not able to see clearly with a light, do
not attempt to ride your bike.
•Make sure your body and other objects do not come into contact with the chain or the wheels
whilst they are moving.
•Never touch the charging connector on the battery case with your hands when they are wet, or
with keys or other metallic objects, in case they damage the battery pole and cause a short circuit.
•Wear bright clothing to help make you visible to others when you are riding at night.
•Don’t lend the electric bicycle to anyone who doesn’t know how to operate it, or who haven’t
read the manual.
•Like other cycles, it can only carry one person, carrying a passenger is not permitted.
•To brake, the rider must action both brake levers to the correct degree.
•Never ride the electric bike under the influence of drugs or alcohol.
•Do not ride under bad conditions, such as on uneven, wet or loose surfaces.
•If possible, do not ride in adverse weather conditions, low visibility or if you are very tired.
•This electric bicycle can be used in the rain; however, it must not be submerged in water or

URBAN 26” Electric Bicycle
©2020 TDRMOTO 3
puddles. The controller, motor and other electrical devices may be short-circuited, causing
damage and creating possible dangerous situations.
•Never spray your bike directly and don’t get the electrical components wet (the battery
connector, motor, controller, cables, handlebar controls, etc)
•Don’t let children under the age of 10 ride the bike.
•ONLY use the charger which was provided (never use a charger from a different model).
•The charger is designed for indoor use only. Keep the charger away from water to avoid short
circuit. Don’t even use it in a dampening, combustible or explosive environment. Do not remove
the plug by pulling the cord, always grip the charging port by its metal body.
•Never modify the electrical system. Alterations could cause a fire resulting in serious injury and
could also damage the electrical system.
•Ensure the voltage and frequency of the charger is compatible with mains electrical supply.
•Use the battery charger in dry locations only.
•Regularly check the charger for damage to the electrical cord, plug, enclosure and other parts. If
any damage or malfunction occurs, do NOT use the charger until repaired or replaced.
•Do not operate the charger or charge batteries near flammable materials.
•Do not clean or perform any maintenance on the product when it is being charged.

URBAN 26” Electric Bicycle
©2020 TDRMOTO 4
Introduction
Congratulations on purchasing a TDR pedal assisted bicycle. We hope you enjoy years of satisfactory and
safe riding.
Read the manual
This manual is provided to help you to get the best performance, comfort, enjoyment and safety from
your bicycle. The manual describes specific care and maintenance procedures that help protect your
warranty and ensure trouble-free use. Please pay particular attention to the section on battery charging
and maintenance.
Read the manual before assembling and riding your bicycle.
Note that the manual is not intended to be an extensive reference source for servicing, maintenance
and/or repairs. For additional assistance, contact an authorised TDR service centre.
In the interests of your safety and the safety of others, it is highly recommended to have your bicycle
assembled and serviced / adjusted by a skilled bicycle mechanic.
Installation Video Guide is available at https://youtu.be/23bIoH8_G04

URBAN 26” Electric Bicycle
©2020 TDRMOTO 5
Parts Identification and Assembly
Tools Required for Assembly
The bicycle may come supplied with some tools. You may require some other tools which
not included.
Assembly
The bicycle comes with some minor assembly required, and may include some necessary tools.
Installation Video Guide is available at https://youtu.be/23bIoH8_G04
No.
Name
1
Bicycle Assembly (Frame, Forks, Handlebar,
7
Spanners & Allen keys Set
Crank, Chain, Battery, Motor, Rear Wheel etc)
2
Front Wheel
3
Front Mudguard
4
Rear Seat Rack
5
Battery Charger Set
6
Seat & Post
URBAN 26” Electric Bicycle
©2020 TDRMOTO 6
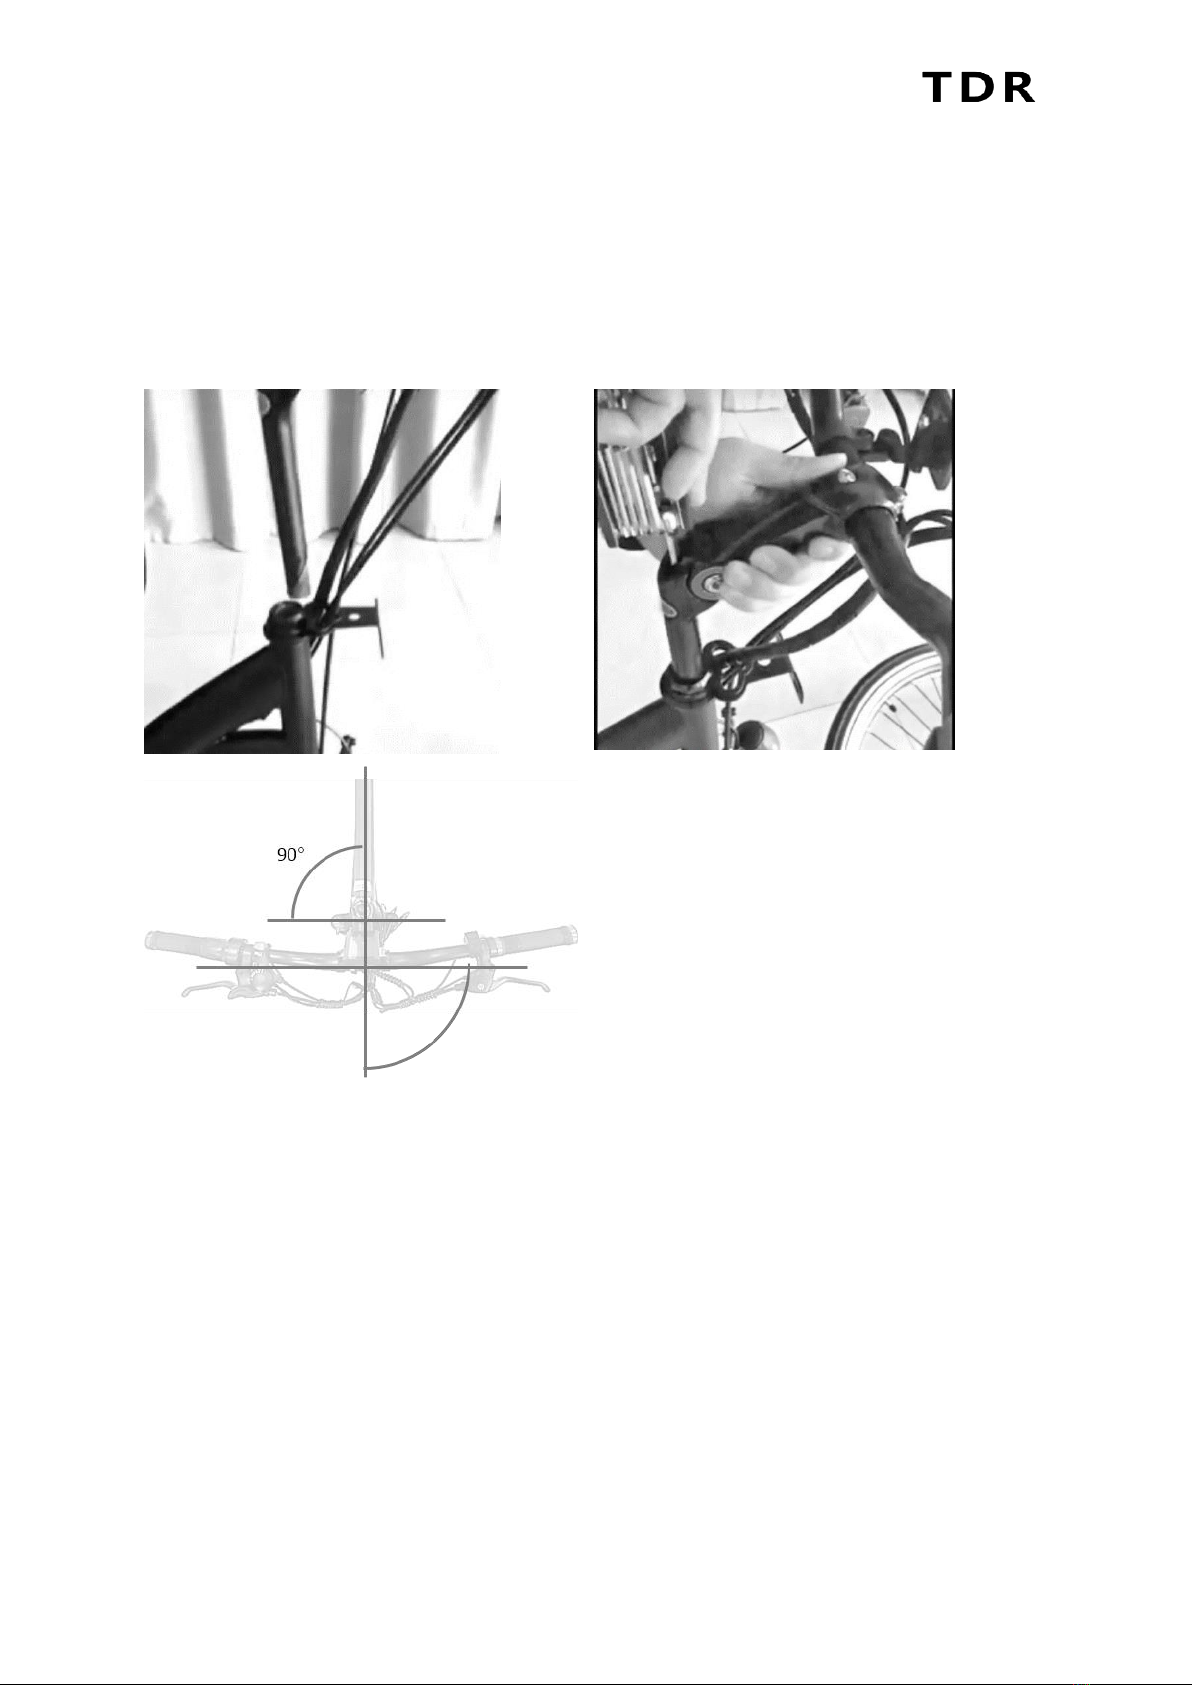
Handlebars
Carefully place the bicycle assembly on a flat surface so that it rests on the front fork and rear wheel.
Place and slide the handlebar assembly centrally into position in the clamp, rotate the handlebar
assembly, as required, so it is aligned "square" to the front fork. That is, the handlebar will be at 90°to the
bicycle frame when the front wheel is straight.
Using an Allen key and torque wrench, tighten the screws to the torque.
URBAN 26” Electric Bicycle
©2020 TDRMOTO 7
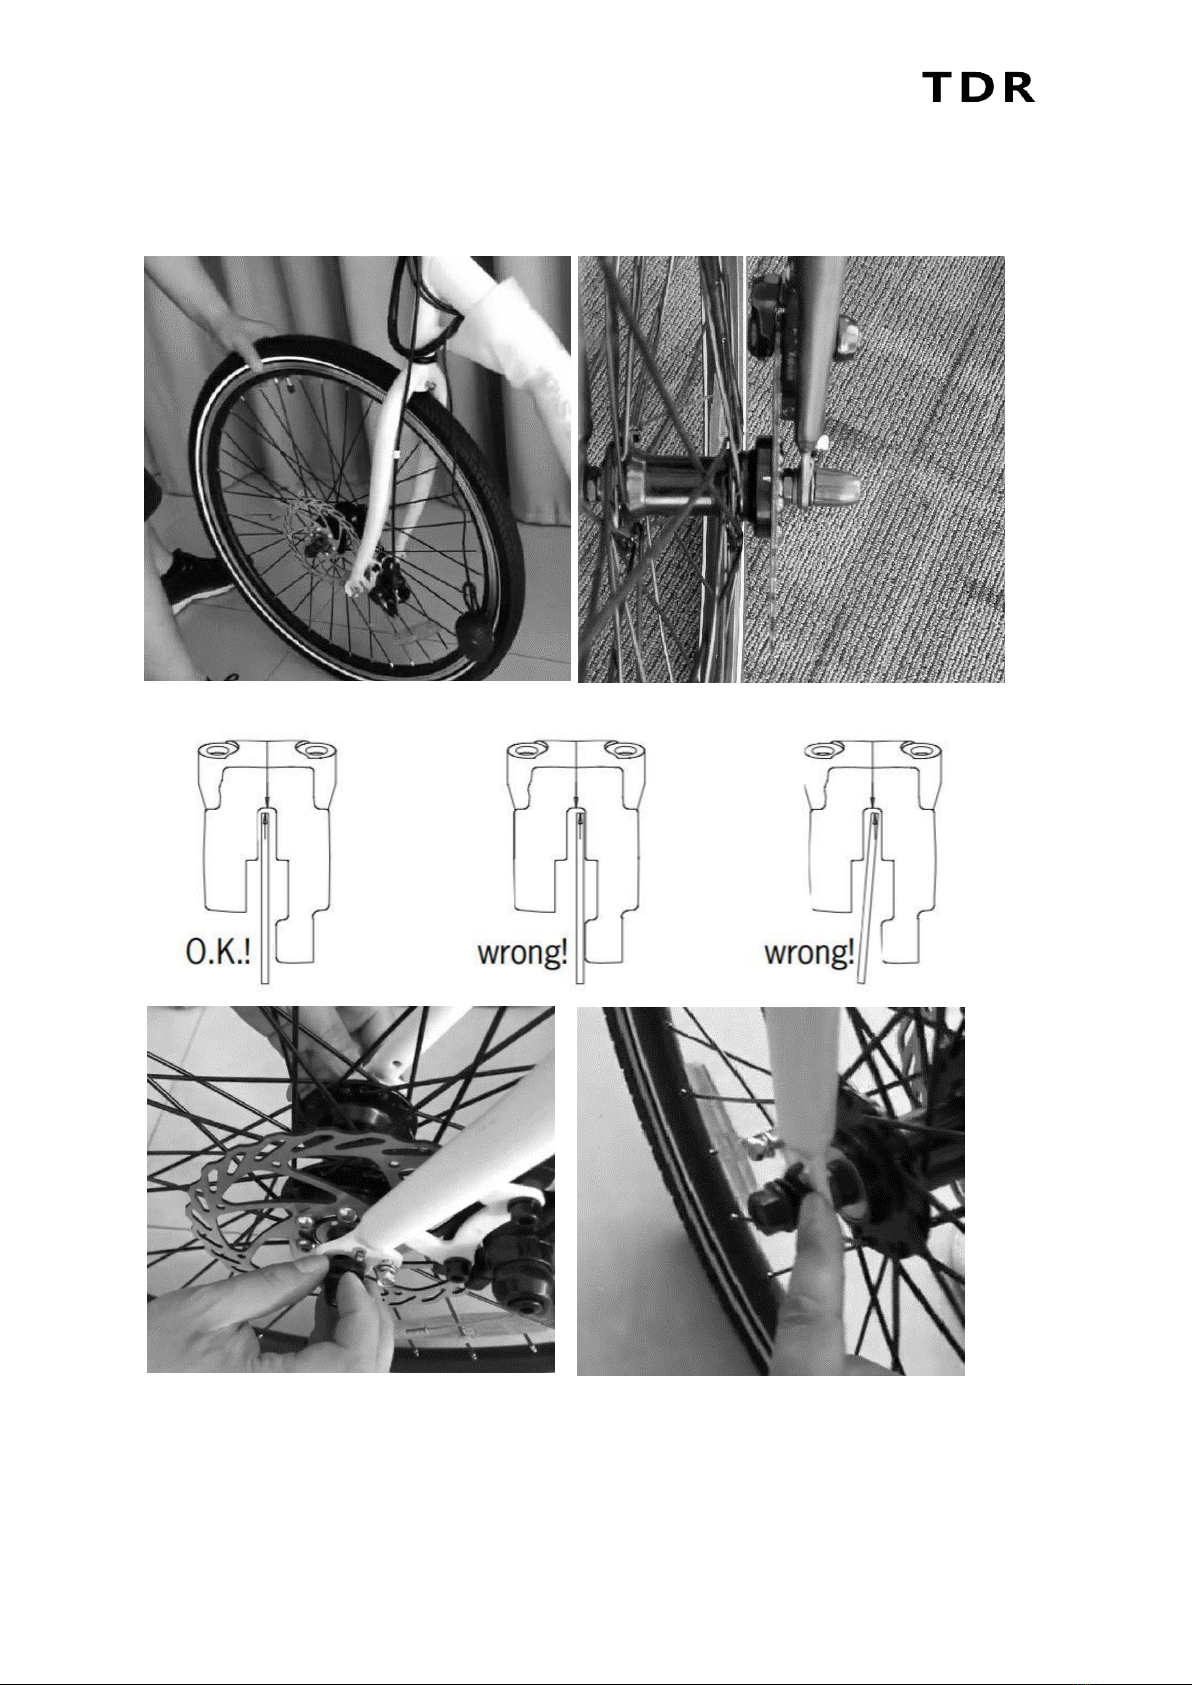
Front Wheel & Disc Brake
The front disc rotor has been installed on the front wheel by manufacture. Install the wheel by positioning
the rotor between the brake pads and fixing the wheel in the dropouts.
If your bicycle has tabbed lock washers, ensure that the locking tabs are correctly mounted into the holes
in the forks.
Fully tighten both nuts and ensure the wheel sits straight in the forks.
URBAN 26” Electric Bicycle
©2020 TDRMOTO 8
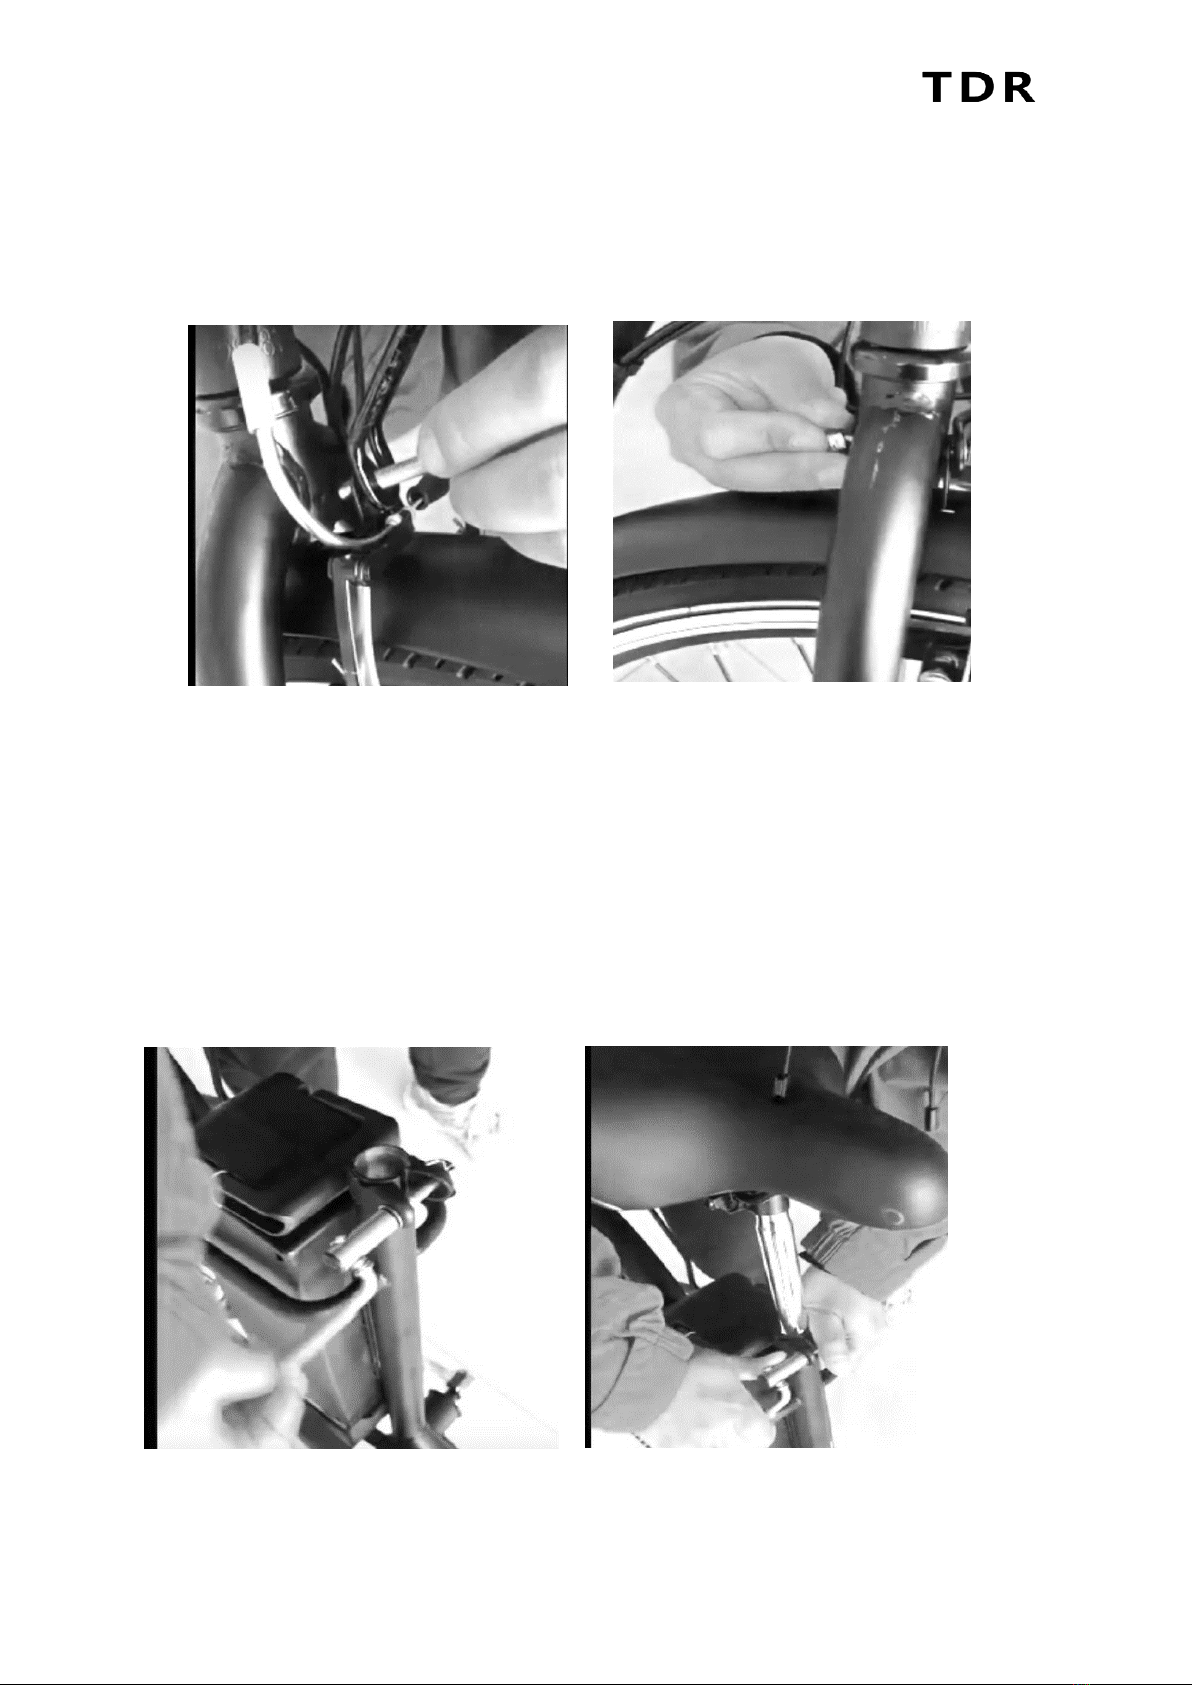
Front Mudguard & Headlight
Attach the mudguard and headlight’s mount stay to the lower of the twin fork blade mounts, using both a
small and large washer centre the guard and, tighten from the hex key end.
During tightening, recheck for centring and possibly raise or lower the guard.
Seat Post
Loosen the clamp and insert the seat post into the frame.
There is a minimum insertion marked on the seat post. This must be situated below the seat post clamp
when riding to avoid accidents and damage.
Slide the seat post down until it is to the desired height for riding.
Tight the clamp and make sure the post is un-moveable.
URBAN 26” Electric Bicycle
©2020 TDRMOTO 9
Rear Rack
Attach rack to the bike then screw the mounting points.
URBAN 26” Electric Bicycle
©2020 TDRMOTO 10
Operation
Before riding, ensure that all required fasteners are tightened to the correct torque and charge the battery
prior to use.
Always wear a helmet and appropriate safety equipment and always keep both hands on the handlebars
and both feet on the pedals whilst riding. Read, understand and follow all safety recommendations before
riding. Avoid riding in damp conditions, rain etc as this may affect operation or possibly damage the
bicycle electronics.
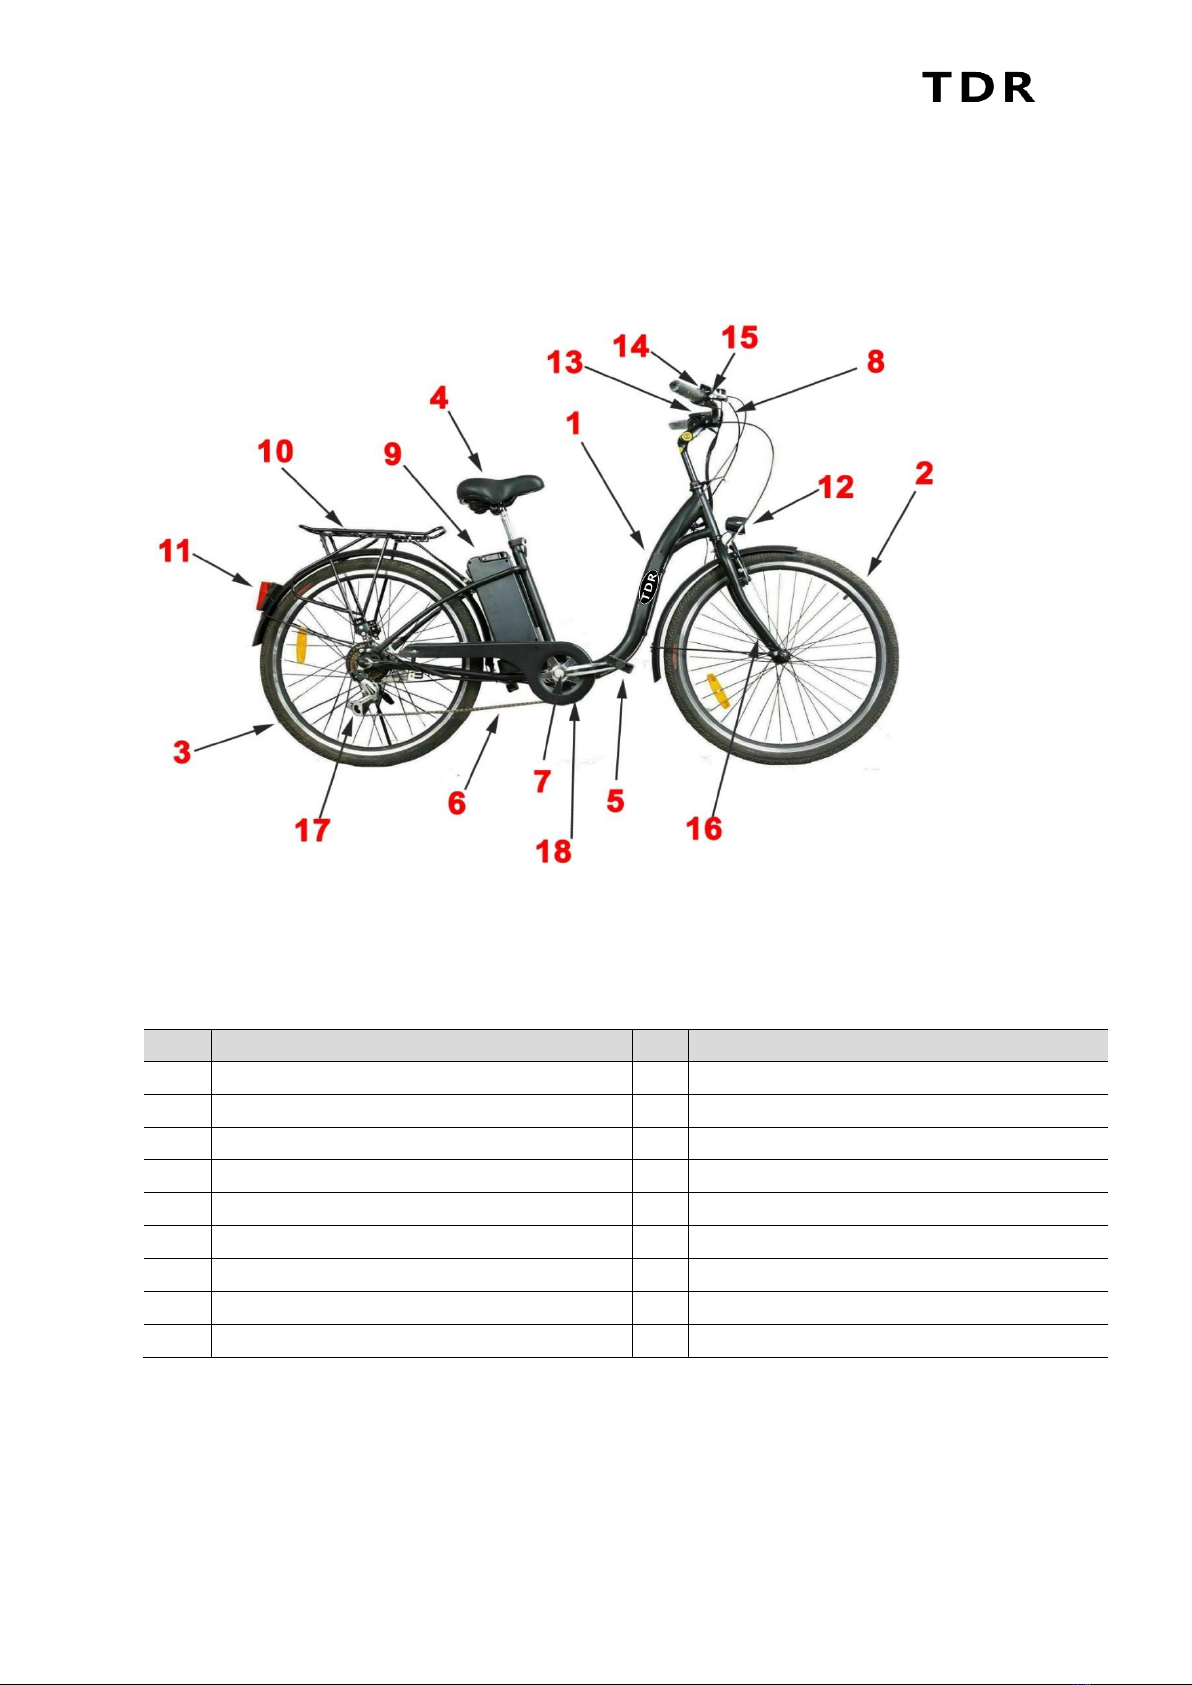
No.
Name
No.
Name
1
Frame
10
Rear Rack
2
Front Wheel
11
Rear Light
3
Rear Wheel and Drive Motor
12
Head Light
4
Seat Post / Seat
13
LCD Display
5
Pedal
14
Gear Change
6
Chain
15
Brake Lever
7
Crank Assembly
16
Front Fork
8
Handlebar
17
Rear Derailleur
9
Battery Pack
18
Chain Wheel
URBAN 26” Electric Bicycle
©2020 TDRMOTO 11
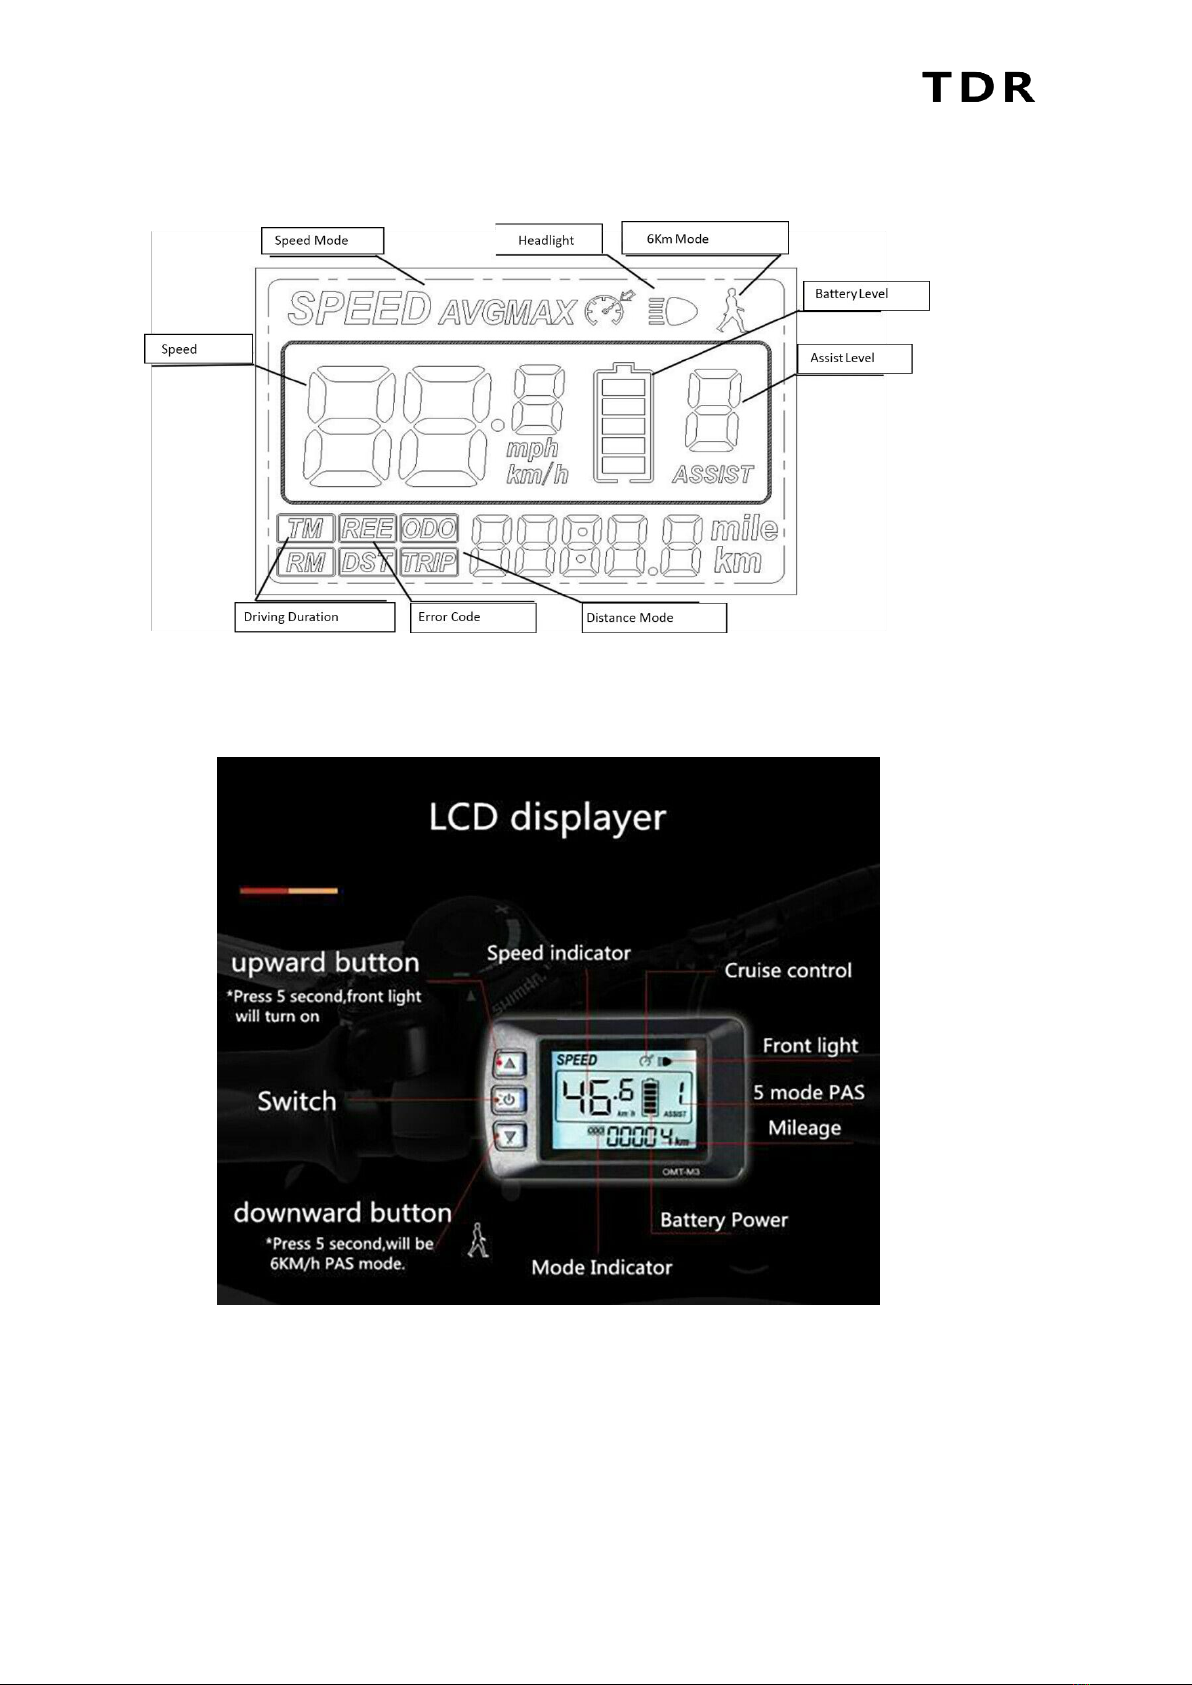
Presentation of LCD Screen

URBAN 26” Electric Bicycle
©2020 TDRMOTO 12
The bike is equipped with an LCD display.
Before riding turn on the LCD display by holding the“B” button. You can then press the “A” or “C” button
to adjust the level of electronic assistance. The levels range from “1” to “5”.
When the level is set to “1”, the bike will provide the lowest assistance. When the level is set to “5” the
assistance is highest, and the speed of the bike is highest.
When riding at night press and hold the “A” button and the front light will turn on. When you no longer
need the front light press and hold the “A” button to switch the light off.
To active the cruise control (6km/h mode), hold “C” button and the bike will move in 6km/h.
When you have finished riding, press and hold the“B” button. The LCD display will turn off.
Note:
Do not simultaneously press two or three buttons. For example “A” ”B”,”A” ”C”, ”B” ”C”,”A” ”B” ”C” etc.
Changing the settings for some functions may cause the bicycle to operate abnormally or in a way that
may appear to be a fault. Take extra care when using any special function to avoid making a setting that
may adversely affect bicycle operation or how you want it to operate.
Changing settings that may affect electrical components of the bicycle or render it unsafe may void
warranty. Some of the parameter is not changeable due to controller model and limit.

URBAN 26” Electric Bicycle
©2020 TDRMOTO 13
Riding Instructions
Check before riding it for the first time:
The bicycle was assembled and checked before leaving the factory, nevertheless, before using for the first
time, check the unit thoroughly.
•First, check to see whether the battery is fully charged and locked.
•Check the air pressure of the tires is normal
•Check and make sure the front and rear brakes are working properly
•Check the tightness of the front and rear wheels
•Check and make sure the handlebar and saddle are fastened tightly enough. Make sure the quick
releases are locked and all lock nuts and screws are tightened.
Riding:
Turn on the power switch (turn the ignition key to" ON” position), the power display indicator will light
on, indicating the unit is powered.
Just like riding a normal bicycle, put up the stand and seat yourself on the saddle. Put one foot on the
pedal and do a final check to see that everything is okay and working well, especially the breaks. Start
pedalling, and when you reach a certain speed, the motor will automatically be activated and start to
move your bike. To stop the bicycle motor, just stop pedalling and the motor will stop automatically. To
bring the vehicle to a halt, use the brake.
The brake will trigger the motor to stop. If either of the brake levers are pulled, the power will be cut off
automatically and the motor will not work.
Battery level gauge:
When the battery is getting low, you will see it on the LCD display, as the battery indicator empties. When
this occurs, turn OFF the power switch and only use the pedals to ride, without the assistance of the
motor. You will have to charge the battery when you get to an electrical outlet and will be able to use the
electric motor again once the unit is fully charged.
Parking:
Shut the power “OFF” and pull out the key of the battery case while parking. The power switch should be
turned “OFF” when pushing so that you don’t start up the motor by accident. Use a chain lock to further
secure your bicycle when necessary.
Note: Don’t expose the e-bike to sunlight or rain for a long time, or some electrical components may
behave abnormally.
Note: If you use the brakes frequently, turn the bicycle ignition on and off often, ride against the wind,
ride uphills or are pedalling with a higher load on the bike, the battery will not last as long and you will
not be able to travel as far using the battery.
URBAN 26” Electric Bicycle
©2020 TDRMOTO 14
Using Gears
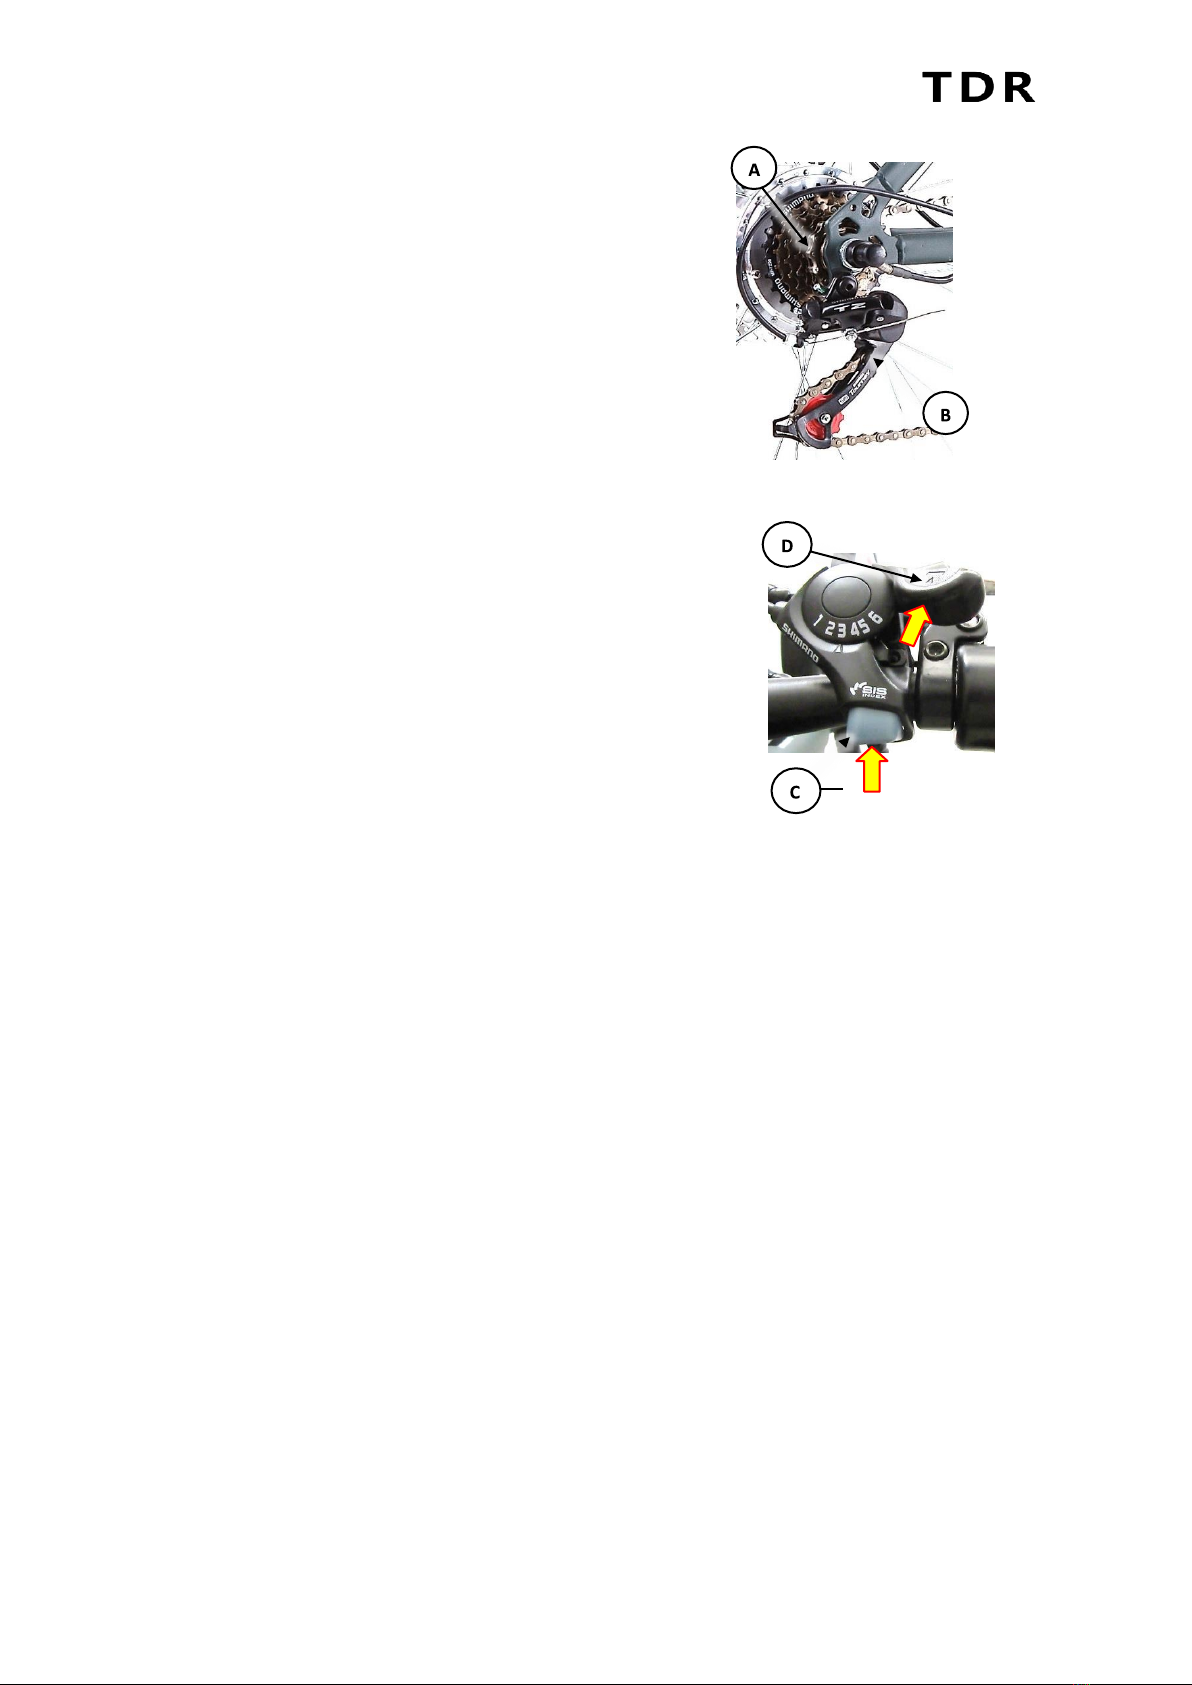
Some model bicycles are equipped with gears. Gears are
used to change the ratio between rotations of the rear
wheel and the crank set. This enables you to pedal less and
travel faster on flat or downhill sections, or pedal faster and
travel slower to climb hills. Gearing is independent to pedal
assistance, so pedal assistance operates the same
regardless of selected gear. Remember, however, that pedal
assistance is "governed" by overall speed.
The selectable gears (A) are located on the rear wheel,
known as a "gear cluster" or "cassette". The larger the gear,
the less number of rotations per rotation of the crank. The
largest gear is the "lowest" and is referred to as "1". As each
gear becomes smaller, it is a "higher" gear then the previous
and is numbered sequentially. The number of gears may
vary between different models. Beneath the gear cluster is
the derailleur mechanism (B), which moves the chain so it
runs on different gears. The derailleur is operated by the
rider using controls mounted on the handlebars. The gear
change is "indexed" so each gear selection positively
engages –this is factory set and should require no
adjustment. There may be slight variations between bicycle
models in method to change gear "up" (from a lower gear to
a higher gear), or to change gear "down" (from a higher gear
to a lower gear). The image shows a "6-speed" type that
uses a button (C) for changing up gears (push button to
activate derailleur), and a lever (D) for changing down
gears (rotate lever forward to activate derailleur).
URBAN 26” Electric Bicycle
©2020 TDRMOTO 15
Using Brakes
All bicycle models are equipped with a front and rear wheel braking system. Brakes are used to slow the
bicycle down. The braking systems may use different mechanics, however, the functionality is the same,
and that is to change the energy of the moving bicycle into heat energy ("friction"):
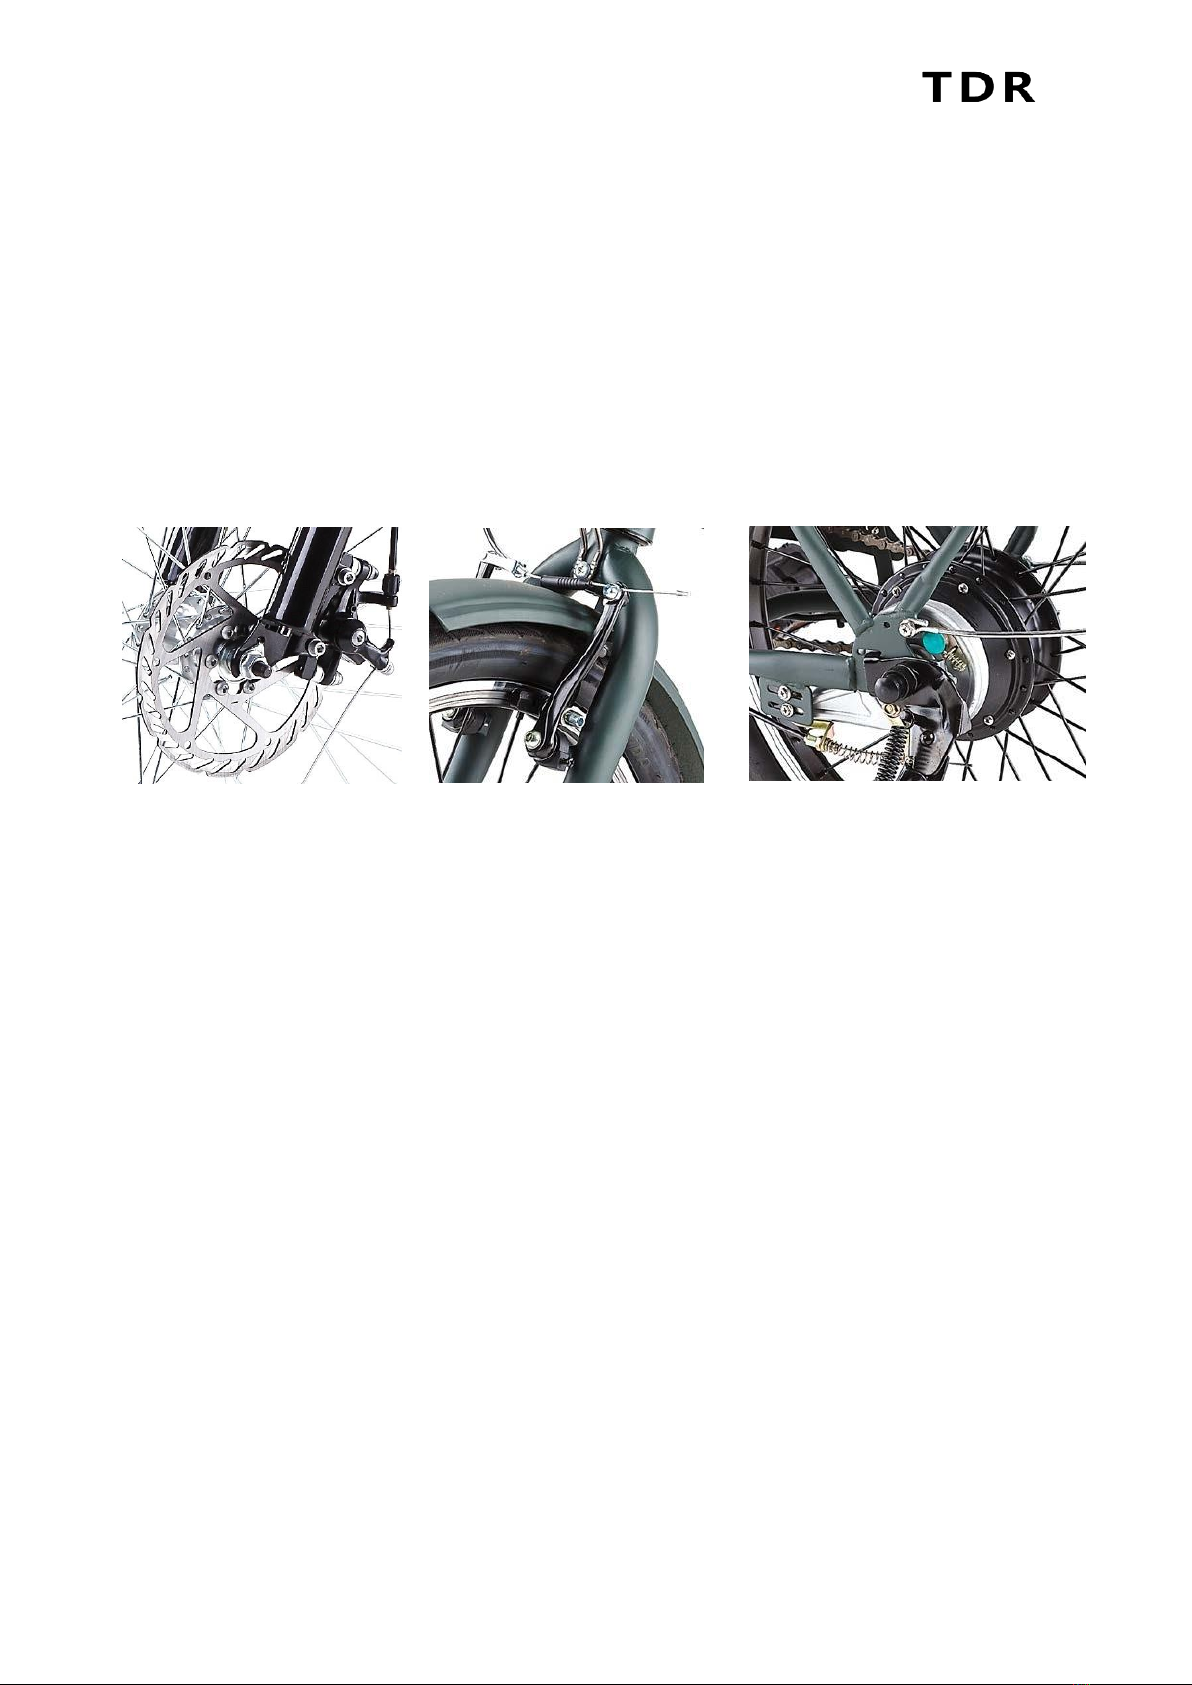
•For disc brakes, this means pads made from a special friction material pinching
against a disc mounted to the centre of the bicycle wheel.
•For rim type "caliper" or "noodle" brakes or “V -Brake”, this means rubber blocks
pinching the outer rim of the bicycle wheel (not the tyre).
•For drum brakes, this means pushing sections (known as "shoes") of special
friction material against the inside of cylinder fixed to the centre of the bicycle
wheel.
The brakes are operated by the rider through levers mounted to the handlebars. The left-hand lever
operates the rear brake, the right- hand lever operates the front brake. The ability of the rider to
adequately slow and/or stop the bicycle depends largely on the skill of the rider, the surface being ridden
on and other factors such as rain, tyres, adjustment and condition of the brake parts etc
Guidelines for Using Brakes
To get the best performance and service life from the brake system, understand and apply the following
techniques:
•In wet conditions, which reduces friction, always provide additional distance for braking and
adjust how quickly you apply the brakes.
•When applying the brakes, particularly the front brake, use a lower pressure to start with until
you feel the brakes starting to "bite", then increase pressure as required. Do NOT over-apply the
brakes and cause the wheel to stop rotating –this may result in loss of control.
•Maintain the brake friction components (pads, shoes, rubbers) in good condition and replace
when they reach the wear limit.
•Maintain brake adjustment so that the brakes perform effectively, the levers are comfortably
positioned, and there is not excessive play in adjustable components.
•If the brakes are not performing effectively, making abnormal noise or any part is not serviceable
or cannot be adjusted correctly, have the brakes inspected and adjusted by a bicycle mechanic or
suitably qualified person.
•If the brake cables become frayed or otherwise damaged, have them replaced by a bicycle
mechanic or suitable qualified person.
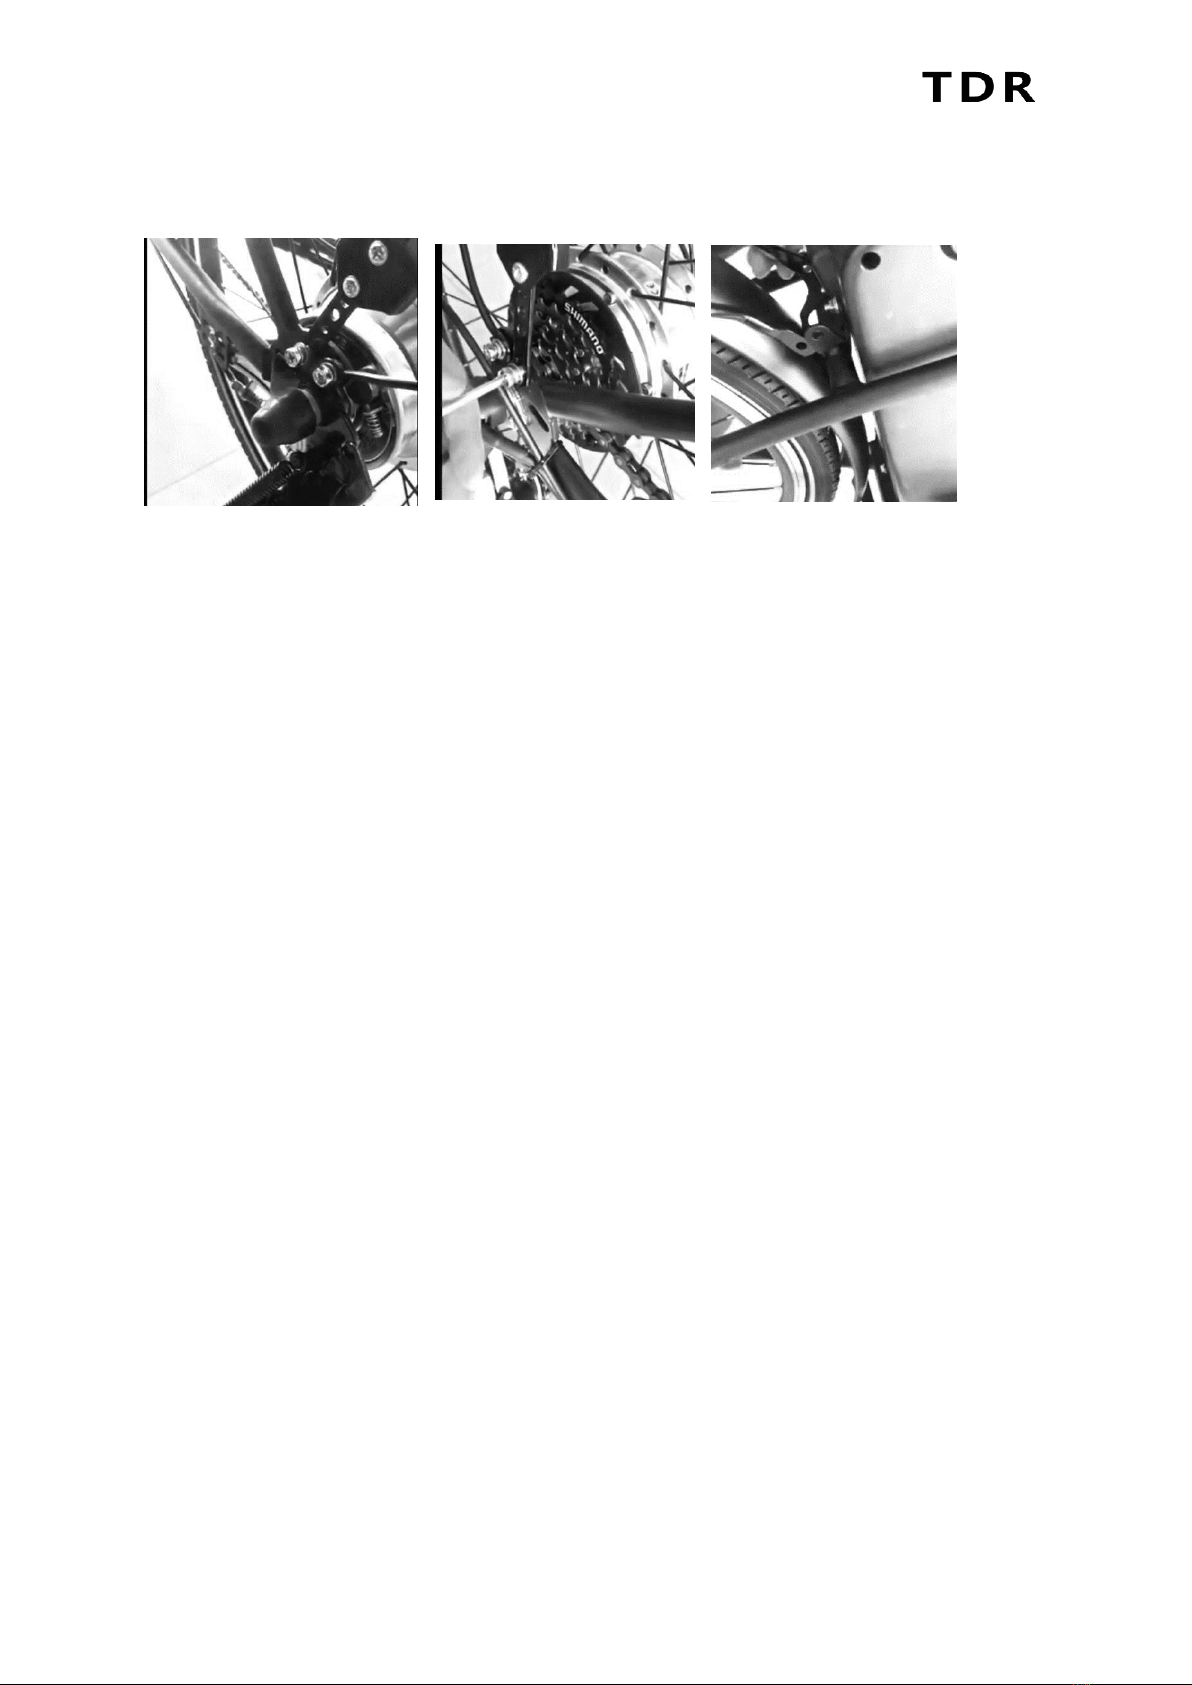
Typical Disc Brake
Typical Rim Brake (V-
Brake)
Typical Drum Brake

URBAN 26” Electric Bicycle
©2020 TDRMOTO 16
Batteries and Battery Charging
Before charging, you must turn the power switch to “OFF” and pull out the key. Keep the charger in a dry
and ventilated condition when it’s working.
•Firstly, connect the output plug of the charger with the socket of the battery case properly, and
then insert the input plug into the electrical outlet. The chargers indicator light will turn on,
which means it’s charging.
•When the light turns from Red to Green, it means the battery has been fully charged. Usually, it
will take about 4-6 hours to recharge the battery depending on the batteries state of charge.
However, it’s a good idea to let it charge for an additional 2 hours after the light has turned green
if it’s convenient for you, as it will extend the service life of the battery.
•Do not charge the battery for more than 10 hours to avoid overcharging and damaging the
battery. After the light turns GREEN, the charger is in the state of trickle electric current and will
fill slowly to attempt to maintain the state of charge. If you are going to be out for a long time, you
should disconnect the charger, especially in hot weather.
•The charger will become warm during charging, so keep the charger away from any heat sources.
Please always keep the charger dry and clean. The electronics inside contain high voltages, so
never disassemble the charger by yourself.
•After charging, please pull the input plug out of the electrical outlet first, and then pull out the
output connecting a plug from the battery case. Do not let the charger charge the battery or be
left connected for a long time, as it may damage the charger and cause a fire.
•While charging, please keep it the charger and battery out of the reach of children. Do not put
anything on top of the charger when use, and prevent any liquid, metal or metal fillings from
coming into contact with the charger.
•You can also remove the battery from the bicycle and then charge it. You should lift the saddle
with the lever that is underneath it, which will enable you to remove the battery. Before you do
this, you will have to unlock the battery with the ignition key. When you finish charging, replace
the battery. To replace the battery, insert the battery along with the slide bracket and then lock
the battery with the ignition key.
•Do not touch the two poles in the battery case with your hands when the battery is removed for
charging. The charging connector poles cannot be touched with any metal or any other material
that conducts electricity, otherwise, it may cause a short circuit.
•If you don’t ride your bike for a long time, the battery should be charged at least one time per
month. This will ensure the battery life. DO NOT use in the state of low battery capacity. Do not
leave your battery in a fully discharged state for long periods of time. The battery will continue to
self-discharge, resulting in damage.
•Avoid any contact with water when charging your battery. If a plug or socket gets wet, dry it
completely before using.
•When charging, if there is a peculiar smell or the temperature is extremely high, please stop
charging immediately and contact us.

URBAN 26” Electric Bicycle
©2020 TDRMOTO 17
Battery Storage
When storing the batteries for a long period of time:
Charge the batteries at least every 30 days to avoid capacity loss. Batteries slowly self-discharge when
unused over a long period. If the battery cells are left at a critically low charge state, the lifespan and
capacity will be permanently reduced.
Always disconnect the charger from the mains electrical supply and battery before storing the battery.
Avoid storing batteries in extreme temperatures, whether hot or cold. The recommended battery storage
temperature is between 0 and 25°C (32 to 77°F). Avoid exposing batteries to temperatures at or above
40°C (104°F) for extended periods.
Batteries are best kept in a cool, dry place. Do not allow batteries to accumulate condensation, as this may
cause shorting or corrosion.
Tyre Pressures
The tyres must always be inflated to the correct pressure (as specified on the tyre sidewall) before every
ride. Riding the bicycle with either too low or too high pressures will affect bicycle performance, may
affect effective electrical assistance range, and may render the bicycle as dangerous. Use an accurate
pressure gauge when checking pressures.

URBAN 26” Electric Bicycle
©2020 TDRMOTO 18
Maintenance
ATTENTION:
Before carrying out any sort of maintenance, turn off the power switch and remove the ignition key.
Do some test riding and check the unit is riding normally and safely. Always keep your bike clean. For the
battery poles, when dirty, clean them top prevent reduced efficiency or burnt poles. Your E-Bike should
undergo an annual check-up. This will keep it in good working condition.
Adjust chain tension:
The chain may loosen after using the bike for a certain period of time, so please adjust the chain when
necessary:
Loosen the bolts on the rear shaft, if the chain is loose, please adjust the Chain Bolts on both sides in
clockwise until correct. If the chain is too tight, adjust the bolts using counter-clockwise rotation. Keep the
crank gear and wheel gear aligned. If you are not experienced or confident, contact a bike specialist.
Adjusting the brakes:
Correct brake adjustment will make the controls easier and offer greater safety.
The brakes are adjusted in a similar fashion to any standard bicycle. It is important for the brakes to work
correctly and that the electric cut-off devices to be in working order (Electric cable to the brake levers).
Once the brakes have been adjusted, make the wheels turn to ensure there is no binding and check that
when either of the brake levers is pulled, the motor stops working.
Lubrication:
For a long service life the following parts of your E-Bike should be regularly lubricated every half year:
•Front axle
•Chain
•Rear axle
•Freewheel
•Front fork and other rotation parts.
For electrical parts, you do not need to lubricate them because they are lubricated in the factory. If you
find anything wrong, please go to a bicycle specialist or contact Fortis.
Cleaning:
The bike should be cleaned with a damp sponge, taking special care not to get electrical parts wet
(Battery connection, motor (rear axle), electric cables, handlebar controls, etc.). Dry with a cloth. When
cleaning your electric bike, do not use a steady direct stream of water from a hose. Use a cloth to avoid
short-circuiting any electrical components. Your electric bike has a durable finish and does not need to be
waxed. Clean with a mild detergent and buff to restore its original shine if needed.

URBAN 26” Electric Bicycle
©2020 TDRMOTO 19
For safety, longest possible service life and reliability, maintain the bicycle properly. Use the maintenance
schedule below for guidance. It is very important that you check certain systems and components before
each and every ride. The proper condition and function of these systems is critical to your safety.
*Every 5 to 10 rides depending on ride length and conditions.
Maintenance
Schedule
Component / Condition
Check Before
Every Ride
*Check
Periodically
Clean /
Lubricate
Adjust /
Tighten /
Replace as
Required
Tyre Pressure
■
■
Tyre Wear / Damage
■
■
Brake Adjustment
■
■
Handlebar Tightness
■
■
■
Controls and Displays
■
Seat Post Tightness
■
■
Fasteners / Mounting
Hardware
■
Brake Pads
■
■
Brake Cable Wear
■
■
Chain
■
■
■
Reflectors
■
Battery / Charger
■
■
Steering Head Bearings
■
■
■
Derailleur
■
■
■
Wheel Spoke Tension
■
■
Wheel Trueness
■
■
Wheel Bearings
■
■
■
Bottom Bracket (Crank)
Bearings
■
■
■

URBAN 26” Electric Bicycle
©2020 TDRMOTO 20
Troubleshooting
Malfunction
Possible Cause
Possible Solution
Pedal assistance not
working
1.
Under-charged battery.
2.
Battery no longer serviceable.
3.
Battery charger faulty.
4.
Motor electrics or switches damaged
/ faulty.
1.
Charge battery. Follow battery care procedures.
2.
Have battery checked. Replace if faulty.
3.
Have charger checked. Replace if faulty.
4.
Seek diagnosis and repair from authorised
service centre.
Reduced range and/or
speed
1.
Under-charged battery.
2.
Battery no longer serviceable.
3.
Low tyre pressure.
4.
Brakes dragging.
5.
Terrain, headwind, etc.
1.
Charge battery. Follow battery care procedures.
2.
Have battery checked. Replace if faulty.
3.
Inflate to recommended pressure.
4.
Adjust.
5.
Normal.
Gear change (where
applicable) rough /
not changing
1.
Derailleur cables sticking /
stretched / damaged.
2.
Derailleurs / shifter not correctly set.
1.
Lubricate / adjust / replace cables.
2.
Adjust.
Chain slip / jumping
off sprockets
1.
Worn sprockets.
2.
Stretched chain.
3.
Front sprocket loose / out of true.
4.
Sprocket teeth bent / broken.
5.
Derailleur / shifter not
correctly adjusted.
1.
Replace.
2.
Replace.
3.
Re-true / tighten.
4.
Replace.
5.
Adjust.
Clicking noises when
pedaling
1.
Stiff chain link.
2.
Loose pedals / bearings.
3.
Loose bottom bracket / bearings.
4.
Bent bottom bracket or pedal bolt.
5.
Loose pedal arm bolts.
1.
Lubricate chain.
2.
Tighten / adjust bearings.
3.
Tighten / adjust bearings.
4.
Replace.
5.
Tighten.
Grinding noise when
pedaling
1.
Pedal bearings too tight.
2.
Bottom bracket bearings too tight.
3.
Rear wheel not straight.
4.
Chain too tight.
5.
Derailleur dirty.
1.
Adjust.
2.
Adjust.
3.
Align so chain straight.
4.
Adjust.
5.
Clean and lubricate.
Brakes not effective
1.
Pads worn.
2.
Pads / discs dirty.
3.
Brake cables binding /
stretched / damaged.
4.
Brakes levers binding.
5.
Brakes require adjustment.
1.
Replace.
2.
Clean and degrease.
3.
Lubricate / adjust / replace cables.
4.
Clean pivots.
5.
Adjust.
Brakes squeal
1.
Pads / discs dirty.
2.
Brakes not centred.
3.
Caliper fasteners loose.
1.
Clean and degrease.
2.
Centre brakes and adjust.
3.
Tighten.
Brakes chatter / vibrate
1.
Brake mounting bolts loose.
2.
Brakes out of adjustment.
3.
Steering head bearings loose.
1.
Tighten.
2.
Centre brakes and adjust.
3.
Adjust bearings.
Wheel vibration / wobble
1.
Axle bent or broken.
2.
Wheel out of true.
3.
Wheel hub bearings loose /
not serviceable.
4.
Quick-release (if equipped)
mechanism loose.
1.
Replace.
2.
True wheel.
3.
Adjust / replace.
4.
Adjust.
Steering not accurate
1.
Wheels not aligned to frame.
2.
Steering head loose / binding.
1.
Align wheels.
2.
Adjust.
Table of contents
Other TDR Bicycle manuals


