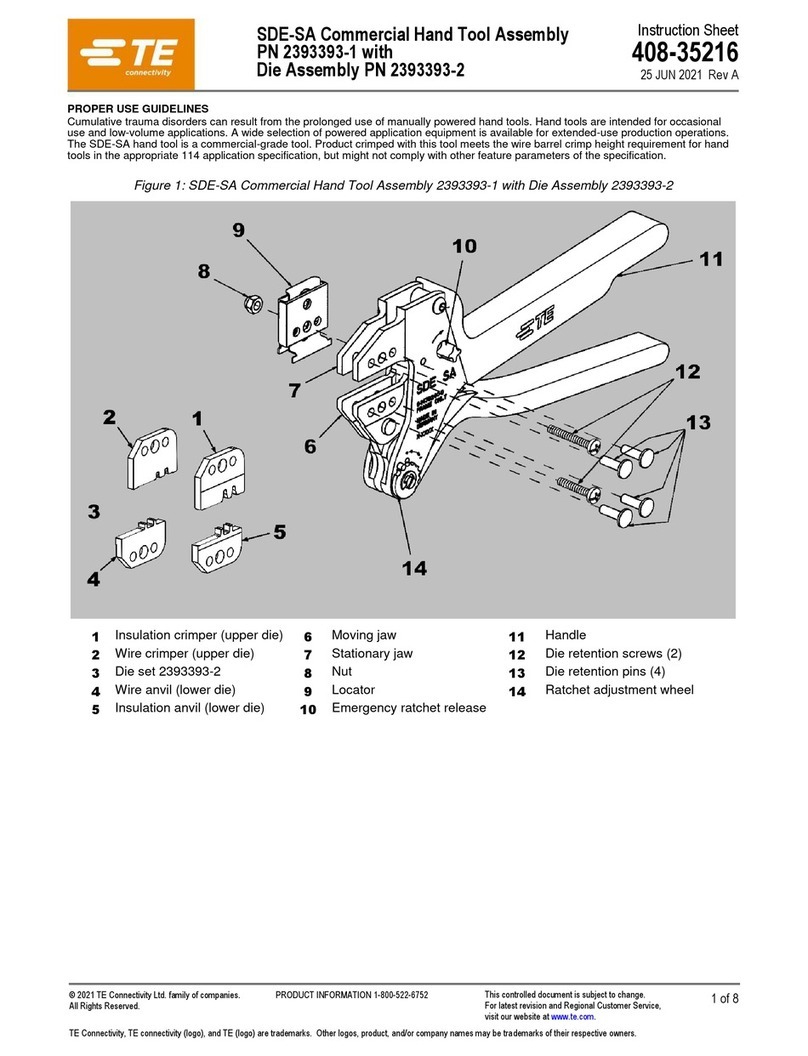
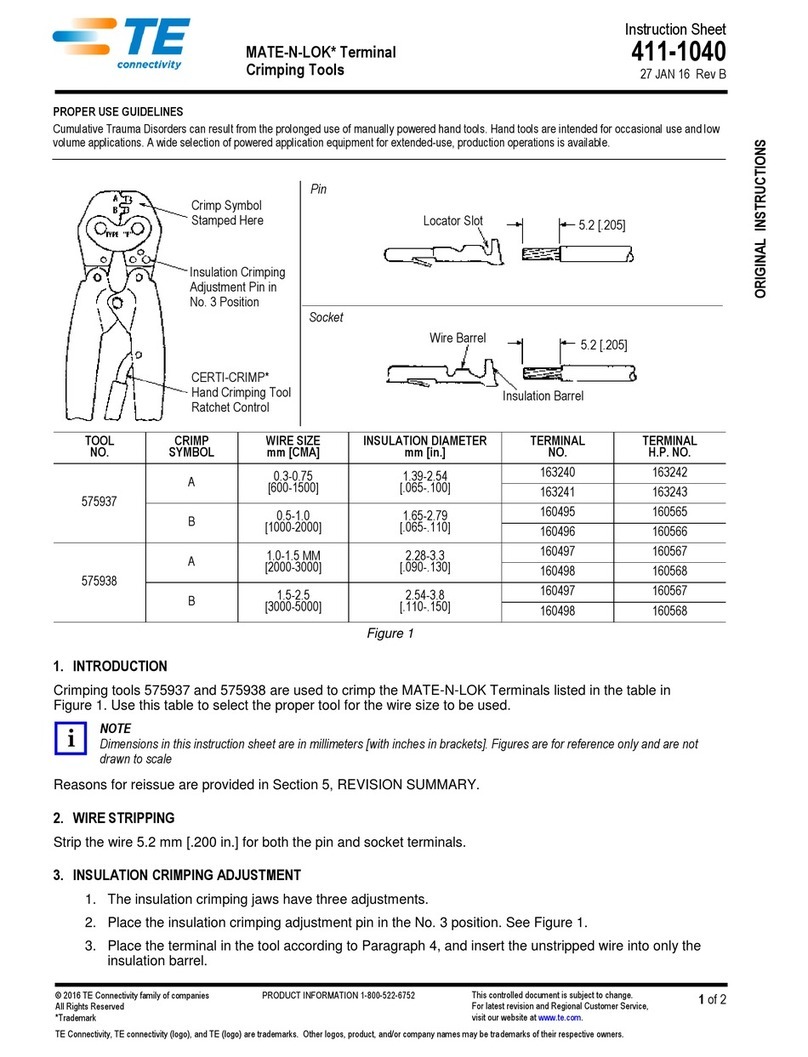
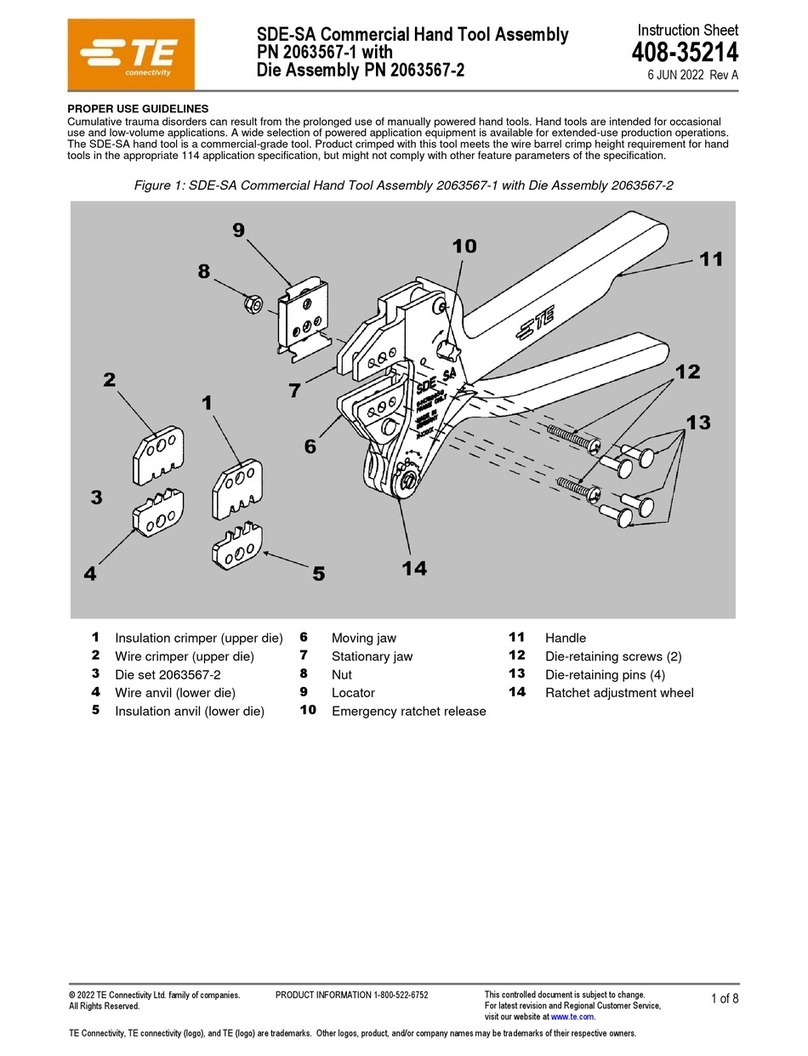
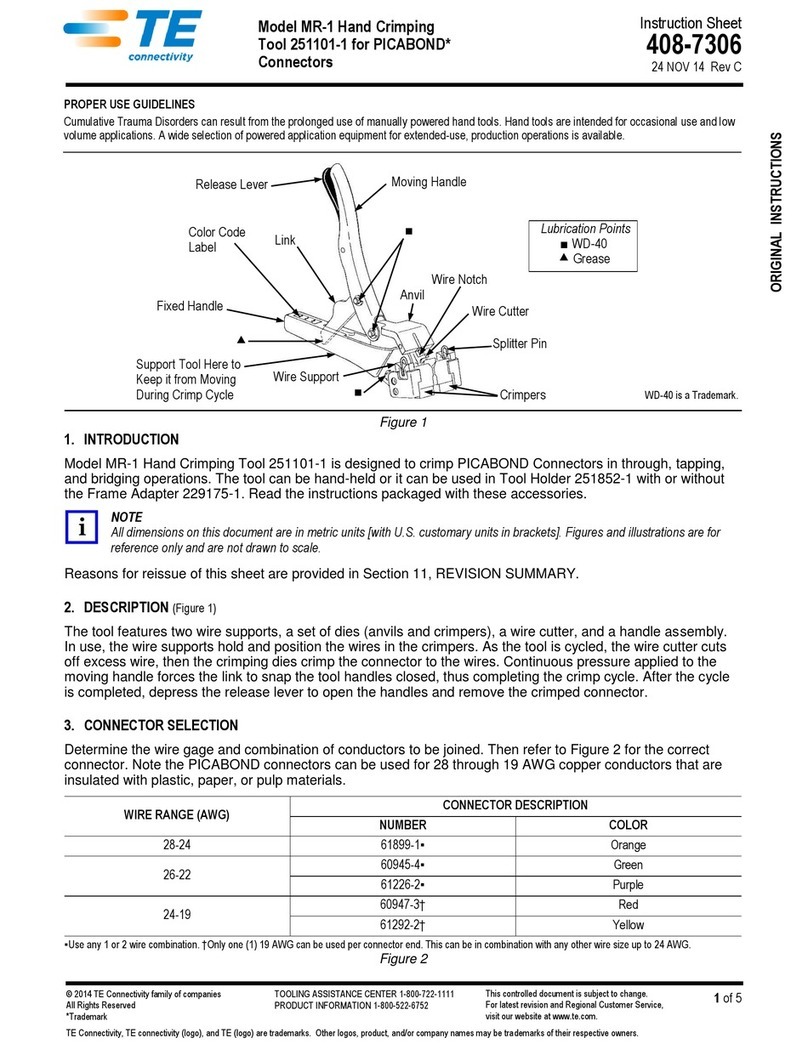
manuals.online logo
Brands
  1. Home
  2. •
  3. Brands
  4. •
  5. TE Connectivity
  6. •
  7. Crimping Tools
  8. •
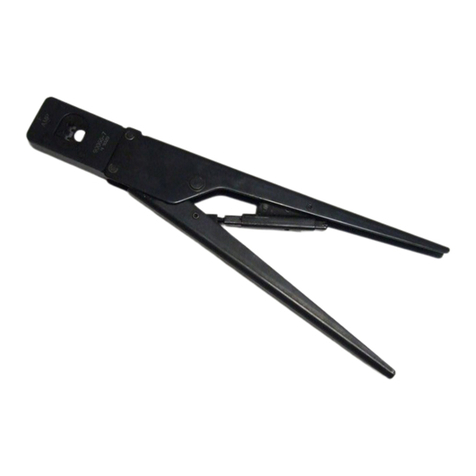
  9. TE Connectivity 90281-1 User manual

TE Connectivity 90281-1 User manual

©2011 Tyco Electronics Corporation, a TE Connectivity Ltd. Company
All Rights Reserved
*Trademark
TE Connectivity, TE connectivity (logo), and TE (logo) are trademarks. Other logos, product and/or Company names may be trademarks of their respective owners.
1of 4
Instruction Sheet
TOOLING ASSISTANCE CENTER
1-800-722-1111
PRODUCT INFORMATION
1-800-522-6752
This controlled document is subject to change.
For latest revision and Regional Customer Service,
visit our website at www.te.com LOC B
408-6810
Hand Crimping Tool 90281-1 13 SEP 11 Rev A
PROPER USE GUIDELINES
Cumulative Trauma Disorders can result from the prolonged use of manually powered hand tools. Hand tools are intended for occasional use
and low volume applications. A wide selection of powered application equipment for extended-use, production operations is available.
Figure 1
1. INTRODUCTION
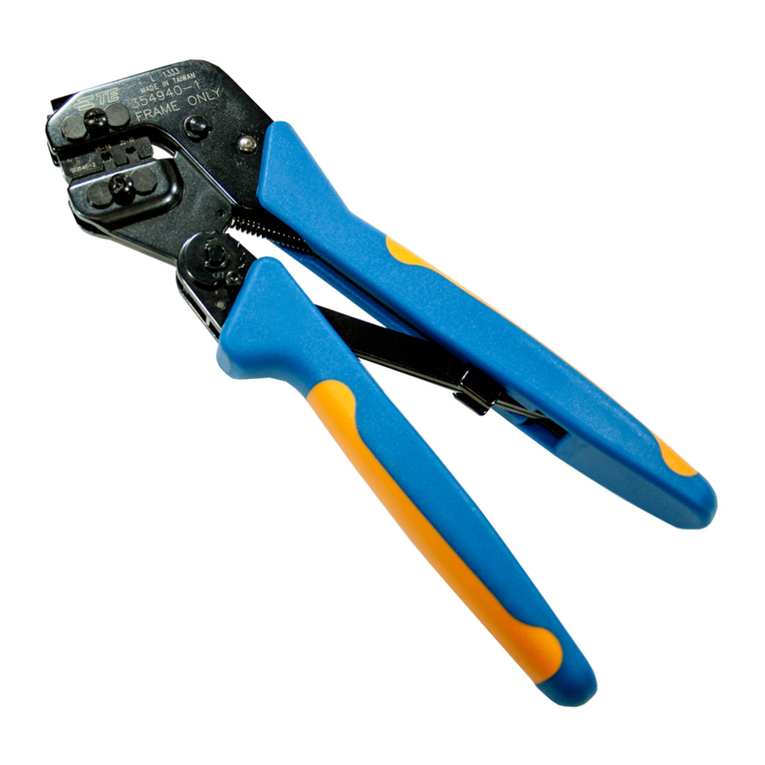
Hand Crimping Tool 90281-1 is designed for crimping
the Multimate Type II pin and socket contacts listed in
Figure 1. Read these instructions thoroughly before
crimping any contacts. The tool is recommended for
field repair use ONLY.
All dimensions on this document are in metric units
[withU.S.customaryunitsinbrackets].Figuresand
illustrations are for identification only and are not
drawn to scale.
Reason for revision is given in Section 7, REVISION
SUMMARY.
2. DESCRIPTION (Figures 1 and 2)
This tool features twocrimper jaws, two anvil jaws, two
crimp sections with applicable color-coded wire size
markings, a contact locator/support, a ratchet to
ensure full contact crimping, and spring-actuated
handles with cushioned handgrips. See Figure 1.
A color band appears around either the contact
insulation barrel or wire barrel.
3. CRIMPING PROCEDURE
Refer to the table in Figure 1 and select wire of the
specified size and insulation diameter. Strip the wire to
the length indicated. Do NOT cut or nick the wire
strands.
Crimper Jaws
Ratchet
Front of Tool
Contact Locator/
Support
Anvil Jaws
HandTool
90281-1
Cushioned
Handgrips
Color on Insulation or
Wire Barrel Indicates
Wire Range
Wire Strip
Length
Inspection
Hole
Shoulder of
Contact
Type II Pin
Contact (Ref)
WIRE COLOR
CODE
MULTIMATE CONTACT CRIMP SET
(Wire Size
Marking)
SIZE (AWG) INSUL DIA STRIP LENGTH PIN SOCKET
24-20 1.40-2.16 [.055-.085] 5.16 [.203] Yellow
200334 200331
24-20
200679 201328
201330 ---
1.02-1.57 [.040-.062] 201578 201580
--- 201584
18-16 Contacts Do Not Have
Insulation Barrel 6.35 [.250] Blue
--- 200333
18-16
14
200336 ---
200681 ---
--- 201589
14 Violet 201570 201568
Violet 201645 ---
NOTE
i
ORIGINAL INSTRUCTIONS
408-6810
2of 4
Rev A
Figure 2
Select an applicable contact and identify the
appropriate crimp section (according to the wire size
markings on the BACK of the tool). The color band on
the contact insulation or wire barrel must match the
color-coded wire size marking beside the appropriate
tool crimp section. Refer to Figure 2 and proceed as
follows:
1. Hold tool so BACK (wire side) is facing you. Make
sure ratchet is released - squeeze tool handles
together and allow them to open fully.
2. Looking straight into BACK of appropriate crimp
section, insert contact (insulation barrel first) into
FRONT of crimp section. Position contact on anvil
jaws, with contact shoulder against locator. Allow
contact to rest in contact locator/support.
3. Squeeze tool handles together until ratchet
engages enough to hold contact in position. Do
NOT deform insulation barrel or wire barrel.
4. Insert a properly stripped wire into contact wire
barrel until it bottoms.
5. Holding wire in place, squeeze tool handles
together until ratchet releases. Allow tool handles to
open FULLY, and remove crimped contact.
6. Check to be sure contact is properly crimped.
Wire must be visible through inspection hole in
contact.
4. MAINTENANCE/INSPECTION PROCEDURES
4.1. Daily Maintenance
It is recommended that each operator of the tool be
made aware of, and responsible for, the following four
steps of daily maintenance:
1. Remove dust, moisture, and other contaminants
with a clean brush, or a soft, lint-free cloth. Do NOT
use objects that could damage the tool.
2. Make sure the proper retaining pins are in place
and secured with the proper retaining rings.
3. Make certain all pins, pivot points, and bearing
surfaces are protected with a THIN coat of any good
SAE No. 20 motor oil. Do NOT oil excessively.
4. When the tool is not in use, keep the handles
closed to prevent objects from becoming lodged in
the crimping jaws and store the tool in a clean, dry
area.
Contact Locator/
Support
Crimper Jaws
Back of Tool
Crimp Section Wire
Size Markings
Ratchet Disengaged
Violet
Blue
Yellow
Anvil Jaws
Contact Shoulder
Butts Against Locator
408-6810
3of 4
Rev A
4.2. Periodic Inspection
Regular inspections should be performed by quality
control personnel. A record of scheduled inspections
should remain with the tool and/or be supplied to
supervisory personnel responsible for the tool. Though
recommendations call for at least one inspection a
month, the inspection frequency should be based on
the amount of use, ambient working conditions,
operator training and skill, and established company
standards. These inspections should be performed in
the following sequence:
A. Visual Inspection
1. Remove all lubrication and accumulated film by
immersing the tool (handles partially closed) in a
suitable commercial degreaser that will not affect
paint or plastic material.
2. Make certain all retaining pins are in place and
secured with retaining rings. If replacements are
necessary, refer to the parts list in Figure 4.
3. Close the tool handles until the ratchet releases,
then allow handles to open freely. If they do not
open quickly and fully, the spring is defective and
must be replaced (see Section 5, REPAIR).
4. Inspect the head assembly, with special
emphasis on checking for worn, cracked, or broken
jaws. If damage to any part of the head assembly is
evident, the tool must be repaired (see Section 5,
REPAIR).
B. Crimp Height Inspection
Crimp height inspection is performed through the use
of a micrometer with a modified anvil, commonly
referred to as a crimp-height comparator. TE does not
manufacture or market crimp-height comparators.
Detailed information on obtaining and using crimp-
height comparators can be found in Instruction Sheet
408-7424.
Proceed as follows:
1. Refer to the table in Figure 1, and select a contact
and a wire (maximum size) for each crimp section
listed in the table.
2. Refer to Section 3, CRIMPING PROCEDURE,
and crimp the contact(s) accordingly.
3. Using a crimp height comparator, measure wire
barrel crimp height as shown in Figure 3. If the
crimp height conforms to that shown in the table,
the tool is considered dimensionally correct. If not,
the tool must be repaired (see Section 5, REPAIR).
C. Ratchet Inspection
Obtain a 0.03-mm [.001-in.] shim that is suitable for
checking the clearance between the bottoming
surfaces of the crimping jaws.
Proceed as follows:
Figure 3
1. Select a contact and wire (maximum size) for the
tool (see Figure 1).
2. Position the contact and wire between the
crimping jaws, according to Section 3, CRIMPING
PROCEDURE (Steps 1 through 4). Holding the wire
in place, squeeze the tool handles together until the
ratchet releases. Hold the tool handles in this
position, maintaining just enough pressure to keep
the jaws closed.
3. Check clearance between the bottoming surfaces
of the crimping jaws. If the clearance is 0.03 mm
[.001 in.] or less, the ratchet is satisfactory. If
clearance exceeds 0.03 mm [.001 in.], the ratchet is
out of adjustment and must be repaired (see
Section 5, REPAIR).
If the tool conforms to these inspection procedures,
lubricate it with a THIN coat of any good SAE No. 20
motor oil and return it to service.
5. REPAIR
All parts of the tool can be replaced. Customer
replaceable parts are listed in Figure 4. A complete
inventory should be stocked and controlled to prevent
lost time when replacement of parts is necessary. If
parts that affect ratchet setting are replaced, the
ratchet must be adjusted using the spanner wrench
(see Figure 4).
Proceed as follows:
1. Loosen the ratchet nut on the back of tool (side
with wire size markings).
2. Check bottoming of tool jaws according to
Paragraph 4.2.C, Ratchet Inspection. Turnscrew on
front of tool CLOCKWISE to tighten ratchet or
COUNTERCLOCKWISE to loosen ratchet.
WIRE SIZE
(AWG) MAX
CRIMP
SECTION(WIRE
SIZE MARKING)
CIRMP HEIGHT
(DIM. “A”)
20 24-20 1.14 ±0.08[.045 ±.003]
16 18-16
14 1.588 ±0.089 [.0625 ±.0035]
14
Position Point on
Center of Wire Barrel
Opposite Seam
Modified Anvil
“A”
408-6810
4of 4
Rev A
3. When tool jaws bottom properly, retighten nut.
Itmay benecessary to holdtheratchet screw while
securing the ratchet nut.
6. REVISION SUMMARY
•Updated document to corporate requirements
•New logo
Figure 4
NOTE
i
Weight: 0.45 kg [1 lb]
57.15 [2.250]
228.6 [9.00]
19.05 [.750]
Spanner
Wrench
1
2
3
4 7 8
9
5 6
22 10 11 14 21 25 26 23 12
24 13 20 15 19
16 17 18
REPLACEMENT PARTS
ITEM PART
NO. DESCRIPTION QTYPER
TOOL ITEM PART
NO. DESCRIPTION QTYPER
TOOL
1
2
3
4
5
6
7
8
9
10
11
12
13
127302-1
127303-1
127304-1
127305-1
127306-1
127307-1
127272-1
127308-1
127309-1
127252-1
127290-1
127254-1
127291-1
LOCATOR
LINK
LINK
SCREW, 6-32 x 3/8 Long
PIN
RIVET
WASHER, Spring
BUSHING
RIVET
PIN
RING, Retaining
GRIP
WASHER
1
1
1
1
1
2
1
1
2
2
4
2
4
14
15
16
17
18
19
20
21
22
23
24
25
26
127256-1
127251-1
127292-1
127253-1
127255-1
127293-1
127257-1
127294-1
127295-1
127258-1
127296-1
127259-1
127297-1
HANDLE, Inside
PAWL
SPRING, Extension
PIN, Spring
PAWL, Pivot
RING, Retaining
HANDLE, Outside
PIN, Pivot
SPRING, Torsion
RATCHET
RING, Retaining
STUD, Eccentric
NUT
1
1
1
1
1
4
1
1
1
1
2
1
1

Other TE Connectivity Crimping Tools manuals

TE Connectivity 68321-1 User manual

TE Connectivity

TE Connectivity 68321-1 User manual

TE Connectivity 58422-1 User manual

TE Connectivity

TE Connectivity 58422-1 User manual

TE Connectivity FDH 3000 864 User manual

TE Connectivity

TE Connectivity FDH 3000 864 User manual

TE Connectivity PRO-CRIMPER III User manual

TE Connectivity

TE Connectivity PRO-CRIMPER III User manual

TE Connectivity TERMI-FOIL 68026 User manual

TE Connectivity

TE Connectivity TERMI-FOIL 68026 User manual

TE Connectivity 2379381-1 User manual

TE Connectivity

TE Connectivity 2379381-1 User manual

TE Connectivity ERGOCRIMP 5-1579001-2 User manual

TE Connectivity

TE Connectivity ERGOCRIMP 5-1579001-2 User manual

TE Connectivity SDE-SA User manual

TE Connectivity

TE Connectivity SDE-SA User manual

TE Connectivity 2391789-1 User manual

TE Connectivity

TE Connectivity 2391789-1 User manual

TE Connectivity 2392570-1 User manual

TE Connectivity

TE Connectivity 2392570-1 User manual

TE Connectivity 2397100-1 User manual

TE Connectivity

TE Connectivity 2397100-1 User manual

TE Connectivity 2386893-1 User manual

TE Connectivity

TE Connectivity 2386893-1 User manual

TE Connectivity MR-1 User manual

TE Connectivity

TE Connectivity MR-1 User manual

TE Connectivity 69376 User manual

TE Connectivity

TE Connectivity 69376 User manual

TE Connectivity COPALUM 408-2281 User manual

TE Connectivity

TE Connectivity COPALUM 408-2281 User manual

TE Connectivity ERGOCRIMP 4-1579001-6 User manual

TE Connectivity

TE Connectivity ERGOCRIMP 4-1579001-6 User manual

TE Connectivity ERGOCRIMP 539671-2 User manual

TE Connectivity

TE Connectivity ERGOCRIMP 539671-2 User manual

TE Connectivity SDE-SA PN 2063534-1 User manual

TE Connectivity

TE Connectivity SDE-SA PN 2063534-1 User manual

TE Connectivity Positive Lock A User manual

TE Connectivity

TE Connectivity Positive Lock A User manual

TE Connectivity 2392900-1 User manual

TE Connectivity

TE Connectivity 2392900-1 User manual

TE Connectivity 2362810-1 User manual

TE Connectivity

TE Connectivity 2362810-1 User manual

TE Connectivity SDE-SA 2391790-1 User manual

TE Connectivity

TE Connectivity SDE-SA 2391790-1 User manual

TE Connectivity AT-SC User manual

TE Connectivity

TE Connectivity AT-SC User manual

TE Connectivity SDE-SA User manual

TE Connectivity

TE Connectivity SDE-SA User manual

Popular Crimping Tools manuals by other brands

KIMBALL MIDWEST 27-798 Operating instructions manual

KIMBALL MIDWEST

KIMBALL MIDWEST 27-798 Operating instructions manual

molex 63811-6170 Specification sheet

molex

molex 63811-6170 Specification sheet

Emerson Klauke ESG 25CFB manual

Emerson

Emerson Klauke ESG 25CFB manual

molex 63811-8100 Specification sheet

molex

molex 63811-8100 Specification sheet

Hilpress 11030 operating instructions

Hilpress

Hilpress 11030 operating instructions

Granit G20 operating instructions

Granit

Granit G20 operating instructions

Tyco Electronics PRO-CRIMPER III 58603-1 instruction sheet

Tyco Electronics

Tyco Electronics PRO-CRIMPER III 58603-1 instruction sheet

Panduit CT-2002CH manual

Panduit

Panduit CT-2002CH manual

molex 207129 Series Specification sheet

molex

molex 207129 Series Specification sheet

Burndy HYTOOL MD6 Series SAFETY OPERATING & MAINTENANCE INSTRUCTIONS

Burndy

Burndy HYTOOL MD6 Series SAFETY OPERATING & MAINTENANCE INSTRUCTIONS

SharkBite 865894 Instruction guide

SharkBite

SharkBite 865894 Instruction guide

Lapp Group EPIC CIRCON  LS1/M23 instruction manual

Lapp Group

Lapp Group EPIC CIRCON LS1/M23 instruction manual

JST WC Series instruction manual

JST

JST WC Series instruction manual

Textron Greenlee GATOR EK1230LT/X Operation manual

Textron

Textron Greenlee GATOR EK1230LT/X Operation manual

molex 63816-1100 quick start guide

molex

molex 63816-1100 quick start guide

Astro Tool 613214 quick start guide

Astro Tool

Astro Tool 613214 quick start guide

Tyco Electronics PRO-CRIMPER III instruction sheet

Tyco Electronics

Tyco Electronics PRO-CRIMPER III instruction sheet

Emerson Klauke EK 120/32CFM manual

Emerson

Emerson Klauke EK 120/32CFM manual

manuals.online logo
manuals.online logoBrands
  • About & Mission
  • Contact us
  • Privacy Policy
  • Terms and Conditions

Copyright 2025 Manuals.Online. All Rights Reserved.