Technaxx TX-25 User manual

Technaxx®
Video-Sport-Sonnenbrille Full HD 1080P TX–25
Bedienungsanleitung
Die Konformitätserklärung für dieses Gerät finden Sie unter: www.technaxx.de/ (untere Leiste
“Konformitätserklärung”). Vor dem ersten Gebrauch des Gerätes lesen Sie die
Bedienungsanleitung sorgfältig durch.
Dieses Gerät verfügt über einen aufladbaren Akku. Es muss vor dem ersten
Gebrauch vollständig aufgeladen werden.
Telefonnummer für den technischen Service: 01805 012643 (14 Cent/Minute aus dem deutschen
Besonderheiten
Echtzeit-Videoaufnahme mit Ton in brillanter Bildqualität
HD-Kameralinse mit 142° Weitwinkel und 5 Megapixel CMOS Sensor
Videoauflösung Full HD 1920x1080P mit 25fps, AVI Format
Fotoauflösung interpoliert 15M Pixel 4480 x 3360, JPEG Format
Auswechselbare UV400 Sonnenschutzgläser in 3 Farben
Eingebauter, aufladbarer Lithium-Ion-Polymer Akku 400mAh
Unterstützt MicroSD Speicherkarten bis 32GB (Klasse 10 wird empfohlen)
Benutzerfreundliche Ein-Knopf-Bedienung
Einfacher Anschluss an PC/Notebook, keine Treiber erforderlich
Elegantes, modernes, sportliches Design
Lieferumfang: Video-Sport-Sonnenbrille Full HD 1080P TX–25, USB-Kabel,
Netzadapter 5V DC 1A, Schutzhülle mit Reißverschluss und Handschlaufe, 1 Paar
dunkelgraue/blaue/gelbe Gläser, Reinigungstuch, Bedienungsanleitung
Produktansicht
1. Taste: EIN / AUS,
Aufnahme, Abspielen
2. MicroSD Kartenfach
3. USB- / Ladeanschluss

Austausch der Gläser
Die Gläser können leicht ausgetauscht werden. Das Brillenglas mit sauberen Fingern
mittig festhalten und es aus dem Gestell drücken. Mit dem zweiten Brillenglas
anschließend ebenso verfahren. Bitte vorsichtig vorgehen, da die kleinen Pins an
beiden Seiten des Glases brechen können wenn zu viel Druck ausgeübt wird. Auch
die Brille selbst vorsichtig handhaben, um die Bildung von Kratzern zu vermeiden.
Aufladen des Akku
Das Gerät mit dem USB-Anschluss an Ihrem PC oder mit Hilfe des mitgelieferten
Netzadapters an das Stromnetz anschließen. Während des Ladevorgangs blinkt die
rote LED. Leuchtet die rote LED dauerhaft, ist der Ladevorgang abgeschlossen. Es
wird eine Aufladezeit von 4 Stunden empfohlen.
ACHTUNG: Videoaufnahmen und Tonaufnahmen sind nur möglich,
wenn eine MicroSD* Karte in den entsprechenden Steckplatz
eingelegt wurde. [* Die Karte ist im Lieferumfang nicht enthalten!]
Formatieren einer MicroSD-Karte – Wichtige Hinweise!
Legen Sie eine MicroSD* Karte ein und schalten Sie das Gerät an. Ist die MicroSD
Karte nicht (!) systemkompatibel, schaltet sich die rote LED ein, blinkt aber 20
Sekunden lang sehr langsam. Dies ist eine Art Warnhinweis für Sie, die MicroSD
Karte vor der Verwendung zu formatieren.
Achtung: Beim Formatieren einer MicroSD Karte werden alle Daten auf der
Karte gelöscht. Vor dem Formatieren unbedingt die Daten sichern!
Drücken Sie die EIN/AUS-Taste. Die rote LED blinkt sehr schnell, während die Karte
formatiert wird. Nach der Formatierung können Sie andere Vorgänge starten. Wird
innerhalb von 20 Sekunden kein Vorgang gestartet, schaltet sich das Gerät
automatisch aus.
Verwendung der Sonnenbrille
(1) MicroSD Karte (bis 32GB, Klasse 10 oder höher wird empfohlen) einlegen.
(2) Taste Nr. 1 (EIN-AUS/Aufnahme/Abspielen) einige Sekunden lang drücken, bis
sich die rote LED einschaltet, um das Gerät zu starten.
(3) Die rote LED beginnt zu blinken. Das Gerät startet automatisch mit der Aufnahme
eines Videos, wenn die MicroSD Karte in Windows FAT32 formatiert wurde.
Andernfalls schaltet sich das Gerät nach 3-5 Sekunden aus!
(4) Um das Gerät AUSzuschalten, halten Sie die Taste EIN/AUS für einige Sekunden
gedrückt, bis sich die rote LED ausschaltet.

Video aufzeichnen
(1) Drücken Sie die Taste EIN/AUS. Das Gerät schaltet sich automatisch ein und
beginnt ROT ZU BLINKEN. Sie können nun ein Video aufzeichnen.
(2) Um die Aufnahme zu stoppen, drücken Sie erneut die Taste EIN/AUS. Die ROTE
LED leuchtet nun DAUERHAFT ROT. Leuchtet die LED DAUERHAFT ROT, können
sie die Taste drücken, um ein Foto aufzunehmen oder die Taste 3 Sekunden lang
gedrückt halten, um eine weitere Videoaufnahme zu starten.
(3) Alle 10 Minuten speichert das Gerät automatisch eine Datei.
(4) Wird länger als 2 Minuten kein Vorgang im Standby-Modus gestartet, schaltet sich
das Gerät automatisch aus.
Bilder aufnehmen
Um Bilder aufzunehmen, während sich das Gerät im Standby-Modus befindet,
drücken Sie einmal die Taste EIN/AUS, um ein Bild aufzunehmen. Die rote LED blinkt
einmal auf und zeigt hierdurch an, dass das Foto aufgenommen und gespeichert wird.
Dann leuchtet die rote LED dauerhaft rot auf.
Dateien auf einem Computer aufrufen
Um die Dateien auf einem Computer aufrufen zu könne, müssen Sie lediglich das
Gerät mit dem beiliegenden USB-Kabel an den USB-Anschluss eines Computers
anschließen.
Es wird als Wechsellaufwerk erkannt und je nach PC-Einstellungen automatisch
erkannt. Wenn ja, wählen Sie Ordner öffnen aus, um die Dateien aufzurufen.
Wird es nicht (!) automatisch erkannt, klicken Sie auf Ihrem Computer auf Start. Unter
Windows wählen Sie “Mein Computer” aus, unter Windows Vista oder WIN7
“Computer”. Das Gerät wird als Wechsellaufwerk unter "Geräte mit Wechselspeicher"
aufgeführt.
Nutzung des Geräts als Webcam
Um das Gerät als Webcam nutzen zu können, müssen Sie zunächst die MikroSD
Karte aus dem Steckplatz entfernen und das Gerät mit dem USB-Anschluss eines
Computers verbinden. Anschließend unter “Mein Computer” nach “Standardkamera”
suchen, oder unter Skype nach “Videoeinstellung” suchen. Wurde das Gerät korrekt
angeschlossen, erscheint der Webcam-Bildschirm auf Ihrem Computer. Es sind keine
Audioaufnahmen möglich!

Einstellen von Uhrzeit und Datum
Mit dem USB-Kabel das Gerät im Standby-Modus mit dem Computer verbinden.
Dann erscheint das Laufwerk. Im Stammverzeichnis mit der rechten Maustaste auf
das Laufwerk klicken. Dann auf "Neu" und auf "Textdokument" erstellen klicken. Dann
die Textdokumentdatei "time.txt" erstellen. Dann einen Doppelklick auf "time.txt" und
editieren wie folgt: zur Anzeige im Bild
2014.07.30 08:51:30 (Datum und Uhrzeit)
Diese Angaben so eingeben und speichern.
keine Anzeige im Bild
2012.07.26 08:51:30 (Datum und Uhrzeit in der Vergangenheit)
Diese Angaben so eingeben und speichern.
Einstellen der Videoauflösung
Mit dem USB-Kabel das Gerät im Standby-Modus mit dem Computer verbinden. Das
Laufwerk erscheint. Im Stammverzeichnis mit der rechten Maustaste auf das
Laufwerk klicken. Dann auf "Neu" und auf "Textdokument" erstellen klicken. Dann die
Textdokumentdatei "size.txt" erstellen. Dann einen Doppelklick auf "size.txt".
Für die Videoauflösung 1280x720P mit 50fps die Zahl “1” eingeben.
Für die Videoauflösung 1920x1080P mit 25fps die Zahl "0" eingeben.
Für die Videoauflösung 1440x1080P mit 30fps die Zahl "2" eingeben.
Speichern und beenden!
Das System ist standardmäßig auf 1440x1080P und 30fps eingestellt.
Ein Video abspielen
Möchten Sie Ihre Dateien auf einem Computer abspielen, empfehlen wir die
Verwendung des VLC-Player. Die aktuellste Version können Sie kostenlos
herunterladen unter http://www.videolan.org
Fehlerbehebung
F: Das Gerät reagiert nicht auf Tastendruck.
A: Hierzu kann es kommen, wenn das Gerät zu viele Befehle in kürzester Zeit
empfängt. Zum Zurücksetzen, die EIN-/AUS-Taste einige Sekunden gedrückt halten,
bis sich das Gerät AUSschaltet.
F: Die rote LED blinkt 10 Sekunden lang schneller und schaltet sich dann automatisch
aus. Das Gerät ist im Stand-by-Modus.
A: Das passiert, wenn die MicroSD Karte voll ist. De Informationen auf einem anderen
Speichermedium speichern und die aktuelle MicroSD Karte leeren.

F: Die rote LED leuchet 10 Sekunden lang dauerhaft und schaltet sich dann
automatisch aus. Das Gerät ist im Stand-by-Modus.
A: Es wurde keine MicroSD Karte eingelegt. Eine MicroSD Karte (bis 32GB) einlegen.
F: Die rote LED blinkt 4 Sekunden lang und schaltet sich dann automatisch aus. Das
Gerät ist im Stand-by-Modus. (Wenn der Akku leer ist, dann schaltet sich das Gerät
automatisch aus.)
A: Der Akku des Geräts ist fast leer. Das Gerät mit Hilfe des USB-Kabels oder mit
einem Netzadapter aufladen.
F: Beim Abspielen meiner Videos höre ich den Ton, sehe aber kein Bild.
A: Das ist der Fall, wenn der Mediaplayer des Computers Ihre Dateien nicht korrekt
lesen kann. Versuchen Sie den VLC-Player, den Sie kostenlos herunterladen können
unter http://www.videolan.org
Technische Spezifikationen
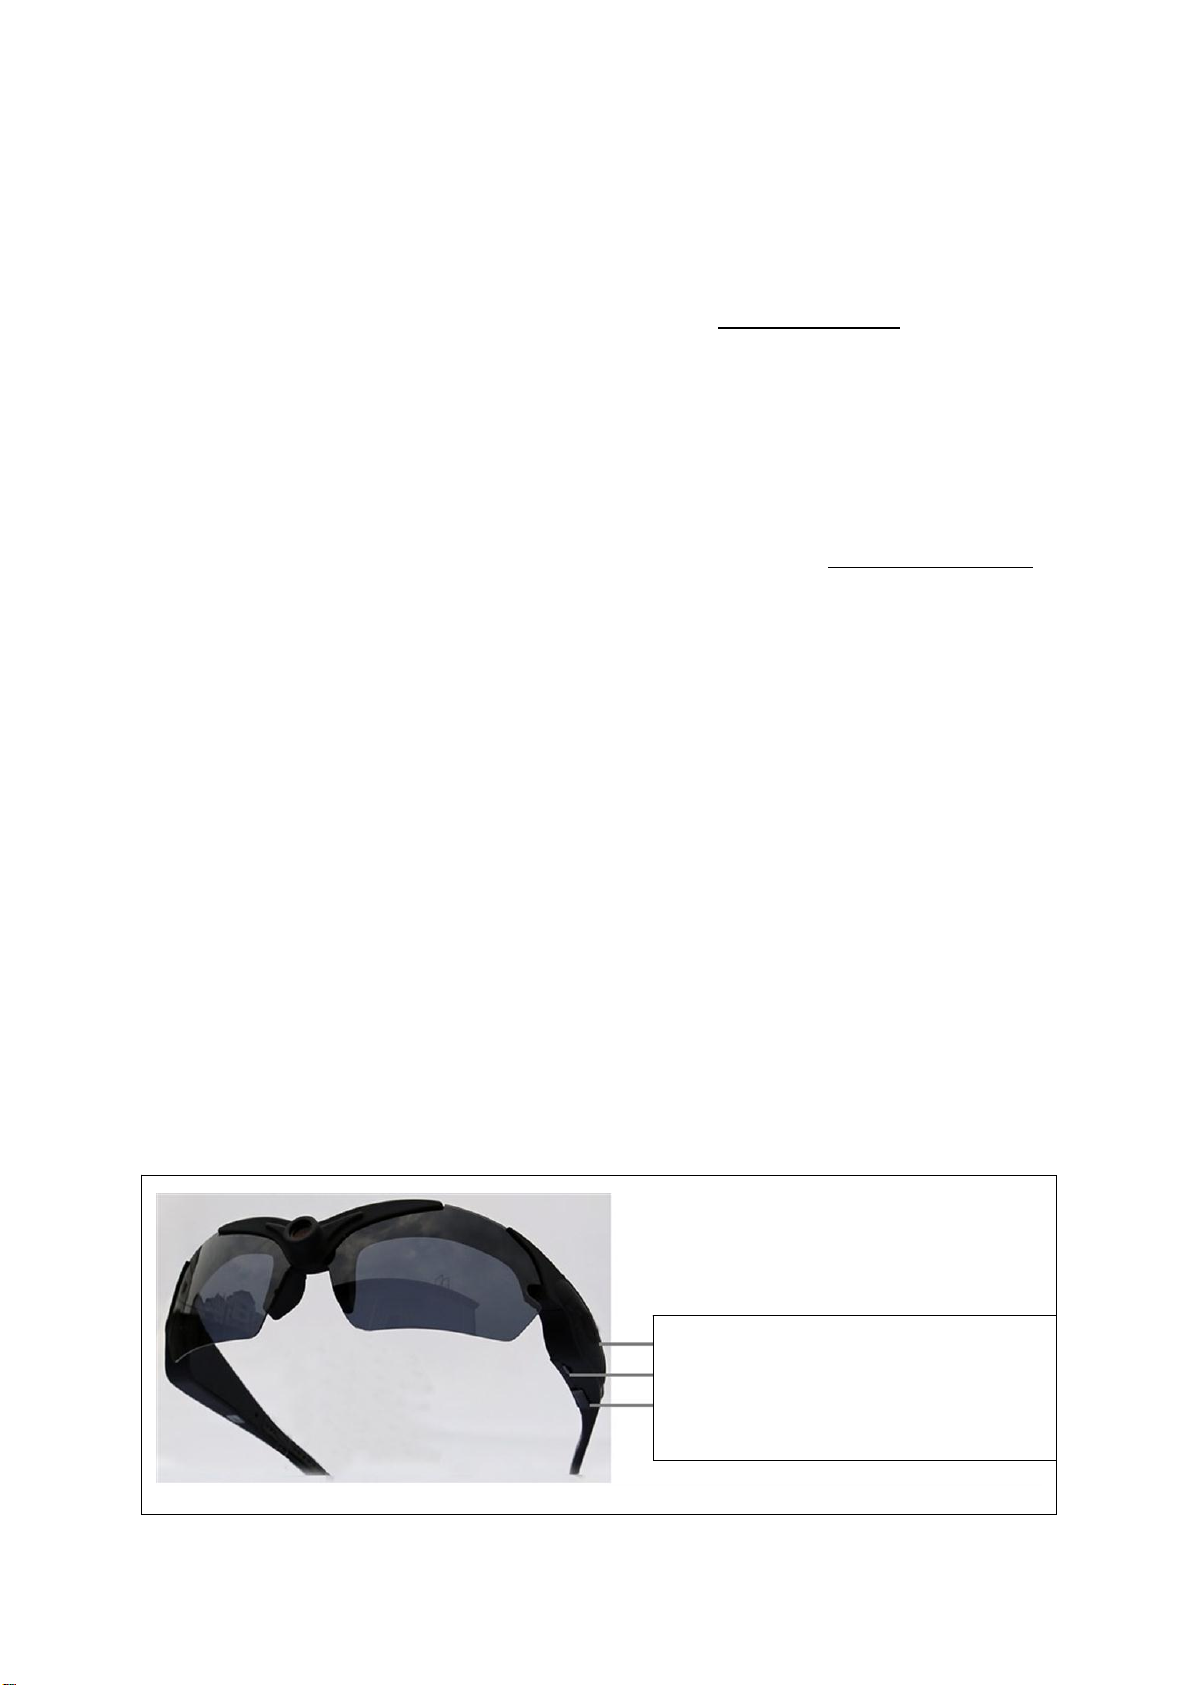
Objektiv und Sensor HD Weitwinkel 142° und 5 Megapixel CMOS Sensor
Videoauflösung Full HD 1920x1080P mit 25fps, AVI Format
Optionale
Videoauflösungen
1440x1080P 30fps,AVI Format
720P 1280x720P 50fps,AVI Format
Full HD 1920x1080P 25fps,AVI Format
Fotoauflösung 15M Pixel 4480 x 3360, JPEG Format
Audio Reine Audioaufnahmen sind nicht möglich, nur zus. mit Videoaufnahmen
Speicherkarte MicroSD* bis 32GB (Klasse 10 wird empfohlen)
[*nicht im Lieferumfang enthalten]
Akku Eingebauter, aufladbarer Lithium-Ion-Polymer Akku 400mAh
Akku-Ladezeit ~ 1,5 Stunden (über USB-Anschluss aufladbar)
Akku-Laufzeit Videoaufnahmen ~ 1 Stunde
Rahmenmaterial ABS + PC
USB MINI 8Pin
Netzadapter / Stromverbauch 5V DC 1A / < 0,8 W
Betriebssysteme Windows 8.1, 8, 7, Vista, XP und kompatibel mit MAC
Software Mediaplayer Windows Media Player, Real Player, Stormcodec
Gewicht / Maße 56 g / (L) 16,5 x (B) 7,7 (Bügel gefaltet) x (H) 4,8 cm
Hinweise zum Umweltschutz: Verpackungen sind recycelbares Rohmaterial.
Alte Geräte nicht im Hausmüll entsorgen. Reinigung: Gerät vor Verschmutzung
schützen (mit sauberem Tuch reinigen). Keine rauen, groben Materialien oder
Lösungsmittel oder andere aggressive Reiniger verwenden. Gereinigtes Gerät
gründlich abwischen. Inverkehrbringer: Technaxx Deutschland GmbH &
Co.KG, Kruppstr. 105, 60388 Frankfurt a.M., Deutschland

Technaxx®
Video Sport Sunglasses Full HD 1080P TX–25
User Manual
The Declaration of Conformity for this device is under the Internet link: www.technaxx.de/ (in
bottom bar “Konformitätserklärung”). Before using the device the first time, read the user manual
carefully.
This device has a rechargeable battery. It must be fully charged before first use.
Service phone No. for technical support: 01805 012643 (14 cent/minute from German fixed-line
Features
Real time video recording with sound in brilliant image quality
HD camera lens wth 142° wide-angle and 5 Megapixel CMOS sensor
Video resolution Full HD 1920x1080P with 25fps, AVI format
Photo resolution interpolated 15M pixel 4480 x 3360, JPEG format
Interchangeable sun protection lenses UV400 in 3 colours
Built-in rechargeable Lithium-Ion-Polymer battery 400mAh
Supports MicroSD memory cards up to 32GB (Class 10 is recommended)
User friendly one-button operation
Easy connection with PC/Notebook, no driver needed
Elegant, stylish, sporty design
Package Contents: Video Sport Sunglasses Full HD 1080P TX–25, USB cable,
Power adaptor 5V DC 1A, Protective case with zipper and hand loop, 1 pair of dark
grey/yellow/blue lenses, Cleaning cloth, User Manual
View of product

Changing of the glasses
Changing of the glasses is very easy. Hold the center of a glass with clean fingers and
klick it out of the frame, first one side, then the other. Please do it carefully, because
the little pins on both side of the glass could break when handle the glass too roughly.
Also handle the glasses themselves with care, otherwise scatches could appear.
Charging the built-in battery
Connect the device to a USB port on your PC or plug it into AC power with the
included power adapter. While charging the red LED is blinking constantly. When the
red LED turns to a solid red light the battery is fully charged. Charging time of 4 hours
is recommended.
Attention: Video recording or taking pictures only is possible, when
a MicroSD* card is inserted into the MicroSD card slot.
[* The card is not included in delivery!]
Formating a MicroSD card – Important Hints !
Insert a MicroSD* card and turn on device. In case the micro card is not (!) compatible
with the system, the red LED turns on but blinks very slowing for 20 seconds. That is a
kind of warning system that you have to format the MicroSD card before using.
Attention: When formatting a MicroSD card, all information on the card
will be deleted. Therefore please save them before formatting!
Press the ON/OFF button, then the red LED flashes very fast to format the card. After
formatting, you can start other operations. If there is no action during a time period of
20 seconds, the device will shut down automatically.
Start to use the sunglasses
(1) Insert a MicroSD card (max. 32GB, recommended is Class 10 high speed or
above).
(2) Press the button No. 1 (ON-OFF/Recording/Play) for a few seconds, until the red
LED is on to start up the device.
(3) Then the red LED is on and starts blinking. The device starts automatically
recording a video when the MicroSD card is Windows FAT32 formatted. Otherwise
the device turns off after 3–5 seconds!
(4) To power OFF the device, press and hold down the ON/OFF button for a few
seconds, until the red LED turns off.

Recording a video
(1) Press the ON/OFF button and the device turns on and starts BLINKING RED. You
are now recording a Video.
(2) Press the ON/OFF button again to stop the recording. The RED LED now is
SOLID RED. When the LED is SOLID RED press the button once to take a picture or
you can hold button for 3 seconds and release to start recording a video again.
(3) Every 10 minutes the device saves one file automatically.
(4) If no operation in standby status in 2 minutes, the device will shut down
automatically.
Taking photos
To take photos when device in standby mode, press the ON/OFF button once to take
one photo. The red LED blinks one time to indicate it is capturing and saving your
photo, then the red LED returns to solid red light.
Viewing files on a computer
To view your files on a computer, simply connect the device with the enclosed USB
cable to a USB port of a computer.
It will connect as a removable drive, and depending on the settings on your PC, it
may automatically notify that a new hardware has been detected. If so, select
Open Folder to View Files.
If it is not (!) automatically detected, click Start on your desktop. Select “My Computer”
if you are using Windows, or “Computer” if your are using Windows Vista or WIN7.
The device should be listed as a Removable Disk under the “Devices with Removable
Storage” section.
Using the device as a Webcam
To use the device as a webcam, you first have to take out the MicroSD card from the
MicroSD card slot and plug the device into a computer’s USB port. Then search for
the “Standard Camera“ under “My Computer” or search under your Skype “Video
setting”. If the connection is correct then a webcam screen will appear on your
computer. No audio recording is possible!

Setting Time and Date
Use the USB cable to connect the device in the Standby mode with the computer.
Then the device appears. Click in the root directory with the right mouse button on the
drive. Then click on „New“ and on „Create Text Document“. Then create a text
document file „time.txt“. Then double-click on „time.txt“ and edit as follows:
for display in the picture
2014.07.30 08:51:30 (Date and Time)
Enter this information like this and save it.
no display in the picture
2012.07.26 08:51:30 (Date and Time in the past)
Enter this information like this and save it.
Setting video resolution
Use the USB cable to connect the device in the Standby mode with the computer. The
drive of the computer appears. Click in the root directory with the right mouse button
on the computer drive. Then click on "New" and on create a "Text document". Then
create the text document file "size.txt". Then double click on "size.txt".
For a video resolution 1280x720P with 50fps enter the number “1”.
For a video resolution 1920x1080P with 25fps enter the number "0".
For a video resolution 1440x1080P with 30fps enter the number "2".
Save and exit!
The system will be default with 1440x1080P 30fps specifications.
Viewing a video
If you plan on viewing your files on your computer, we suggest using VLC Player. The
most recent version can be downloaded at no cost from http://www.videolan.org
Troubleshooting
Q: The device seems to have frozen and don’t reacting when any buttons are pressed.
A: This usually occurs if the device receives too many commands in too short a time.
To reset the device, press the ON/OFF button for a few seconds until the device will
turn OFF.
Q: The device’s red LED is blinking faster for 10 seconds and then it turns off
automatically. The device goes into stand-by mode.
A: It occurs when the MicroSD card is full. Store the information to other storage
media and empty your current MicroSD card.

Q: The device’s red LED remains shining for 10 seconds and then it turns off
automatically. The device goes into stand-by mode.
A: It occurs when no MicroSD card was inserted. Insert a MicroSD card (up to 32GB).
Q: The device’s red LED is blinking fast for 4 seconds and then it turns off
automatically. The device goes into stand-by mode. (If no battery power is left, the
device will shut down automatically.)
A: The device is in low battery status. Charge the battery by using the USB cable or
the power charger.
Q: When playing back my video, I can hear audio, but cannot see any picture.
A: This most often occurs if your computer’s media player has trouble with your files.
Try using VLC player, which can be downloaded for free at http://www.videolan.org
Technical Specifications
Lens and Sensor HD wide angle 142° and 5 megapixels CMOS sensor
Video resolution Full HD 1920x1080P with 25fps, AVI format
Optional
Video resolutions
1440x1080P 30fps,AVI format
720P 1280x720P 50fps,AVI format
Full HD 1920x1080P 25fps,AVI format
Photo resolution 15M pixel 4480 x 3360, JPEG format
Audio Pure audio recording is not possible, only together with video recording
Memory card MicroSD* up to 32GB (Class 10 is recommended)
[*not included in delivery]
Battery Built-in rechargeable lithium-ion-polymer battery 400mAh
Battery charging time ~ 1,5 hour (chargeable via USB connection)
Battery playing time Video recording ~ 1 hour
Frame material ABS + PC
USB MINI 8Pin
Power adapter / Power consumption 5V DC 1A / < 0,8 W
Operating systems Windows 8.1, 8, 7, Vista, XP and compatible with MAC
Media Player Software Windows Media Player, Real Player, Stormcodec
Weight / Dimensions 56g / (L) 16,5 x (W) 7,7 (folded bows) x (H) 4,8cm
Hints for Environment Protection: Packages materials are raw materials and
can be recycled. Do not disposal old devices or batteries into the domestic waste.
Cleaning: Protect the device from contamination and pollution (use a clean
drapery). Avoid using rough, coarse-grained materials or other aggressive
cleaner. Wipe the cleaned device accurately. Distributor: Technaxx
Deutschland GmbH & Co.KG, Kruppstr. 105, 60388 Frankfurt a.M., Germany

Technaxx®
Lunettes de soleil vidéo sport Full HD 1080P TX–25
Manuel d’utilisation
Déclaration de Conformité est sur: www.technaxx.de/ (la barre du bas “Konformitätserklärung”)
Lisez attentivement le mode d'emploi avant la première utilisation.
Caractéristiques
Enregistrement vidéo en temps réel avec son en qualité d'image exceptionnelle
HD lentille de la caméra avec 142° grand angle et capteur 5 mégapixels CMOS
Résolution vidéo Full HD 1920x1080P avec 25fps, format AVI
Résolution photo interpolée 15M pixels 4480x3360, format JPEG
Lentilles de protection solaire UV400 interchangeables en 3 couleurs
Batterie intégrée rechargeable de lithium-ion-polymère 400mAh
Prise en charge les cartes MicroSD jusqu’à 32GB (Classe 10 est recommandée)
Un seul bouton de commande convivial
Connexion facile aux PC/ordinateurs portables, aucun pilote requis
Design élégant, esthétique, sportif
Contenu de l'emballage: Lunettes de soleil vidéo-sport Full HD 1080P TX–25, Câble
USB, Adaptateur d’alimentation 5V DC 1A, Étui de protection avec fermeture éclair et
dragonne, 1 paire de lentilles de gris foncé/jaune/bleu Chiffon doux, Manuel
d’utilisation.
Composition
Changer les lentilles
Le changement des lentilles est très facile. Tenez le verre par le centre avec des
doigts propres et déboîtez-le de la monture, d’abord un côté puis l’autre. Veuillez le
faire doucement car les petites broches de chaque côté du lentille pourraient se briser
si ce dernier est rudement manipulé. Veuillez aussi soigneusement manipuler les
lentilles eux-mêmes, autrement des rayures pourraient apparaître.
1. Button: Marche/Arret,
Enregistrer, Lire
2. Fente de carte Micro SD
3. Port USB/rechargement

Recharger la batterie incorporée
Branchez l’appareil à un port USB de votre PC ou branchez-le à une alimentation CA
avec l'adaptateur d'alimentation fourni. La LED rouge clignotera constamment durant
le rechargement. La batterie sera totalement rechargée lorsque la LED rouge
deviendra fixe. Une durée de rechargement de 4 heures est recommandée.
Attention: Il n’est possible d’effectuer un enregistrement vidéo ou
une prise de photos que lorsqu’une carte Micro SD* est insérée
dans la fente de la carte MicroSD.
[* La carte n’est pas (!) fournie dans la livraison.)
Formater une carte MicroSD – Conseils importants!
Insérez une carte MicroSD* et allumez l’appareil. Si la carte Micro n'est pas (!)
compatible avec l’appareil, la LED rouge s’allume mais clignote très lentement
pendant 20 secondes. C’est une sorte d’avertissement qui vous signale que votre
carte MicroSD devra être formatée avant l’utilisation.
Attention: Lors du formatage d’une carte MicroSD, toutes les données de
la carte seront supprimées. Par conséquent, veuillez les sauvegarder avant
de formater!
Appuyez sur le bouton MARCHE/ARRET, puis la LED rouge clignote très rapidement
pour formater la carte. D’autres opérations peuvent être commencées après le
formatage. Si aucune manipulation n’est effectuée durant 20 secondes, l’appareil
s'éteindra automatiquement.
Commencer à utiliser les lunettes de soleil
(1) Insérez une carte MicroSD (jusqu’à 32GB de Classe 10 est recommandée).
(2) Appuyez sur le bouton n°1 (MARCHE/ARRET/Enregistrer/Lire) durant quelques
secondes, jusqu’à ce que la LED rouge s’allume pour allumer l'appareil.
(3) Puis la LED rouge est allumé et commence à clignoter. L’appareil commence
automatiquement à enregistrer une vidéo lorsque le formatage de la carte MicroSD
est de Windows FAT32. Autrement, l’appareil s’éteindra après 3 à 5 secondes!
(4) Pour éteindre l’appareil, maintenez le bouton MARCHE/ARRET enfoncé pendant
quelques secondes, jusqu’à ce que la LED rouge s'éteigne.
Enregistrer une vidéo
(1) Appuyez sur le bouton MARCHE/ARRET et l’appareil s’allume et commence à
CLIGNOTER ROUGE. L’enregistrement vidéo est maintenant en cours.
(2) Appuyez à nouveau sur le bouton MARCHE/ARRET pour arrêter l’enregistrement.
La LED ROUGE est maintenant ROUGE FIXE. Lorsque le voyant est ROUGE FIXE, il
vous est possible d’appuyer une fois sur le bouton pour prendre une photo ou de
maintenir le bouton enfoncé pendant 3 secondes et de le relâcher pour recommencer
l’enregistrement d’une vidéo.
(3) L’appareil sauvegarde automatiquement un fichier toutes les 10 minutes.
(4) Si aucune opération n’est effectuée durant 2 minutes en mode de veille, l’appareil
s’éteindra automatiquement.

Prendre des photos
Pour prendre des photos lorsque l’appareil est en mode veille, appuyez une fois sur le
bouton MARCHE/ARRET pour prendre une photo. La LED rouge clignote une fois
pour signaler que votre photo est prise et sauvegardée, puis la LED rouge redevient
rouge fixe.
Visualiser des fichiers sur un ordinateur
Pour visualiser vos fichiers sur un ordinateur, branchez simplement l’appareil à un
port USB d’un ordinateur avec le cordon USB.
Il se connectera comme dispositif amovible, et conformément aux paramètres
de votre PC, il peut automatiquement prévenir si un nouveau matériel a été
détecté. Dans ce cas, sélectionnez ‘Ouvrir Dossier’ pour visualiser les fichiers.
S’il n’est pas (!) automatiquement détecté, cliquez sur ‘Démarrer’ sur votre Bureau.
Sélectionnez ‘Mon ordinateur’ si vous utilisez Windows, ou ‘Ordinateur’ si vous utilisez
Windows Vista ou WIN7. L’appareil devrait s’afficher comme ‘Disque Amovible’ dans
la partie ‘Dispositifs de stockage amovibles’.
Utiliser l’appareil comme Webcam
Pour utiliser l’appareil comme Webcam, il vous faut d’abord retirer la carte MicroSD
de la fente de la carte MicroSD et brancher l’appareil dans le port USB de l’ordinateur.
Ensuite, regardez sous “Mon Ordinateur” a la “Caméra par défault” (Caméra
standard), ou recherchez les “Paramètres Vidéo” dans Skype. Si l’apparail a été
correctement connecté, l’écran de la webcam s’affichera sur votre ordinateur. Aucun
enregistrement audio n’est possible!
Régler l’heure et la date
(1) En mode veille, branchez l’appareil à un ordinateur avec le cordon USB fourni
jusqu’à ce que le disque apparaisse.
(2) Cliquez sur le disque dans le répertoire racine.
(3) Dans le répertoire racine, créez un fichier de document ‘time.txt’ (durée.txt),
saisissez la date du jour et l’heure sous le format:
année.mois.jour heure:minute:seconde
Exemple: 2013.03.14 05:50:01 ou
année mois jour heure:minute:seconde 2013 03 14 05:50:01)
(4) Pour supprimer l’heure de la vidéo et de la photo, saisissez une date et heure qui
sont invalides.
Exemple: aujourd’hui 2014.03.10 10:00:00 et puis saisir – par exemple – 2012.01.26
20:30:01), la date et heure seront retirées de la vidéo et de la photo de
l’enregistrement suivant.

Régler la résolution vidéo
(1) En mode veille, branchez l’appareil à l’ordinateur avec le cordon USB jusqu’à ce
que le disque s’affiche, cliquez sur le disque dans le répertoire racine.
(2) Dans le répertoire racine, créez un fichier de document ‘size.txt (taille.txt),
saisissez un chiffre ‘1’ pour obtenir la résolution vidéo de 1280 x 720P avec 50 ips,
saisissez un chiffre ‘0’ pour obtenir la résolution vidéo de 1920 x 1080P en 25 ips,
saisissez le chiffre ‘2’ pour obtenir la résolution vidéo de 1440 x 1080P avec 30 ips.
Le système sera de spécifications 1440 x 1080P 30 ips par défaut.
Visualiser une vidéo
Si vous projetez de visualiser vos fichiers sur votre ordinateur, l’utilisation du Lecteur
VLC est recommandée. La version la plus récente peut être téléchargée gratuitement
sur http://www.videolan.org.
Dépannage
Q: L’appareil semble s’être bloqué et ne répond pas lorsque les boutons sont
appuyés.
R: Cela se produit généralement si l’appareil reçoit trop de commandes dans un délai
trop bref. Pour réinitialiser, maintenez le bouton OFF (arret) pendant quelques
secondes jusqu’à ce qu’il l’apparail s’êteint.
Q: La LED rouge clignote rapidement pendant 10 secondes et s’éteint automatique-
ment. L’appareil est en mode stand-by.
R: Cela se produit lorsque la carte MicroSD est pleine, veuillez transférer vos
données importantes sur un autre dispositif de stockage et vider votre carte MicroSD
actuelle.
Q: La LED rouge s’allume pendant 10 secondes en continu et s’éteint automatique-
ment. L’appareil est en mode stand-by.
R: Il n’a pas été inséré une carte MicroSD. Si’il vous plaît insérer une carte MicroSD
(jusqu’à 32GB).
Q: La LED rouge clignote pendant 4 secondes et s’éteint automatiquement. L’appareil
est en mode stand-by. (Si la batterie est vide, l’appareil s’êteint automatiquement.)
R: L’état de la batterie de l’appareil est faible, veuillez recharger votre appareil avec le
cordon USB ou l'adaptateur d'alimentation.
Q: Lors de la lecture de ma vidéo, j’entends le son, mais je n’ai pas de vidéo.
R: Ceci se produit le plus souvent si le lecteur média de votre ordinateur a des
problèmes avec vos fichiers. Essayez d’utiliser le lecteur média VLC, qui peut être
téléchargé gratuitement sur http://www.videolan.org.

Caractéristiques techniques
Capteur Grand angle de 142° et 5 mégapixels CMOS
Résolution vidéo Full HD 1920x1080P avec 25fps, format AVI
Résolutions vidéo
facultatives
1440x1080P 30fps, formatAVI
720P 1280x720P 50fps, format AVI
Full HD 1920x1080P 25fps, formatAVI
Résolution photo 15M pixel 4480 x 3360, format JPEG
Audio L’enregistrement audio pur n’est pas possible, uniquement
avec des enregistrement vidéo
Carte mémoire MicroSD* jusqu’à 32GB (Classe 10 est recommandée)
[* n’est pas inclus de contenu de l'emballage]
Batterie Batterie batterie lithium-ion-polymère 400mAh intégrée et
rechargeable
Batterie durée de rechargement ~ 1,5 heures (rechargée par branchement USB)
Batterie durée d’enregistrement Enregistrement vidéo ~ 1 heure
Matériau de monture ABS + PC
USB MINI 8Pin (MINI 8 broches)
Adaptateur d’alimentation 5V DC 1A
Puissance consommée < 0,8 W
Système d’exploitation Windows 8.1, 8, 7, Vista, XP et compatible avec MAC
Logiciel de lecteur Windows Media Player, Real Player, Stormcodec
Poids / Dimensions 56g / (L) 16,5 x (I) 7,7 (monture pliante) x (H) 4,8cm
Conseils de sécurité et des batteries: Tenir éloigné les enfants des batteries. Si l'enfant avale une batterie, vous rendre
immédiatement auprès d'un docteur ou amener l'enfant à l'hôpital! Respecter la polarité (+) et (--) des batteries! Remplacer
toujours toutes les batteries. Ne jamais utiliser des batteries neuves et usées, ou des batteries de type différent ensemble. Ne
jamais mettre en court-circuit, ne pas ouvrir, déformer ou charger excessivement des batteries! Risque de blessure! Ne jamais
jeter les batteries dans le feu! IRisque d'explosion!
Conseils pour le respect de l'environnement: Matériaux packages sont des matières premières et peuvent être
recyclés. Ne pas jeter les appareils ou les batteries usagés avec les déchets domestiques. Nettoyage: Protéger le
dispositif de la saleté et de la pollution (nettoyer avec un chiffon propre). Ne pas utiliser des matériaux dures, à gros
grain/des solvants/des agents nettoyants agressifs. Essuyer soigneusement le dispositif nettoyé. Remarque
importante: Si vous notez une perte de l'électrolyte de la batterie, essuyez le boîtier de la batterie avec un chiffon
doux sec.
Distributeur: Technaxx Deutschland GmbH & Co.KG, Kruppstr. 105, 60388 Frankfurt a.M., Allemagne
Other manuals for TX-25
1
Table of contents
Languages:
Other Technaxx 3D Glasses manuals