Technaxx TX–43 User manual

Technaxx
®
Digital LP Converter TX–43
Digitize you old vinyl records directly to USB up to 32GB
User Manual
Declaration of Conformity is under: www.technaxx.de/ (in bottom bar “Konformitätserklärung”)
Before using the device the first time, read the user manual carefully.
Before usage
Choose the installation location of your unit carefully. Avoid placing it in direct
sunlight or close to a source of heat. Also avoid locations subject to vibrations and
excessive dust, heat, cold or moisture.
Do not install the unit in a inclined position, It is designed to be operated in a
horizontal position only.
If the unit is brought directly from a cold to a warm location, moisture may
condense inside the player, and cause damage it. When you first install the unit, or
when you move it from a cold to a warm location, wait for 30 minutes before operating
the unit.
Do not open the cabinet. This might cause a damage to circuitry or electrical shock.
When removing the power plug, never yank the cord. If you are not going to use
the player for long time, be sure do disconnect the player from the AC power source.
To prevent fire or shock hazard, disconnect your unit from the AC power source
when cleaning. Use caution when cleaning and wiping the plastic parts. Do not
attempt to clean the unit with the chemical solvents as this might damage the finish.
1. FEATURES
Directly recording of vinyl records on USB flash drive (up to 32GB)
No PC required
Plays MP3 music from USB flash drive
Record player with 2-speeds: 33 1/3 and 45 RPM
USB output to convert music directly to a computer
Stereo RCA outputs to enjoy vinyl records through your home stereo speakers
Functional and easy handling

2. STRUCTURE
3. INSTALLATION
CAUTION: To avoid stylus damage, make certain the included stylus guard is in place
whenever the turntable is being installed, moved or cleaned.
Remove the stylus guard gently from the needle and put back the security latch.
Transparent dust cover
1 45 single adapter
2 Tone arm and stylus
3 Speed switch
4 Tone arm rest &
security latch
5 Cartridge / stylus
6 The big platter
7 AUX-L out
8 AUX-R out
9 Power in & USB output
10 PREV key / VOL– key
11 NEXT key / VOL+ key
12 PLAY / PAUSE key
13 REC key
14 Source key
15 Power key
16 USB interface
16 LED light

4. PHONO OPERATION
(4.1.) Press the Function switch to PHONO position.
Then put a record on the Platter lightly.
In certain circumstances, 45 RPM adapter is needed.
(4.2.) Select the speed of record: 33 1/3 and 45
RPM according to record size.
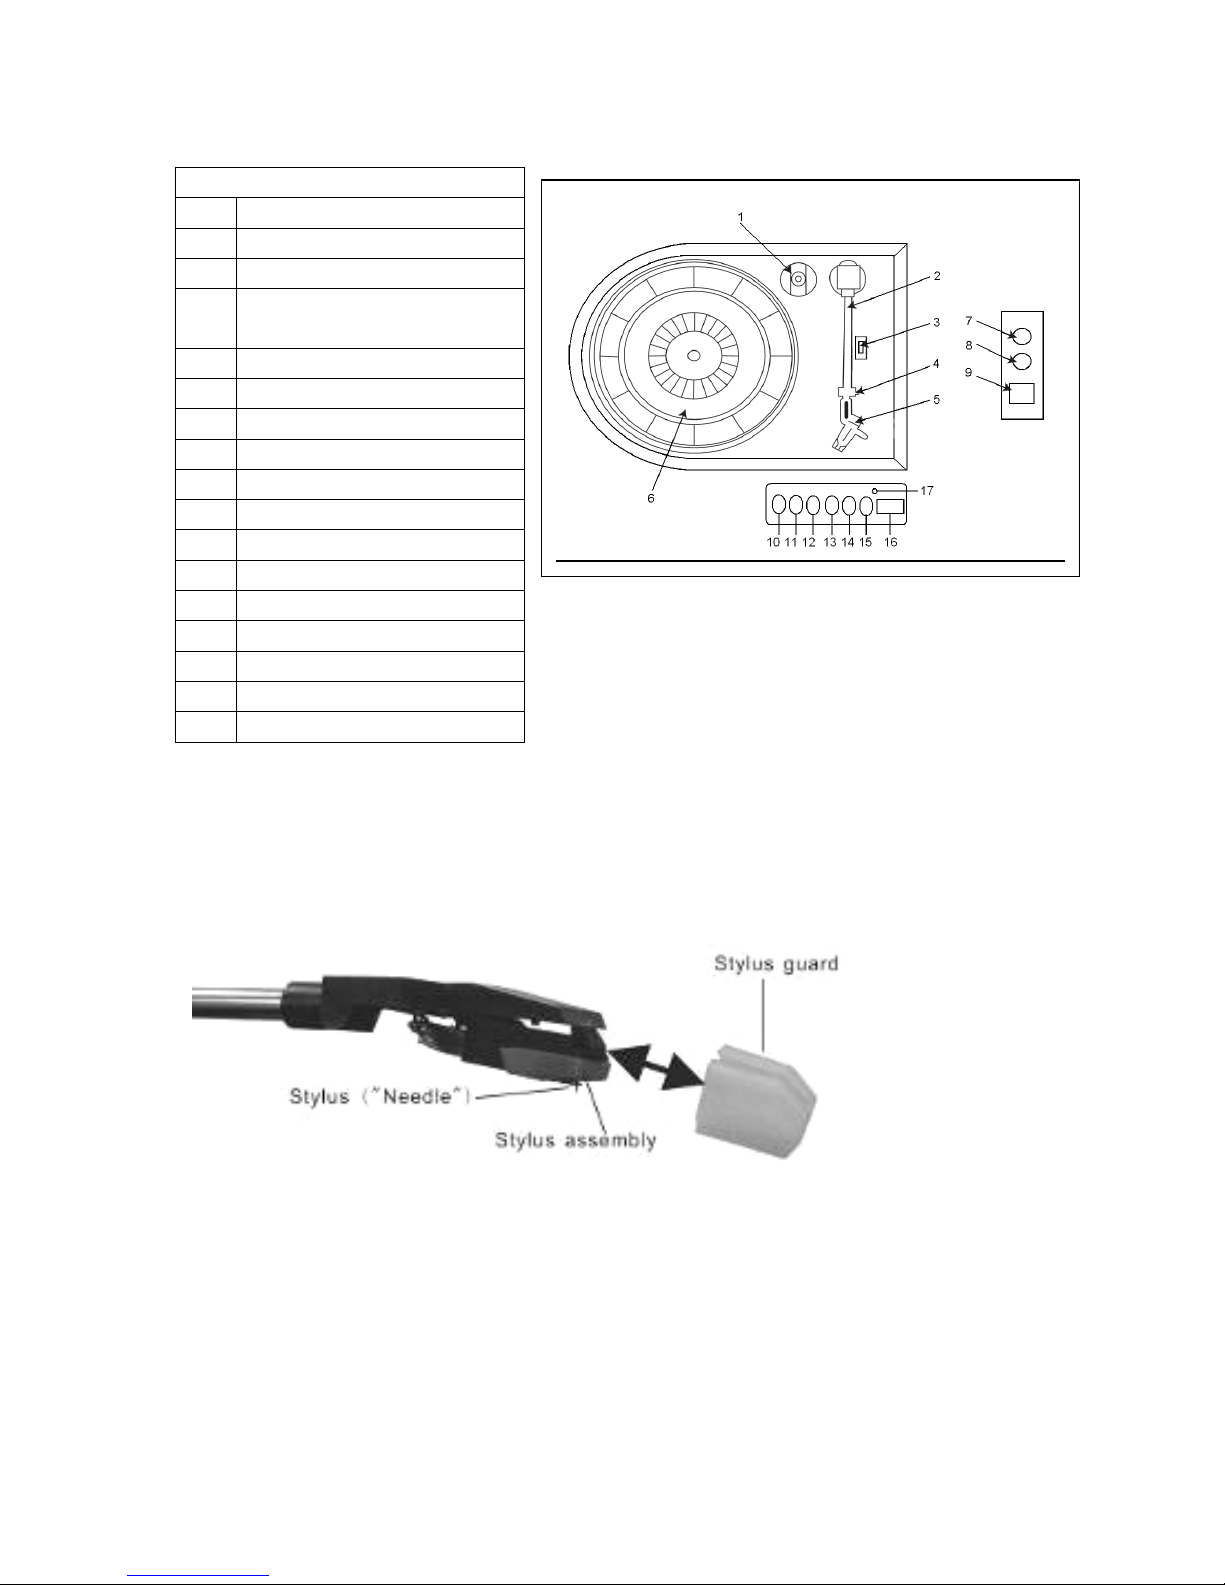
(4.3.) Remove the stylus guard and push the lift lever upward to raise the tone
arm from the arm park, and then move the cartridge holder over the record gently, now
the platter will run automatically (default set of Auto/Manual; Stop-Switch at ON
position ). Then put down the lever, the tone arm would drop and touch record surface
gently. Now users can enjoy their favorite songs.
(4.4.) Select the auto/manual stop control: The turntable will stop automatically
while the song on the record finished when the switch at ON position. The other side it
will always play when it is at OFF position, this may helps to play some long recorded
vinyl which can not be played to the end by normal way.
(4.5.) Adjust the volume with VOL– key (10) or VOL+ key (12). Press long the VOL–
key to decrease the volume. Press long the VOL+ key to increase the volume.
(4.6.) Push the arm lift lever up to raise the arm, now platter will still running but
play will pause. To continue the play, user just need to put down the lever.
(4.7.) Record Vinyl: Firstly insert memory device (USB flash disk). When turntable is
working, press the REC key (13) on front control board of the unit, now recording
works will begin. To stop recording, press again the REC key (13).
NOTE 1: When you insert a USB flash disk, the recorded file will be saved into
the latter inserting device.
NOTE 2: Recorded file in MP3 format with 128bit.

5. HOW TO PLAY VINYL RECORDS
(5.1.) Press and hold the power key (15) for about 3 seconds. The LED
light changes from red into green.
(5.2.) Place a vinyl record on platter and select a speed (33 or 45 RPM). If you select
45 speed, then use the included 45 RPM adapter.
(5.3.) Undo the tone arm clip. Use the Raise/Lower Lever to raise the tone arm, and
then move it over to the record. Lower the tone arm onto record. The record begins
playing.
(5.4.) Adjust the volume with VOL– key (10) or VOL+ key (12). Press long the VOL–
key to decrease the volume. Press long the VOL+ key to increase the volume.
(5.5.) When finished, raise the tone arm and return it to rest on the tone arm clip.
6. HOW TO RECORD ON A USB FLASH DRIVE
(6.1.) Connect a USB flash drive to the front USB port. The device plays songs from
the USB immediately.
(6.2.) By pressing the SOURCE key (14) you can shift from USB flash drive to LP
playing.
(6.3.) To start recording, press the REC key (13). The LED light will flash RED,
indicating that the device is recording.
(6.4.) To stop recording, press again the REC key (13). The recorded song recorded
will be played immediately.
7. PLAYING DIRECTLY FROM USB
(7.1.) Be sure power is on, insert USB flash disk with MP3 music files into USB port.
(7.2.) When the LED light (17) is flashing GREEN, the device plays songs from the
USB flash drive. If the LED light is RED, press and hold the Power key (15) for about 3
seconds. Then the LED light will change from RED to flashing GREEN.
(7.3.) The device supports for MP3 formats. During play status, press PLAY/PAUSE
key (12) once to halt playing, press it again to continue.

(7.4.) Press BACK/VOL– key (10) once to play the preview song, hold down
continuously to speed up selecting backward. Press FORWARD/VOL+ key (11) once
to play next one, hold down continuously to speed up selecting forward.
Adjust the volume with VOL– key (10) or VOL+ key (12). Press long the VOL– key to
decrease the volume. Press long the VOL+ key to increase the volume.
(7.5.) When playing from USB, press the SOURCE key (14) to stop the playback
from USB. The recorded files can only be deleted via PC/Notebook, or you delete the
recorded files by overwritting them when pressing REC key.
8. AUX–L OUT & AUX–R OUT
The device can be connected to two external stereo speakers by the two outputs,
AUX–LEFT (7) and AUX–RIGHT (8). When doing that, and the divice plays songs
from a vinyl LP or from a USB flash drive, you hear the songs over the connected
external speakers.
9. HOW TO REPLACE THE NEEDLE
(9.1.) Removing the needle from the cartridge: Place a screwdriver at the tip of the
needle heads hell and push downwards in the direction shown in sketch “A”. Remove
the needle head shell by pulling it forwards and pushing downwards.
(9.2.) Inserting the needle: Hold the tip of the needle head shell and insert it by
pressing in the direction illustrated by “B”. Push the needle head shell upwards in the
direction illustrated by “C” until the needle locks into the tip position.
Guide Pins (inside)

10. TIPS FOR BETTER PERFORMANCE
(10.1.) When opening or closing the turntable cover, handle it gently, moving it either
at the center or equally from both sides.
(10.2.) Do not touch the stylus tip with your fingers; avoid bumping the stylus on the
turntable mat or a record’s edge.
(10.3.) Clean the stylus tip frequently, using a soft brush with a back-to-front motion
only. If you use a stylus cleaning fluid, use it very sparingly. Wipe the dust cover and
turntable housing gently with a soft cloth. Use only a small amount of mild detergent
solution to clean the turntable and dust cover. Never apply harsh chemicals or
solvents to any part of the turntable system.
(10.4.) Prior to moving the turntable, always unplug it from the AC outlet and fasten
the tone arm on the tone arm rest with the vinyl twist-tie.
TECHNICAL SPECIFICATIONS
USB slot (USB interface)
Built-in 45 single adapter
Belt-drive and semi-automatic play tone arm
Cartridge with stylus
Removable transparent plastic dust cover
Weight / Dimensions: 1 KG / (L) 33,0 x (W) 25,5 x (H) 8,0 cm
Package Contents: Digital LP converter TX–43, USB cable, User Manual
Hints for Environment Protection: Packages materials are raw materials and
can be recycled. Do not disposal old devices into the domestic waste.
Cleaning: Protect the device from contamination and pollution (use a clean
drapery). Avoid using rough, coarse-grained materials/solvents/other
aggressive cleaner. Wipe the cleaned device.
Distributor: Technaxx Deutschland GmbH & Co.KG, Kruppstr. 105, 60388
Frankfurt a.M., Germany
Table of contents
Other Technaxx Turntable manuals

Technaxx
Technaxx TX-137 User manual

Technaxx
Technaxx TX-94 User manual

Technaxx
Technaxx TX-186 User manual

Technaxx
Technaxx TX-186 User manual

Technaxx
Technaxx Digital Converter for LP and Cassettewith built-in Stereo Radio... User manual

Technaxx
Technaxx TX-22+ User manual

Technaxx
Technaxx TX-188 User manual