Technika 15.4-311 User manual

Model No. 15.4-311
IDTV with DVD Player
User Guide
UK
Tesco-Tecknika IDTV with DVD Player UK .indd 1Tesco-Tecknika IDTV with DVD Player UK .indd 1 07/07/2009 16:40:4607/07/2009 16:40:46

Tesco-Tecknika IDTV with DVD Player UK .indd 2Tesco-Tecknika IDTV with DVD Player UK .indd 2 07/07/2009 16:41:3707/07/2009 16:41:37

User Guide
1
CONTENTS
Introduction ................................... 3
HDMI .............................................. 3
Safety is Important ................................. 3
In the box ....................................... 3
Safety Information ........................ 4
Keep these instructions .......................... 4
Electrical Information .................... 5
Mains Supply ......................................... 5
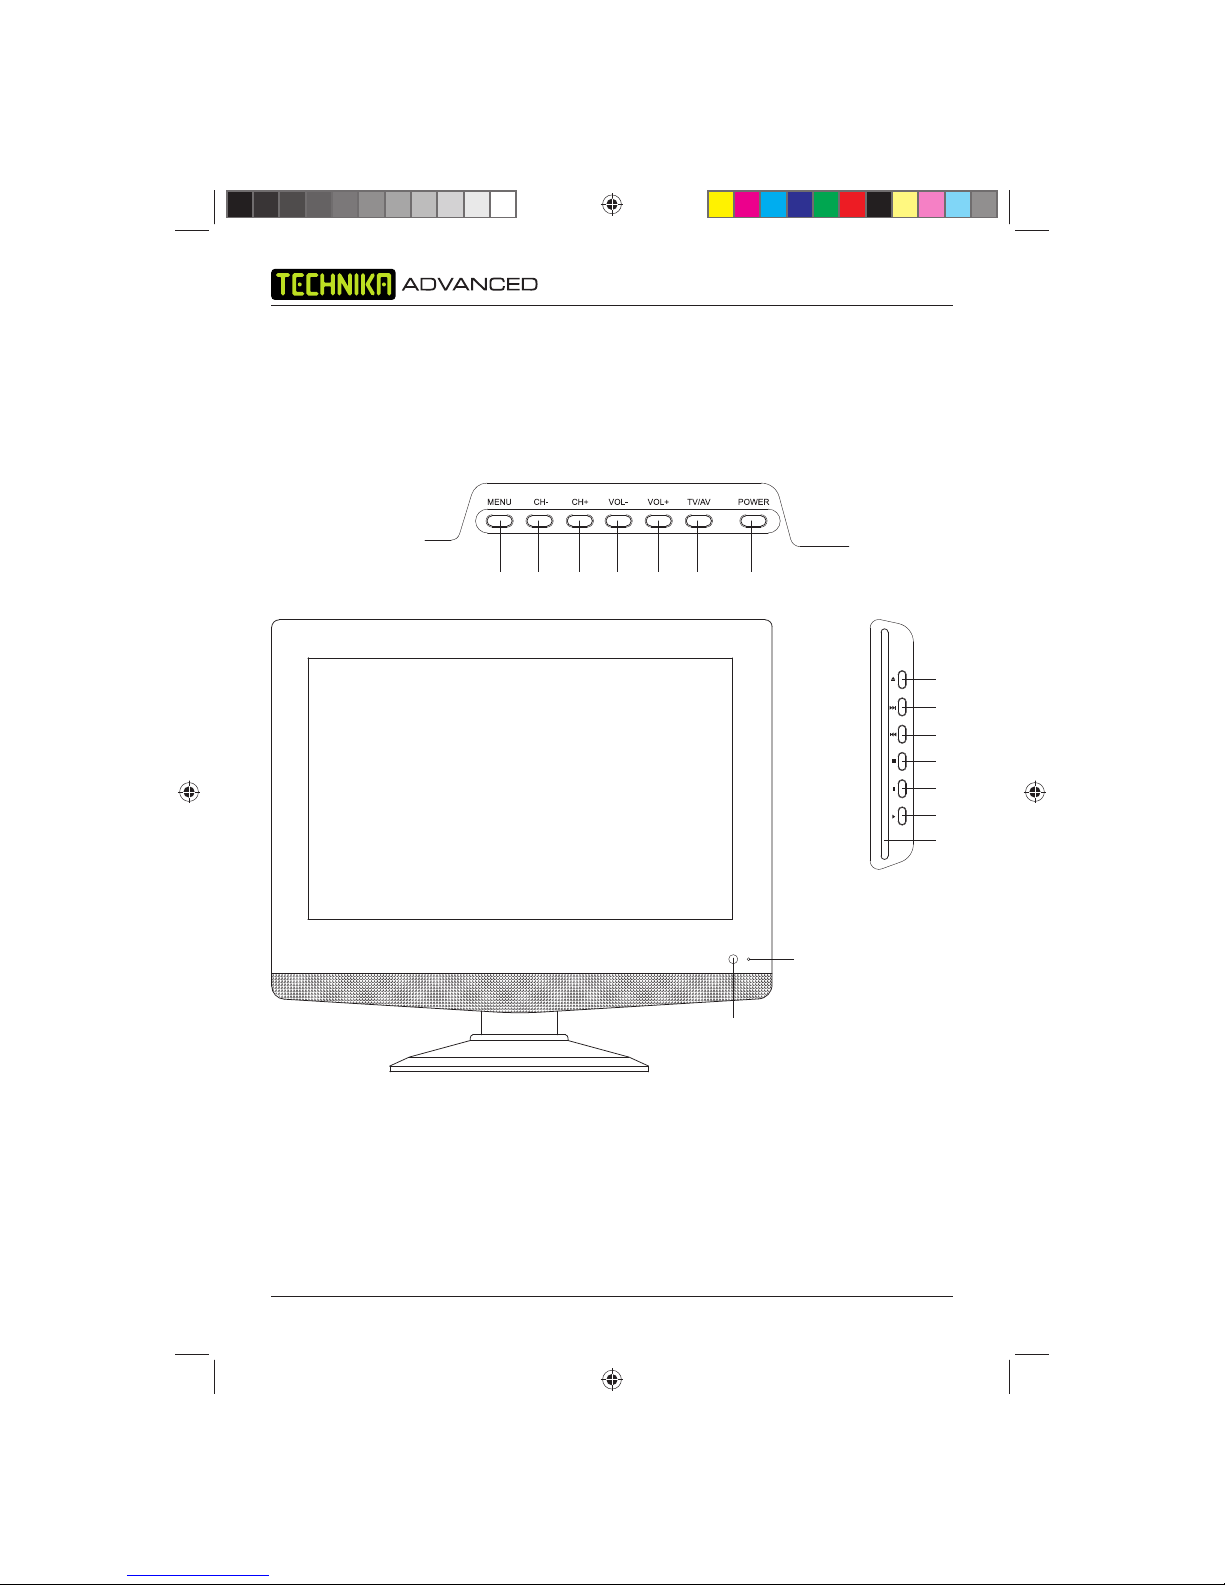
Parts Identification ........................ 6
Front View and Side View ...................... 6
Rear View and Side View ....................... 7
Remote Control - TV/Digital
TV Controls ............................................ 8
Remote Control - DVD Controls ............. 9
Remote Control ........................... 10
Installing Batteries in the
Remote Control ................................... 10
Using the Remote Control .................... 10
Fitting The Stand ......................... 11
Connecting the TV ....................... 12
Connecting the TV Antenna ................. 12
Connecting External Devices ................ 12
Wall Mounting ..................................... 13
Operating the TV ......................... 14
Basic Operating Instructions ................. 14
Menu Operations ................................. 16
Sound Menu Options ........................... 17
Tuning Menu Options .......................... 17
Common Interface Slot
(Only in Freeview Mode) ....................... 19
Timer Setting Menu ............................. 19
General Settings Menu ......................... 20
PC Menu Operation (VGA) ................... 22
PC Settings Menu ................................ 22
Using Teletext
(TV/Analogue Mode) ................... 23
To Enter Text/Mix Mode ........................ 23
To Select a Page of Text ........................ 23
Subtitles ............................................... 23
To Reveal Information ........................... 23
Fast Text ............................................... 23
Page Hold ............................................ 24
Text Enlargement ................................. 24
Operating the FREEVIEW TV ....... 25
Using the Freeview for the First Time .... 25
Menu Operations ................................. 25
Digital Text ........................................... 26
Operating the DVD Player .......... 27
Inserting a Disc .................................... 27
DVD ..................................................... 27
Audio CD ............................................. 27
Photo CD ............................................. 27
Compatible Discs ................................. 27
Region Code ........................................ 28
Playing DVDs ........................................ 28
Special DVD Functions .......................... 29
Tesco-Tecknika IDTV with DVD Player UK .indd Sec1:1Tesco-Tecknika IDTV with DVD Player UK .indd Sec1:1 07/07/2009 16:41:3707/07/2009 16:41:37

IDTV with DVD Player
2
Playing Audio CDs ....................... 32
Selecting tracks .................................... 32
Control during playback ....................... 32
Repeat ................................................. 32
Repeat A-B ........................................... 32
Programme .......................................... 32
Search .................................................. 32
Playing Photo CDs ....................... 33
Mixed Media CDs ........................ 33
DVD Menu Operation ................. 34
System Setup ....................................... 34
Audio Setup ......................................... 35
Digital Setup ........................................ 35
Using your Common Interface Slot
36
Common Interface ............................... 36
Troubleshooting Guide ............... 37
Care and Maintenance ................ 38
Handling Discs ..................................... 38
Disposal ............................................... 38
Warranty .............................................. 38
Specifications ............................... 39
Tesco-Tecknika IDTV with DVD Player UK .indd Sec1:2Tesco-Tecknika IDTV with DVD Player UK .indd Sec1:2 07/07/2009 16:41:3807/07/2009 16:41:38

User Guide
3
INTRODUCTION
Thank you for purchasing this Technika Advanced IDTV with DVD Player which has been designed
and manufactured to give you many years of trouble-free service.
You may already be familiar with using a similar product but please take time to read these
instructions which have been written to ensure you get the very best from your purchase.
Throughout the remainder of this user guide the Technika Advanced IDTV with DVD Player will be
referred to as the ‘TV’.
HDMI
HDMI (High Definition Multimedia Interface) is the next generation of digital interface. Unlike
conventional connections, it transmits uncompressed digital and audio signals using a single cable.
This TV supports high-definition video input via the HDMI socket on the back of the TV.
Safety is Important
To ensure your safety and the safety of others, please read the Safety precautions BEFORE you
operate this product.
Keep this information in a safe place for future reference.
IN THE BOX
You will find the following:
• TV
• User Guide
• Quick Start Guide
• Remote Control
• 2 x AAA Batteries
NOTE: If any of the items listed are damaged or missing, please contact the TESCO electrical help
line on 0845 456 6767.
Tesco-Tecknika IDTV with DVD Player UK .indd Sec1:3Tesco-Tecknika IDTV with DVD Player UK .indd Sec1:3 07/07/2009 16:41:3807/07/2009 16:41:38

IDTV with DVD Player
4
SAFETY INFORMATION
IMPORTANT SAFETY INSTRUCTIONS – READ CAREFULLY BEFORE USE
Take note of the following safety information which appears on the back of this TV.
CAUTION! TO PREVENT ELECTRICAL SHOCK, DO NOT REMOVE ANY COVER OR
SCREWS. NO USER SERVICEABLE PARTS INSIDE. REFER SERVICING TO QUALIFIED
SERVICE PERSONNEL.
This symbol indicates that there are important operating and maintenance instructions
in the literature accompanying this unit.
This symbol indicates that dangerous voltage constituting a risk of electric shock is
present within this unit.
Keep these instructions
• Do not use this TV near water.
• Clean only with a slightly damp cloth.
• Do not block any ventilation openings.
• Install in accordance with the supplied Quick Start Guide and this User Guide.
• Do not install or operate near any heat sources such as radiators, stoves, or other apparatus that
produce heat.
• Protect the power cord from being walked on or pinched, particularly at plugs, and the point
where it exits from the TV.
• Do not allow the power cord to overhang the edge of a table.
• Unplug this TV during lightning storms or when unused for long periods of time.
• To avoid interference, switch this TV off while operating other radio devices in the immediate
vicinity. Refer all servicing to qualified service personnel. Servicing is required when the TV has
been damaged in any way, such as the power cord or plug being damaged, liquid being spilled
on or objects have fallen onto the TV, the TV has been exposed to rain or moisture, does not
operate normally, or has been dropped.
WARNING! TO REDUCE THE RISK OF FIRE OR ELECTRICAL SHOCK, DO NOT EXPOSE
THIS TV TO RAIN OR MOISTURE. THE TV MUST NOT BE EXPOSED TO DRIPPING
AND SPLASHING AND NO OBJECTS FILLED WITH LIQUIDS SHOULD BE PLACED ON
THE TV.
• No naked flame sources such as candles should be placed on the TV.
Tesco-Tecknika IDTV with DVD Player UK .indd Sec1:4Tesco-Tecknika IDTV with DVD Player UK .indd Sec1:4 07/07/2009 16:41:3807/07/2009 16:41:38

User Guide
5
CAUTION! CHANGES OR MODIFICATIONS NOT EXPRESSLY APPROVED BY THE
MANUFACTURER COULD VOID THE USER’S AUTHORITY TO OPERATE THIS DEVICE.
CAUTION! USAGE OF CONTROLS OR ADJUSTMENTS OR PERFORMANCE OF
PROCEDURES OTHER THAN THOSE SPECIFIED HEREIN MAY RESULT IN HAZARDOUS
EXPOSURE.
Important
This TV generates, uses and can radiate radio frequency energy and, if not installed and used
in accordance with these instructions, may cause harmful interference to radio communication.
However, this is no guarantee that interference will not occur in a particular installation. If the TV
does cause harmful interference to electrical devices, which can be determined by turning the
TV off and on, the user is encouraged to try to correct the interference by one of the following
measures:
• Re-orient or relocate the receiving antenna.
• Increase the separation between the external device and the TV.
• Connect the external device into an outlet on a circuit different from that to which the TV is
connected.
• Consult the dealer or an experienced radio/ TV technician for help.
ELECTRICAL INFORMATION
Mains Supply
The mains operating voltage is detailed on the rating plate on the rear of the TV.
The mains lead on this equipment may be supplied with a moulded plug incorporating a fuse.
Should the fuse need to be replaced, an ASTA or BSI approved BS1362 fuse must be used of
the same rating. If the fuse cover is detachable never use the plug with the cover removed. If a
replacement fuse cover is required, ensure it is of the same colour as that visible on the pin face of
the plug. If there is no alternative to cutting off the mains plug, dispose of it immediately, having
first removed the fuse, to avoid a possible shock hazard by inadvertent connection to the mains
supply.
Tesco-Tecknika IDTV with DVD Player UK .indd Sec1:5Tesco-Tecknika IDTV with DVD Player UK .indd Sec1:5 07/07/2009 16:41:3907/07/2009 16:41:39

IDTV with DVD Player
6
PARTS IDENTIFICATION
1. MENU Accesses the TV menus
2. CH- Selects the next channel down
3. CH+ Selects the next channel up
4. VOL- Decrease the volume
5. VOL+ Increase the volume
6. TV/AV Accesses the Source menu
7. POWER Turns the TV on and into
standby
8. EJECT Disc Insert/Eject
9. I Next
10. I Previous
11. Stop
12. II Pause
13. Play
14. DVD Slot
15. Standby LED
16. Remote Control Sensor
Front View and Side View
Tesco-Tecknika IDTV with DVD Player UK .indd Sec1:6Tesco-Tecknika IDTV with DVD Player UK .indd Sec1:6 07/07/2009 16:41:3907/07/2009 16:41:39

User Guide
7
17. HDMI Socket High Definition lead connection
18. VGA Socket PC Monitor connection
19. SCART Socket SCART lead connection
20. S-Video In Socket S-Video lead connection
21. Component In Sockets Component Video input connections
22. Common Interface Allows you to insert a Conditional Access Module (CAM)
(CI) Slot and Card (sold separately by the broadcaster e.g. Setanta Sports).
23. Digital Audio Out Socket Digital audio connection
24. Audio Input Socket (PC) Audio input connection when using the TV as a monitor
25. Audio Input Socket Audio input connection when using S-video or component
(S-Video and Component) video inputs
26. Antenna In Aerial connection
27. On / Off Switch Turns the TV on or off
28. Mains Socket Mains AC connection
Rear View and Side View
Tesco-Tecknika IDTV with DVD Player UK .indd Sec1:7Tesco-Tecknika IDTV with DVD Player UK .indd Sec1:7 07/07/2009 16:41:4107/07/2009 16:41:41

IDTV with DVD Player
8
1. STANDBY Switches the TV to Standby
or On
2. DISPLAY Programme Information
3. Numeric Buttons
4. -/-- Digital Selector
5. Swaps between current and
previous channel
6. LANG Selects Audio Languages
7. EPG Electronic Programme Guide
8. Vol + Volume Up
9. CH + Channel Up
10. Vol - Volume Down
11. CH - Channel Down
12. Navigates Up
13. OK Selects Channel List
14. Navigates Left
15. Navigates Right
16. Navigates Down
17. LCD MENU Selects Main Menu
18. PICTURE Alters the Aspect Ratio
FORMAT
19. PMODE Picture Mode
20. SMODE Sound Mode
21. SOURCE Input Source Selector
22. MUTE Mutes the Sound
23. EXIT Exits Menu Options
24. SLEEP Selects Sleep Timer
25. No Function in this Mode
26. NICAM Selects the Audio Menu
AUDIO
27. FAV Selects Favourite List
28. FAV - Favourite Channel Down
29. TEXT Digital Text / Teletext
30. FAV + Favourite Channel Up
31. SIZE Teletext Size
32. REVEAL Teletext Reveal Answer
33. INDEX Teletext Index
34. SUBPAGE / Selects Individual Sub-Menus
SUBTITLE within the Main Page /
Selects Subtitles
35. Green Digital Text / Teletext Shortcut
36. Yellow Digital Text / Teletext Shortcut
37. Red Digital Text / Teletext Shortcut
38. Blue Digital Text / Teletext Shortcut
Remote Control - TV/Digital TV Controls
When using the remote control, aim it towards the
remote control sensor on the TV. The function of
some buttons will vary depending on the source
being used (e.g. TV or DTV).
Tesco-Tecknika IDTV with DVD Player UK .indd Sec1:8Tesco-Tecknika IDTV with DVD Player UK .indd Sec1:8 07/07/2009 16:41:4207/07/2009 16:41:42

User Guide
9
1. STANDBY Switches the TV to Standby
or On
2. EJECT Ejects / Inserts the disc
3. Numeric Buttons
4. 10 + Select two digit titles
and chapters
5. Selects the Root Menu
6. TITLE Selects the Title Menu
7. D.DISPLAY Display Current Position on
Disc/Chapter/Title
8. Vol + Volume Up
9. No Function in this Mode
10. Vol - Volume Down
11. No Function in this Mode
12. Navigates Up
13. OK Selects Menu Options
14. Navigates Right
15. Navigates Left
16. Navigates Down
17. LCD MENU Selects Main Menu
18. DVD Setup Selects the DVD Menu Options
19. PMODE Picture Mode
20. SMODE Sound Mode
21. SOURCE Input Source Selector
22. MUTE Mutes the Sound
23. STOP Stops Playback
24. SLEEP Selects Sleep Timer
25. PLAY / Plays and Pauses the DVD
PAUSE
26. NICAM Selects the Audio Menu
AUDIO
27. Fast Forwards
28. GOTO Select a Specific Point on the Disc
29. Fast Backwards
30. ANGLE Selects Alternative Viewing Angles
31.
I
Skip Forwards
32. ZOOM Zoom In and Out
33. I
Skip Backwards
34. SUBTITLE Selects Subtitles
35. MENU Selects the Root Menu
36. REPEAT Repeats Chapter / Title / Disc
37. PROGRAM Program Chapter / Title Playback
38. AB Repeat a Chosen Section
Remote Control - DVD Controls
When using the remote control, aim it towards
the remote control sensor on the TV.
Tesco-Tecknika IDTV with DVD Player UK .indd Sec1:9Tesco-Tecknika IDTV with DVD Player UK .indd Sec1:9 07/07/2009 16:41:4407/07/2009 16:41:44

IDTV with DVD Player
10
REMOTE CONTROL
Installing Batteries in the Remote Control
1. Remove the battery compartment cover at the rear of the remote
control by depressing the retaining clip.
2. Install the supplied AAA batteries as shown, ensuring the polarity
matches that shown in the battery compartment.
3. Replace the battery compartment cover.
Using the Remote Control
To use the remote control point it at the TV and press the required
buttons. You must be within 6 metres and at an angle of less than 30
degrees from the centre of the TV.
NOTE: Sunshine or other strong light sources may interfere with the
signal from the remote control. In this situation turn the TV set
away from the light source.
WARNING! DO NOT LEAVE BATTERIES IN THE REMOTE CONTROL FOR EXTENDED
PERIODS AS THEY CAN LEAK OR CORRODE CAUSING DAMAGE TO THE REMOTE
CONTROL. CHECK THEM PERIODICALLY AND REPLACE THEM AS REQUIRED.
WARNING! DO NOT MIX BATTERY TYPES. WHEN INSERTING BATTERIES, REPLACE
ALL BATTERIES AT THE SAME TIME. DO NOT MIX OLD AND NEW BATTERIES.
WARNING! EXHAUSTED BATTERIES MUST BE TREATED WITH CARE AND DISPOSED
OF ACCORDING TO ANY SAFETY OR RECYCLING REGULATIONS IN FORCE IN YOUR
LOCAL AREA. NEVER DISPOSE OF BATTERIES INTO GENERAL WASTE, OR FIRE.
Tesco-Tecknika IDTV with DVD Player UK .indd Sec1:10Tesco-Tecknika IDTV with DVD Player UK .indd Sec1:10 07/07/2009 16:41:4507/07/2009 16:41:45

User Guide
11
FITTING THE STAND
Before using the TV for the first time, you
should fit the stand to the TV.
NOTE: You do not have to fit the stand if you
are mounting the TV on a wall. See
Wall Mounting on page 13.
1. Place the TV face down on the edge of a
flat surface, for example a table, taking care
not to damage the TV screen.
2. Fit the stand to the stand column (part
of the TV), ensuring the locating hole is
correctly aligned as shown on the right.
3. Rotate the stand anti-clockwise to lock in
position.
4. Fit the two fixing screws (supplied) into the
two holes at the base of the stand.
NOTE: Do not overtighten the fixing screws
as this may damage the stand.
Tesco-Tecknika IDTV with DVD Player UK .indd Sec1:11Tesco-Tecknika IDTV with DVD Player UK .indd Sec1:11 07/07/2009 16:41:4507/07/2009 16:41:45

IDTV with DVD Player
12
CONNECTING THE TV
WARNING! ENSURE THE TV AND ALL ANCILLARY EQUIPMENT IS UNPLUGGED
FROM THE MAINS BEFORE MAKING ANY CONNECTIONS!
Connecting the TV Antenna
Connect the TV antenna to the aerial socket with a 75 ohm
co-axial plug. For best results use a high gain TV aerial,
preferably roof or loft mounted.
• To improve picture quality in a poor signal area, purchase
and install a signal amplifier.
• If the antenna needs to be split for two TVs, use a 2-Way
Signal Splitter (not supplied).
Connecting External Devices
The Quick Start Guide shows the simplest and most effective
way of connecting your TV to ancillary equipment. Alternate
methods are listed below.
NOTE: The TV will connect through the HDMI cable by default. Only use the HDMI cable and one
other option. Connecting more than one option may cause interference.
HDMI lead
You can connect this TV to a compatible device using a HDMI lead. This method will give the best
picture.
Connect the cable from the HDMI equipment to the TV HDMI socket.
SCART lead
You can connect this TV to a compatible device using a SCART lead. The connection uses
component video signals, i.e. the red, green and blue (RGB) content of the video are sent on
separate signals.
VGA cable
You can use your TV as a monitor for your personal computer by using a VGA cable. Sound from
your personal computer may also be played through the TV.
This requires the audio output of the personal computer to be connected to the Audio Input socket
(PC) of the TV.
S-Video lead
You can connect this TV to a compatible device using an S-VIDEO lead.
Tesco-Tecknika IDTV with DVD Player UK .indd Sec1:12Tesco-Tecknika IDTV with DVD Player UK .indd Sec1:12 07/07/2009 16:41:4607/07/2009 16:41:46

User Guide
13
Component Input (YPbPr cables)
You can connect this TV to a compatible device using YPbPr cables. Connect the red, green and
blue outputs to the matching coloured inputs on the compatible device. An additional audio input
is required.
Wall Mounting
1. The base must first be removed. Place the TV face down.
2. Remove the two screws holding the base in position.
3. Remove and store the base and screws.
4. Use four machine screws to mount the TV on the bracket.
This unit is VESA-compliant and designed to be wall-mounted with a VESA-compliant
100mmx100mm mounting kit. Mount this unit according to the instruction of the wall bracket (not
supplied).
Tesco-Tecknika IDTV with DVD Player UK .indd Sec1:13Tesco-Tecknika IDTV with DVD Player UK .indd Sec1:13 07/07/2009 16:41:4607/07/2009 16:41:46

IDTV with DVD Player
14
OPERATING THE TV
NOTE: Throughout this User Guide the buttons referred to will be on the remote control unless
otherwise stated.
Basic Operating Instructions
Switching on for the first time
When the POWER (STANDBY) button on the remote
control is pressed to turn the TV on, the indicator light
on the front of the TV changes from red to green. When
the TV is turned off using the POWER (STANDBY)
button, the TV goes into standby mode and the indicator
light changes to red. The display to the right will appear
on the screen when the TV is turned on for the first time.
1. Press thebuttons to select your country and
language.
2. Press the OK button.
3. The TV will automatically start Auto Tuning the Analogue and then the Digital channels.
NOTE: The TV will take up to 5 minutes to complete this process.
4. All channels will be stored after the Auto search process.
Source Selection
1. Press the SOURCE button to display the source menu.
2. Press the buttons to scroll between inputs and press the OK button.
3. If no source is manually selected, the TV will automatically come out of the source Menu after
10 seconds.
The following sources are available:
• TV/ANALOGUE
• FREEVIEW
• HDMI
• SCART
• COMPONENT
• S-VIDEO
• VGA/PC
• DVD
NOTE: To exit the display at anytime press the SOURCE button.
Tesco-Tecknika IDTV with DVD Player UK .indd Sec1:14Tesco-Tecknika IDTV with DVD Player UK .indd Sec1:14 07/07/2009 16:41:4707/07/2009 16:41:47

User Guide
15
Volume
1. Press the Vol +/Vol - buttons to increase/decrease the volume. The volume level will be displayed
at the bottom of the screen.
Mute
1. Press the MUTE button to mute the sound. The Mute symbol will be displayed at the bottom left
hand side of the screen.
2. Press the MUTE button again or the Vol +/Vol - buttons to restore the sound. The Mute symbol
will disappear.
Mono/Stereo (TV Analogue mode only)
Press the NICAM button to switch between mono ( ) and stereo ( ) sound.
Select the TV channel
1. Press the Numeric button(s) to select the channel you require.
NOTE: In TV Analogue mode, use the -/-- button to select channel numbers above nine. Press the
-/-- button twice to enter two digit channel numbers and three times to enter three digit
numbers.
2. Press the CH +/- buttons to scroll up or down through the channels.
Picture Mode
Press the PMODE button on the remote control for the display options. Choose from the following
settings displayed at the bottom left hand side of the screen:
• STANDARD
• PERSONAL
• MOVIE
• SPORT
• MILD
• GAME
Picture Format
Press the PICTURE FORMAT button to choose from one of the following aspect ratios. The aspect
ratio setting is displayed at the bottom left hand side of the screen:
• Fullscreen
• Zoom (Analogue only)
• Stretch
• Auto
• 4:3 (Analogue only)
• 14:9 (Analogue only)
• 16:9 (Analogue only)
• Subtitle (Analogue only)
Tesco-Tecknika IDTV with DVD Player UK .indd Sec1:15Tesco-Tecknika IDTV with DVD Player UK .indd Sec1:15 07/07/2009 16:41:4807/07/2009 16:41:48

IDTV with DVD Player
16
Sound Format
Press the SMODE button on the remote control for the sound options. Choose from the following
settings displayed at the bottom left hand side of the screen:
• Personal
• Voice
• Music
• Theatre
Menu Operations
The on screen menus allow you to adjust and control the TV.
1. To access the on-screen menus, press the LCD MENU button.
2. Press thebuttons to access the different menus and available options.
3. Press the LCD MENU button to exit the menu.
Note: Some options are only available on specific sources.
Picture Settings Menu
This menu gives the options for adjusting the appearance of the TV picture. The following options
are available.
PICTURE MODE - Allows you to select preset levels of contrast, brightness and colour. Choose
from the following settings:
• STANDARD
• PERSONAL
• MOVIE
• SPORT
• MILD
• GAME
CONTRAST – Allows you to increase or decrease the
contrast of the picture.
BRIGHTNESS – Allows you to increase or decrease the brightness of the picture.
COLOUR – Allows you to increase or decrease the intensity of the picture colour.
TINT - Allows you to increase or decrease the level of tint of the picture (Only NTSC signal)
SHARPNESS – Allows you to increase or decrease the sharpness of the picture.
COLOUR TEMPERATURE (Only in VGA mode) - Allows you to select a warmer or cooler picture.
DNR (Noise Reduce) - Allows you to adjust the sound quality. Choose from the following settings:
• OFF
• LOW
Tesco-Tecknika IDTV with DVD Player UK .indd Sec1:16Tesco-Tecknika IDTV with DVD Player UK .indd Sec1:16 07/07/2009 16:41:4907/07/2009 16:41:49

User Guide
17
• MID
• HIGH
Sound Menu Options
This menu gives options for adjusting the TV sound. The following options are available:
VOLUME – Allows you to adjust the volume level.
SOUND MODE – Allows you to select preset levels of
bass and treble. Choose from the following settings:
• PERSONAL
• VOICE
• MUSIC
• THEATRE
BASS – Allows you to adjust the bass level.
TREBLE – Allows you to adjust the treble level.
BALANCE – Allows you to adjust the audio output between the left speaker and the right speaker.
AVL – Allows you to turn the Auto Volume Level (AVL) function on or off. Turn the AVL function on
to reduce the difference in volume between TV programmes and advertisments.
Tuning Menu Options
This menu gives options for adjusting the TV tuning.
NOTE: The following options are ONLY available with the ‘TV/Analogue‘ or ’Freeview’ source
selected.
Country (TV/Analogue Mode) – Allows you to select
your country.
Auto Tuning – Allows you to auto search and save
channels.
Manual Tuning – Gives options for adjusting the TV
tuning.
Program Edit – Allows you to reorder, lock and delete
channels.
Common Interface (Freeview Mode) – Allows you to
configure the Conditional Access Module (CAM) and Smart Card.
Tesco-Tecknika IDTV with DVD Player UK .indd Sec1:17Tesco-Tecknika IDTV with DVD Player UK .indd Sec1:17 07/07/2009 16:41:4907/07/2009 16:41:49

IDTV with DVD Player
18
Manual Tuning (TV/Analogue Mode)
This menu gives options for manually adjusting the TV tuning.
Program – Allows you to change the TV channel.
Sound System – Allows you to select the TV sound
system. Choose between:
• I
• DK
• L/L’
• B/G
Colour System – Allows you to select the TV colour
system from the following settings;
• PAL
• SECAM
• AUTO
Programme Label – Allows you to:
• Name or edit a channel name.
• To name or edit a channel name: Press thebuttons to input the characters.
AFT – If AFT is set to ON, the TV will automatically track slight changes in the frequency of the
signal. It is recommended that this is left set to ON.
Manual Search – Allows you to manually search for channels by changing the frequency.
Manual Tuning (Freeview Mode)
This menu allows you to manually search for channels. The following options are available.
Channel – Allows you to select the channel you want to
manually tune.
Start Search – Allows you to begin searching.
NOTE: All the other options provide information on
the signal quality and strength along with the
frequency.
Tesco-Tecknika IDTV with DVD Player UK .indd Sec1:18Tesco-Tecknika IDTV with DVD Player UK .indd Sec1:18 07/07/2009 16:41:5007/07/2009 16:41:50
Table of contents
Other Technika TV DVD Combo manuals

Technika
Technika LCD19-208E User manual

Technika
Technika LCD 22-220 User manual

Technika
Technika LED 22TE User manual

Technika
Technika 32-601 User manual

Technika
Technika LCD23-231-BL User manual

Technika
Technika LCD26-310 User manual

Technika
Technika LCD 19-240 User manual

Technika
Technika 32-612 User manual

Technika
Technika LCD22-228W User manual

Technika
Technika DVDID-501 User manual