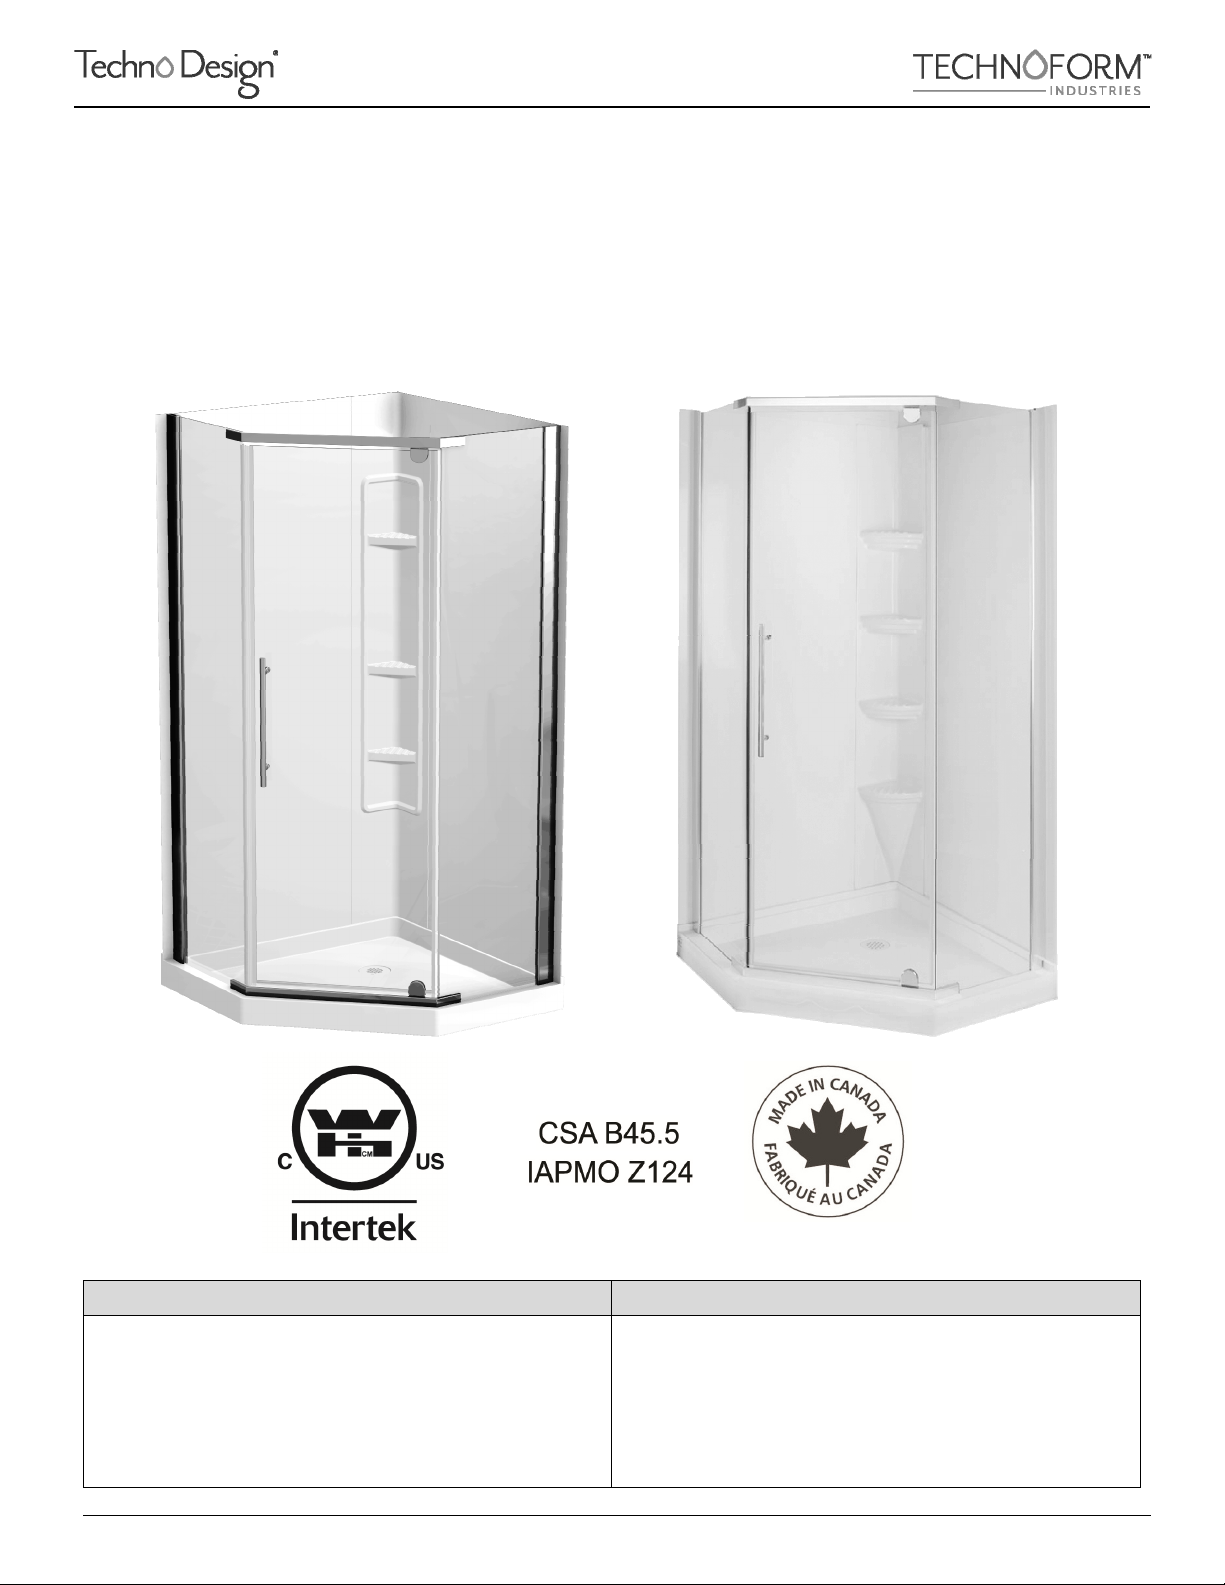
Technoform NEO-ANGLE User manual

par
by
450.699.2424–1877.377.4494450.699.8484[email protected]www.technoform.ca TSSK38202003‐08
MANUELD’INSTALLATIONPOURDOUCHES
38"NEO‐ANGLE
SHOWERSINSTALLATIONMANUAL
CONTENUCONTENT
Basededouchex1
Drainx1
Portededouchex1
Panneaudecôtéx2
Étagèreencoinx1
Showerbasex1
Drainx1
Showerdoorx1
Sidepanelx2
Cornercaddyx1

par
by
450.699.2424–1877.377.4494450.699.8484[email protected]www.technoform.ca TSSK38202003‐08
OUTILS&MATÉRIAUXREQUISREQUIREDTOOLS&MATERIALS
Rubanàmesurer
Niveau
Équerre
Crayon
Scieemporte‐pièce
Couteauutilitaire
Rubanmasque2''
Tournevis
Perceuse
Mècheàfraiser(1/8)
Visno.8x11/4"x6
Pistoletàcalfeutrage
Truelleàcannelures1/4''pourétalerl’adhésif
Tubede304mldescellantlatex/acryliquepour
salledebain*x1
Tubesde310mld’adhésifrecommandépourles
contoursdebainetdedouche*x5
*Informez‐vousauprèsdevotredétaillant.
Measuringtape
Level
Square
Pencil
Holesaw
Utilityknife
2''Maskingtape
Screwdriver
Drill
Countersinkbit(1/8)
No.8x11/4"screwsx6
Caulkinggun
1/4"v‐notchedtrowelforspreadingadhesive
304mlcartridgeoflatex/acryliccaulkfor
bathrooms*x1
310mlcartridgesofadhesiverecommendedfor
showerandtub‐surrounds*x5
*Pleaseseewithyourretailer.
IMPORTANT–MURDEDOUCHE|IMPORTANT–SHOWERWALL
Utilisezuniquementunadhésifrecommandépourlepolystyrènede45millièmesd'épaisseur(maximum)
qui peut s'appliquer à l'aide d'unetruelle.Nousvousrecommandons d'utiliser un adhésif de couleur
blancheouclairepuisquel'adhésifdecouleurbrunâtreserapossiblementvisibleàtraverslespanneaux.
Veuillez suivre les instructions du fabricant de l'adhésif pour les mises en garde et le mode d'emploi.
Technoform ne se tiendra aucunement responsable si le consommateur avisé pose le produit à l'aide
d'unadhésif1)quin'estpasrecommandépourlepolystyrène45millièmesd'épaisseurmaximum(etqui
pourraitdoncpotentiellementcontenirtropdesolvant,endommageantainsileproduit);2)quinepeut
êtreappliquéàl'aided'unetruelle,résultantainsienl'insatisfactionduconsommateurquantauproduit
fini(l'applicationdel'adhésifenformedeSsansêtreétaléuniformémentàlatruelleestdéconseillépar
Technoform puisque les cordons de colle seront assurément visibles à travers les panneaux de
polystyrèneunefoisleproduitinstallé).
Onlyuseadhesiverecommendedfor45milthickness(maximum)polystyreneandwhichcanbeapplied
withthehelpofatrowel.Wealsorecommendthatyouuseawhite or clear adhesive since brownish
adhesive may show through the panels. Follow the manufacturer of the adhesive's instructions and
warnings.Technoformwillnotbeheldresponsibleiftheinformedconsumerinstallstheproductwithan
adhesive which 1) is not recommended on polystyrene of 45 mil maximum thickness (and which could
potentiallycontaintoomanysolvents,thusdamagingtheproduct);2)cannotbeappliedwiththehelpof
atrowel,thusresultinginconsumerdissatisfactionwithrespecttothe finalproduct(theapplicationof
theadhesiveinS‐shapewithoutbeingspreadevenlywithatrowelisnotrecommendedbyTechnoform
sincethebeadsofadhesivewillsurelybevisiblethroughoutthepolystyrenepanelsoncetheproductis
installed).

par
by
450.699.2424–1877.377.4494450.699.8484[email protected]www.technoform.ca TSSK38202003‐08
AVANTDECOMMENCER|PRIORTOSTARTING
Ce manuel traite de l’installation et de l’entretien de votre nouvelle douche Techno Design® par
Industries Technoform Ltée. Veuillez en lire le contenu avant d’entamer l’installation. Par la suite,
assurez‐vousdeleconserverdansunlieusûrpourréférencefuture.
Retirezleproduitdesonemballage,vérifiezquetouteslescomposantes s’y trouvent, enlevez la
pelliculedeplastiquesurchacunedescomposantess’ilyalieuetassurez‐vousqueleproduitsoiten
bon état. Si l’inspection révèle que le produit est endommagé ou qu’il y a un défaut de fabrication,
veuillezcommuniqueravecledistributeur.Lagarantienecouvrepaslesdommagesoulesdéfautsde
finition unefois le produitinstallé. Laresponsabilité quant auxdommages survenuslors dutransport
cesselorsqueleproduitesttransféréautransporteur.Touteplainteliéeàundommagedûautransport
doitêtredirectementsoulevéeauprèsdutransporteur.
Vérifiez tous les codes de plomberie locaux et veillez à arrêter l’eau à la source et retirer la veille
plomberie,lecaséchéant.
Ceproduitpermetuncertainajustement;toutefois,silesparoisetlasurfacedesolnesontpassolides,
d’aplombetd’équerre,l’installationpourraitensouffrir.
Nepasinstallerleproduitdansdesendroitsoùlatempératurerisquededescendreendessousde0ºC
(32ºF).
Utilisezlecartond’emballagepourprotégerleproduitlorsdel’installation.
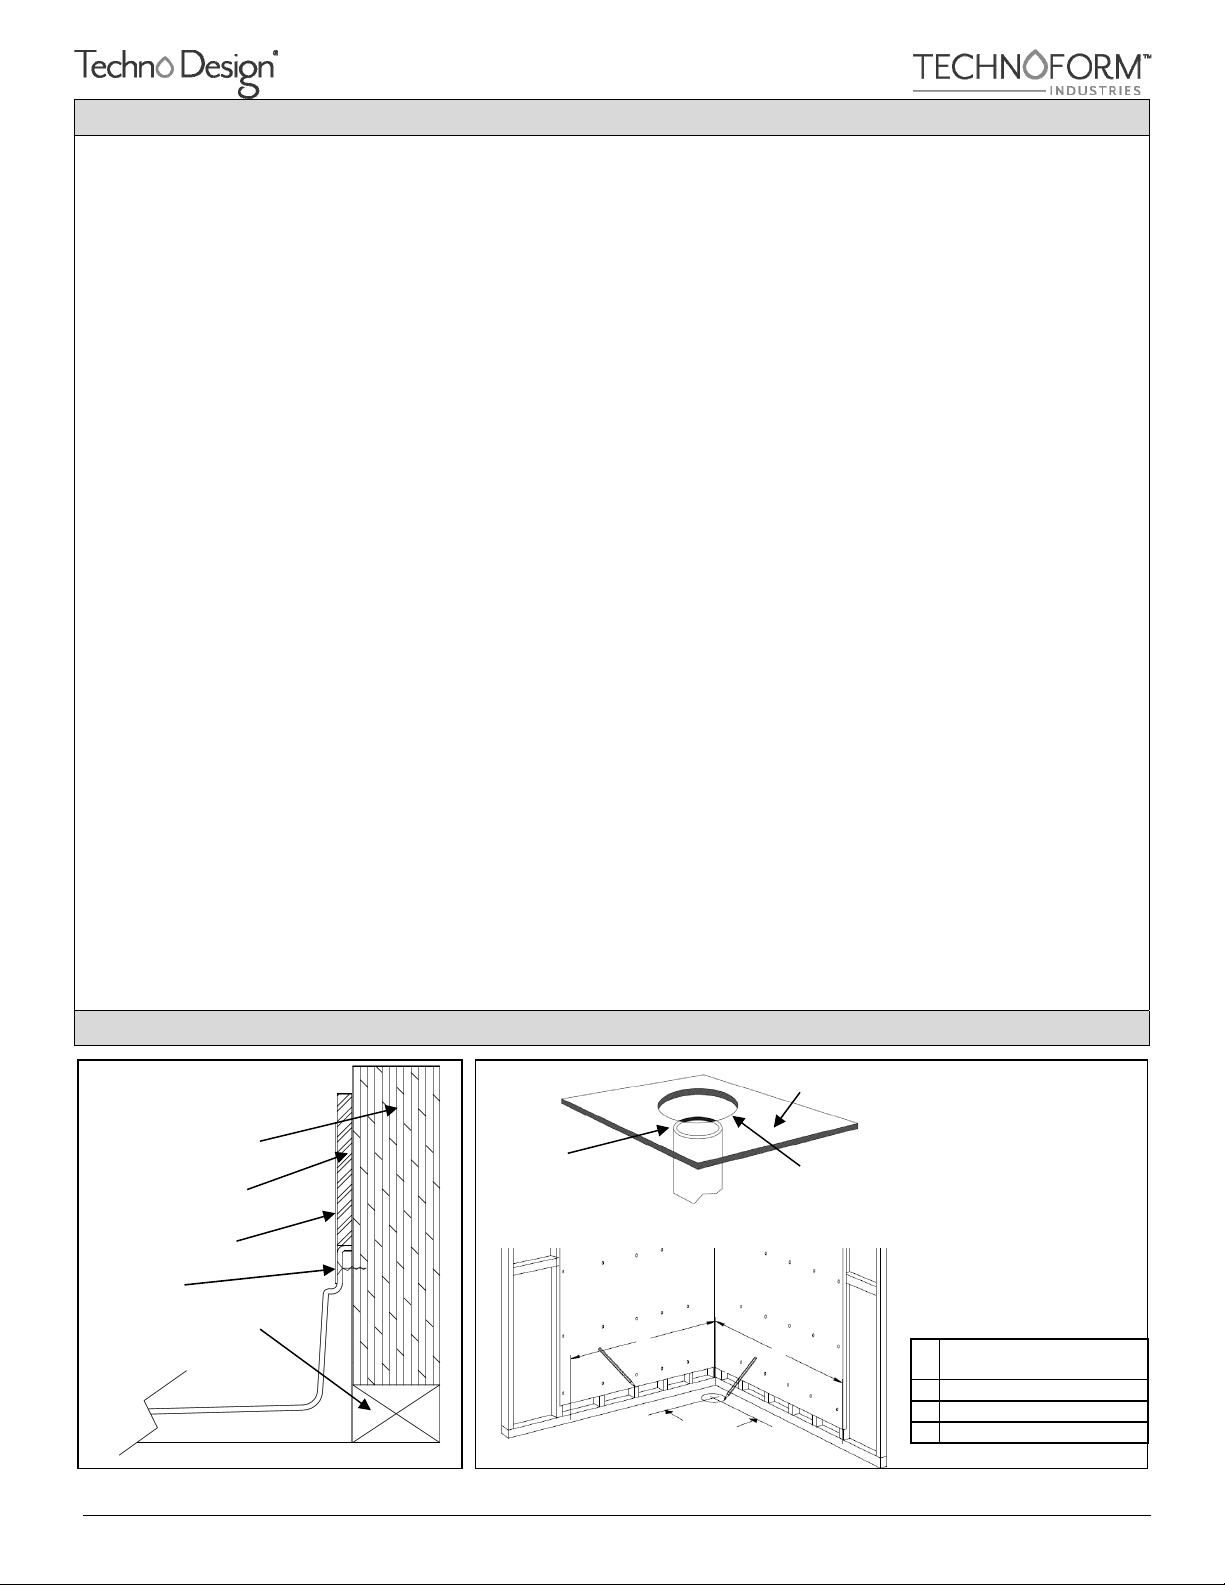
Basededouche:Danslecasd’unenouvelleconstruction,préparerl’alcôveenutilisantlesdimensions
danslafigure2.L’alcôvedevraitêtreencadréeavecduboisde construction 2" X 3"et couverte de
placoplâtre de 1/2". Elle doit être construite d’aplomb et d'équerre pour s’assurer de la bonne
installationdeladouche.Sivousinstallerpar‐dessusunplancherdebéton,dégagezlebétonautourdu
tuyaududrainexistantafind’accommoderledrain(Fig.3).
Murdedouche:Laissezlemurdedoucheàlatempératuredelapièceenvironunedemi‐heureavantde
procéderàl’installation.Encasdefenêtreoupourtoutajustementnécessitantunedécoupe,nousvous
recommandonsde couperles panneauxà l'aided'un couteauutilitaire. Veuillezprévoirà l'avanceles
perforations pour la plomberie. Nous vous recommandons l'usage d'une scie emporte‐pièce pour se
faire.Lesmursdevraientêtrerecouvertsdeplacoplâtreordinaire ou de placoplâtre résistant à l’eau,
d’uneépaisseurde1/2''.Lesmursdoiventêtresecsetexemptsdesaleté,decireetdesavon,oudetout
autrerésidu.Lespapierspeintsdoiventêtreenlevés.Nepasinstallerlemurdedouchepar‐dessusdes
tuilesdecéramiqueouducontre‐plaqué.
ThisguidecoverstheinstallationprocessaswellasthemaintenanceofyournewTechnoDesign®shower
byTechnoformIndustriesLtd.Pleaseread itcarefullypriortoinstallation.Youshouldthenkeepitina
safeplaceforfuturereference.
Removetheproductfromitspackaging,makesurethatallofthecomponentsarethere,thenremovethe
plasticfilmoneachofthecomponentsifneedbeandverifythattheproductisingoodshape.Shouldthe
inspection reveal that the product is damaged or that it has a manufacturing defect, contact the
distributoratonce.Thewarrantydoesnotcoverdamagesorfinishingdefectsoncetheproducthasbeen
installed.Theresponsibilityforshippingdamages ceasesupon deliveryoftheproductingoodorderto
thecarrier.Allcomplaintsregardingdamagesduetoshippingmustbemadedirectlytothecarrier.
Check all local plumbing codes and be sure to shut off water supply at the source and remove old
plumbing,ifapplicable.

par
by
450.699.2424–1877.377.4494450.699.8484[email protected]www.technoform.ca TSSK38202003‐08
Thisproducthasbeen designedwithsomeadjustability forminoralignmentproblems;however,ifthe
wallsandfloorsurfacearenotsolid,plumbandsquare,itmayresultinapoorinstallation.
Thisproductshouldnotbeinstalledinareaswherethetemperaturemaydropbelowfreezing(32ºFor
0ºC).
Useshippingcardboardtoprotecttheproductwhileinstalling.
Showerbase:Innewconstruction,prepareshoweralcoveusingdimensionsshowninfigure2.Thealcove
shouldbeframedin2"X3"lumberand coveredwith1/2"drywall. It must bebuilt plumb and squareto
insureproperfitoftheshower.Ifyouareinstallingoveraconcrete floor, clear away concrete around the
existingdrainpipetoaccommodatethedrainbody(Fig.3).
Showerwall:Allowpanelstoreachroomtemperaturefor30minutes before installing. In case of a
windowopeningorforanadjustmentrequiringacut,werecommendthatyoucutthepanelswiththe
helpofautilityknife.Planaheadtheperforationsrequiredfortheplumbing.Werecommendthatyou
useaholesawtoproceed.Thewallsshouldbecoveredwith1/2"drywallorwater‐resistantdrywall.The
wallsmustbedryandfreeofdirt,waxandsoap,oranyotherresidue.Wallpapermustberemoved.Do
notinstallpanelsoverexistingceramictileorplywood.
ÉTAPESÀSUIVRE–BASEDEDOUCHE|STEPSTOFOLLOW–SHOWERBASE
1. Installezlabasededouchedansl'alcôveetassurez‐vousqu'ellesoitdeniveau.Tracezunelignerepère
pourladécoupeduplacoplâtre.Retirezlabasededouchedel'alcôve.
2. Découpezleplacoplâtresurunelongueurde38"X41/2"lelongdelabasededouche,dechaquecôté,
selonvotrelignerepère.
3. Installez le drain dans la base de douche (Fig. 3). Si un scellant additionnel est requis, un calfeutrant
d'acryliqueouuncordondeplombier(mastic)devraitêtreutilisé.
4. Coupezletuyaududrainà13/4''àpartirdudessousduplancher(ouà21/2''àpartirdudessusdu
plancher)(Fig.3).Repositionnezlabasededouchedanssonalcôvepar‐dessusledrain.
5. Percezdestrousdanslabridedecarrelage(3dechaquecôté)àl'aided'unemècheàfraiser,puisvissez
danslesmontantsmurauxàl'aidedevisno.8X11/4(Fig.1+4).
6. Terminezl'installationdudrainselonlesinstructionsdumanufacturier.
1. Placetheshowerbaseintothealcoveandmakesurethatitislevelled.Traceapencillineforthecutting
ofthedrywall.Removetheshowerbase.
2. Cutadrywallsectionof38"X41/2"alongtheshowerbase,oneachside,asperyourpencilline.
3. Installthedrainontheshowerbase(Fig.3).Ifadditionalsealantisrequired,acryliccaulkorplumbers
puttyshouldbeused.
4. Cutthedrainpipeat13/4''fromunderneaththefloor(orat21/2''fromabovethefloor)(Fig.3).Placethe
showerbaseintothealcoveoverthedrainpipe.
5. Drillcountersinkholesthroughthetilingflange(3screwsoneachside),thensecurewithno.8X1¼screwson
thestuds(Fig.1+4).
6. Finishthedraininstallationasperthemanufacturer'sinstructions.

par
by
450.699.2424–1877.377.4494450.699.8484[email protected]www.technoform.ca TSSK38202003‐08
ÉTAPESÀSUIVRE–MURSDEDOUCHE|STEPSTOFOLLOW–SHOWERWALL
1. Placezunpanneaudecôtésurlereborddelabasededouche.Àl'aided'uncrayon,tracezuneligne
repèresurlemurautourdupanneau(Fig.5).Retirezlepanneau.
2. Suivezlesinstructionsdufabricantd'adhésifpourcollerlepanneauetprocédezdelamêmefaçonpour
le2epanneaudecôté(Fig.6+7).
3. Poseztemporairementl'étagèreencoin.Àl'aided'uncrayon,tracezunelignerepèredechaquecôté
(Fig.8).
4. Appliquez ensuite l'adhésif selon les recommandations du manufacturier de l'adhésif afin de coller
l'étagèreencoin(Fig.9).
5. Maintenezlespanneauxetl'étagèreencoinenplaceàl'aidederubanmasquependantquel'adhésif
sèche(Fig.10).
6. Veuillez suivre les recommandations du manufacturier de l'adhésif quant au temps de séchage
(habituellementunminimumde24heures)avantd’appliquerlescellanttoutletouretsurlesjoints(Fig.
11).Veuillezsuivrelesrecommandationsdumanufacturierduscellantquantautempsdeséchage.
1. Placeoneofthesidepanelsontherimoftheshowerbase.Traceareferencelineonthewallaroundthe
panelwithapencil(Fig.5).Removethepanel.
2. Followtheinstructionsoftheadhesivemanufacturerinordertoinstall(glue)thepanelandproceedthe
samewayforthesecondsidepanel(Fig.6+7).
3. Temporarilyplacethecornercaddy.Withthehelpofapencil,traceareferencelineonbothsides(Fig.
8).
4. Applytheadhesiveasperthemanufacturer'sinstructionsandthenpermanentlyinstallthecornercaddy
(Fig.9).
5. Maintainpanelsandcornercaddyinplacewithmaskingtapewhileadhesivedries(Fig.10).
6. Follow the cure time recommendations (usually a minimum of 24 hours) of the manufacturer of the
adhesive before applying caulk beads to all edges and joints (Fig. 11). Follow the cure time
recommendationsofthemanufacturerofthecaulk.
ENTRETIEN&NETTOYAGE|CARE&CLEANING
Nettoyezavecunsavon doux(savonà vaisselle).NEPASemployer deproduitsdenettoyage abrasifs ou
corrosifs. L'usage de ces produits pourrait endommager les composantes et annulerait la garantie.
L'utilisation de grattoir, brosse ou tout autre objet pouvant endommager la surface du produit est à
proscrire.L'applicationrégulièred'unecirepourautodequalitécontribueraàmaintenirlelustreduproduit
etenfaciliteral'entretient.
Cleanwithgentlesoap(dishwashingliquid).DONOTuseanyabrasiveorcorrosivecleaningproducts.Using
theseproductsmaydamagethecomponentsandvoidthewarranty.Theuseofgritting,scraper,brushesor
any other object which can damage the surface of the product is proscribed. A regular application of a
qualitywaxwillhelpmaintainthesurfacefinishandfacilitatethemaintenance.

par
by
450.699.2424–1877.377.4494450.699.8484[email protected]www.technoform.ca TSSK38202003‐08
GARANTIELIMITÉEDE3ANS|LIMITEDWARRANTYOF3YEARS
Ceproduitestgaranticontretoutdéfautdefabricationàpartirdeladated’achatindiquéesurlecoupon
decaisseduconsommateur.IndustriesTechnoformLtéeoffreunegarantielimitéedetrois(3)anssurses
douches.Cettegaranties’adresseaupropriétaireoriginal.Elleportesurleproduitmaisn’incluspaslamain
d’œuvreetnecomprendspaslesfraisdedéplacement,lesfraisd’installation,dedésinstallation,nilesfrais
detransport.Àsadiscrétion,lemanufacturierassureraàsesfraisleremplacementoularéparationdetout
produit défectueux durant la période de garantie si l’installation est conforme (n’inclut pas les frais
mentionnésci‐dessus).Lagarantienes'appliquepasauxtachesprovoquéesparuneeauferreuseouune
eau dure. Cette garantie ne couvre pas les dommages causés par les usages abusifs, la négligence, le
mauvais usage, les bris résultant de chocs,de mauvaises manutentions, de modifications du produit,de
l’utilisationdeproduitschimiquesouabrasifs.Sitelétaitlecas,cettegarantieseraitannuléesansaucun
autre recours. Cette garantie n’est valide que si les instructions d’installation ont été suivies et que
l’installation est conforme au manuel d’installation.Cettegarantieselimiteauchoixdumanufacturier
concernant le remplacement ou la réparation. Aucune indemnité ne pourra être réclamée suite à un
accidentsurvenulorsdel’installationousuiteàl’usageduproduit.
This product is warranted against any manufacturing defect from the date of purchase indicated on the
consumer sales receipt. Technoform Industries Ltd offers a limited warranty of three (3) years on its
showers.Thiswarrantyislimitedtotheoriginalconsumerpurchaserandisapplicablefortheproductonly.
Laborcharges,travelingexpenses,installation/uninstallationfees,aswellascarrierfeesarenotcovered.
Atitsdiscretion,themanufacturerwill,atitsownexpense,replaceorrepairanydefectiveproductduring
the warranty period if the installation is compliant (does not include the aforementioned costs). The
warrantydoesnotapplytostainscausedbyferrousorhardwater.Thewarrantydoesnotcoverdamage
causedbyabusiveusage,neglect,misuse,breakageresultingfromshocks,improperhandling,modifications
madetotheproduct,usageofabrasiveorchemicalproducts.Ifthatwerethecase,theguaranteewouldbe
revokedwithoutfurtherrecourse.Thiswarrantyisvalidonlyiftheinstallationinstructionswerefollowed
andthattheinstallationiscompliantwiththeinstructionmanual.Thiswarrantyislimitedtothechoiceof
themanufacturerregardingthereplacementorrepair.Nocompensationmaybeclaimedasaresultofan
accidentduringinstallationorduringtheuseoftheproduct.
FIGURES
Basede3½"deprofondeur
3½"deepbase
A 38¼"
B 12"
C 12"
FIGURE1
Supportdebois2"X3"
2"X3"Woodsupport
Placoplâtre|Drywall
Panneaudepolystyrène
Polystyrenepanel
Vis|Screw
Bois1''X3''ou2''X3''
1''X3''ou2''X3''Wood
Installationavecpanneauxdepolystyrène
Installationwithpolystyrenepanels
Tuyaududraincoupéà
13/4''plusbasquele
plancher|Drainpipecutat
13/4''belowthefloor
Troudediamètre5''pourle
drain|5''diameterholefor
thedrain
FIGURE2 Plancher|Floor
A
BC
A

par
by
450.699.2424–1877.377.4494450.699.8484[email protected]www.technoform.ca TSSK38202003‐08
Basededouche|Showerbase Partiesupérieurefiletmâleetgrille|Toppartmalethreadandgrid
Plancher|Floor Calfeutrantd'acrylique|Acryliccaulk
Disques(joints)encaoutchoucetencarton
Rubberandpapergaskets
Partieinférieurefiletfemellebasehexagonale
Bottompartfemalethreadwithhex.base
Tuyaududrain|Drainpipe
FIGURE3
FIGURE4 FIGURE5 FIGURE6
FIGURE7 FIGURE8 FIGURE9
FIGURE10 FIGURE11
Table of contents
Other Technoform Bathroom Fixture manuals
Popular Bathroom Fixture manuals by other brands

Valore
Valore VS 2002 Plus Installation and user guide

METHVEN
METHVEN 01-8345 installation guide

Anzzi
Anzzi SP-AZ076 install guide

Nabis
Nabis D02183 INSTALLATION INSTRUCTIONS & WARRANTY LEAFLET

Signature Hardware
Signature Hardware KIRANA 949633 quick start guide

CLEOPATRA
CLEOPATRA Steam Smart Instructions for use/assembly instructions