Teesa TSA2010 User manual

DE
EN
PL
RO
SK
Steam iron
Instrukcja obsługi
Manual de utilizare
Owner’s manual
Návod na použitie
Bedienungsanleitung
TSA2010 | TSA2015 | TSA2020 | TSA2025

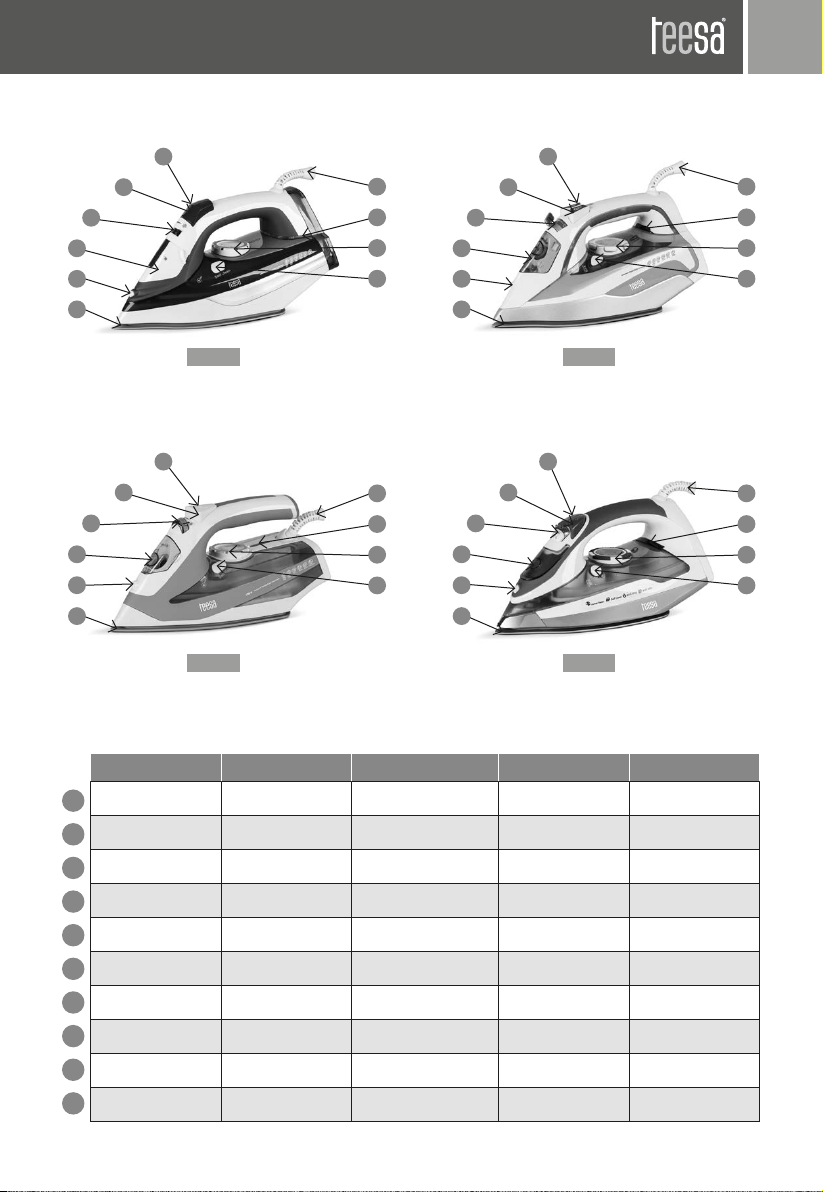
TSA2010 TSA2015 TSA2020 TSA2025
DE - Dampfbügeleisen
• Wassertankkapazität: 400 ml
• Flexibles 180 Grad Kabel
• Ununterbrochner Dampfaustritt
• UnunterbrochneDampfaustritt-Kontrolle
• Max leistung: 2400 W
• Sprühen
• Antitropf
• Geeignet für Leitungswasser
• Anti-Kalk-Filter
• Selbstreinigungs-Funktion
• Automatische ausschalten function
• Spannung: 220-240 V, 50/60 Hz
• Wassertankkapazität: 280 ml
• Flexibles 180 Grad Kabel
• Ununterbrochner Dampfaustritt
• UnunterbrochneDampfaustritt-Kontrolle
• Max leistung: 2200 W
• Sprühen
• Antitropf
• Geeignet für Leitungswasser
• Anti-Kalk-Filter
• Selbstreinigungs-Funktion
• Automatische ausschalten function
• Spannung: 220-240 V, 50/60 Hz
• Wassertankkapazität: 380 ml
• Flexibles 180 Grad Kabel
• Ununterbrochner Dampfaustritt
• UnunterbrochneDampfaustritt-Kontrolle
• Max leistung: 2400 W
• Sprühen
• Antitropf
• Geeignet für Leitungswasser
• Anti-Kalk-Filter
• Selbstreinigungs-Funktion
• Automatische ausschalten function
• Spannung: 220-240 V, 50/60 Hz
EN - Steam iron
• Water tank capacity: 400 ml
• Flexible 180° cord swivel
• Continuous steam output
• Continuous steam output control
• Max. Power: 2400W
• Spray
• Anti-drip
• Suitable for tap water
• Anti-calc lter
• Self-clean function
• Auto shut-o function
• Voltage: 220-240V, 50/60 Hz
• Water tank capacity: 400 ml
• Flexible 180° cord swivel
• Continuous steam output
• Continuous steam output control
• Max. Power: 2400W
• Spray
• Anti-drip
• Suitable for tap water
• Anti-calc lter
• Self-clean function
• Auto shut-o function
• Voltage: 220-240V, 50/60 Hz
• Water tank capacity: 280 ml
• Flexible 180° cord swivel
• Continuous steam output
• Continuous steam output control
• Max. Power: 2200W
• Spray
• Anti-drip
• Suitable for tap water
• Anti-calc lter
• Self-clean function
• Auto shut-o function
• Voltage: 220-240V, 50/60 Hz
• Water tank capacity: 380 ml
• Flexible 180° cord swivel
• Continuous steam output
• Continuous steam output control
• Max. Power: 2400W
• Spray
• Anti-drip
• Suitable for tap water
• Anti-calc lter
• Self-clean function
• Auto shut-o function
• Voltage: 220-240V, 50/60 Hz
PL - Żelazko parowe
• Pojemność zbiornika wody: 400 ml
• Elastyczny, obracany przewód: 180°
• Stała dystrybucja pary
• Regulacja stałej dystrybucji pary
• Moc maksymalna: 2400 W
• Spryskiwacz
• Blokada kapania
• Możliwość użycia wody z kranu
• Filtr antywapienny
• Funkcja auto-czyszczenia
• Funkcja auto-wyłączenie
• Zasilanie: 220-240 V, 50/60 Hz
• Pojemność zbiornika wody: 280 ml
• Elastyczny, obracany przewód: 180°
• Stała dystrybucja pary
• Regulacja stałej dystrybucji pary
• Moc maksymalna: 2200 W
• Spryskiwacz
• Blokada kapania
• Możliwość użycia wody z kranu
• Filtr antywapienny
• Funkcja auto-czyszczenia
• Funkcja auto-wyłączenie
• Zasilanie: 220-240 V, 50/60 Hz
• Pojemność zbiornika wody: 380 ml
• Elastyczny, obracany przewód: 180°
• Stała dystrybucja pary
• Regulacja stałej dystrybucji pary
• Moc maksymalna: 2400 W
• Spryskiwacz
• Blokada kapania
• Możliwość użycia wody z kranu
• Filtr antywapienny
• Funkcja auto-czyszczenia
• Funkcja auto-wyłączenie
• Zasilanie: 220-240 V, 50/60 Hz
RO - Fier de calcat
• Capacitate rezervor apa: 400 ml
• Flexibilitate r la 180°
• Debit de abur continuu
• Control debit de abur continuu
• Putere max: 2400W
• Pulverizator
• Anti-picurare
• Se poate utiliza apă de la robinet
• Filtru anti-calcar
• Functie de autocuratare
• Functia auto-oprire
• Tensiune de alimentare:220-240V,50/60Hz
• Capacitate rezervor apa: 280 ml
• Flexibilitate r la 180°
• Debit de abur continuu
• Control debit de abur continuu
• Putere max: 2200W
• Pulverizator
• Anti-picurare
• Se poate utiliza apă de la robinet
• Filtru anti-calcar
• Functie de autocuratare
• Functia auto-oprire
• Tensiune de alimentare:220-240V,50/60Hz
• Capacitate rezervor apa: 380 ml
• Flexibilitate r la 180°
• Debit de abur continuu
• Control debit de abur continuu
• Putere max: 2400W
• Pulverizator
• Anti-picurare
• Se poate utiliza apă de la robinet
• Filtru anti-calcar
• Functie de autocuratare
• Functia auto-oprire
• Tensiune de alimentare:220-240V,50/60Hz
SK - Naparovacia žehlička
• Objem nádržky na vodu: 400 ml
• Ohybný, otočný o 180°
• Trvalé naparovanie
• Nastavenie trvalého naparovania
• Maximálny výkon: 2400 W
• Rozprašovač
• Blokovanie kvapiek
• Možnosť používať vodu z vodovodu
• Anti-vápenný lter
• Funkcia automatického čistenia
• Funkcia automatického vypínania
• Napätie: 220-240 V, 50/60 Hz
• Objem nádržky na vodu: 280 ml
• Ohybný, otočný o 180°
• Trvalé naparovanie
• Nastavenie trvalého naparovania
• Maximálny výkon: 2200 W
• Rozprašovač
• Blokovanie kvapiek
• Možnosť používať vodu z vodovodu
• Anti-vápenný lter
• Funkcia automatického čistenia
• Funkcia automatického vypínania
• Napätie: 220-240 V, 50/60 Hz
• Objem nádržky na vodu: 380 ml
• Ohybný, otočný o 180°
• Trvalé naparovanie
• Nastavenie trvalého naparovania
• Maximálny výkon: 2400 W
• Rozprašovač
• Blokovanie kvapiek
• Možnosť používať vodu z vodovodu
• Anti-vápenný lter
• Funkcia automatického čistenia
• Funkcia automatického vypínania
• Napätie: 220-240 V, 50/60 Hz

DE EN PL RO SK
Bügelsohle Soleplate Stopa żelazka Talpa ceramica Žehliacia plocha
Sprühdüse Spray nozzle Dysza spryskiwacza Duza de pulverizare Rozprašovacia tryska
Temperaturregler Temperature knob Pokrętło temperatury Buton de temperatura Nastavenie teploty
Betriebsanzeige Power lamp Kontrolka zasilania Bec functionare Kontrolka napájania
Dampfregler Steam ruler Suwak/pokrętło pary Regulator debit abur Parná mierka
Sprühtaste Spray button Przycisk spryskiwacza Buton pulverizare Rozprašovanie
Dampfstoßtaste Steam burst button Przycisk uderzenia pary Buton aburi Vypustenie pary
Selbstreinigungstaste Self-clean button Przycisk auto-czyszczenia Buton auto-curatare Automatické čistenie
Wassertankdeckel Water tank cover Pokrywka zbiornikanawodę Capac rezervor apa Kryt nádržky na vodu
Kabel Cable Kabel sieciowy Cablu Kábel
3
4
8
10
3
6
9
1
5
2
7
7
9
1
5
2
4
8
10
3
6
6
9
1
5
2
4
8
10
3
7
6
9
1
5
2
4
8
10
3
7
7
9
1
5
2
4
8
10
3
6
TSA2025
TSA2015
TSA2020
TSA2010

DE
Bedienungsanleitung4
Vor dem Gebrauch des Produktes, lesen Sie bitte diese Bedienungsanleitung sorgfältig.
Bewahren Sie diese Anleitung auf zum späteren Nachschlagen.
SICHERHEITSANWEISUNGEN
1. Verwenden Sie das Bügeleisen nur für den vorgesehenen Gebrauch.
2. Um gegen eine Gefahr von Stromschlägen zu schützen, das Bügeleisen nicht ins Wasser
oder andere Flüssigkeiten eintauchen.
3. Das Bügeleisen sollte vor dem Anschließen oder Abziehen aus der Steckdose immer auf
„Min” eingeschaltet sein. Stecker nicht am Kabel aus der Steckdose ziehen; Stattdessen
den Stecker umfassen und daran ziehen.
4. Lassen Sie keine Kabel die heißen Oberächen berühren. Lassen Sie das Bügeleisen
abkühlen, bevor Sie es weglegen. Bei der Lagerung, Kabel locker um das Bügeleisen
wickeln.
5. Trennen Sie immer das Bügeleisen von der Stromversorgung, wenn Sie es mit Wasser
Befüllen, beim Entleeren, und wenn nicht in Gebrauch.
6. Nicht bügeln mit beschädigtem Netzkabel oder wenn das Bügeleisen fallen gelassen oder
beschädigt wurde. Um das Risiko eines Stromschlags zu vermeiden, das Bügeleisen nicht
zerlegen. Bringen Sie es zu einer qualizierten Servicestelle für Prüfung und Reparatur.
Falscher Zusammenbau kann eine Gefahr von Stromschlägen und Brandgefahr sein,
wenn das Bügeleisen verwendet wird.
7. Verbrennungen können auftreten beim Berühren heißer Metallteile, Warmwasser oder
Dampf. Seien Sie vorsichtig, wenn Sie ein Dampfbügeleisen auf den Kopf drehen - es kann
sich heißes Wasser im Behälter benden.
8. Wenn die Fehlfunktions-Anzeige leuchtet, oder etwas Ungewöhnliches auftritt, wird das
Bügeleisen nicht normal funktionieren. Trennen Sie das Gerät von der Stromversorgung
und lassen es von qualiziertem Fachpersonal reparieren.
9. Das Bügeleisen muss auf eine stabile Oberäche benutzt und abgestellt werden.
10. Das Bügeleisen darf nicht verwendet werden, wenn es fallen gelassen wurde, es undicht
ist, oder es gibt sichtbare Schäden am Gerät oder Kabel.
11. Dieses Gerät ist nicht zum gebrauch durch Personen (einschließlich Kinder) mit
eingeschränkten physischen, sensorischen oder geistigen Fähigkeiten oder mangelnder
ErfahrungundWissen,bestimmt,es sei denn eine angemessene Aufsichtoder ausführliche
Anleitung zur Benutzung des Geräts durch eine für ihre Sicherheit verantwortliche Person.
12. Sorgfältige Aufsicht ist für jedes Gerät erforderlich, das von oder in der Nähe von Kindern
benutzt wird.
13. Lassen Sie das Bügeleisen nicht unbeaufsichtigt wenn es mit dem Stromnetz verbunden
ist, oder sich auf einem Bügelbrett bendet.
14. Kinder sollten beaufsichtigt werden, um sicherzustellen, dass sie nicht mit dem Gerät
spielen.
15. Der Stecker muss von der Steckdose entfernt werden, bevor der Wasserbehälter mit
Wasser gefüllt wird.
WARNUNG!
1. Um eine Überlastung zu vermeiden, sollten Sie kein weiteres Gerät mit hoher Leistung am

Bedienungsanleitung 5
DE
gleichen Stromkreis betreiben.
2. Bügeleisen sollte direkt an die Netzsteckdose angeschlossen werden (verwenden Sie kein
Verlängerungskabel).
BEACHTEN SIE
LASSEN SIE NICHT Kinder oder unerfahrene Personen das Gerät ohne Aufsicht verwenden.
NIEMALS das Bügeleisen, Kabel oder Stecker in Flüssigkeiten tauchen.
LASSEN SIE NICHT das heiße Bügeleisen Gewebe oder leicht entzündbare Oberächen
berühren.
LASSEN SIE NICHT das Bügeleisen unnötig eingeschaltet. Trennen Sie das Bügeleisen vom
Netz, wenn das Gerät nicht in gebrauch ist.
NIEMALS das Gerät mit nassen oder feuchten Händen berühren.
NIEMALS das Kabel oder Gerät verwenden um den Stecker aus der Steckdose zu ziehen.
NIEMALS das Gerät Wetterbedingungen aussetzen (Regen, Sonne, usw.)
LASSEN SIE NICHT das Bügeleisen unbeaufsichtigt wenn es mit der Stromversorgung
verbunden ist.
NIEMALS den Wassertank füllen, bevor das Gerät nicht vom der Stromversorgung getrennt
wurde.
HINWEIS!
Verwenden Sie keine chemischen Zusatzsto, Duftstoe oder Entkalker. Die Nichtbeachtung
der obengenannten Vorschriften führt zum Verlust der Garantie.
ALLGEMEINE ANLEITUNGEN
Hinweis:
Denken Sie daran, die Bügelsohle glatt zu halten. Führen Sie es nicht über Metallgegenstände
(wie beispielsweise gegen das Bügelbrett, Knöpfe, Reißverschlüsse, usw.), da dieses das
Bügeleisen beschädigen kann.
ReineWollfasern (100%Wolle) können mit dem Gerät in der Position Dampf gebügelt werden.
Temperatur auf„Wolle” einstellen, wählen Sie eine hohe Dampfeinstellung und benutzen ein
trockenes Bügeltuch über das Material.
VORSCHLÄGE VOR DEM ERSTEN GEBRAUCH
1. Bevor Sie das Bügeleisen zum ersten Mal verwenden, entfernen Sie den Plastikschutz von
der Bügelsohle (falls vorhanden) und reinigen Sie die Bügelsohle mit einem weichenTuch.
2. Es wird empfohlen, das Bügeleisen über ein gewöhnliches Tuch zu passieren, bevor Sie es
zum ersten Mal benutzen.
3. Bei der ersten Verwendung des Bügeleisens, können Sie eine leichte Rauchentwicklung
feststellen, und einen Ton hören, erzeugt durch das Ausdehnen des Kunststos. Das ist
ganz normal und es ist nach kurzer Zeit beendet.

DE
Bedienungsanleitung6
4. Bestimmte Teile des Bügeleisens wurden leicht eingefettet; das Bügeleisen könnte daher
eine leichte Rauchentwicklung erzeugen wenn es zum ersten Mal angeschlossen wird.
Dies wird nach kurzer Zeit vorüber sein.
AUSWAHL DER TEMPERATUR
1. Überprüfen Sie die Bügelanleitung auf dem zu bügelnden Kleidungsstück.
2. Wenn das Kleidungsstück keine Bügelvorschriften hat aber Sie kennen die Stoart,
verwenden Sie die untere Tabelle.
3. Stoe, die eine Art von Oberäche haben, (Schleifen, Falten, Gegensätze, etc.) können bei
den niedrigsten Temperaturen gebügelt werden.
4. Wenn das Gewebe mehrere Arten von Fasern enthält, ist die niedrigste Temperatur für die
Fasern in der Mischung zu empfehlen; wenn ein Artikel 60% Polyester und 40% Baumwolle
enthält, müssen Sie die Temperatur für Polyester und bügeln ohne Dampf wählen.
5. Artikel gebügelt werden, je nach ihrer Bügeltemperatur gruppieren: Wolle zu Wolle,
Baumwolle zu Baumwolle usw. Das Bügeleisen erwärmt sich so schnell, wie es abkühlt,
beginnen Sie stets mit den Textilien die niedrigste Temperatur erfordern, (wie diese
die aus synthetischen Fasern hergestellt sind) und wenden sich zu denen die höhere
Temperaturen erfordern.
6. Bewegen Sie den Temperaturregler, bis er sich vor dem entsprechenden Symbol bendet,
siehe unten:
• Position für Nylon und Acetate
• • Position für Wolle, Seide oder gemischte
• • • Position für Baumwolle oder Leinen (Dampf)
AUFFÜLLEN DES WASSERTANKS
1. Bügeleisen vom Netz trennen.
2. Dampfregler auf trockenbügeln stellen.
3. Tank durch das Füllloch auüllen.
4. Wenn SiehartesLeitungswasserhaben,istes ratsamnurdestilliertesoderdemineralisiertes
Wasser zu benutzen; verwenden Sie kein chemisch entkalktes Wasser oder Duftstoe.
5. Bügeleisen nicht mit Wasser im Tank lagern!
DAMPFBÜGELN
1. Füllen Sie das Bügeleisen wie im Abschnitt “ Auüllen des Wassertanks”beschrieben.
2. Bügeleisen ans Netz anschließen.
3. Dampfbügeln ist nur möglich wenn höchste Temperaturen gewählt sind (anderenfalls
kann Wasser durch die Bügelsohle austreten).
4. Warten Sie bis dieTemperaturanzeige erlischt, dieses bedeutet die eingestellteTemperatur
wurde erreicht.
5. Stellen Sie den Dampfregler in die erforderliche Position.

Bedienungsanleitung 7
DE
6. Wenn das Bügeln beendet ist, oder während der Bügelpausen, stellen Sie das Bügeleisen
in seine aufrechte Position.
7. Trennen Sie das Bügeleisen vom Stromnetz. Gießen Sie verbliebenes Wasser aus und lasen
das Bügeleisen abkühlen.
SPRÜHEN
1. Sprühen kann in jeder Position verwendet werden, entweder in Trocken- oder
Dampfbügeln, sofern der Wassertank mit Wasser gefüllt ist.
2. Drücken Sie die Taste Sprühen, um einen Spritzer zu lösen.
HINWEIS: Bei der erstenVerwendung der Sprühfunktion, muss die Taste wiederholt gedrückt
werden, um diese Funktion zu aktivieren.
DAMPFSTOß
Dampfstoß gibt Ihnen extra Dampf um hartnäckige Falten zu entfernen.
1. Stellen Sie den Temperaturregler auf die Position “MAX” und warten bis die
Temperaturanzeige erlischt.
2. Warten Sie ein paar Sekunden damit der Dampf die Faser durchdringt bevor Sie erneut
drücken.
HINWEIS: Für die beste Dampfqualität, verwenden Sie nicht mehr als drei aufeinander
folgende Stöße zu einem Zeitpunkt. Bei der ersten Verwendung von Dampfstoß, muss der
Knopf wiederholt gedrückt werden, um diese Funktion zu aktivieren. Übermäßiger Gebrauch
von dieser Funktion bewirkt, dass das Bügeleisen abkühlt.
Vor der Inbetriebnahme der Dampfstoß-Funktion stellen Sie sicher, dass die Kontrollleuchte
aus ist.
REINIGEN
1. Vor dem Reinigen, trennen Sie das Bügeleisen vom Stromnetz.
2. Verwenden Sie ein weiches Tuch um das Bügeleisen zu reinigen. Verwenden Sie keine
Chemikalien oder Scheuermittel, da diese das Gerät beschädigen können.
SELBSTREINIGUNGSFUNKTION
1. Bevor Sie diese Funktion einleiten, Bügeleisen von der Stromversorgung trennen;
2. Füllen Sie den Wassertank bis zum MAX Pegel.
WARNUNG: Den Tank mit nicht anderen Flüssigkeiten als Wasser füllen. Den Wassertank
nicht mit Essig oder Reinigungsüssigkeiten füllen.

DE
Bedienungsanleitung8
3. Schließen Sie dann das Bügeleisen an die Stromversorgung an, schalten die Dampf-
Funktion aus und drehen den Temperaturregler auf Maximalstellung;
4. Stellen Sie das Gerät waagerecht über dem Waschbecken;
5. Drücken Sie die Selbstreinigungs-Taste. Sie können das Bügeleisen leicht Schwenken. Das
Wasser beginnt, aus der Bügelsohle auszutreten.
6. Wenn alles Wasser im Wasserbehälter verbraucht wurde, ziehen Sie das Dampfbügeleisen
aus der Steckdose und lassen es abkühlen.
7. Wenn das Bügeleisen kalt ist, behandeln Sie die Bügelsohle mit einem sauberen, feuchten
Tuch, um jegliche verbleibenden Verunreinigungen und Kalk Flocken zu entfernen.
AUTOMATISCHE ABSCHALTUNG
Wenn das Bügeleisen eingeschaltet ist und sich für einen Zeitraum von 8 Minuten nicht
bewegt, während er auf seiner Rückseite; oder 30 Sekunden, während es sich auf der
Bügelsohle bendet, wird eine interne Sicherheitsfunktion das Bügeleisen ausschalten und
die automatische Abschaltung blinkt. Bewegen Sie das Gerät stark, um es wieder einschalten.
VERTIKALER DAMPFSTOß
Dieses Bügeleisen hat auch eine vertikale Dampfstoß-Funktion.
Halten Sie das Bügeleisen senkrecht, drücken Sie die Dampfstoß-Taste und berühren sanft
den Sto mit der Bügelsohle.
WARNUNG: Seien Sie vorsichtig, austretender Dampf ist heiß und kann Verbrennungen
verursachen. Kleider Nicht bügeln, während man sie trägt.
ANTITROPF
Das Bügeleisen ist mit einer Tropfstopp-Funktion ausgestattet: Wenn die Bügeltemperatur
zu niedrig ist, stoppt die Dampf-Funktion automatisch um zu verhindern dass Wassertropfen
aus der Bügelsohle austreten.
ANTIKALK
Die Anti-Kalk-Funktion ltert die Mineralien aus dem Wasser, um Aufbau von mineralischen
Rückständen an der Dampfkammer zu verhindern
DEFEKTE UND REPARATUREN
Versuchen Sie nicht, ein defektes Netzkabel zu ersetzen. Das Gerät muss zur Reparatur an
einen autorisierten Kundendienst eingesandt werden.

Bedienungsanleitung 9
DE
STÖRUNGSBEHEBUNG
Bügeleisen gibt einen Geruch oder Rauch ab
• Das Bügeleisen gibt einen Geruch ab, wenn es zum ersten Mal eingeschaltet wird. Öle,
die bei der Herstellung verwendet wurden müssen verbrannt werden. Der Geruch wird
innerhalb von 10 Minuten verschwinden.
Bügeleisen gibt keinen Dampf ab
• Der Wassertank kann leer sein. Bügeleisen vom Netz trennen, Dampfregler auf “0” stellen
und Wasser hinzufügen. Lassen Sie das Bügeleisen einige Minuten aufheizen (abhängig
von der eingestellten Temperatur) und stellen den Dampfregler in die gewünschte
Position.
Dampfstoß funktioniert nicht
• Der Wassertank muss wenigstens bis zur Minimum Anzeige gefüllt sein. Füllen Sie das
Bügeleisen wie im Abschnitt “ Auüllen des Wassertanks” beschrieben. Temperatur muss
auf Dampfposition eingestellt sein. Bügeleisen sollte in horizontaler Position sein. Pumpe
kurz drücken. Machen Sie kurze Pausen zwischen den Schüssen. Seien Sie sicher, dass Sie
die Dampfstoß-Taste vollständig nach unten drücken.
Sprühfunktion funktioniert nicht
• Der Wassertank muss wenigstens bis zur Minimum Anzeige gefüllt sein. Füllen Sie das
Bügeleisen wie im Abschnitt “ Auüllen des Wassertanks” beschrieben und versuchen es
erneut.
Wasser tritt aus dem Bügeleisen aus
• Der Dampfregler muss ausgeschaltet werden, bis das Bügeleisen heiß ist. Wenn die
eingestellte Temperatur zu niedrig ist, wird kein Dampf erzeugt werden, und Wasser tritt
aus dem Bügeleisen aus
• Hinweis:Wenn die Dampfstöße zu häug verwendet werden, wird das Bügeleisen nicht in
der Lage sein, sich wieder zu erwärmen und wird keinen Dampf mehr erzeugen. Machen
Sie zwischen den Dampfstößen Pausen.
Deutsch
Korrekte Entsorgung dieses Produkts
(Elektromüll)
(Anzuwenden in den Ländern der Europäischen Union und anderen europäischen Ländern mit einem
separaten Sammelsystem)
Die Kennzeichnung auf dem Produkt bzw. auf der dazugehörigen Literatur gibt an, dass es nach seiner
Lebensdauer nicht zusammen mit dam normalen Haushaltsmüll entsorgt werden darf. Entsorgen Sie
dieses Gerät bitte getrennt von anderen Abfällen, um der Umwelt bzw. der menschilchen Gesundheit
nicht durch unkontrollierte Müllbeseitigung zu schaden. Recyceln Sie das Gerät, um die nachhaltige
Wiederverwertung von stoichen Ressourcen zu fördern.
Private Nutzer sollten den Händler, bei dem das Produkt gekauft wurde, oder die zuständigen Behörden
kontaktieren, um in Erfahrung zu bringen, wie sie das Gerät auf umweltfreundliche Weise recyceln
können.
Gewerbliche Nutzer sollten sich an Ihren Lieferanten wenden und die Bedingungen des Verkaufsvertrags
konsultieren. Dieses Produkt darf nicht zusammen mit anderem Gewerbemüll entsorgt werden.
Vertrieben durch LECHPOL Electronics BV, Nijverheidsweg 15 4311RT Bruinisse, Niederlande.

EN
Owner’s manual10
Please read this operation instruction carefully before use. Please keep this operation
instruction for future use.
SAFETY INSTRUCTIONS
1. Use iron only for its intended use.
2. To protect against a risk of electric shock, do not immerse the iron in water or other liquids.
3. The iron should always be turned to “min” before plugging or unplugging from outlet.
Never yank cord to disconnect from outlet; instead, grasp plug and pull to disconnect.
4. Do not allow cord to touch hot surfaces. Let iron cool completely before putting away.
Loop cord loosely around iron when storing.
5. Always disconnect iron from electrical outlet when lling with water or emptying, and
when not in use.
6. Do not operate iron with a damaged cord or if the iron has been dropped or damaged. To
avoid the risk of electric shock, do not disassemble the iron. Take it to a qualied service
point for examination and repair. Incorrect reassembly can cause a risk of electric shock
and re when the iron is used.
7. Burns can occur from touching hot metal parts, hot water, or steam. Use caution when you
turn a steam iron upside down – there may be hot water in the reservoir.
8. If the malfunction indicator goes on, or occur any abnormality, the iron is not operating
normally. Disconnect from the power supply and have the device serviced by qualied
service personnel.
9. The iron must be used and rested on a stable surface.
10.The iron is not to be used if it has been dropped, it’s leaking, or there are visible signs of
damage on the device or its cord.
11.This appliance is not intended for use by persons (including children) with reduced
physical, sensory or mental capabilities, or lack of experience and knowledge, unless they
have been given supervision or instruction concerning use of the appliance by a person
responsible for their safety.
12.Close supervision is necessary for any appliance being used by or near children.
13.Do not leave iron unattended while connected or on an ironing board.
14.Children should be supervised to ensure that they do not play with appliance.
15. The plug must be removed from the socked-outlet before the water reservoir is lled with
water.
WARNING!
1. To avoid a circuit overload, do not operate another high wattage appliance on the same
circuit.
2. Iron should be connected directly to power supply socket (do not use extension cords).
REMEMBER
DO NOT let children or untrained persons use the appliance without supervision.
NEVER immerse the iron, cable or plug in any liquid.

Owner’s manual 11
EN
DO NOT leave the hot iron touching fabrics or very inammable surfaces.
DO NOT leave the appliance unnecessarily plugged in. Disconnect the plug from the mains
when the appliance is not in use.
NEVER touch the appliance with wet or damp hands.
DO NOT use the power cord or the appliance in order to pull the plug out of the socket.
DO NOT leave the appliance exposed to weather conditions (rain, sun, etc.).
DO NOT leave the iron without supervision when it’s connected to the power supply.
DO NOT ll the water reservoir before removing the plug from the socket.
NOTE!
Do not use chemical additive, scented substances or decalciers. Failure to comply with the
above-mentioned regulations leads to the loss of guarantee.
GENERAL INSTRUCTIONS
Note:
Remember to keep the base smooth. Do not run it over metal objects (such as against the
ironing board, buttons, zips, etc.), as it may damage iron’s surface.
Pure wool bers (100% wool) can be ironed with the appliance in the steam position. Set
temperature to “wool”, select a high steam position and use a dry ironing cloth over the
material.
SUGGESTIONS BEFORE FIRST USE
1. Before using the iron for the rst time, remove the plastic protector from the base (if it has
one) and clean the base with a soft cloth.
2. It is recommend to pass the iron over an ordinary cloth before using it for the rst time.
3. When using the iron for the rst time, you may notice a slight emission of smoke and hear
some sounds made by the expanding plastics. This is quite normal and it stops after a
short time.
4. Certain parts of the iron have been lightly greased; therefore the iron could give o a little
smoke when plugged in for the rst time. This will cease after a short while.
SELECTING THE TEMPERATURE
1. Check the ironing instructions on the garment to be ironed.
2. If the garment does not have any ironing instructions but you know the kind of fabric in
question, use the chart below.
3. Fabrics that have some kind of nish (polishing, wrinkles, contrasts, etc.) can be ironed at
the lowest temperatures.
4. If the fabric contains several kinds of bers, use the lowest temperature recommended
for the bers in the blend; if an article contains 60% polyester and 40% cotton, you must
choose the temperature corresponding to polyester and iron without steam.
5. Group the articles to be ironed, according to their ironing temperature: wool with wool,

EN
Owner’s manual12
cotton with cotton, etc. The iron heats up as fast as it cools, start by ironing the articles
requiring the lowest temperature (such as those made of synthetic bers), and move
towards those that require higher temperatures.
6. Move the temperature control until it is in front of the appropriate symbol according to
the following:
• position for nylon and acetate
• • position for wool, silk or mixtures
• • • position for cotton or linen (steam)
HOW TO FILL THE WATER TANK
1. Unplug the iron.
2. Set the steam ruler to dry ironing.
3. Fill the tank through the lling hole.
4. If you have hard tap water, it is advisable to use only distilled or demineralized water; do
not use chemically de-limed or perfumed water.
5. Do not store the iron with water in the tank!
STEAM IRONING
1. Fill the iron as described in the section “how to ll the water tank”.
2. Plug the iron into the mains.
3. Steam ironing is only possible when highest temperatures are selected (otherwise, water
may escape through the soleplate).
4. Wait until the temperature light goes out, which indicates that the selected temperature
has been reached.
5. Set the steam ruler to required position.
6. When the ironing is nished, and during breaks in ironing, place the iron in its upright
position.
7. Disconnect the iron from the mains supply. Pour o any remaining water and leave the
iron to cool o.
SPRAY
1. The spray can be used in any position, either in dry or steam ironing, provided the water
tank is lled with water.
2. Press the spray button to release spray.
NOTE: When using spray for the rst time, the button has to be pressed repetitively to
activate this function.

Owner’s manual 13
EN
SHOT OF STEAM
Shot of steam gives extra steam to remove persistent wrinkles.
1. Move the temperature control at the“MAX”position and wait until the pilot light goes o.
2. Wait few seconds for the steam to penetrate the ber before pressing again.
NOTE: For the best steam quality, do not use more than three successive bursts at a time.
When using steam for the rst time, the button has to be pressed repetitively to activate this
function. Excessive use of this feature will cause the iron to cool down.
Before operating the shot of steam control make sure the pilot light is out.
CLEANING
1. Before cleaning, disconnect the appliance from the mains.
2. Use soft cloth to clean the iron. Do not use solvents or abrasive products as it may damage
this device.
SELFCLEANING FUNCTION
1. Before initiating this function, disconnect iron from the power supply;
2. and ll the water tank to MAX level.
WARNING: Do not ll the tank with other liquids than water. Do not ll the water tank with
vinegar or any cleaning liquids.
3. Next, connect the iron to power supply, turn o steam function and turn temperature
knob to maximum position;
4. place the device horizontally above the sink;
5. and press self-clean button. You can also gently shake the iron. Water will start to pour out
of the iron soleplate.
6. When all water inside water tank has been used, unplug the steam iron from the power
supply socket and leave the iron to cool o.
7. When the iron is cool, treat the soleplate with clean, damp cloth to remove any remaining
impurities and calc akes.
AUTOMATIC SHUT OFF
If the iron is switched on and not moved for a period of 8 minutes while standing on its heel;
or 30 seconds while standing on the soleplate, an internal safety feature will switch the iron
o and the auto-shuto indicator will blink. Move the appliance sharply to switch it on again.

EN
Owner’s manual14
VERTICAL STEAM BOOST
This iron has function of steam burst even while it’s positioned vertically.
Hold the iron vertically, press the steam burst button, and gently touch the fabric with
soleplate.
WARNING: Be careful, released steam is hot and may cause scalds. Do not iron garments
while wearing it.
ANTIDRIP
This iron is equipped with a drip-stop function: when the iron’s temperature is too low, the
steaming function automatically stops to prevent water from dripping out of the soleplate.
ANTICALC
The Anti-calc function ltrate the minerals from the water to prevent mineral residue build
up at the steam chamber.
DEFECTS AND REPAIRS
Do not attempt to replace a defective mains cable. The appliance has to be returned to an
authorized service center for repair.
TROUBLESHOOTING
Iron emits an odor or smoke
• Iron gives o an odor when turned on for the rst time. Oils used during manufacture
need to be burnt o. The odor will disappear within 10 minutes.
Iron does not steam
• The water tank may be empty. Unplug the iron from the mains supply and turn the steam
ruler to“0” and add water. Leave the iron for few minutes to heat (depending on selected
temperature), and then set the steam dial to the steam setting.
Burst of steam feature does not work
• The water tank must be ll up to minimum indicator at least. Fill the iron as described
in the section “how to ll the water tank”. Temperature must be set to steam position.
Iron should be in the horizontal position. Prime pump briey. Make short pauses between
shots. Be sure you depress the burst of steam button fully.
Spry mist feature does not work
• The water tank must be ll up to minimum indicator at least. Fill the iron as described in
the section “how to ll the water tank”, and try again.
Iron is leaking
• The steam ruler must be set o, until the iron is hot. If the set temperature is too low, the

Owner’s manual 15
EN
English
Correct Disposal of This Product
(Waste Electrical & Electronic Equipment)
(Applicable in the European Union and other European countries with separate collection systems)
This marking shown on the product or Its literature, indicates that It should not be disposed with other
household wastes at the end of its working life. To prevent possible harm lo the environment or human
health from uncontrolled waste disposal, please separate this from other types of wastes and recycle it
responsibly to promote the sustainable reuse of material resources. Household users should contact ei-
ther the retailer where they purchased this product, or their local government oce, for details of where
and how they can take this item for environmentally safe recycling. Business users should contact their
supplier and check the terms and conditions of the purchase contract This product should not be mixed
with other commercial wastes for disposal.
Made in China for LECHPOL Zbigniew Leszek, Miętne, 1 Garwolińska Street, 08-400 Garwolin.
steam will not be produced, and the iron will be leaking.
• Note: If the shots of steam are used too often, the iron won’t be able to reheat, and won’t
produce steam. Make pauses between bursts of steam.

PL
Instrukcja obsługi16
Przed pierwszym użyciem żelazka należy dokładnie przeczytać instrukcję obsługi. Instrukcję
należy zachować w celu późniejszego wykorzystania.
KWESTIE BEZPIECZEŃSTWA
1. Zabrania się używania urządzenia do celów innych niż prasowanie tkanin.
2. W celu uniknięcia porażenia prądem, zabrania się zanurzania żelazka lub jakiejkolwiek z
jego części w wodzie czy w innym płynie.
3. Przed podłączeniem/odłączeniem wtyczki żelazka, należy ustawić pokrętło temperatury
na najniższej wartości. Zabrania się ciągnięcia za kabel aby odłączyć sprzęt od źródła
zasilania; należy suchą ręką chwycić i pociągnąć wtyczkę.
4. Należy uważać aby kable nie miały styczności z gorącymi powierzchniami; Zanim żelazko
powróci do miejsca przechowywania, należy odstawić je w bezpieczne miejsce i odczekać
kilka minut aż się ostudzi. Przed schowaniem, można luźno owinąć kabel wokół żelazka.
5. Należy zawsze odłączać żelazko od źródła zasilania przy uzupełnianiu/opróżnianiu
zbiornika na wodę, a także wtedy kiedy żelazko nie jest używane.
6. Należy zaprzestać używania żelazka jeśli kabel jest uszkodzony, urządzenie nie funkcjonuje
prawidłowo lub zostało upuszczone. Zabrania się własnoręcznej próby naprawy
uszkodzonego urządzenia. W przypadku usterki, należy zanieść żelazko do najbliższego
autoryzowanego punktu serwisu w celu sprawdzenia lub naprawy. Nieprawidłowo
naprawione żelazko stwarza ryzyko porażenia prądem lub pożaru.
7. Zaleca się zachowanie szczególnej uwagi podczas obsługi żelazka, gdyż kontakt z
gorącymi metalowymi częściami, gorącą wodą czy parą może powodować poparzenia.
Należy zachować ostrożność w przypadku odwracania urządzenia stopą żelazka do góry,
w zbiorniku może znajdować się gorąca woda!
8. W przypadku wystąpienia jakiejkolwiek anomalii świadczącej o nieprawidłowym działaniu
urządzenia, należy natychmiast przerwać pracę urządzenia. Należy jak najszybciej
odłączyć żelazko od źródła zasilania i zanieść je do autoryzowanego punktu naprawy.
9. Żelazko należy przechowywać i używać na stabilnej powierzchni.
10.Zabrania się używania żelazka w przypadku gdy zostało wcześniej upuszczone, przecieka,
bądź widoczne są na nim, lub jego przewodzie zasilającym jakiekolwiek uszkodzenia.
11.Urządzenie nie może być obsługiwane przez osoby (w tym dzieci) o ograniczonych
zdolnościach zycznych, sensorycznych lub umysłowych, oraz przez osoby które nie
posiadająwiedzyidoświadczenianiezbędnego doobsługitegourządzenia;zwyłączeniem
sytuacji użytkowania żelazka w obecności osoby odpowiedzialnej za ich bezpieczeństwo.
12.Zabrania się użytkowania urządzenia przez dzieci bez nadzoru osób dorosłych.
13.Zabrania się pozostawiania bez nadzoru urządzenia podłączonego do źródła zasilania.
14.Należy poinstruować dzieci żeby nie traktowały żelazka jako zabawki.
15.Przed napełnianiem zbiornika wodą, należy wyciągnąć wtyczkę z gniazda zasilania.
OSTRZEŻENIE!
Aby uniknąć przeciążenia, zaleca się nie podłączać innego urządzenia o wysokiej mocy do
tego samego gniazda zasilania do którego zostało podłączone żelazko.
Żelazko należy podłączyć bezpośrednio do gniazdka ściennego (nie należy stosować
przedłużacza).

PL
Instrukcja obsługi 17
PAMIĘTAJ
Zabrania się użytkowania urządzenia przez dzieci bez nadzoru osób dorosłych.
Zabrania się zanurzać żelazko, kabli lub innych części urządzenia w wodzie lub
jakimkolwiek płynie.
Zabrania się pozostawiania rozgrzanego żelazka na materiałach, czy wysoce łatwopalnych
powierzchniach.
Zabrania się pozostawiania nieużywanego urządzenia podłączonego do prądu. Jeśli
żelazko nie jest używane, należy odłączyć je od zasilania i wyciągnąć wtyczkę.
Zabrania się dotykać żelazka mokrymi lub wilgotnymi dłońmi.
Zabrania się szarpać kabel w celu wyciągnięcia wtyczki z gniazdka.
Zabrania się pozostawiać żelazko na wpływ działań atmosferycznych (deszcz,
nasłonecznienie, itd.).
Zabrania się pozostawiać żelazko bez nadzoru jeśli jest podłączone do źródła zasilania.
Zabrania się napełniać zbiornik na wodę w sytuacji gdy żelazko jest podłączone od prądu.
UWAGA!
Zabrania się wlewania do zbiornika na wodę detergentów, substancji zapachowych czy
odkamieniaczy. Niezastosowanie się do powyższego zalecenia skutkuje utratą gwarancji!
INSTRUKCJE OGÓLNE
Uwaga:
1. Należy zwrócić szczególną uwagę aby nie porysować stopy żelazka; zabrania się dotykać
nią do metalowych przedmiotów (guzików, suwaków, itd.).
2. Materiały z włókna 100% wełny mogą zostać wyprasowane za pomocą funkcji parowania;
należy przestawić pokrętło temperatury na opcję „wełna” (wool), włączyć wysokie
parowanie oraz zastosować ściereczkę do prasowania.
SUGESTIE PRZED PIERWSZYM UŻYCIEM
1. Jeśli na stopie żelazka znajduje się osłona zabezpieczająca, należy ją usunąć przed
pierwszym użyciem, oraz przetrzeć stopę czystą ściereczką.
2. Przed pierwszym użyciem, zaleca się przeprasowanie skrawka zwykłego materiału, w celu
sprawdzenia działania żelazka.
3. Niektóre części żelazka zostały lekko nasmarowane w czasie produkcji. W związku z
tym, żelazko może wydzielać nieznaczne ilości dymu po pierwszym podłączeniu; takie
działanie ustąpi po chwili.
4. Podczas pierwszego użycia, rozszerzające się plastikowe części żelazka mogą wydzielać
nieznaczne ilości dymu i wydawać dźwięki. Takie zachowanie sprzętu jest normalne, i
ustaje po krótkim czasie użytkowania.

PL
Instrukcja obsługi18
WYBÓR TEMPERATURY
1. Należy sprawdzić i dostosować się do zaleceń producenta odnośnie temperatury
prasowania danego materiału.
2. Jeśli na metce ubrania nie znajdują się wskazówki dotyczące prasowania, należy
zastosować się do wskazówek podanych poniżej.
3. Materiały które posiadają specyczne wykończenie (połysk, marszczenia, itp.) powinny
być prasowanie w najniższych temperaturach.
4. Jeśli materiał jest mieszaniną różnych włókien, należy zastosować najniższą temperaturę
zalecaną do prasowania włókien zawartych w materiale. Np. jeśli materiał składa się
w 60% z poliestru i w 40% z bawełny należy wybrać temperaturę odpowiadającą
poliestrowi, oraz wyłączyć funkcję pary.
5. Zaleca się segregowanie materiałów według temperatury ich prasowania. Żelazko
rozgrzewa się z taką samą szybkością z jaką się chłodzi, i w związku z tym zaleca
się rozpoczęcie prasowania od materiałów wymagających najniższej temperatury
prasowania (np. materiałów z włókien syntetycznych), i kontynuowanie zgodnie ze
wzrostem wymaganej temperatury prasowania.
6. Następnie, należy ustawić pokrętło temperatury na wybranej temperaturze,
odpowiednio do poniższych wskazówek:
• nylon i materiały z włókien syntetycznych
• • wełna, jedwab i materiały z włókien mieszanych
• • • bawełna, len (funkcja pary)
NAPEŁNIANIE ZBIORNIKA NA WODĘ
1. Najpierw, należy wyciągnąć wtyczkę z gniazda zasilania;
2. Następnie, wyłączyć funkcję pary;
3. Wlać wodę przez otwór w obudowie.
4. Uwaga: Jeśli bieżąca woda w Państwa domu jest twarda, zaleca się użycia wody
destylowanej lub zdemineralizowanej. Zabrania się używania wody chemicznie
odwapnionej lub perfumowanej!
5. Po zakończeniu pracy, należy opróżnić zbiornik na wodę. Zabrania się przechowywania
urządzenia jeśli w zbiorniku znajduje się woda.
PRASOWANIE PARĄ
1. Należy napełnić zbiornik na wodę zgodnie z instrukcją podaną powyżej;
2. Następnie podłączyć żelazko do źródła zasilania.
3. Prasowanie parą możliwe jest tylko przy ustawieniu najwyższych temperatur (w
przeciwnym razie, ze stopy żelazka może wydostawać się woda).
4. Następnie, zaczekać aż zgaśnie kontrolka temperatury (co wskazuje na osiągnięcie
pożądanej temperatury);
5. Oraz ustawić przycisk pary na wybranym poziomie.
6. Podczas przerw i po zakończeniu prasowania należy ustawiać żelazko w pozycji pionowej.

PL
Instrukcja obsługi 19
7. Po zakończeniu pracy, należy odłączyć żelazko od źródła zasilania, wylać resztki wody ze
zbiornika i odstawić żelazko do ostudzenia.
SPRYSKIWACZ
Funkcja spryskiwacza dostępna jest zarówno w suchym jak i parowym prasowaniu, pod
warunkiem, że w zbiorniku znajduje się woda.
Aby spryskać powierzchnię, należy nacisnąć przycisk spryskiwacza.
UWAGA: Przed pierwszym użyciem należy kilkukrotnie nacisnąć przycisk spryskiwacza aby
uruchomić tę funkcję.
UDERZENIE PARY
Uderzenie pary dostarcza dodatkową ilość pary w celu usunięcia trudnych zagnieceń.
1. Należy ustawić pokrętło temperatury na najwyższej wartości i zaczekać aż urządzenie się
nagrzeje, a kontrolka zgaśnie;
2. Nacisnąć przycisk uderzenia pary.
3. Przed kolejnym uderzeniem, należy odczekać, aż para przeniknie włókno.
UWAGA: Aby uzyskać najwyższą jakość parowania, zaleca się generowanie nie więcej niż
3 uderzenia pary za jednym razem. Kilkukrotne naciśnięcie przycisku pary wymagane jest
tylko przed rozpoczęciem tej funkcji. Nadmierne używanie funkcji pary spowoduje spadek
temperatury żelazka.
Przed prasowaniem parą, należy upewnić się, czy żelazko osiągnęło odpowiednią
temperaturę a kontrolka się nie świeci.
CZYSZCZENIE
1. Przed rozpoczęciem czyszczenia, należy odłączyć urządzenie od źródła zasilania.
2. Żelazko należy czyścić miękką ściereczką; zabrania się używania rozpuszczalnika czy
produktów ścierających.
FUNKCJA AUTOCZYSZCZENIA
1. Przed włączeniem funkcji auto-czyszczenia, należy odłączyć urządzenie od źródła zasilania;
2. napełnić zbiornik na wodę, do poziomu maksymalnego.
UWAGA: Zabrania się wlewania do zbiornika innych płynów niż woda. Nie należy wlewać
do zbiornika octu ani żadnych środków czyszczących.
3. Następnie, należy podłączyć żelazko do zasilania sieciowego, wyłączyć funkcję pary i

PL
Instrukcja obsługi20
przesunąć pokrętło temperatury na wartość maksymalną;
4. umieścić żelazko w pozycji poziomej nad zlewem;
5. oraz nacisnąć przycisk auto-czyszczenia. Można również delikatnie potrząsnąć
urządzeniem. Ze stopy żelazka zacznie wydobywać się woda.
6. Po zakończeniu czyszczenia, kiedy zbiornik wody zostanie opróżniony, należy odłączyć
żelazko od źródła zasilania, i pozostawić urządzenie do ostudzenia.
7. Następnie przetrzeć stopę żelazka czystą, wilgotną ściereczką, w celu usunięcia resztek
zanieczyszczeń.
AUTOMATYCZNE WYŁĄCZANIE
Jeśli żelazko jest włączone, ale nie było używane od 8 minut (w pozycji pionowej), lub 30
sekund (w pozycji poziomej), system zabezpieczający automatycznie wyłączy żelazko, a
kontrolka zacznie migać. Aby ponownie włączyć urządzenie, należy nim poruszyć.
PIONOWE UDERZENIE PARY
Żelazko posiada funkcję uderzenia pary w pozycji pionowej.
Aby użyć tej funkcji, należy trzymać żelazko w pozycji pionowej, nacisnąć przycisk
uderzenia pary i delikatnie dotykać prasowanej tkaniny stopą żelazka.
UWAGA: Zaleca się zachowanie szczególnej ostrożności podczas stosowania tej funkcji.
Para wydobywająca się z żelazka jest gorąca i stwarza ryzyko poparzeń. Zabrania się
prasowania odzieży po jej założeniu.
BLOKADA KAPANIA
Żelazko wyposażone jest w funkcję zapobiegającą kapaniu: urządzenie automatycznie
wyłącza funkcję pary jeśli temperatura jest za niska i mogłoby to prowadzić do kapania wody
ze stopy żelazka.
FUNKCJA ANTYWAPIENNA
Funkcja anty-wapienna ltruje wodę z minerałów i tym samym zapobiega gromadzeniu się
osadu w komorze żelazka.
NAPRAWA
Zabrania się własnoręcznej wymiany uszkodzonego lub naprawy żelazka lub jakiejkolwiek
części urządzenia. W razie usterki lub nieprawidłowego działania urządzenia, należy oddać je
do autoryzowanego punktu w celu naprawy.
This manual suits for next models
3
Table of contents
Languages:
Other Teesa Iron manuals