TEIKO SKPU 4/90 User manual

763 64 Spytihněv č.p. 576, okres Zlín
tel.:+420 577 110 311, fax:+420 577 110 315
teik[email protected]; www.teiko.cz
ver. 04/2007
MONTÁŽNÍ A UŽIVATELSKÝ NÁVOD
ASSEMBLY AND USER´S MANUAL INSTRUCTIONS
MONTAGE- BEDIENUNGS- UND PFLEGEANLEITUNG
SPRCHOVÝ KOUT PĚTIÚHELNÍKOVÝ
PENTAGONAL SHOWER CABIN
FÜNFEDUSCHE MIT 4 BEWEGLICHEN TEIELEN
SKPÚ 4/90 K VANIČCE PEGAS
SKPÚ 4/90 TO PEGAS SHOWER-TRAY
SKPÚ 4/90 ZU DUSCHWANNE PEGAS
#:%à
36+à
%.'à
$%à
(5.à
0/,à
253
РУС
253à
253à
253à
#:%à
36+à
%.'à
$%à
(5.à
0/,à
253
РУС
253à
253à
253à
#:%à
36+à
%.'à
$%à
(5.à
0/,à
253
РУС
253à
253à
253à

2
>
>
POKYNY PŘED MONTÁŽÍ VÝROBKU
INFORMATION PRIOR TO PRODUCT ASSEMBLY
WICHTIGE INFORMATIONEN VOR DER MONTAGE
Sprchová zástěna je dodávána ve složeném stavu.
Před zahájením montáže, překontrolujte výrobek, zda nedošlo k jeho poškození nebo ke ztrátě částí při přepravě.
Shower enclosure is supplied assembled.
Before unpacking the product check it properly whether the packing came undamaged or whether some
of the parts did not get lost during transport to the place.
Die Duschtrennwand wird fertig montiert geliefert.
Vor dem Beginn der Montage überprüfen Sie das Produkt, ob es zu dessen Beschädigung oder zum Verlust
von Teilen während des Transportes kam.
POPIS DÍLŮ KOMPLETU
A) Sprchová zástěna 1 ks
B) Montážní balíček 1 ks
C) Upevňovací profil 2 ks
COMPONENTS LIST OF THE PRODUCT
A) Shower enclosure 1 pc
B) Assembly kit 1 pc
C) Attaching profile 2 pcs
BESCHREIBUNG DER KOMPLETTEN TEILE
A) Wannentrennwand 1 Stck.
B) Montagepaket 1 Stck.
C) Befestigungsprofil 2 Stck.
#:%à
36+à
%.'à
$%à
(5.à
0/,à
253
РУС
253à
253à
253à
#:%à
36+à
%.'à
$%à
(5.à
0/,à
253
РУС
253à
253à
253à
#:%à
36+à
%.'à
$%à
(5.à
0/,à
253
РУС
253à
253à
253à
OBSAH MONTÁŽNÍHO BALÍČKU
a) Hmoždinka Ø 6 mm 6 ks
b) Šroub 3,9 x 38 6 ks
c) Šroub 3,5 x 9,5 6 ks
d) Krytka šroubu 6 ks
e) Víčko 12 ks
f) Silikonový tmel 1 ks
g) Samolepka s logem 1 ks
ASSEMBLY PARTS
a) Dowel Ø 6 mm 6 pcs
b) Screw 3,9 x 38 6 pcs
c) Screw 3,5 x 9,5 6 pcs
d) Screw cap 6 pcs
e) Cap 12 pcs
f) Silicon 1 pc
g) Sticker with logo 1 pc
INHALT DES MONTAGEPAKETES
a) Dübel Ø 6mm 6 Stck.
b) Schraube 3,9 x 38 6 Stck.
c) Schraube 3,5 x 9,5 6 Stck.
d) Schraubenkappe 6 Stck.
e) Silikon 12 Stck.
f) Selbstklebendes Etikett mit Logo 1 Stck.
g) Silikonový tmel 1 Stck.
ab c d e
A
B
C
C
fg

3
1.Před zahájením montáže sprchové zástěny překontroluj-
te upevnění sprchové vaničky a ustavení do vodoroviny.
Na vaničce v místě montáže zástěny nesmí být ochranná
fólie. Do vaničky doporučujeme vložit ochrannou pod-
ložku (karton).
2.Ustavte sprchovou zástěnu s nasunutými stěnovými
profily (C) na vaničku, polohu stěnových profilů vyrovnej-
te svisle do vzdálenosti cca 5 mm od okraje vaničky.
Označte tužkou polohu stěnových profilů (C). Sejměte
stěnové profily ze zástěny, přiložte dle označení na zeď
a označte otvory pro hmoždinky. Do stěny vyvrtejte
otvory 6mm a vložte do nich hmoždinky (a). Na profily
(C) naneste tenkou vrstvu silikonového tmelu a přišrou-
bujte je napevno ke stěně.
3.Zasuňte sprchovou zástěnu do stěnových profilů. Ustav-
te ji tak, aby dosedla těsně na vaničku a svislé profily
pevné stěny byly zasunuty rovnoměrně do stěnových pro-
filů. Zástěnu svrtejte zevnitř se stěnovými profily ve třech
místech, vrtákem 3 mm ve vzdálenosti cca 8 cm od horní
a spodní hrany zástěny a uprostřed. Sešroubujte šrouby
3,5 x 9,5 mm (c) a zakryjte krytkami (d).
4.Ustavte polohu dveřních dílů (je-li potřeba). Dovřete
dveře zástěny a lehce povolte šrouby kloubů kladek.
Výškově seřiďte polohu dveří posunem kloubů nahoru
nebo dolů. Dotáhněte šrouby, překontrolujte chod dveří
a dosednutí obou magnetických profilů při dovření.
Šrouby kloubů zakryjte víčky (e).
5.Napojení profilů zástěny na vaničku a stěny utěsněte
z vnější strany zástěny silikonovým tmelem. Těsněné
plochy musí být suché a čisté, zbavené prachu. Tmel
naneste seříznutou špičkou nádstavce do rohu spo
je a uhlaďte stěrkou nebo prstem navlhčeným
v tekutém mýdle.
Tmel nechejte zaschnout minimálně 24 hodin!!!
U sprchové zástěny s výplní PEARL odstraňte ochrannou
folii z vnitřní strany.
NÁŘADÍ PRO MONTÁŽ
1) Tužka
2) Vodováha
3) Úhelník
4) Vrták Ø 3 mm
5) Vrták do zdi Ø 6 mm
6) Vrtačka s příklepem
7) Akuvrtačka
8) Šroubovák křížový
9) Svinovací metr
>
POKYNY K POUŽÍVÁNÍ VÝROBKU
• Pro správnou funkci doporučujeme výrobek čistit a udržovat.
• Zástěny se ošetřují běžnými čistícími prostředky určenými pro domácnost, které neobsahují pevné částice.
• Kladky a profily je nutno občas odmastit a vyčistit běžným saponátem.
• Dále doporučujeme pojezdy potřít lékařskou vazelínou nebo ochranným glycerinovým krémem.
#:%à
36+à
%.'à
$%à
(5.à
0/,à
253
РУС
253à
253à
253à

4
1.Description of the enclosure assembly works. Before
you begin to assemble the enclosure please check up
whether the bath is rmly xed and leveled. The shower
-tray does not have to be provided with masking
(protective foil). Prior to assembly works we recom-
mend you to put cardboard as a protective pad inside
the shower-tray (cardboard).
2.Set up the shower enclosure with already inserted “C”
wall proles onto the shower-tray. Align position of the
wall proles vertically about 5 mm from the rim of the
shower-tray. With a pencil mark position of the “C” wall
proles. Take the wall proles away from the shower
enclosure, by the mark hold it on the wall and mark
the holes for dowels. Drill 6 mm in diameter holes in
the wall and insert “a” dowels into them. Apply a thin
layer of silicon on “C” prole and x it rmly to the wall
with “b” screws.
3.Slide the shower enclosure into the wall proles. Set
up the shower enclosure so it lays tight on the shower
-tray and be sure the vertical proles of the xed screen
to be inserted uniformly into the wall proles. Drill the
shower enclosure and proles from the inside in three
spots with a Ć 3 mm drill in a distance about 8 cm
from the top and lowest rim of the enclosure as well as
in the middle. Drive in the 3,5 x 9,5 mm screws. Provide
the screws with the “d” caps.
4.Set up correct position of the door parts (if necessary).
Close the enclosure door and slightly loosen the bolts
of the pulleys joints. By height adjust position of the door
by moving joints upwards or downwards. Screw up the
bolts; check up movement of the door as well as both
magnetic proles whether they t at the door closed
position. Provide screws of the joints with the “e” caps.
5.Remove the masking (protective foil) from the inside
of screens (just in case when a PEARL-type screen is
used). Screen wall proles connection to the shower
-tray and walls has to be sealed from the outside of the
shower enclosure with silicon. The sealed surfaces
have to be dry and clean, deprived of dust. Silicon is to be
applied with a splayed tip of the gun into the corner
of the joint and has to be slicked down with spatula or
by nger moistened in a liquid soap.
Keep the silicon curing for 24 hours!!!
INSTRUCTION HOW TO USE THE PRODUCT
• We recommend you to clean it and keep it well so that the product could give you as best as possible service.
• Enclosures are treated with current cleaning agents for domestic use which do not contain solid particles.
• It is important to remove the grease out of guiding profiles and pulleys and clean them with a current detergent.
• Furthermore we recommend you to apply both mineral-jelly or protective glycerin gel on rails and guiding profiles.
>
ASSEMBLY TOOLS
1) Pencil
2) Water level
3) Angle bar
4) Drill Ø 3 mm
5) Drill Ø 6 mm
6) Drilling machine with hammer
7) Drilling machine
8) Cross-head screwdriver
9) Tape measure
#:%à
36+à
%.'à
$%à
(5.à
0/,à
253
РУС
253à
253à
253à

5
1.Vor dem Beginn der Montage der Wannentrennwand
überprüfenSie die Befestigungder Wanneund diewaage-
rechte Aufstellung. Auf der Wanne darf keine Schutzfolie
an der Stelle für die Montage der Trennwand sein. Wir
empfehlen, in die Wanne eine Schutzunterlage (Karton)
zu legen.
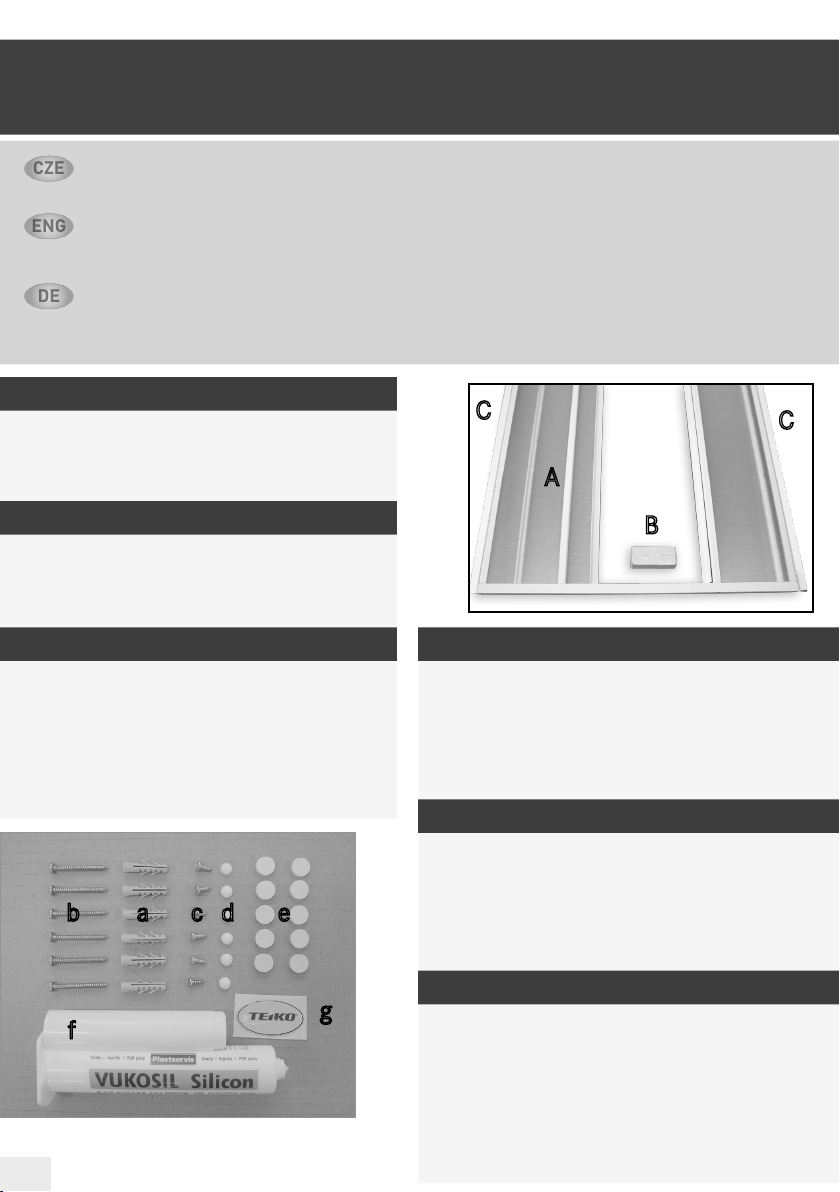
2.Legen Sie die Profile (C1 und D) an die Wand an der
Stelle für die Befestigung der Trennwand an (5 und 45
mm ) und zwar so, dass sie mit der Trennwand im Winkel
von 90 ° übereinstimmen. Markieren Sie die Lage der
Bohrungen. Bohren Sie die Löcher Ø 6 mm in die Wand
und stecken Sie die Dübel ein. Tragen Sie auf das Profil
(C1) eine dünne Silikonschicht auf und schrauben Sie es
fest an die Wand. Wiederholen Sie den gleichen Vorgang
mit (C2) auf der anderen Wandseite. Das Profil (D) wird
bisher nicht montiert.
3.Stecken Sie die Wannentrennwand bis zum Anschlag
ins Profil (C2) ein. Richten Sie die andere Seite mit dem
selbstständigen Profil auf das Profil C1 aus und ziehen
Sie die Wannentrennwand etwas aus dem Profil (C2) ins
Profil (C1) so heraus, dass die Trennwand gleichmäßig
in beiden Profilen (C1, C2) eingesteckt werden kann.
Führen Sie in den Profilen (C1) und (C2) gemeinsam
mit der Duschtrennwand Bohrungen an drei Stellen
mit dem Bohrer Ø 3 mm aus und sichern Sie diese mit
den Schrauben ( c). Auf die Schrauben werden dann die
Deckkappen aufgesteckt.
4.Tragen Sie auf das Profil (D) eine dünne Silikonschicht
auf und schrauben Sie das Profil fest an die Wand.
Stecken Sie ins Profil (D) das Profil mit dem Magnet (E)
und ziehen Sie das Profil so heraus, dass es optimal auf
dem gegenüberliegenden Magnet der geschlossenen
Tür der Trennwand aufsetzt. Bohren Sie die Profile (D)
und (E) von innen an drei Stellen (Ø 3 mm) und sichern
Sie sie mit den Schrauben (c ). Auf die Schrauben wer
den dann die Deckkappen aufgesteckt.
5.Die Fuge zwischen den Profilen (C) der Wand und der
Wanne wird gereinigt (entfettet). In die Fugen zwischen
der Wand und den Profilen (C) wird Silikon aufgetragen.
Das Silikon wird mit einem Spachtel oder mit dem in
flüssiger Seife befeuchteten Finger glattgerieben. Die
untere Fuge zwischen dem Teil der Trennwand und der
Badewanne auf der Außenseite ist auch mit Silikon abzu
dichten. Lassen Sie das Silikon minimal 24 Std.
trocknen!!!! Entfernen Sie an der Trennwand der
Badewanne mit der Ausfüllung PEARL die Schutzfolie
auf der inneren Seite
PFLEGEHINWEISE
• Für eine langlebige Funktion wird empfohlen, das Produkt regelmäßig zu reinigen.
• Die Trennwände sollen mit normalen Haushaltsreinigern - die keine Scheuermittel beinhalten - gepflegt werden.
• Die Gelenke und Profile sind regelmäßig zu entfetten und mit Surfactant zu reinigen.
• Wir empfehlen, die Gelenke mit medizinischem Fett oder mit schützender Glyzerincreme regelmäßig zu schmieren.
MONTAGEWERZEUG
1) Bleistift
2) Wasserwaage
3) Winkel
4) Bohrer Ø 3 mm
5) Bohrmaschine Ø 6 mm
6) Schlagbohrmaschine
7) Akku-Bohrmaschine
8) Kreuzschlitz-Schraubenzieher
9) Bandmaß
>
#:%à
36+à
%.'à
$%à
(5.à
0/,à
253
РУС
253à
253à
253à

6
5 mm
5.
1.
2.
3.
4.

7
Výška vanové zástěny 1850 mm
Šířka vanové zástěny 900 mm
The height of the shower enclosure 1850 mm
The width of the shower enclosure 900 mm
Höhe der Wannentrennwand 1850 mm
Breite der Wannentrennwand 900 mm
TECHNICKÉ PARAMETRY
TECHNICAL PARAMETERS
TECHNICKÉ PARAMETRY
max. 330

8
www.teiko.cz
Table of contents
Popular Other manuals by other brands

Feig Electronic
Feig Electronic OBID Classic-Pro ID CPR.M02 Series installation manual

Wallenstein
Wallenstein BX36S operating manual

NRD
NRD Staticmaster P-2035 Installation, operation and maintanance manual

Elite Screens
Elite Screens DIY Screen Series user guide

Innovatione
Innovatione 1S PRO instructions

Cardin Elettronica
Cardin Elettronica EL Series instruction manual