Tekkeon MP3450-10 User manual

ACCREDITED SOLUTION
EXPLORER®– myPower™ ALL MP3450 Universal Battery

Accredited Solution EXPLORER – myPower ALL MP3450 Universal Battery Page 2/5
Document Name: EXPLORER – myPower ALL MP3450 Universal Battery Revision: A
Introduction: This document describes the pocket-sized rechargeable battery pack from Tekkeon as a back-up
power source and universal power supply for the EXPLORER terminals and other portable devices.
Typical Users: Mobile workforce.
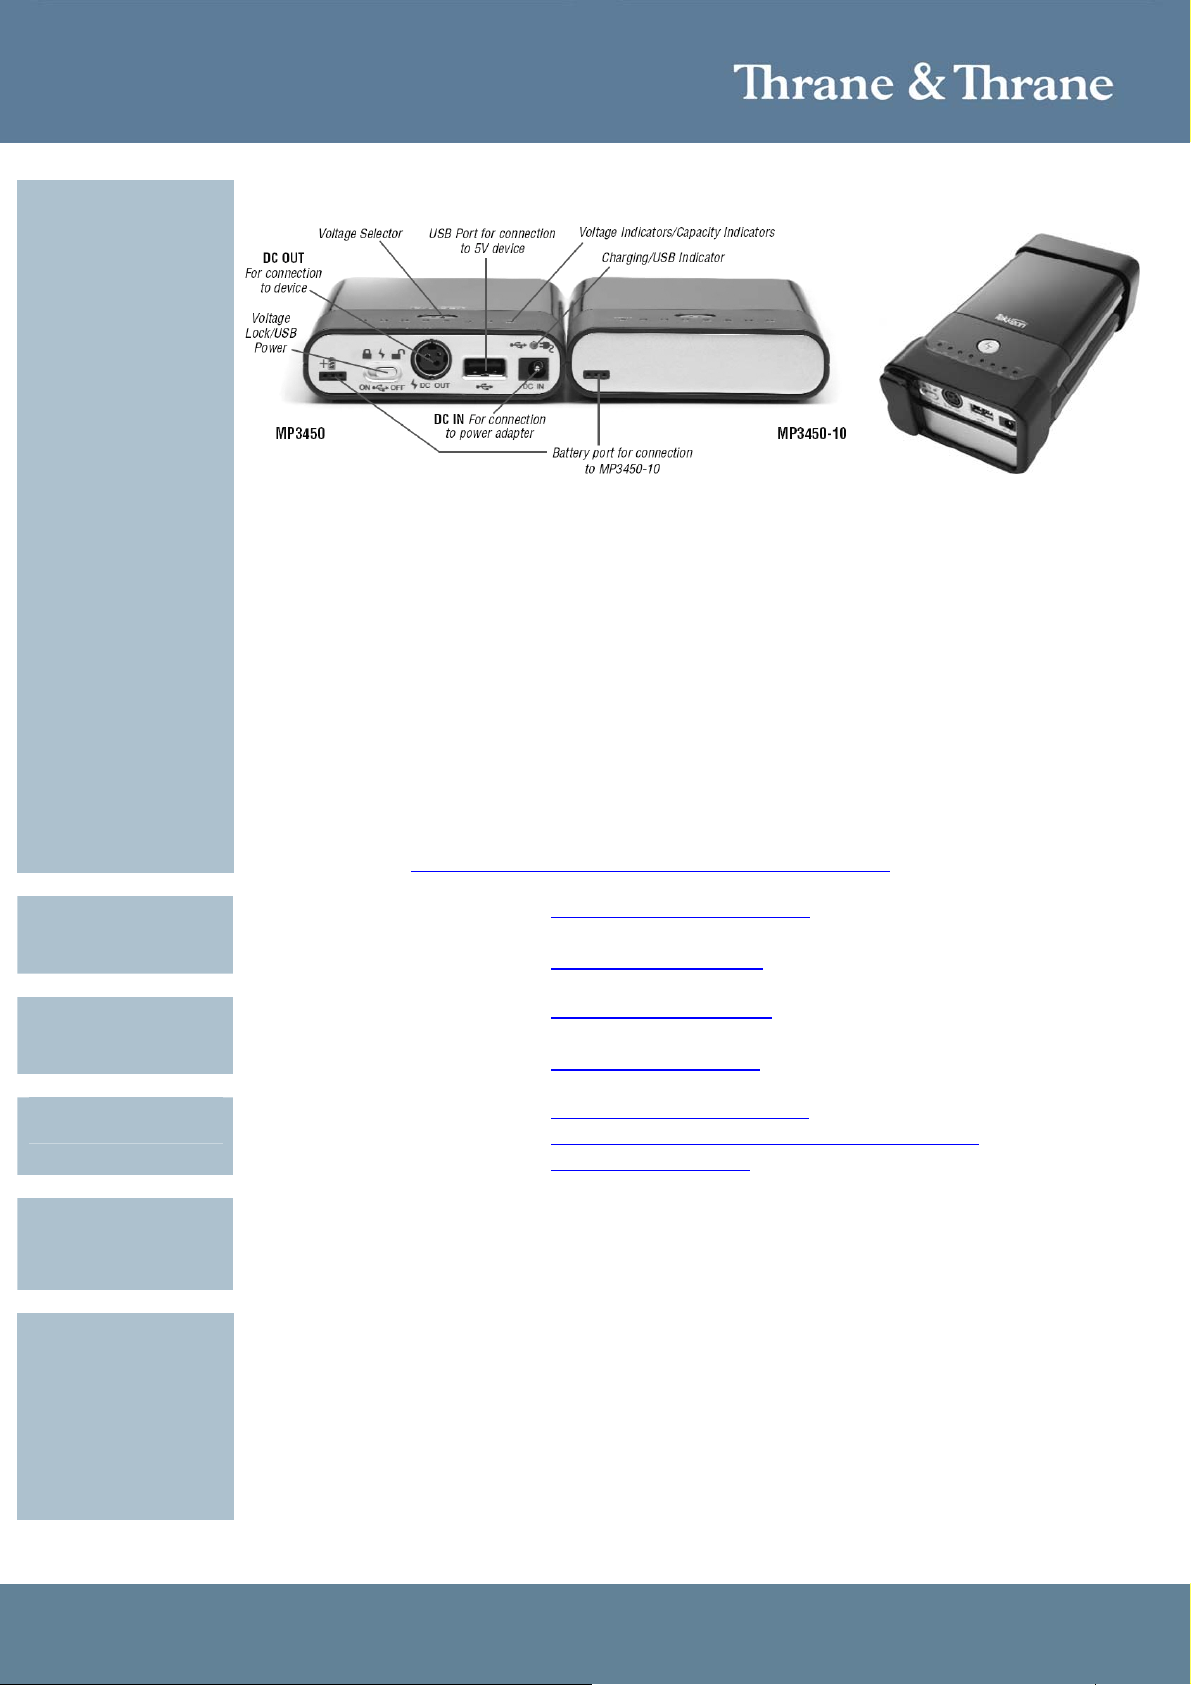
Product Description: The MP3450 myPower ALL is a single lightweight rechargeable
battery to extend the operation time on your portable devices, like the
EXPLORER terminal, computer, digital camera, camcorder and more.
Selecting the right voltage for a device is done quickly and easily.
The myPower ALL automatically resets to the lowest setting after
a device is connected, and thereby not overcharging the device.
Included as standard:
►myPower ALL universal battery
►AC/DC power adapter
►Adapter kit/tips
►Leather carrying case
►User guide
Features:
►Supports multiple voltages
►Additional USB power output
►Voltage lock holds current voltage setting
►LED’s indicate remaining battery capacity
►Visual indicators identify exact output voltage
►Connects directly to any portable EXPLORER terminal
►The EXPLORER 300/500/700 AC/DC power adapter can be used to charge the MP3450
►Bring only one power supply when travelling.
►Includes 8 adapter tips that connect to most devices. Compatibility list on http://www.tekkeon.com
Accredited Solution EXPLORER – myPower ALL MP3450 Universal Battery Page 3/5
An optional MP3450-10 battery pack is available to double the capacity.
MP3450 technical specifications:
Technology : Rechargeable lithium polymer
Charge time : 2 hours 15 minutes (4 h 15 m with MP3450-10)
Capacity : 50 Wh (100 Wh with MP3450-10)
Input Voltage : 8.5V to 20V
Output Voltage : 5, 6, 7.5, 9, 12, 14, 16, 19 Volt (selectable)
Max. output current : 3.5 Amp
USB output Voltage : 5 Volt
Charge temp. range : 32°F to 104°F (0°C to 40°C)
Operation temp. range : -4°F to 140°F (-20°C to 60°C)
Weight total : 15.3 oz (434 gram) or 32 oz (910 gram) with MP3450-10
Dimensions : 3.32” x 6.85” x .89” (84 x 174 x 23 mm)
More product info: http://www.tekkeon.com/site/products-mypowerall.php
E-mail mailto:[email protected]
Phone +1 888 787 5888
Tekkeon
contact details:
Web http://www.tekkeon.com
E-mail mailto:[email protected]
Phone +45 7020 8628
UnatSolar
contact details:
Web site http://www.unatsolar.eu
E-mail mailto:[email protected]
Thrane & Thrane Distributors http://www.thrane.com/Contact/Distributors.aspx
Thrane & Thrane
contact details:
Website http://www.thrane.com
EXPLORER 110 Software version: 02.10.02
EXPLORER 300 Software version: 2.04
EXPLORER 500 Software version: 2.04
Tested on products:
EXPLORER 700 Software version: 2.04
Instructions: To charge the MP3450 please follow the instructions in the User Guide.
When using an EXPLORER power adapter or a P3-62W solar panel the MP3450 can be charged at
the same time it is charging an EXPLORER terminal.
Follow the simple steps on next page to connect the MP3450 to an EXPLORER 110, EXPLORER
300, EXPLORER 500 or EXPLORER 700 terminal:
Accredited Solution EXPLORER – myPower ALL MP3450 Universal Battery Page 4/5
Step 1: The EXPLORER terminals battery must be inserted
before you connect the MP3450.
Step 2: Connect the adapter C to the output cord if
charging an EXPLORER 300, EXPLORER 500 or
EXPLORER 700 (see Connection Overview).
Connect the adapter B to the output cord if
charging an EXPLORER 110.
Figure 1.
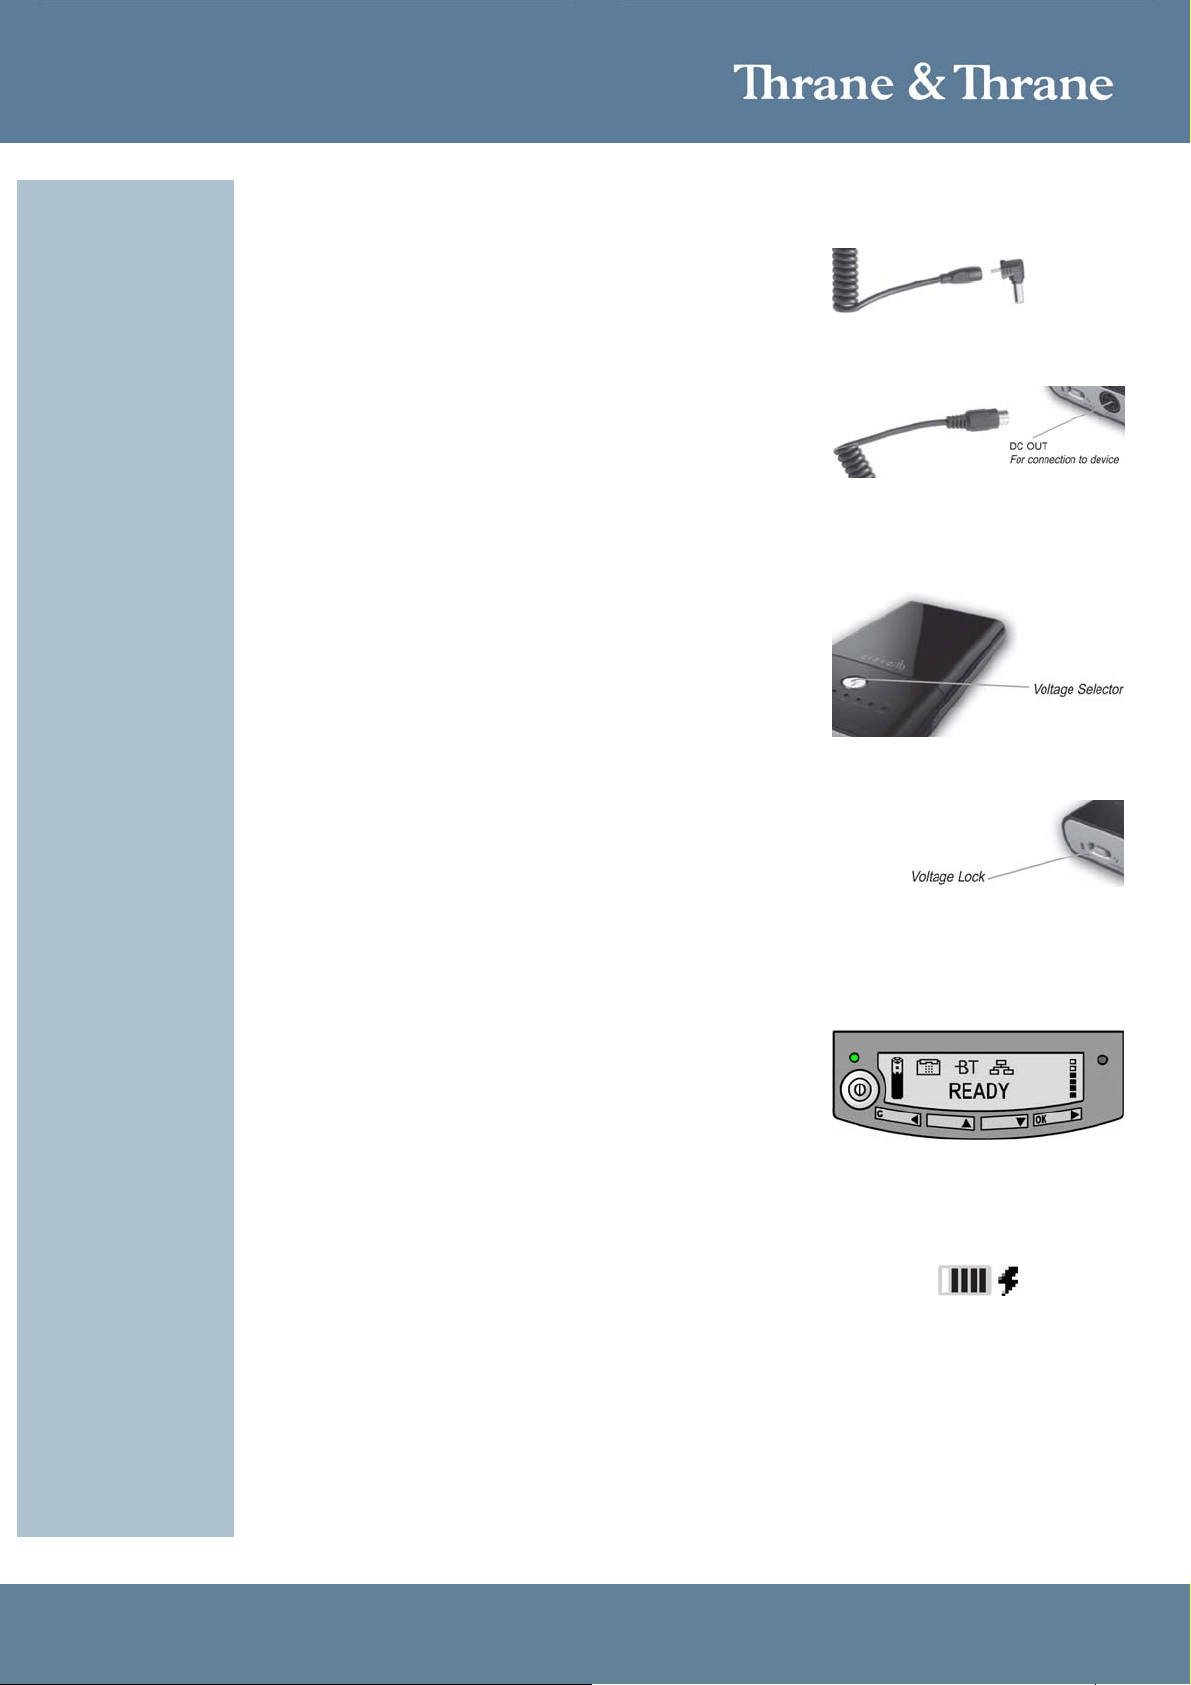
Step 3: Connect the other end of the output cord to the
DC OUT on the MP3450.
The output voltage will automatically be set to 5V
(red LED) to protect the device that will be
connected.
Figure 2.
Step 4: With the voltage lock in the unlocked position
(switched right to VOLTAGE), set the voltage
output to the input voltage of the EXPLORER
terminal.
►EXPLORER 110 = 14V
►EXPLORER 300 and EXPLORER 500 = 16V
►EXPLORER 700 = 19V
To do this, press the voltage selector until the
correct voltage indicator (LED) turns ON.
Figure 3.
Step 5: Slide the voltage lock to the locked position
(switch left to LOCK). This will prevent
accidentally selecting a different output voltage
while charging the EXPLORER terminal or other
devices.
Please refer to Figure 4.
Figure 4.
Step 6: Connect the other end of the output cord to the DC
input of the EXPLORER terminal.
Step 7: On the EXPLORER 300, EXPLORER 500 and
EXPLORER 700 the green LED left to the display
is constantly lit as long as the battery is charging
(Figure 5). When the battery is fully charged, the
green LED is turned off.
If the EXPLORER terminal is switched on, the
green LED will be flashing every 2 seconds when
fully charged.
On the EXPLORER 110 the battery indicator in
the EXPLORER ISDN Handset will show four bars
when the battery is between 60 to 80% full (Figure
6).
Figure 5.
Figure 6.
Step 8: When the EXPLORER battery or other devices is
charged unplug the MP3450.
You can preserve power by following below guidelines:
►Disconnect the MP3450 when the EXPLORER battery is approximately 80 to 90% charged.
►Point the EXPLORER antenna carefully to obtain best possible signal strength.
►Upgrade the EXPLORER terminal firmware to latest software release.

Accredited Solution EXPLORER – myPower ALL MP3450 Universal Battery Page 5/5
►Switch OFF the EXPLORER terminal when not being used for more than 15 min.
►It is possible to change the Power Up Mode to Manual in the EXPLORER 300, EXPLORER 500
and EXPLORER 700 terminal, so it does not power up automatically each time the MP3450 is
connected. Please follow the instructions in the EXPLORER User Guide on how to set it up.
►Remove the spiral cable from the MP3450 and set the lock to open, when not being used.
Note: The MP3450 only supports Centre Positive polarity. If your device has a Centre Negative
polarity, do not power the device with the MP3450.
The EXPLORER AC/DC Power Adapter can be used as a replacement for the MP3450 AC/DC
power adapter.
It is recommended to charge the EXPLORER battery to 100% from time to time as partial
charging/discharging may affect the accuracy of the capacity measurement.
Do not attempt to charge the MP3450 from a car battery, this may damage the circuitry in the
MP3450. This will require a special adapter.
A solar panel of minimum 30 watt is required, for instance the P3-30W or P3-62W from UnatSolar
http://www.unatsolar.eu/ (UnatSolar can also deliver the batteries and cables needed).
Tested: All tests performed @ 20°C (68°F) ambient temperature:
#1 A switched-ON EXPLORER 110 with a completely drained battery can be charged to
approx. 80% in 1 h 45 min. The EXPLORER 110 terminal can be recharged to 80% twice
on a fully charged MP3450.
#2 A switched-OFF EXPLORER 300/500 with a completely drained battery can be charged
to approx. 80% in 1 h 45 min. The EXPLORER 300/500 terminal can be recharged to
80% twice on a fully charged MP3450.
#3 The EXPLORER 700 can be charged to 100% from a fully charged MP3450.
#4 A Compaq nc6220 laptop (19V / Plug A) can be recharged to 90% from a fully charged
MP3450.
#5 A completely drained MP3450 can be fully charged by the UnatSolar P3-62W solar panel
in 2 h 15 min.
#6 The MP3450 with an optional MP3450-10 can be fully charged by the UnatSolar P3-62W
solar panel in 4 h 15 min.
#7 Powering a D-Link AirPlus DWL-G730AP Wireless Pocket Router/AP via the MP3450
USB power output creating a Wi-Fi hotspot over an EXPLORER 110/300/500 terminal.
Information in this document is subject to change without notice and
does not represent a commitment on the part of Thrane & Thrane A/S.
© 2008 Thrane & Thrane A/S. All ri
g
hts reserved. Printed in Denmark.
This manual suits for next models
1
Other Tekkeon Camera Accessories manuals


