Teknoware AALTO WMU TST5108 User manual

Wireless Monitoring Unit
U s e r G u i d e

Table of Contents
1. System setup ..............................................................................................3
1. 1. System Setup Process.................................................................................. 3
1. 2. First Login .................................................................................................... 3
1. 3. Seng up Soware sengs ........................................................................ 3
1. 4. Seng up Hardware sengs....................................................................... 4
1. 5. Seng up External Coordinator ................................................................. 5
1. 6. Adding Locaons (Areas and Buildings)....................................................... 6
1. 7. Adding Luminaires....................................................................................... 8
1. 8. Creang user accounts ................................................................................ 9
1. 9. Email reporng sengs............................................................................... 10
1. 10. Updang the Aalto WMU Soware........................................................... 10
2. Basic funcons............................................................................................11
2. 1. Checking faulty luminaires........................................................................... 11
2. 2. Quick Guide for using basic funcons in REPORTS and INSTALL views........ 11
2. 3. Using Filters (creang a Luminaires List) ..................................................... 12
2. 4. Adding luminaires to locaons (INSTALL view)............................................ 13
2. 5. Adding Notes to luminaires (INSTALL view)................................................. 14
2. 6. Using Acon tab (REPORTS view) ............................................................... 15
2. 7. Using History tab to create a test log (REPORTS view) ................................ 15
2. 8. Using Prohibions tab to create test schedules (REPORTS view) ................ 17

AALTO CONTROL WMU USER GUIDE
VOT97, Rev 1.1, 1.3.2017
3
1. System setup
1. 1. System Setup Process
To set up the system:
1. Log in for the rst me and change the administrator password (Chapter 1. 2)
2. Check, and set the system me (Chapter 1. 3)
3. Make the necessary soware sengs (Chapter 1. 3)
4. Make the necessary hardware sengs, and add the (oponal) external coordinator
(Chapters 1. 4 - 1. 5)
5. Add the Locaons to the system (Chapter 1. 6)
6. Add the luminaires to the system (Chapter 1. 7)
7. Create the user accounts (Chapter 1. 8)
8. Set up email addresses for the email reporng funcon (Chapter 1. 9)
9. Place the luminaires into the Locaons created previously (Chapter 2. 4)
10. Add notes to luminaires to help idenfy them (Chapter 2. 5)
1. 2. First Login
When logging in for the rst me, the system will prompt for a username and a password. The default
username is “ADMIN” and the password is “1234”. Make sure you change the password as soon as
possible (see Chapter 1.8 Creang user accounts for more informaon).
1. 3. Seng up Soware sengs
To change the soware sengs, tap SETTINGS and go to the Soware tab:

AALTO CONTROL WMU USER GUIDE
VOT97, Rev 1.1, 1.3.2017
4
Before making further system changes, make sure to check and set the system me by tapping the SET
TIME buon, and typing in the correct me and date.
Aer seng the system me, make the following sengs:
1. Stand by me: select a “screensaver” me. I.e., aer the system has been idle for this period
of me, the system will dim the screen. If the system remains idle for another idencal me
period, the system goes to stand by mode and logs out the current user.
2. Alternate names: From here you can change the tles for Note 1 and Note 2 luminaire data
elds. You can change the tles to for example Name and Locaon. Tap SAVE NAMES buon
aer changing the names.
3. You can import or export the luminaire data into a USB drive by using the IMPORT FROM
FILE or EXPORT TO FILE buons. You can also import or export the enre Aalto Control WMU
database, by tapping the IMPORT DATABASE or EXPORT DATABSE buons. It is recommended,
that aer all the sengs are done, and all the luminaires are installed, a backup le is
created by exporng the database.
NOTE!
If you intend to import the luminaire data from a CSV le, and the said le includes Locaon
data (Buildings and Areas), you do not need to pre-create the Locaons. They will be created
automacally during import.
4. REBOOT buon: reboots the system (required for running a WMU soware update)
1. 4. Seng up Hardware sengs
The Hardware sengs must be set before using the email reporng opon. To change the Hardware
sengs, tap SETTINGS and go to the Hardware tab:
The Local name is an open text eld, which can be used for naming the device.
Local IP address, Local netmask and Gateway are set according to the local network sengs. Contact
you network administrator or IT-support if you do not know these sengs.

AALTO CONTROL WMU USER GUIDE
VOT97, Rev 1.1, 1.3.2017
5
1. 5. Seng up External Coordinator
Make sure that the external coordinator and the Aalto Control WMU unit are both connected to
the network. Type in the IP address of the external coordinator, and tap SAVE. The IP address is set
according to the local network sengs. Contact you network administrator or IT-support if you do not
know the IP address. The “Info” -eld is an oponal free text eld, that can be used for adding relevant
informaon about the coordinator.
If an internet connecon is not needed (i.e. the email reporng is not in use) or connecon to an
enterprise LAN (Local Area Network) is not wanted, it is possible to create a WMU specic address
space. This means connecng an external coordinator either directly to the ethernet connector, or to
the WMU, via a router. In this case, make sure the Aalto Control WMU and the external coordinator
are in the same address space by seng the addresses, for example, as such:
• Local IP address: 192.168.42.39
• Local netmask: 255.255.255.0
• Gateway: 192.168.42.1
• External IP address: 192.168.42.40

AALTO CONTROL WMU USER GUIDE
VOT97, Rev 1.1, 1.3.2017
6
1. 6. Adding Locaons (Areas and Buildings)
NOTE!
If you intend to import the luminaire data from a CSV le, and the said le includes Locaon
data (Buildings and Areas), you do not need to pre-create the Locaons. They will be created
automacally during import.
Locaons are the categories you can later add the luminaires into. There are three dierent levels
of Locaons: Site is the root-level Locaon, which includes the enre Aalto Control WMU system.
There is only one Site in the system, and it is pre-created. The Site can be renamed. The next level of
Locaons are Buildings. There can be several Buildings, each of them can contain several Areas, which
is the 3rd, and lowest level of Locaons.
1. Tap ”LOCATIONS”:
2. To name the Site, click the menu icon next to the Site name, and select Rename site:

AALTO CONTROL WMU USER GUIDE
VOT97, Rev 1.1, 1.3.2017
7
3. Type the Site name (for example the company name) and tap Enter, and then Apply.
4. Tap the menu icon again, and select Add Building. Name the Building (e.g. BUILDING1), tap
Enter, and then Apply.
5. If you want to add more Buildings, repeat step 4

AALTO CONTROL WMU USER GUIDE
VOT97, Rev 1.1, 1.3.2017
8
6. To add an Area, tap the menu icon next to the Building name, tap Add area, name the area
(e.g. FLOOR 2), and tap Enter.
7. If you want to add more Areas, repeat step 6
8. To remove Buildings or Areas, tap the corresponding menu icon, and tap Remove... Note that
removing a Building will remove all Areas under that Building!
1. 7. Adding Luminaires
1. Tap SETTINGS, and open the Hardware tab
2. To search for luminaires in the wireless range, tap AUTOMATIC SEARCH. Wait for the automac
search to complete. The amount of added luminaires is displayed.
3. To install a luminaire manually, click ADD MANUALLY and ll in the data elds (RF ID and Type
are mandatory).
NOTE!
The ADVANCED SETTINGS are for authorized maintenance use only. Do not change these sengs!
4. To import the luminaire data from a CSV le, go to the Soware tab, insert the USB drive
containing the CSV le, and tap IMPORT FROM FILE buon. Select the le and conrm the
import with the corresponding buon.
Aer adding the luminaires to the system, you can add the luminaires to Locaons, and add Note and
Type informaon to the luminaires. This can be done either manually with the Aalto Control WMU
console, or with a spreadsheet soware. See Appendix 1 for instrucons on how to use a spreadsheet
/ CSV le to add the informaon.

AALTO CONTROL WMU USER GUIDE
VOT97, Rev 1.1, 1.3.2017
9
1. 8. Creang user accounts
1. Tap SETTINGS, and go to the User tab.
2. Tap NEW to add a new user, and ll in the required elds. User levels are:
• Basic user can access the LOCATIONS and REPORTS views to view luminaire errors and other
info.
• Advanced user can also access the INSTALL view to set Luminaire notes, place Luminaires
into Locaons etc.
• Administrator user can also access the SETTINGS view to change soware sengs, create
user accounts etc.
3. To change a password for an exisng user account, select a user from the list, and tap EDIT
4. To remove a user account, select a user from the list, and tap DELETE. Note that you cannot
delete an Administrator user account, if the account is the last Administrator account in the
system.
NOTE!
Make sure your administrator password is not lost.
If the password is lost, contact Teknoware’s Aer Sales.

AALTO CONTROL WMU USER GUIDE
VOT97, Rev 1.1, 1.3.2017
10
1. 9. Email reporng sengs
NOTE!
To use email reporng, the Aalto Control WMU needs to be connected to internet.
1. Tap SETTINGS, and go to Email tab.
2. Add 1-4 email addresses where you want the system to send reports
3. Select the opons for the email reporng:
• Not reached: Sends an email report if there are luminaires that have not responded to
querys by Aalto Control WMU in 7 days.
• Failures: Sends an email report, if there are luminaires with failures in the system
• Reports: sends an email report according to the set Time interval even if there are no fail-
ures, and all luminaires have been reached normally by the Aalto Control WMU
• Time interval: denes how oen the dened report is sent.
4. Tap SAVE to save the sengs.
5. To test the email reporng, tap TEST EMAIL.
NOTE!
The SET SERVER sengs are for authorized maintenance use only.
Do not change these sengs!
1. 10. Updang the Aalto Control WMU Soware
1. First, make a backup from the Aalto Control WMU database (Chapter 1. 3).
2. Copy the update les received from Teknoware to a USB drive’s root folder, and insert the USB
drive to the USB port.
3. Go to SETTINGS -> Soware, and tap REBOOT.
4. Follow the instrucons on the screen.

AALTO CONTROL WMU USER GUIDE
VOT97, Rev 1.1, 1.3.2017
11
2. Basic funcons
With the Aalto Control WMU you can:
• Check faulty luminaires
• Divide the luminaires into previously created locaons
• Set Note data for luminaires
• View luminaire status and informaon
• View test and event history, and export said history to a USB DRIVE for further use
• Set test prohibion schedules to prohibit the self tesng of luminaires in certain me periods
• Set luminaires to BLINK state, or switch Exit Luminaires ON or OFF.
2. 1. Checking faulty luminaires
When faulty luminaires are present in the system, the system will nofy it by displaying a large
red symbol “X”, and a text box “SHOW FAILURES” in the main screen. Tapping the text box will
automacally display a list of faulty luminaires. If there is only one faulty luminaire, detailed
informaon about it will be shown.
2. 2. Quick Guide for using basic funcons in REPORTS and INSTALL views
When using any of the other basic funcons described above, the workow is always idencal:
1. First, tap LOCATIONS and select where the luminaires to be aected with the intended acons
are located.
2. Then, lter a list of the luminaires to be aected by the intended acons from the REPORTS >
Filter tab or from the INSTALL view.
3. This Luminaires List can now be aected with the various tools of Aalto Control WMU. Note
that you can select individual luminaires from the list too.
See the next chapter for more detailed instrucons of using the REPORTS view’s Filter tab.
AALTO CONTROL WMU USER GUIDE
VOT97, Rev 1.1, 1.3.2017
12
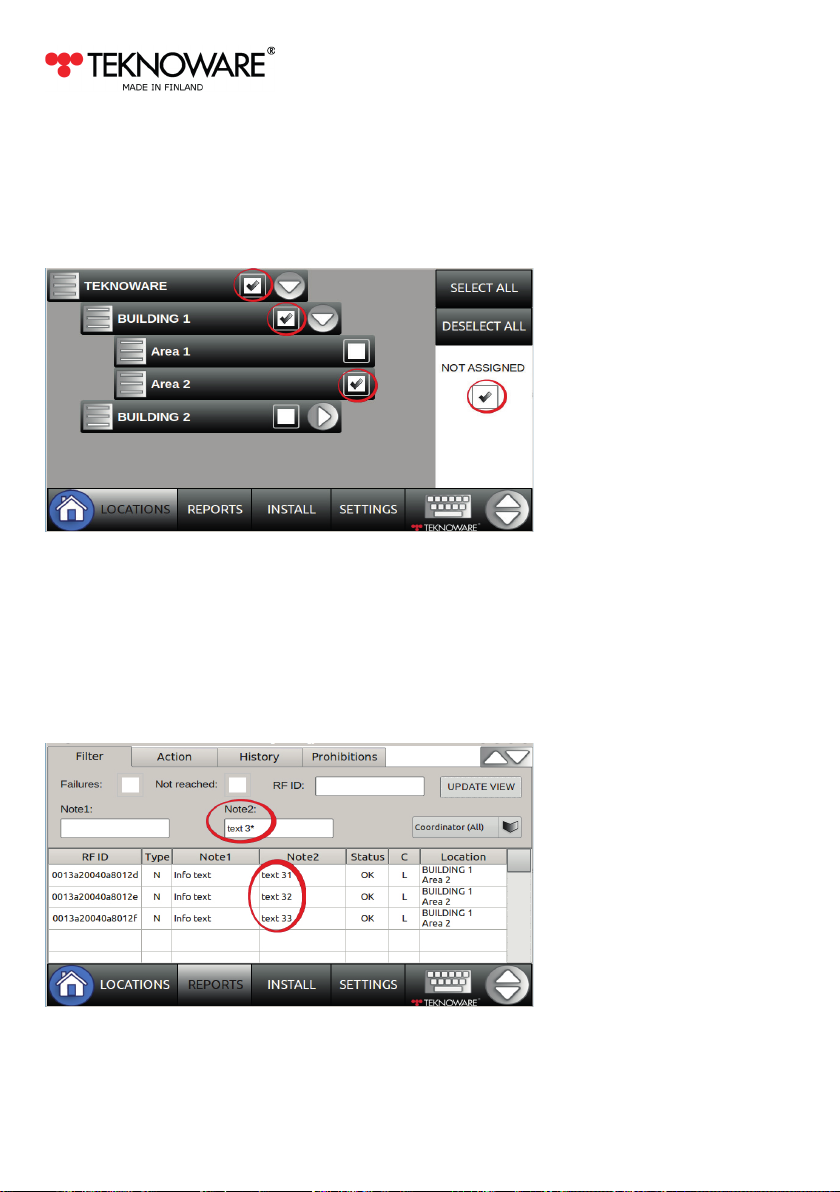
2. 3. Using Filters (creang a Luminaires List)
1. To display the desired luminaires in REPORTS view, always rst tap LOCATIONS and select the
Site, Buildings and/or Areas, in which the luminaires to be shown are located.
2. To display unassigned luminaires in the reports view, select NOT ASSIGNED
3. You can also select all locaons, or deselect all locaons by tapping the corresponding buons.
4. To lter the luminaires, tap REPORTS and select Filter tab
• Note 1 and Note 2: Filters the luminaires according to the Note data elds. A wildcard * can
also be used (e.g. in Note2, the value “text 3*” displays all luminaires starng with “text 3” in
Note2).
• Selecng Failures and/or Not reached will display the desired luminaires accordingly.
• If an external coordinator is used, the luminaires can be ltered by selecng the desired
Coordinator.
• RF ID: lters the luminaires according to their RF ID. A wildcard * can also be used.
5. Note that you can also select mulple lters, to opmize the results.

AALTO CONTROL WMU USER GUIDE
VOT97, Rev 1.1, 1.3.2017
13
6. Finally, tap the UPDATE VIEW buon, to display the ltered luminaires (in REPORTS) in the
selected locaons (in LOCATIONS).
NOTE!
Depending on the amount of luminaires, displaying the luminaires may take a while.
7. Tapping the RF ID cell of a luminaire in the table will display addional luminaire informaon
on the screen:
8. Whenever you wish to target another group of luminaires, always go to LOCATIONS rst and,
aer that, lter the desired luminaires in REPORTS view.
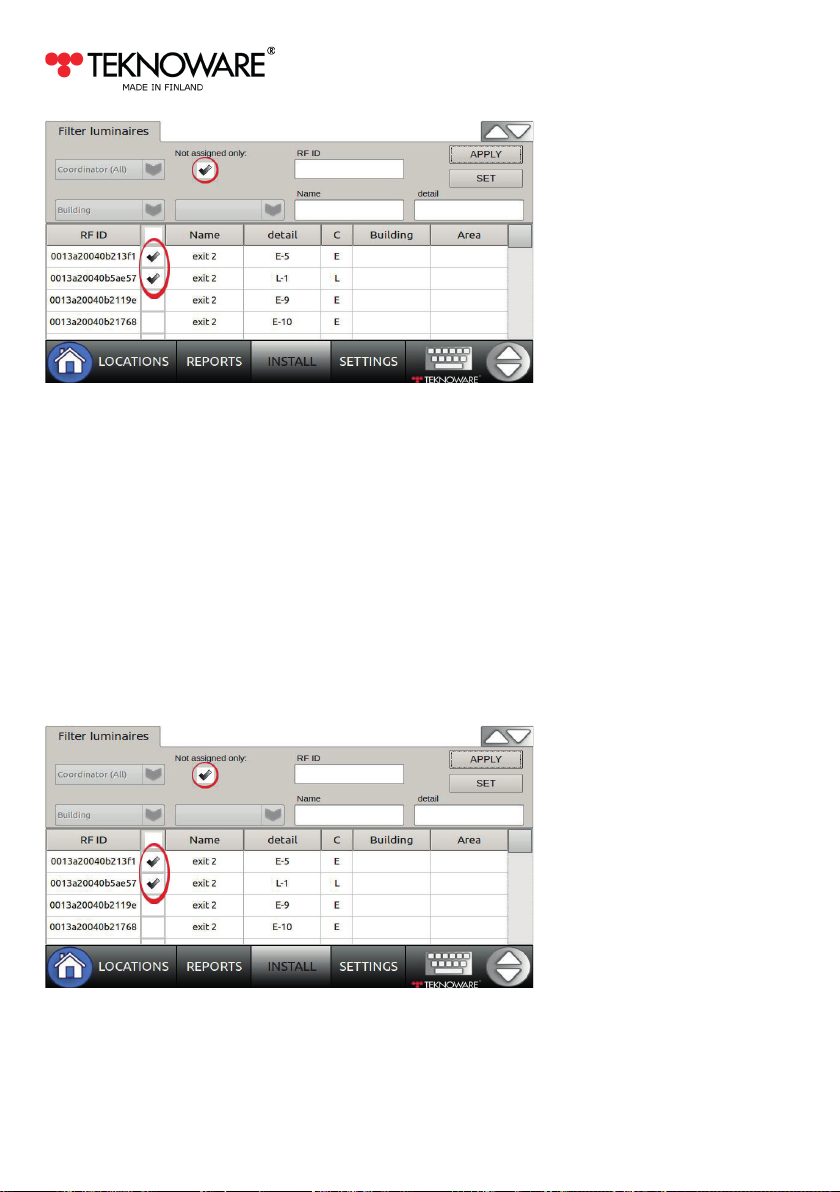
2. 4. Adding luminaires to locaons (INSTALL view)
1. Select NOT ASSIGNED from LOCATIONS.
2. Tap INSTALL, and select Not assigned only.
3. Use the lters, if applicable, and tap APPLY.
4. Select the luminaire(s) you wish to add to a locaon (in the image two rst luminaires are
selected) and tap SET:
AALTO CONTROL WMU USER GUIDE
VOT97, Rev 1.1, 1.3.2017
14
5. Choose the Buiding and Area you wish to add these luminaires to. You can also write values for
the Note elds, if you wish to add a note for all the selected luminaires.
6. Tap apply, and approve the changes by clicking OK.
7. Tap < in the right upper corner of the screen to return to Install view
2. 5. Adding Notes to luminaires (INSTALL view)
1. Create a Luminaires List to INSTALL view, as described in Chapter 2. 2.
2. To add a Note to an individual luminaire, tap the Note eld of said luminaire, and type the
Note.
3. To add Notes to several luminaires at the same me: select the luminaire(s) you with to add
a Note to (when choosing several luminaires, please keep in mind that the same Note will be
added to all selected luminaires), and tap SET:
4. Write values for the Note elds.

AALTO CONTROL WMU USER GUIDE
VOT97, Rev 1.1, 1.3.2017
15
5. Tap APPLY, and approve the changes by tapping OK.
6. Tap < in the right upper corner of the screen to return to Install view
2. 6. Using Acon tab (REPORTS view)
From the Acon tab, you can set luminaires to BLINK state, remove the luminaires from the system
and all locaons, or set the Exit lights OFF or ON. Note that switching an Exit light OFF or ON must be
enabled from SETTINGS -> User, and can be done only when logged in as an administrator user.
To use these acons, rst create a Luminaires list in LOCATIONS view, as desribed earlier, then go
to REPORTS, choose Acon, select the luminaires to be targeted, and tap the corresponding buon
(BLINK or REMOVE).
Using the BLINK funcon, will make the selected luminaires blink for 1-5 minutes, depending of the
system layout and luminaire model.
Using the REMOVE funcon will delete the selected luminaires from the system. This cannot be
undone.
2. 7. Using History tab to create a test log (REPORTS view)
In the History tab, you can view the test history of the luminaires, and export the history log to a CSV
le. To do so:
1. Create a Luminaires List to REPORTS view, as described in Chapter 2. 2.
2. Go to REPORTS, and tap the History tab. Select the luminaires you wish to include to the
History report.

AALTO CONTROL WMU USER GUIDE
VOT97, Rev 1.1, 1.3.2017
16
3. Select the STACK opon, if you wish to stack all events by an individual luminaire into a single
row. I.e., if this opon is not selected, each individual event will create a row. In stacked view,
tapping the “+” -symbol will open all stacked events to single rows.
Stack selected:
Stack not selected:

AALTO CONTROL WMU USER GUIDE
VOT97, Rev 1.1, 1.3.2017
17
4. Tap PREVIEW to create the list.
5. If you wish to export the list, insert a USB drive and tap EXPORT HISTORY TO CSV FILE buon.
Select a le you wish to export the list to, or tap SELECT without selecng a le to create a new
le.
2. 8. Using Prohibions tab to create test schedules (REPORTS view)
Test prohibion (only for selected Teknoware luminaire models)
With the Test prohibion tool you can set up me periods, during which the luminaires are not
allowed to run tests.
To add a Test Prohibion Rule:
1. Create a Luminaires List to REPORTS view, as described in Chapter 2. 2.
2. Go to Prohibions tab, and tap the ADD RULE buon.
3. Type a name for the prohibion rule. Set up the me period on which you want to prohibit
luminaire self tesng. Select whether you want the Prohibion me to aect all tests, or only
duraon tests. Tap the SAVE buon.
4. A Prohibion Rule is now created.
5. You can modify the Prohibion Rule by selecng a Rule, and clicking the EDIT RULE buon. To
remove a Rule from the system, select a Rule and click the REMOVE RULE buon.
6. To apply this Prohibion Rule, select luminaire(s) from the Luminaires list, and tap the APPLY
buon. Selected luminaires can be removed from a prohibion rule with the REMOVE buon.
NOTE!
Modifying a Prohibion Rule WILL aect all the luminaires
using the said prohibion me rule!

AALTO CONTROL WMU USER GUIDE
VOT97, Rev 1.1, 1.3.2017
18
NOTE!
Carefully plan the Test Prohibions before implemenng them, leaving enough me for each
luminaire to run the automac tests. It is recommended that no less than
12 hours of “free” me is le for each luminaire. Also note, that overlapping or large Test
Prohibion groups may result in groups of luminaires running tests simultaneously.
Checking test prohibions
To check, which luminaires are included in a prohibion rule, select the rule from the Rule dropdown
list, and tap FETCH. This will display all the luminaires with the selected rule in the Luminaires List.
Somemes more detailed informaon about luminaires aected by prohibion rules is useful. You
might, for example, want to know which luminaires are prohibited to run tests on Mondays. Or maybe
you have used the Note 1 eld to specify the locaon of the luminaires, and now need to know when
the emergency luminaires in the front lobby have test prohibions.
To create a detailed list of the test prohibion rules and the luminaires they aect, you can use the
PREVIEW buon. To lter the PREVIEW list, choose a criteria by which the list is ltered by. To do so:
1. Choose a Preview criteria from the list. For example, if you wish to create a list of all the lumi-
naires that are prohibited to perform tests on a certain day, choose “Test Time”. Or, if you wish
to create a list of luminaires with a specic Note 1 data, choose Note 1.
2. Choose a Rule criteria. Connuing the example above: if the certain day you wish to have test
prohibion me informaon from is Monday, select “Mondays”. Or, if the Note 1 data is “Front
lobby”, simply type the note data to Rule criteria. For free text elds such as Note 1, a wildcard
“*” can be used. So, typing “Front*” would also do.
3. When the rules are set, simply click PREVIEW. A list of all the luminaires is displayed.
Clicking PREVIEW without seng any criteria will list all Rules, and the luminaires set to them.

AALTO CONTROL WMU USER GUIDE
VOT97, Rev 1.1, 1.3.2017
19
APPENDIX 1. Adding luminaire info in CSV form
When seng up the system, or making substancial updates into the luminaire info, the most
convenient way to add or edit the luminaire info is by using a CSV-compable spreadsheet soware,
such as OpenOce Calc, or Microso Excel.
Exporng a CSV le
If you are seng up the system, add the luminaires to the system by following the instrucons in
Chapter “1. 4. Adding Luminaires” on page 8, before exporng the CSV le. Insert a USB drive into
the USB port, and export the luminaire data to a CSV le:

AALTO CONTROL WMU USER GUIDE
VOT97, Rev 1.1, 1.3.2017
20
Adding/eding luminaire info with a spreadsheet soware
Remove the USB drive from the Aalto Control WMU, and insert it to a USB port of a computer with a
CSV-compable spreadsheet soware. Open the previously created CSV le. The le contains a com-
plete list of all the RFIDs of the luminaires in the system. Fill in the addional info, from le to right, in
the following order:
• Column A in the table below: RFID, this is pre-lled. Do not change the RFIDs exported from
the system. If you have a separate RFID list of luminaires you wish to add to the system,
copying the RFIDs here will add the luminaires.
• Column B in the table below: Type: M = a maintained luminaire (an exit light), N = a
non-maintained luminaire (an emergency light), 3rd = a third party luminaire
• Columns C-D in the table below: Note 1 and Note 2 = text elds for addional informaon
about the luminaire
• Columns E-F in the table below: Building and Area = The Locaons, in which the luminaires
are dened to. Note that these are not open text elds: these locaons will be used in the
Locaons view of the System. All unique locaons added here will be created to the system
when the CSV le is imported.
• Column G in the table below: Coordinator: denes whether the luminaire is connected to the
local Aalto Control WMU coordinator (= L), or on an external Aalto Control Coordinator (= E).
Other manuals for AALTO WMU TST5108
2
Table of contents
Other Teknoware Measuring Instrument manuals


