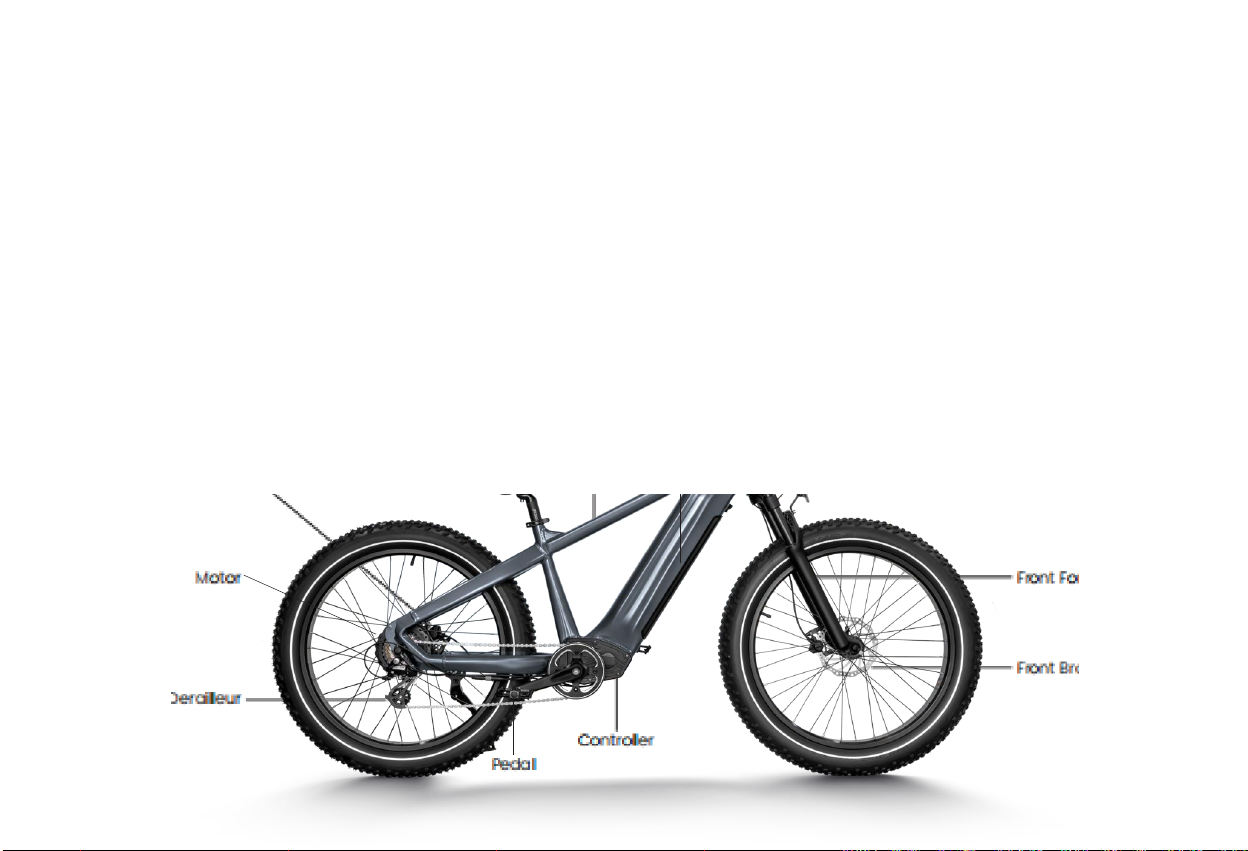
TEKTRO SHARK User manual

SHARK
Owner's Manual

About Manual
This manual contains details of the product, information on its operation and maintenance, and other helpful tips for owners. Read it carefully and familiarize
yourself with the E-Bikesbefore using it to ensure safe use, reduce risk of damage and premature wear, and prevent accidents. Be sure to retain this
manual as your convenient E-Bikes information source.
Because it is impossible to anticipate every situation or condition which can occur while riding, this manual makes no representations about the safe use of
our bicycles under all conditions. There are risks associated with the use of any bicycle which cannot be predicted or avoided, and which are the sole
responsibility of the rider. You should keep this manual, along with any other documents that were included with your bicycle, for future reference, however all
content in this manual is subject to change or withdrawal without notice.Assembly and first adjustment of your E-Bikesrequires special tools and skills, and it
is recommended that this be performed by a trained bicycle mechanic if possible.
This manual contains many Warnings and Cautions concerning safe operation, and consequences if proper setup,
operation and maintenance guidelines are not followed. All information in this manual should be carefully reviewed.
The safety grade color of Caution is orange, and if
not avoided, may result in moderate or serious injury.
Users should also pay special attention to information
marked in this manual beginning with “NOTICE”
1
The safety grade color of Warning is red, and if not
avoided will likely result in serious injury or death.

Contents
2
Bike Specification
Bike Assembly Guide
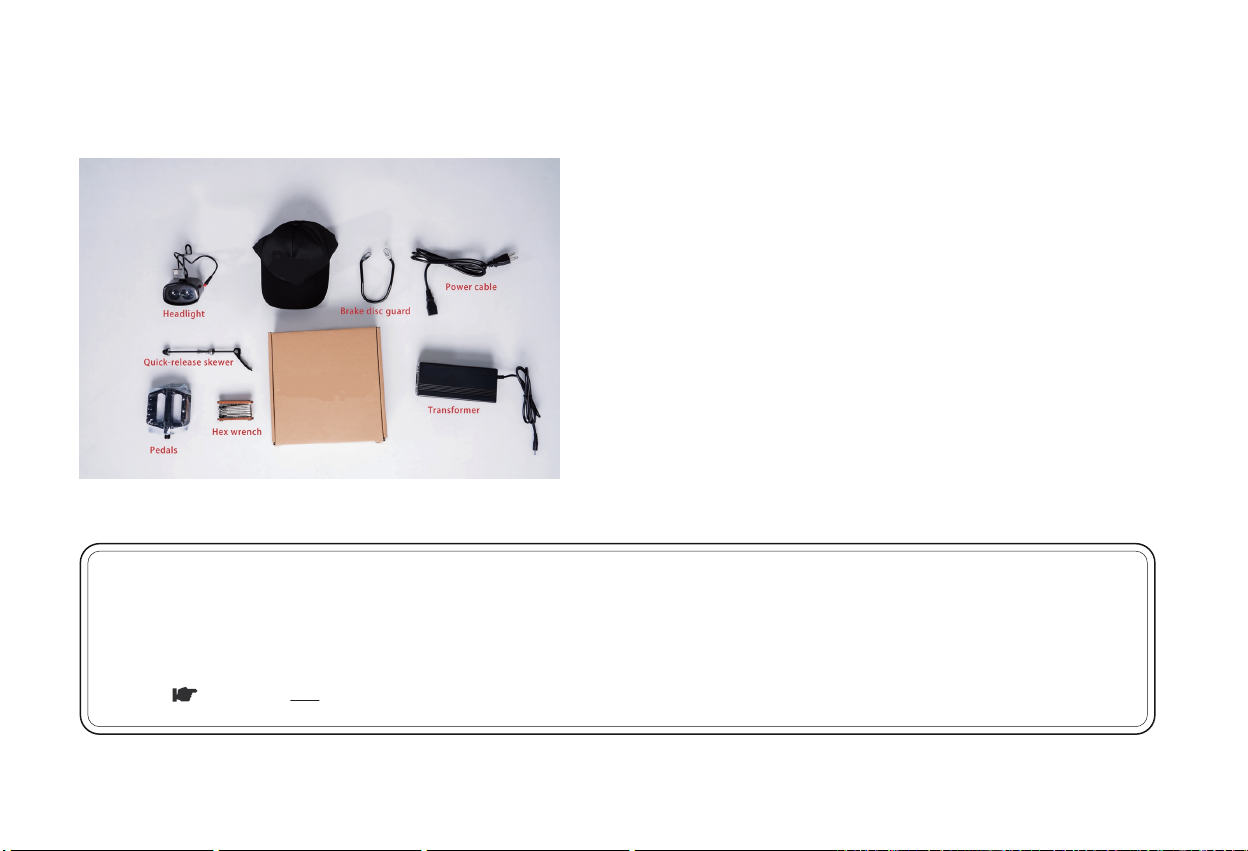
• Preparation Checklist
• Recommended Torque Values
• Assembly Instructions
• Safety Check
• Safety Precautions
E-Bike Use and Care
3
6
6
7
8
21
22
23
23
31
38
40
40
41
42
42
42
42
43
43
•••••••••••••••••••••••••••••••••••••••••••••••••••••••••••••••••••••••••••••••••••••••••••••••••••••••••••••••••••••••••••••••••••••••••••••••••••••••••••••••••••••••••••••••••••••••••••••••••••••••••••••••••••••••••••••••••••••••••••••••••••
•••••••••••••••••••••••••••••••••••••••••••••••••••••••••••••••••••••••••••••••••••••••••••••••••••••••••••••••••••••••••••••••••••••••••••••••••••••••••••••••••••••••••••••••••••••••••••••••••••••••••••••••••••••••••••••••••••••••••••••
••••••••••••••••••••••••••••••••••••••••••••••••••••••••••••••••••••••••••••••••••••••••••••••••••••••••••••••••••••••••••••••••••••••••••••••••••••••••••••••••••••••••••••••••••••••••••••••••••••••••••••••••••••••••••••••••••••••
••••••••••••••••••••••••••••••••••••••••••••••••••••••••••••••••••••••••••••••••••••••••••••••••••••••••••••••••••••••••••••••••••••••••••••••••••••••••••••••••••••••••••••••••••••••••••••••••••••••••••••••••••••••
••••••••••••••••••••••••••••••••••••••••••••••••••••••••••••••••••••••••••••••••••••••••••••••••••••••••••••••••••••••••••••••••••••••••••••••••••••••••••••••••••••••••••••••••••••••••••••••••••••••••••••••••••••••••••••••••••••
••••••••••••••••••••••••••••••••••••••••••••••••••••••••••••••••••••••••••••••••••••••••••••••••••••••••••••••••••••••••••••••••••••••••••••••••••••••••••••••••••••••••••••••••••••••••••••••••••••••••••••••••••••••••••••••••••••••••••••••••••••
•••••••••••••••••••••••••••••••••••••••••••••••••••••••••••••••••••••••••••••••••••••••••••••••••••••••••••••••••••••••••••••••••••••••••••••••••••••••••••••••••••••••••••••••••••••••••••••••••••••••••••••••••••••••••••••••••••••••••
•••••••••••••••••••••••••••••••••••••••••••••••••••••••••••••••••••••••••••••••••••••••••••••••••••••••••••••••••••••••••••••••••••••••••••••••••••••••••••••••••••••••••••••••••••••••••••••••••••••••••••••••••••••••••••••
••••••••••••••••••••••••••••••••••••••••••••••••••••••••••••••••••••••••••••••••••••••••••••••••••••••••••••••••••••••••••••••••••••••••••••••••••••••••••••••••••••••••••••••••••••••••••••••••••••••••••••••••••••••••••••••••••••
•••••••••••••••••••••••••••••••••••••••••••••••••••••••••••••••••••••••••••••••••••••••••••••••••••••••••••••••••••••••••••••••••••••••••••••••••••••••••••••••••••••••••••••••••••••••••••••••••••••••••••••••••••••••••••••••••••••••••••••
•••••••••••••••••••••••••••••••••••••••••••••••••••••••••••••••••••••••••••••••••••••••••••••••••••••••••••••••••••••••••••••••••••••••••••••••••••••••••••••••••••••••••••••••••••••••••••••••••••••••••••••••••••••••••••••••••••••••••••••••••••
•••••••••••••••••••••••••••••••••••••••••••••••••••••••••••••••••••••••••••••••••••••••••••••••••••••••••••••••••••••••••••••••••••••••••••••••••••••••••••••••••••••••••••••••••••••••••••••••••••••••••••••••••••••••••••••••••••••••••
••••••••••••••••••••••••••••••••••••••••••••••••••••••••••••••••••••••••••••••••••••••••••••••••••••••••••••••••••••••••••••••••••••••••••••••••••••••••••••••••••••••••••••••••••••••••••••••••••••••••••••••••••••••••••••••••
••••••••••••••••••••••••••••••••••••••••••••••••••••••••••••••••••••••••••••••••••••••••••••••••••••••••••••••••••••••••••••••••••••••••••••••••••••••••••••••••••••••••••••••••••••••••••••••••••••••••••••••••••••••••
••••••••••••••••••••••••••••••••••••••••••••••••••••••••••••••••••••••••••••••••••••••••••••••••••••••••••••••••••••••••••••••••••••••••••••••••••••••••••••••••••••••••••••••••••••••••••••••••••••••••••••••••••••••••••••••••••••••••••••••••••••••••••••
•••••••••••••••••••••••••••••••••••••••••••••••••••••••••••••••••••••••••••••••••••••••••••••••••••••••••••••••••••••••••••••••••••••••••••••••••••••••••••••••••••••••••••••••••••••••••••••••••••••••••••••••••••••••••••••••••••••••
•••••••••••••••••••••••••••••••••••••••••••••••••••••••••••••••••••••••••••••••••••••••••••••••••••••••••••••••••••••••••••••••••••••••••••••••••••••••••••••••••••••••••••••••••••••••••••••••••••••••••••••••••••••••••••••••••••••••••
•••••••••••••••••••••••••••••••••••••••••••••••••••••••••••••••••••••••••••••••••••••••••••••••••••••••••••••••••••••••••••••••••••••••••••••••••••••••••••••••••••••••••••••••••••••••••••••••••••••••••••••••••••••••••••••••••••••••••
••••••••••••••••••••••••••••••••••••••••••••••••••••••••••••••••••••••••••••••••••••••••••••••••••••••••••••••••••••••••••••••••••••••••••••••••••••••••••••••••••••••••••••••••••••••••••••••••••••••••••••••••••••••••••••••••••
•••••••••••••••••••••••••••••••••••••••••••••••••••••••••••••••••••••••••••••••••••••••••••••••••••••••••••••••••••••••••••••••••••••••••••••••••••••••••••••••••••••••••••••••••••••••••••••••••••••••••••••••••••••••••••••••••••••••••
• Basic Display Settings
• Battery Charging
• Riding Modes
• Parking & Transport
• Carrying Loads & Cargo
• Safety and Care Instructions
Maintenance
• Battery Maintenance
• Motor Maintenance
• Chain Maintenance
• Front Fork Maintenance
• Brake Maintenance

Real Derailleur
LED Light Switch
On/Off Switch
LCD Display
Shimano Shifter
Throttle
Saddle Frame Battery
Controller
LED Head Light
Front Fork
Front Brake
Pedal
Motor
Rear Brake
Bike Specification
3
Information
Head Tube

78.7 Inch
42.9 Inch
49.2 Inch
27.6 Inch
35.4 Inch
18.9 Inch
31.5 Inch
23.6 Inch
28.7 Inch
5.5 Inch
27.6 Inch
A
B
C
D
E
F
G
H
I
J
K
- Total Length
- Handlebar Height
- Wheelbase
- Min Seat Height
- Max Seat Height
- Chain Stay Length
- Standover Height
- Top Tube Length
- Wheel Diameter
- Head Tube Length
- Handlebar Length
4

Battery
Range
Hub Motor
Total Payload
Capacity
Recommended
Rider Heights
Tires
Brake lever
Rear Light
Freewheel
Brake
Chain
Stem
Crank
Gearing
5'3" ~ 6'4"
400 lbs
750W brushless gear motor
60-80 miles
48V 20Ah Samsung/LG lithium battery
26" x 4" Kenda fat tires
Aluminum alloy comfort grip levers with motor
cutoff switch
Integrated Taillight
Shimano 7-speed gear shift system
180mm Hydraulic Brakes
KMC chain
Promax MA-400 SSABK
170mm forged alloy
Shimano- 14-28T BROWN/BK
Pedal Assist
Intelligent
Weight
Display
Controller
Charger
Front Fork
Throttle
Pedal
Bike Frame
Front Light
Saddle
Seat Post
Kickstand
Spokes
0~5 level pedal assist
79 lbs
LCD display with USB charging
48V/22A
US standard 3.0 A smart charger
Alloy front suspension fork with lockout and
adjustment
Half twist throttle
Alloy pedals with reflectors
6061 Aluminum frame
48V LED light
SR saddle
Diameter 30.9mm length 300mm
Heavy-duty aluminum
13 Gauge front / 12 Gauge rear
5

Extra tools needed: (1)10mm Wrench (2)15mm Wrench
NOTICE: Before assembling your bike, it’s recommended to remove the battery for the reasons outlined below:
1.
2.
3.
Determine if there’s battery drain or damage during shipping.
Reduce the weight of the ebike to make it easier to maneuver the bike while assembling.
Avoid battery damage during the assembly process.
Go to page 31 to learn about removing and charging the battery.
Bike Assembly Guide
◆ Preparation Checklist
6

NOTICE: Using an impact driver to achieve the required torque is not recommended as it might cause damage. We suggest you use the wrench set
we provided and extra tools to manually adjust nuts and bolts.
Recommended Torque Values
Hardware Location
Handlebar
Stem
Saddle
Front Wheel(For bikes with bolts on front wheel)
Rear wheel
Bottom Bracket Parts
Pedals
Disk Mounting Bolts
Disk Caliper Mount
Crank Bolts
Rear Derailleur Cable Pinch
Front Derailleur Clamp
Saddle Post Clamp
Recommended Torque(NM)
12-18
12-18
12-18
15-22
30-38
30-50
28-33
3-5
6-8
32-36
3-5
3-6
3-6
7

Assembly Instructions
◆ Handlebar Installation(4mm Hex Wrench)
Loosen the bolts on your bike stem.
Center your handlebars and rotate them to align to the marking pointed to in the below image.
Step 1:
Step 2:
Step 3: Tighten bolts to handlebar stem, but don’t tighten completely as you may want to further adjust the angle later to align more precisely. Test the
positioning, and adjust the handlebar to your preferred angle. After determining the best position, completely tighten all the bolts on the stem.
8
NOTICE: In addition to angle,
the height of the handlebar
can be adjusted by adding or
removing the headset spacers
if needed. For those without
experience, we recommend
having a professional make
such adjustments for safety
reasons.

9
Remove the bolts with washers located a couple inches behind the seat post.
Place the rack down and adjust placement until the holes on the end are aligned, and screw the bolts back in. Make sure the washer is on top of the
rack, rather than underneath, as shown in the below image.
Tighten the eyelet bolts on both sides of the rear rack to the frame.
◆ Rear Rack Installation (4mm Hex Wrench)
Step 1:
Step 2:
Step 3:
The rear rack comes loosely attached to the bike, but has not yet been fully secured.
Bolt & washer

Remove the plastic axle guards from the front wheel, being careful to avoid contact with the brake rotor set.
◆ Front Wheel Installation
Step 1:
Step 2:
After tightening the rear rack, lay a mat down to protect both bike and floor from scratches. Next, carefully flip your bike upside down for the front
wheel installation.
10

Remove the front forks protection bar by manually pulling it straight up. Pull out the red pad, which is used to protect the hydraulic brake caliper.
Step 3:
Step 4: Align the fork dropouts with the axle of the wheel hub, making sure the dropouts are fully seated on the axle. Also ensure the brake rotor is properly
inserted into the caliper.
WARNING: Do not pull the brake lever without having either the red pad or the brake disc inserted, as this will damage the hydraulic brake caliper.
11

Prepare your quick-release skewer for the next step by removing the thumb nut and one of the cone springs.
Install the quick-release skewer starting from the brake rotor side of the wheel, inserting the quick-release skewer through the hub and then replacing
the second cone spring on the other side. Ensure both springs are pointed narrow-side-in towards the wheel hub.
Step 5:
Step 6:
12

Tighten the thumb nut until the quick-release lever is held in line with the axle, and then use your palm of your hand to close the quick-release lever.
Rotate the front wheel. Make sure to fully close the quick release skewer lever on the front wheel and check the wheel balance in Pedal Only Mode. If
you notice the riding is imbalanced or the rotation of the front wheel makes noise, it means the bolts were not completely tightened or not aligned
horizontally.
Step 7:
Step 8:
13

◆ Front Light & Front Fender Installation (Extra Tool: 10mm Wrench)
The front light and front fender are both secured by a single bolt, so the front fender must be installed together with the front light. If you prefer not to
have a front fender, you may install the front light by itself.
Step 1:
Tighten the bolt with your 10mm wrench. Then connect the light wire connectors together. Pay careful attention to the arrows on the wire connectors,
making sure the arrows align with each other to avoid damaging the interior circuitry.
Step 2:
14

Tighten the bolts attaching the front fork to the hub, as shown in the image. Make sure the washers are directly underneath the bolt head and nut.
◆ Pedals Installation
Make sure your pedals are installed on the correct side, as installing on the wrong side will damage the threads. Indicators for the right pedal (R) and the left
pedal (L) can be found in two places:
Step 3:
the stickers on the plastic cover, and
the bottom of the pedal threads.
1.
2.
15

Before you install the pedals, apply a small amount of waterproof grease onto the spindle. Start threading the pedal on by hand to ensure the pedal is going in
perfectly straight, rotating in the direction of the pointer shown on the crank. If it is not spinning smoothly, make doubly sure that you have the correct left or right
pedal. After initial hand-tightening, finish tightening the pedals with a standard 15mm wrench .
16

◆ U Shape Disc Brake Guard Installation (4mm Hex Wrench)
Remove the bolts on the chain stay.
Put the bolts through the disc brake guard, then replace bolts as shown in the picture below.
Step 1:
Step 2:
17

◆ Seat Adjustment
Adjust the Seat Height:
Open the seatpost quick release lever. Adjust the seatpost height by sliding the seatpost up or down to a height appropriate for your leg length and preferred
riding position. Do not extend the seatpost beyond the minimum insertion marking etched onto the seatpost.
WARNING: Overextending the seatpost can cause it to break or come off your bike, putting you at very high risk of serious injury or
death. Avoid this danger by inserting your seatpost into the seat tube far enough that the minimum insertion point is no longer visible.
18

Adjust the Seat Angle:
Loosen the seat adjustment bolt beneath the seat. Move the seat backward or forward and tilt to adjust the angle within the limit markings etched on
the seat rail. Do not exceed the limit markings, to ensure the safety of yourself and the bike.
Tighten the seat adjustment bolt. Ensure the top and bottom of the seat rail clamp are aligned, so that the seat adjustment bolt will clamp the seat
rails together properly.
19
Step 1:
Step 2:
Table of contents
Other TEKTRO Scooter manuals