Telecom R83 User manual

1
Telecom
R83
Mobile Phone
User Manual

2
LEGAL INFORMATION
Copyright © 2013 ZTE CORPORATION.
All rights reserved.
No part of this publication may be quoted, reproduced,
translated or used in any form or by any means, electronic or
mechanical, including photocopying and microfilm, without the
prior written permission of ZTE Corporation.
ZTE Corporation reserves the right to make modifications on print
errors or update specifications in this guide without prior notice.
The Bluetooth®trademark and logos are owned by the Bluetooth
SIG, Inc. and any use of such trademarks by ZTE Corporation is
under license. Other trademarks and trade names are the
property of their respective owners.
This product supports expandable memory up to 32GB
microSD(HC) card as an optional accessory. External memory
card is not included in the box.
The microSD logo is a trademark of the SD Card
Association.
Ver. 1.5 August 2013
This product is user-upgradeable. Please check for updates at
zte.co.nz or use the built in System Updates app.
In the event of a device lock up press and hold the power key for
10 seconds to restart your device.

3
Contents
Device Overview ......................................................5
The Home Screen ..................................................14
Customise your device with Settings ..................15
Making Calls...........................................................31
Messaging ..............................................................38
People.....................................................................53
Using the Drive Mode App ....................................60
Accounts ................................................................60
Email .......................................................................62
GmailTM ...................................................................66
Calendar .................................................................70
Google Talk ............................................................72
Google+ ..................................................................75
Using the Chrome Browser...................................77
Google Location Services.....................................79
Using the Camera ..................................................83
Gallery.....................................................................87
Music.......................................................................90

4
Google ‘Play Music’...............................................92
FM Radio.................................................................94
Other Apps .............................................................96
Settings Summary ...............................................102
Troubleshooting...................................................104
General Safety Warnings.....................................107
Technical Specifications .....................................116
IMPORTANT NOTICE – LIQUID AND DUST PROTECTION
Your device is waterproof to 1m depth but should never be
deliberately immersed in any liquid.
Always close the port covers after use to maintain protection
against liquid and dust.
Close the port covers by pressing the cover firmly into the case
and sliding back and forth to fully seal.
The headphone socket is protected against liquid ingress, if you
get water inside the headphone port, please invert the device to
drain the liquid. Do not leave liquid inside the socket.
The battery is sealed and is not user replaceable.
See your warranty card for full warranty terms and conditions.
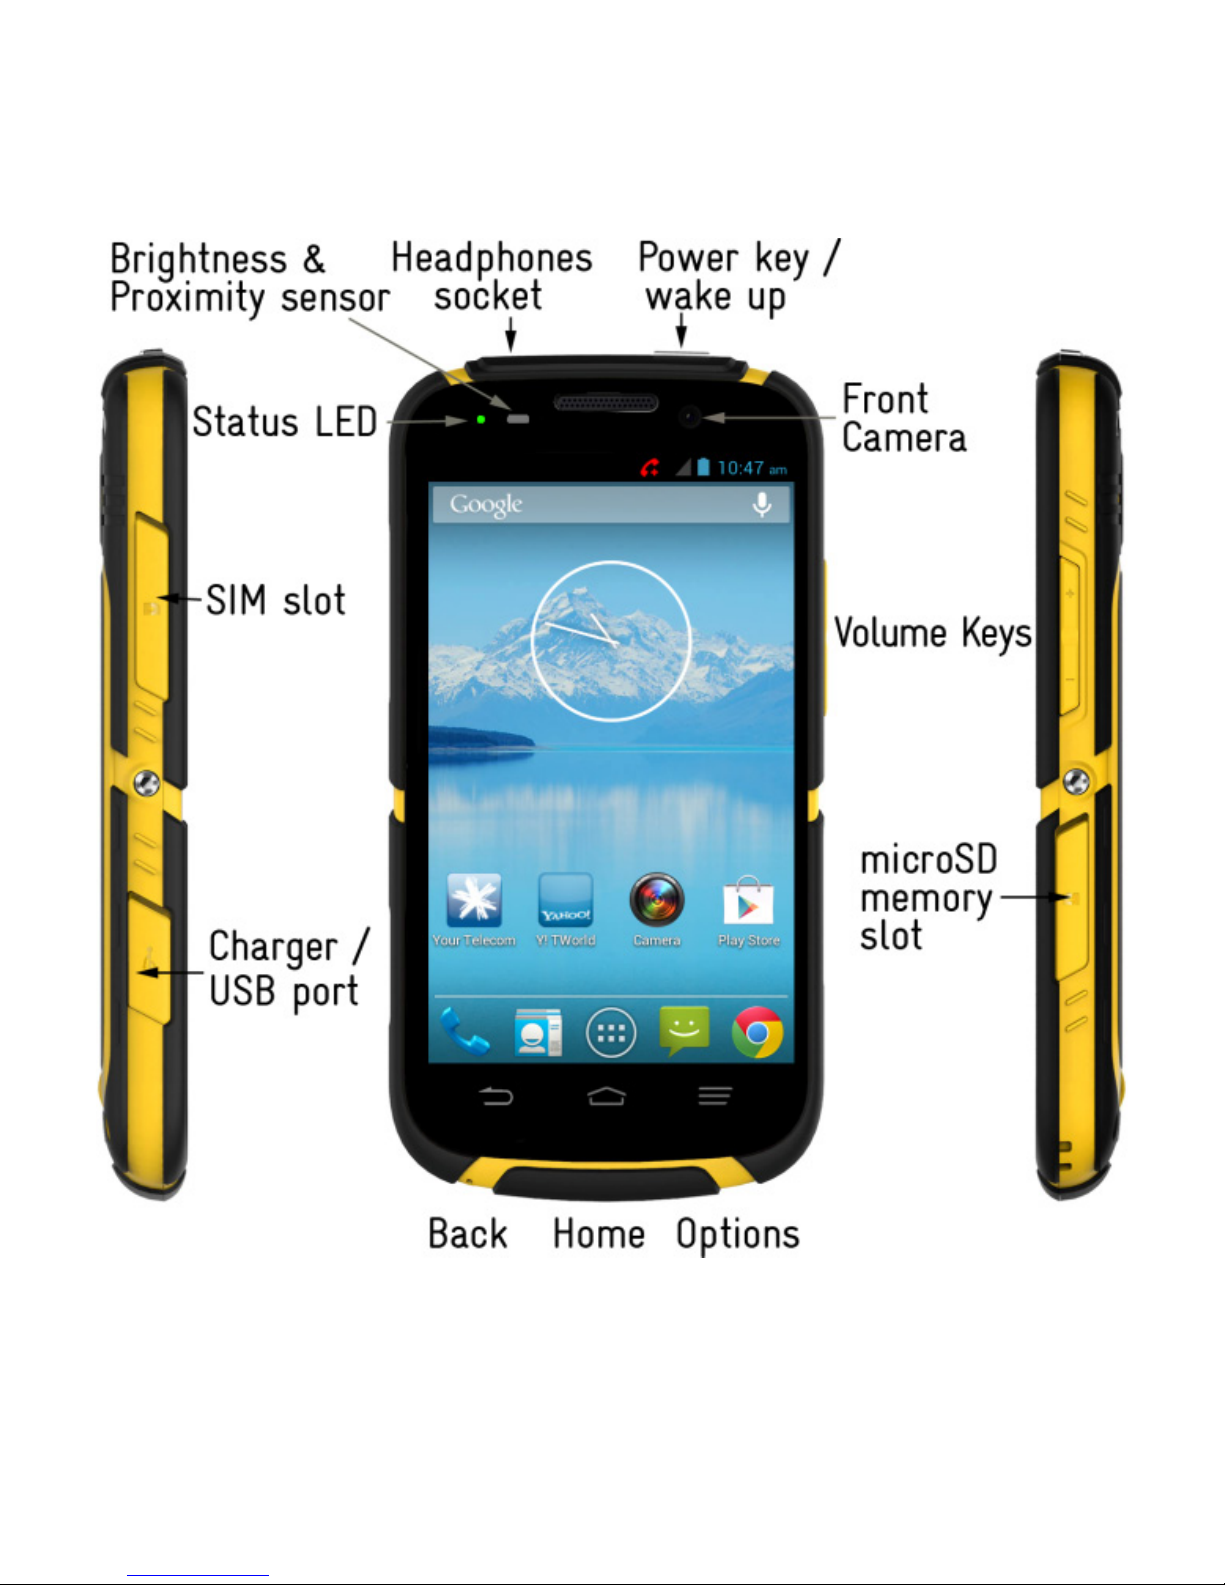
5
Device Overview

6
Key Functions
Key Function
Power Key
Press to wake up your phone
Press and hold to select Silent, Vibrate or Flight
mode, to Restart your device or power on & off
Press to switch your phone to Sleep mode.
Back Touch to go to the previous screen
Touch to exit applications
Home
Touch to return to the Home Screen
Press and hold to view recent apps
Options Touch for current Options menu
Apps View all your system apps
Volume Keys
Press or hold to turn the volume up or down.
Can be used to take photos in camera mode.
Status LED Indicator
Red
Less than 10% charge
Orange Between 10 – 70%
Green
More than 70% charge
LED Flashing
Message or Missed Call Notification

7
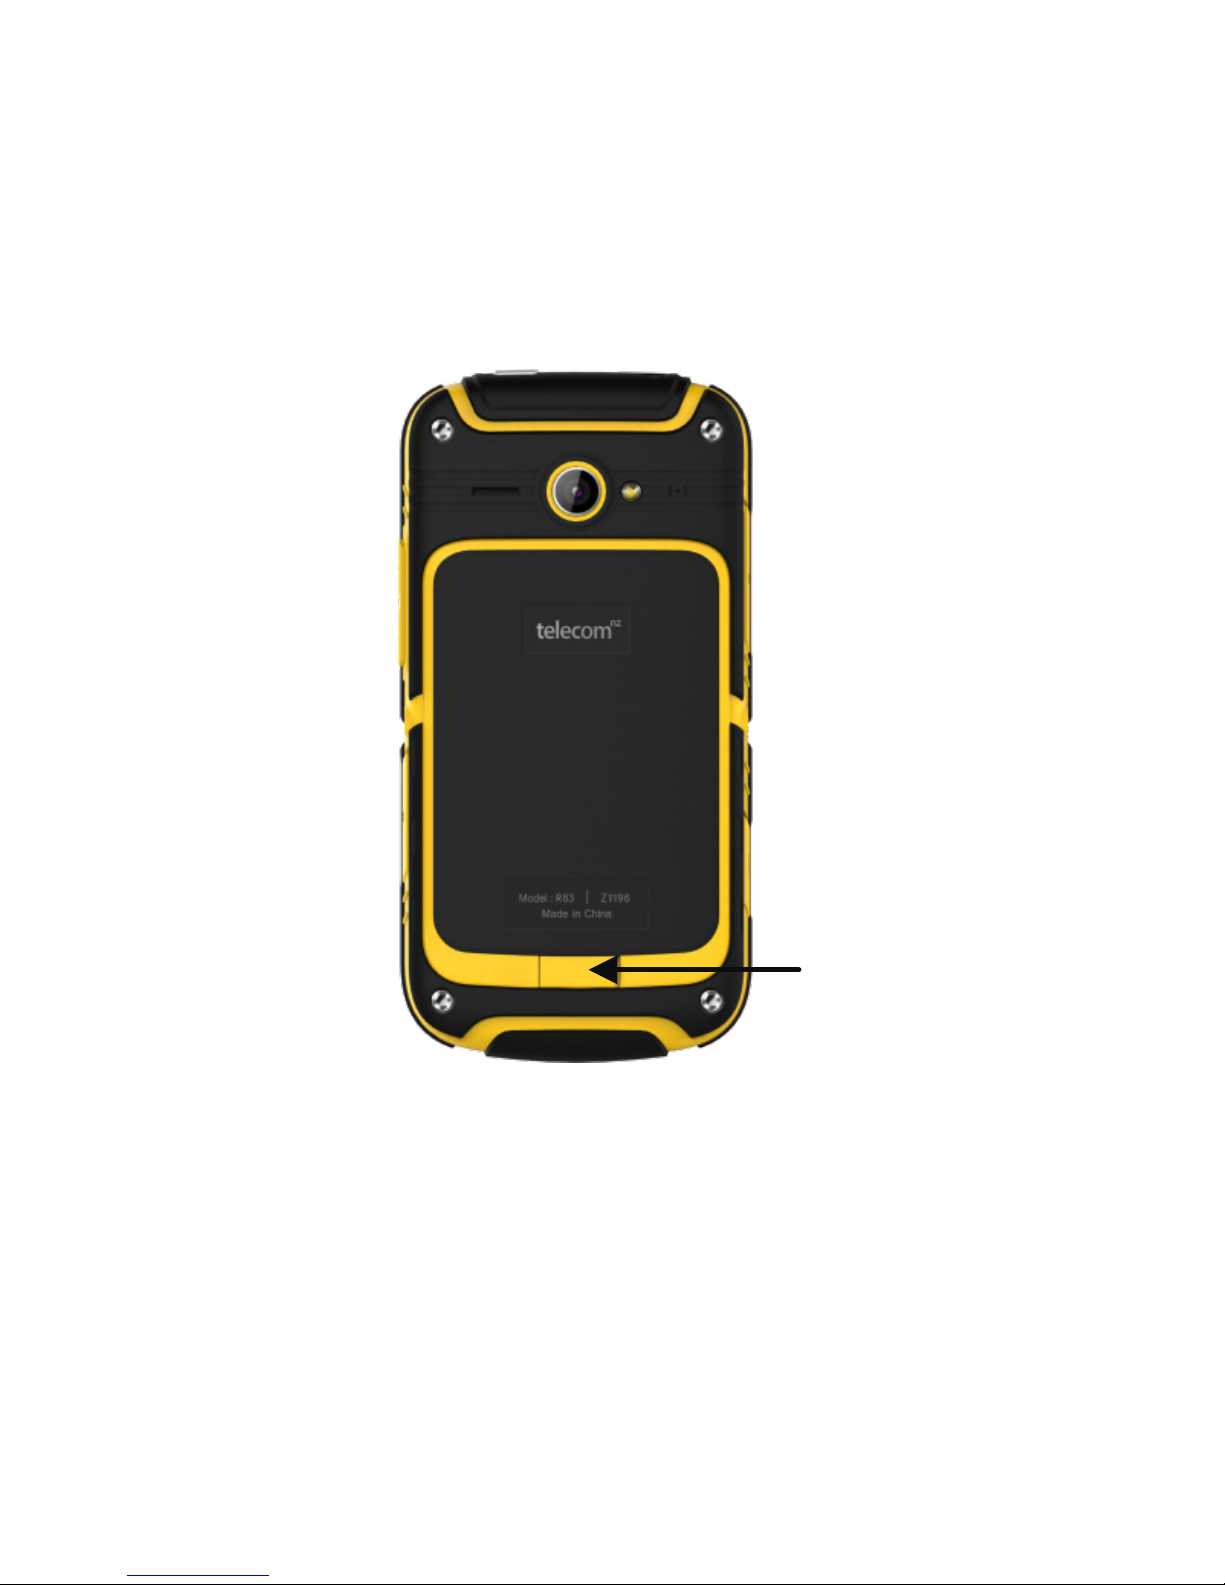
Insert the SIM Card and microSD Card*
1. Locate and open the SIM port on the left hand side of the
phone.
2. Hold the SIM card with the gold contacts facing down and the
cut corner facing the top of the phone as shown and slide it
into the card holder. Press it home so it clicks into place.
3. If you wish to increase the memory capacity insert a microSD
card (*optional) up to 32GB with the metal contacts facing
down as shown above. Push it fully home until it clicks into
place. The microSD card is not included in the box.
4. Remember to always close the port covers after use.

8
Charging the Battery
The back cover is sealed and the battery is not user replaceable.
Do not attempt to open the back cover which will void your
warranty.
To charge the battery:
1. Insert the charger lead carefully. Ensure that the plug is
inserted with the correct orientation. Do not force the
connector into the charger jack.
2. Connect the charger to a standard AC wall outlet.
3. Disconnect the charger when the battery is fully charged.
4. Remember to close the charging port to maintain protection
against liquid ingress.
How much charge have you got?
If the battery is low, there will be a pop-up message on the
screen. As you charge your phone, the lock screen will tell you
the battery level each time you wake up your phone.
If the phone is on, you’ll see the charging icon / on the
status bar.

9
Battery and Charging Tips
•Only use the AC charger and USB lead supplied. Insert the
charger lead carefully.
•Be careful to avoid tripping over or pulling on the lead whilst it
is plugged in.
•Physical damage to the charging port is NOT covered by
warranty.
•The phone can also be charged by connecting it to a
computer using the USB lead supplied.
•Avoid high temperatures and direct sunlight. The battery will
not charge above 45°C
•Do not leave the battery in a discharged state. Charge the
battery promptly when flat.
•Keep your handset cool. High temperatures degrade the
battery more quickly.
•Normal charge time is 3-4 hours. Do not leave on charge for
more than 24hrs.
•After 2-3 charge/discharge cycles the battery life will improve.
From then on use top up charging to recharge frequently and
always charge promptly when flat.
•When not using the phone for long periods switch off and
store in a cool place.
•With poor network conditions (less than 2 bars) battery life is
reduced, turn off Bluetooth and Wi-Fi when not in use to
extend battery life.
10
External Antenna Port
Your device provides an external RF antenna port for connecting
to approved devices. Using an external antenna can enhance
your coverage, provide better quality service and higher data
rates in marginal signal areas.
•Only use approved connectors suitable for ZTE devices.
•Always insert and remove the RF connector carefully.
•Do not pull or trip on the RF lead whilst it is plugged in.
•Damage to the RF port will make your device unusable and is
not covered by the manufacturer’s warranty.
•Remember to close the port cover after use.
External RF Port

11
Powering On/Off
•Press and hold the Power Key to turn on your phone.
•To turn it off, press and hold the Power Key to open the
options menu. Touch Power off and then touch OK.
TIP If you see FTM during power up this indicates Factory Test
Mode and is initiated by holding the Volume Down key during
power on. Press the Power key for 3 seconds to exit FTM mode.
Setting Up for the First Time
When you first power on your phone or after a factory reset (see
Settings – Backup and Reset), you need to enter some settings
before use.
1. The default language is English (New Zealand) touch to
change if required or touch Start.
2. Select Yes if you have a Google account or No to skip.
3. Configure the Google location options and touch Next.
4. You will be prompted to accept the terms of Google service.
Touch Next to continue.
5. Set your Location preferences
6. Enter a preferred user name if required
7. Touch Finish to complete the setup.
8. Further assistance is given in the form of pop ups describing
how to use various features. Press OK to clear these notices.

12
Using the Touch Screen
Your phone’s touch screen lets you control actions through a
variety of touch gestures.
•Touch
When you want to type using the onscreen keyboard, select
items, or press onscreen buttons, simply touch them with
your finger.
•Press and Hold (long press)
To open the available options for an item (for example, a
message or link in a Web page), press and hold the item.
•Swipe or Slide
To swipe or slide means to quickly drag your finger vertically
or horizontally across the screen.
•Drag
To drag, press and hold your finger with some pressure
before you start to move your finger. While dragging, do not
release your finger until you have reached the target position.
•Pinch
In some apps (such as Maps, Chrome, and Gallery), you can
zoom in and out by placing two fingers on the screen at once
and pinching them together (to zoom out) or spreading them
apart (to zoom in).
•Rotate the phone to change from portrait to landscape.
13
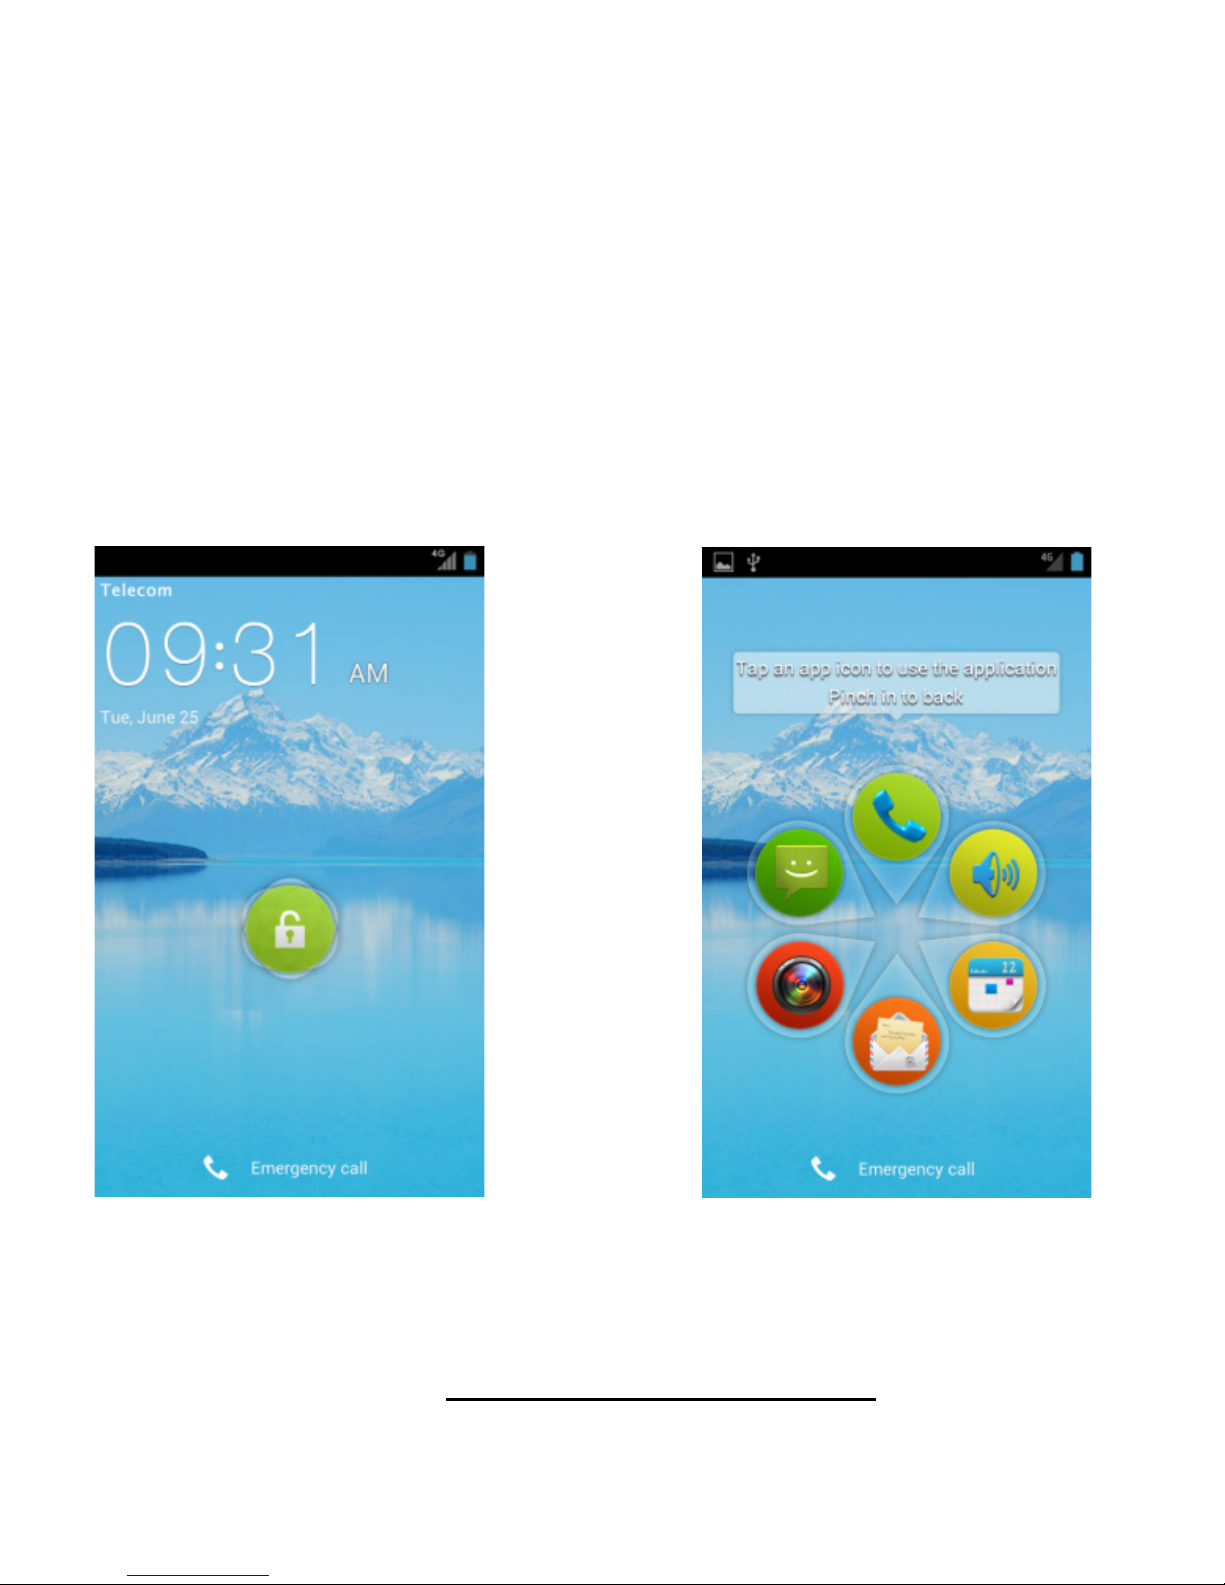
Locking/Unlocking your phone
Press the Power Key to turn the screen on or off and to lock and
unlock the device. The default screen lock is set to Long Press.
Press and hold the padlock icon to unlock your device. Swipe the
padlock icon to unlock your device directly to your chosen
application (eg Phone, Messages, Camera, Calendar etc).
Long Press the Padlock Swipe the padlock to
To unlock your screen: unlock to an application:
To save battery power, the phone automatically turns off the
screen after a certain period of time when you leave it idle.
Review this setting at Settings – Display – Sleep.
14
Clock, touch to set
alarms
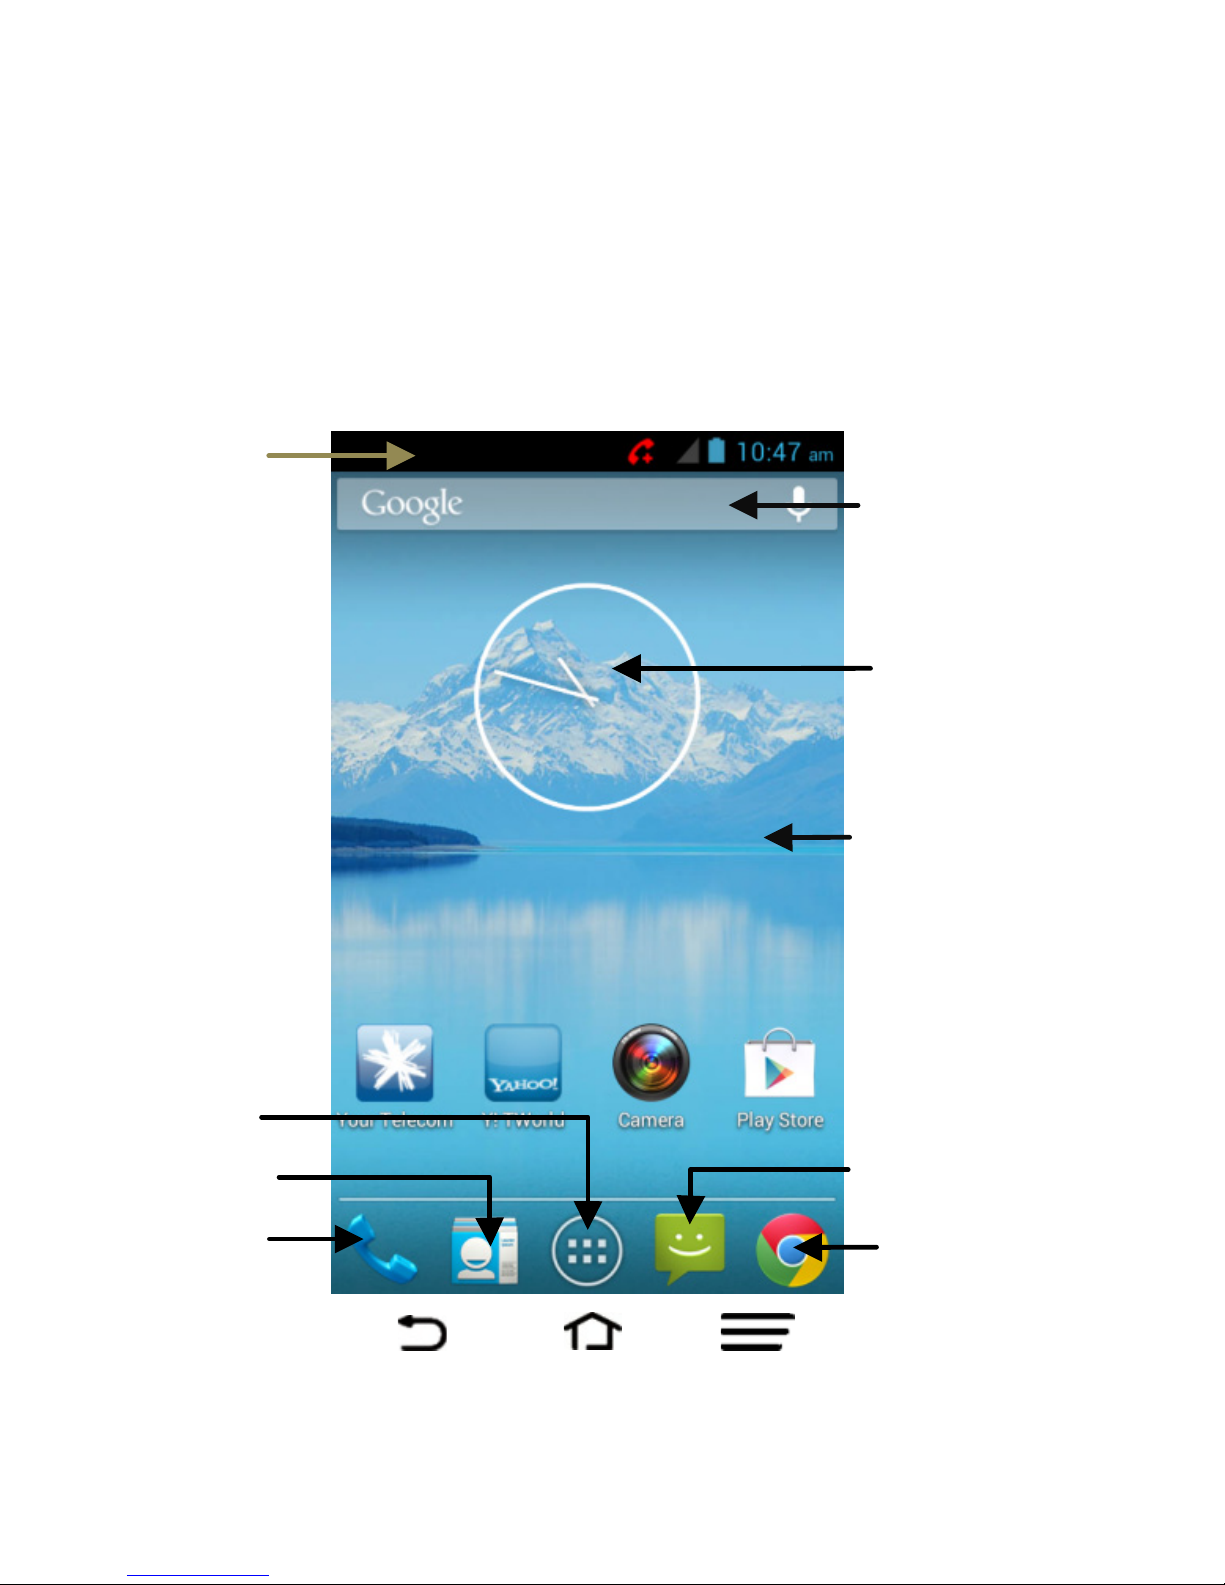
The Home Screen
The home screen is the starting point for applications, functions,
and menus. You can customize your home screen by adding
application icons, shortcuts, folders, widgets, and more. Swipe
the screen left or right to display additional screens.
Status &
Notifications
Drag the
notifications
bar down to
review
Back Home Options
Google Search
Wallpaper, press
and hold to
personalise
Browser
Messaging
Apps
People
Phone

15
Customise your device with Settings
Use the Settings menu to set up your device exactly as you like it.
The quickest way to access the Settings menu is to swipe down
on the home screen and touch the Settings icon . You can
also access from Apps > Settings. Swipe down from the top of
the screen to access the Quick Settings panel.
Quick Settings Panel
Swipe down from the top of the screen and use the Quick
Settings panel to quickly switch functions on and off. Blue is
active, grey is switched off.
Change Ringtones and Notifications
Ringtone sets the incoming call sound and Notifications are used
for incoming SMS, MMS, Email and other information updates.
1. Touch Home > Apps > Settings > Sound
2. Touch Phone ringtone or Default notification
3. Touch the available tones and press OK to choose, or
Cancel to exit.
TIP: To set a personalised ringtone for a caller, go to the
People app, select the contact, touch Options > Set
ringtone. The contact must be stored on the handset to use
this feature.

16
Adjusting Volumes
1. Touch Home > Apps > Settings > Sound > Volumes
2. Set the volume for music, video, games & other media or the
ringtone and notification volume independently.
3. Touch OK to save.
TIP: When the handset is idle, touch the volume keys to adjust
the ring volume. When playing any media press the volume keys
to adjust the media volume.
Enable Silent or Vibrate mode in the following ways:
•Press and hold the Power Key and then touch to
enable silent mode, touch to enable vibrate mode, or
touch to disable silent mode.
•With no media application running press the volume keys to
control the ring volume.
•Touch Home > Apps > Settings > Sound > Silent mode,
and touch Off, Vibrate or Mute. Also enable Vibrate when
ringing from this menu.
Changing the System Language
1. Touch Home > Apps > Settings > Language & input >
Language.
2. Select your chosen language.

17
Setting the Date and Time
1. Touch Home > Apps > Settings > Date & time.
2. Clear the Automatic date & time and Automatic time zone
check boxes to manually set the date, time and time zone
3. Set the date, time, time zone, and date/time format.
Change your background Wallpaper
1. Touch Home to return to your home screen
2. Press and hold on the home screen (long press)
3. Select home or lock screen.
4. Select from Gallery, Live Wallpapers, or Wallpapers and
choose the image or animation you want to use. Some
cropping may be needed for Gallery images.
5. Touch Done at the top of the screen (for Gallery images) or
Set wallpaper for other images.
Changing Screen Brightness
1. Touch Home > Apps > Settings > Display > Brightness
2. Uncheck the Automatic brightness box to set the brightness
manually, otherwise it is automatically adjusted to
background conditions by a sensor at the top of the phone.
3. Touch OK.
TIP The automatic brightness sensor is on the left side of the
earpiece. If this sensor is blocked (eg by a case or sticker) then
the screen brightness will always be low. Make sure this sensor
area is kept clear.

18
Protect Your Phone With Screen Locks
You can change the default (long press) screen lock to a variety
of alternate screen locks. The phone supports face recognition,
pattern lock, a numeric PIN or a password.
1. Touch Home > Apps > Settings > Security.
2. Touch Screen lock.
3. Select from Long Press, Face Unlock, Pattern, PIN or
Password.
•If you touch Pattern a short tutorial about creating an
unlock pattern appears. Follow the prompts to draw and
confirm your pattern.
•If you touch PIN or Password, you’re prompted to set a
numeric PIN or a password to unlock your screen.
•If you select Face Unlock you are guided through the face
recognition application to lock and unlock your handset.
The next time you turn on your phone or wake up the screen,
your chosen screen lock method will be activated.
IMPORTANT: Screen lock options are listed in the approximate
order of the strength of their security, starting with None and
Long Press, which provide no security.
If you forget your unlock pattern, PIN or password and have NOT
set a Google account you will need to hard reset your device
which will erase all user data and apps stored on your handset.
From the locked screen, touch Emergency call, enter the code
*983*987# and follow the instructions.

19
Protect Your Phone With Encryption
After encryption is applied you need to enter a numeric PIN or
password each time you power on your phone and without the
password the data is encrypted so cannot be read by anyone
else.
WARNING! Encryption is irreversible. The only way to revert to
an unencrypted phone is to perform a factory data reset, which
erases all your data.
Encryption provides additional protection in case your phone is
stolen, and may be required in some organisations.
Before turning on encryption, prepare as follows:
1. Set a lock screen PIN or password.
2. Connect your phone to the charger to charge your battery.
3. The encryption process may take up to one hour. If you
interrupt the process you may lose data or your phone can
end up in an unusable state.
When you're ready to proceed:
4. Touch Home > Apps > Settings > Security > Encrypt
phone.
5. Read the instructions encryption carefully.
The Encrypt phone button is not available if the battery is not
sufficiently charged or your phone is not plugged in.
If you are unsure about proceeding then touch the Back Key.

20
6. Touch Encrypt phone.
7. Enter your lock screen PIN or password and touch
Next.
8. Touch Encrypt phone again.
The encryption process starts and displays its progress, the
phone may restart several times.
When encryption is complete, you are prompted to enter your
PIN or password.
Subsequently, you must enter your PIN or password each time
you power on your phone, to decrypt it.
Table of contents
Other Telecom Cell Phone manuals

Telecom
Telecom R6 User manual

Telecom
Telecom T54 User manual

Telecom
Telecom R1 User manual

Telecom
Telecom T4010 User manual

Telecom
Telecom New Zealand R90 User manual

Telecom
Telecom R303 User manual

Telecom
Telecom R880H User manual

Telecom
Telecom U3100 User manual

Telecom
Telecom R54 User manual

Telecom
Telecom R6 User manual

Telecom
Telecom R55 User manual

Telecom
Telecom R7 User manual

Telecom
Telecom R7 User manual

Telecom
Telecom T171/k1751A User manual

Telecom
Telecom T903 User manual

Telecom
Telecom R55 User manual

Telecom
Telecom R109 User manual

Telecom
Telecom R203 User manual

Telecom
Telecom R203 User manual

Telecom
Telecom T4010 User manual


