Telecom T54 User manual

1
T54
Rugged Mobile Phone
User Manual

2
PC Software Requirements
Join Me PC Software included supports Microsoft Windows 7, Vista (32 and 64 bit), XP with
Service Pack 2 & 3. A limited version of Join Me is supplied that supports MAC OS 10.5, 10.6
ZTE cannot guarantee that third party hardware or software is compatible with this product.
Warnings and Safety Notices
Please read all the safety notices before using this device.
Do not use the phone near fuel or chemicals or in any prescribed area such as service stations
and refineries.
Do not transport or store flammable gas, liquid or explosives in the same compartment of your
vehicle as your mobile phone and accessories.
Copyright © 2010 ZTE Corporation All rights reserved.
1st Edition October 2010
No part of this publication may be excerpted, reproduced, translated or utilized in any form or by
any means, electronic or mechanical, including photocopying and microfilm, without the prior
written permission of ZTE Corporation.
ZTE Corporation operates a policy of continuous development. ZTE Corporation reserves the
right to make changes and improvements to any of the products described in this document
without prior notice.
Limitation of Liability
ZTE shall not be liable for any loss of profits or indirect, special, incidental or consequential
damages resulting from or arising out of or in connection with using this product, whether or not
ZTE had been advised, knew or should have known the possibility of such damages. The user
should refer to the enclosed warranty card for full warranty and service information.

3
Contents
Liquid Damage - Important Note...........................................................................................4
RF Safety Information ............................................................................................................5
Handset Overview...................................................................................................................8
Information Bar Icons...........................................................................................................10
Menu Quick Reference Guide.............................................................................................. 11
1Getting Started........................................................................................... 13
1.1 Insert the (U)SIM Card ................................................................................13
1.2 Insert the battery..........................................................................................14
1.3 Installing Additional Memory (Optional).......................................................15
1.4 How to switch the phone On or Off .............................................................16
1.5 How do I connect the charger? ...................................................................16
1.6 Tips about charging and battery life ............................................................17
1.7 How do I set the time and date? .................................................................18
1.8 How do I lock or unlock the keypad? ..........................................................18
1.9 How to make a voice call.............................................................................18
1.10 How to answer an incoming call..................................................................18
1.11 How to send a Text Message (SMS)...........................................................19
1.12 How to navigate the Menu...........................................................................19
1.13 Call Features Summary...............................................................................20
2Contacts..................................................................................................... 23
3Messages and Emails................................................................................ 26
3.1 How to send a Text Message (SMS)...........................................................26
3.2 How to view a received Text Message (SMS).............................................26
3.3 How to use Predictive Text..........................................................................27
3.4 How to add words to the built in Dictionary (My Words).............................28

4
3.5 Special Characters and SMS Message Length ..........................................28
3.6 How to send a Multimedia Message (MMS) ...............................................29
3.7 How to receive a Multimedia Message (MMS) ...........................................29
3.8 WAP Push Messages..................................................................................30
3.9 How to send an Email..................................................................................30
3.10 How to retrieve an Email .............................................................................31
3.11 How to set up automatic Email Retrieval ....................................................31
3.12 What are User Folders? ..............................................................................31
3.13 How to create a new Mailbox......................................................................32
4Handset Features & Applications............................................................. 33
5Installing the Join Me Computer suite...................................................... 38
6Troubleshooting, Technical and Warranty Information........................... 39
6.1 Troubleshooting and FAQ‟s.........................................................................39
6.2 Error Messages ...........................................................................................41
6.3 Technical Parameters..................................................................................42
6.4 Support Information.....................................................................................43
6.5 Warranty Information...................................................................................43
Liquid Damage - Important Note
Your ruggedised handset is compliant with the IP54 Standard which gives limited
protection from dust and liquid ingress. It is not waterproof and should never be immersed
in any liquid. The handset contains liquid detecting stickers and any liquid damage will
void your warranty. To ensure continued protection against liquid damage the battery cover,
antenna port and USB port cover must be properly closed.

5
RF Safety Information
The handset has an internal antenna located at the top of the phone. For optimum
performance with minimum power consumption do not cover the antenna area with your
hand. Hold the handset between thumb and finger in the middle of the device. Covering
the antenna affects call quality, may cause the handset to operate at higher power level
than needed, and may shorten talk and idle times.
Radio Frequency Energy
The handset is a low-power radio transmitter and receiver. When switched on it
intermittently transmits radio frequency (RF) energy (radio waves). The transmit power
level is optimized for best performance and automatically reduces when there is good
quality reception. Maximum power is only used at the edge of network coverage so under
most circumstances the power output is very low. Under poor network conditions the
phone transmits at a higher power, may get hot and have a significantly shorter battery life.
Declaration of Conformity - SAR (Specific Absorption Rate)
We declare that the product(s) detailed in this manual, and in combination with our
accessories, conform with the essential requirements of The Radio Communications
Standard (Electro-magnetic Radiation Human Exposure) 2003 and the Australian
Communications and Media Authority Section 376 of the Telecommunications Act 1997.
N14945 / Z1196
The SAR limit for mobile devices is 1.6 W/kg and the highest SAR value for this device

6
when tested at the ear was 0.821W/kg* and at the body worn was 1.360 W/kg*
Body Worn Operation
Important safety information regarding radio frequency(RF) radiation exposure.
To ensure compliance with RF exposure guidelines the phone must be used with a
minimum of 15 mm separation from the body.
Failure to observe these instructions could result in your RF exposure exceeding the
relevant guideline limits.
FCC Compliance
This device complies with part 15 of the FCC Rules. Operation is
subject to the following two conditions: (1) This device may not
cause harmful interference, and (2) this device must accept any
interference received, including interference that may cause
undesired operation.
Caution: Changes or modifications not expressly approved by the
manufacturer could void the user’s authority to operate the
equipment.

7
NOTE: This equipment has been tested and found to comply with
the limits for a Class B digital device, pursuant to part 15 of the
FCC Rules. These limits are designed to provide reasonable
protection against harmful interference in a residential installation.
This equipment generates, uses and can radiate radio frequency
energy and, if not installed and used in accordance with the
instructions, may cause harmful interference to radio
communications. However, there is no guarantee that interference
will not occur in a particular installation. If this equipment does
cause harmful interference to radio or television reception, which
can be determined by turning the equipment off and on, the user is
encouraged to try to correct the interference by one or more of the
following measures:
Reorient or relocate the receiving antenna.
Increase the separation between the equipment and receiver.
Connect the equipment into an outlet on a circuit different
from that to which the receiver is connected.
8
Consult the dealer or an experienced radio/TV technician for
help.
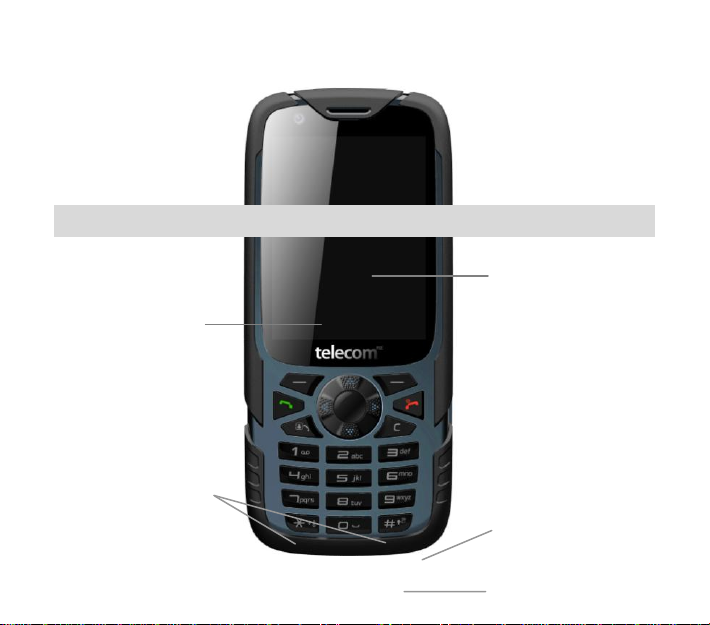
Handset Overview
Left & Right Soft Keys
Performs the function
shown on the display
Power / End Key
Hold down to power
On or Off.
Press to End a call.
Display
C Key
Step back in menus.
Clear text.
Earpiece

9
Handset Overview
Volume
USB,
Headphones
& Charging Port
Speaker
aker
Camera
Call Key
Call a number, answer a
call, show Call History
# Key
Switch to Meeting Mode
Change text modes
*Key
Lock / Unlock the keypad.
Access text symbols.
Insert a Pause or Wait
command.
Camera Key
Antenna Port
10
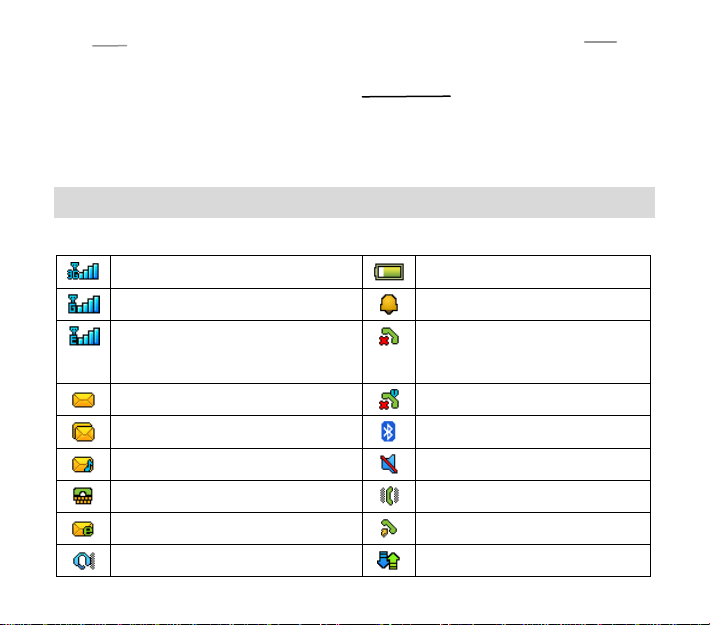
Information Bar Icons
3G Signal Strength
Battery Level Indicator
GSM Signal Strength
Alarm is set
Signal Strength of the EDGE
Network
Missed Call
New SMS Message
Missed Video Call
Message Memory is Full
Bluetooth ON
New MMS Message
Silent Mode
CTM
Vibrate mode enabled
New E-mail
Call Forward is Active
Headset and Vibrate Mode
Data channel available (GPRS)
Right
Left
Rear
Cover lock

11
New Wap Push Message
Data channel active (PDP)
Headset Mode
Roaming
Menu Quick Reference Guide

12
Menu Quick Reference Guide Continued…

13
1 Getting Started
1.1 Insert the (U)SIM Card
The (U)SIM card (UMTS Subscriber Interface Module) is the small plastic smart-card with
gold contacts. It holds account and contact information and can be used to store text
messages. It can be moved between different phones if required.
The (U)SIM card must be inserted before use.
Insert the (U)SIM card with the gold contacts facing down and the bevelled edge on
the top right as shown. Carefully slide it into the housing observing the correct
orientation.

14
1.2 Insert the battery
1. Rotate the locking screw to the right to unlock the battery cover.
2. Open the battery cover using the thumb notches on the bottom on the cover.
3. Insert the battery as shown with the contacts located against the gold springs.
4. Press the battery down flush into the case
If your handset displays:
Enter Handset unlock
code
The default code is 0000
Enter (U)SIM PIN Code
Enter the PIN supplied with your SIM card
No (U)SIM detected
Check the SIM is inserted correctly.
Enter PUK code
Contact your Service Provider
15
5. Line the battery cover up correctly, close the case and engage the locking
screw.
6. It is important to keep the battery cover, antenna port and USB port cover
properly closed to maintain IP54 protection from liquid and dust.
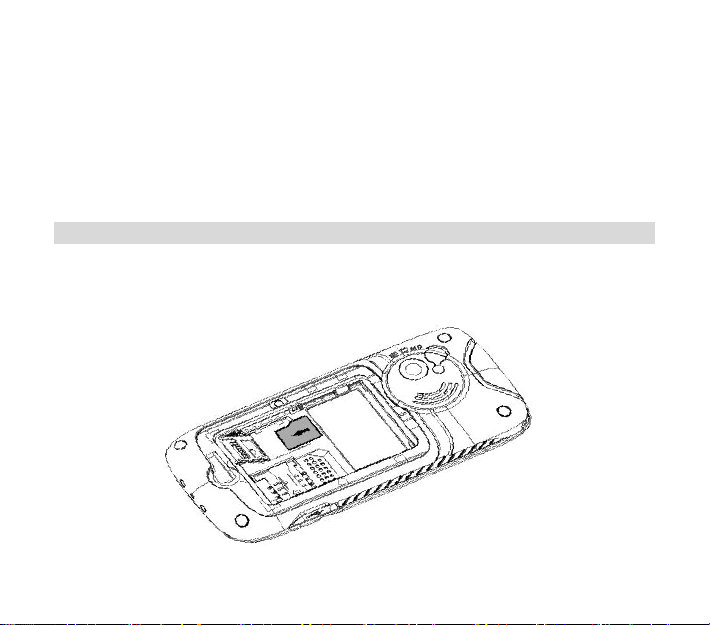
1.3 Installing Additional Memory (Optional)
Handset memory can be increased by inserting a microSD™ card up to 16GB.
microSD™cards up to 2GB are supported (FAT 16 format).
microSDHC™(high capacity) cards up to 16GB are supported (FAT 32 format).
Class 4 Memory cards are required.
Open the back cover, locate the memory card holder, slide and lift to open

16
The Information bar
Insert the memory card as shown with the gold contacts facing down
Close the card holder and make sure the card is correctly aligned.
With the microSD™card inserted the default storage location (for photos etc) is the
External Memory.See Menu > Settings > arrow right ►to Handset > Download
location to change if required.
Go to Menu > File Manager > arrow right ►to Memory Card to access the stored files
Connect the handset to your computer using the USB lead supplied to transfer files to
and from the memory card.
1.4 How to switch the phone On or Off
Press and hold the red key for two seconds to switch the phone ON or OFF.
Enter (U)SIM PIN code –supplied with your (U)SIM card. The start up screen below is
referred to throughout the manual as the Idle Screen:
The Idle Screen:
1.5 How do I connect the charger?
Charge before initial use. The plug and socket are keyed so they will only fit together one

17
way.
Do NOT use excessive force which may damage the USB port.
Physical damage to the USB port is NOT covered by warranty.
The phone can also be charged by connecting it to a
computer using the USB lead supplied.
A sound is played when the charger or USB cable is
inserted into the handset.
If the phone is off after charging long press the red
End Key to switch it back on.
1.6 Tips about charging and battery life
Only use the AC charger and USB lead supplied.
Insert the charger lead carefully with the plug and socket aligned correctly.
Normal charge time is 3-4 hours. Do not leave on charge for more than 24hrs.
When not using the phone for long periods remove the battery.
Charge the battery between 0°C~45°C. Charge the battery promptly when flat.
With poor network conditions (less than 2 bars) battery life is reduced.
To maximize battery life turn off Bluetooth when not in use and limit multimedia
functions.
Battery life is improved after a few charge / discharge cycles.
The phone can be charged in the ON or OFF state: When OFF the message “Charging
battery…” is displayed.When switched ON the battery icon animates until fully charged.
If charging in the OFF state turn the phone ON by long pressing the red End key.

18
1.7 How do I set the time and date?
The time and date is set automatically from the network. It takes a few seconds to
update when the phone is first switched on. Select 12 or 24 hr format in the Network Time
menu. To manually set the time it is necessary to switch Network Time off: Menu >
Settings > Handset > Network Time > State > Off then set the time and date manually:
Menu > Settings > Handset > Time and Date.
1.8 How do I lock or unlock the keypad?
Manual keylock: Long press the * key then press the Right Soft Key to lock or unlock
the handset. Auto keylock: Menu > Settings > Handset > Keylock
1.9 How to make a voice call
Enter the number on the keypad and press the green key to make the call.
Press OK to activate Speaker (Handsfree) mode
Press the red key to end the call.
1.10 How to answer an incoming call
Press the green key or OK to answer the call, OK to activate Speaker (Handsfree)
mode.
Press the red key or Reject to end the call.
If Voicemail is active pressing Reject forwards the call to Voicemail.

19
1.11 How to send a Text Message (SMS)
Press the Left Arrow ◄for Messages
Press OK for New message.Press OK for Text message
Enter the phone number directly or press OK to select from Contacts (Cont.)
Select the Contact then press OK for Done. The Contact number is displayed, press
OK
Press the Down Arrow ▼once to move the cursor into the text field
Type the message using the letter keys on the keypad (see Chapter 6 on Texting)
Press the OK to send the message.
1.12 How to navigate the Menu
The Main Menu is a grid of icons that are used to access key features on the phone.
From the Idle Screen press OK to access the Main Menu. Use the Arrow Keys
▲▼◄►to move the cursor or press the corresponding number key as shown on the
grid below. Eg Menu > 5 = Messages
The icons are described at the bottom of the screen.
OK

20
Shortcuts
From the idle screen the Arrow Keys launch the default Shortcuts as shown:
TWorld
Messages File Manager
Calls
|To change default shortcuts: Menu > Settings > arrow right ►to Handset >
Shortcut keys
1.13 Call Features Summary
Check the table below to quickly find the Call Feature you require:
Function
Description
Menu Selection
Any key to
answer
Enable any key to answer for an
incoming call.
Menu > Settings > arrow
right to Call > Any key to
answer
Call a Contact
Access your Contacts list and dial
directly from your chosen
Contact.
Left Soft Key > Scroll up
or down to chose a
Contact > Call Key
Icon
description
Table of contents
Other Telecom Cell Phone manuals

Telecom
Telecom R54 User manual

Telecom
Telecom New Zealand R90 User manual

Telecom
Telecom U3100N User guide

Telecom
Telecom T903 User manual

Telecom
Telecom R7 User manual

Telecom
Telecom R83 User manual

Telecom
Telecom T4010 User manual

Telecom
Telecom R7 User manual

Telecom
Telecom R880H Installation guide

Telecom
Telecom R6 User manual

Telecom
Telecom R109 User manual

Telecom
Telecom T4010 User manual

Telecom
Telecom R55 User manual

Telecom
Telecom New Zealand R90 User manual

Telecom
Telecom U3100 User manual

Telecom
Telecom R1 User manual

Telecom
Telecom R203 User manual

Telecom
Telecom R203 User manual

Telecom
Telecom R55 User manual

Telecom
Telecom T4010 User manual


