Telecom T4010 User manual

Let’s go
Getting started with your
Telecom T4010 mobile
CJB26NBL1AAA
IP4464_Telecom T4010_QG_Eng_USA_for NZ_05_130322.indd 2-3IP4464_Telecom T4010_QG_Eng_USA_for NZ_05_130322.indd 2-3 2013-3-22 15:48:052013-3-22 15:48:05

1
PROTECT YOUR HEARING
To prevent possible hearing damage,
do not listen at high volume levels for
long periods. Exercise caution when holding
your device near your ear while the loudspeaker
is in use.
Contents
1Your mobile 2
2
Text input 16
3
Phone call 18
4
Contacts 20
5
Messaging 21
6
Email 23
7
Getting connected 25
8
Locate my location
using GPS satelites 29
9
Data backup 30
10
Factory data reset 31
11
Applications 32
12
Making the most of your phone 33
IP4464_Telecom T4010_QG_Eng_USA_for NZ_05_130322.indd 4-1IP4464_Telecom T4010_QG_Eng_USA_for NZ_05_130322.indd 4-1 2013-3-22 15:48:082013-3-22 15:48:08

32
Camera
• On Home screen, press to quickly
access Settings menu or Notification
panel; to launch quick search; to
manage applications; to customize
your Home screen by adding
applications or changing wallpaper.
• On other screens, press to view
options list.
Press: Return to the Home screen or
back to the central Home screen
if it is extended.
Press and hold: Enter the recently used
applications list.
Go back to the previous menu or
screen.
1Your mobile
1.1 Keys and connectors
Proximity sensor
Touch screen
LED
light
Back
key
Home key
Menu key
Headset connector
Power key
micro-USB connector
Volume up
Volume down
IP4464_Telecom T4010_QG_Eng_USA_for NZ_05_130322.indd 2-3IP4464_Telecom T4010_QG_Eng_USA_for NZ_05_130322.indd 2-3 2013-3-22 15:48:082013-3-22 15:48:08
54
1.2 Getting started
1.2.1 Set-up
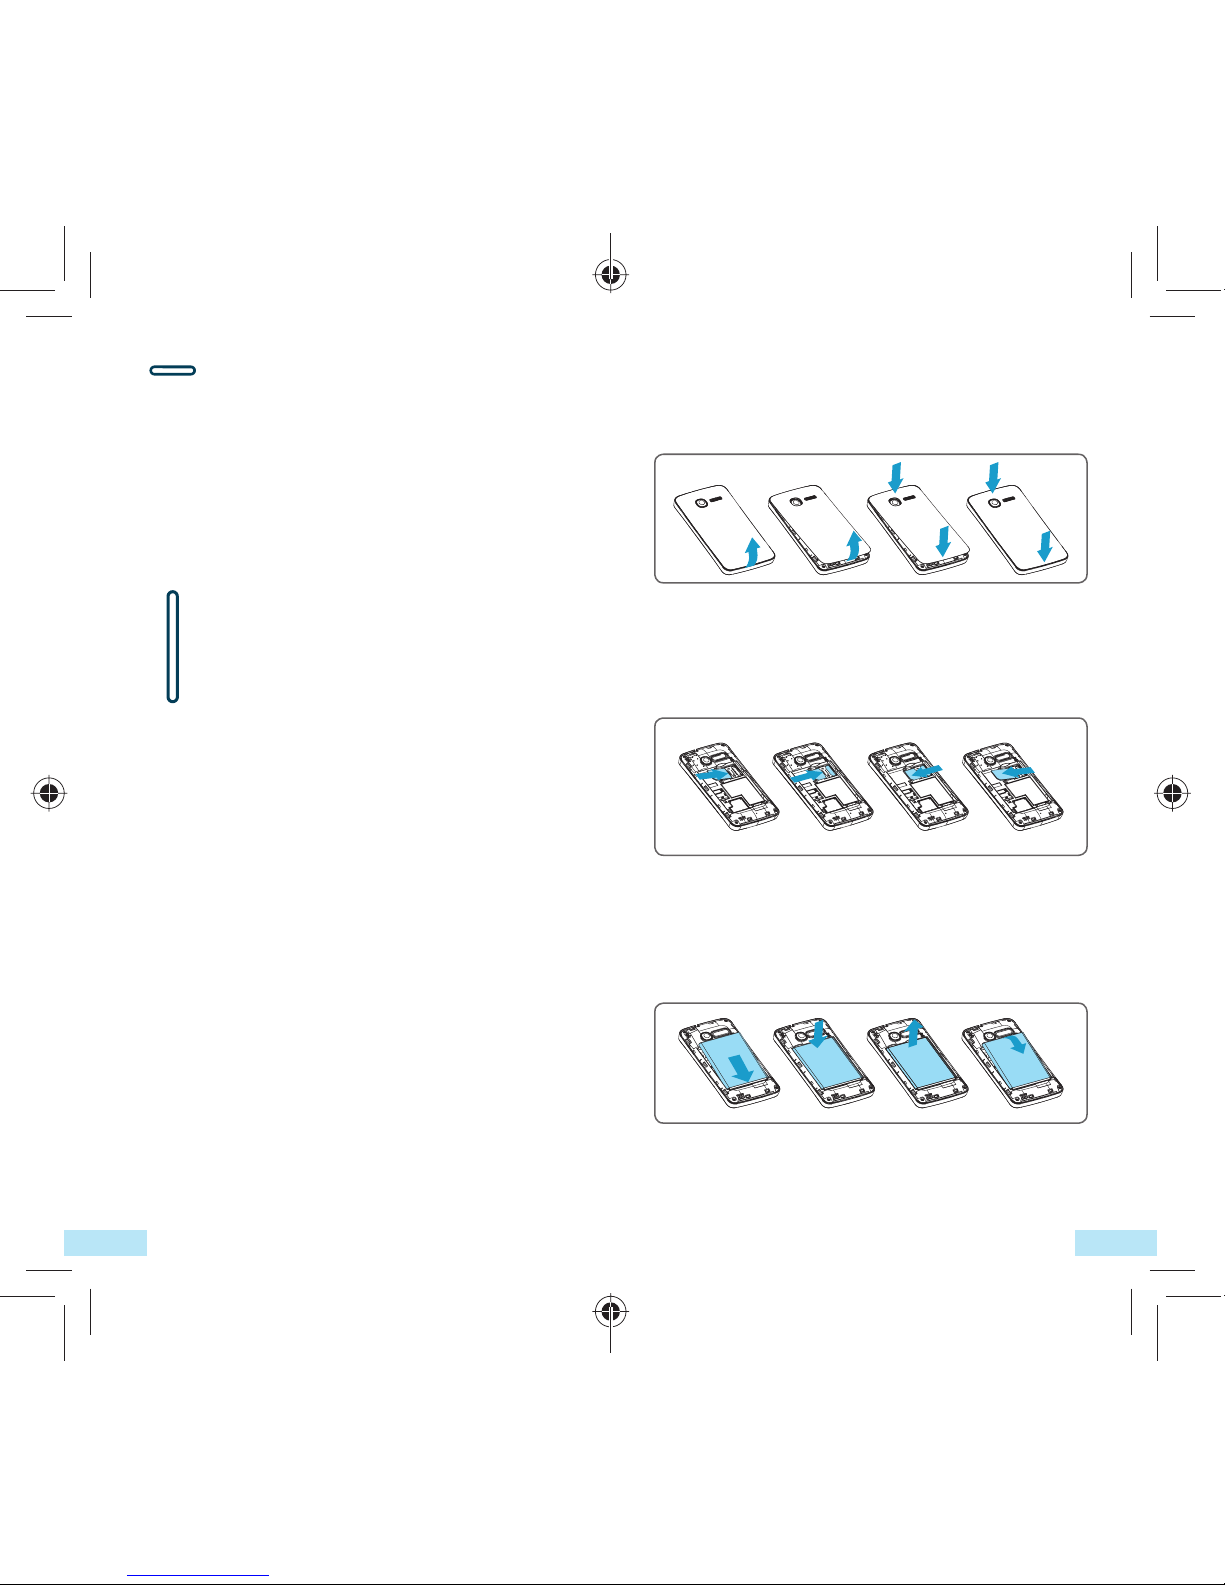
Removing or installing the back cover
Inserting or removing the SIM card
You must insert your SIM card to make phone
calls. Please power off your phone and remove
battery before inserting or removing the SIM card.
Place the SIM card with the chip facing
downwards and slide it into its housing. Make
sure that it is correctly inserted. To remove the
card, press and slide it out.
Installing or removing the battery
• Insert and click the battery into place, then
close the phone cover.
• Unclip the cover, then remove the battery.
Press: Lock the screen.
Light up the screen.
Press and hold: When phone is off,
power on the phone.
When phone is on,
enter Phone options:
Silent mode, Airplane
mode, Power off.
Press to adjust the Volume (in call/
media playing mode)
IP4464_Telecom T4010_QG_Eng_USA_for NZ_05_130322.indd 4-5IP4464_Telecom T4010_QG_Eng_USA_for NZ_05_130322.indd 4-5 2013-3-22 15:48:092013-3-22 15:48:09
76
1.2.2 Power on your phone
Hold down the Power key until the phone
powers on. It will take a few seconds before the
screen lights up.
Set up your phone for the first time
The first time you power on the phone, you are
prompted to set up your phone in multiple ways:
language, input method, mobile data connection,
account setup and synchronization, system
update, etc. You are required to sign into your
Google account to synchronize email, contacts,
calendar and other Google applications (1).
• Enter your user name and password, then
touch Sign in. If you forget your password, you
can go to http://www.google.com/ to retrieve
it. If you don’t own a Google Account, you are
prompted to create one by touching Create.
• Read the setup information on the screen.
• Mark/Unmark the check box to choose
whether you want to take advantage of
Google's location service, then touch Next.
• Mark/Unmark the check box to choose
whether you want to back up data with your
Google account, then touch Next.
• Touch Finish setup.
(1) Application availability depends on country and operator.
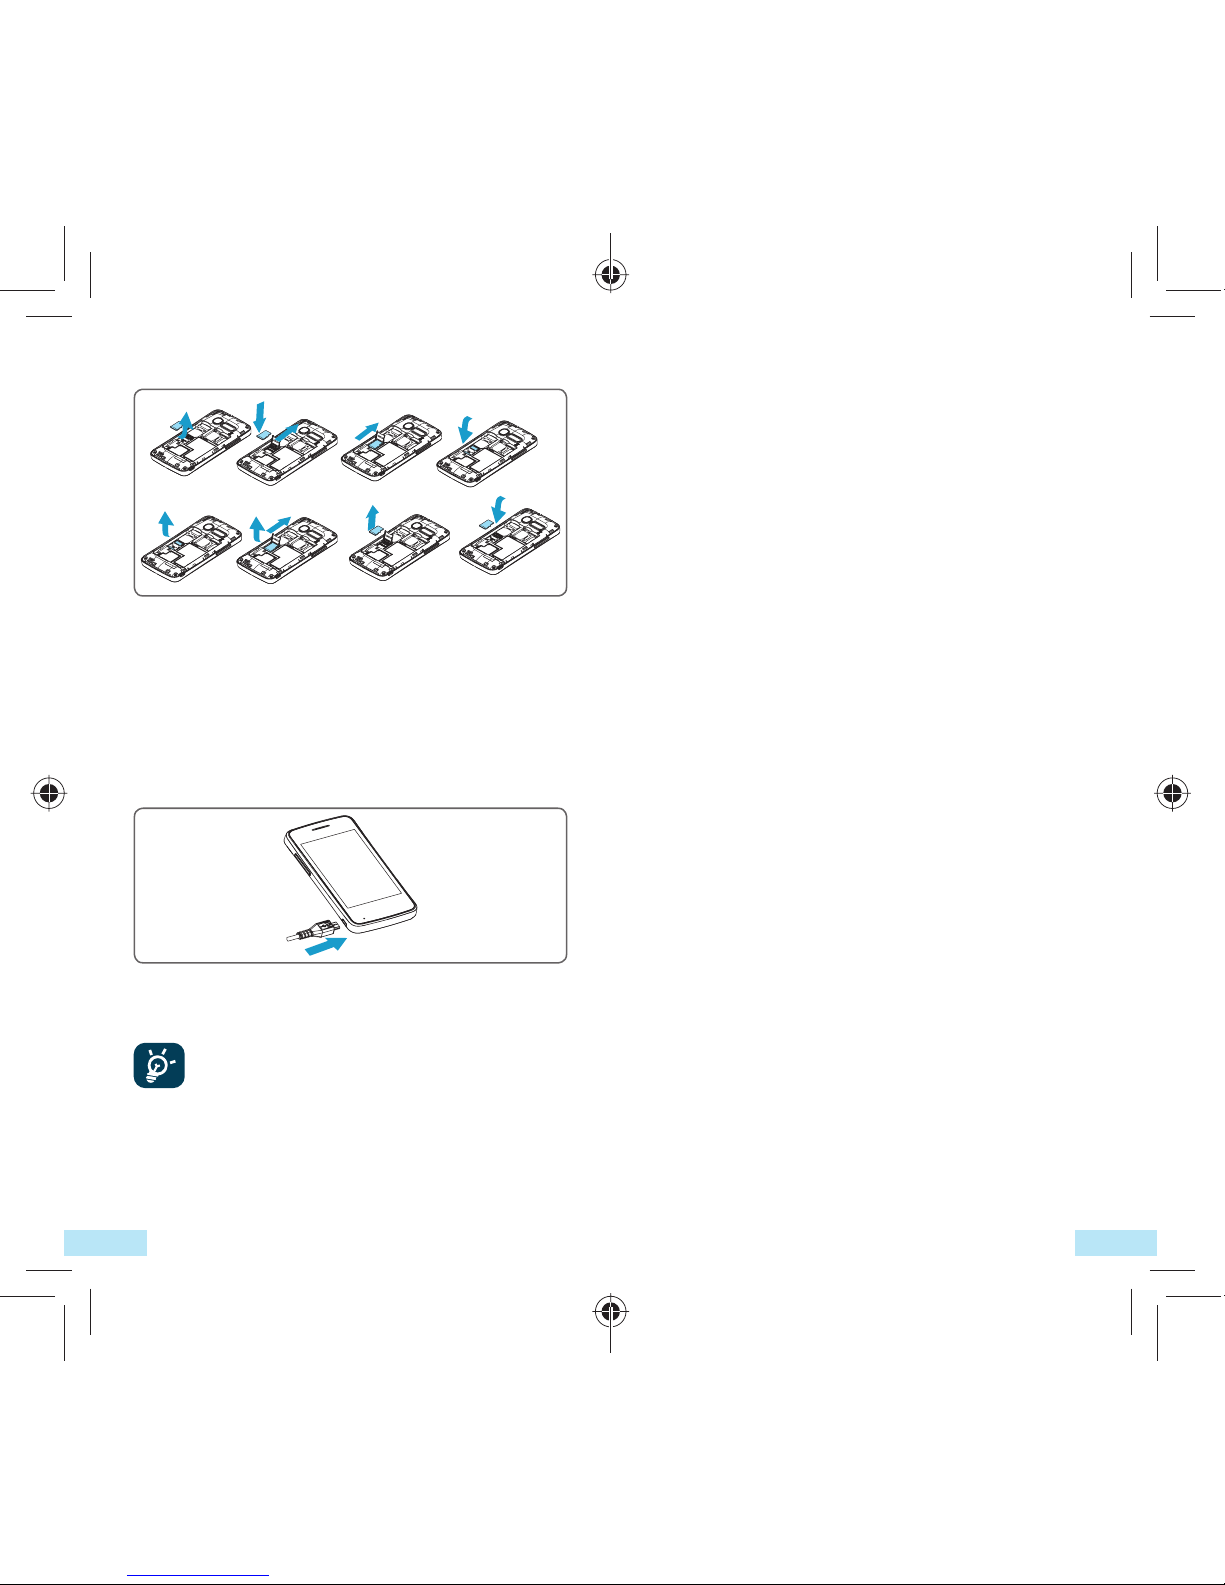
Installing and removing the microSD card
To release the microSD card holder, slide it in
the direction of the arrow and lift it. Then insert
the microSD card with the golden contact
downward. Finally, turn down the microSD
holder and slide it in the opposite direction to
lock it.
Charging the battery
Connect the battery charger to your phone and
outlet respectively.
To reduce power consumption and
energy waste, when battery is fully
charged, disconnect your charger
from the plug; switch off Wi-Fi, GPS,
Bluetooth or applications running in the
background when not in use; reduce the
backlight time, etc.
IP4464_Telecom T4010_QG_Eng_USA_for NZ_05_130322.indd 6-7IP4464_Telecom T4010_QG_Eng_USA_for NZ_05_130322.indd 6-7 2013-3-22 15:48:112013-3-22 15:48:11

98
Home screen is provided in an extended format
to allow more space for adding applications,
shortcuts etc. Slide the Home screen
horizontally left and right to get a complete
view of the Home screen. Small dots at the
lower left and right of the screen indicate which
screen you are viewing.
1.3.1 Using the touchscreen
Touch
To access an application, touch it with your finger.
Touch and Hold
To enter the available options for an item, touch
and hold the item. For example, select a contact
in Contacts, touch and hold this contact, options
list will then appear on screen.
Drag
Place your finger on the screen to drag an
object to another location.
Slide/Swipe
Slide the screen to scroll up and down the
applications, images, web pages… at your
convenience.
Flick
Similar to swiping, but flicking makes it move
quicker.
This initial set up can be skipped and
enabled via Settings\Accounts & sync.
In power on screen without SIM card inserted,
you can also connect to a Wi-Fi network to
sign into your Google account and to use some
features.
1.2.3 Power off your phone
Hold down the Power key until the phone
options appear, select Power off.
1.3 Home screen
You can bring all the items (applications,
shortcuts, folders and widgets) you love or use
most frequently to your home screen for quick
access. Press Home key to switch to Home
screen.
Status bar
• Status/Notification
indicators
• Touch and Drag down to
open notification panel.
Application tab
Touch to open applications
list.
Press and hold to display
thumbnails.
Touch to access Messaging
Touch to place a call/access Call log if you have
missed call(s).
Search bar
Touch nto enter Search
options: All, Web, Apps,
Contacts, etc.
Touch oto enter voice
search screen.
Touch an icon to open an
application, folder, etc.
o
n
IP4464_Telecom T4010_QG_Eng_USA_for NZ_05_130322.indd 8-9IP4464_Telecom T4010_QG_Eng_USA_for NZ_05_130322.indd 8-9 2013-3-22 15:48:122013-3-22 15:48:12

1110
Status icons
GPRS connected Receiving location
data from GPS
GPRS in use Speakerphone is on
EDGE connected Roaming
EDGE in use No signal
3G connected Vibrate mode
3G in use Silent mode
HSPA (3G+)
connected
Phone microphone
is mute
HSPA (3G+) in use Battery is very low
Connected to a Wi-Fi
network Battery is low
Bluetooth is on Battery is partially
drained
Connected to a
Bluetooth device Battery is full
Airplane mode Battery is charging
Alarm is set Headset connected
GPS is on and in use Signal strength
Pinch/Spread
Place your fingers of one hand on the screen
surface and draw them apart or together to
scale an element on the screen.
Rotate
Automatically change the screen orientation
from portrait to landscape by turning the phone
sideways to have a better screen view.
1.3.2 Status bar
From status bar, you can view both phone status
(to the right side) and notification information
(to the left side). When the status bar is full, “ ”
icon will appear, touch to display hidden icons.
IP4464_Telecom T4010_QG_Eng_USA_for NZ_05_130322.indd 10-11IP4464_Telecom T4010_QG_Eng_USA_for NZ_05_130322.indd 10-11 2013-3-22 15:48:122013-3-22 15:48:12

1312
Notification panel
Touch and drag down the Status bar or press
Menu key and touch Notifications to open the
notification panel. Touch and drag up to close
it. From the Notification panel, you can open
some functions by touch (GPS, Bluetooth, etc.),
reminders indicated by notification icons, or
view wireless service information.
Touch to clear all event–based notifications
(other ongoing notifications will remain).
1.3.3 Search bar
The phone provides a Search function which
can be used to locate information within
applications, the phone or the web.
Notification icons
New Gmail message Call in progress
(green)
New text or
multimedia message
Call in progress using
Bluetooth headset
(blue)
Problem with text or
multimedia message
delivery
Missed call
New Google Talk
message Call on hold
New voice mail Call forwarding is on
Upcoming event Uploading data
Data is synchronizing Downloading data
Problem with sign-in or
synchronization
An open Wi-Fi
network is available
microSD card is full Phone is connected
via USB cable
Connected to or
disconnected from
VPN
Radio is on
Song is playing System update
available
USB tethering is on Portable Wi-Fi
hotspot is on
Both USB tethering
and portable hotspot
are on
Application update
available
IP4464_Telecom T4010_QG_Eng_USA_for NZ_05_130322.indd 12-13IP4464_Telecom T4010_QG_Eng_USA_for NZ_05_130322.indd 12-13 2013-3-22 15:48:132013-3-22 15:48:13
1514
1.3.6 Application tab
Touch from Home screen to enter
applications list.
To return to the Home screen, press Home key.
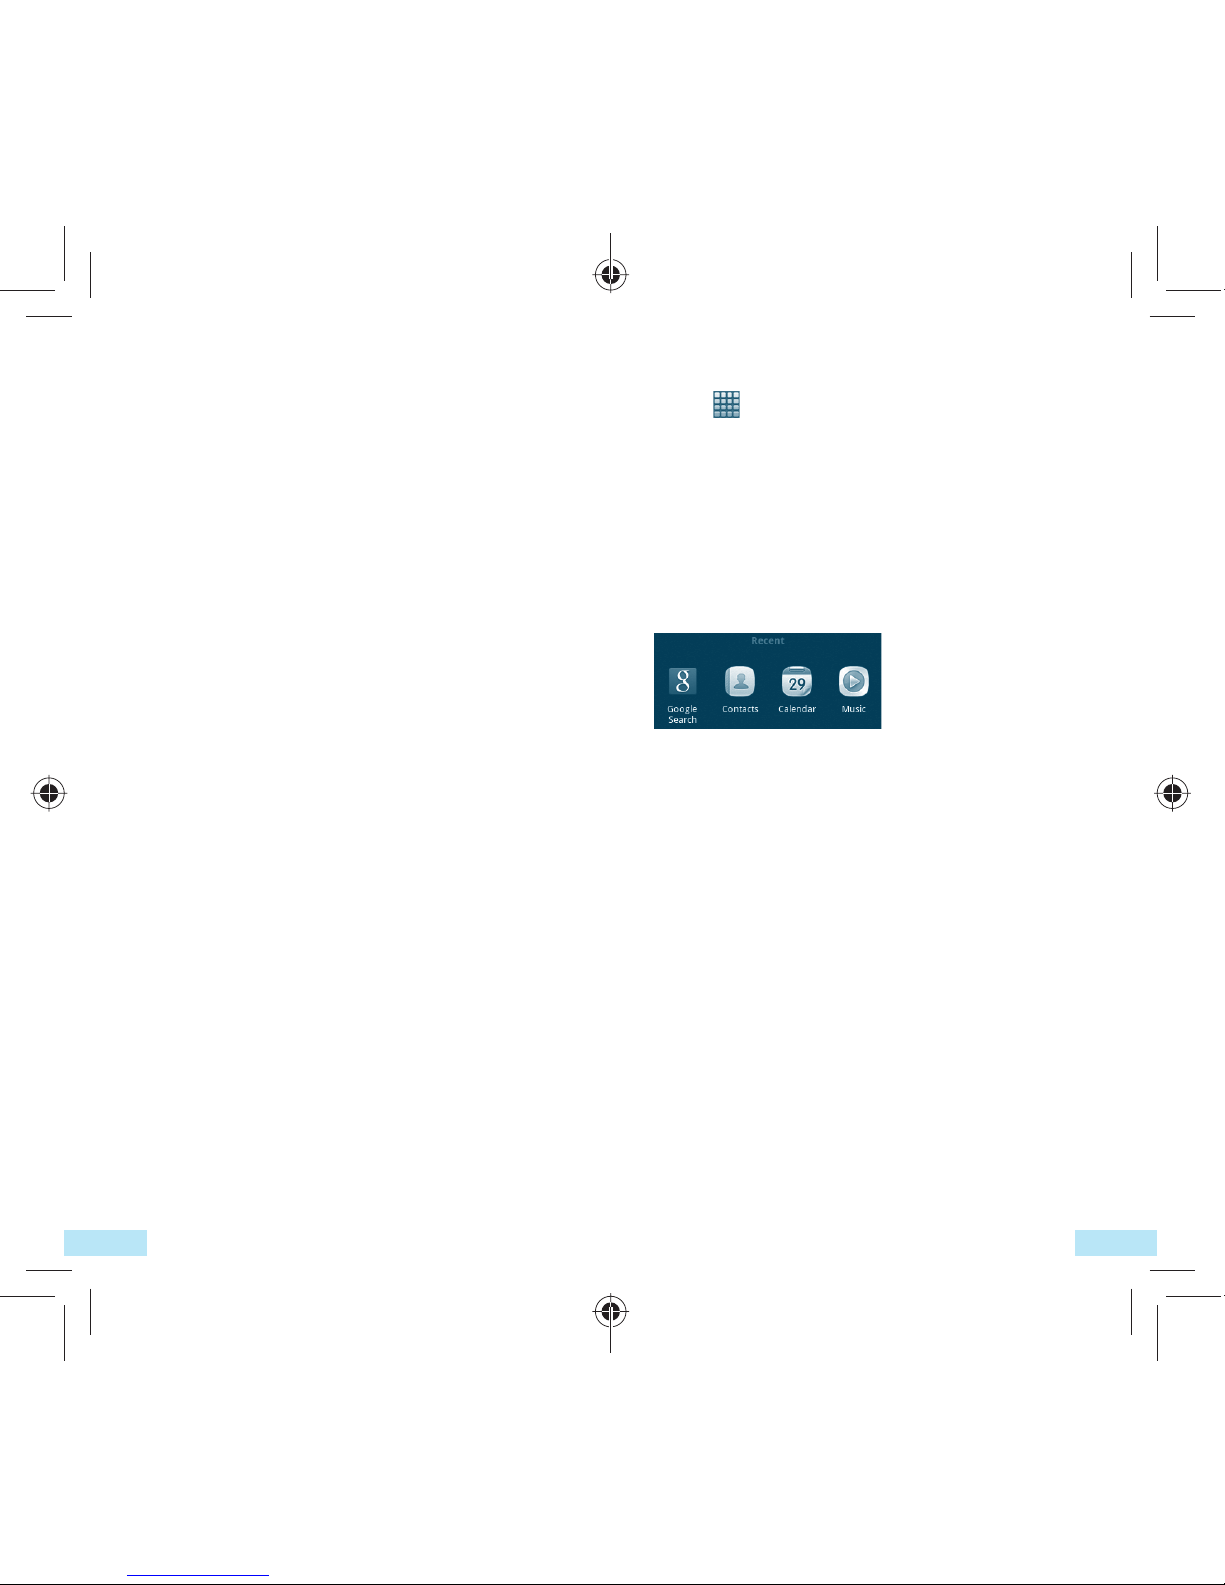
Consult recently-used applications
To consult recently-used applications, you
can press and hold the Home key from Home
screen. Touch an icon in the window to open
the related application.
1.3.7 Volume adjustment
Press Volume up/down key to adjust the
volume. While in the lowest volume level, your
phone will be switched to vibrate/silent mode.
Press Menu key from Home screen, then touch
Settings\Audio profiles, you can set alarm and
incoming call volume to your preference.
1.3.4 Lock/Unlock your screen
To protect your phone and privacy, you can
lock the phone screen by creating a variety of
patterns, PIN or password etc.
1.3.5 Personalize your home screen
Add
Touch and hold an empty area or press Menu
key and touch Add on the Home screen, you
can add shortcuts, widgets or folders to the
Home screen.
Reposition
Touch and hold the item to be repositioned
to activate the Move mode, drag the item to
desired position, then release. Hold the icon on
the left or right edge of the screen to drag the
item to another Home screen page.
Remove
Touch and hold the item to be removed to
activate the Move mode, drag the item to the
bottom trash can, which will then turn red, and
release.
Wallpaper customization
Touch and hold an empty area or press Menu
key and touch Wallpaper on the Home screen
to customize wallpaper.
IP4464_Telecom T4010_QG_Eng_USA_for NZ_05_130322.indd 14-15IP4464_Telecom T4010_QG_Eng_USA_for NZ_05_130322.indd 14-15 2013-3-22 15:48:132013-3-22 15:48:13
1716
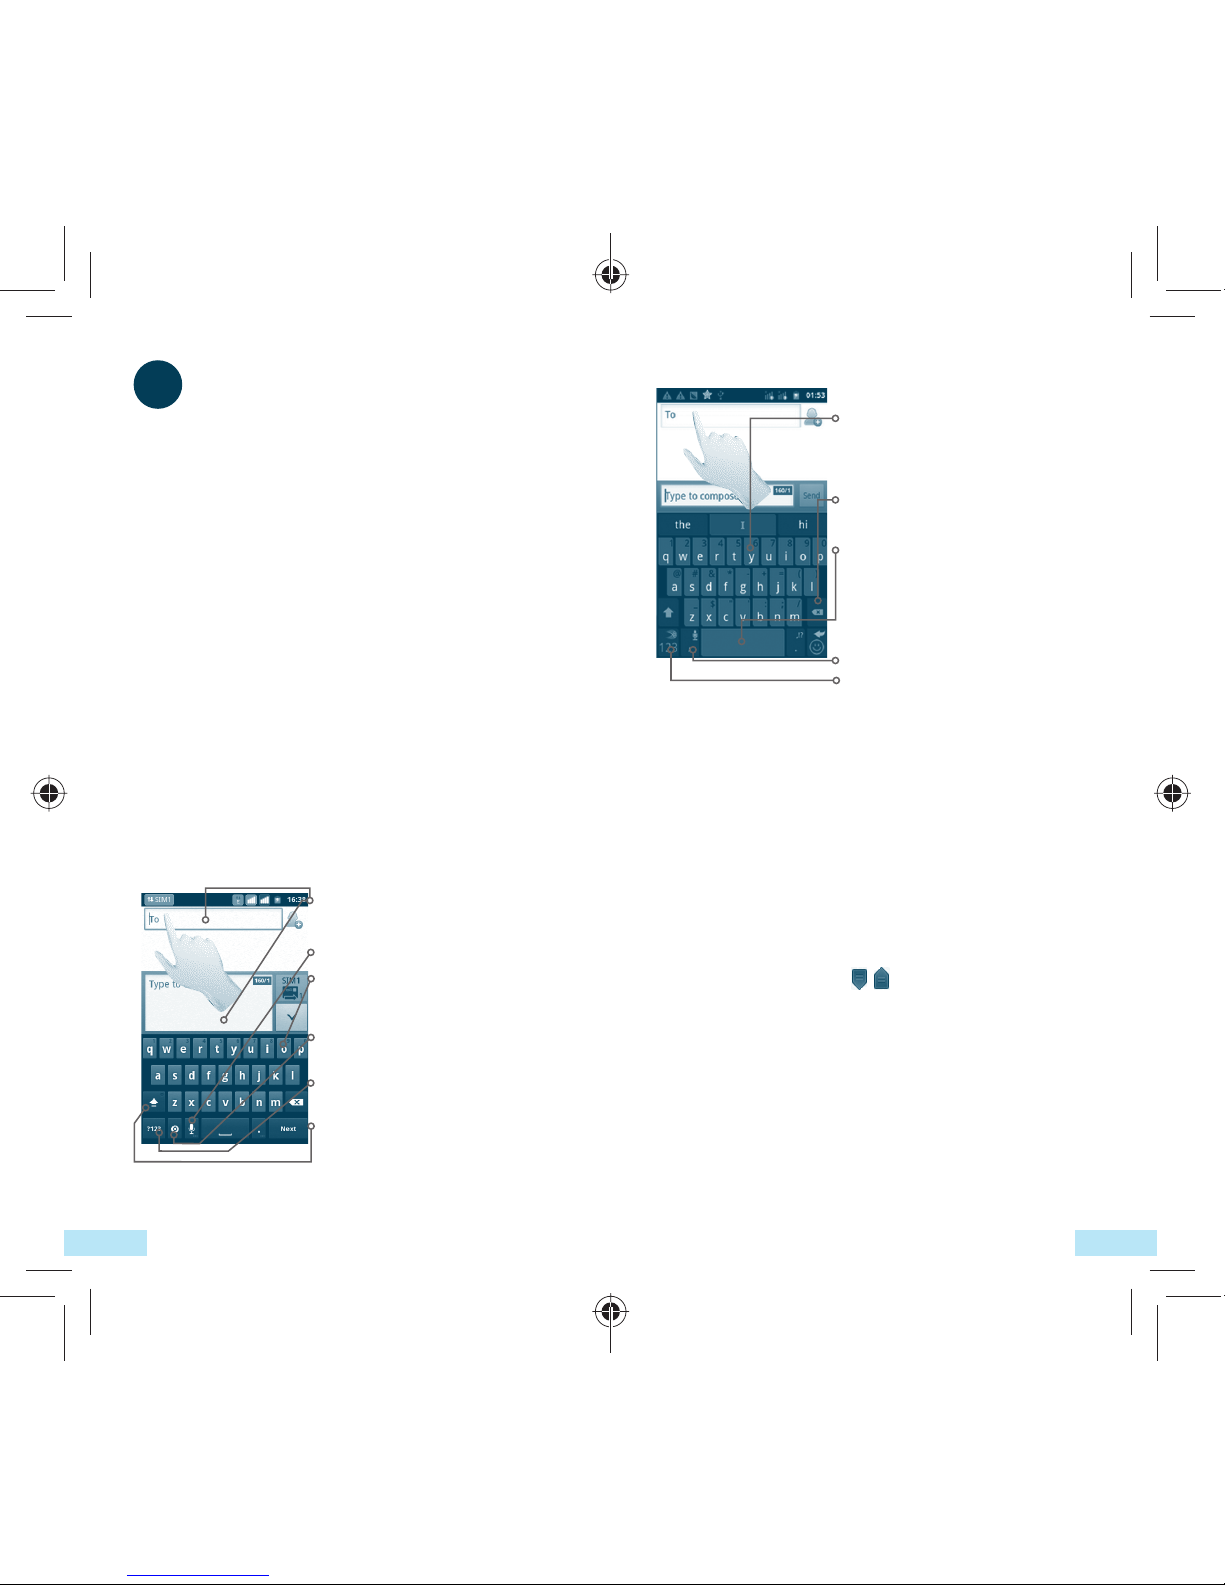
2.1.2 SwiftKey keyboard
Slide through letters to input
characters with auto-prediction and
correction
Touch to delete incorrect characters
Touch to insert a space or complete
the current word or insert a
prediction as preferred
Touch and hold to switch voice input
Touch to enter numbers and
symbols, etc.
2.2 Text editing
You can edit the text you have entered.
• Touch and hold the text field to zoom in on
the text with a magnifying glass.
• Touch twice the text you have entered and
then touch Select all/Select text in the pop
up button.
• The selected text is now highlighted in orange.
Drag a selection tab /to adjust the range
of selected text.
• Touch Cut/Copy/Paste (1) in the pop up button.
(1) 'Paste' option will not appear unless copy or cut operation has been
made.
2Text input
2.1 Using Onscreen Keyboard
Onscreen keyboard will display automatically
when a program requires entering text or
numbers.
Onscreen keyboard settings
Press Menu key from Home screen, select
Settings\Language & keyboard\SwiftKey
or Android keyboard, a series of settings are
available for your selection.
Adjust the onscreen keyboard orientation
Turn the phone sideways or upright to adjust
the onscreen keyboard orientation. You can also
adjust it by settings (Press Menu key on Home
screen\Settings\Display).
2.1.1 Android keyboard
Touch to enter text or numbers, touch
again to select input method.
Touch to enter Voice input.
Hold and slide to select a character,
such as an accented letter, number, etc.
Touch to select input method or
access android keyboard settings.
Touch to switch to symbol and
numeric keyboard.
Touch twice to lock in capital letter
input mode.
IP4464_Telecom T4010_QG_Eng_USA_for NZ_05_130322.indd 16-17IP4464_Telecom T4010_QG_Eng_USA_for NZ_05_130322.indd 16-17 2013-3-22 15:48:142013-3-22 15:48:14

1918
3.2 Answering or rejecting a call
Indicates the SIM
card you're using
When you receive an incoming call, touch the
green phone icon to answer; touch the red
phone icon to reject.
3.3 Consulting your call memory
You can access your call memory by touching
from the Home screen and touching Call log
to view call history in categories of Missed calls,
Outgoing calls, and Incoming calls.
3Phone call
3.1 Placing a call
User can easily launch a call using Phone. Enter
this menu using one of the following two ways:
• Touch from Home screen.
• Touch from Home screen and select Phone.
Scroll up or down to view matched
results
Touch and hold to access Voice mail
Touch to add to Contacts
Touch to send message
Enter the desired number from keyboard
directly or select a contact from Contacts, Call
log or Favorites by touching tabs, then touch
to place the call. The number you entered can
be saved to Contacts by touching .
If you make a mistake, you can delete the
incorrect digits by touching .
To hang up a call, touch End.
IP4464_Telecom T4010_QG_Eng_USA_for NZ_05_130322.indd 18-19IP4464_Telecom T4010_QG_Eng_USA_for NZ_05_130322.indd 18-19 2013-3-22 15:48:142013-3-22 15:48:14
2120
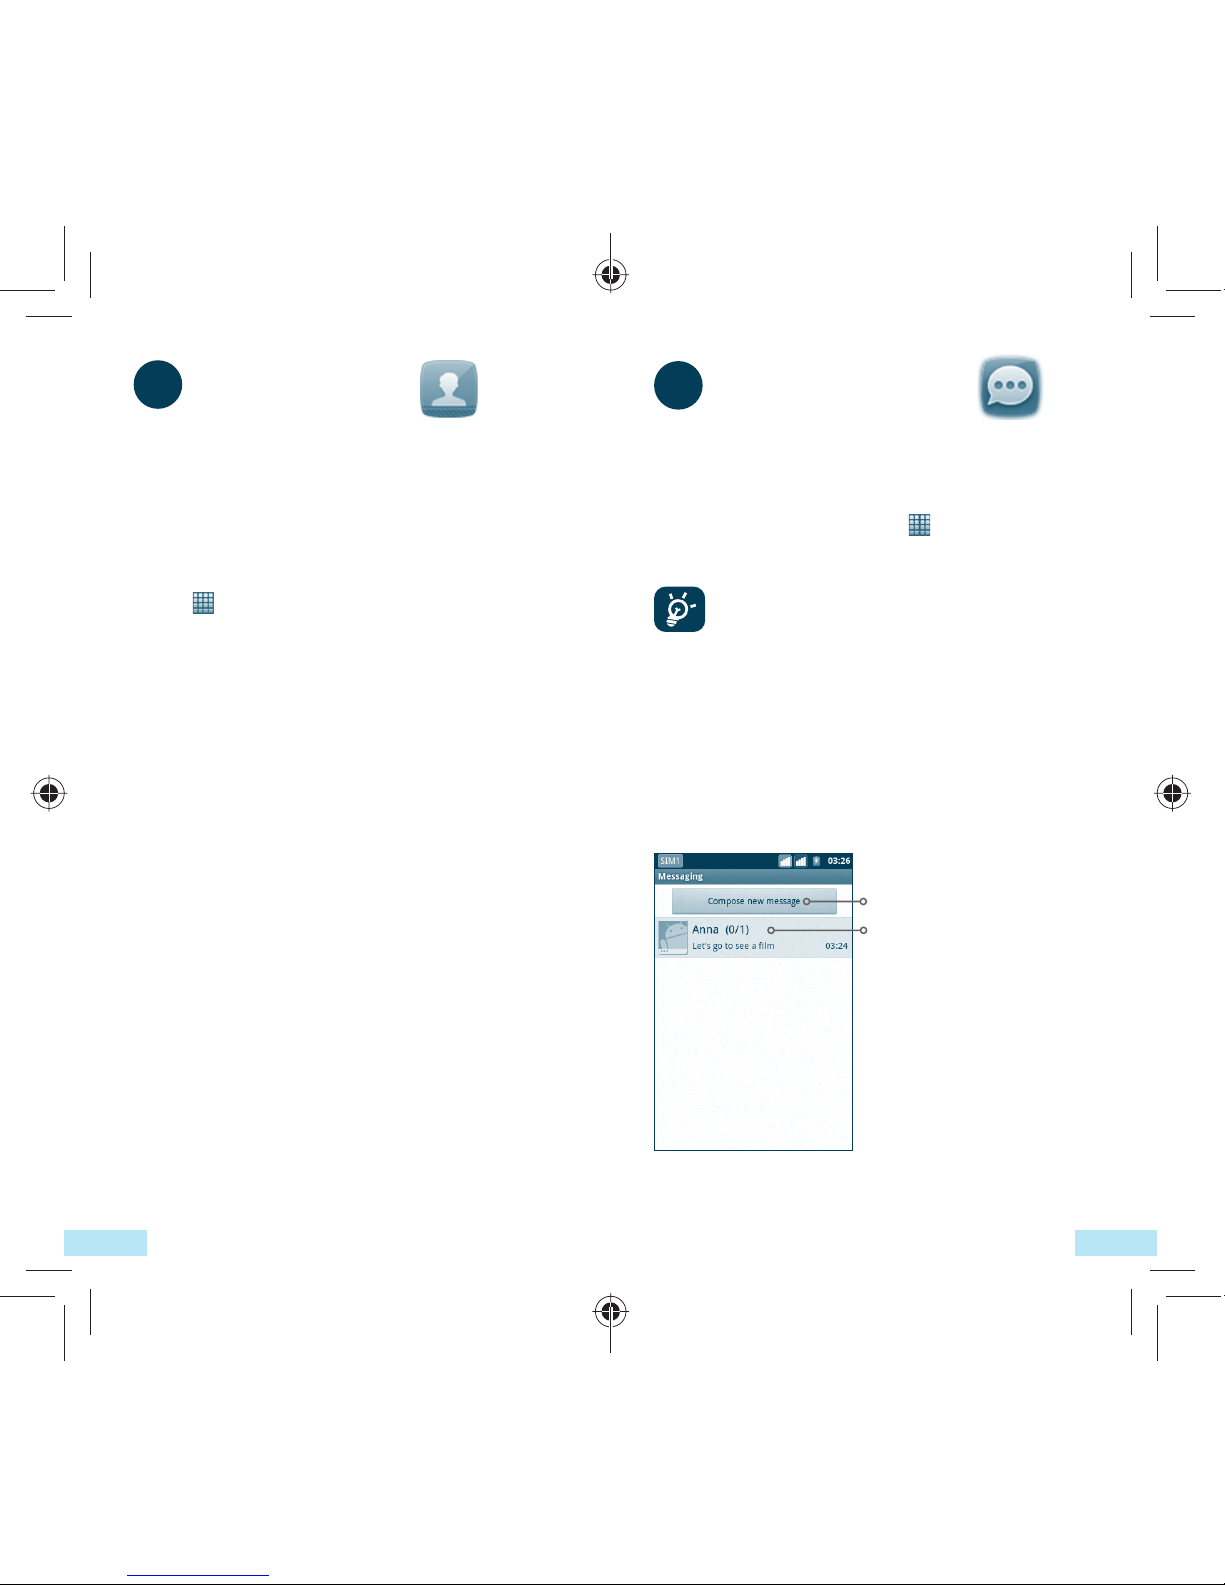
5Messaging
You can create, edit and receive SMS and MMS
with this mobile phone.
To access this feature, touch from Home
screen, then select Messaging.
All messages you receive or send out
can be saved in phone memory or SIM
card. To consult messages stored in SIM
card, press Menu key from Messaging
screen, then touch Settings\Manage SIM
messages.
5.1 Write message
On message list screen, touch Compose new
message to write text/multimedia messages.
Touch to create new message
Touch to view the whole
message thread
4Contacts
You can view and create contacts on your
phone or either SIM and synchronize these with
your Gmail contacts or other applications on the
web or on your phone.
4.1 Adding a contact
Touch on the Home screen, select Contacts,
then press Menu key from contacts list screen
and touch New contact.
4.2 Importing , exporting and sharing contacts
From Contacts screen, press Menu key to open
the contacts list option menu, touch More\
Import/Export. From here you can exchange
contacts between Phone and SD card; Phone
and SIM card.
You can share a single contact or contacts with
others by sending the contact's vCard to them
via Bluetooth, SMS, Email, etc.
Touch a contact you want to share, press Menu
key and touch Share from contact details
screen, then select the application to perform
this action.
4.3 Synchronizing contacts in multiple accounts
Contacts, data or other information can
be synchronized from multiple accounts,
depending on the applications installed on your
phone.
IP4464_Telecom T4010_QG_Eng_USA_for NZ_05_130322.indd 20-21IP4464_Telecom T4010_QG_Eng_USA_for NZ_05_130322.indd 20-21 2013-3-22 15:48:142013-3-22 15:48:14

2322
6Email
Besides your Gmail account, you can also set-up
external POP3 or IMAP email accounts in your
phone.
To access this function, touch from Home
screen, then select Email.
An email wizard will guide you through the
steps to set-up an email account.
• Select an account.
• Enter the email address and password of the
account you want to set-up.
• Touch Next. If the account you entered is
not provided by your service provider in the
phone, you will be prompted to go to the
email account settings screen to enter settings
manually. Or you can touch Manual setup
to directly enter the incoming and outgoing
settings for the email account you are setting
up.
• Enter the account name and display name in
outgoing emails.
• Touch Done.
• To add another email account, you can press
Menu key and touch Accounts to access Email
account screen. Press Menu key and touch
Add account to create.
Sending a text message
Enter mobile phone number of the recipient
on To bar or touch to add recipients, touch
Type to compose bar to enter the text of the
message. When finished, touch Send to send
the text message.
An SMS of more than 160 characters
will be charged as several SMS. Specific
letters (accent) will also increase the size
of the SMS, this may cause multiple SMS
to be sent to your recipient.
Sending a multimedia message
MMS enables you to send video clips, images,
photos, animations, slides and sounds to other
compatible mobiles and e-mail addresses.
An SMS will be converted to MMS automatically
when media files (image, video, audio, slides,
etc.) are attached or Subject or email addresses
added.
IP4464_Telecom T4010_QG_Eng_USA_for NZ_05_130322.indd 22-23IP4464_Telecom T4010_QG_Eng_USA_for NZ_05_130322.indd 22-23 2013-3-22 15:48:142013-3-22 15:48:14
2524
7Getting connected
To connect to the Internet with this phone,
you can use GPRS/EDGE/3G networks or Wi-Fi,
whichever is most convenient.
7.1 Connecting to the Internet
7.1.1 GPRS/EDGE/3G
The first time you turn on your phone with SIM
card inserted, it will automatically configure
network service: GPRS, EDGE or 3G.
To check the network connection you are using,
press Menu key on Home screen, then touch
Settings\Wireless & networks\Mobile networks\
Network operators or Access Point Names.
7.1.2 Wi-Fi
Using Wi-Fi, you can connect to the Internet
when your phone is within range of a wireless
network. Wi-Fi can be used on phone even
without a SIM card inserted.
To turn Wi-Fi on and connect to a wireless
network
• Press Menu key from Home screen.
• Touch Settings\Wireless & Networks\Wi-Fi.
• Mark/Unmark the checkbox to turn on/off
Wi-Fi.
• Touch Wi-Fi settings. The detailed information
of detected Wi-Fi networks is displayed in the
Wi-Fi networks section.
To create and send emails
• Press Menu key from Inbox screen, and touch
Compose.
• Enter recipient(s)’s email address in To field,
and if necessary, press Menu key and touch
Add Cc/Bcc to include a copy or a blind copy
to the message.
• Enter the subject and content of the message.
• Press Menu key, touch Add attachment to
send an attachment to the receiver.
• Finally, touch Send.
• If you do not want to send the mail right away,
you can touch Save as draft or press Back key
to save a copy.
IP4464_Telecom T4010_QG_Eng_USA_for NZ_05_130322.indd 24-25IP4464_Telecom T4010_QG_Eng_USA_for NZ_05_130322.indd 24-25 2013-3-22 15:48:142013-3-22 15:48:14
2726
• Open the Notifications panel and touch USB
connected.
• Touch Mount and then OK in the dialog that
opens to confirm that you want to transfer
files.
To disconnect:
• Unmount the microSD card on your computer.
• Open the Notifications panel and touch Turn
off USB storage.
• Touch Turn Off in the dialog that opens.
To locate data you have transferred or
downloaded in your microSD card:
• Touch from Home screen to open the
applications list.
• Touch File Manager.
All data you have downloaded are stored in
File Manager, where you can view media files
(videos, photos, music and others), rename files,
install applications into your phone, etc.
7.4 Sharing your phone's mobile data
connection
You can share your phone's mobile data
connection with a single computer via a USB
cable (USB tethering) (1) or with up to eight
devices at once by turning your phone into a
portable Wi-Fi hotspot.
(1) Only when the computer is with windows XP SP3 or higher
version.
• Touch a Wi-Fi network to connect. If the
network you selected is secured, you are
required to enter a password or other
credentials (you may contact network operator
for details). When finished, touch Connect.
7.2 Browser
Using Browser, you can enjoy surfing the Web.
To access this function, touch from Home
screen, then touch Browser.
To go to a web page
On Browser screen, touch the URL box at the
top, enter the address of the web page, then
touch . Some web sites scroll the URL box off
the top of the screen, but you can slide the page
down to bring it into view.
7.3 Connecting to a computer via USB
With the USB cable, you can transfer media files
and other files between your phone’s microSD
card and the computer.
To connect/disconnect your phone to/from the
computer
To connect your phone to the computer:
• Use the USB cable that came with your phone
to connect the phone to a USB port on your
computer. You will receive a notification that
the USB is connected.
IP4464_Telecom T4010_QG_Eng_USA_for NZ_05_130322.indd 26-27IP4464_Telecom T4010_QG_Eng_USA_for NZ_05_130322.indd 26-27 2013-3-22 15:48:142013-3-22 15:48:14
2928
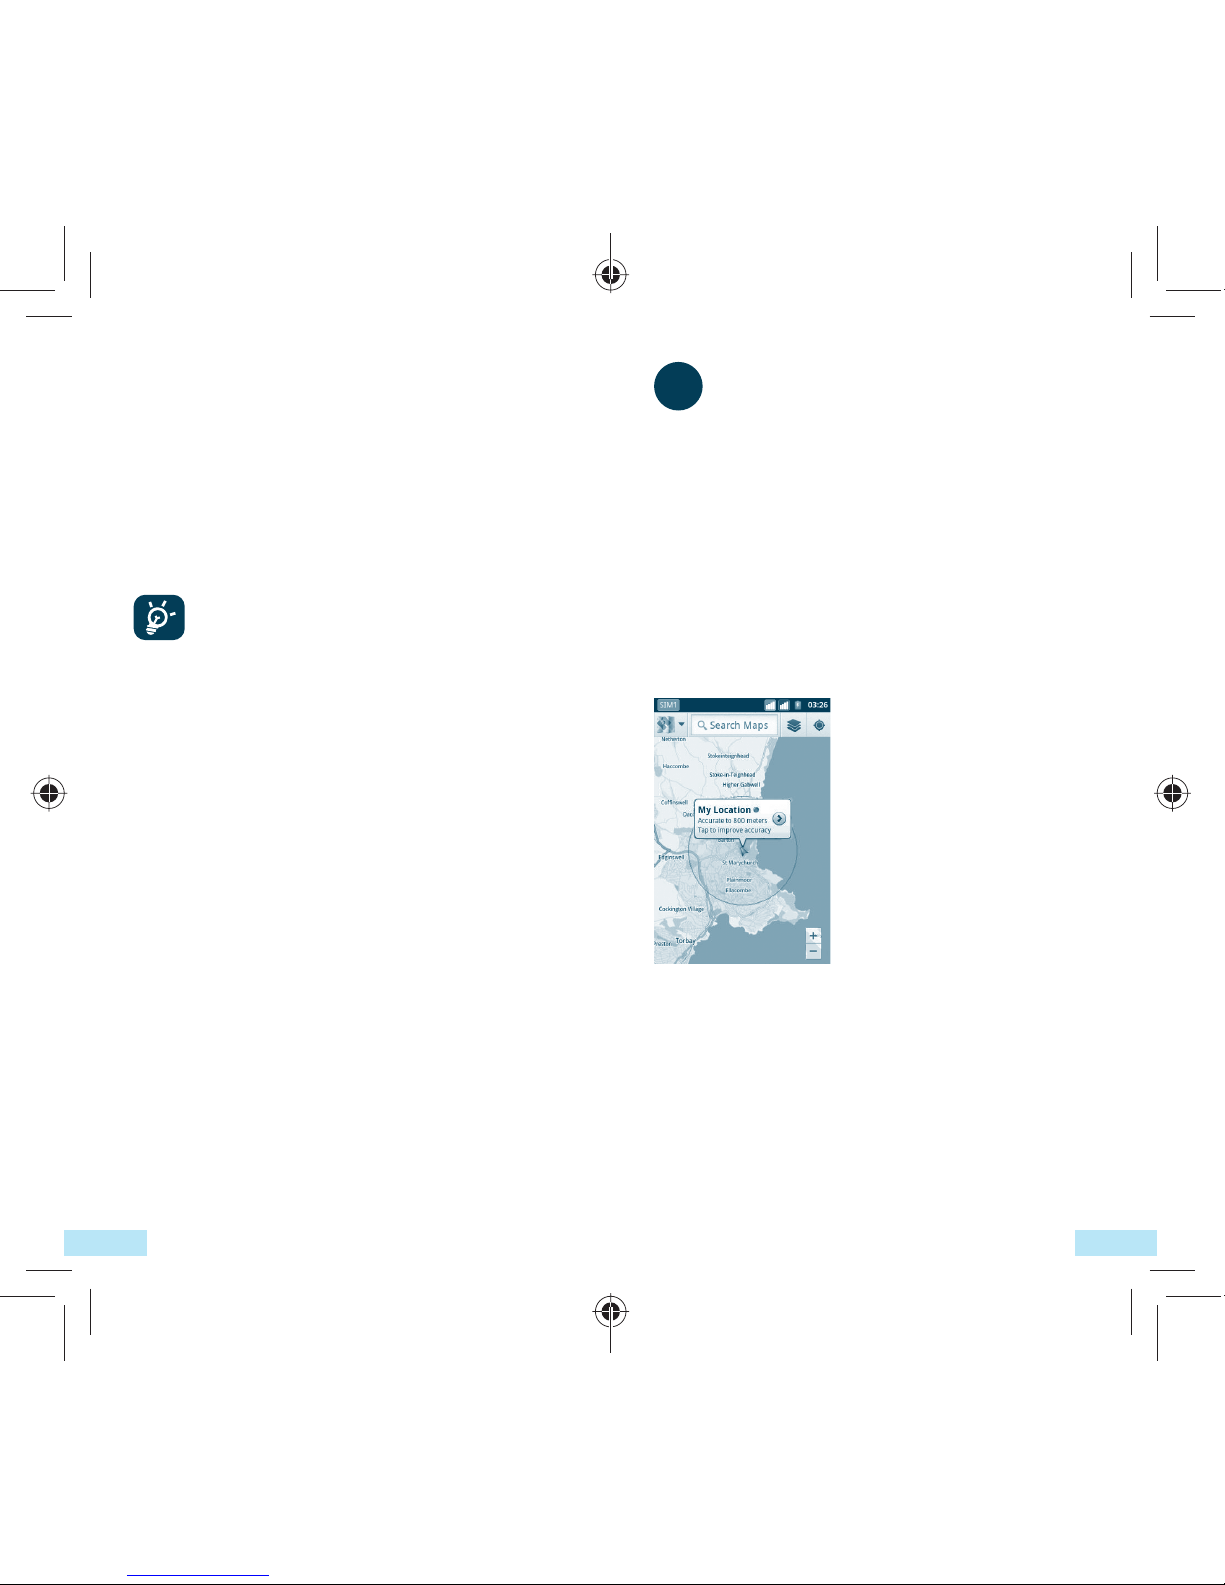
8Locate my location
using GPS satellites
To activate your phone’s global positioning system
(GPS) satellite Receiver:
• Press Menu key from Home screen
• Touch Settings\Location\Use GPS satellites
• Mark the checkbox
You can also mark GPS EPO assistance or A-GPS
to speed up the GPS location fix time.
When open Maps, you can find your location:
Use your phone’s GPS satellites receiver to
pinpoint your location within an accuracy as
close as several meters (“street level”). The
process of accessing the GPS satellite and
setting your phone's precise location for the first
time will require up to 5 minutes. You will need
to stand in a place with a clear view of the sky
and avoid moving. After this, GPS will only need
20-40 seconds to identify your precise location.
To turn on USB tethering or Portable Wi-Fi
hotspot
• Press Menu key from Home screen.
• Touch Settings\Wireless & Networks\
Tethering & Portable hotspot.
• Mark the check box of USB tethering or
Portable Wi-Fi hotspot to activate this
function.
The functions may incur additional
network charges from your network
operator. Extra fees may also be
charged in roaming areas.
IP4464_Telecom T4010_QG_Eng_USA_for NZ_05_130322.indd 28-29IP4464_Telecom T4010_QG_Eng_USA_for NZ_05_130322.indd 28-29 2013-3-22 15:48:142013-3-22 15:48:14

3130
10 Factory data reset
To activate factory data reset:
• Press Menu key from Home screen
• Touch Settings\Privacy\Factory data reset
Phone reset will erase all of your personal
data from internal phone storage, including
information about your Google Account, any
other accounts, your system and application
settings, and any downloaded applications. You
can also mark the Erase SD card check box to
erase all the data on your microSD card, such
as music or photos. If you reset the phone in
this way, you’re prompted to re-enter the same
kind of information as when you first started
Android.
When you are unable to power on your phone,
there is another way to perform a factory
data reset by using hardware keys. Hold down
Volume up key and press Power key at same
time until the screen lights up.
9Data backup
This phone enables you to back up your phone’s
settings and other application data to Google
Servers, with your Google Account.
If you replace your phone, the settings and
data you’ve backed up are restored onto the
new phone the first time you sign in with your
Google Account.
To activate this function:
• Press Menu key from Home screen
• Touch Settings\Privacy\Back up my data
• Mark the checkbox
Activated this function, a wide variety of
settings and data are backed up, including
your Wi-Fi passwords, bookmarks, a list of the
applications you’ve installed, the words you’ve
added to the dictionary used by the onscreen
keyboard, and most of the settings that you
configure with the Settings application. If you
deactivated this option, you stop backing up
your settings, and any existing backups are
deleted from Google Servers.
IP4464_Telecom T4010_QG_Eng_USA_for NZ_05_130322.indd 30-31IP4464_Telecom T4010_QG_Eng_USA_for NZ_05_130322.indd 30-31 2013-3-22 15:48:142013-3-22 15:48:14

3332
12 Making the most
of your phone
You can download software upgrade for free
from the website: www.alcatelonetouch.com.
12.1 Android Manager
The Android Manager includes:
• Contacts
It allows you to back up contact entries so that
you don't have to worry about losing, breaking,
switching phone or changing service providers.
• Messages
It frees you from painstakingly inputting text
on the keypads. All of your messages are easily
accessible and well-organized.
• Photos
It allows you to easily import photos from PC
or the handset and organize them in different
albums for better management.
• Videos
It allows you to insert video files from PC for
playback and then upload to handset folder.
• Music
It allows you to quickly search your favorites in
PC, manage the ultimate Library, and enjoy the
easiest digital jukebox in your own mobile way.
11 Applications
With this phone, some build-in Google
applications and other third party applications
are available for your convenience.
With the built-in applications, you can
• Communicate with friends
• Exchange messages or emails with friends
• Track you location, view traffic situations,
search for locations and get navigation
information to your destination
• Download more applications from Google
Play Store
For more information about these applications,
please check user manual online:
www.alcatelonetouch.com.
IP4464_Telecom T4010_QG_Eng_USA_for NZ_05_130322.indd 32-33IP4464_Telecom T4010_QG_Eng_USA_for NZ_05_130322.indd 32-33 2013-3-22 15:48:142013-3-22 15:48:14

3534
Safety and use
We recommend that you read this chapter carefully
before using your mobile phone. The manufacturer
disclaims any liability for damage, which may result
as a consequence of improper use or use contrary
to the instructions contained herein.
• TRAFFIC SAFETY:
Given that studies show that using a mobile
phone while driving a vehicle constitutes a real
risk, even when the hands-free kit is used (car kit,
headset...), drivers are requested to refrain from
using their mobile phone when the vehicle is not
parked. Check the laws and regulations on the use
of wireless mobile phones and their accessories
in the areas where you drive. Always obey them.
The use of these devices may be prohibited or
restricted in certain areas.
When driving, do not use your mobile phone and
headphone to listen to music or to the radio. Using
a headphone can be dangerous and forbidden in
some areas.
When switched on, your mobile phone emits
electromagnetic waves that can interfere with the
vehicle’s electronic systems such as ABS anti-lock
brakes or airbags. To ensure that there is no problem:
- do not place your mobile phone on top of the
dashboard or within an airbag deployment area,
- check with your car dealer or the car manufacturer
to make sure that the car’s electronic devices are
shielded from mobile phone RF energy.
• CONDITIONS OF USE:
You are advised to switch off the mobile phone
from time to time to optimize its performance.
Remember to abide by local authority rules of
mobile phone use on aircrafts.
• Application
It allows you to import downloaded mobile
applications and have them installed into your
handset upon synchronization.
• File
It allows you to organize Handset files with just
a few clicks and files on the Handset can be at
where you want them to be.
• Sync
It allows you to synchronize the Contacts and
Calendar in Outlook/ Outlook Express and
handset.
Supported Operating Systems
Windows XP/Vista/Windows 7.
IP4464_Telecom T4010_QG_Eng_USA_for NZ_05_130322.indd 34-35IP4464_Telecom T4010_QG_Eng_USA_for NZ_05_130322.indd 34-35 2013-3-22 15:48:142013-3-22 15:48:14
3736
When replacing the cover please note that your
mobile phone may contain substances that could
create an allergic reaction.
Always handle your mobile phone with care and
keep it in a clean and dust-free place.
Do not allow your mobile phone to be exposed
to adverse weather or environmental conditions
(moisture, humidity, rain, infiltration of liquids, dust,
sea air, etc.). The manufacturer’s recommended
operating temperature range is -10°C (14°F) to
+55°C (131°F) (the max value depends on device,
materials and housing paint/texture).
Over 55°C (131°F) the legibility of the mobile
phone’s display may be impaired, though this is
temporary and not serious.
Do not open or attempt to repair your mobile
phone yourself.
Do not drop, throw or try to bend your mobile phone.
Do not use the mobile phone if the glass made screen,
is damaged, cracked or broken to avoid any injury.
Do not paint it.
Use only batteries, battery chargers, and accessories
which are recommended by TCT Mobile Limited
and its affiliates and are compatible with your
mobile phone model.TCT Mobile Limited and its
affiliates disclaim any liability for damage caused by
the use of other chargers or batteries.
Your mobile phone should not be disposed of in a
municipal waste. Please check local regulations for
disposal of electronic products.
Remember to make back-up copies or keep a
written record of all important information stored in
your mobile phone.
Some people may suffer epileptic seizures or
blackouts when exposed to flashing lights, or when
playing video games. These seizures or blackouts
may occur even if a person never had a previous
Operational Warnings: Obey all posted signs when
using mobile devices in public areas.
Follow Instructions to Avoid Interference Problems:
Turn off your mobile device in any location where
posted notices instruct you to do so. In an aircraft,
turn off your mobile device whenever instructed to
do so by airline staff. If your mobile device offers an
airplane mode or similar feature, consult airline staff
about using it in flight.
Switch the mobile phone off when you are in health
care facilities, except in designated areas. As with many
other types of equipment now in regular use, mobile
phones can interfere with other electrical or electronic
devices, or equipment using radio frequency.
Switch the mobile phone off when you are near
gas or flammable liquids. Strictly obey all signs and
instructions posted in a fuel depot, gas station,
or chemical plant, or in any potentially explosive
atmosphere.
When the mobile phone is switched on, it should be
kept at least 15 cm from any medical device such
as a pacemaker, a hearing aid or insulin pump. In
particular when using the mobile phone you should
hold it against the ear on the opposite side to the
device, if any.
Read and follow the directions from the
manufacturer of your implantable medical device.
If you have any questions about using your mobile
device with your implantable medical device,
consult your healthcare provider.
To avoid hearing impairment, answer the call before
holding your mobile phone to your ear. Also move
the handset away from your ear while using the
“hands-free” option because the amplified volume
might cause hearing damage.
It is recommended to have proper supervision while
small children use your mobile phone.
IP4464_Telecom T4010_QG_Eng_USA_for NZ_05_130322.indd 36-37IP4464_Telecom T4010_QG_Eng_USA_for NZ_05_130322.indd 36-37 2013-3-22 15:48:152013-3-22 15:48:15
Other manuals for T4010
2
Table of contents
Other Telecom Cell Phone manuals

Telecom
Telecom T4010 User manual

Telecom
Telecom T4010 User manual

Telecom
Telecom New Zealand R90 User manual

Telecom
Telecom R55 User manual

Telecom
Telecom T54 User manual

Telecom
Telecom R7 User manual

Telecom
Telecom R83 User manual

Telecom
Telecom U3100N User guide

Telecom
Telecom U3100 User manual

Telecom
Telecom R303 User manual

Telecom
Telecom R203 User manual

Telecom
Telecom R880H User manual

Telecom
Telecom New Zealand R90 User manual

Telecom
Telecom R55 User manual

Telecom
Telecom R7 User manual

Telecom
Telecom R880H Installation guide

Telecom
Telecom R109 User manual

Telecom
Telecom R1 User manual

Telecom
Telecom R6 User manual

Telecom
Telecom R203 User manual


