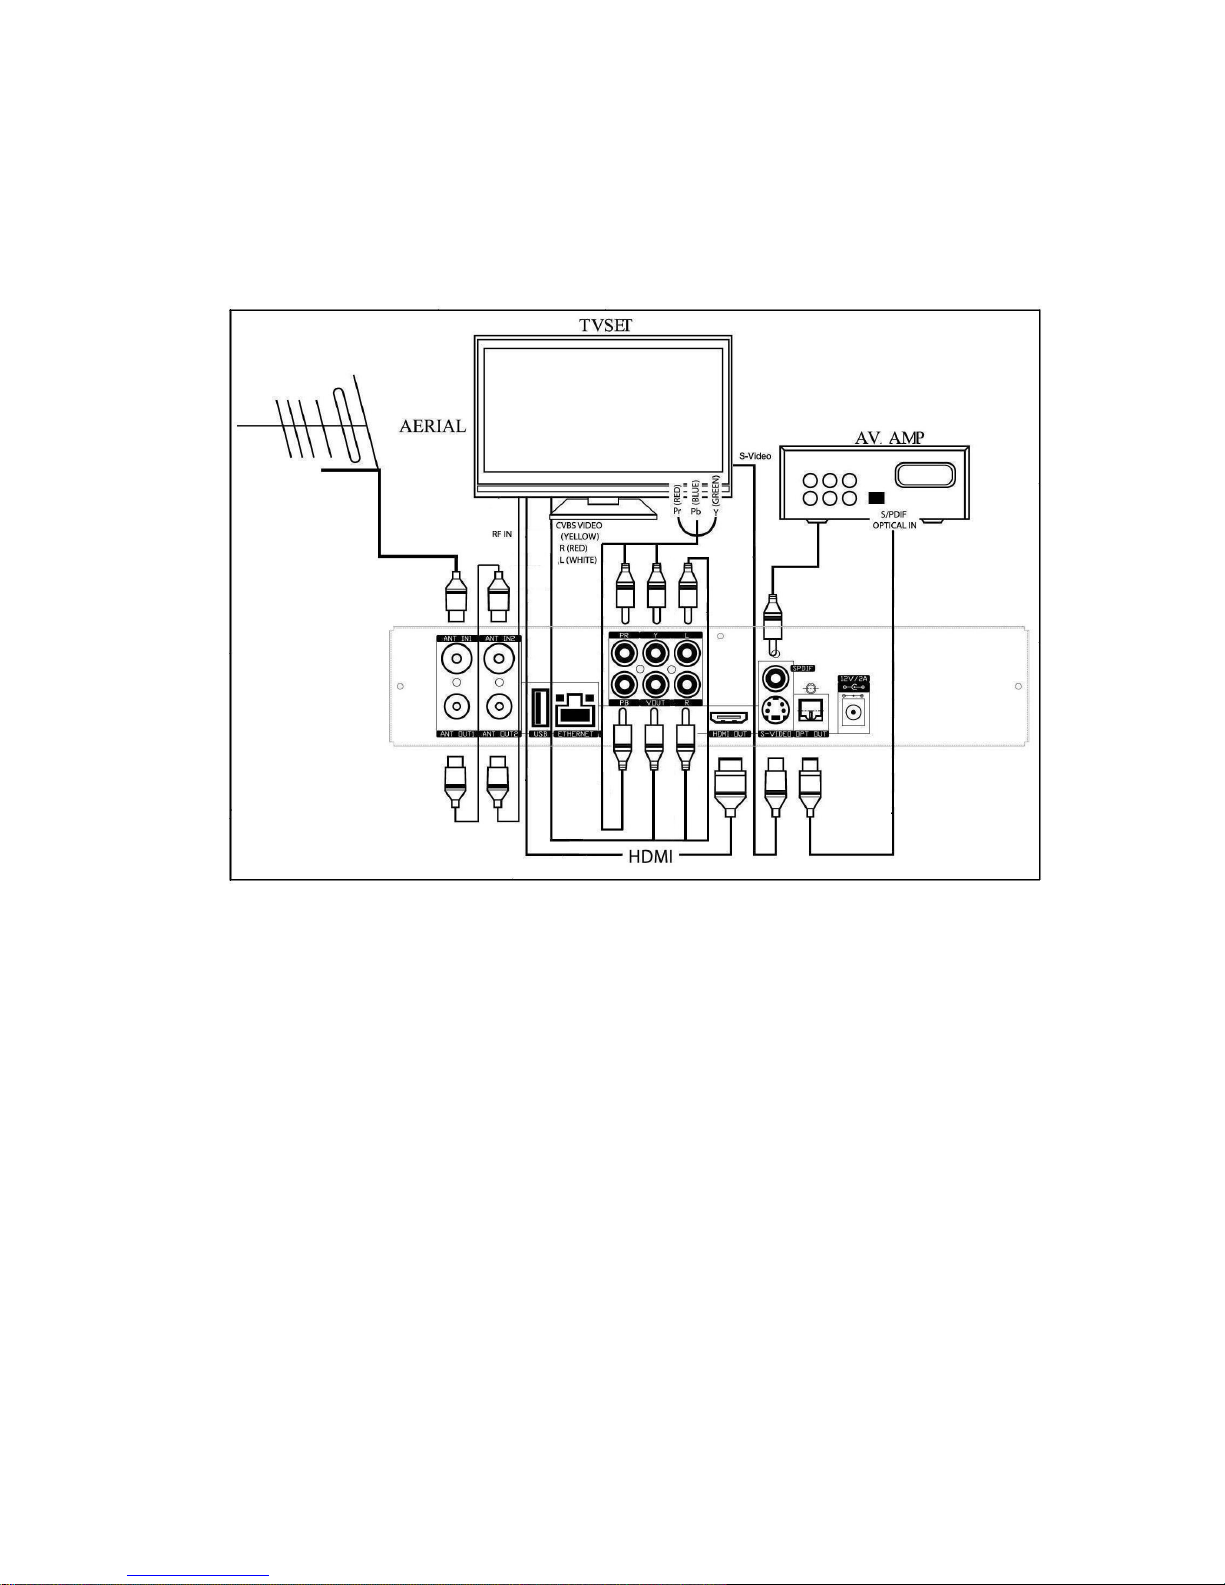
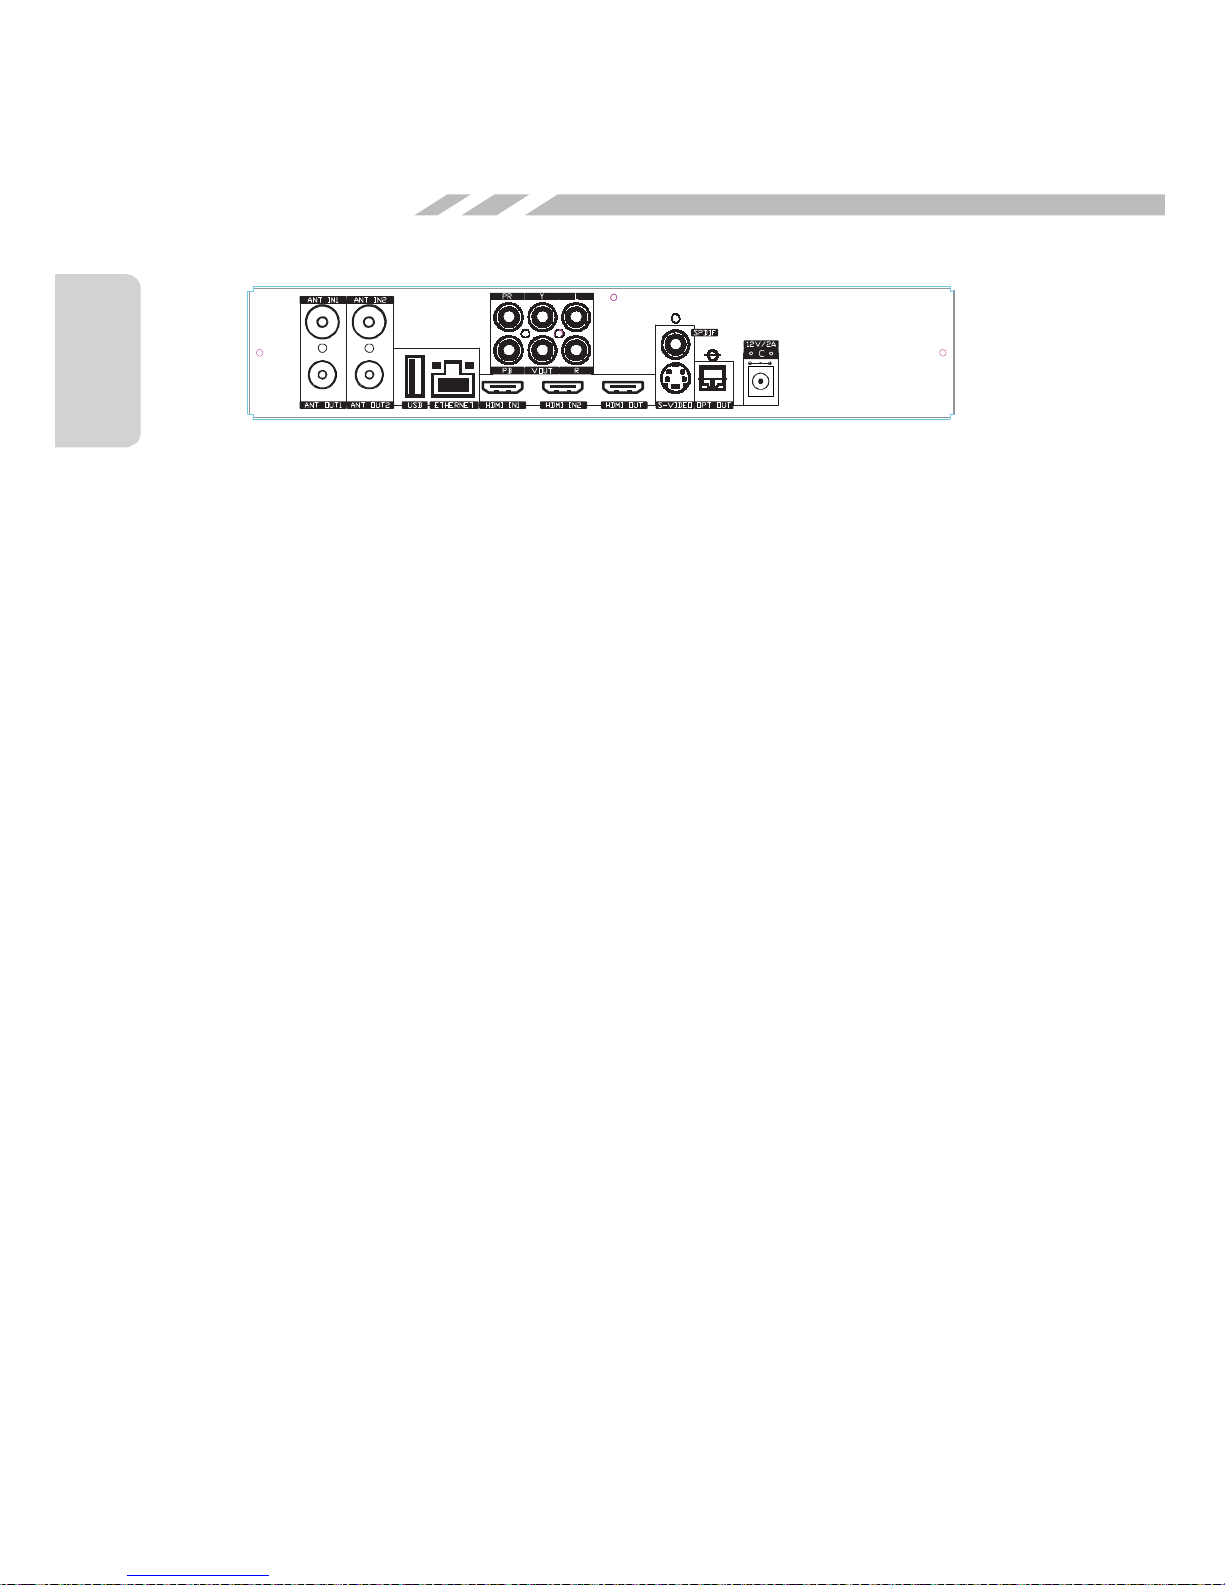
Kogan KGNPVR500VAA User manual


QUICK GUIDE
TV / PVR CONNECTION

QUICK GUIDE
Twin Tuner PVR Recording HD Set Top Box
A. Tuning 1. Menu, Set Up
2. Tuning
i. Search Mode : Select Auto
ii. Press OK to save data after scanning completed
B. SUMMER TIME / DAYLIGHT SAVING TIME Setting
To ensure accurate EPG ( Electronic Program Guide) Setting , particularly for areas where Daylight Saving
Time is applicable. Using the remote control, please follow these steps :
1. Menu
2. Set Up
3. Time/OSD
4. Region Setting, Select : USER ( instead of NSW or Vic)
5. Time Offset , set to : +11:00
6. Press OK to save data
7. Ready to use HD Set Top Box now
C. FOUR (4) RECORDING MODES
1. Live Recording : press “Record” button while watching a TV program (Press “Stop”button, to stop
recording. )
Note: Selecting a second channel program can also be recorded by pressing “Record” button simultaneously.
And a third program from either of the two TV Stations/carriers can be watched while recording 2 programs
at the same time.
2. Time Shift Recording :
i. Press “Pause” button, then “Play” to playback the program.
ii. Press >>> Fast Forward to catch on the Live program
iii. Press STOP to stop recording
Note: Selecting a second channel program can also be recorded by pressing “Pause” button simultaneously.
And a third program from either of the two TV Stations/carriers can be watched while recording 2 programs
at the same time.
3EPG (Electronic Program Guide) Recording : ( refer to page 15 of user manual )
i. Press EPG on the Remote Control
ii. Select program & preferred time/day schedule.
iii. Press Red (not record button) to set PVR into recording mode
iv. PVR will record automatically on selected time schedule
Note: Selecting a second channel program from the EPG , please follow these steps:
i. Press EPG , to show other channel listings.
ii. Select TV program from the list on the left using Remote Up/Down Key
iii Press OK , then Press “3” to show weekly schedule.
iv. Select Program and preferred time schedule
v Pressing “Record” button to program recording mode.
Note: During playing back of both programs, a third program from either of the two TV Stations/carriers can
be watched while these 2 programs are still being recorded. at the same time.
4Time Set Recording :
i. Menu , Select : Time Set Up
ii. Wake Up Menu:
1. Timer Mode: Select Off / Once/Daily/Weekly
2. Service : Select Programs
3. WakeUp Mode: Select : Service / Record
4. WakeUp Date : Enter Day/Month/Year
5. Start Time : Enter Time
6. Stop Time : Enter Time
Note: Selecting a second channel program from the EPG can also be recorded by pressing “Record” button
simultaneously.

Content
1. SAFETY REMARK
1
2. Accessories Supplied
2
3. Features
3
4. Front Panel
4
PROPER INSERT OF Hard Disk 4
5. Rear Panel
5
6. Remote Control Unit
6
7. Connecting to a TV
7
8. Quick Start Guide
8
-Tuning Local Digital TV/Radio Station
8
-TV Screen Setup
9
-Location & Time Offset Set Up
11
-Perform Factory Default
13
9. Basic Operations
14
-Change TV/Radio Channel
14
-Change Volume Level
14
-Change TV/Radio Operation Mode
14
-Mute
14
-Audio Selection
15
-Electronic Program Guide (EPG)
15
-TV/Radio Channel Information
16
-Teletext/DVB Subtitle/Subtitle Function
17
-Wakeup Timer
19
-Power On/ Off
19
-Recording
19
10. Main Menu
20
- Main Menu
20
TV Select
21
TV Guide
21
TV Preference
22
TV Management
22
- Radio
Menu
23
Radio
Select
23
Radio
Guide
24
Radio
Preference
24
Radio
Management
25
- Setup
Menu
26
T
uning
Menu
26
Delete
Carriers
27
TV
Setup
Menu
27
Time/OSD
Menu
31
Wakeup
Timer
32

Basic
Information
Getting
Start
Basic
Operations
Menu
Operations
Others
- PVR
Function
33
Record
Browser
(
V
ideo
Program
Browser)
33
Storage Device
Info
35
Playlist
Manager
36
Digital
Photo
37
Safe
Remove
38
Password
Setup
38
-
Software
Upgrade
39
12.
T
rouble
Shooting
40
41
14.
Glossary
43

1
Basic
Information
1. SAFETY REMARK
噝 Be sure to use the machine correctly, please read and understand this User Manual
before starting the operation of the receiver.
噝 DO NOT open the cover. It is dangerous to touch the inner part of the receiver due
to electric shock hazard.
噝 DO NOT
personnel.
噝 Disconnect the receiver from the wall outlet before cleaning. Us only a soft dry cloth
to clean the case of the receiver.
噝 Please unplug the power adaptor from the wall outlet when the receiver is unused
for a long time.
噝 DO NOT connect or modify cables when the receiver is plugged-in. Unplug the
power adaptor of the receiver at the wall outlet before connecting or disconnecting
any cables.
噝 DO NOT
Electric Shock.
噝 DO NOT touch a power cord with wet hands. It may cause Electric Shock.
噝 NEVER cover the receiver with soft furnishing or carpets.
噝 For indoor Use Only.
噝 DO NOT use or store the receiver where it is exposed to sunlight or near a heater.
噝 NEVER put other electronic equipment on top of the receiver.
噝 DO NOT use any attachments that are not recommended by the manufacturer as
this could cause damage to, or impair the operation of the equipment.
噝 DO NOT expose the receiver to dripping or splashing.
噝 DO NOT .
噝 The ventilation would be impeded by covering the ventilation openings with items,
such as newspapers, tablecloths, curtains etc.
噝
ventilation.
噝
apparatus.
噝 Dispose of remote control batteries properly in accordance with local, state or
federal regulations.
Remark: This manual provides complete instructions for installing and using the
receiver. All functions of the receiver can be carried out from the buttons on the
remote control.
If you have any problems with the operation of your receiver, please refer to the
relevant section of this manual.
As hard disk drive inside might be damaged and/or lost all the video data. In such
event, the manufacturer is not liable for such lost of data or pre-recorded video
contents. Factors such as shaking or mishandling the receiver with hard disk
drive inside will cause lost of all data.
use a damaged power cord. Damaged power cords may Cause Fire or

Basic
Information
2.
Accessories
Supplied
Link to User
Manual
Remote Control
Unit
Batteries:2xAAA
A/V
Cable
RF Loop
Cable
12V 2A AC-DC
Adaptor
2

Basic
Information
3.
Features of
function
Support the decoding system in MPEG-4 AVC H.264, MPEG
2
and
fully DVB-T
compliant.
Support MPEG-4 AVC H.264, MPEG 2(MP@HL) HD channel
format
and MPEG1 audio Layer
1,2
Double conversion DVB-T tunner with Loop Throught
output
Frequency input from 177.5MHz to 816.5MHz (Centre
Frequency)
Automatic parameter discovery &
update
User-friendly OSD Menu with full
function
256 Colours Graphic User
interface
Variable aspect ratio 4:3or 16:9 with Pan, Scan or Letter
Box
Advanced 7 days 24 hours EPG (Digital Program
Guide)
Current or Next Event
Guide
Auto update (PMT/
PAT)
Customized channel data
saving
Carriers & Frequency Table Editing with add, delete, rename and
modify.
Small Screen Picture on EPG and TV Channel
list
Support TELETEXT decoding or Re-insert into
VBI
Support
Subtitle
Support
PAL
Advanced Automation
Tuning
9 Favorite Channel
Preset
30 Events
timer
Channel Editing, Delete, Move, Rename, Lock and
Skip
Channel
Sorting
Support software upgrade via USB interface and
OTA
Program Recording and Play by internal harddisk & USB2.0 external
harddisk
Signal LED
indicator
SPDIF for digital audio, RCA & Optical
Option
2 HDMI channel input and HDMI
output
YPbPr Comonent
Output
Video, Audio L, Audio R Output
(RCA)
S-Video
output
Support output formats: 1080i, 720p, 576p and
480p
Support dual
tuner
Support 2 channels recording at the same
time
Large capability inside, more recording can be
saved
MEPS function, power is less than 1 Watt when stand
by
Manufactured under license from Dolby
Laboratories.
Dolby and the double-D symbol are trademarks of Dolby
Laboratories.
3

Basic
Information
4.Front Panel
G F E D
B
C
A
A. Power
Button
B. Channel Up / Channel Down Button
C. Volume Up / Volume Down Button
D. Remote Control IR
sensor
E. LED
Display
F. Standby
LED
G. Hard Disk Drive Swappable
Slot
PROPER INSERT of HARD DISK DRIVE
into Opening Slot (SATA Connector)
Carefully unpack & insert the Hard Disk Drive
into the Open Slot (Fig 4.1.1)
Using both your thumbs with equal pressure on
both edges, ( Fig 4.1.2), push all the way in to
connect Hard Disk Drive securely into the SATA
connector inside the Open Slot. Fig 4.1.1
IMPORTANT: Make sure that the Hard Disk Drive
is properly connected into the SATA connector
inside – this can be achieved by applying further
push after the Clicking Sound from the Locking
Mechanism inside.
TV screen will show “SATA Device Initializing” upon
switching-ON the machine (refer to page 8).
After initializing, your can start using the recording
function.
Fig
4.1.2
4

Basic
Information
5. Rear Panel
ANT IN 1 &
2
Connect to external and indoor
antenna.
ANT OUT 1 &
2
Connect to TV and VCR RF
input.
(ANT OUT 1 Loop Through with the use of a RF cable connect to ANT IN 2
to attain Dual Tuner PVR
Function)
POWER
INLET
Connect this to the an adaptor (12V
2A)
AUDIO OUT
(L/R)
Left, Right audio
output
S/PDIF Out / OPT
OUT
Sony/ Philips Digital interface output for digital audio, optical option
out
VOUT
VIDEO
Composite video
output.
S-VIDEO
OUTPUT
S-VIDEO output
connector.
YPbPr
OUTPUT
Progressive Component output
connector.
USB
PORT
USB interface
output
Ethernet
PORT
ETHERNET
connector
HDMI
INPUT1
HDMI input 1
connector
HDMI
INPUT2
HDMI input 2
connector
HDMI
OUTPUT
HDMI output
connector
5

6
Basic
Information
6. Remote Control Unit
The following details the remote control buttons and their functions.
1. POWER
2. TV/R
3. MUTE
4. VOL+/VOL-
5. CH+/ CH-
6. Numeric Keys( 0-9)
7. FAV
8. MENU
9. EPG
10. Capture Still Image
11. HDMI S
12. INFO
13. TIMER
14. EXIT
15. ǂǂCH UP/DOWN
16. ǂǂVOL-/VOL+
17. OK
18. Function key
(RED),(GREEN),(YELLOW),(BLUE)
19. PAUSE
20. AUDIO
21. FORMAT
22. ARC
23. FILE
24. SUBT
25. LANG
26. TEXT
27. REC
28. STOP
29. PLAY
30. JUMPTO
31. ǂǂFB(Fast Backward)
32. ǂǂFF(Fast Forward)
33. ǂǂǂǂC SKIP

7
Basic
Information
7. Setup
There are few ways to inter-connect your TV , VCR, Blu Ray / DVD Player, Hi Fi System
and other devices. Shown above are the most common inter-connections that you can
normally apply. If you've experienced difficulties with the connections, please contact your
retailer as soon as possible.
Connecting to the TV via HDMI/ YPbPr for Optimum Quality to enjoy HDTV.
Note : HDMI & YPbPr cables are not provided. Please purchase your HDMI cable from your
local retailers.
1. Connect Aerial / Antenna to ANT IN 1
2. Using the RF cable ( provided ), connect ANT OUT 1 with ANT IN 2 to attain Dual TUNER
PVR function.
3. Use a second RF cable ( not provided ), connect ANT OUT 2 to RF IN of TV
4. Use AV cable ( provided with Yellow, White, Red cable also called Composite ) to connect
For HDTV Quality Viewing :
1. Connect HDMI OUT to TV HDMI IN using HDMI cable ( not provided)Optional Connection;
if HDMI is not availabe on your TV set:
a. connect Y PR PB ( cable not provided ) OUT to Y PR PB of TV Set.
2. Turn On TV and Select HDMI or Component input mode from TV Select.
For Additional Devices using the Extra HDMI INPUT :
1. Using HDMI cable ( not provided ), connect to Blu Ray Player HDMI OUT or
2. Connect to Game Console HDMI OUT
Use of built-in HDMI switching together with other devices such as BLU-Ray
Player & Game Console :
1. From HDMI S ( S means Select ) button of remote control, press accordingly each time to
select either the following :
Composite OUT to TV's Composite Input.
a . IN 1 ( for input Device 1 ), b. IN 2 ( for input Device 2 ), c. TV Program
AERIAL
TV SET
AV AMP

8
Getting
Start
8. Quick Start Guide
Fig. 8.1.1
Fig. 8.1.2
Fig. 8.1.3
Step 1: Power Up
When Set Top Box starts up, internal
Hard Disk Drive(HDD) will be
initializing.
Refer to : Fig.8.1.1
Step 2: Auto channel Detect
Initialization completed, select
the appropriate country, Aspect
ratio, width height ratio, Region
name, or use defualt.
Figure
as: Fig.8.1.2
Press [OK] button to confirm
and enter the [Auto Detect]
window, Carriers will be detected.
Carriers scan completed,
programs will be detected in the
[Auto Detect] window,then, the “
Scan Completed!” will be
displayed, refer to : Fig.8.1.3
1. Tuning Local Digital TV /Radio Station
Note: Note: The Hard Disk Drive
(HDD) will initialize every time
the receiver is switched “on”.

9
Fig. 8.2.3
Fig. 8.2.1
Fig. 8.2.2
Getting
Start
Step 1: TV Setup
噝 Press [MENU] button to pop up Main Menu
噝 Press [CH +/-, ] button to move cursor
to {Setup} , press [OK].
噝 Press [OK] to go to next menu.
Step 2: Choose TV Screen Resolution
噝 Press [CH +/-, ] button to move cursor
to {HD Resolution} as shown in Figure
8.2.2.
噝 Press [VOL+/-, ] button to select
{1080i}or {720p} or {576p} or {480p} or
{Native}.
(When changing the TV resolution, status will appear on the
front panel and TV screen.)
Step 3a: Choose TV Aspect Ratio
噝 Press [CH +/-, ] button to move cursor to
{Aspect Ratio} as shown in Figure 8.2.3.
噝 Press [VOL +/-, ] button to select {Auto},
{Horz Stretch}, {Centered}, {Half Zoom},
{Full Zoom}.
(Width Height Ratio with16:9)
噝 Press [OK] button to save setting {Full
Screen}, {Letter box3}, {Auto}
(Width Height Ratio with 4:3)
2. TV Screen Setup
The default TV resolution is {1080i} and the
screen ratio is {Auto}. Change the TV resolution or
screen ratio, if your TV does not match.
噝 Press [CH +/-, ] button to move cursor
to {TV Setup} as shown in Figure 8.2.1

10
Fig. 8.2.4
Fig. 8.2.5
Getting
Start
Fig. 8.2.6
Step3c: Choose TV Full Screen Ratio,
Brightness and Contrast
Press [CH +/-, ] button to move cursor to
{Sataration,Brightness,Contast} as shown
in Figure 8.2.5
Press [VOL +/-, ] button to select 1%-
100%
Press [OK] button to save setting
Refer to above operations to set up
brightness and contrast
Step3b: Choose TV Width Height Ratio
Press [CH +/-, ] button to move cursor
to {Width Height Ratio} as shown in Figure
8.2.4.
Press [VOL +/-, ] button to select {4:3}
or {16:9}
Press [OK] button to save setting.
Step 4: Set the Digital Video Output
Press [CH +/-, ] button to move cursor
to {Digital Video}as shown in Figure 8.2.6.
Press [VOL +/-, ] button to select
between {Auto} or {HDMI Output}or {DVI
Output}.
Press [OK] button to save setting.
Note: You can select {Auto} to optimize the hand-shaking and compatibility between
your TV setting, Display Panel and the Set Top Box digital output {HDMI socket}. In the
event
of incompatibility in Auto mode, or if an adaptor is being used, manually select {HDMI
Output} or your viewing device does not support HDMI digital audio, you may have to
( Note : DVI OUTPUT option is not included
in this particular model )

11
Fig. 8.3.1
Fig. 8.3.2
Getting
Start
Step1: Main Menu
噝 Press [MENU] button to pop up top
menu as shown in Figure 8.3.1.
噝 Press [CH +/-, ] button to move
cursor to {Setup}
噝 Press [OK] button
Step 2:Select Time /OSD
噝 Press [CH +/-, ] button to move
cursor to {Time /OSD}as shown
in Figure 8.3.2.
噝 Press [OK] button
3. Location & Time Offset Set Up
There are 30-event timers. To ensure they work properly. The default timer mode is
pre-set at “auto”
. If your region is different, please select your own region.

)LJ
)LJ
*HWWLQJ
6WDUW
6WHS&KRRVH$XWR7LPHU0RGH
6HOHFW5HJLRQ
Ǹ!
3UHVV>&+ @EXWWRQWRPRYH
FXUVRUWR^7LPHU0RGH`DVVKRZQLQ
)LJXUH
Ǹ!
3UHVV>92/ @EXWWRQWRVHOHFW
^$XWR`DVVKRZQLQ)LJXUH
Ǹ!
3UHVV>2.@EXWWRQWRVDYHVHWWLQJ

)LJ
)LJ
)LJ
*HWWLQJ
6WDUW
Ǹ!
3UHVV>0(18@EXWWRQWRSRSXSPDLQ
PHQXDVVKRZQLQ)LJXUH
Ǹ!
3UHVV>&+ @EXWWRQWRPRYH
FXUVRUWR^6HWXS`
Ǹ!
3UHVV>2.@EXWWRQ
Ǹ!
3UHVV>&+ @EXWWRQVWRPRYH
FXUVRUDQGKLJKOLJKW^7XQLQJ`DV
VKRZQLQ)LJXUH
Ǹ!
3UHVV>2.@EXWWRQ
Ǹ!
3UHVV>&+ @EXWWRQWRKLJKOLJKW
^6HDUFK0RGH`VKRZQLQ)LJXUH
Ǹ!
3UHVV>92/ @EXWWRQVWRVHOHFW
^)DFWRU\'HIDXOW`
Ǹ!
3UHVV>2.@WRFRQ¿UP
3HUIRUP)DFWRU\'HIDXOW
,I\RXH[SHULHQFHWKHVHWWLQJSUREOHPSOHDVHSHUIRUP)DFWRU\'HIDXOW

%DVLF
2SHUDWLRQV
)LJ
7KLVFKDSWHUDVVXPHVWKDWWKH6HW7RS%R[KDVEHHQLQVWDOOHGFRUUHFWO\DVGHWDLOHGLQWKH
SUHYLRXVVHFWLRQ,IWKH6HW7RS%R[KDVQRWEHHQLQVWDOOHGRUFRQQHFWHGSURSHUO\SOHDVH
UHIHUWRWKHFKDSWHUVLQVWDOODWLRQ4XLFN6WDUW*XLGH
%DVLF2SHUDWLRQV
&KDQJH795DGLR&KDQQHO
Ǹ!3UHVV>&+ @EXWWRQWRFKDQJHFKDQQHOXSGRZQ
Ǹ!RUSUHVVQXPHULFNH\>@RQWKHUHPRWHFRQWUROGLUHFWO\WRLQSXWWKHFKDQQHO
QXPEHU
Ǹ!RUSUHVV>&+83'2:1@EXWWRQVRQWKHIURQWSDQHOWRFKDQJHFKDQQHOXSGRZQ
&KDQJH795DGLR2SHUDWLRQ0RGH
Ǹ!3UHVV>795@EXWWRQRQWKHUHPRWHFRQWURORURQWKHIURQWSDQHOWRWRJJOHEHWZHHQ
79DQG5DGLRRSHUDWLRQPRGHV
Ǹ!7KH795$',2/('RQWKHIURQWSDQHOZLOOEHOLJKWHGXSZKHQVZLWFKWR79PRGH
0XWHWKH6RXQG
Ǹ!3UHVV>0XWH@EXWWRQVWRPXWHWKHVRXQGWKHDXGLREDUEHFRPHVUHGFRORUDV
VKRZQLQ)LJXUH
Ǹ!3UHVVLWDJDLQWRUHWXUQQRUPDO
&KDQJH9ROXPH/HYHO
Ǹ!3UHVV>92/ @EXWWRQWRFKDQJHYROXPHOHYHOXSGRZQ

6. Electronic Program Guide (EPG)
•User may access the 24 hours / 7 days electronic
program guide (EPG) if available.
•Press [EPG] button to pop up the TV Guide or Radio
Guide depend on TV or Radio mode as shown in Figure
9.6.1.
•Press [VOL +/-, /] button to select particular day of
the week within the 7 Days EPG.
•Press [1] to select currently shown program, Refer to Fig
9.6.2.
•From this sub-menu, press [CH +/-, /] to select
channel / program.
•Press [OK] to confirm selected channel / program.
•Press [EXIT] to exit from Main Menu.
Fig. 9.6.1
Fig. 9.6.2
6A. Recording from EPG Time Setting
•Press [EPG] on remote control for TV Program Guide,
refer to Fig. 9.6.1.
•Press [VOL +/-, /] button to select particular day of
the week within the 7 Days EPG.
•Press [CH +/-, /] to select the TV program from the
selected day.
•PRESS the ‘RED’ button ( not the RECORDER red
button) to set the selected program to be recorded at the
specified EPG schedule.
Fig. 9.6.3
6B. To edit or delete previously set EPG timer recording:
•Press [EPG] on remote control for TV Program Guide.
•Press 'GREEN' button on remote control to initiate list
of programs set for recording.
15
Table of contents
Other Kogan Set-top Box manuals