Teltonika DPH200 User manual

TELTONIKA
GSM Desktop Phone
DPH200
User Manual v1.01

Teltonika © 2008, GSM Desktop Phone DPH200 User Manual v1.01
2
LEGAL NOTICE
Copyright © 2008 TELTONIKA Ltd. All rights reserved. Reproduction, transfer,
distribution or storage of part or all of the contents in this document in any form
without the prior written permission of TELTONIKA Ltd is prohibited.
Other product and company names mentioned herein may be trademarks or trade
names of their respective owners.
ATTENTION
Before using the device we strongly recommend read this
user manual.
Do not rip the device. Do not touch the device if the device
block is broken or its connecting wires are without isolation.
All wireless devices for data transferring may be susceptible
to interference, which could affect performance.
The device is not water-resistant. Keep it dry.
The device requires high 230V AC voltage.
IMPORTANT NOTES!
It is mandatory to read the notes and manual carefully before starting to use the
device.

Teltonika © 2008, GSM Desktop Phone DPH200 User Manual v1.01
3
Table of contents
1 SAFETY INFORMATION ....................................................................................4
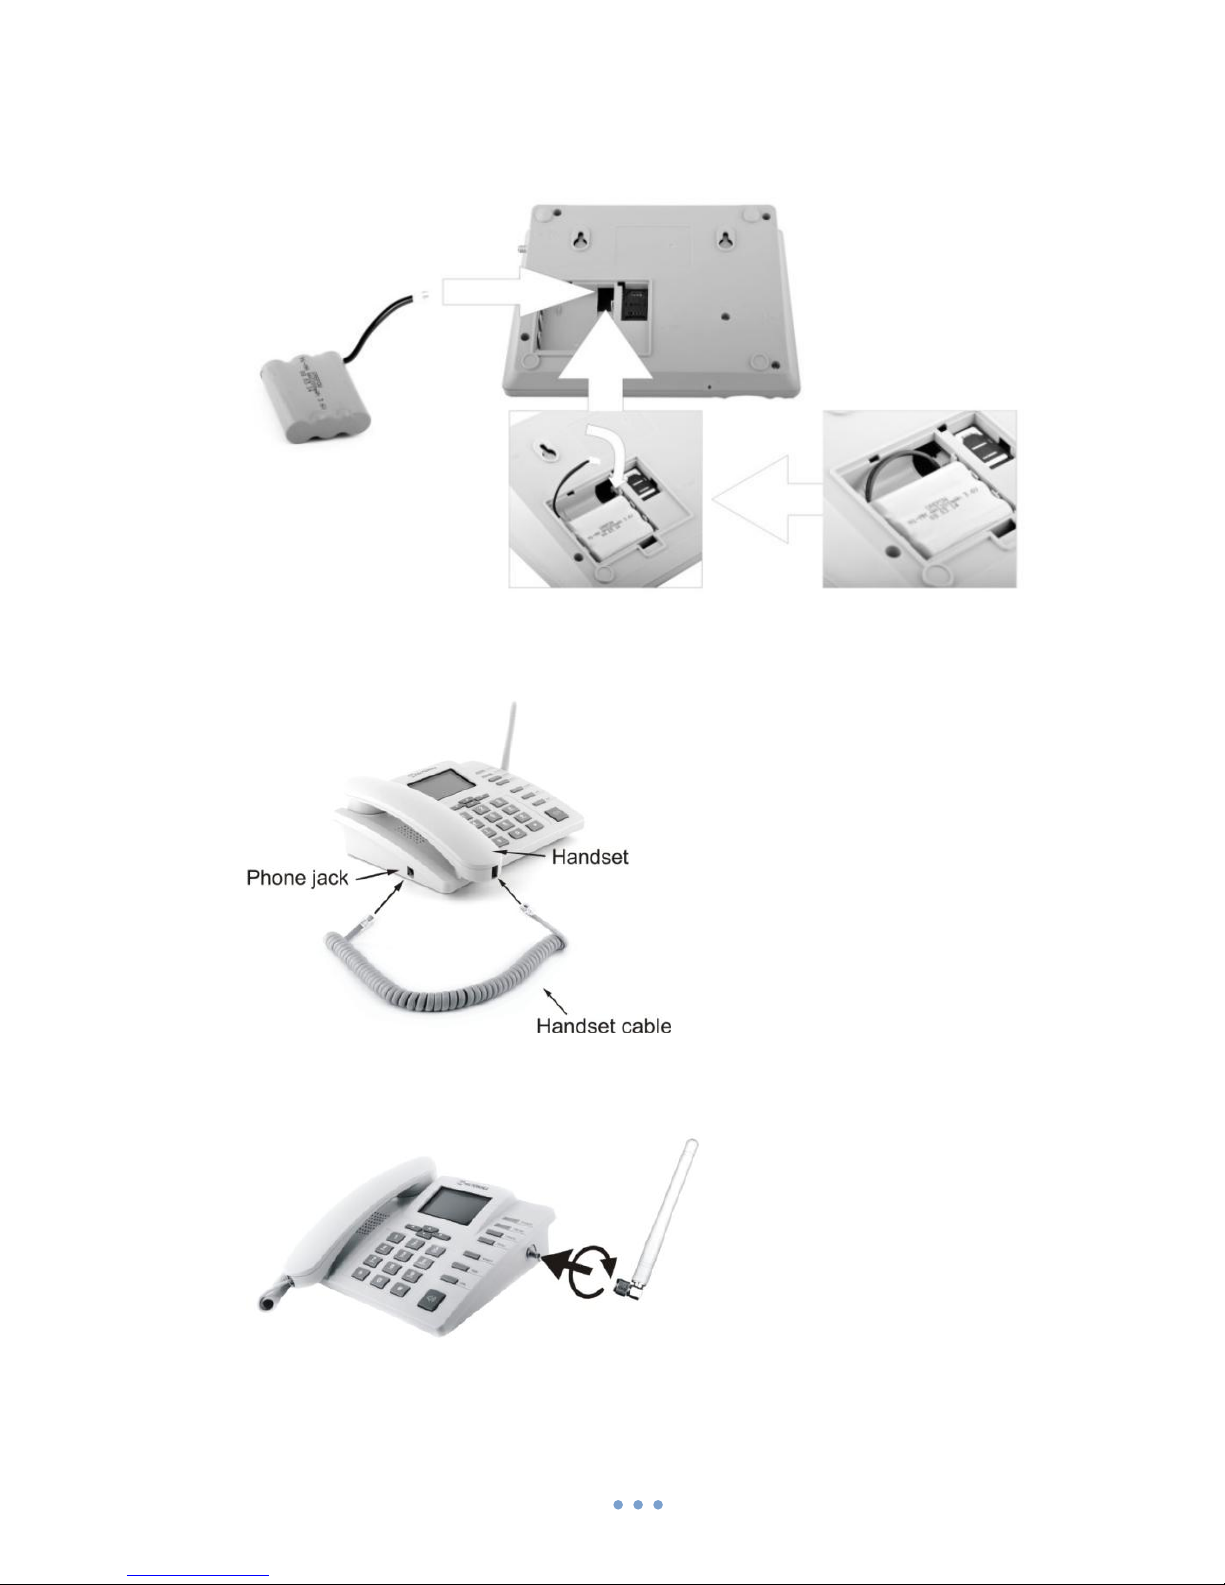
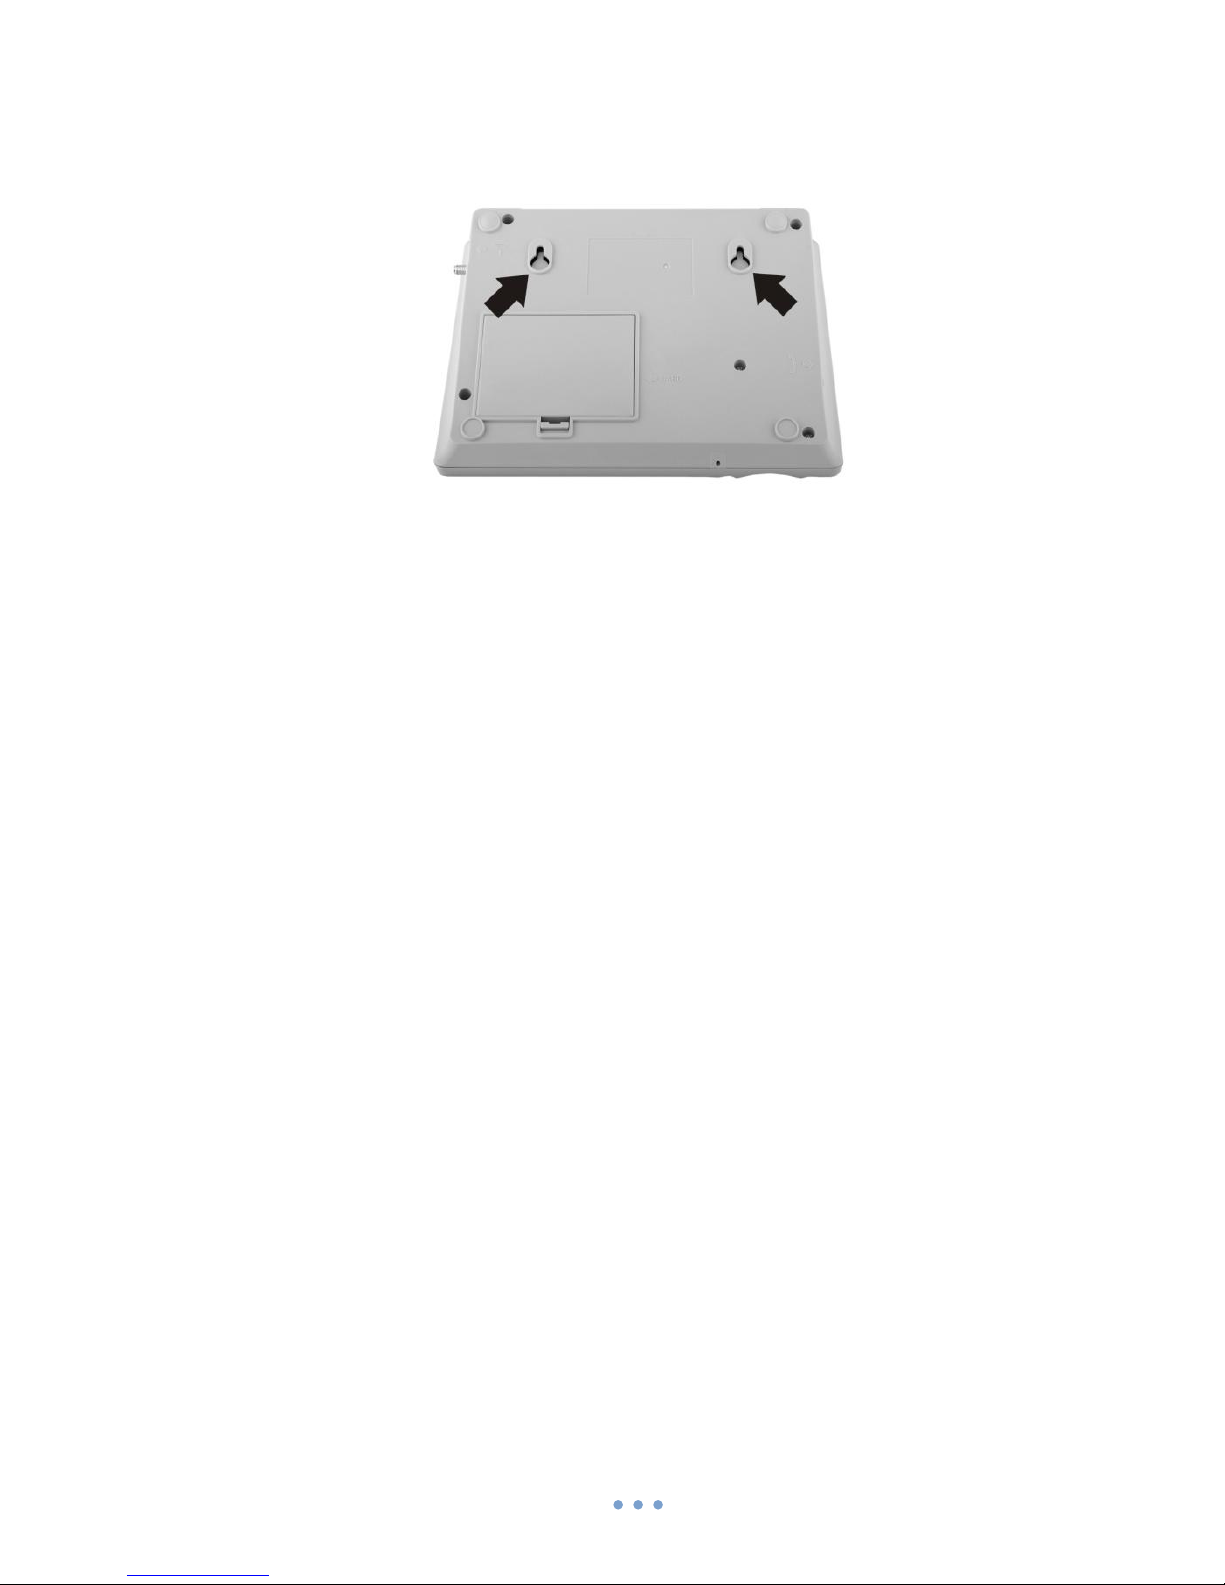
2 GETTING STARTED ...........................................................................................5
3 PHONE OVERVIEW...........................................................................................8
3.1 Description of the phone ........................................................................8
3.2 LCD screen icons ..................................................................................... 8
3.3 DPH200 menu structure .........................................................................8
4 CALL FUNCTIONS .............................................................................................9
4.1 Making calls ............................................................................................9
4.2 Receiving calls .........................................................................................9
4.3 Ending calls .............................................................................................9
4.4 In call functions....................................................................................... 9
5 SMS................................................................................................................10
5.1 Read SMS ..............................................................................................10
5.2 Send SMS ..............................................................................................10
5.3 Delete SMS............................................................................................10
5.4 Message Settings ..................................................................................11
6 ADDITIONAL FEATURES .................................................................................11
6.1 Date and Time Settings.........................................................................11
6.2 Address Book ........................................................................................12
6.3 Speed Dialing ........................................................................................13
6.4 Audio Settings.......................................................................................13
6.5 Alarm ....................................................................................................14
6.6 Language Selection ...............................................................................15
6.7 Call delay...............................................................................................15
6.8 Baby call................................................................................................15
6.9 Security settings....................................................................................15
6.10 Restore Factory Defaults ...................................................................... 16
7 SUPPLEMENTARY SERVICES (NETWORK DEPENDENT)..................................16
7.1 Call Forwarding ..................................................................................... 16
7.2 Call Barring............................................................................................17
7.3 Call Waiting...........................................................................................17
8 TECHNICAL SPECIFICATION............................................................................18
9 TROUBLESHOOTING ......................................................................................19

Teltonika © 2008, GSM Desktop Phone DPH200 User Manual v1.01
4
1SAFETY INFORMATION
In this document you will be introduced how to use GSM Desktop Phone safely.
We suggest you to adhere to following recommendations to avoid any damage to
person or property. You have to be familiar with the safety requirements before
starting to use the device!
Device requires power supply source that satisfies all safety
requirements listed in LST EN 60950-1 standard. Each power supply
source should not exceed 15VA.
Socket RJ45 is used for device firmware upgrade. Only
qualified personnel with proper equipment can upgrade the device.
Do not mount or serve device during a thunderbolt.
To disconnect power for the device please do the following:
Plug off AC/DC power adapter from the wall outlet.
Turn off using power on/off button.
To avoid mechanical damages of the device it is recommended to transport the
device packed in damage-proof pack. Protection against over currents, short circuits
and earth faults should be provided as a part of the building installation. Additional
two pole protective device is required to protect from short-circuit and earth false. The
power of connected device should satisfy power of release device. The creepage
distance between contacts should be no less than 3mm. While using the device, it
should be placed so, that it would be possible easy to plug off AC/DC power adapter
from the wall outlet.
Signal level of the device depends on the environment in which it is working. If
the device starts working insufficiently only qualified personnel may repair this
product. We recommend to forward it to repair centre or to manufacturers. No
exchangeable parts inside of the device.

Teltonika © 2008, GSM Desktop Phone DPH200 User Manual v1.01
5
2GETTING STARTED
Package Contents
A. Handset with cable
B. Phone device
C. Battery
D. Power supply adapter
E. External GSM Antenna
F. User guide
Note: If any of the components are missing or damaged, please contact the
retailer or reseller from which this product was purchased.
Inserting SIM card
Note: SIM card is mandatory for setting up connection to the GSM network. If
you don’t have s SIM card please contact your network service provider.
1. Remove the power supply if it was connected
2. Remove cover
3. Open SIM card holder and gently insert SIM card in the slot
4. Close SIM card holder

Teltonika © 2008, GSM Desktop Phone DPH200 User Manual v1.01
6
Connecting back up battery
Battery is under the same cover as the SIM card. To install the battery plug the
battery connector in to the battery socket.
Connect handset
Connect one handset cable end to handset and another to the phone jack.
Attach antenna
Screw the antenna in a clockwise direction.
Position the antenna upwards at its connecting joint. This will ensure optimal
reception.

Teltonika © 2008, GSM Desktop Phone DPH200 User Manual v1.01
7
Wall mounting
GSM desktop phone can be mounted on the wall. Device has two holes for
mounting as shown in figure below:
To mount device on the wall please do the following:
1. Mark two holes location 115mm horizontally apart and drill two holes in the wall.
2. Install the screws (not supplied) into the wall, leaving a gap of approximately
3 mm between screw head and wall.
3. Mount the GSM desktop phone on holes with screws.
Turning on GSM desktop phone
Before turning on the phone make sure that:
-SIM card is inserted
-Battery is connected (not necessary)
-Antenna is attached
-Handset is connected to the phone
-Power adapter is connected
After all these operations are done you can switch the phone on by pushing the
power button on a back panel. After the device is switched on it will start up. LCD
screen will display information that the phone is starting up. To turn off the phone
press the same button again.

Teltonika © 2008, GSM Desktop Phone DPH200 User Manual v1.01
8
3PHONE OVERVIEW
3.1 Description of the phone
3.2 LCD screen icons
3.3 DPH200 menu structure
User friendly menu navigation allows reach all GSM Desktop phone features. To
enter the Menu functions press the functional “Menu” key. Menu can be browsed
using arrow keys ↑ ↓ located below the LCD screen. When the wanted menu function
is highlighted press ← (OK) to enter or → (Exit) to exit. Menu structure is shown below:
Messages:
Call register:
Contacts:
Settings:
Create message
Inbox
Clear inbox
Message settings
Missed calls
Received calls
Dialed numbers
Clear lists
Phone book
Speed dial
New contact
Language
Sound
Call services
Time and date
Security
Misc
Factory reset
Received signal strength -
indicates strength of GSM
signal. More bars indicate
stronger signal.
Speaker- indicates
that ring volume is
turned off.
Alarm -indicates
that alarm time
has been set.
Battery –Indicates
the battery level.
More bars indicate
more power.
Ring –Indicates
missed calls.
Number shows how
many calls are
missed.
Date and time.
Speaker –Indicates
that handsfree
function is turned on.
Message –Indicates
received SMS.
Number shows how
many SMS are
received.
LCD
GSM antenna
Indication LED’s
Functional keys
Handsfree button
Handset
Arrow keys
Number keypad

Teltonika © 2008, GSM Desktop Phone DPH200 User Manual v1.01
9
4CALL FUNCTIONS
4.1 Making calls
Pick up the handset or press the speaker phone key.
Listen for dial tone.
Type the phone number, then press dial or wait for 5s.
Note: To input the “+” character press and hold “0” key.
Correcting dialed number
To delete one digit press the delete key once.
To delete all digits press the delete key until all digits are cleared.
Redial last dialed number
Press the dial key.
Use arrow keys ↑ ↓ to select number.
Pick up the handset.
4.2 Receiving calls
Answering call
To answer the call, pick up the handset or press the speaker phone key.
Refusing call
To refuse call press arrow key →(LCD displays Disconn.)
Note: incoming call number is displayed on the LCD. The ID and call number is
displayed on the LCD if the number is stored in the phone book.
Note: If there are missed calls the picture “Ring” on the LCD screen is displayed.
Number near picture shows how many calls where missed.
4.3 Ending calls
To end a call place the handset back onto the cradle or press the spearkerphone
key if using the handsfree feature.
4.4 In call functions
Adjust volume
While in call press keys ↑↓ to increase or decrease speech volume.
Call transfer
During call press ←(Hold), then again same key ←(Options)
Select New call and press ←(OK)
Enter a number or press ←(Phone book )
Press key ←(Options), Select Transfer and press ←(OK)

Teltonika © 2008, GSM Desktop Phone DPH200 User Manual v1.01
10
5SMS
GSM Desktop phone allows sending and receiving SMS text messages. Each SMS
message can have a maximum of 160 characters. Contact your service provider to
activate SMS.
5.1 Read SMS
Read received message
When a new message is received picture “Message” on the LCD screen is
displayed. To read the message press ←(Read)
Read message from inbox
Press the MENU key
Select Messages by using arrow keys and press ←(OK)
Select Inbox by using arrow keys ↑↓ and press ←(OK)
Select message from the list using arrow keys↑ ↓ and press ←(Read)
Reply to Received Messages
View the desired message
Press ←(OPTIONS)
Select Reply to reply with a text message and press ←(OK)
Type the phone number or use phone book to select addressee
Forward Text Message
View the desired message
Press ←(OPTIONS)
Select Forward to forward text message and press ←(OK)
Type the phone number or use phone book to select addressee
5.2 Send SMS
Press SMS key
Type the text using number key pad and press ←(Send)
Type the phone number or use phone book to select addressee
5.3 Delete SMS
Press the MENU key
Select Messages by using arrow keys and press ←(OK)
Select Inbox by using arrow keys ↑↓ and press ←(OK)
Select message from the list using arrow keys↑ ↓ and press ← (Read)
Press ←(OPTIONS)
Select Delete to delete text message and press ←(OK)

Teltonika © 2008, GSM Desktop Phone DPH200 User Manual v1.01
11
5.4 Message Settings
Message Center
Press the MENU key
Select Messages by using arrow keys and press ←(OK)
Select Message settings by using arrow keys ↑↓ and press ←(OK)
Select Service center by using arrow keys ↑↓ and press ←(OK)
Enter the number that your service provider gave you and press ←(OK)
Note: If the number is already entered, press ← (OK).
Message Lifetime
Press the MENU key
Select Messages by using arrow keys and press ←(OK)
Select Message settings by using arrow keys ↑↓ and press ←(OK)
Select Validity period by using arrow keys ↑↓ and press ←(OK)
Using arrow keys select preferred messages lifetime and press ←(OK)
Note: Message lifetime is the amount of time that an unread message will
remain on the network server before being removed.
6ADDITIONAL FEATURES
6.1 Date and Time Settings
Set the time
Press the MENU key
Select Settings by using arrow keys and press ←(OK)
Select Time and date by using arrow keys ↑↓ and press ←(OK)
Select Adjust time, set time using number keypad and press ←(OK)
Using number keypad or arrow keys ↑↓ set time and press ←(OK)
Change the time format
Press the MENU key
Select Settings by using arrow keys and press ←(OK)
Select Time and date by using arrow keys ↑↓ and press ←(OK)
Select Time format, set time format using arrow keys ↑↓, press ←(OK)
Using number keypad or arrow keys ↑↓ set time and press ←(OK)
Set the date
Press the MENU key
Select Settings by using arrow keys and press ←(OK)
Select Time and date by using arrow keys ↑↓ and press ←(OK)
Select Adjust date, set time using number keypad and press ←(OK)
Using number keypad or arrow keys ↑↓ set time and press ←(OK)

Teltonika © 2008, GSM Desktop Phone DPH200 User Manual v1.01
12
Change the date format
Press the MENU key
Select Settings by using arrow keys and press ←(OK)
Select Time and date by using arrow keys ↑↓ and press ←(OK)
Select Date settings by using arrow keys ↑↓ and press ←(OK)
Select Date format, set date format using arrow keys ↑↓, press ←(OK)
Turn On/Off date display on the LCD screen
Press the MENU key
Select Settings by using arrow keys ↑↓ and press ←(OK)
Select Time and date by using arrow keys ↑↓ and press ←(OK)
Select Date settings by using arrow keys ↑↓ and press ←(OK)
Select Show date, select ON or Off using arrow keys ↑↓, press ←(OK)
6.2 Address Book
GSM desktop phone stores all contacts in the SIM card. Depending on the SIM
(SIM cards may have different memory capacities) card phonebook capable of storing
up to 240 telephone numbers with names.
Note: To dial a number from the Phonebook pick up the handset and press →
(Phone book).
Add new contact
Press the MENU key
Select Contacts by using arrow keys ↑↓ and press ←(OK)
Select New contact using arrow keys ↑↓ and press ←(OK)
Using number keypad enter name and press ←(OK)
Using number keypad number and press ←(OK)
Note: To input the “+” character press and hold “0” key.
Edit Contact in the phone book
Press the NAMES key
Press key ←(Options)
Select Edit contact using arrow keys ↑↓ and press ←(OK)
Edit the name and press ←(OK)
Edit the number and press ←(OK)
Contact Delete
Press the NAMES key
Press key ←(Options)
Select Delete using arrow keys ↑↓ and press ←(OK)

Teltonika © 2008, GSM Desktop Phone DPH200 User Manual v1.01
13
6.3 Speed Dialing
Speed dialing function allows quickly select saved number using number keypad
keys (1-9). To program number keypad buttons please do the following:
Press the MENU key
Select Contacts by using arrow keys ↑↓ and press ←(OK)
Select Speed dial using arrow keys ↑↓ and press ←(OK)
Select wanted keypad number arrow keys ↑↓ and press ←(Options)
Select Edit number using arrow keys ↑↓
Type the number and press ←(OK)
6.4 Audio Settings
Increase/Decrease ring volume
Press the MENU key
Select Settings by using arrow keys ↑↓ and press ←(OK)
Select Sound using arrow keys ↑↓ and press ←(OK)
Select Ring volume using arrow keys ↑↓ and press ←(OK)
Use keys ↑↓ to increase message volume and press ←(OK)
Select ring tone
Press the MENU key
Select Settings by using arrow keys ↑↓ and press ←(OK)
Select Sound using arrow keys ↑↓ and press ←(OK)
Select Ring tone using arrow keys ↑↓ and press ←(OK)
Use keys ↑↓ select wanted melody and press ←(OK)
Increase/Decrease message volume
Press the MENU key
Select Settings by using arrow keys ↑↓ and press ←(OK)
Select Sound using arrow keys ↑↓ and press ←(OK)
Select Message volume using arrow keys ↑↓ and press ←(OK)
Use keys ↑↓ to Increase/Decrease message volume and press ←(OK)
Select message tone
Press the MENU key
Select Settings by using arrow keys ↑↓ and press ←(OK)
Select Sound using arrow keys ↑↓ and press ←(OK)
Select Message tone using arrow keys ↑↓ and press ←(OK)
Use keys ↑↓ select wanted melody and press ←(OK)
Increase/Decrease speech volume
Press the MENU key
Select Settings by using arrow keys ↑↓ and press ←(OK)

Teltonika © 2008, GSM Desktop Phone DPH200 User Manual v1.01
14
Select Sound using arrow keys ↑↓ and press ←(OK)
Select Speech volume using arrow keys ↑↓ and press ←(OK)
Use keys ↑↓ to Increase/Decrease message volume and press ←(OK)
Turn On/Off phone keypad tone
Press the MENU key
Select Settings by using arrow keys ↑↓ and press ←(OK)
Select Sound using arrow keys ↑↓ and press ←(OK)
Select Key tone using arrow keys ↑↓ and press ←(OK)
Using arrow keys ↑↓ select On or Off and press ← (OK)
6.5 Alarm
The alarm feature can be used as an alarm clock. Alarm time and tone can be
set for daily use or for one time only
Set alarm time
Press the MENU key
Select Settings by using arrow keys and press ←(OK)
Select Time and date by using arrow keys ↑↓ and press ←(OK)
Select Alarm, and press ←(OK)
Select Alarm time, and press ←(OK)
Set time using number keypad and press ←(OK)
Choose repeat alarm or not
If repeat- select days to repeat alarm
Set alarm volume
Press the MENU key
Select Settings by using arrow keys and press ←(OK)
Select Time and date by using arrow keys ↑↓ and press ←(OK)
Select Alarm, and press ←(OK)
Select Alarm options, and press ←(OK)
Select Alarm volume, and press ←(OK)
Use keys ↑↓ to Increase/Decrease message volume and press ←(OK)
Set alarm tone
Press the MENU key
Select Settings by using arrow keys and press ←(OK)
Select Time and date by using arrow keys ↑↓ and press ←(OK)
Select Alarm, and press ←(OK)
Select Alarm options, and press ←(OK)
Select Alarm tone, and press ← (OK)
Use keys ↑↓ select wanted melody and press ← (OK)

Teltonika © 2008, GSM Desktop Phone DPH200 User Manual v1.01
15
6.6 Language Selection
To select the language use following instructions:
Press the MENU key
Select Settings by using arrow keys ↑↓ and press ←(OK)
Select Language using arrow keys ↑↓ and press ←(OK)
Using arrow keys ↑↓ select wanted language and press ← (OK)
6.7 Call delay
Call delay is the amount of time, for the phone before automatically making a
call after dial number is entered. To set the time use following instructions:
Press the MENU key
Select Settings by using arrow keys ↑↓ and press ←(OK)
Select Call settings by using arrow keys ↑↓ and press ←(OK)
Select Dial delay by using arrow keys ↑↓ and press ←(OK)
Set delay time using arrow keys ↑↓ and press ← (OK)
6.8 Baby call
Call delay feature allows automatic calling after handset is picked up. The time
and number are programmed. Use following instructions to enable this feature:
Press the MENU key
Select Settings by using arrow keys ↑↓ and press ←(OK)
Select Call settings by using arrow keys ↑↓ and press ←(OK)
Select Baby call by using arrow keys ↑↓ and press ←(OK)
Select Baby cal delay by using arrow keys ↑↓ and press ←(OK)
Select delay time and press ←(OK)
Select Baby cal number by using arrow keys ↑↓ and press ←(OK)
Enter calling number using number keypad and press ← (OK)
6.9 Security settings
Change PIN code
Press the MENU key
Select Settings by using arrow keys ↑↓ and press ←(OK)
Select Security by using arrow keys ↑↓ and press ←(OK)
Select Change PIN code by using arrow keys ↑↓ and press ←(OK)
Enter PIN code and press ←(OK)
Enter new PIN code and press ←(OK)
Note: to change PIN code PIN code request must be enabled.

Teltonika © 2008, GSM Desktop Phone DPH200 User Manual v1.01
16
Pin code request
Press the MENU key
Select Settings by using arrow keys ↑↓ and press ←(OK)
Select Security by using arrow keys ↑↓ and press ←(OK)
Select PIN code request by using arrow keys ↑↓ and press ←(OK)
Enter PIN code and press ←(OK)
Use arrow keys ↑↓ to turn On/Off PIN code request and press ←(OK)
Show IMEI
Press the MENU key
Select Settings by using arrow keys ↑↓ and press ←(OK)
Select Misc by using arrow keys ↑↓ and press ←(OK)
Select Show IMEI using arrow keys ↑↓ and press ←(OK)
Show software version
Press the MENU key
Select Settings by using arrow keys ↑↓ and press ←(OK)
Select Misc by using arrow keys ↑↓ and press ←(OK)
Select Show software version using arrow keys ↑↓ and press ← (OK)
6.10 Restore Factory Defaults
Show software version
Press the MENU key
Select Settings by using arrow keys ↑↓ and press ←(OK)
Select Factory defaults using arrow keys ↑↓ and press ←(OK)
Confirm resetting device to factory defaults by pressing ← (OK)
7SUPPLEMENTARY SERVICES (NETWORK DEPENDENT)
7.1 Call Forwarding
Call forwarding feature allows redirecting incoming calls to another telephone number,
even when the device is turned off. Call forwarding options include all calls, calls that
come in when the line is busy, calls that are not answered after a specified number of
seconds, or calls that come in when DPH200 is not reachable (no signal or turned off).
Turn On/Off call forwarding feature
Press the MENU key
Select Settings by using arrow keys ↑↓ and press ←(OK)
Select Call settings using arrow keys ↑↓ and press ←(OK)
Select Call forwarding using arrow keys ↑↓ and press ←(OK)
Select the desired forwarding type (All , If busy, No Answer, Not
reachable), press ← (OK)
Using arrow keys ↑↓ select Enable/Disable and press ←(OK)

Teltonika © 2008, GSM Desktop Phone DPH200 User Manual v1.01
17
Cancel all call forwarding
Press the MENU key
Select Settings by using arrow keys ↑↓ and press ←(OK)
Select Call settings using arrow keys ↑↓ and press ←(OK)
Select Call forwarding using arrow keys ↑↓ and press ←(OK)
Select Disable All and press ← (OK)
7.2 Call Barring
Call barring feature allows barring of incoming or outgoing calls. The following
calls barring options are available:
All outgoing - do not allow any calls to be made.
Outgoing international - do not allow international calls.
Int. ex. to home country - do not allow international calls except to home
country.
All incoming - do not allow any incoming calls.
Incoming when roaming - do not allow any incoming calls if rooming
Disable all - do not allow any calls to be made or received.
Turn On/Off call barring feature
Press the MENU key
Select Settings by using arrow keys ↑↓ and press ←(OK)
Select Call settings using arrow keys ↑↓ and press ←(OK)
Select Call barring using arrow keys ↑↓ and press ←(OK)
Select the desired barring type
Using arrow keys ↑↓ select Enable/Disable and press ← (OK)
7.3 Call Waiting
Call Waiting enables notification of incoming calls when the DPH200 is on call.
To respond to Call Waiting, press ←key (Answer) to answer or →key (Reject) to reject
call. Press Hold to switch between incoming calls. Contact your service provider to
activate Call Waiting.
Turn On/Off call waiting feature
Press the MENU key
Select Settings by using arrow keys ↑↓ and press ← (OK)
Select Call settings using arrow keys ↑↓ and press ← (OK)
Select Call waiting using arrow keys ↑↓ and press ← (OK)
Using arrow keys ↑↓ select Enable/Disable and press ← (OK)

Teltonika © 2008, GSM Desktop Phone DPH200 User Manual v1.01
18
8TECHNICAL SPECIFICATION
GSM Interface
Quad-Band GSM 850 / 900 / 1800 / 1900 MHz.
Output power:
class 4 (2 W) for EGSM 850/900.
class 1 (1 W) for GSM 1800/1900.
Memory
Address book up to 240 entries (SIM dependant)
SMS memory up to 30 (SIM dependant)
Call memory: 10 last dialed, 10 last received, 10 last missed
Power supply
Mains adaptor: 100 - 240 V AC / 5.2V 1A
Built in lighting protection
Battery: NiMH 3.6V 1600 mAh
Power consumption when talking 2W (peak)
Power Consumption stand by (100mW)
Battery charging time 10 hours
Standby time: 120 hours
Temperature & humidity
Operation 00to 550C
Storage temperature -200to 800C
Humidity 10% to 90%
Storage humidity 5% to 95%
Dimensions / weight
Approx. 220 x 170 x 65 mm
Weight: Approx. 920 g
Other
External omni directional antenna (SMA)
Antenna Gain 2dBi
Port for FW update - RJ45 (UART)

Teltonika © 2008, GSM Desktop Phone DPH200 User Manual v1.01
19
9TROUBLESHOOTING
Messages
Description
Solution
No network
1. Antenna not connected
2. No network signal or signal
level to low
1. Connect antenna and wait until network is
found
2. Contact your GSM network operator
Error
General error message
Contact your GSM network operator if
message persists
Network timeout
Request failed to execute
Contact your GSM network operator if
message persists
Error sending
Error occurred while sending SMS
1. Check Service center number under
Message settings.
2. Contact your GSM network operator
Wrong format
Format of received SMS is not
supported
SIM not inserted
SIM card is not inserted
Turn device Off, insert SIM card and turn
device On
SIM failure
SIM card is corrupted or missing
Turn device Off, insert valid SIM card and
turn device On
SIM busy
SIM card is busy
1. Wait for SIM card to become available
2. Insert valid SIM card
3. Contact your GSM network operator
SIM wrong
Wrong SIM card is inserted
Turn device Off, insert valid SIM card and
turn device On
Enter PIN
PIN code is required
1. Enter correct PIN code
2. Contact your GSM network operator
Enter PIN2
PIN2 code is required
1. Enter correct PIN2 code
2. Contact your GSM network operator
Enter PUK
PUK code is required
1. Enter correct PUK code
2. Contact your GSM network operator
Enter PUK2
PUK2 code is required
1. Enter correct PUK2 code
2. Contact your GSM network operator
Service not available
Service requested
is not available
Contact your GSM network operator for
available services
Service not subscribed
Service requested
is not subscribed
Contact your GSM network operator for
available services
Service code error
Error occurred while
executing service request
Contact your GSM network operator for
available services
Phone book error
Error occurred during
initialization of Phone book
Replace SIM card if error persists
Inbox error
Error occurred during
initialization SMS inbox
Replace SIM card if error persists
Inbox full
SMS inbox is full
Delete some/all messages to be able to
receive new SMS messages
Other manuals for DPH200
1
Table of contents
Other Teltonika Telephone manuals