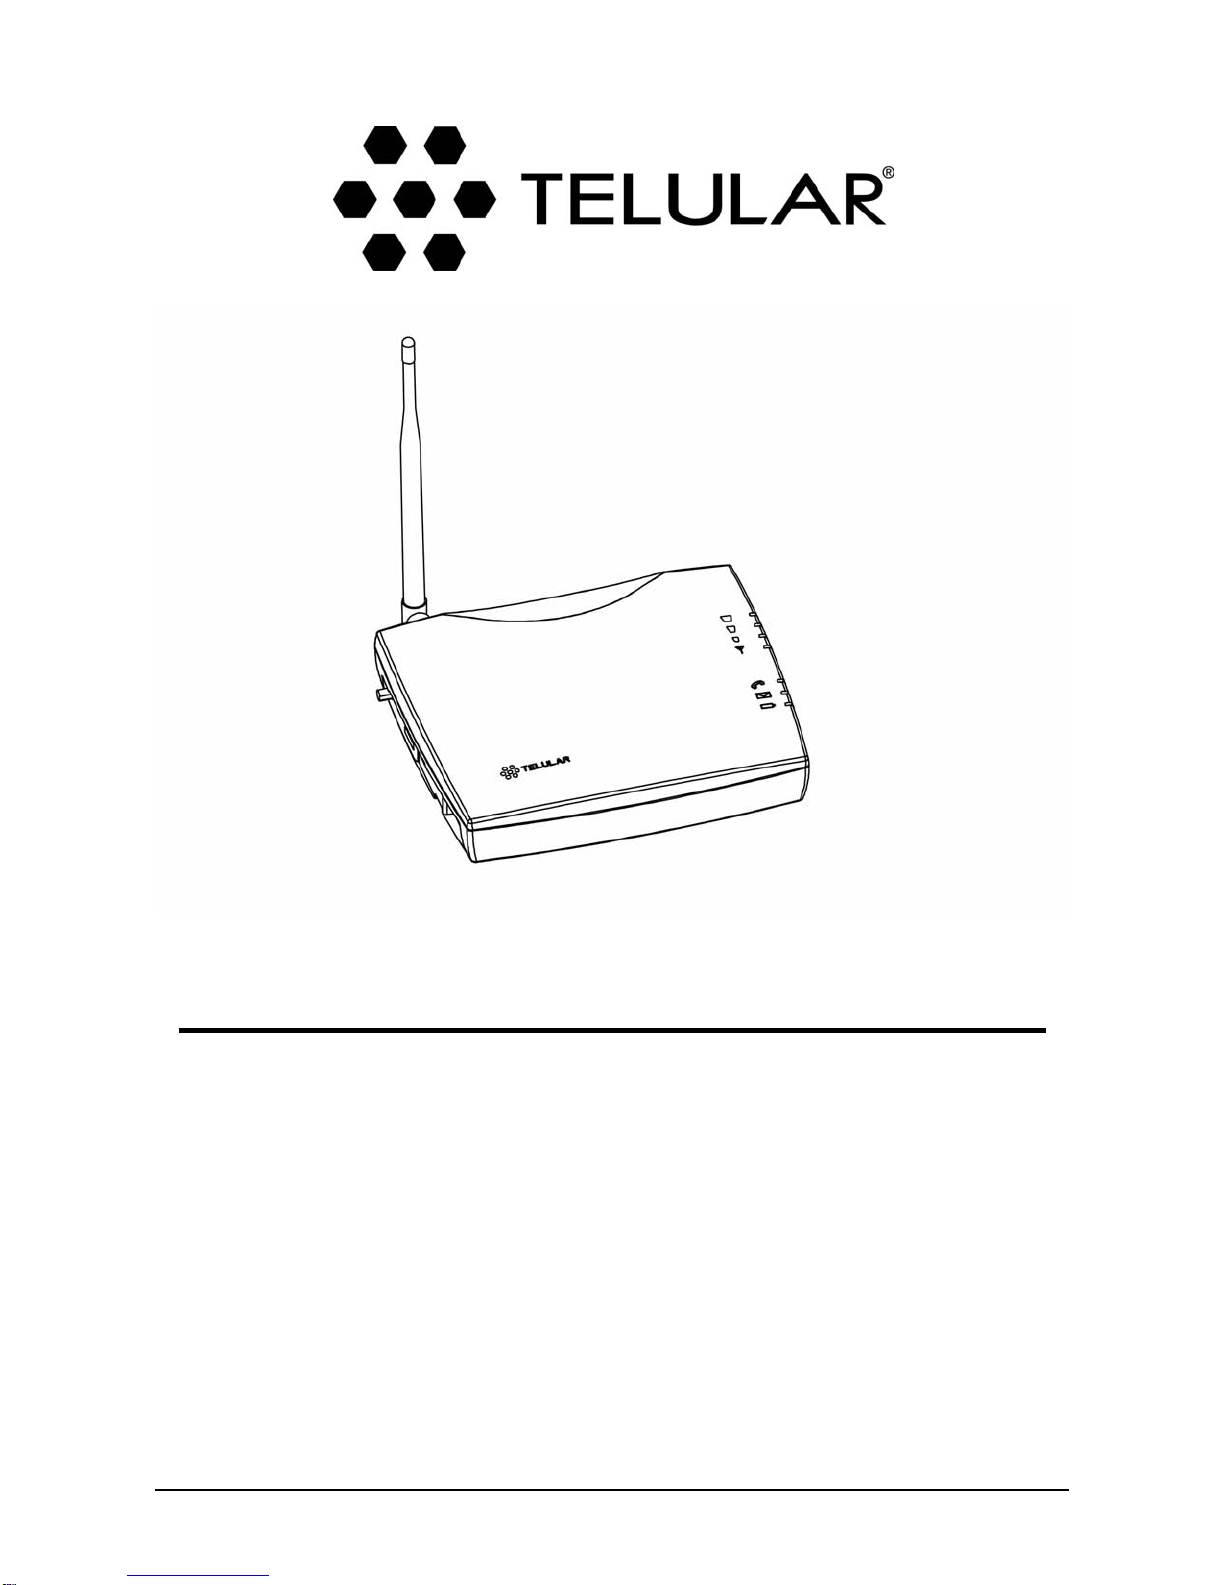
Telular CDMA SX5T-500C User manual
11/19/04 PartNumber56029901
Phonecell®SX5TCDMA2000®1X
FixedWirelessTerminal
SX5T-505C/-535CDUAL-BAND 800/1900MHZCDMA
SX5T-500CSINGLE-BAND 800MHZCDMA
SX5T-500CSINGLE-BAND 1900MHZCDMA
USER MANUAL

Phonecell®SX5TCDMA2000 ii UserManual
Quick Connection Diagram
BeforeinstallingthePhonecell®SX5T,carefullyremovethecontentsfromtheshippingcartonand
checkforevidenceofshippingdamage.Ifdamageisfound,contact yourAuthorizedTelular
Distributororshippingagentimmediately.
CONTENTS
Phonecell®SX5T CDMA FWT Spike Antenna Power Supply
or BBU
AC Power Cord
GPS Antenna
(Optional)
SX5TFixed WirelessTerminal

Phonecell®SX5TCDMA2000 iii UserManual
SAFE OPERATION INSTRUCTIONS
IMPORTANT!Beforeinstallingoroperatingthisproduct,readtheSAFETYINFORMATION
sectiononpage36ofthismanual.
• Installtheunitindoors.
• Installtheunitonahard,flatsurfaceforproperventilation.
• Donotexposetheunittorainormoisture.
• Donotplacetheunitonorclosetosourcesofheat.
IMPORTANT NOTICES
TERMSAND CONDITIONSFOR USEOF PHONECELL®PRODUCTS("Product")
TheseTermsandConditionsarealegalcontractbetweenyouandTelularCorporationforthetitleto
anduseoftheProduct.BYRETAININGANDUSINGTHEPRODUCTAFTERRECEIPTOFIT,
YOUAGREETOTHETERMSANDCONDITIONSINCLUDINGWARRANTYDISCLAIMERS,
LIMITATIONSOFLIABILITYANDINDEMNIFICATIONPROVISIONSBELOW.IFYOUDONOT
AGREETOTHETERMSANDCONDITIONS,DONOTUSETHEPRODUCTANDIMMEDIATELY
RETURNTHEUNUSEDPRODUCTFORACOMPLETEREFUND.Youagreetoacceptsole
responsibilityforanymisuseoftheProductbyyou;and,inaddition,anynegligentorillegalactor
omissionofyouroryouragents,contractors,servants,employees,orotherusersoftheProductso
longastheProductwasobtainedfromyou,intheuseandoperationoftheProduct.
INDEMNIFICATIONOFTELULARCORPORATION("TELULAR")
YOU SHALL INDEMNIFY, DEFEND AND HOLD HARMLESS TELULAR FOR ANY OF THE COST, INCLUDING
REASONABLEATTORNEYS'FEES,ANDFROMCLAIMSARISINGOUTOFYOU,YOURCLIENTS'OROTHERTHIRD
PARTIES'USEOROPERATIONOFTHEPRODUCT:(i)FORMISUSEORINAMANNERNOTCONTEMPLATEDBYYOU
AND TELULAR OR INCONSISTENT WITH THE PROVISIONS OF THIS MANUAL; (ii) IN AN ILLEGAL MANNER OR
AGAINSTPUBLICPOLICY;(iii)INAMANNERSPECIFICALLYUNAUTHORIZEDINTHISMANUAL;(iv)INAMANNER
HARMFUL OR DANGEROUS TO THIRD PARTIES; (v) FROM CLAIMS BY ANYONE RESPECTING PROBLEMS,
ERRORS OR MISTAKES OF THE PRODUCT; OR (vi) COMBINATION OF THE PRODUCT WITH MATERIAL,
MODIFICATION OF THE PRODUCT OR USE OF THE PRODUCT IN AN ENVIRONMENT NOT PROVIDED, OR
PERMITTED,BYTELULARINWRITING.THEPARTIESSHALLGIVEEACHOTHERPROMPTNOTICEOFANYSUCH
COST OR CLAIMS AND COOPERATE, EACH WITH THE OTHER, TO EFFECTUATE THIS INDEMNIFICATION,
DEFENSEANDHOLDHARMLESS.
TelularCorporation
CorporateHeadquarters
647NorthLakeviewParkway
VernonHills,Illinois60061,USA
TechnicalSupport
Tel:847-247-9400•Fax:847-247-0021
E-mail:support@telular.com•http://www.telular.com
PartNumber56029901 ©2004TelularCorporation,AllRightsReserved
PLEASESEETHEIMPORTANTNOTICESANDSAFETYINFORMATIONSECTIONS
OFTHISMANUALFORIMPORTANTINFORMATIONONUSEAND
INDEMNIFICATION.FORWARRANTYINFORMATION,PLEASESEETHELIMITED
COMMERCIALWARRANTYCARDWHICHWASPACKAGEDWITHYOURDEVICE.

Phonecell®SX5TCDMA2000 iv UserManual
TableofContents
Quick Connection Diagram..................................................................................................ii
Safe Operation Instructions................................................................................................iii
Important Notices ................................................................................................................iii
Setup......................................................................................................................................1
RUIM Card Installation (RUIM Model Only) ....................................................................................1
Connecting an SX5T Model With a Power Supply..........................................................................2
Emergency Batteries .......................................................................................................................3
Connecting an SX5T Model With a BBU (Backup Battery Unit).....................................................4
SX5T Location and Installation........................................................................................................5
Wall Mounting..................................................................................................................................5
GPS Antenna Mounting (optional on SX5T-505C/-535C only)........................................................6
Direct Connection: Phone, Fax and Data .......................................................................................7
Connection via Wall Jacks...............................................................................................................7
Getting to Know Your SX5T.................................................................................................8
LED Status Indicators......................................................................................................................8
Important Dial Tones........................................................................................................................9
Using the SX5T ...................................................................................................................10
Making Calls..................................................................................................................................10
Receiving Calls..............................................................................................................................10
Ending Calls...................................................................................................................................10
Using In-Call Features...................................................................................................................10
Accessing Your Voicemail..............................................................................................................11
Making a Three-Way Call ..............................................................................................................11
Using Call Forwarding....................................................................................................................11
Adjusting Your Phone’s Settings......................................................................................12
Volume Level.................................................................................................................................12
Entering Configuration Mode.........................................................................................................12
Changing the Lock Code...............................................................................................................12
Audio Line Level............................................................................................................................13
Auto-Send Delay............................................................................................................................13
Frequently Dialed Numbers (Zero Delay Dialing)..........................................................................13
Call Barring....................................................................................................................................13
Call Restrict (SX5T-500C only)......................................................................................................14
Dial Tone After Remote Disconnect (DTARD)...............................................................................14
Hotline............................................................................................................................................15
One-Minute Alert............................................................................................................................15
TTY Use.........................................................................................................................................15
Voicemail Number..........................................................................................................................16
One-Touch Voicemail Retrieval .....................................................................................................16
Restore User Defaults...................................................................................................................16
Using Additional Hardware Devices.................................................................................17
Using an External Answering Machine..........................................................................................17
Setting Up Data Transfer for a Digital Video Recorder (DVR) or Satellite Receiver.....................17
Using a Fax Machine With Your SX5T..........................................................................................17
Windows XP/Windows 2000 Setup for Data & PC Fax ...................................................18
Windows 98 Setup for Data & PC Fax..............................................................................24
Sending/Receiving a PC Fax.............................................................................................28
Sending/Receiving 1X Data ...............................................................................................29
Sending/Receiving Circuit Switched Data........................................................................30
SX5T-500C Advanced Programming Settings .................................................................31
SX5T Troubleshooting........................................................................................................35
Conformance Statements ..................................................................................................36
Safety Information..............................................................................................................36
Phonecell®SX5TCDMA2000 1 UserManual
Setup
RUIMCard Installation(RUIM ModelOnly)
ConsultyourserviceprovidertodetermineifyourunitrequirestheuseofaRUIM (RemovableUser
IdentityModule)card.IfitisaRUIMmodel,yourSX5Twillonlybeabletomakeemergencycallsuntil
youinstallaRUIMcard.Itwillnotreceivecallsorallownon-emergencyoutgoingcallswithoutthe
RUIMcardinstalled.
1. Removethepowersupplyifithasalreadybeenconnected.(Thepowersupplymustbe
removedwheneveraRUIMCardisremovedorinstalled.)Ifyourunithasemergencybatteries
installed,makesuretheAC/BatterSwitchisintheACPowerposition(see“BatteryOperation”
onpage3).
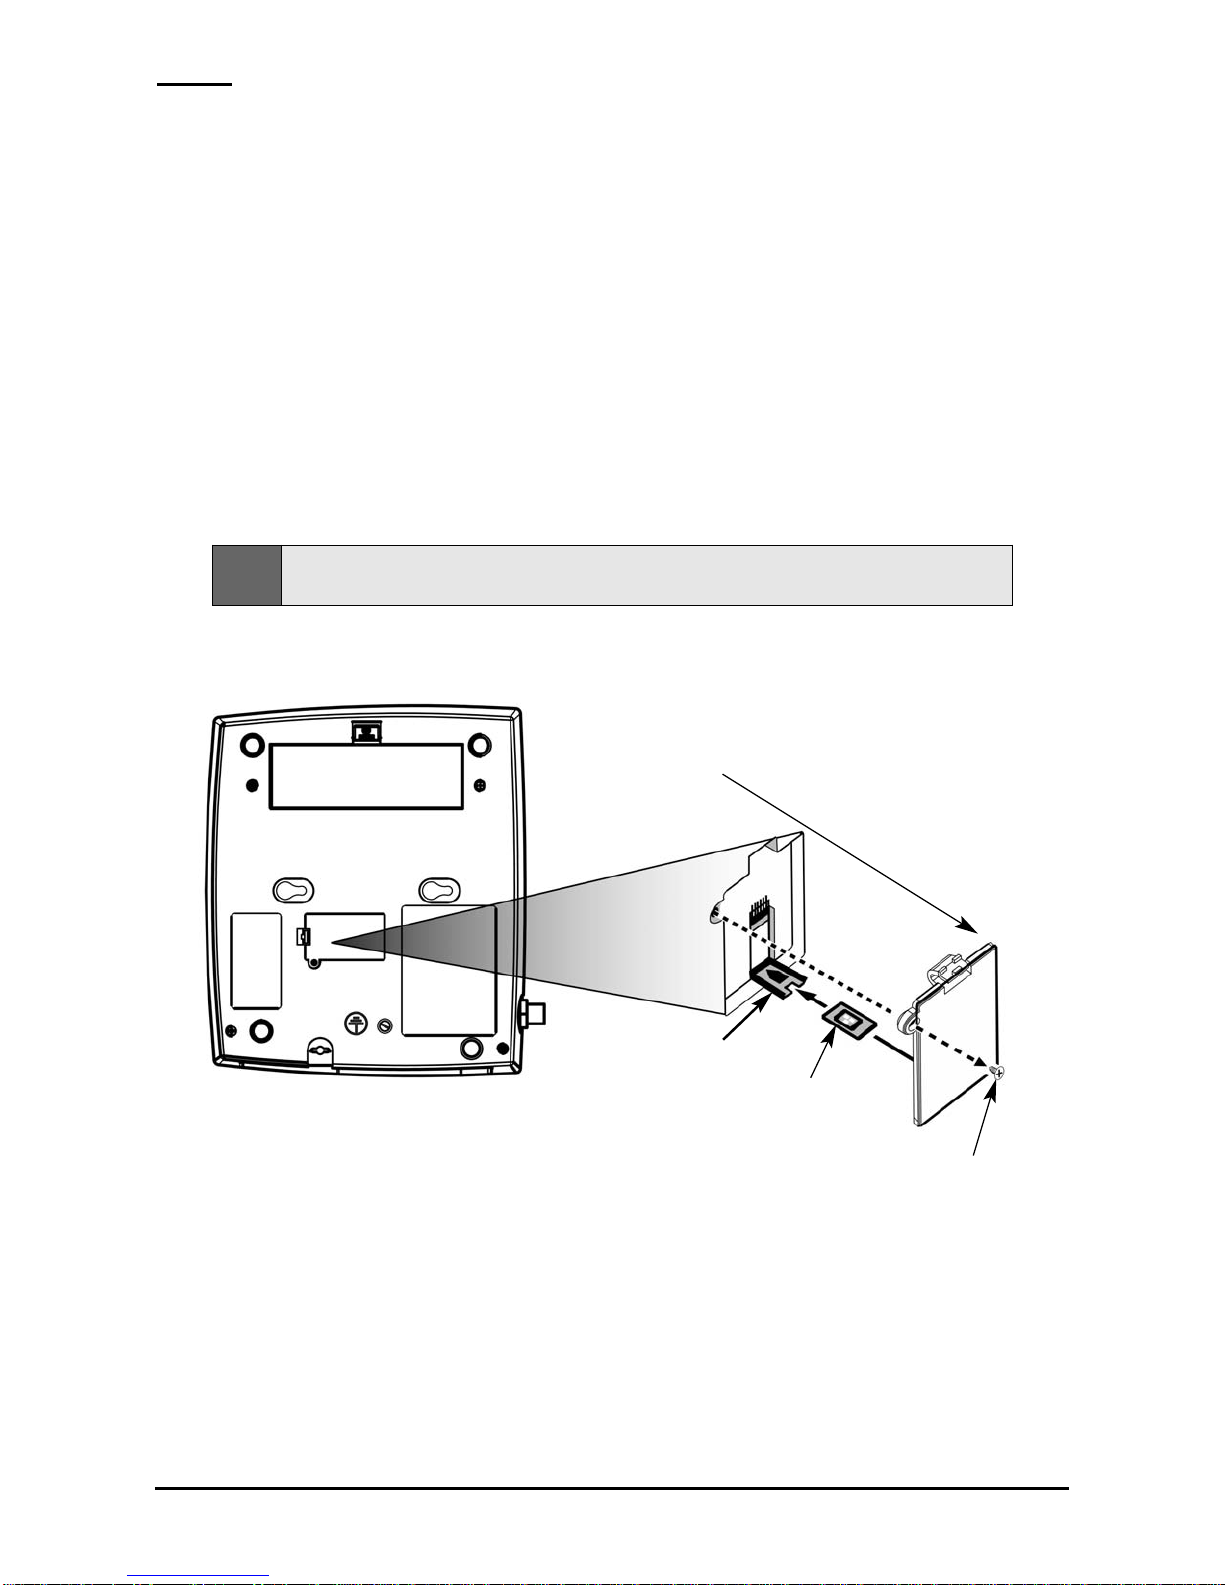
2. RemovetheRUIMcompartmentcover-see Figure 1.
3. OpentheRUIMcompartmentholder.
4. LineuptheRUIMcardwiththearrowontheRUIMcardholder-seeFigure2.
5. GentlyinserttheRUIMcardintheslotoftheRUIMcardholder.
6. ClosetheRUIMcardholder.
7. ReattachtheRUIMcompartmentcover,closingitwiththeseparatecoverscrewprovided.
RUIM
Compartment
Cover
RUIM Card
Holder RUIM Card
Cover Screw
Figure 2 - Install the RUIM Card.Figure 1 - RUIM Compartment.
Note: DonotforcetheRUIMcardholdershut.MakesuretheRUIMcardisalignedproperlywiththe
directionalarrowontheholder.

Phonecell®SX5TCDMA2000 2 UserManual
Connectingan SX5TModel WithaPowerSupply
YourSX5ThaseitheraPowerSupply(part#74007301)oraBatteryBackupUnit
(BBU;part#74006803).IfyourunitusesaPowerSupply,pleasefollowtheinstructions
belowtoconnecttheSX5TtoyourACpower.IfitusesaBBU,pleasesee“ConnectinganSX5T
ModelWithaBBU”onpage4.
ToconnectanSX5TmodelwithaPowerSupply:
1. ConnectthebarrelconnectorofthepowersupplytotheACpowerinputreceptacleoftheSX5T
-seeFigure3.
2. PlugtheACpowercordintothepowersupply.
3. PlugtheACpowercordintotheACPoweroutlet.
4. Checkthecellularsignalstrengthandmovetheunituntilyouachievethebestsignal
possible-seeLEDStatusIndicatorsonpage8formoreinformation.
Figure 3 –
Connect the SX5T toAC Power.
AC Power
AC Power
Position
Battery
Position
AC Power Cord
Power
Supply
Barrel Connector
AC Power
Input Receptacle
Hint: IftherearenoemergencybatteriesintheSX5T,itwillonlypoweroniftheAC/Batteryswitchisinthe
ACpowerposition-seeFigure5 onpage3foradetailedview.
Phonecell®SX5TCDMA2000 3 UserManual
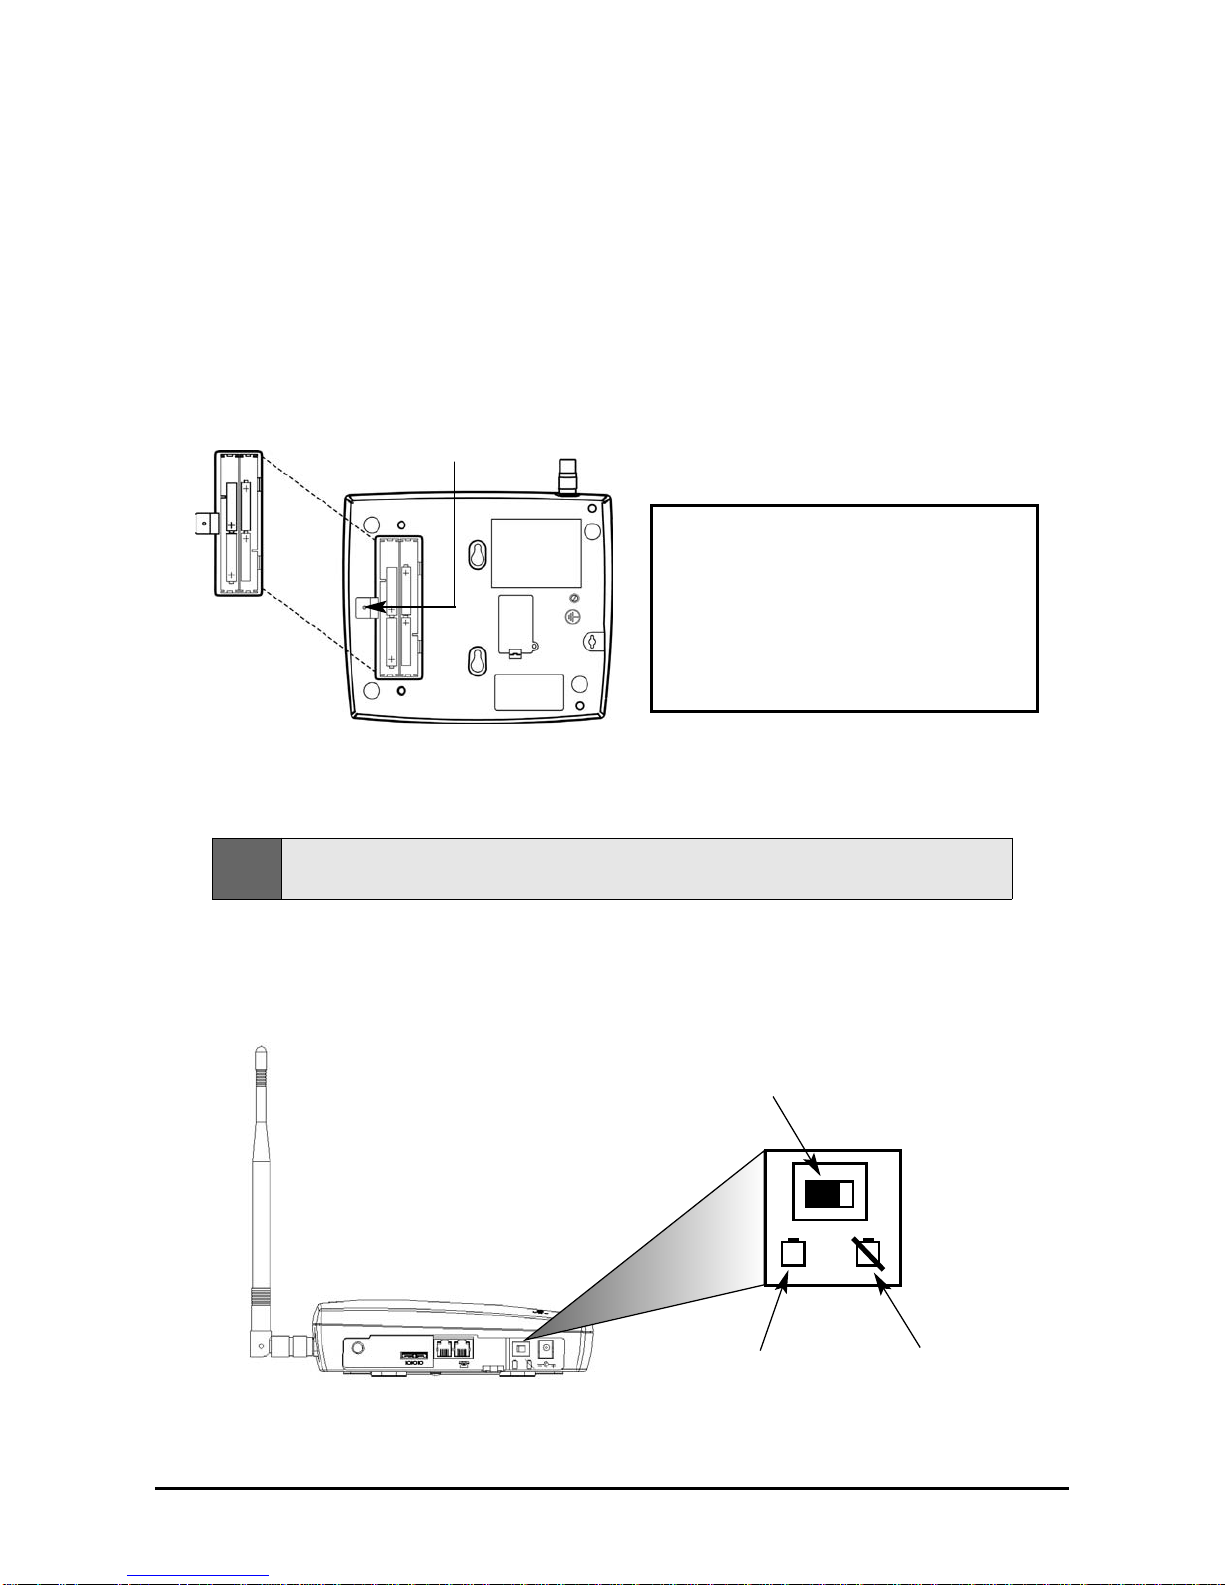
EmergencyBatteries
IfyourSX5ThasaPowerSupply,youmayinstallemergencybatteriestopowerthedeviceinthe
eventofapoweroutage.DonotinstallemergencybatteriesifyourSX5ThasaBBU.TheSX5T
willnotautomaticallyswitchtobatteryifAC powerfails;youmustfliptheAC/Batteryswitchtobattery
operation-seeFigure5.
Toinstallemergencybatteries:
1. Removethebatteryaccessdoorscrewlocatedonthebottomoftheunit-seeFigure4.
2. Pressthebatteryaccessdoortabsandremovethebatteryaccessdoor.
3. Install4“AA”alkalinebatteries(notsupplied)-see Figure 4.
4. Reinstallthebatteryaccessdoorusingthescrew.
Battery Operation
SX5TmodelswithPowerSupplieswillnotautomaticallyswitchfromACtobatteryuponlossofAC
power.TheAC/Batteryswitchmustbechangedmanually-seeFigure5.Batterypowerwillprovide
upto3.5hoursofstandbyoruptoonehouroftalktime,dependingontheSX5Tmodel.
Figure 5 – SX5TAC/Battery switch.
AC/Battery Switch
Battery Position AC Power Position
Note: Ifyouuserechargeable“AA”batterieswiththeSX5T,theymustberechargedexternally(theunitwill
notrechargethemautomatically).
Battery
Access
Door
BatteryAccess
Door Screw
Figure 4 – SX5T battery installation.
WARNING!
Only “AA” alkaline batteries should be
used with the Phonecell®SX5T.
Useofanyotherbatteriesmayresultin
fireand/orotherdamagetotheunit.

Phonecell®SX5TCDMA2000 4 UserManual
Connectingan SX5TModel WithaBBU(BackupBatteryUnit)
YourSX5ThaseitheraPowerSupply(part#74007301)oraBatteryBackupUnit
(BBU;part#74006803).
IfyourmodelhasaBBU,itisshippedwiththebatterydisconnectedtopreventiffrombeing
prematurelydrained.TheBBUmustnotbeconnectedtoaSX5TortoACpowerwhenyou
connectorreplacethebattery.Connectingthewrongwirestothebatteryterminalsmay
causeseveredamagetothedevice.
ToconnectanSX5TmodelwithaBBU:
1. MakesuretheBBUisdisconnectedfromtheSX5TandtheACpowercord.
2. Unlatchthebatterycompartmentcoverbyusingacointorotateitslatchtotheopenposition.
3. Removethecover.
4. Connecttheblackwire(-)inthebatterycompartmenttotheblackterminal(-)onthebattery-
seeFigure6.
5. Connecttheredwire(+)inthebatterycompartmenttotheredterminal(+)onthebattery-
seeFigure6.
6. Insertthebatteryintothebatterycompartment.
7. Reattachthecompartmentcoverandsecureitwiththecoverlatch.
8. InsertthebarrelconnectorofthePowerSupplyandBatteryBackupUnit’scordintothe SX5T’s
PowerInput-seeFigure3onpage2.
9. ConnecttheACpowercordtothePowerSupplyandBatteryBackupUnit,thenplugitintoa
poweroutlet-seeFigure3onpage2.
10. PresstheBatteryPowerSwitchontheBBUtotheON(|/right)position.
11. SlidethePowerSwitchontheSX5TtotheON(right)position.
12. Checkthecellularsignalstrengthandmovetheunituntilyouachievethebestsignal
possible-seeLEDStatusIndicatorsonpage8formoreinformation.
Figure6–Connectingthebattery.
RedWire(+)
BlackWire(-)
BatteryCompartment
RedTerminal(-)
BlackTerminal(-)
Phonecell®SX5TCDMA2000 5 UserManual
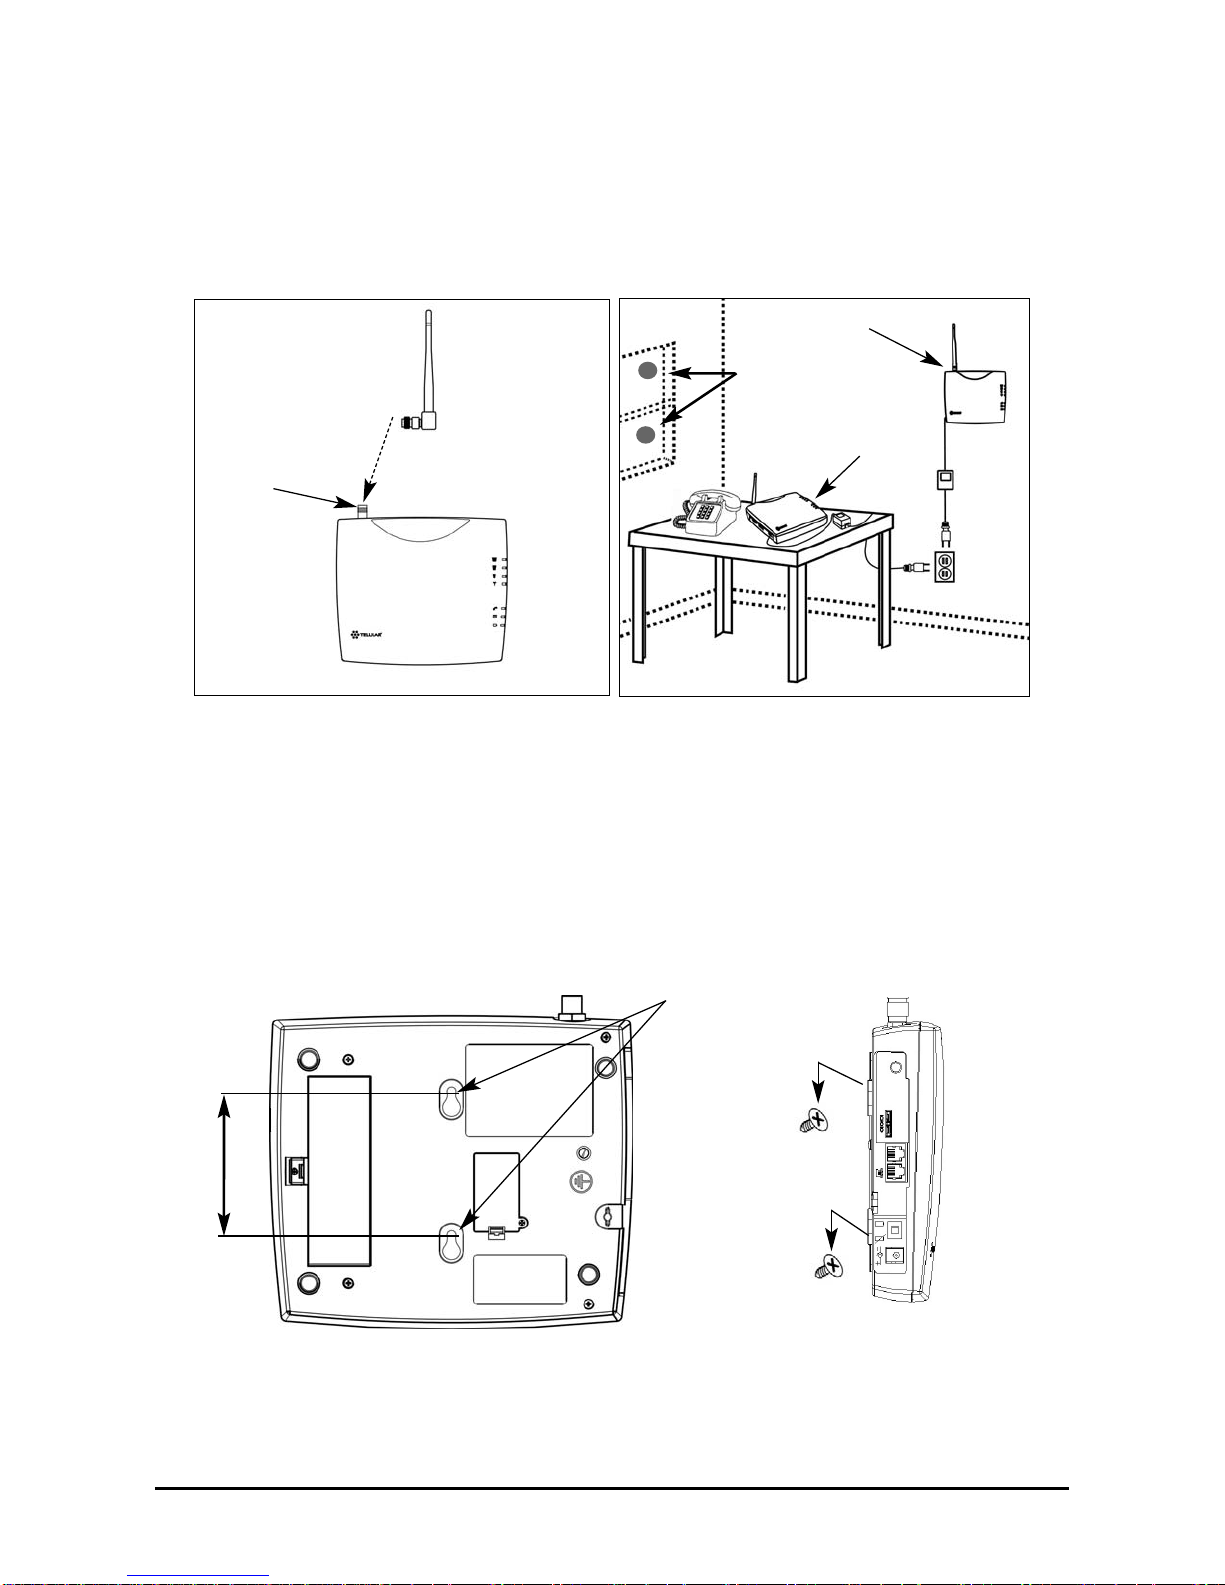
SX5TLocation andInstallation
TheSX5Tcomeswithastandardspikeantenna(TNC)-seeFigure7.Foroptimalsignalstrength,
choosealocationthatisabovegroundandasclosetowindows(orexteriorwalls)aspossible-see
Figure8.Placetheunitwhereyoureceivethebestsignalstrengthpossible.(Cellularsignalstrength
isdisplayedbytheReceivedSignalStrengthIndicator[RSSI]LEDsontheunit-seeLEDStatus
Indicatorsonpage8formoreinformation.)
1. Connecttheantennatotheterminal-seeFigure7.
2. Finger-tightentheantenna.Donotover-tightentheantenna.
WallMounting
1. Marktwoholelocations98.5mm (3-7/8inches)verticallyapartanddrilltwoholesintothewall.
2. Installthescrews(notsupplied)intothewall,leavingagap(approximately3mm(1/8inch))
betweenscrewheadandwall.
3. AlignthemountingholeswiththescrewsandmounttheSX5Tontothescrews-see Figures 9
and10.
Figure 9 – SX5T mounting holes.
Mounting Holes
98,5 mm (3 7/8”)
Figure 10 – Mount the SX5T onto the screws.
Figure 8 – Typical SX5T installations.
Wall Mount
Table Mount
GPS Brackets
Figure 7 –
SX5T antenna connection.
Spike
antenna
TNCAntenna
Connector

Phonecell®SX5TCDMA2000 6 UserManual
GPSAntenna Mounting(optional onSX5T-505C/-535Conly)
TosatisfytheFCC'sEnhanced911(E-911)PhaseIImandate,SX5T-505Cand535Cmodels
distributedintheUSAincludeanoptionalGPSantennawithamountingbracketandsuctioncups.
TheGPSantennausessatellitetechnologyduringemergencycallstoautomaticallyreportyour
locationtoa911dispatcherwithin50-100metersinmostcases.Forthisfeaturetofunction,youmust
properlymounttheGPSantennaon awindowasdescribedbelowinadditiontothestandardantenna
usedforcellularsystemoperation.
1. Mountthebracketonawindowwithgoodlineofsight(noobstructionstothesky)usingthe
suctioncups.Asmallamountofwaterorpetroleumjellyappliedtothewindowsurfaceofthe
suctioncupswillimprovetheirlong-termadhesiontothewindow-see Figure 8 onpage5.
2. Placetheantennaonthetopsidecenterofthebracket.Thebracketistiltedtoaimthe
antennaoutthewindowandtowardthesky.
3. ConnecttheantennatotheGPSConnectoronthesidepaneloftheSX5T-seeFigure11.
GPS Connector
(SX5T-505C/
-535C Only)
Figure11–Connectors
Phone Jacks
(RJ11)
Data Port
(Serial or USB)
Note: InstallationoftheGPSantennaisnotrequiredfornormaloperationoftheSX5T.
SinceE-911servicemaynotbeavailableinallareas,911orotheremergencycallsmaynot
automaticallyprovidealocation.Youmustbepreparedtoprovideanaddressduringany
emergencycalls.

Phonecell®SX5TCDMA2000 7 UserManual
DirectConnection: Phone,Fax andData
1. ConnectaphonetoeitherofyourSX5T’sphone(RJ11)jacksusingastandardtelephonecord-
seeFigure11onpage6.
2. Ifdesired,connectyourSX5T’sotherphone(RJ11)jacktoasecondtelephoneorafaxmachine
usingastandardtelephonecord- see Figure 11 onpage6.
3. Ifdesired,connectacomputertotheSX5T.Youmayeither:
·UseaTelularUSBcable(part#1L01A043or81025901)toconnectthecomputer’sUSBport
totheSX5T’sdataport;
·UseaTelularserialcable(part#1L01A042or81025801)toconnectthecomputer’sserial
porttotheSX5T’sdataport;
·Oruseastandardtelephonecordtoconnectthecomputer’smodemoutporttoeitherofthe
SX5T’sphone(RJ11)jacks.
Contactyourserviceprovidertodeterminewhatwirelessdatatransferservicesareavailable.
Formoreinformationondataconnections,see“WindowsXP/Windows2000SetupforData&
PCFax”onpage18or“Windows98SetupforData&PCFax”onpage24.
Connectionvia WallJacks
Ifyoudonothavelocalphoneservice,youmayuseyourSX5Ttoprovideaconnectiontoyour
wirelessservicefordevicesthatarepluggedintoyourwalljacks.
1. ConnecteitherofyourSX5T’sphone(RJ11)jackstoanywalljackusingastandardtelephone
cord- see Figure 11 onpage6.
2. Ifdesired,connectyourSX5T’sotherphone(RJ11)jacktoatelephoneorfaxmachineusinga
standardtelephonecord- see Figure 11 onpage6.
3. Connectadditionalphones,afaxmachineand/oracomputermodemtoanyavailablewall
jacks.Contactyourserviceprovidertodeterminewhatwirelessdatatransferservicesare
available.
Important: DONOTCONNECTYOURSX5TTOAWALL JACKIFYOUHAVEOUTSIDESERVICE
(I.E.,ADIALTONE)ATYOURWALL JACK.YourSX5Twillnotfunctionproperlyandmay
becomedamagedifoutsidephoneservicehasnotbeendisconnected.

Phonecell®SX5TCDMA2000 8 UserManual
Getting to Know Your SX5T
LEDStatusIndicators
TheLEDindicatorsareactivatedwhentheSX5Tispoweredon.Thefollowingtablesdescribethe
modesandoperationoftheindicators.
ServiceIndicator
*Contactyourserviceprovidertoverifythatservicehasbeenactivated.
SignalStrengthIndicator(ReceivedSignalStrengthIndicator–RSSI)
Signal Strength LEDs Activity Cellular Signal Strength
Signal Strength 1 (RSSI 1) Continuous Poor
Signal Strength 2 (RSSI 2) Flashing
Continuous Fair
Good
Signal Strength 3 (RSSI 3) Flashing
Continuous Very Good
Best
LED Color Activity Description
Green Continuous Full Service
Amber Continuous or Flashing
(network dependent) Roaming
Red Continuous No Service*
Signal Strength 3
Signal Strength 2
Signal Strength 1
Service Indicator
CallActivity Indicator
Message Indicator
AC Power/Battery
Indicator
Note: Ifyouaregettingnoservice,contactyourserviceproviderformoreinformation.

Phonecell®SX5TCDMA2000 9 UserManual
CallActivityIndicator
MessageIndicator
ACPower/BatteryIndicator
Important Dial Tones
Youmayhearthesetonesthroughthereceiverwhenyourphoneisoff-hook:
SteadyTone(dialtone):Service–Indicatesthatyourphoneisreadyforuse.
FastBeepingTone:NoService–Indicatesthatthereisnoserviceavailable.
ShortTone:CallWaiting–Duringanactivecall,ashorttoneindicatesthatyouhaveanother
incomingcall.
PulsedDialTone,followedbyaSteadyDialTone:Voicemail–Indicatesthatyouhaveanew
voicemailmessage.
Color Activity Description
Green Continuous AC power applied
Amber Continuous Battery level good
(battery switch on)
Amber/Green Alternating Battery level poor
(battery switch on)
LED Color Activity Description
Green Flashing New voicemail
LED Color Activity Description
Green Flashing
(phone will also be ringing) Incoming call
Green Continuous In an active call
Green Fast Flashing Processing data call
Amber Continuous Programming Mode

Phonecell®SX5TCDMA2000 10 UserManual
Using the SX5T
OnceyouhaveinstalledandactivatedyourSX5T,you’llbereadytomakeandreceivecalls,setup
voicemail,andsendandreceivefaxes.ThissectionexplainshowtousethefeaturesoftheSX5Tfor
allyourcommunications.
MakingCalls
Tomakeacall:
1. Pickupthetelephonehandset.(Thephoneisnow“off-hook.”)
2. Listenforadialtone.(IfyouhearaNoServicetone[fastbeeping],hangupandtryagain.Ifthe
NoServicetonecontinues,contactyourserviceprovidertoverifythatcellularserviceis
available.)
3. Dialaphonenumber.(Whenyouhavefinisheddialing,thecallwillbesentautomatically.)
ReceivingCalls
• Whenthetelephonerings,pickupthehandsetandbegintalking.
EndingCalls
• Whenyouarefinishedwithacall,hangupthephonebyplacingthehandsetbackonthe
telephonecradleorbypressingtheOfforEndbutton.
UsingIn-Call Features
Toplaceacallonhold:
• Duringacall,presstheFlashkeyonyourhandset(ifyourphonedoesn’thaveaFlashkey,
pressandreleasetheswitch-hook).
·Ifyouhangupyourphonewhenacallisonhold,thecallwillbedisconnected.
Toretrieveacallonhold:
• PresstheFlashkeyonyourphone(orpressandreleasetheswitch-hook).
Toansweracallwaitingcall:
• Whenyou’reonanactivecallandanewincomingcallarrives,youwillhearashorttoneonyour
phone.Toplacethecurrentcallonholdandanswertheincomingcall,presstheFlashkeyon
yourphone(orpressandreleasetheswitch-hook).(Toswitchbetweencalls,simplyrepeatthe
process.)
Toansweracallwhenyouaredialingorwiththephoneoffthehook:
• Ifacallcomesinwhileyouaredialingorwhenyouhavethephoneoffthehook,youwillheara
callwaitingtoneonyourphone.Toanswertheincomingcall,presstheFlash keyonyour
phone(orpressandreleasetheswitch-hook).
Note: CallHoldandCallWaitingarenotavailablewithallserviceproviders.Theseservicesmaynotbe
availableifyouareusingyourSX5Tinaroamingarea.Todeterminetheseservices’availabilityinyour
area,contactyourserviceprovider.
Tip: PressingtheFlashkeyorpressingandreleasingtheswitch-hookafterdialinganumberwillsend
thecallimmediately.
Phonecell®SX5TCDMA2000 11 UserManual
AccessingYourVoicemail
WithyourSX5T,youhavetwooptionsforaccessingyourvoicemailaccountfromyourphone:
One-TouchVoicemailRetrievalandDirectDial.(Formoreinformationaboutyourvoicemail
settings,see“VoicemailNumber”and“One-TouchVoicemailRetrieval”onpage16.Forinformation
aboutyourvoicemailservice,pleasecontactyourserviceprovider.)
ToaccessyourvoicemailusingOne-TouchVoicemailRetrieval:
• Pressandholdthe buttononanyhomephonefortwoseconds.
ToaccessyourvoicemailusingDirectDial:
1. Dialyourphonenumber.
2. Whenyourvoicemailanswers,press .
3. Followthevoicepromptstoenteryourvoicemailpasscodeandretrieveyourmessages.
ClearingYour Voicemail Indicator
• ThemessagelightonyourSX5Twillflashwhenyouhaveanewvoicemailmessage.
Theindicatorshouldclearafteryouhavelistenedtoallofyournewmessages.Ifyour
voicemailmessageindicatordoesnotclear(orifyoujustwanttoclearitmanually),
press .
Makinga Three-WayCall
YourSX5Tsupportsthree-waycalling,ifitissupportedbyyourserviceprovider.
Tomakeathree-waycall:
1. Placeoransweracallonyourphone.
2. Onceyouhaveestablishedtheconnectionwiththefirstcaller,pressFlash,enterthesecond
numberyouwishtocall,thenpressFlashagain.(Thisputsthefirstcalleronholdanddialsthe
secondnumber.)
3. Whenyou’reconnectedtothesecondparty,pressFlash againtobeginyourthree-waycall.
Ifoneofthepeopleyoucalledhangsupduringyourcall,youandtheremainingcallerstay
connected.Ifyouinitiatedthecallandarethefirsttohangup,allthreecallersaredisconnected.
UsingCall Forwarding
CallForwardingletsyouforwardallyourincomingcallstoanotherphonenumber.Youcancontinue
tomakecallsfromyourphonewhenCallForwardingisactivated.
Toactivatecallforwarding,contactyourserviceproviderforinstructions.
Note: Certaincellularsystemsmayuseadifferentmethodtoconnectthree-waycalls.Pleasecontactyour
serviceproviderformoreinformation.
#
5
0
1
*
#
Note: Ifyourphonedoesn’tsupportacontinuoustone(i.e.,ifyouonlyhearashorttonewhenyoupressand
holdakey),One-TouchVoicemailRetrievalwillnotworkonyourphone.Toaccessyourvoicemail,you
willhavetousetheDirectDialmethodofvoicemailretrieval.
YoumayalsousetheDirectDialmethodtoretrieveyourvoicemailfromanyotherphone.
*
1
Phonecell®SX5TCDMA2000 12 UserManual
Adjusting Your Phone’s Settings
VolumeLevel
Ifthevolumelevelonyourphone’sreceiveristoohighortoolowduringacall,youcanadjustthe
levelsusingthetelephonekeypad.
Toincreasethephone’svolumelevel:
• Press .
Todecreasethephone’svolumelevel:
• Press .
EnteringConfiguration Mode
ManydeviceconfigurationsettingsrequireyoutoenterConfigurationMode–thedevice’s
programmingmode–beforeyoumayinputthecommands.
ToenterConfigurationMode:
• Press <lockcode> .
YouwillhearasteadytoneindicatingthatyouhaveenteredConfigurationMode.Whenyoupress
anyadditionalkey,thetonewillstop.
Ifyoucorrectlyenteraconfigurationsequenceforanyofthesettingslisted,thesteadytonewill
returnandtheSX5Twillhaveacceptedthenewsetting.Ifyoudonotenteravalidsequence,youwill
hearthreebriefascendingtonesfollowedbythesteadytone(atwhichpointyoumayre-enteryour
configurationsettings).
ToexitConfigurationMode,simplyhangupthephone.
Changingthe LockCode
YourSX5TispreconfiguredwithalockcodeforuseinenteringConfigurationModeandtouse
withtheCallBarringfeature.Thedefaultlockcodeisthelastfourdigitsofthephonenumber.
(Ifnonumberisprogrammed,thedefaultis0000).
YoumayuseConfigurationModetochangeyourlockcodetoany4-digitnumber.
TochangetheLockCode:
• FromConfigurationMode,press <oldlockcode>
<newlockcode> <newlockcode> .
(Forexample,tochangethedefaultlockcodefrom0000to5555,press
.)
#
55
55
*
5555
*
0000
*
34
1
*
#
#
***
341
*
#
Note: YoumaychangemultiplesettingsduringasingleConfigurationModesession.Ifyouenteran
incorrectsequenceduringaConfigurationModesession,onlythesettingyouwereenteringwillneed
tobere-entered;allpreviouschangeswillberetained.
#
*
0
*
#
Note: TheSX5Tvolumesettingallowsyoutoadjustthevolumethreelevelsfromthedefaultsetting.The
adjustedvolumesettingremainsineffectforfuturecallsuntilitismanuallychanged.WhentheSX5T’s
poweristurnedOffandOn,thedefaultmid-rangevolumesettingisrestored.
3
*
#
8
*
#

Phonecell®SX5TCDMA2000 13 UserManual
AudioLine Level
Ifusing and doesnotprovidesatisfactoryvolumeoptionsfor
you(see“VolumeLevel”onpage12),youmayadjustyourphonesystem’saudiolinelevel.
Toadjustyourphonesystem’saudiolinelevel:
• FromConfigurationMode,press <0,1,or2> .
0=Low
1=Normal(default)
2=High
Auto-SendDelay
Theauto-senddelayistheamountoftimetheSX5Twaitstodialafteryoumakeanentryonthe
phonekeypad.Thedefaultsettingis3secondsandthevalidrangeis2-20seconds.
Tochangetheauto-senddelay:
• FromConfigurationMode,press <2-20> ,whereyou
enteranumberbetween2and20seconds.(Forexample,ifyouwanttheautosenddelaytobe
fiveseconds,press .)
FrequentlyDialed Numbers(Zero DelayDialing)
Ifyoudialaphonenumbertwiceandstayconnectedforatleast15seconds,theSX5Twillremember
thatphonenumberinthefutureandautomaticallysenditwithouttheauto-senddelaywheneveryou
subsequentlydialthenumber.Thisfeatureisenabledbydefault.
ToenableZeroDelayDialing(defaultsetting):
• FromConfigurationMode,press .
TodisableZeroDelayDialing:
• FromConfigurationMode,press .
CallBarring
Toavoidinadvertentservicecharges,youmayenableyourdevice’sCallBarringfeaturetobarall
outgoingcalls(exceptemergencycalls).
ToenableCallBarring:
• FromConfigurationMode,press <lock
code> .
TodisableCallBarring(defaultsetting):
• FromConfigurationMode,press <lock
code> .
#*
0
*
241
*
#
#*
1
*
24
1
*
#
#
0
*
1
2
*
#
#
1
*
12
*
#
#
5
*
11
*
#
#
*
11
*
#
#
*
9
6
*
#
3
*
#
8
*
#

Phonecell®SX5TCDMA2000 14 UserManual
CallRestrict (SX5T-500Conly)
CallRestrictallowsyoutodeterminewhichcallsmayormaynotbeplacedthroughyourSX5T.When
theCallRestrictlevelissettoUseTable,theCallRestrictfeaturechecksoutgoingcallsagainst
user-definedpermitanddenytablestodeterminewhethertopermitordenytheoutgoingcall.Each
table(permitanddeny)maycontainuptotenentries.
TosettheCallRestrictlevel:
• FromConfigurationMode,press <1,2,3,or4> ,
where<1,2,3,or4>areasfollows:
1=NoRestriction (default setting)
2=UseTable
3=EmergencyOnly (onlyemergencycallspermitted;allothercallsdenied)
4=ClearTable
TosettheCallRestricttableentries:
• FromConfigurationMode,press <0or1>
<index> <number> ,wheretheoptionsareasfollows:
<0or1>=Tablemode (0 =Deny table; 1= Permittable)
<index>=Tableentry
<number>=10-digitphone number forthe CallRestrict entry
(Forexample,ifyouwantedtoadd555-123-4567asthethirdentryinyourDenytable,you
wouldpress )
DialToneAfterRemoteDisconnect(DTARD)
Toallowyoutoplaceanothercallwhenaconnectionhasbeenterminatedremotely(whentheother
partyhashungupthephone),youmayelecttohavetheSX5Treturntodialtoneautomatically.Ifyou
electnottoenableDTARD,youwillneedtohangupthephonebeforeplacinganothercall.
ToenableDialToneAfterRemoteDisconnect(toreturntodialtone):
• FromConfigurationMode,press .
TodisableDialToneAfterRemoteDisconnect:
• FromConfigurationMode,press .
Note: IfDialToneAfterRemoteDisconnectisdisabled,additionalremotedisconnectoptionsmaybe
available.See“DisconnectTone”onpage33 formoreinformation.
#
0
*
8
*
#
#
1
*
8
*
#
#
7654321
555
*
3
*
0
*
641
*
#
#
***
641
*
#
#
*
541
*
#

Phonecell®SX5TCDMA2000 15 UserManual
Hotline
TheHotlinefeatureallowsyoutoprogramtheSX5Ttoautomaticallydialaspecificphonenumber
afteraselectedtimeoutdelaywheneveryoutakethephoneoff-hook.
ToprogramtheHotlinephonenumber:
• FromConfigurationMode,press <phone#> ,where
<phone#>isthephonenumberyouwanttodialautomatically.
ToenabletheHotlinefeature:
• FromConfigurationMode,press <1-8> ,
where<1-8>equalstheselectedtimeoutdelay,inseconds.
(Forexample,ifyouwantedthephonetowaitfivesecondsbeforedialingthehotlinenumber,
youwouldpress from
configurationmode.)
TodisabletheHotlinefeature(defaultsetting):
• FromConfigurationMode,press .
One-MinuteAlert
Youcankeeptrackofyourin-calldurationbyconfiguringyourSX5Ttosoundashortbeepat
one-minuteintervalsduringactivecalls.
ToenableOne-MinuteAlerts:
• FromConfigurationMode,press .
TodisableOne-MinuteAlerts(default):
• FromConfigurationMode,press .
TTYUse
ATTYdevice(alsoknownasaTDDorTextTelephone)isatelecommunicationsdevicethatallows
peoplewhoaredeaf,hardofhearing,orwhohavespeechorlanguagedisabilitiestocommunicate
bytelephone.
YourSX5TiscompatiblewithselectTTYdevices.PleasecheckwiththemanufacturerofyourTTY
devicetoensurethatitsupportsdigitalwirelesstransmission.
ToestablishTTYservice,contactyourcellularserviceprovider.
Tosetyourphone’sTTYmode:
• FromConfigurationMode,press <0or3> ,where
<0or3>areasfollows:
0=TTYOff
3=TTYAlways
#
*
9
3
1
*
#
#
0
*
99
*
#
#
1
*
99
*
#
#
1
*
0
*
711
*
#
#
5
*
1
*
711
*
#
#
*
1
*
711
*
#
#
*
811
*
#

Phonecell®SX5TCDMA2000 16 UserManual
VoicemailNumber
YoucanuseConfigurationModetosetthedefaultvoicemailnumberforyourSX5T.
Tosetthedefaultvoicemailnumber:
• FromConfigurationMode,press <voicemail
number> .
Forexample,toset555-123-4567asyourvoicemailnumber,youwouldpress .
Ifyourvoicemailaccessnumberincludesaspecialcharacter,suchasanasterisk(*)orapoundsign
(#),youcanprogramitbyaddinganextraasteriskinfrontofthespecialcharacter.Pleaserefertothe
examplesbelow:
Toset*86asthedefaultvoicemailnumber:
• FromConfigurationMode,press .
Toset#86asthedefaultvoicemailnumber:
• FromConfigurationMode,press .
One-TouchVoicemailRetrieval
YoucanconfigureyourSX5Ttoconnecttoyourvoicemailboxusingone-touchvoicemailretrieval,
allowingyoutoretrievemessagesbypressingandholding .(One-Touch VoicemailRetrieval
isenabledbydefault.)
ToenableOne-TouchVoicemailRetrieval(defaultsetting):
• FromConfigurationMode,press .
TodisableOne-TouchVoicemailRetrieval:
• FromConfigurationMode,press .
RestoreUser Defaults
TorestoreyourSX5Ttoitsdefaultsettingsafterchangingconfigurationsettings:
• FromConfigurationMode,press <0or1> ,where
0=KeepCurrentSettingsand1=RestoretoDefaultSettings.
#
*
7
0
1
*
#
Note: Ifyourphonedoesn’tsupportacontinuoustone(i.e.,ifyouonlyhearashorttonewhenyoupressand
holdakey),One-TouchVoicemailRetrievalwillnotworkonyourphone.Toaccessyourvoicemail,you
willhavetousetheDirectDialmethodofvoicemailretrieval(seepage11).
Formoreinformationaboutretrievingvoicemail,see“AccessingYourVoicemail”onpage11.
Forinformationaboutyourvoicemailservice,pleasecontactyourserviceprovider.
#
0
*
8
4
1
*
#
#
1
*
841
*
#
1
#
68
#
**
1
0
1
*
#
#
68
***
1
0
1
*
#
#
7654321555
*
1
0
1*
#
#*
1
0
1
*
#
Note: ThevoicemailsettingsforyourSX5Tshouldhavebeenconfiguredpriortopurchase.Theinstructions
forVoicemailNumberandOne-TouchVoicemailRetrievalaremainlyforyourreference.
This manual suits for next models
6
Table of contents
Other Telular Telephone Accessories manuals


