TELUS SmartHome User manual

TELUS
SmartHome
Security
Owner’s Guide
Version 2

2
|
TELUS SmartHome Security
Quick Start Guide
Getting started with your TELUS SmartHome Security
This Quick Start Guide is meant to provide you with a preview of the most popular
features to help you start using what your system has to offer. You can find more
detailed information on each feature starting from Page 7.
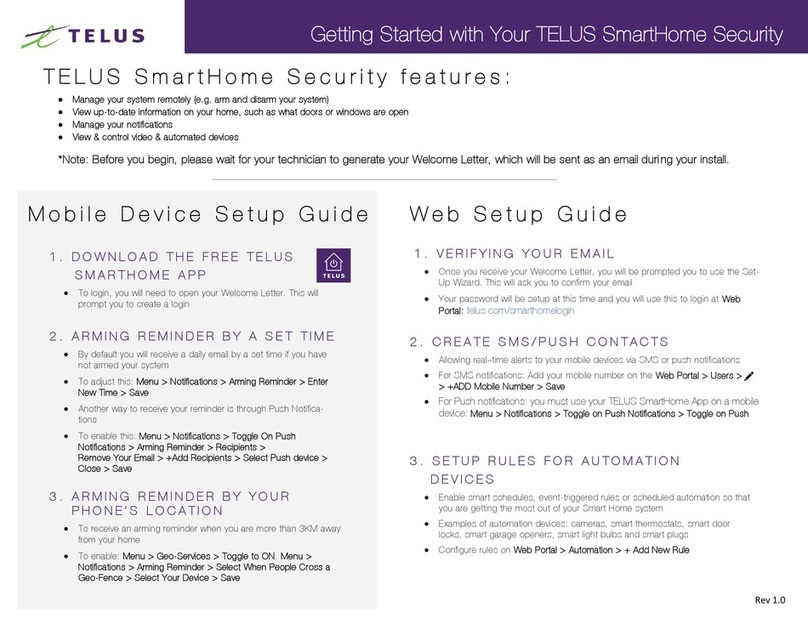
TELUS SmartHome Security features:
•Manage your system remotely (e.g. arm and disarm your system)
•View up-to-date information on your home, such as which doors or windows are open
•Manage your notifications
•View and control video and automated devices
Before you begin, please wait for your technician to generate your Welcome
Letter, which will be sent as an email during your install. If you’re self-installing
your services, this is sent when you activate your account.
Mobile Device Setup Guide
1. Download the free TELUS SmartHome app.
•To login, you will need to open your Welcome Letter. This will prompt you to create a login.
2. Arming reminder by a set time.
•By default you will receive a daily email by a set time if you have not armed your system.
•To adjust this: Menu >Notifications >Arming Reminder >Enter New Time >Save
•Another way to receive your reminder is through Push Notifications.
•To enable this: Menu >Notifications >Toggle On Push Notifications >Arming Reminder >
Recipients >Remove Your Email >+ Add Recipients >Select Push Device >Close > Save
3. Arming reminder by your phone’s location.
•To receive an arming reminder when you are more than 3KM away from your home
•To enable: Menu > Geo-Services >Toggle to ON. Menu >Notifications >Arming
Reminder > Select When People Cross a Geo-Fence >Select Your Device >Save

Owner’s Guide
|
3
Web Setup Guide
1. Verifying your email.
•Once you receive your Welcome Letter, you will be prompted you to use the Set-Up Wizard.
This will ask you to confirm your email.
•Your password will be setup at this time and you will use this to login at
web portal: telus.com/smarthomelogin
2. Create SMS/push contacts.
•Allowing real–time alerts to your mobile devices via SMS or push notifications
•For SMS notifications: Add your mobile number on the Web Portal >Users >+ ADD Mobile
Number >Save
•
For Push notifications: you must use your TELUS SmartHome app on a mobile device:
Menu >Notifications >Toggle on Push Notifications >Toggle on Push
3. Setup rules for automation devices.
•
Enable smart schedules, event-triggered rules or scheduled automation so that you are
getting the most out of your TELUS SmartHome Security system
•Examples of automation devices: cameras, smart thermostats, smart door locks, smart
garage openers, smart light bulbs and smart plugs
•Configure rules on Web Portal >Automation >+ Add New Rule

4
|
TELUS SmartHome Security
How to use your alarm panel
Arming
SYSTEM
DISARMED
Touch to access arming options.
Sensor status:
Open
Closed
Motion Active
Idle
Unreachable
Tampered
SMITH HOME
DISARMED
ARM S TAY ARM AWAY
SMITH HOME
DISARMED
ARM S TAY ARM AWAY
BYPASS
Front Door
Living Room Motion
EXIT SOUNDS
ON
ENTRY DELAY
ON
ALLACTIVE
See more options by touching the
““ icon on the right.
AR M STAY
AR M AWAY
Arming Options:
Quickly choose from “Stay” or “Away”.
Arming Stay - Arms doors and
windows only.
Arming Away - Arms doors, windows
and motions.
Additional Options - View additional
arming options by touching “ ” icon
on the right side.
Additional Arming Options:
Select these options before choosing your
arming type.
Bypass - Touch the circle next to a sensor to
bypass it during the arming sequence. All open
sensors will automatically bypass when arming.
Exit Sounds - The panel beeps as the timer
counts down. Silence these beeps before you
choose the arming type.
Entry Delay - The panel will give you time to
disarm once a “delay door” has been opened.
Turn this off with a touch.

SMITH HOME
ARM ED AWAY
Owner’s Guide
|
5
How to use your alarm panel
Disarming
Touch to disarm panel manually.
Disarming your system
When your system is armed, there are
multiple ways to disarm:
Disarming Manually
To manually disarm your panel, touch
the icon in the center of the screen. You
will be prompted to enter a valid code.
Failure to enter a valid code within the
time required will trigger the alarm.
When someone manually disarms the
panel the built in camera will take a
photo and save it on the camera page
along with the date, time and name of
the user.
Disarming Remotely
To remotely disarm your panel, login
to your mobile app and touch the
“disarm” icon.
Arming Remotely
To remotely arm your panel, log into your
mobile app and touch the “arm” icon.


Owner’s Guide
|
7
Welcome
Welcome to smarter security
Thanks for choosing a TELUS SmartHome Security system. In this guide, you’ll find
important information about your account, as well as some tips on how to set up and
get the most out of your system.
Please take time to read through this guide, as there are several crucial steps that
you need to take in order to optimize your system and ensure everything is
working properly. The checklist on pages 10 to 13 is designed to help you get
up and running quickly. Ensure that everyone in your household understands the
information. We’ll be in touch shortly via email with more handy tips and guides.
We’re happy to have you on board and look forward to keeping your home smart,
safe and secure.
Contact us
Contact our dedicated teams at 1-855-255-8828.
For Customer Care:
Monday–Friday: 7:30am–9:00pm
Weekends: 8:00am–8:00pm
For Installation support:
24/7 or visit telus.com/smarthomeguides
For Technical support:
24/7 or visit telus.com/support
In an emergency, please dial 9-1-1.
Visit telus.com/homesecurity for more information.

8
|
TELUS SmartHome Security
Contents
Getting started with smarter security
Practice makes perfect 09
48-hour checklist 10
Alarm process
Arming and disarming your system 14
An alarm occurs. What now? 17
Using your new security system
1. Users and access codes 19
2. Video clips 20
3. Personalized notifications 23
Explore smarter security
Scenes 24
Rules 25
Scheduling 27
Other useful information
FAQs 29
Billing 33
Make your home even smarter 34

Getting started
with smarter security
Practice makes perfect
By default, your security system
is in Test Mode for 48 hours.
We want you to feel confident operating your new system and reduce the chance
of false alarms. For this reason, your security system is in Test Mode for the first
48 hours after installation. During this time, we encourage you to practice with
the system and get used to how it works. Turn to Alarm processes on pages
14 to 18 to learn more about using your system.
While your system is in Test Mode, our central monitoring station will not respond
to alarms and as a result, emergency services will not be dispatched during this time.
This will allow you to practice with your system risk free.
Safety Tip
The Test Mode period is the ideal time
to complete your account setup process.
Please work through the checklist on pages
10 to 13 during your first 48 hours.

10
|
TELUS SmartHome Security
48-hour checklist
Follow this handy checklist and you’ll be ready to make the most of your
system in no time.
Provide your information
Obtain your alarm permit (where applicable) and provide
us with the number
Some municipalities require an alarm permit to dispatch emergency services.
Once you receive your permit, you must provide the permit number to TELUS
by contacting us at 1-855-255-8828.Visit telus.com/permits to learn more.
Download and register your apps and accounts
Set up your My TELUS account
Register for My TELUS online at telus.com/MyTE LUS, then click Link an Account.
My TELUS lets you view your bill and make instant payments, as well as sign up
for pre-authorized payments.
My TELUS Username
DID YOU KNOW?
If you have other TELUS services, you can view all your billing information in
one location by linking your My TELUS account to your TELUS SmartHome
Security account.
Download the TELUS SmartHome app
This app is the easiest way to control your TELUS SmartHome Security system.
TELUS SmartHome Security Username*
* You will have received your username during the installation process of your security system.

Owner’s Guide
|
11
Log in to the TELUS SmartHome Security web portal
While the TELUS SmartHome app provides the most frequently used features on
the go, many advanced set-up functions are only available through the web portal.
Visit telus.com/homesecurity/login
TIP: Bookmark the web portal page for easy access for when you want to
change your settings.
Set your preferences
Log in to the TELUS SmartHome app and complete the following
during the first 48 hours.
Create users and access codes
1. From the Menu, click Users
2. Click + to add a new user and enter their details
3. Enter the user’s contact information
4. Enter the user’s Access Code
5. Select which devices the user should have access
6. Click Save

12
|
TELUS SmartHome Security
Provide emergency contact information
As part of your account setup, you are required to provide three emergency
contacts who can be reached in order to verify an alarm. Your emergency contacts
should ideally live at or know the location of your premises, have access to the
building, and be able to act on your behalf in case emergency service providers
need to further investigate. Make sure you keep these details up-to-date to ensure
the right people are contacted.
If you haven’t already provided the following information to TELUS during the
purchase or installation process, or if you would like to update your information,
please login to the TELUS SmartHome app or web portal.
Manage your emergency contact information
1. From the menu, click Monitoring Settings
2. Click Emergency Contacts
3. Click Add Contact
4. Enter the emergency contact’s details
5. Click Save
Contact 1 (You)
Name
Phone Number
Verbal Password
Contact 2
Name
Phone Number
Verbal Password
Contact 3
Name
Phone Number
Verbal Password
Alarm Permit
TIP: Ensure your emergency contacts remember their password as it will
be required to verify in-progress burglar and panic alarms.

Owner’s Guide
|
13
Set up your video cameras
1. If you have one or more video cameras, select the Video tab in the
TELUS SmartHome app to access this device
2. Adjust recording rules and settings to your preferred specifications.
Double-check the positioning of your cameras
3. Set up your recording schedule and clip duration
Note: Your camera will record a maximum of 3,000 clips a month. If you exceed this
limit, you’ll need to contact Technical Support to reactivate recording capability.
See Video clips on page 20 for more detailed information.
Set up personalized notifications
There are many notification options that are able to alert you when different events
occur. See Personalized notifications on page 23 for more information.
Practice on the app and panel
Avoid false alarms by ensuring all users are well trained in arming and
disarming the alarm.
User 1
User 2
User 3
Uploading video contributes to your monthly data usage. To avoid
unnecessary use of your home internet data, experiment with the
Smart Video Alerts settings most appropriate for your needs.

14
|
TELUS SmartHome Security
Alarm process
Arming and disarming
your system
Arming and disarming the system
from the TELUS SmartHome app or web portal
Your primary system control button is found on the home screen of your mobile app and
on the main page of the online portal. Simply tap on the Security System icon to arm
or disarm your TELUS SmartHome Security system. Note that arming the system does
not automatically engage your locks.
TIP: You may be charged by your municipality if an emergency service provider
is dispatched in response to a false alarm. In some regions, this charge may be
incurred through your TELUS bill. Practice arming and disarming your system to
reduce the likelihood of false alarms.

Owner’s Guide
|
15
Arming and disarming the system from your panel
Arming and disarming via the panel couldn’t be easier. Just tap the Security System icon,
then select your desired mode. To disarm the system via the panel, you’ll need to enter
your access code.
When arming the system from any device, you have the choice of 2
different modes:
1. Selecting Stay Mode arms only the system perimeter and is typically used during
the night when occupants are sleeping.
2. Selecting Away Mode arms all the sensors attached to your alarm system and
is typically used when occupants are out of the home.


OUR 24/7 CENTRAL MONITORING
STATION (CMS) WILL ATTEMPT TO
CONTACT YOU AND YOUR
EMERGENCY CONTACTS
• TheCMSwillrstattempttocontactyou
by phone
•If you cannot verify whether the alarm is
a true or false alarm, the CMS will then
contact your emergency contacts
•For burglar and panic alarms, you and
your emergency contacts must provide
a verbal password to verify the alarm,
even if the numeric access code has
been entered at the panel. This is for your
protection and safety
•If you or your emergency contacts verify
the alarm as false and provide the correct
password, the CMS will not take any
further action
A GUARD MAY BE DISPATCHED
•If a burglar alarm is in progress and it
was not veried via the previous step,
Guard Response may be available in your
regionasanadditionalvericationstep.
See telus.com/guardresponse to see if
you are eligible for this service.
•A guard completes an exterior patrol of
your your home, looking for signs of a
break-in
•A guard does not replace police
services and will not be dispatched
inresponsetopanic,reormedical
alarms. The purpose is to verify whether
a burglar alarm is a true alarm, which
is often a necessary step in order to
dispatch police
• Iftheguardveriesthealarmtobefalse,
no further action is taken
AN ALARM OCCURS.
WHAT NOW?
Your alarm goes off You and your contacts are
unreachable, or are unable to verify
whether the alarm is true or false

EMERGENCY SERVICES MAY BE
DISPATCHED
•Unless an alarm is veried to be false via the
previous steps, our CMS will request
emergency service providers to be
dispatched
•With increasing frequency, emergency
service providers are denying requests to
dispatchifalarmsarenotveried
EMERGENCY SERVICE PROVIDERS
WILL BE DISPATCHED IMMEDIATELY
•This can happen at any stage of the
alarm response as long as the alarm
isveriedbyyou,youremergency
contacts, or a guard
•If requested, the guard can remain on
site until police arrive.
Note: there is an incremental charge
for this service that you must authorize
in advance
Some emergency service providers will only dispatch authorities if the alarm is verified to be a true alarm.
To achieve this verification and prevent you from incurring false alarm fees, we attempt to verify the event
through a series of steps based on industry proven best-practices. Failure to determine the nature of an
alarm at any step will escalate the response to the next course of action.
The alarm is still unable to be
veried by you, your contacts
or a guard
The alarm is veried to be a
true alarm event

Owner’s Guide
|
19
1. Users and access codes
Using your new
security system
During a meeting at work, you receive a notification that your dog walker
has arrived at your house — right on time. They’re able to get inside and
take your excited pup for her lunchtime walk, all without you needing
to lift a finger.
Access control allows approved users to come and go with ease, while
maintaining your home’s security and your peace of mind.
Your TELUS SmartHome Security system allows you to grant unique user codes for family and
trusted guests. These codes securely allow your visitors the freedom to come and go without
sacrificing security or control. Each code is unique and works only during the times you assign.
You can also create user codes that expire, perfect for those weekend-only house guests.
User codes are far more reliable, convenient and secure than sharing a spare key, which
can easily get lost.
To set up Access:
1. Log in to the TELUS SmartHome app or web portal
2. From the menu, click Users
3. Click +to add a new user or Edit an existing user
4. Update user Access Control as desired
5. Click Save to send the code to the panel. Allow a few minutes for the system to update, and
then test the new user code

20
|
TELUS SmartHome Security
2. Video clips
Video lets you check in on things while you’re away and provides critical
evidence during an alarm event. If you own any cameras, take the time to
set them up properly for maximum efficiency.
2.1 Configuring your cameras
A. Check and adjust your camera sensitivity and positioning
Other Cameras
1. Log in to the TELUS SmartHome app
2. Select Menu at the top left-hand corner
3. Select Video
4. Select the Gear icon at the top
right-hand corner
5. Select Recording Rules
6. Select Add Rule at the top right-hand
corner
7. Select Video Analytics and follow the
on-screen steps to complete the setup
of your Smart Video Alerts
Doorbell Camera
1. Log in to your TELUS SmartHome app
2. Open the Menu at the top left corner of
the app
3. Scroll down and select Doorbell camera
4. Select Settings in the top right-hand
corner to pull up the options for your
doorbell. Here, you can:
•Rename your doorbell
•Set up doorbell call notifications
•Set up doorbell motion detection
•Set up recording schedules
•Set up motion sensitivity
•Change LED colors
•Change chime settings and volume
Other manuals for SmartHome
1
Table of contents
Other TELUS Security System manuals
Popular Security System manuals by other brands
Abbra
Abbra Fully Supervised Wireless Alarm Control... Installer's guide
Satel
Satel CA-4M Installation guides
ESP
ESP MAGPRO16 Installation and programming manual

New Cosmos Electric
New Cosmos Electric NV-100S instruction manual

Dreamwave
Dreamwave 4CH NVR KIT Quick installation guide
rba
rba SwiftAlert user manual
Witura
Witura WT-9001 IP65 User manual & setting instructions
GE Security
GE Security Simon 60-875 user guide

AV
AV Portable Studio manual

Extron electronics
Extron electronics VNR 100 Setup guide
Honeywell Home
Honeywell Home PROSiXSIREN Quick installation guide

Digital Monitoring Products
Digital Monitoring Products XR150 user guide
