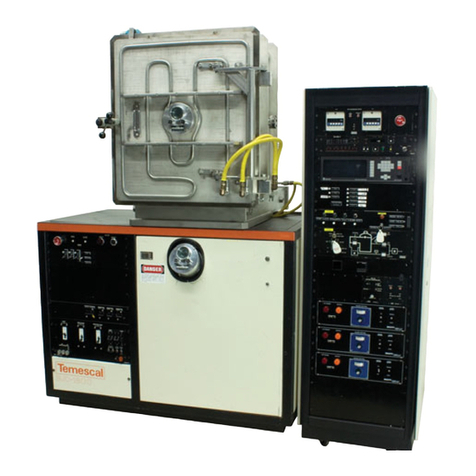
Temescal BJD-1800 Manual

Temescal BJD-1800 Ebeam Evaporator (2) Operation
Procedure
Before you begin the process you must start your log book entry. Please write down your name,
date and the material you intend to evaporate on the log sheet.
Sample Loading Instructions:
1. Turn off the ion gauge by pressing the “Filament On/Off” button on the ion gauge
control, unless it is already off.
2. Press the “Auto Stop” button to vent the chamber. It will take approximately five
minutes for the chamber to reach atmospheric pressure.
3. Open the chamber lid.
4. Check that the glass slide mounted over the view port is clear. If not, replace it with a
new one.
5. If you need to deposit a metal other than one of those that is already in the chamber,
open the shutter and remove one of the crucibles and replace it with the desired
material. The name of the material contained in each crucible is scribed on the
bottom surface of the crucible.
6. If the crucible is less than half full, add more pellets. If the gold is low, notify Nano3
staff.
7. Check the thickness monitor crystal usage (See the “I/C5 Deposition Controller”
segment of this operation procedure). Replace the crystal if necessary.
8. Place your samples in the sample holder clips.
9. Make sure that the chamber lid o-ring is properly seated and clean of debris.
10. Close the chamber lid.
11. Make sure the shutter control switch is in the “Auto” position.
12. Record the load time on the log sheet.
Pump-down:
1. Turn on the mechanical pump by switching the breaker to the on position.
2. Press the “Auto Start” button. The system will automatically pump down.
3. Once the system is in high vacuum, turn on the ion gauge by pressing the “Filament
On/Off” button on the ion gauge control.
4. While the chamber is pumping down, set up your deposition recipe: See the “I/C5
Deposition Controller” segment of this operation procedure.
5. When the system is in high vacuum, turn off the mechanical pump.
6. Wait till the pressure reaches 1.0e-6T or less.
7. Record the base pressure in the log sheet.
I/C5 Deposition Controller:
1. Check crystal usage:
a. Press “Sensors”.

b. Check the reading in the “ACT” column. If this number is less than 300 the
crystal needs to be replaced. Your trainer will instruct you on how to change the
crystal.
c. To exit the “Sensors” screen, press the “Operate” button.
2. Select your process:
a. Press “Process Directory”.
b. Using the arrow keys, cursor to the desired material. Select the material by
pressing “Select Active Process”.
3. Set the final thickness and deposition rate:
a. From the Process Directory Screen, press “Process”.
b. Set the deposition rate. The deposition rate should not be set above 5Å/s for
any material and for Aluminum it should not be set above 3 Å/s.
c. Set the final thickness.
d. Make sure that the thickness limit and time limit are set sufficiently high so that
the deposition will not time out before you reach your desired thickness.
e. DO NOT CHANGE ANY OTHER SETTINGS ANY WHERE IN THE I/C5
CONTROLLER!!!
f. Press the F6 button until you reach the main screen.
4. Please note that if you need to deposit more than one layer each layer must be
programmed independently. The IC/5 does not control the turret source selector. If
you have already deposited a layer and plan to deposit another, proceed to step 5
of the “Deposition” section of this operation procedure.
Deposition:
1. Once the chamber pressure is at or below 1.0e-6 you may begin the deposition.
2. Turn on the “Main Power” switch on the power supply.
3. Turn the interlock key on the control panel to the on position.
4. Press the “HV On” button to turn the high voltage on.
5. Make sure the turret dial is set to the metal you intend to evaporate.
6. Press “Gun 1 Fil On” button to turn on the filament.
7. Press the “Start” button on the IC/5 Deposition Controller. The deposition is
completely automatic. The system will go through a series of filament power ramp
and soak times before reaching deposition.
8. During Soak One check to make sure that the beam is sweeping properly. Go to the
“Beam Position and Sweep Settings” segment of this operation procedure. After
the beam sweep is set correctly set the shutter control back to “Auto”.
9. The shutter will open after the second soak time and the IC/5 will adjust the power
setting to maintain the deposition rate set by the user.
10. During the deposition, record the power, deposition rate and process vacuum on the
log sheet.
11. When the final thickness is reached the shutter will close and the filament current will
automatically ramp down.
12. When the power reaches 0%, press the “Gun 1 Fil Off” button to turn off the filament.
13. If you need to deposit another layer at this point, return to step 2 of the “IC/5
Deposition Controller” section of this operation procedure.
14. Press the “HV Off” button to turn off the high voltage.

15. Turn the interlock key back to its initial position.
16. Turn off the “Main Power” switch on the power supply.
17. For longer depositions (>500nm) you should allow at least five minutes for the
chamber to cool.
18. After a sufficient amount of cooling time, go to the “Sample Unloading Instructions”
segment of this operation procedure.
Beam Position and Sweep Settings:
1. Typically the beam is already in the correct position and does not require significant
adjustment.
2. Open the shutter.
3. If the beam is sweeping outside of the crucible, slowly adjust the longitudinal and
latitudinal beam position knobs until the beam is centered.
4. Adjust longitudinal and latitudinal sweep knobs until the beam sweeps across the
entire surface of the metal melt in the crucible; the beam should not touch the crucible
walls.
5. None of the sweep settings should ever be set to zero.
6. Return to step 10 of the “Deposition” segment of this operation procedure.
Sample Unloading Instructions:
1. Record the sample unload time on the log sheet.
2. Turn off the ion gauge.
3. Press “Auto Stop” to vent the chamber.
4. Open the chamber.
5. Remove your samples.
6. Make sure the sign indicates that the correct materials are located in the correct
crucible positions.
7. Replace the glass slide that covers the view port. Put the used slide in the sharps
container.
8. Close the chamber lid.
9. Turn on the mechanical pump.
10. Press the “Auto Start” button to pump down.
11. Wait till the system is in high vacuum and turn off the mechanical pump by switching
the breaker to the off position.
12. Note any comments or concerns in the “Comments” section of the log sheet.
13. End of process.
Table of contents
Other Temescal Industrial Equipment manuals


