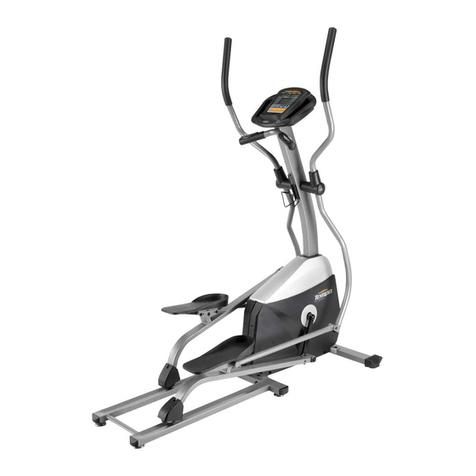
Tempo Fitness 605E User manual

ELLIPTICAL OWNER’S MANUAL
MANUEL DU PROPRIÉTAIRE DE L’EXERCISEUR ELLIPTIQUE
Read the ELLIPTICAL GUIDE before using this OWNER’S MANUAL.
Lire le GUIDE D’UTILISATION DE L’EXERCISEUR ELLIPTIQUE avant de se servir du présent MANUEL DU PROPRIÉTAIRE.
605E

2
3 ENGLISH
22 FRANÇAIS

3
ASSEMBLY
There are several areas during the assembly process that special attention must be paid. It is very important to follow the assembly
instructions correctly and to make sure all parts are firmly tightened. If the assembly instructions are not followed correctly, the
elliptical could have frame parts that are not tightened and will seem loose and may cause irritating noises. To prevent damage to
the elliptical, the assembly instructions must be reviewed and corrective actions should be taken.
Before proceeding, find your elliptical’s serial number located on the front stabilizer tube and enter it in the space provided
below. Also locate the model name which is next to the serial number.
ENTER YOUR SERIAL NUMBER IN THE BOX BELOW:
» Refer to the SERIAL NUMBER and MODEL NAME when calling for service.
SERIAL NUMBER:
MODEL NAME: TEMPO 605E ELLIPTICAL
WARNING

4
ASSEMBLY STEP 1
A Attach front stabilizer (2) to main frame (1),
fasten with carriage bolt (4) , flat washer(5),
spring washer (6) and domed nut (7).
ASSEMBLY STEP 2
A Attach rear stabilizer (8) to main frame (1),
fasten with carriage bolt (4), flat washer (5),
spring washer (6) and domed nut (7).

5
ASSEMBLY STEP 3
A Connect upper computer wire (13) and lower
computer wire (14).
B Attach front post to the main frame (1), fasten
with allen head bolt (12), spring washer(6),
curved washer (27).
ASSEMBLY STEP 4
A Insert post axle (17) into front post (15).
B Attach the right handlebar rail (20) through
the right side of post axle (17). Fasten with
the spring washer (6), flat washer (16A), D
shape washer (16B) and allen head bolt (12).
C Repeat on opposite side.

6
ASSEMBLY STEP 5
A Attach upper post cover (50) to action arm (26).
B Attach action arm (26) to right handle rail (20)
with allen head bolts (12), spring washers (6),
curved washers (27).
C Attach right pedal post (24) with pedal fix welding
(56), fasten with sleeve (98), allen head screw
(23), flat washers (5) and nylon nut (56).
D Repeat on opposite side.
ASSEMBLY STEP 6
A Attach the pedal (R) (34) to the right pedal
post (24). Fasten with the carriage bolt (30),
pedal washer (29), flat washer (31), spring
washer (32), plum blossom shape nuts (33).
B Repeat on opposite side.

7
ASSEMBLY STEP 7
A Attach front post front end cap and right (38)
onto pedal post (24), fasten with screw(45),
screw(39).
B Attach pedal post rear end cap (37) onto right
pedal post (24), fasten with screw (39).
C Repeat on opposite side.
ASSEMBLY STEP 8
A Connect the lower computer wire (13) and
computer connector (35).
B Attach the computer (48) onto the front post (15),
fasten with the allen head bolt (49).

8
ASSEMBLY STEP 9
A Attach the handlebar (43) onto the front post
(15), fixed by handlebar fix bracket (44), fasten
with the allen head bolt (88), curved washer
(27) and spring washer (6).
B Plug the handle pulse sensor wire into hole of
the computer.
ASSEMBLY STEP 10
A Plug the power adaptor (36) onto the main
frame(1).
YOU ARE FINISHED!

9
ELLIPTICAL OPERATION
This section explains how to use your elliptical’s console and programming.
The BASIC OPERATION section in the ELLIPTICAL GUIDE has instructions for the following:
• LOCATION OF THE ELLIPTICAL
• POWER/GROUNDING INSRUCTIONS
• FOOT POSITIONING
• MOVING THE ELLIPTICAL
• LEVELING THE ELLIPTICAL
• POWER/MANUAL INCLINE OPERATION
• USING THE HEART RATE FUNCTION

10
CONSOLE OPERATION
A) LED DISPLAY WINDOWS: time, distance,
calories, watts, heart rate and level are displayed
when levels are changed.
B) LED MATRIX WINDOW: displays workout profile.
C) START/STOP: press to begin exercising, pause
workout, or stop workout.
D) UP/DOWN KEYS: used to adjust resistance level
(16 levels).
E) ENTER: used to confirm a selection.
F) RECOVERY: press for 60 seconds of recovery
time. Press START to continue program.
Note: The console will enter sleep mode after 4 minutes.
Press any key to wake the console.
START
_
STOP RECOVERYENTER
605E
DÉMARRAGE
ARRÊT REPOS
Decal for French translation is in assembly box.

11
21 PROGRAMS PROFILES:
P: MANUAL (Fig. 1) P1: ROLLING (Fig. 2) P2: VALLEY (Fig. 3)
P3: FATBURN (Fig. 4) P4: RAMP (Fig. 5) P5: MOUNTAIN (Fig. 6)
P6: INTERVAL (Fig. 7) P7: CARDIO (Fig. 8) P8: ENDURANCE (Fig. 9)

12
P9: SLOPE (Fig. 10) P10: RALLY (Fig. 11)
WATT CONTROL (Fig. 12)
HEART RATE CONTROL 55%H.R (Fig. 13) HEART RATE CONTROL 75%H.R (Fig. 14) HEART RATE CONTROL 90%H.R (Fig. 15)
TARGET H.R (Fig. 16) CUSTOM PROGRAM 1 (Fig. 17) CUSTOM PROGRAM 2 (Fig. 18)

13
CONSOLE OPERATION
TURNING ON THE COMPUTER
Plug in one end of the adaptor to the AC electrical
source and connect the other end to the unit. The
computer will beep and enter into initial mode. (See
fig 24)
MANUAL PROGRAM AND PRESET
PROGRAM P1–P10
1) Press UP/DOWN keys to select a
program. (See fig 25) Press ENTER to
confirm.
2) Press UP/DOWN keys to set up your
desired time. Press ENTER to confirm.
(See fig 26)
3) The distance will flash, and then press UP,
DOWN to set up the desired distance
value. Press ENTER to confirm the value.
(See fig 27)
4) Press UP/DOWN keys to set up the
desired calories target. Press ENTER to
confirm. (See fig 28)
5) Press START/ STOP to begin exercise.
(See fig 29)
INITIAL MODE (Fig. 24) STEP 1 (Fig. 25)
STEP 5 (Fig. 28)
STEP 3 (Fig. 26) STEP 4 (Fig. 27)
STEP 6 (Fig. 29)

14
WATT CONTROL PROGRAM
1) Press UP/DOWN to select the watt control program. Press ENTER to confirm.
2) Press UP/DOWN to set up the desired time. Press ENTER to confirm.
3) Press UP/DOWN to set up the desired distance value. Press ENTER to confirm.
4) The calories will flash, and then press UP, DOWN to set up the desired calories to
be consumed. Press ENTER to confirm the value.
5) Press UP/DOWN to set up the desired watt. Press ENTER to confirm. (See fig 30)
6) Press START/ STOP to begin exercise.
NOTE: The WATT value is decided by the TORQUE and RPM. In this program, the
WATT value will stay constant. This means that if you peddle quickly, the resistance will
decrease and if you peddle slowly, the resistance will increase to ensure you stay at the
same watt value.
(Fig. 30)
(Fig. 31)
HEART RATE CONTROL PROGRAMS:
55%H.R, 75% H.R AND 90% H.R
The maximum heart rate depends on your age and this program
ensures your heart rate stays in the desired area.
1) Press UP/DOWN to choose the heart rate control program.
Press ENTER to confirm.
2) Press UP/DOWN to set up the desired time. Press ENTER to
confirm.
3) Press UP/DOWN to set up the desired distance value. Press
ENTER to confirm.
4) Press UP/DOWN to set up the desired calories target. Press
ENTER to confirm.
5) Press UP/DOWN to set the your age. Press
ENTER to confirm. (See fig 31)
6) The final screen will display your target heart
rate driven by your age entry.
7) Press START/ STOP to begin exercise.

15
TARGET HEART RATE
The user can set any target heart rate to do the exercise.
1) Press UP/DOWN to select TARGET HEART RATE program. Press ENTER to
confirm.
2) Press UP/DOWN to set the desired time to do the exercise. Press ENTER to
confirm.
3) Press UP/DOWN to set up the desired distance value. Press ENTER to confirm.
4) Press UP/DOWN to set up the desired calories to be consumed. Press ENTER
to confirm.
5) Press UP/DOWN to set up your target heart rate. Press ENTER to confirm. (See
fig 32)
6) Press START/ STOP to begin exercise.
NOTE: During exercise, your heart rate is influenced by the resistance level and
speed. The heart rate control program ensures your heart rate stays within the preset
value. When the computer detects your current heart rate is higher than the preset, it
will decrease the resistance level automatically. If your current heart rate is lower than
the preset, it will increase resistance.
(Fig. 32)
(Fig. 33)
USER PROFILE PROGRAMS: CUSTOM1–CUSTOM4
1) Press UP/DOWN to select the user. Press ENTER to
confirm.
2) Press UP/DOWN to set up the desired time to do the
exercise. Press ENTER to confirm.
3) Press UP/DOWN to set up the desired distance value.
Press ENTER to confirm.
4) Press UP/DOWN to set up the desired calories
target. Press ENTER to confirm.
5) Press UP/DOWN to set the desired resistance.
Press ENTER to confirm. Then repeat to set the
resistance from 2 to 10. (See fig 33)
6) Press START/ STOP to begin exercise.

16
BODY FAT MEASUREMENT PROGRAM
1) Press UP/DOWN to select BODY
FAT TEST program. (See fig 34) Press
ENTER to confirm.
2) Press UP/DOWN to set up your
height. Press ENTER to confirm.
Height is displayed in cm. (See fig 35)
3) Press UP/DOWN to set up your
weight. Press ENTER to confirm.
Weight is displayed in kg. (See fig 36)
4) Press UP/DOWN to set up your age.
Press ENTER to confirm. (See fig 37)
5) Press UP, DOWN to set up your
gender. Press ENTER to confirm. (See
fig 38)
6) Press START/STOP to begin testing
your body fat. (See fig 39)
INITIAL MODE (Fig. 34) STEP 1 (Fig. 35)
STEP 5 (Fig. 38)
STEP 3 (Fig. 36) STEP 4 (Fig. 37)
STEP 6 (Fig. 39)

17
NOTE: During the body fat measurement,
place both your palms on the contact
pads. The test result are: FAT%, BMR
(Basal Metabolic Rate), BMI (Body Mass
Index), BODY and body shape. (See fig
40)
NOTE: During the body fat measurement,
if your palms do not contact the pulse
sensor well, the computer cannot receive
any signal and it will display ERROR2.
Press START/STOP to try again.
NOTE: During the test, you cannot
exit until the test is completed. After
completing the test, press UP/DOWN to
exit the body fat measurement program
and switch to another program.
• FAT%: The total body fat measured by
percentage.
• BMR: Basal Metabolic Rate
(metabolism) is the energy (measured
in calories) expended by the body at
rest to maintain normal bodily function.
• BMI: means Body Mass Index.
(Fig. 40)
PULSE RECOVERY TEST
The pulse recovery test compares your
heart rate before and after exercise.
1) Press RECOVERY to enter the
pulse recovery test. (See fig. 41)
2) Place both your hands on the
pulse sensor to test the pulse, the
computer will display your current
pulse.
3) Keep your hands on the pulse
grips. The time will count down for
60 seconds.
4) When time reaches 0, the test
result (F1-F6) appears on the
display.F1=Excellent F2=Good
F3=Fair F4=below average F5=
No Good F6= Poor (See fig. 42)
5) Press RECOVERY to exit the test
and return to the original program.
(Fig. 41)
(Fig. 42)

18
TROUBLESHOOTING
1) When the computer displays ERROR1, check to see if the motor wires are connected correctly.
2) When the computer displays ERROR2, please check if your hands are contacted fully with the heart rate sensors. This
error means no body fat signal is detected.
ADAPTOR
INPUT: AC (The voltage depends on different country)
OUTPUT: 8VDC 500mA
PULSE MEASUREMENT
Place both your palms on the contact pads and the computer will show your current heart beat rate in beats per minute (BPM)
on the LCD after 3~4 seconds. During the measurement, heart icon will flash with simulative ECG showing.
NOTE: The original reading may not be accurate, so make sure to hold the contact grips for up to 60 seconds for an accurate
reading.

19
LIMITED HOME-USE WARRANTY

20
WEIGHT CAPACITY = 275 lbs (125 kilograms).
FRAME • 3 YEARS
Tempo warrants the frame against defects in workmanship and
materials for a period of three years from the date of the original
purchase, so long as the device remains in the possession of
the original owner. (The frame is defined as the welded metal
base of the unit and does not include any parts that can be
removed.)
ELECTRONICS & PARTS • 90 DAYS
Tempo warrants the electronic components, finish and all
original parts for a period of 90 days from the date of original
purchase, so long as the device remains in the possession of
the original owner.
LABOR • 90 DAYS
Tempo shall cover the labor cost for the repair of the device for
a period of 90 days from the date of original purchase, so long
as the device remains in the possession of the original owner.
EXCLUSIONS AND LIMITATIONS
Who IS covered:
• The original owner and is not transferable.
What IS covered:
• Repair or replacement of a defective motor, electronic
component, or defective part and is the sole remedy of
the warranty.
What IS NOT covered:
• Normal wear and tear, improper assembly or
maintenance, or installation of parts or accessories not
originally intended or compatible with the equipment as
sold.
• Damage or failure due to accident, abuse, corrosion,
discoloration of paint or plastic, neglect, theft, vandalism,
fire, flood, wind, lightning, freezing, or other natural
disasters of any kind, power reduction, fluctuation
or failure from whatever cause, unusual atmospheric
conditions, collision, introduction of foreign objects into
the covered unit, or modifications that are unauthorized
or not recommended by Tempo.
Table of contents
Languages:
Other Tempo Fitness Elliptical Trainer manuals
Popular Elliptical Trainer manuals by other brands
BH FITNESS
BH FITNESS I.SUPER KHRONOS Instructions for assembly and use

Tecnovita
Tecnovita YC0900 Instructions for assembly and use

Body Flex Sports
Body Flex Sports BODY CHAMP BCB 5860 owner's manual

Confidence
Confidence XKCFB-0200 user manual

Trojan
Trojan Glide Cycle 500 user manual

Action Fitness
Action Fitness Spirit owner's manual

Octane Fitness
Octane Fitness xRide xR6x Operation manual

NordicTrack
NordicTrack Smart Terrain 12.0 NTEL01310.3 user manual

Smooth Fitness
Smooth Fitness CE-8.0LC owner's manual

Xterra
Xterra FS3.9e owner's manual

Sunny Health & Fitness
Sunny Health & Fitness SF-E3607 user manual

Xterra
Xterra 16417320 owner's manual