TENDO V- 316 User manual


CONTENT
Overview…………….………………………………………………….…………………………………3
1 Technical description………….……………………………………….…………………………………4
2 Installation steps………..…………….……………………………….………………………………… 5
2.1 Battery installation………..…….………………………….………………………………… 5
2.2 How to attach microcomputer to a tripod or rack……………….………………………… 5
2.3 Connecting microcomputer and sensor unit…………………….………………………… 7
2.4 How to attach sensor unit to barbells or exercise machines……….………….………… 8
3 How the microcomputer operates…………….……………………….………………………………. 9
4 What is measured and calculated……….……..……………………….…………………………….10
5 Sensor’s range of motion….….………..…………………………….………………………………..10
6 Microcomputer setup……………………………………………….…………………………………..10
6.1 ON / OFF………….……………………………………….………………………………… 10
6.2 Enter setup mode………..……………………………….………………………………… 11
6.3 Exit setup mode………..………..……………………….…………………………….…… 12
6.4 What can be set up in setting mode…………..……….…………………………….…… 12
6.4.1 Load………..………………………………….………….…………………….… 12
6.4.2 Audio signal upper/lower limits.……..………….……………………………… 12
6.4.3 Filter………..………………………………….…………………………………… 13
6.4.4 % limit for partial average power and peak force……………………..……… 14
6.4.5 Rest time measurement……..………………….……………………………… 16
6.4.6 Eccentric average velocity……..…………….………………………………… 16
7 Factory settings………….……………………………………….……………………………………..17
8 Batteries……….…….…………………………………………………………………………………..17
8.1 How to charge batteries……….………………………….………………………………… 17
8.2 Battery exchange……….…………………..…………….………………………………… 18
9 How to use the system…………………………………………..……………………………………..18
9.1 ON / OFF, weight adjustment, rest time measurement……….………………………… 18
9.2 Power, Velocity, Force measurement…………….……….……………………………… 19
9.3 Deleting data………..…………………………………….………………………………… 19
9.4 Deleting last repetition……..…………………………….………………………………… 19
9.5 Battery saver………..…………………………………….………………………………… 19
10 Memory……….…………….……………….………………………………………………………….20
11 Connection to computer….……………………………….…………………………………………..20
12 Maintenance and trouble-shooting……..……………….…………………………………………..21
www.tendosport.com
2
TENDO Power Analyzer V- 316
A microcomputer system for strength diagnostic and feedback monitoring of weight training.
Thank you for purchasing the Tendo Power Analyzer
The purpose of this manual is to guide you through the first basic steps necessary to set up
the system and give you an idea how to begin.
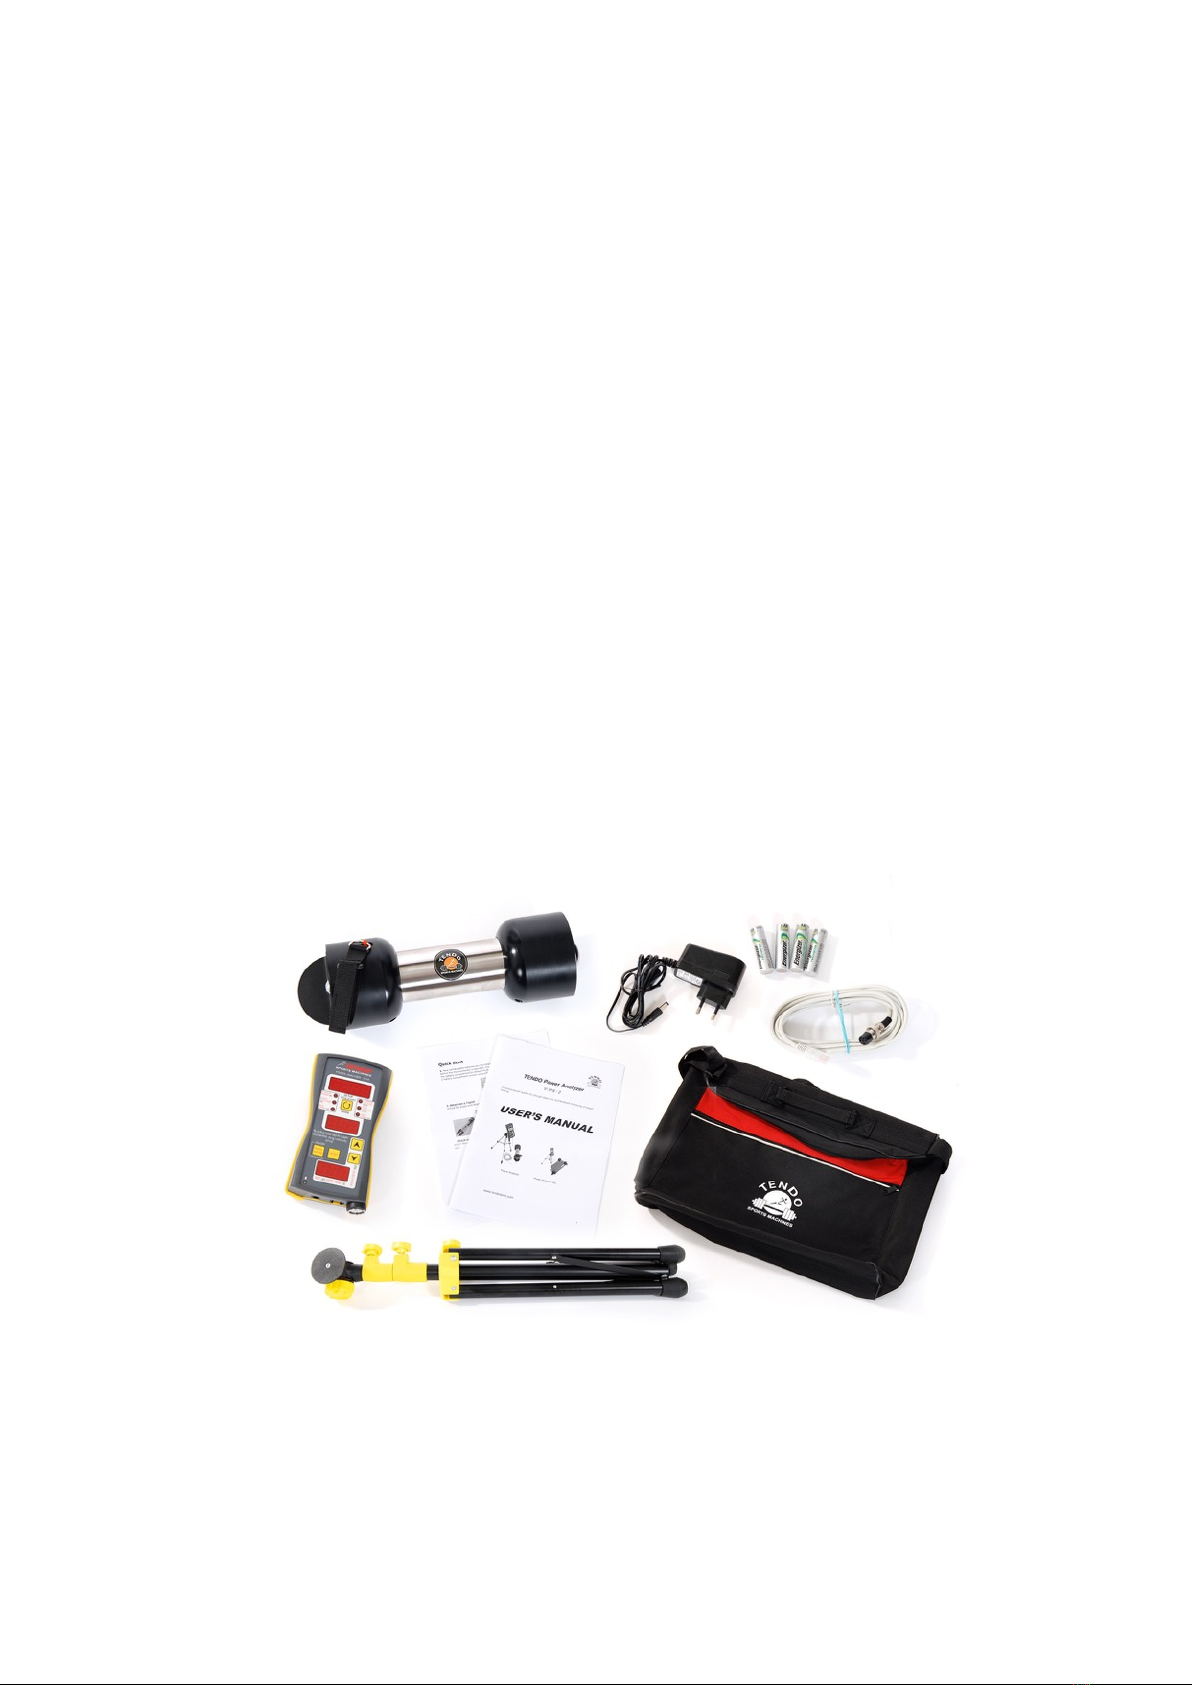
What comes as a part of the unit?
-Microcomputer
-Sensor Unit
-Data Cable
-Tripod
-Rechargeable Batteries (4x of AA size, type NiMH)
-Built-in Battery Charger
-AC / DC Power Supply Adapter
-Manual
-Carrying Case
-iButton Reader for identification of the person with iButton for Tendo computer software
What is optional?
-TENDO Bluetooth - wireless connection to the computer.
-The Tendo Analyzer computer software "
www.tendosport.com
3

1. Technical description
System consists of 2 functional components: Sensor Unit and Microcomputer
Sensor Unit is connected to the weight by a kevlar cord with a strap on a Velcro.
In weight exercises, muscles lift a mass mby applying a force Fat a velocity v, produces average
power P."
F = m x g"
P = F x v
"
System measures vertical Average and Peak Velocity of the weight lifted."
Using known mass system also calculates Average Power, Peak Power and Peak Force
in concentric phase of weight training.
To calculate Peak Power and Peak Force system uses equation:
P = F x v , where F = (m x g) + (m x a) , g-acceleration of gravity and a-acceleration
System also measures downward average velocity and rest time between reps or sets.
www.tendosport.com
4
SENSOR UNIT
MICROCOMPUTER
Power Analyzer
Power Analyzer - WL

2. Installation steps !
2.1 Battery Installation
New rechargeable batteries are pre-installed in the battery compartment."
Before the microcomputer is operated, it is necessary to pull out a safety plastic strap from the
battery compartment to release the battery contact. Afterwards, tighten the 2 battery compartment
screws using a Phillips screwdriver. Battery compartment has a magnet for quick attachment to a
rack or tripod. Rechargeable batteries come pre-charged, ready for use.
Use NiMH, AA size rechargeable batteries, 2000 - 2500 mAh.
2.2 How to Attach microcomputer to a Tripod or a rack
The microcomputer unit is equipped with neodymium magnet for quick attachment to the rack or
tripod. Just place the microcomputer unit on desirable place on metal rack or on metal plate of the
tripod.
www.tendosport.com
5

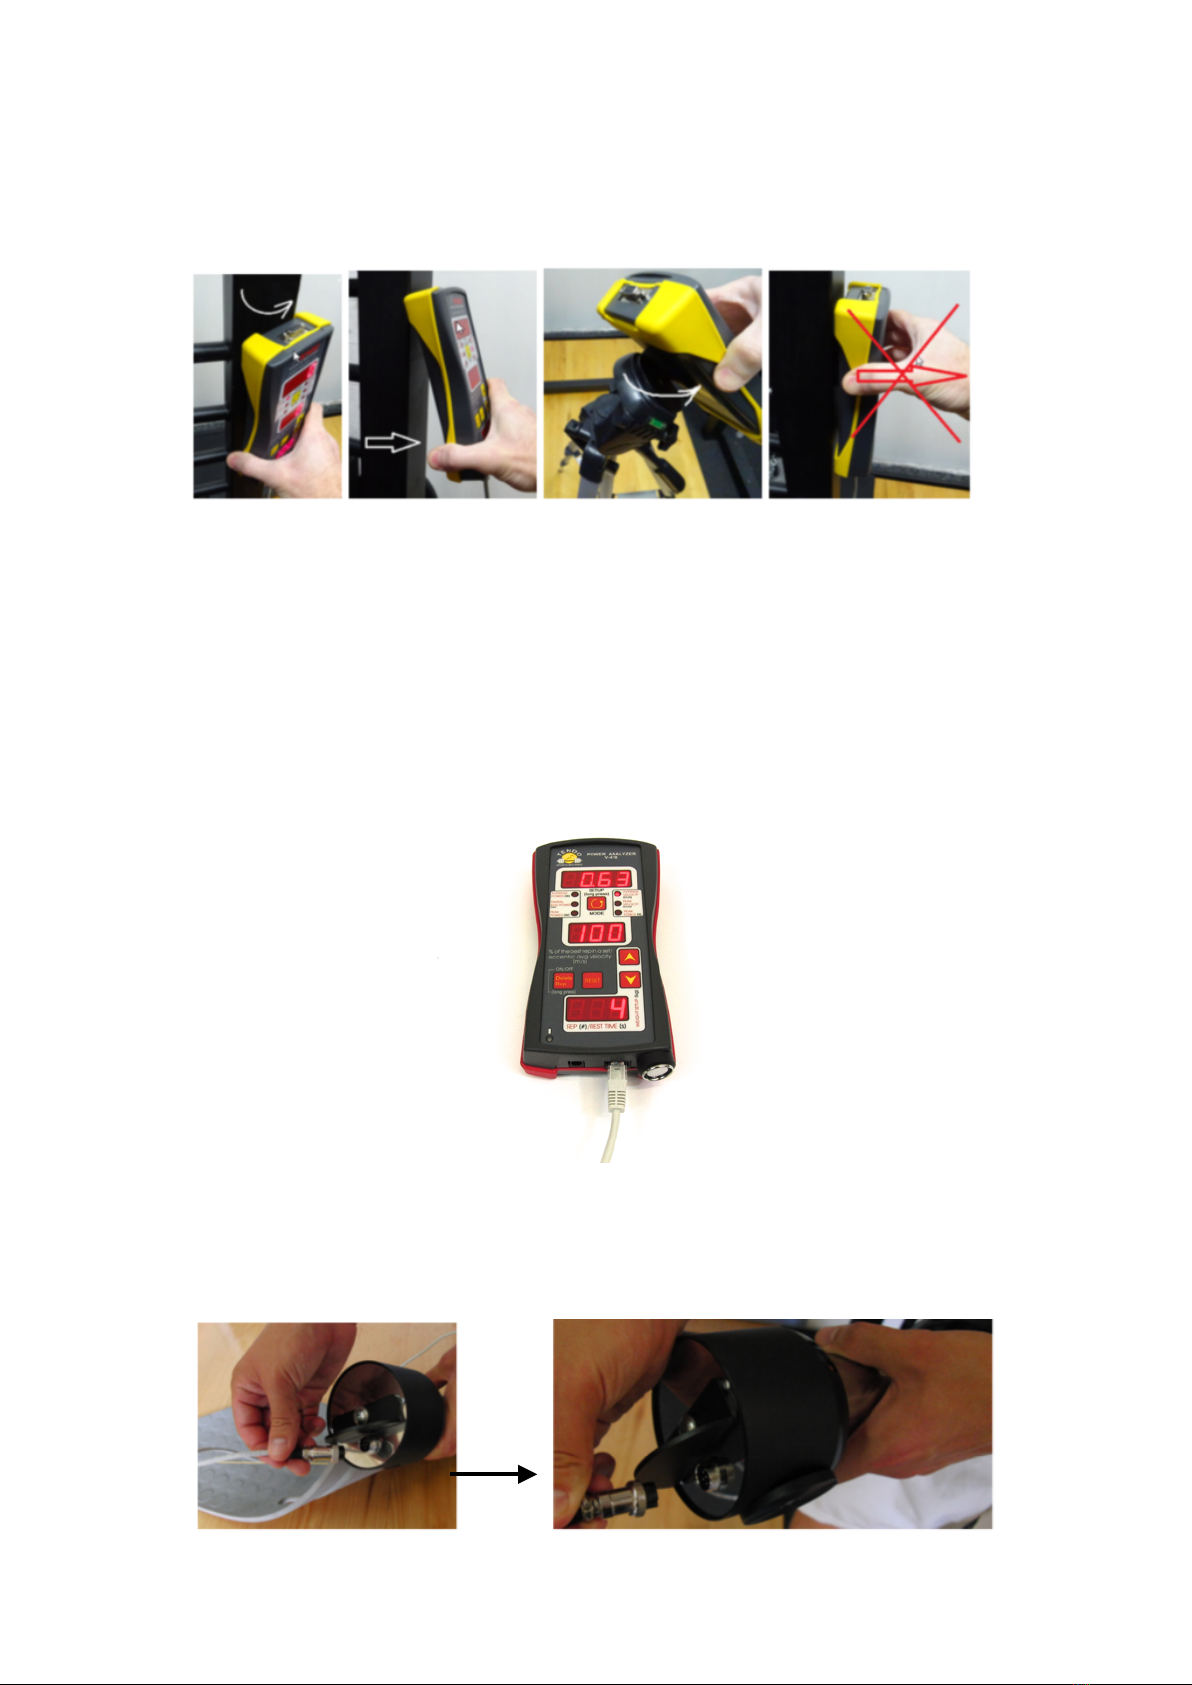
For quick microcomputer release from the rack or tripod, turn the microcomputer to the side or
pull the unit from down side to up. For the microcomputer release from the tripod, hold the neck of
the tripod to prevent its damage.
2.3 Connecting microcomputer and sensor unit
1. Plug the male connector of your Data Cable into the connector at the bottom of the
microcomputer. The microcomputer is compatible withyboths Power Analyzer sensor and
Power Analyzer - WL sensor.
2. Plug the other end of the Data Cable into the appropriate connector on your Sensor Unit.
www.tendosport.com
7

2.4. How to attach Sensor Unit to barbells or exercise
machines?
Fasten the cord of the sensor unit to the bar, dumbbell or top weight of the weight stack with the
Velcro strap."
Position the cord so that, during the exercise, the trajectory of the cord will be as close to
perpendicular to the floor as possible. See below examples.
Where to attach Sensor Unit?
www.tendosport.com
8

3. How the microcomputer operates
After switching ON unit (press the ON/OFF button for 3 seconds, until you hear a short beep),
weight of the barbell or stack is to be set using Up/Down buttons."
After each upward repetition:
-Upper display shows average / peak power, partial average power average / peak velocity, and
peak force.
-Middle display shows a percent value of the best repetition in particular set and eccentric
average velocity, if turned on.
-Lower display shows repetition number and rest time, if turned on.
-Preset parameter (avg / peak power, avg / peak velocity, partial avg power, peak "
force) in the first repetition will be set 100%. Subsequent reps will be displayed as percentage of
this maximum. However, should any subsequent repetition be higher than previous 100%, it will
be considered as the new 100%. All subsequent reps will be compared to. If there is a multi
www.tendosport.com
9
Upper display
Mode button
Middle display
ON / OFF button
Reset Button
Up button
Down button
Lower display
iButton reader

weight exercise set (different weight setting without resetting between weight change), all reps
will be compared with the absolute best repetition.
-Up to 500 reps can be stored and retrieved from memory.
-Reset button clears memory, recalls weight input. "
4. What is measured and calculated
•Average power measured in Watts [W] – for full range of motion.
•Partial average power measured in Watts [W] – average power for limited (pre set) range of
motion from 0 to 100% of range of motion.
•Peak power measured in Watts [W] – the highest possible power in full range of motion. If the
value of Peak Power is over 9,999W, the microcomputer displays the value in kW (e.g.
10.35 = 10,350W)
•Average velocity measured in meter per second [m/s] – for full range of motion.
•Peak velocity measured in meter per second [m/s] – the highest possible speed.
•Peak Force measured in Newtons [N] – maximum force for limited (pre set) range of motion
motion from 0 to 100% of range of motion.
•Microcomputer also measures a rest time between reps or sets measured in seconds. After
10 seconds of the rest time, the microcomputer shows time from the last repetition or set.
•Eccentric average velocity (average velocity in downward movement) measured in meter per
second [m/s]
•Rest Time and Eccentric Velocity can be turn on or turn off in setting mode.
5. Sensor’s range of motion
"
Durable Kevlar cord, 2.7 meters (8.85’) long."
Length of string makes it applicable for almost any power or Olympic lift and all vertical jumping
applications.
6. Microcomputer Setup
6.1 ON / OFF
To turn the power on or off, press the ON/OFF button for 3 seconds, until you hear a short beep.
www.tendosport.com
10
6.2 Enter setup mode
Identifying the parameters in the Setup Mode:
"
• Load (Weight) – microcomputer indicates on upper display „LoAd“
• Filter – microcomputer indicates on upper display „FILt“"
• Audio signal - Upper Limit – microcomputer indicates on upper display „A-UP“
- Lower Limit – microcomputer indicates on upper display „A-LO“
• % limit for Partial Avg. Power and Peak Force (from 1 to 100%) – microcomputer indicates on
upper display „P-AP“"
• Rest time (ON/OFF) – microcomputer indicates on upper display „r-t“"
• Eccentric average velocity (ON/OFF) – microcomputer indicates on upper display „ECS“
www.tendosport.com
11
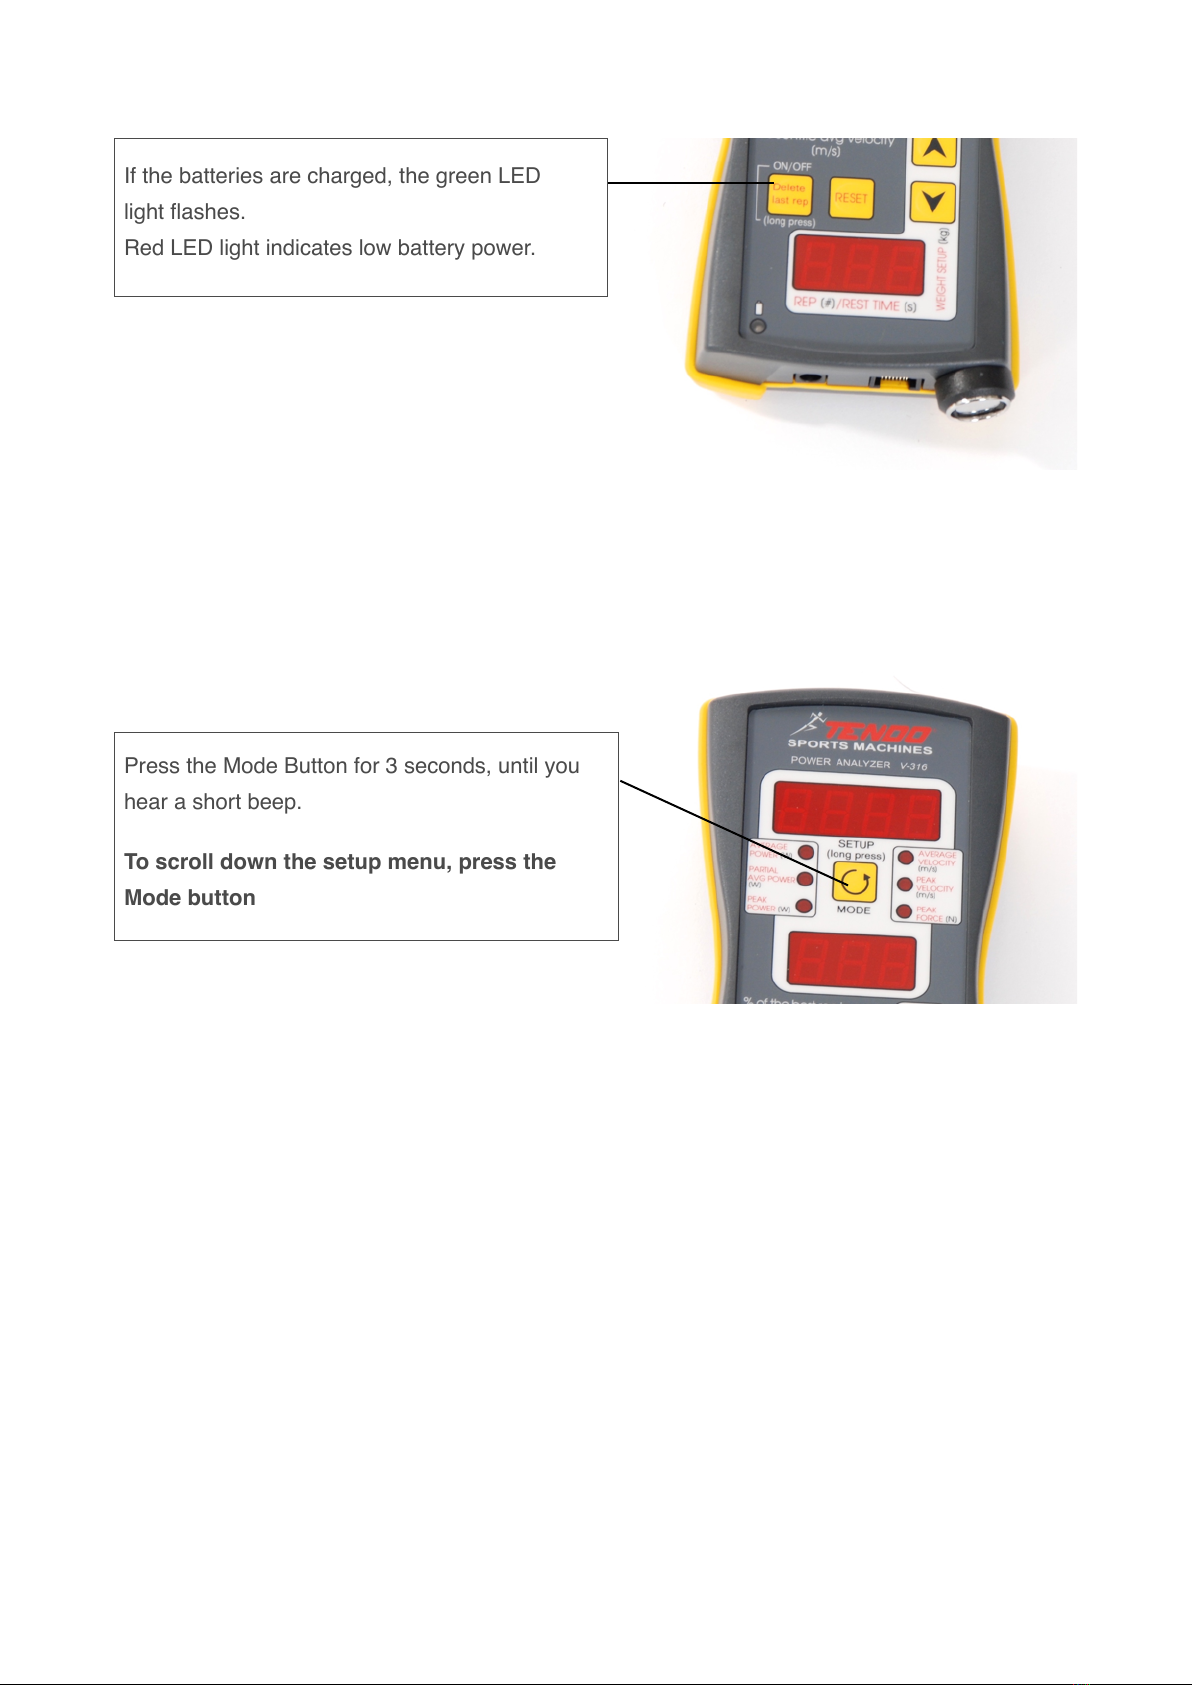
If the batteries are charged, the green LED
light flashes."
Red LED light indicates low battery power.
Press the Mode Button for 3 seconds, until you
hear a short beep.
To scroll down the setup menu, press the
Mode button
6.3 Exit setup mode
Press Reset Button and all changes will be saved."
If you do not press Reset Button, the microcomputer exits from setup mode automatically after 30
seconds, without saving new settings.
6.4 What can be set up in setting mode
•Load
•Audio signal Lower/Upper Limit
•Filter 0 – 150 cm
•% limit for Partial Avg. Power and Peak Force
•Rest time
•Eccentric velocity
6.4.1 Load
It is possible to change a weight setting, even if data are measured, without resetting the
microcomputer unit.
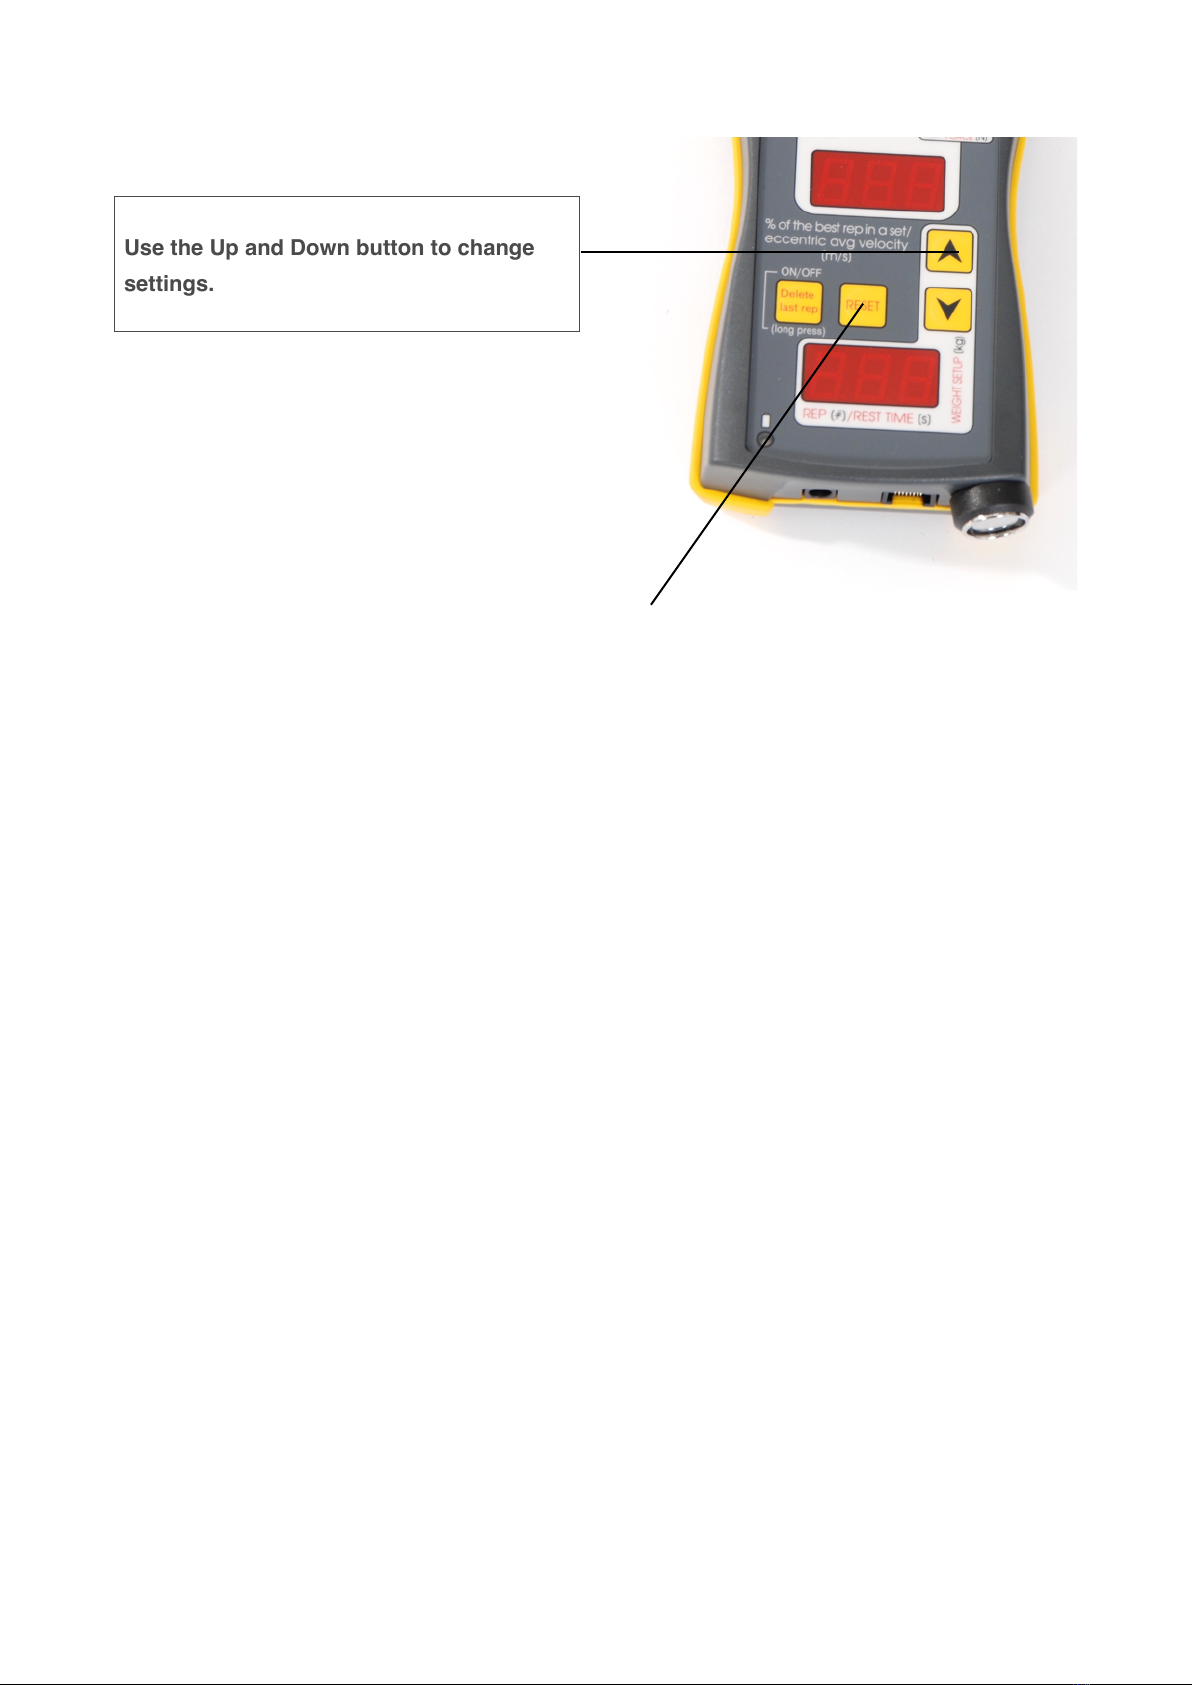
Use Up and Down buttons to change settings.
6.4.2 Audio signal Lower/Upper Limit
•Upper limit means every measured value of the selected parameter (power, velocity, force)
which is above setting percent values of upper limit will be indicated by means of double beep.
www.tendosport.com
12
Use the Up and Down button to change
settings.
•Lower limit means every measured value of the selected parameter (power, velocity, force)
which is below a setting percent values of lower limit will be indicated by means of short beep.
Setting range:"
Lower Limit range from 0% to Upper Limit.
Upper Limit range from 100% to Lower Limit.
Use Up and Down buttons to change settings.
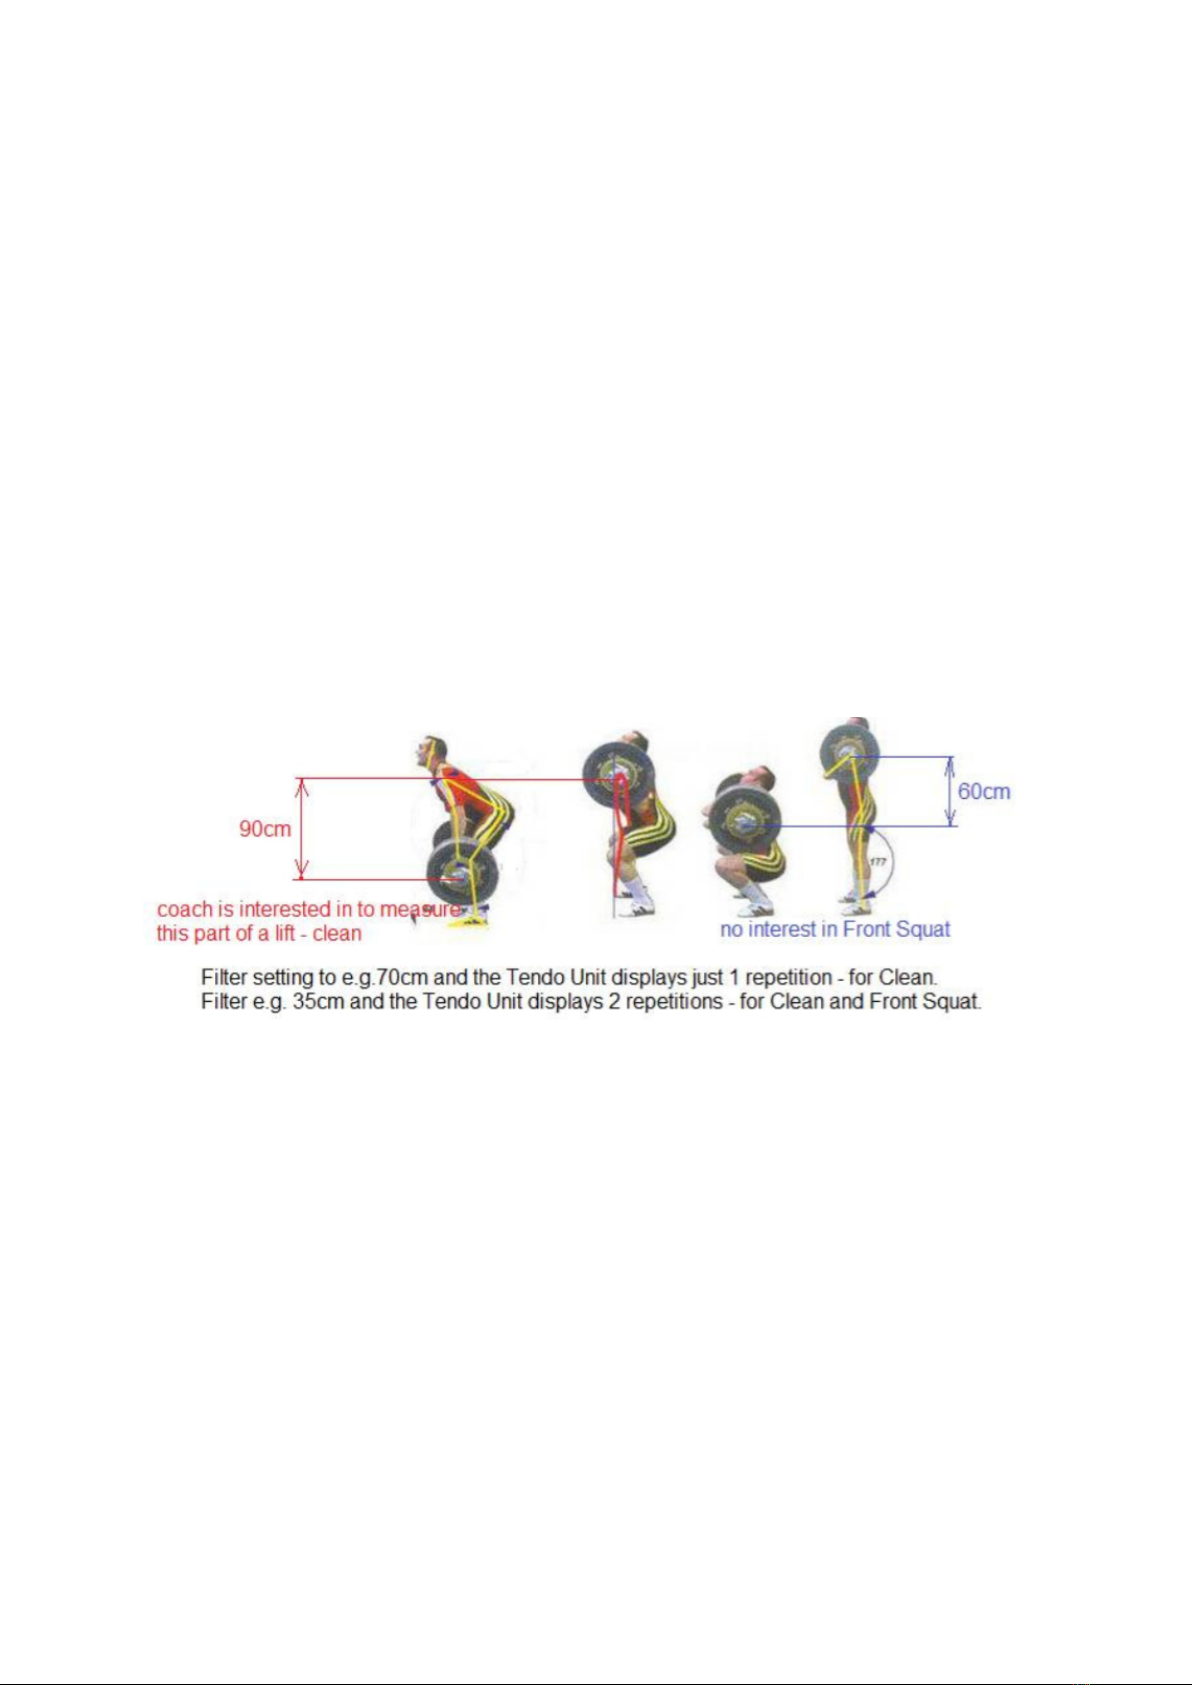
6.4.3 Filter
Purpose of the filter is to hide unwanted movements. This means that all the movements with the
range of motion less than the setting value of the filter, will not be shown on display.
For instance: take barbell from the rack, or short movement while holding a barbell, etc.
Setting range - from 0 to 150 cm
Use Up and Down buttons to change settings.
FILTER is a limit from 0 to a certain predefined value of the range of motion in centimetres
(10 centimetres = 0.1 meter), which microcomputer does not show. It means the exercise
range of motion has to be longer than the value of the Filter.
!
- For most of the exercises we suggest to set Filter to 35 cm.(less then length of the motion)"
- For exercises with very short amplitude (e.g. toe raise) we suggest to set Filter to 10 cm."
- For exercises with very long range (Olympic lifting exercises) we suggest to set Filter to more
than 80 cm.
www.tendosport.com
13
"
The microcomputer system measures from the lowest position to the top. The Filter does not have
any influence on measured range. The Filter just causes to not show measurement results for
motions shorter than the setting value of the Filter.
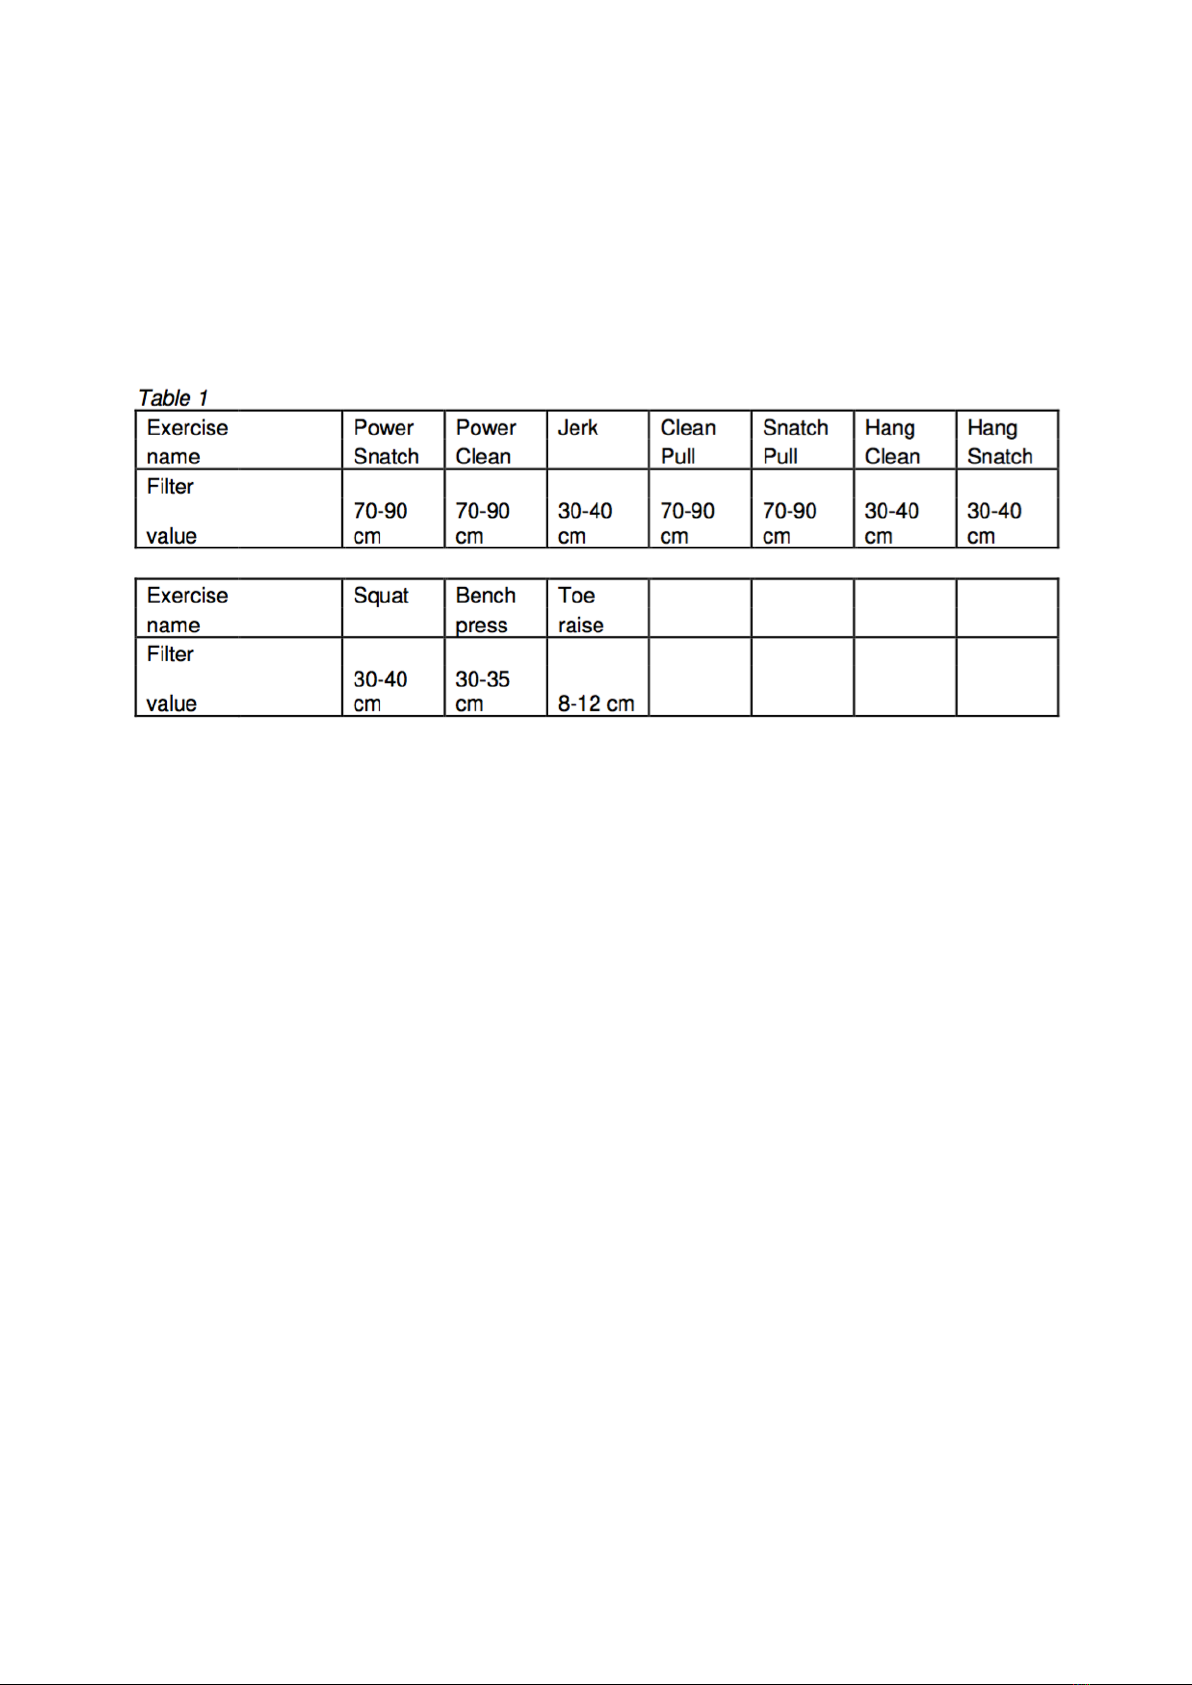
Remember: The value of Filter has to be set less than length of the motion. It is
important to set up the right value of the Filter for weightlifting exercises. (see table 1)
6.4.4 % limit for Partial Avg. Power and Peak Force
Partial Average Power is the value of average power, which is measured from start (0) to a
certain predefined percent value of the range of motion. Default setting is 50%.
Setting range - from 1 to 100%
Peak Force measurement has the same range setting as Partial Avg. Power."
It means the system finds peak force for setting range, from 0 to a certain predefined percent value
of the range of motion. Default setting is 50%.
Use Up and Down buttons to change settings.
Why should you measure Partial Average Power?
Sometimes average or peak power are not sufficient parameters for assessment of athlete’s
qualities in weight training. Many athletes in effort to reach maximum power value try to accelerate
at the end of the movement. This way, athletes reach high average and peak power values, but
those parameters are misrepresenting the actual results. Simply said, being fast at the end of a
movement is too late. These athletes do have high average and peak power values but with a low
rate of force development. The rate of force development is a key factor in sports performance
where explosiveness is required. The partial average power will help you to emphasise the rate of
force development in your training and ensures the development of the explosive power.
www.tendosport.com
14
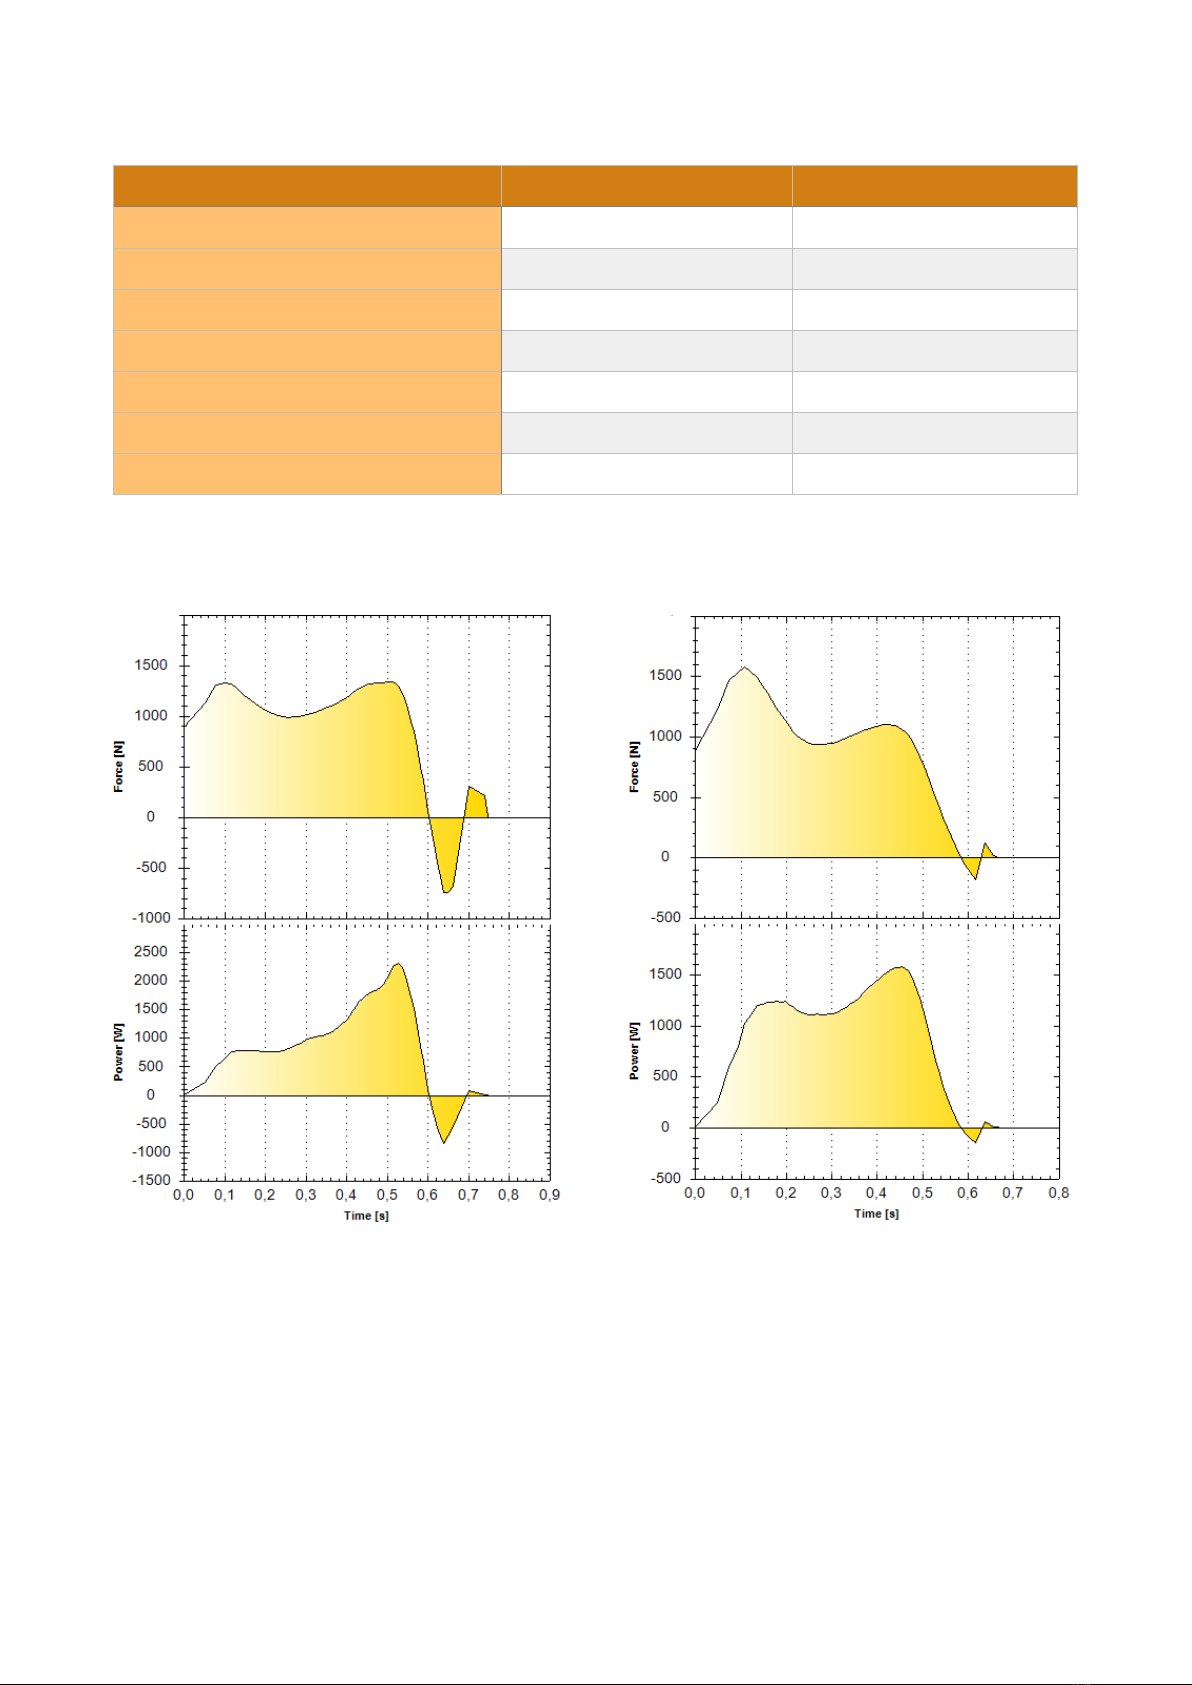
!Example!–!Back%Squat%measured%on%waist!
Ice Hockey player Olympic Weightlifter
Why should you adjust % Range for Peak Force measurement?
In some exercises there can be two positions for peak force. One at the beginning of the
movement and another at the end. To filter out the undesirable peak at the end of the movement,
just shorten the range for the measurement of the Peak Force.
Ice hockey player
Olympic weightlifter
Body weight
100kg
100kg
Vertical jump height
50cm
56cm
1RM Back Squat
160kg
230kg
Average power
954W
975W
Peak Power
2316W
1579W
Partial Avg Power (40%)
803W
1073W
Peak Force up to 0.25
1320N/0.15
1574N/0.115
www.tendosport.com
15

Force x time graph for back squat
6.4.5 Rest time measurement
Microcomputer also measures a rest time between reps or sets. After 10 seconds of the rest time
(Sensor Unit inactivity), the microcomputer will show time from the last repetition or set.
The rest time is shown on lower display if the rest time is turned on. The rest time is measured up
to 999 seconds.
After 180 seconds of the microcomputer inactivity, the lower display is turned off, to save battery
power. Any activity of the system turns on the displays.
To turn on the rest time, press Up button in setting mode.!
To turn off the rest time, press Down button in setting mode.
"
If there are not data and rest time is turned on, press Mode button or Up/Down button to re call
weight setup.
6.4.6 Eccentric Average Velocity (ECS - Eccentric Speed)
The system measures average velocity in downward movement, if ECS – Eccentric Speed is
turned on .
To turn on the ECS – Eccentric Speed, press Up button in setting mode.!
To turn off the ECS – Eccentric Speed, press Down button in setting mode.
www.tendosport.com
16

7. Factory settings
!
Load: 50kg"
Filter: 35 cm"
Audio signal upper limit: 100%"
Audio signal lower limit: 90%"
Partial Average Power and Peak Force range: 50% Rest Time: OFF
Eccentric Average velocity (ECS): OFF
8. Batteries
8.1 How to charge batteries
The microcomputer has a built-in battery charger. To charge batteries, please use AC / DC Power
Supply Adapter. (included in the package)"
The Power Supply Adapter Input: 110 – 230V AC, 50-60 Hz, Output: 12V DC, 1.2A
Use the NiMH, AA size rechargeable batteries, 2000 - 2500 mAh.
Power Supply Adapter setup:"
- Plug the connector into the appropriate socket at the bottom of the
microcomputer
- Plug the power supply adapter to the 110 – 230 V AC outlet
Precautions:
-Do not exceed the rated operating parameters
-The device may interfere with radio and television sensitive equipment located "
nearby
-There is a risk of the harmless electric shock, fire or equipment failure. Do not "
disassembler or repair the device and do not touch the interior parts of "
the device.
-Do not disassembler the housing
-Dangerous voltages may still exit in the power supply even after few minutes "
from off the power.
-Damaged power cord must be immediately replaced by a qualified technician.
-Do not use the device if it emits smoke, an abnormal smell or strange sounds. "
www.tendosport.com
17

The battery indicator light while charging the unit: the battery indicator light emits a light only if
the microcomputer is turned on.
-red light indicates – low voltage - the batteries need to be charged "
-flashes green light – charging process
-solid green light indicates – the batteries are charged – end of charging process "
8.2 Battery Exchange
To open the battery compartment, located at the back side of the microcomputer, unscrew 2
screws from the battery compartment cover.
Referring to the insert drawing, place the batteries into compartment.
Press 4 batteries into the battery compartment. MAKE SURE that the positive ends of the batteries
(marked “+“ are touching the springs (marked “+“) in the battery compartment. "
Use the NiMH, AA size rechargeable batteries, 2000 - 2500 mAh.
If the batteries are located correctly in the battery compartment, after the microcomputer is turned
on, the battery control LED light is flashing.
If the microcomputer is turned on and the battery control LED is red (low battery power), the
batteries need to be charged.
It is possible to use the Power Analyzer even if the batteries are charging.
9. How use the system
9.1 ON / OFF, weight adjustment, rest time measurement
To turn on the power, press the ON/OFF button for 3 seconds, until you hear short beep.
When the power is turned on, the lower display will begin displaying weight."
To adjust the weight of barbell or weight stack, use Up/Down buttons. (press and hold for fast
change)!
After 10s of inactivity, the lower display begin displaying rest time (if rest time is turned on).
If the Eccentric Speed is turned on, upper display will begin displaying ECS.
www.tendosport.com
18

9.2 Power, Velocity, Force measurement
After each repetition, the repetition number begins to display on the lower display, actual value of
average power, partial avg power and peak power, average velocity, peak velocity and peak force
on the upper display and percent value of the best repetition on the middle display.
It is possible to change the weight setting, even if data are measured, without resetting the
microcomputer unit. Go to setup menu and change the weight using Up and Down buttons.
To quit setup menu press Reset button.!
The microcomputer will show you the exercise set data with different weight setting.
To view particular repetition, press Down or Up button. Prior the repetition with changed
weight, upper display will show "LoAd" and middle display will show new changed weight
for the following repetition.
If there are no measured data it is still possible to change the weight simply using Up and Down
button without necessity to enter to the setup menu.
To scroll down the parameters in upper display, press Mode button.
9.3. Deleting Data
Press Reset. This calls up delete process for all the data. Upper display shows "rSt" and middle
display shows "ALL". To delete all data, press Reset button, again.
To leave deleting process after the Reset button was pressed, press Up and Down button.
9.4 Deleting last repetition
Press the ON/OFF button. This calls up delete process for last repetition data. The Upper display
shows "dEL." Lower Display shows “Rep”. To delete last repetition, press ON/OFF again.
To leave deleting process after the ON/OFF button was pressed once, press Up and Down button.
9.5 Battery Saver
The microcomputer has a built-in battery saver to prolong the battery life. After 2 minutes of
microcomputer rest period, the battery saver is turned on (6 LED Mode lights flashing clockwise)
and the microcomputer switches off the displays. The battery saver is turned off automatically by
www.tendosport.com
19

pulling the Sensor Unit cable, or pressing any button. If the rest time is turned on, lower display
shows rest time. After 3 minutes of microcomputer inactivity, the battery saver will turn off the lower
display as well.
10. Memory
If there are data in the microcomputer before turning off, the data will stay in the memory as long
as RESET is not pressed. After the microcomputer is turned on again the upper display shows
"nnn". This indicates that there are data to be recalled. Do this by pressing the up and down
button.
Press Reset for calling delete process for all data. Upper display shows "rSt" and middle
display shows "ALL". To delete all data, press Reset button, again.
Press ON/OFF button for calling delete process for last repetition. Upper display shows
"dEL.". To delete last repetition, press Reset button, again.
Exit from deleting process after the Reset or ON/OFF button was pressed, just press Up and
Down button.
"nnn" in upper display, indicates data in memory.
If there is data in memory and you do not delete them, it is possible to continue exercising without
deleting this information. However, it will compare the previous Power or Speed data against your
new workout.
If data is downloaded to the Power Analyzer computer software from memory, it is not
possible to display graphs.
11. Connection to computer
Computer software and Tendo Bluetooth does not includes in the package and is an additional
option in this models.
www.tendosport.com
20
Each Tendo Power Analyzer can also be interfaced
with a computer via wireless Tendo Bluetooth."
• It is not needed to pair the bluetooth devices.
• The Tendo software recognises the bluetooth the
same way as a cable.
Table of contents
Popular Measuring Instrument manuals by other brands


Purkay Labs
Purkay Labs AUDIT-BUDDY Gen 2 user manual

Ametek
Ametek Drexelbrook Universal IV quick start guide

Mountz
Mountz TorqueMate Plus Operation manual

JUMO
JUMO flowTRANS MAG S Series Safety manual

CARLO GAVAZZI
CARLO GAVAZZI EN61036 instruction manual

Xiaomi
Xiaomi Huahuacaocao HHCCJCY01HHCC quick start guide