Mountz TorqueMate Plus User manual

TorqueMate®Plus
Operation Manual
Version 1.1
Mountz Incorporated
1080 N. 11th Street
San Jose, CA 95112
Customer Service: 800-456-1828
Fax: 408-292-2733
www.etorque.com
Copyright © 2001 Mountz Incorporated
All rights reserved. No part of this document may be reproduced, distributed, or
transmitted in any form, or by any means (graphic, electronic, or mechanical, including
photocopying, taping or information and retrieval systems now known or as may be
hereafter developed) without the specific written permission of Mountz Incorporated.
Mountz and its logo are registered trademarks.
Information contained herein is subject to change without prior notice.
Mountz, Inc.
ISO 9001
1

Table of Contents
Introduction . . . . . . . . . . . . . . . . . . . . . . . . . . . . . . . . . . . . . . . . . . . . . . . . . .4
Parts Check List . . . . . . . . . . . . . . . . . . . . . . . . . . . . . . . . . . . . . . . . . . . . . .5
Features . . . . . . . . . . . . . . . . . . . . . . . . . . . . . . . . . . . . . . . . . . . . . . . . . . .6-7
Accuracy . . . . . . . . . . . . . . . . . . . . . . . . . . . . . . . . . . . . . . . . . . . . . . . . . . . . .7
Before You Begin . . . . . . . . . . . . . . . . . . . . . . . . . . . . . . . . . . . . . . . . . . . . .8
Connecting and Disconecting Transducer . . . . . . . . . . . . . . . . . . . . . . . . . . . .8
Operation . . . . . . . . . . . . . . . . . . . . . . . . . . . . . . . . . . . . . . . . . . . . . . . . .9-13
Changing Modes & Units . . . . . . . . . . . . . . . . . . . . . . . . . . . . . . . . . . . . . . . . .9
Changing Numbers . . . . . . . . . . . . . . . . . . . . . . . . . . . . . . . . . . . . . . . . . . . . .9
Pause (Paus) Mode . . . . . . . . . . . . . . . . . . . . . . . . . . . . . . . . . . . . . . . . . . .10
Unit of Measure . . . . . . . . . . . . . . . . . . . . . . . . . . . . . . . . . . . . . . . . . . . . . .10
Mode of Operation . . . . . . . . . . . . . . . . . . . . . . . . . . . . . . . . . . . . . . . . . . . .11
Setting Tolerances . . . . . . . . . . . . . . . . . . . . . . . . . . . . . . . . . . . . . . . . . . . . .12
Joint Rate . . . . . . . . . . . . . . . . . . . . . . . . . . . . . . . . . . . . . . . . . . . . . . . . . . .13
SET-UP Mode . . . . . . . . . . . . . . . . . . . . . . . . . . . . . . . . . . . . . . . . . . . . .14-16
Data in Memory, Download Data in Memory, Clear Data in Memory . . . . . . . .14
Manual & Auto Clear and Memory On/Off . . . . . . . . . . . . . . . . . . . . . . . . . . .15
Transducer #, Calibrate, Filters . . . . . . . . . . . . . . . . . . . . . . . . . . . . . . . . . . .16
Fast Calibration . . . . . . . . . . . . . . . . . . . . . . . . . . . . . . . . . . . . . . . . . . . . . . .17
Transducers . . . . . . . . . . . . . . . . . . . . . . . . . . . . . . . . . . . . . . . . . . . . . .18-19
Select Transducer Cables . . . . . . . . . . . . . . . . . . . . . . . . . . . . . . . . . . . . . . .18
Calibration Notes . . . . . . . . . . . . . . . . . . . . . . . . . . . . . . . . . . . . . . . . . . . . .18
Schematic Diagram . . . . . . . . . . . . . . . . . . . . . . . . . . . . . . . . . . . . . . . . . . . .19
Transducer Calibration . . . . . . . . . . . . . . . . . . . . . . . . . . . . . . . . . . . . .20-22
Fast Cal, True Cal . . . . . . . . . . . . . . . . . . . . . . . . . . . . . . . . . . . . . . . . . . . . .20
Brushless Rotary Transducer Calibration . . . . . . . . . . . . . . . . . . . . . . . . . . . .21
Zeroing . . . . . . . . . . . . . . . . . . . . . . . . . . . . . . . . . . . . . . . . . . . . . . . . . . . . .21
Intervals . . . . . . . . . . . . . . . . . . . . . . . . . . . . . . . . . . . . . . . . . . . . . . . . . . . .22
2

Table of Contents (cont.)
Charging The Batteries . . . . . . . . . . . . . . . . . . . . . . . . . . . . . . . . . . . . . . .23
Application Notes . . . . . . . . . . . . . . . . . . . . . . . . . . . . . . . . . . . . . . . . .24-26
Impulse and Power Tool Testing . . . . . . . . . . . . . . . . . . . . . . . . . . . . . . . . . .24
Breakaway Torque Methods . . . . . . . . . . . . . . . . . . . . . . . . . . . . . . . . . . . . .25
Calibrating Torque Wrenches . . . . . . . . . . . . . . . . . . . . . . . . . . . . . . . . . . . . .26
Sending Data . . . . . . . . . . . . . . . . . . . . . . . . . . . . . . . . . . . . . . . . . . . . . . . .26
Filters . . . . . . . . . . . . . . . . . . . . . . . . . . . . . . . . . . . . . . . . . . . . . . . . . . . . . .27
Accessories . . . . . . . . . . . . . . . . . . . . . . . . . . . . . . . . . . . . . . . . . . . . . .28-29
Transducers & Loading Bench . . . . . . . . . . . . . . . . . . . . . . . . . . . . . . . . . . . .28
Accessories . . . . . . . . . . . . . . . . . . . . . . . . . . . . . . . . . . . . . . . . . . . . . . . . .29
Specifications . . . . . . . . . . . . . . . . . . . . . . . . . . . . . . . . . . . . . . . . . . . . . . .30
3

Introduction
The TorqueMate® Plus can be used for many torque applications in virtually any Engineering depart-
ment or environment. Here are a few common applications for the TorqueMate® Plus and an appropri-
ate torque sensor (transducer).
EXAMPLES OF USAGE:
• Pulse Tool Applications - Power Tool Use: Pulse tools and Power tools that operate at high RPMs
generate a significant amount of vibration and bounce, which makes accuracy testing of torque output
difficult. The common "brush bounce" that plagues the accuracy testing of these tools is cured when
using a brushless rotary transducer with the TorqueMate® Plus.
• Production Applications - Hand Use: Use a Mountz TWX or SMX torque sensor connected to the
TorqueMate to apply torque to any assembly. The TWX is suited for wrench style applications, while
the SMX is perfect for screwdriver or socket style functions. The unit has a Go/No Go light and alarm
system to notify the operator when they obtain the low tolerance setting or exceed the high tolerance
setting. The TorqueMate® Plus can also be used with other strain gauge torque sensors for applying
torque and/or torque and angle.
• Production Applications - Power Tool Use: Use a Mountz RTSX, RTSX-A (Torque & angle rotary
transducer) or BLRTSX (Brushless Rotary transducer) attached to a power tool to measure applied
torque of an actual dynamic rundown. The unit has a Go/No Go light and alarm system to notify the
operator when they obtain the low tolerance setting or exceed the high tolerance setting. The
TorqueMate® Plus can be used with a strain gauge rotary sensor for applying torque and/or torque
and angle.
• Quality Control Applications - Inspection/Auditing: Use any strain gauge torque sensor and the
TorqueMate® Plus to measure or check the applied torque by using “First Movement” method (listed
in this manual). Readings can be saved to memory for statistical recall and record keeping or cleared
at the touch of one key.
• Quality Control Applications - Joint Evaluation and Test: Use the TorqueMate® Plus with a torque
sensor with optical encoder and apply torque and angle to a joint. Also, use it for determining “joint
rate” (hard, medium or soft) by setting unit to Angle mode and measuring the amount of torque and
rotation (angle). This can be done both statically (with a hand device) or dynamically (with a power
drive or rotating device) depending on torque sensor selection. Using the TM for joint rate testing is
explained in this manual.
• Calibration or Gauge Laboratory Applications: Use the TorqueMate® Plus with Mountz torque sen-
sors to verify or calibrate hand torque wrenches and screwdrivers or power driven torque tools. The
TorqueMate can be used in any measurement system at the touch of a key and provide an accuracy
that allows use as a main standard.
• R&D and Design Applications: Use the TorqueMate® Plus with proper torque sensor to determine
“make up” of joints, strength of fasteners, clamp force or tension.
4
iNote: Transducer Selection
It is recommended that the TorqueMate be used with Mountz torque or
torque and angle sensors. However, the unit has been developed to
accept a range of 1.000-4.000mv/v input and therefore can be used with
most strain gauge torque sensors whether Mountz brand or other
.

5
Parts Check List
Check to make sure that you have all of the following accessories. Retain the packing materials in case
you need to send the unit in for service or to be calibrated with a transducer using Dead Weights.
TorqueMate® Plus
Power Adapter/Charger
RS232 Cable
9 Pin Serial Adapter
CD - Operation Manual
and Sample Statistics
worksheet
Certification &
Warranty Card
Carrying Case
(Cardboard)
• TorqueMate® Plus
• Power Adapter/Charger
(available for Europe or other)
• CD - Operation Manual Sample Statistics worksheet
• Warranty Card and Certifications
• RS232 cable with 9 Pin Computer Adapter
iNote: Please Send in Warranty Card
Complete and return warranty card to validate purchase date.
If this is not done warranty period becomes effective on date when
distributor/reseller received shipment.

Features
6
“Units” change key
For “Set-Up” press “Tolerance”
and “Mode” keys simultaneously
Five different engineering
units of torque measure
Small window can display -
angle, second peak torque
reading or data number
depending upon mode
“Mode” change key
For “Zero” press “Scroll Right”
and “Scroll Up” simultaneously
Sealed membrane
keypad for any
environment
Use “Scroll Right” key to
change active digit when
setting numbers
Use “Scroll Up” key to move
through the menus or
increase value when setting
numbers
“Tolerance” change
key
“Go” “No Go” LED’s
Large window displays
torque reading
Five Modes of Operation for
Production, Quality Control,
Calibration Laboratory and
Joint Analysis
Top View X Ducer RS232 Charge On/Off

Features (cont.)
Output: RS-232C port for data transfer to printer, data logger or computer.
Engineering Units: 5 different units of torque measure are available. lbf.ft., lbf.in., ozf.in., N.m., Kgf.m
(Other measurement units available as special order)
Battery Operated: NiMH batteries provide long life, without “memory”. Up to 8 hours of
operation per charge. Low battery indicator turns on when battery is low. Automatically shuts down
when battery is critically low.
Memory: Stores up to 1000 torque and/or angle values. Simply press the Enter Key to store data in
memory.
Up To 15 Transducers: Program & calibrate transducers for a variety of applications.
High Impact Plastic Housing: Provides portable belt or bench mounting.
Set (Go/No Go) Tolerance: Easily set user high and low limits for Torque and Angle with green and red
Go/No Go LED’s and an audible buzzer.
Auto Reset: Automatically resets the display when a new torque cycle is sensed (Peak & First Peak
mode). Resets in 3 seconds (Power Tool Mode).
Manual Display Reset: Data is held on the display until: 1. The Enter key is pressed clearing the
display and storing the data in memory or 2. The Scroll Right key is pressed clearing the display without
storing the data in memory.
Calibration: Fast Calibration allows the user to quickly enter and store the full scale mv/v and range
value of each transducer. True Calibration allows the user to apply torque with dead weights and capture
and store 3 calibration points in each direction.
Both calibration procedures are quick and user friendly.
Filters: Three software selectable filters (3600Hz, 1500Hz, 500Hz) allow the user to filter out unwanted
“noise”, minimizing non-torque spikes that can occur when testing pulse or power tools.
7

Before You Begin
Transducer Number
You must have a calibrated transducer with a transducer number assigned to it. Always make sure the
TorqueMate® Plus is set to the transducer number that you have attached. Every time you turn on the
TorqueMate® Plus the current transducer number and its associated range will be displayed (depicted
by “c-XX” where XX is the transducer number). Press Enter to confirm that the proper transducer is
attached. If it is not the proper transducer number you must change it to the correct number or you will be
using incorrect calibration data. To change the number press the Scroll Right key once - this will activate
the Scroll keys. Now press the Scroll Up or Scroll Right keys until the proper transducer number is dis-
played. Press Enter to select and go into the operation mode.
Battery Charging
The TorqueMate® Plus must be turned "ON" in order to charge the battery.The microprocessor monitors
the charging cycle of the NimH batteries and must be turned on to do so. The TorqueMate® Plus will go
into battery saving PAUSE mode after 5 minutes without use, but will still be charging. The
TorqueMate® Plus can be used when the batteries are low and the AC adapter is plugged in.
The TorqueMate® Plus has two smart charging modes: Trickle and Fast Charge. Charging the
TorqueMate® Plus, without a transducer attached, activates the Trickle Mode. This mode charges the
battery, but there is not a specific time frame when charging will be completed. The Fast Charge Mode
is activated when a transducer is plugged into the port.
Therefore, to achieve the most efficient charging, it is recommended that you charge your unit with a
transducer plugged into the transducer port and the unit turned "ON" to obtain a full charge. See page
22 for further detail on charging of the batteries.
Transducer Selection
Transducer selection is very important. Whenever possible, select a transducer range that is approxi-
mately 2 times the range to be used or tested. If you are typically using the tester at 50 lbf.ft., select a
100 lbf.ft. transducer. This significantly reduces the chance that you will overload and damage the
transducer.
Connecting and Disconnecting Transducers
Do not connect or disconnect a transducer with the TorqueMate® Plus powered on. Connect the trans-
ducer and then power on the TorqueMate® Plus and select the cell that you wish to use for the trans-
ducer. When disconnecting the transducer, turn off the unit and then disconnect the transducer.
8
IMPORTANT
!
iNote: When Programming Transducers
The torque range and the measurement units of the transducer are
also shown. The torque range will default to “3333” if a transducer
has never been assigned to the number displayed.

Operation
The TorqueMate® Plus is an accurate, user friendly torque display that allows a user to quickly change
functions and features without getting “lost” in a menu structure. Any change made after pressing the
enter key returns you directly to the operation mode.
CHANGING MODES AND UNITS
With the Scroll and Enter Keys - The most used functions are changed by simply pressing the key
labeled with the feature you want to modify. Change the value easily with the Scroll Up. Once you have
selected the new setting or feature simply press the Enter key to accept and return to operation with the
new setting.
FOR EXAMPLE - to change the operation mode from Track to First Peak, press the Mode key(5) once
and then press the Scroll Up key(3) until the display
icon points to the First Peak mode(7). Press
Enter(1) to accept and return to the operation mode
in the First Peak setting. The Mode icon will point to
First Peak.
CHANGING NUMBERS
With the Scroll and Enter Keys - To change numbers
such as the high and low tolerance, the
TorqueMate® Plus is much like setting an alarm
clock. The active digit (blinking) is changed with the
Scroll Up key, to move to the next digit, simply press
the Scroll Right key (the next digit will now blink). To
set all the Digits in the same manner, press Enter
again and the number is set.
FOR EXAMPLE - to set a tolerance when in peak
or first peak mode, press the Tolerance key(4).
The display will show the Low tolerance set point.
The first digit will be flashing. Change the value of
the flashing digit by pressing the Scroll Up key(3).
Change to the next digit by pressing the Scroll Right
key(6). When the value is reached press the Enter
key(1). To set the High tolerance value, follow the
same procedure as with setting Low tolerance.
Press Enter(1) when the high value is set and you
will be returned to the operation mode.
9
7
6
25
1
3
4

Operation (cont.)
PAUSE (PAUS) MODE
The TorqueMate® Plus automatically conserves battery power after 5 minutes without use.
The display will show “PAUS”. Pressing the Enter key returns the TorqueMate® Plus to the operation
mode.
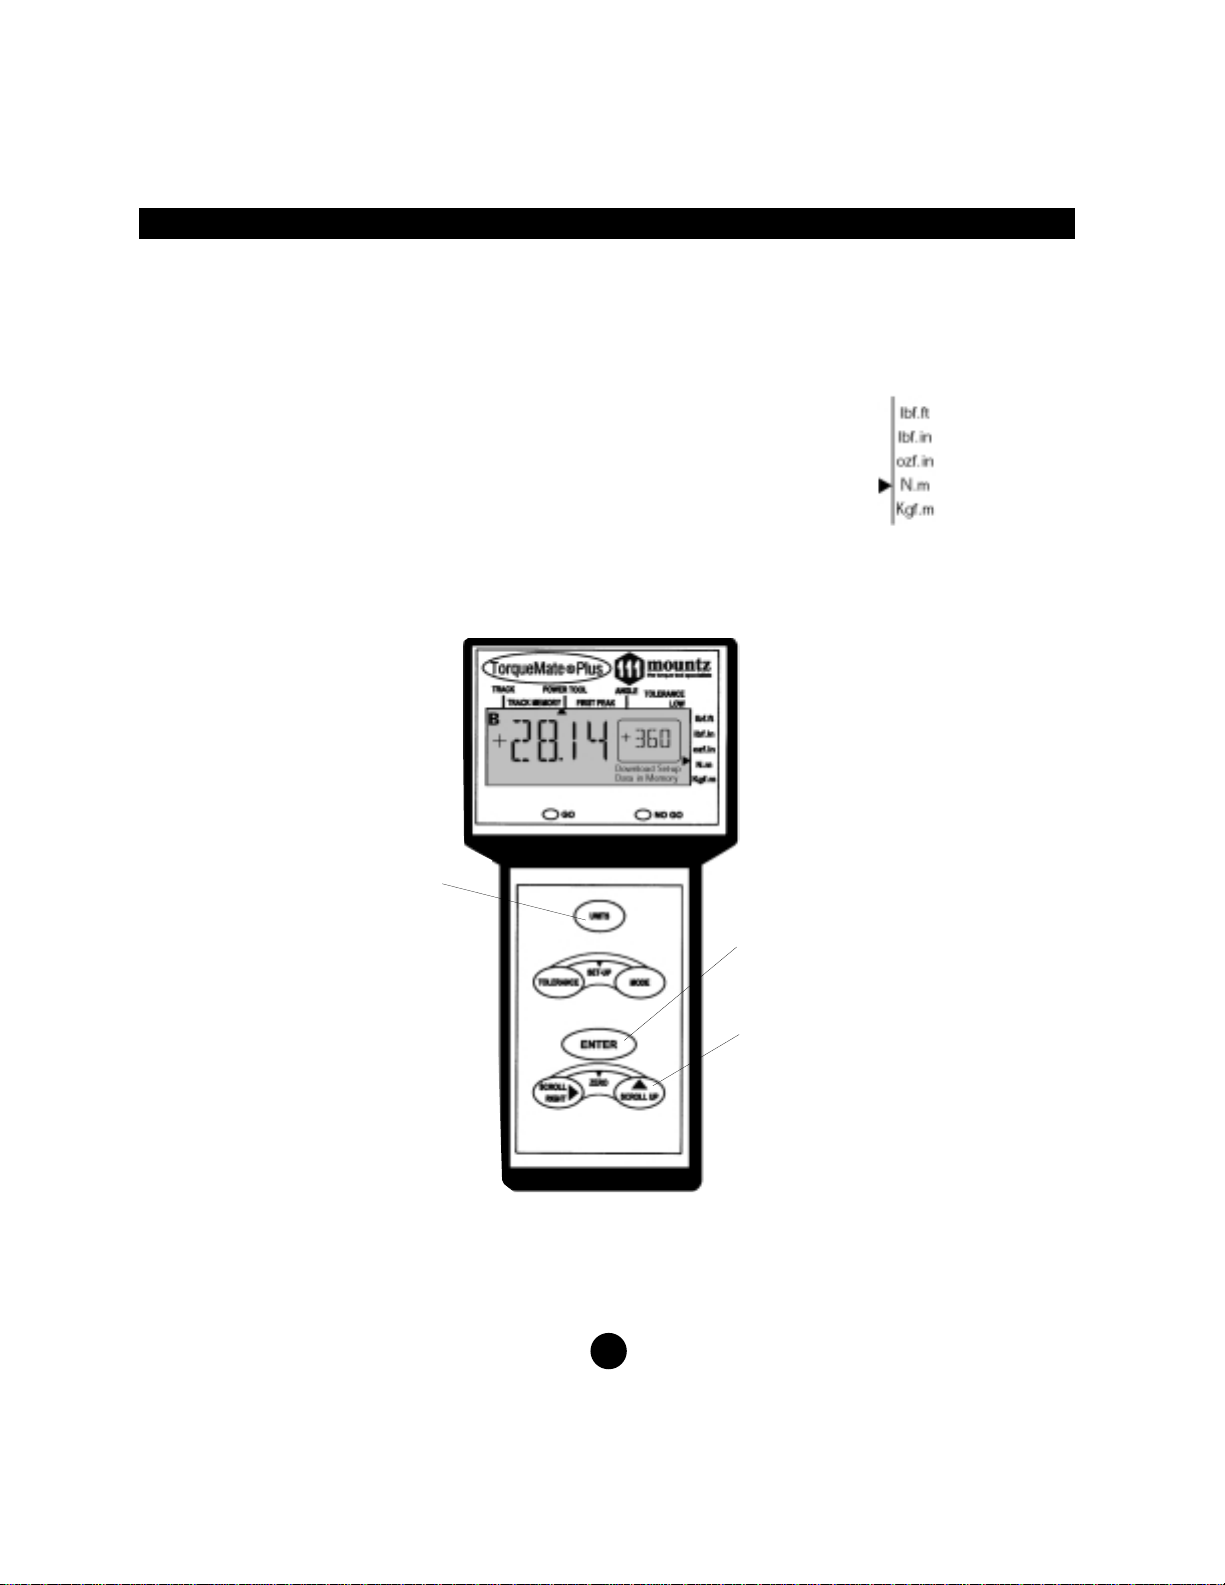
UNIT OF MEASURE (Engineering Units)
To change the unit of measurement:
1. Press the Unit (2) key on the front panel.
2. Press the Scroll Up (3) key until the arrow on the right side of the display
points to the desired units.
3.
Press Enter (1) to accept the new torque units and return to the operation
mode.
10
2
1
3

Operation (cont.)
11
MODE OF OPERATION
To change the mode of operation:
1. Press the Mode key.
2. Press the Scroll Up key until the mode arrow points to the desired mode of operation:
a) Track Mode: The display “tracks” the applied torque in clockwise and counterclockwise directions.
There is a real time torque feature that is available only in Track mode. This feature outputs read-
ings to the RS232 port at a rate of 4 times per second. To enable this feature, press Tolerance and
Scroll Right Simultaneously. You see the Firmware Revision. Press Units. The unit goes back to
reading screen and outputs torque reading at the rate of 4 times per second. Pressing the Enter
key will disable this feature.
b) Peak Mode: The display holds the highest peak torque applied.
c) Power Tool Mode: Used for measuring torque with power tools such as nutrunners and impulse
tools. Always use a quality joint rate simulator (run down adapter) when testing power tools in a
simulated application. If you do not use a joint rate simulator, damage to the transducer and or errat-
ic readings might occur.
d) First Peak Mode: The display holds the first peak torque
applied and disregards any further input. This function is
primarily used for testing and calibrating click type mechani-
cal torque wrenches by hand (without a calibration loading
bench).
The TorqueMate® Plus captures the point the wrench clicks, and disregards any further input from
the operator. Second peak, if any is shown in the window on the display.
e) Angle Mode: Combined with a transducer with angle encoder, the TorqueMate® Plus measures
the angle of rotation of a fastener (with high and low angle tolerance) after a programmed thresh-
old torque has been reached. This feature is used when an angle is specified rather than a final
torque. Joint rate and breakaway torque can also be measured. (See application notes.)
3. Press the Enter key to accept the new mode of operation.
Examples of Mode Applications
Track Mode: Use for reading, running or varying torque on motors and machinery. Use for calibrating
Dial type wrenches on a calibration loading bench.
Peak Mode: Use for calibrating any hand type torque (dial, beam, screwdriver) wrench except hand
testing of clicker type wrenches. Use Peak Mode with the Go/No Go feature. Not for use with power
tools.
Power Tool Mode: Use Power Tool Mode whenever testing dynamic tools such as nutrunners, electric
screwdrivers and impulse tools.
First Peak Mode: Designed exclusively for manually calibrating clicker type torque wrenches (by hand).
Reads the point at which the wrench “clicks” (first peak), and the point when the operator stopped apply-
ing torque (second peak). Also good for operator training. Apply torque smoothly to avoid false first peak
readings.
Angle Mode: Use Angle Mode to apply a specified angle to a fastener after reaching a threshold torque.
Also used to verify break away torque of a fastener and to determine the joint rate of a fastener
(see page 12 and applications notes for detailed information on Angle mode usage).

Operation (cont.)
SETTING GO AND NO/GO TOLERANCE (High/Low) LIMITS
In the Peak, Power Tool or First Peak mode:
1. Press the Tolerance key (the arrow icon will point to Low Tolerance).
2. Change the value of the flashing digit by pressing the Scroll Up key (and the decimal will be fixed).
3. Scroll to the next digit by pressing the Scroll Right key.
4. Press Enter to save the low limit and display the High Tolerance limit.
5. Repeat to set the High limit. Press Enter when finished.
The TorqueMate® Plus will now activate the Green LED and buzzer when reaching a peak over the low
limit, and will activate the Red LED and buzzer when going over the high limit.
In Angle mode:
First enter the threshold torque then the angle tolerance.
1. Press the Tolerance key to display the threshold torque (depicted by torque
threshold in window).
2. Change the value of the flashing digit by pressing the Scroll Up key.
3. Change to the next digit by pressing the Scroll Right key.
4. Press the Enter key when the correct digits are selected for torque threshold.
5. Now set the angle high/low tolerance.
6. Set the low angle tolerance with the Scroll Keys.
7. Press Enter to save the low angle limit.
8. Repeat for the high angle limit.
9. Press Enter to save the high angle limit and return to the operation mode.
The TorqueMate® Plus display will now track the applied torque until the
threshold torque is reached and then begin monitoring the angle. When the
low angle is limit is reached the green LED will illuminate. When the High
angle limit is reached the Red LED will illuminate. When the peak angle is reached the torque at that
angle will now be displayed.
Break Away ( Using the Angle mode)
To check breakaway (first movement) of a fastener: The TorqueMate® Plus will enter a special breakaway
sensing mode when you set the low angle tolerance to a small value, usually 1 to 3 degrees, and the high
angle tolerance to zero. Apply torque to an already tightened fastener, when the TorqueMate® Plus senses
the threshold torque (set at approximately 50% of the expected torque) it will start looking for the fastener to
move the number of degrees set as the low tolerance. When this number of degrees has been reached it
will automatically capture the torque at that point and will disregard any further torque input, even if you
keep turning the fastener.
12
iNote: Use of Go/NoGo
Be sure to set a tolerance if you want to use the Go/No Go feature.
The Go/No Go feature is not active when in the Track Mode.

13
i
Note: Pressing The Wrong Key
If at any time you press the wrong key, and you do not want to
make changes to the function you incorrectly selected simply press
the Enter key to keep the current setting (you can also turn the
TorqueMate® Plus off and on again). If you press the wrong key
while calibrating turn the unit off then on again and start over (data
is not saved until the final operation is entered).
Operation (cont.)
To check the joint rate:
Check the rate of a joint (soft, medium or hard) by tightening the fastener to the specified torque and
measuring the rotation angle of the fastener from 50% to 100% of the torque applied.
• Set the threshold to 50% of expected torque.
• Set the low angle tolerance to zero.
• Set the high angle tolerance to a high value (over 900°).
Testing of the Joint Rate:
Determine if the application joint is a hard, medium or soft joint. This is determined by measuring the
angle of rotation of the fastener from approximately 50% of the final torque to the final torque. If the
angle is less than 30 degrees the joint is considered hard. If the angle is 30 to 360 degrees the angle is
considered medium. If the angle is 360 degrees or more it is considered soft.
A quick method to do this is to use the TorqueMate® Plus with a hand held transducer in Peak Mode.
First tighten the application fastener to 50% of the required torque with the TorqueMate® Plus in peak
mode. Now mark the head of the fastener so you can roughly determine the angle of further rotation.
Once again place the TorqueMate® Plus wrench on the fastener and tighten to the final desired torque.
Measure or approximate the angle of rotation. You do not need to know the exact angle, only the range.
This angle of rotation should be simulated on the test fixture, with a joint rate simulator, when testing
pulse tools (or any power tool).
Clearing Numbers On The Display During Operation - When a reading is on the display, press the
Enter key to clear the number and send it to memory and out the RS 232C port. If you want to clear the
display and bypass sending the data to memory press the Scroll Right key.
If Auto Clear is set to ON and the TorqueMate® Plus is in Peak or First Peak mode, the unit will auto-
matically clear itself upon sensing additional torque saving you the step of having to press the Scroll
Right key. If you want to save the data on the display in memory, press the Enter Key before you apply
a new torque value or the unit will automatically clear the display and you will lose the data.
When in power tool mode, and Auto Clear is ON, the display automatically clears in 3 seconds. So you
must press the Enter key within three seconds to save the data to memory.
If this is not enough time, set Manual Clear to ON and press the Enter key to clear the display and send
the data to memory, or the Scroll Right key to clear the display and bypass sending the data to memory.
When the memory is full, pressing the Enter key will not clear the display. A beep sound and the No Go
indicator will flash warning the user that no more readings can be accepted into memory. See the CLR
function (Item 3, under Set-Up) for the procedure to clear the data in memory.

Set-Up Mode
Enter the Set-Up mode by pressing the Tolerance and Mode key simultaneously (the Set-Up icon
will turn on). Scroll through the various Set-Up functions by pressing the Scroll Up key. When you get
to the option you want to change press the Enter key. Upon changing any option, you will be returned
to the operation mode.
The following seven paragraphs (DISP, DOWNLOAD, CLR, MANUAL/AUTO CLEAR, TRANSDUCER
CODE, CAL, FIL) is the sequence of functions in the Set-Up menu:
1. DISP - DATA IN MEMORY
(Display The Values Stored In Memory)
DISP and the Data in Memory icon will be shown.
a. Press Enter to select this option.
b. The number of data in memory will be displayed on the large digits.
c. Press the Scroll Right key to view the last data in memory. Press Scroll Up to read the next higher
data number. If the data number has both Torque and Angle associated with it then the TorqueMate®
Plus will first display the torque value and then the Angle (as shown by the Torque or Angle Icon in
the Window).
c. Press the Scroll Right key to read the next lower data number (i.e., 100, 99...98). The Scroll Up key
will not scroll from the last data number to the first (i.e., 100 to 1).
d. Press Enter to exit and return to normal operation.
2. DOWNLOAD DATA IN MEMORY
(Downloads Data In Memory To A Computer or Printer)
Make sure an RS232 cable is attached and press the Enter key to download
data to a computer. The data number will count down on the torque window
as the values are downloaded to a dot matrix printer or computer. Press the
Enter key at any time to stop the transfer of data. Data is sent in the following
stream: Data #, Torque, Units, Angle. The protocol is 8, 1, n at 4800bps.
3. CLR - DATA IN MEMORY
(Clears the data In memory)
a. Press the Enter Key to select the Clear Memory (Clr) option
(Clr flashes on the LCD and the Data in Memory icon is shown).
b. Press the Scroll Right key and the Scroll Up key simultaneously to
clear the memory. Press the Enter key to avoid clearing memory,
and return to the operation mode.
Note: when the memory is full, pressing the Enter key will not clear the display. A beep sound and
the No Go indicator will flash warning the user that no more readings can be accepted into memory.
14

Set-Up Mode (cont.)
4. MANUAL CLEAR/AUTO CLEAR
(Selects The Reset (Clear) Mode For The Display)
a. Press Enter to select this option.
b. Press the Scroll Up key to toggle between Manual Clear ON or
Auto Clear ON.
If the mode is set to Peak or First Peak mode the operation, for Auto Clear, is as follows:
If you turn ON Auto Clear Mode, the display will indicate On x, where x can be 1, 2, 3, 4, 5, 6, 7, 8,
9, or A. A numeric display indicates the time to clear after a peak is reached. For example, On 3
means that the display will clear 3 seconds after reaching a peak value. On A indicates that the dis
play will automatically clear when the TorqueMate® Plus senses that you have applied additional
torque after a peak is reached.
If the mode is set to Power Tool mode the operation, for Auto Clear, is as follows:
If you turn ON Auto Clear Mode, the display will indicate On x, where x can be 1, 2, 3, 4, 5, 6, 7, 8,
or 9. The numeric value indicates the time to clear after a peak is reached. For example, On 1
means that the display will clear 1 second after reaching a peak value.
Note: The time for Auto Clear during Power Tool mode is independent of the timer for Peak or First
Peak.
If in Auto Clear Mode:
c. Press Scroll Up to scroll through the available selections for timing on Auto Clear.
d. Press Enter to save and exit.
5. MEMORY ON/OFF
(Turns on/off the send to memory and RS232 output when in Auto Clear mode).
The Memory On icon will display.
a. Press Enter to select this option.
b. Press the Scroll Up key to toggle between Memory On or Memory OFF.
c. Press Enter to save and exit.
With memory turned On and Auto Clear turned on the display will clear after the Auto Clear timer expires
and the value on the display will be sent to memory as well as out the RS232 port. Note that with these
functions selected the memory of the TorqueMate® Plus may fill rapidly. Note that, when the memory is
full, pressing the Enter key will not clear the display. A beep sound and the No Go indicator will flash
warning the user that no more readings can be accepted into memory. See the CLR function (Item 3)
above for the procedure to clear the data in memory.
15

Set-Up Mode (cont.)
6. c-XX (“c” stands for Code Number)
(Selects The Attached Transducer Number)
The transducer number, full scale range and the units icon will show in the
window.
If the Window shows a range of “3333” (indicates an open cell which can be
programmed to the transducer) the associated transducer number has never been calibrated.
a. Press Enter to select this option.
b. Press Scroll-Up to select available transducer numbers (1-15).
c. When the number corresponds to the attached transducer, press the Enter key. The TM200 will now
use the appropriate torque calibration data for that transducer (if it has been previously calibrated).
7. CAL
(Calibration)
See the calibration section of this manual.
8. FIL
(Selects One of Three Electronic Low Pass Filters)
a. Press Enter to select this option.
The display shows the current filter setting:
Fil 1 = 500 (Hz)
Fil 2 = 1500 (Hz)
Fil 3 = 3600 (Hz)
b. Scroll to the desired filter setting and press enter to accept the new filter.
If you do not know what filter to use, set filter to 1500 Hz.
16

Set-Up Mode (Fast Cal)
Quickly Entering Calibration Data For A Transducer (Fast Cal)
To quickly enter calibration data for a transducer you must know the mv/v signal output at full scale
and the range of the transducer (both should be marked on the transducer).
If the transducer is not marked with this information then contact manufacturer of the
transducer to obtain it.
If the transducer is a Brush-Less transducer it is marked as 5 V output rather than a mV/V output.
Please note that this type of transducer must be calibrated using a True, deadweight calibration.
Turn the TorqueMate® Plus on and press Enter when it shows the current cell number.
1. Enter Set-up by pressing the Mode and Tolerance key simultaneously.
2. Press the Scroll Up key until the display shows “CAL”.
3. Press the Enter key. Now press the sequence: Enter, Scroll Right, Tolerance.
4. Select the proper units with the Scroll Up key then press the Enter key.
5.
Select the cell number for the transducer to be calibrated (1-15) with the Scroll Up key, then press
Enter.
6. Enter the full scale range of the new transducer (default is 3333). Use the Scroll Up key to change
the digit value, the Scroll Right key to select a different digit. Do not worry if the decimal is wrong,
you will change that next. Press Enter when the numbers are correct.
7. Now set the decimal place with the Scroll Right key. Press Enter to save the decimal place.
8. Now enter the mv/v range of the transducer at full scale (default 2.000). Use the Scroll Up and the
Scroll Right key as you did with the range (you cannot change the decimal place). Press Enter when
finished.
Note: The TorqueMate® Plus will always display 2.000, even if you have previously programmed a dif-
ferent value.
9. The display will now show Fast (FAST) Cal. Press Enter.
10.
The transducer is now coded and calibrated using mv/v and range. The calibration data will be writ-
ten to memory. Whenever you select the corresponding code number the TorqueMate® Plus will use
the calibration data that was saved.
17
i
Note: Calibration Security
To ensure that inadvertent alteration of calibration data does not occur a Key
Sequence Override is required to be entered at the CAL prompt. After hitting Enter
to activate the Cal Menu the Key Sequence Override is accomplished by pressing
Enter, Scroll Right & Tolerance. Press these keys in exact order to access the CAL
menu.
iNote: Setting Decimal Place
Always enter the range value starting with the first decimal place.
For example 10 ft.lb. transducer should be programmed to 10.00 not 010.0 or 0010.

Transducers
The TorqueMate® Plus can be used with 1 to 4 mv/v transducers. Simply assign a code number to the
transducer (1-15) and calibrate it with dead weights (True Cal), or enter the known mv/v at full scale
and the range (Fast Cal). The TorqueMate® Plus will store the calibration data in memory for that trans-
ducer under the code number you assigned.
SELECTING TRANSDUCER CABLES
A cable with a 10 pin modular plug, which goes into the TorqueMate® Plus, and bare wires on the other
end is not included with the TorqueMate® Plus. This cable is available, upon request, at additional cost.
The part number is 065145. The correct part number for an RTSXA (with Angle and 10 pin Bendix) is
065151.
If you have a transducer that has a special connector Mountz can make a custom connector for the
TorqueMate® Plus. For example, if your transducer has a Bendix type connector you can order a cable
with the TorqueMate® Plus 10 pin connector on one end and a Bendix connector on the other. (See list
of cables below)
Calibration Notes
When using the Fast Cal option on the TorqueMate® Plus, the TorqueMate® Plus will take the mv/v
entry that you manually programmed during transducer calibration, and adjust the gain and span auto-
matically. For example, if the transducer has a mv/v signal of 2.010 at a full range of 50 lbf.ft. then the
TorqueMate® Plus will assume when it senses 2.010 mv/v of output from the transducer that a torque of
50 lbf.ft. is being applied (the display will show 50 lbf.ft.).
When using the True Cal option, the TorqueMate® Plus will take an actual reading of the output of the
transducer when certified dead weights are applied.
Configuration Part Number
Connections to the TorqueMate® Plus
1. RTSX to TorqueMate® Plus (6 pin Bendix) 065138
2. BTSX to TorqueMate® Plus (4 pin Bendix) 065123
3. TorqueMate® Plus connector/no connector 065145
(to connect to other transducers)
4. RTSXA (with Angle indication and 10 pin Bendix) 065151
5. BLRTSX (with Brushless indication and 10 pin Bendix) 065134
18
IMPORTANT
!

The TorqueMate® Plus and transducers are instruments that should be handled with care. Never over-
load transducers above full capacity. Avoid using impact tools on transducers*. Before use, load the
transducer to full scale in the direction to be used, then zero the display to compensate for any zero off-
set. Zero offset is a normal characteristic of transducers.
The TorqueMate® Plus will accept transducers with up to 2% zero offset. If the transducer has more
than 2% offset the transducer is most likely damaged due to overload. This may result in the inability to
zero the display of the TorqueMate® Plus.
*If testing impact tools select a transducer that is twice the expected range of the impact tool and use for reference only.
Do not expect to receive repeatable results when testing impact type wrenches.
19
Transducers (cont.)
IMPORTANT
!

Transducer Calibration
• Always calibrate the TorqueMate® Plus with the unit plugged into the AC power adapter and make
sure the batteries are fully charged.
• Calibration data for up to 15 transducers can be memorized by the TorqueMate® Plus.
There are two options available for calibrating a transducer:
1. FAST - Fast Cal means that you do not use dead weights for calibration. The TorqueMate® Plus will
assume the mv/v signal entered is accurate and automatically span the range of the transducer and
store it in memory.
2. TRUE - True Cal means that you use calibration arms and dead weights to calibrate the transducer.
The TorqueMate® Plus will take three readings in each direction and create a calibration table in
memory.
Procedure for Calibration
Attach the transducer to be calibrated.
• Enter Set-up by pressing the Mode and Tolerance keys at the same time. The Set-up icon will show
and the display will be blank.
• Press the Scroll Up key until the LCD shows CAL.
• Press Enter to select this option.
• The Units icon will be flashing.
• Press the Scroll Up key to select the units that you will be calibrating this transducer to. Press Enter to
select the Units.
• The display will now show the expected transducer number (c-1 to c-15). Press the Scroll Up key
until the desired transducer number is displayed. If the TorqueMate® Plus transducer number has
never been used it will show “3333” for the range (default). This will change as soon as you assign a
range to the transducer. Press Enter to select the proper transducer number.
• Enter the range of the transducer to be calibrated. Press the Scroll Up key to change the value of the
flashing digit. Press the Scroll Right key to select a different digit. When the desired value has been
selected press Enter to accept. Now set the decimal by pressing the Scroll Right key. Press the
Enter key to save the range of the transducer.
Continue the calibration with the steps on page 21.
20
Note: Calibration Security
To ensure that inadvertent alteration of calibration data does not
occur, a Key Sequence Override is required to be entered at the CAL
prompt. After pressing Enter to activate the Cal Menu the Key
Sequence Override is accomplished by pressing Enter, Scroll Right &
Tolerance. Press these keys in exact order to access the calibration
function.
i
This manual suits for next models
1
Table of contents
Other Mountz Measuring Instrument manuals