Teradek Sphere User manual

User Guide
Teradek, LLC. All rights reserved. PLEASE READ PG 1
sphere cover.indd
1
8/10/16 9:23
AM
www.teradek.com www.teradek.com
J
K
www.teradek.com
GH
F
A
B
C
DE
I
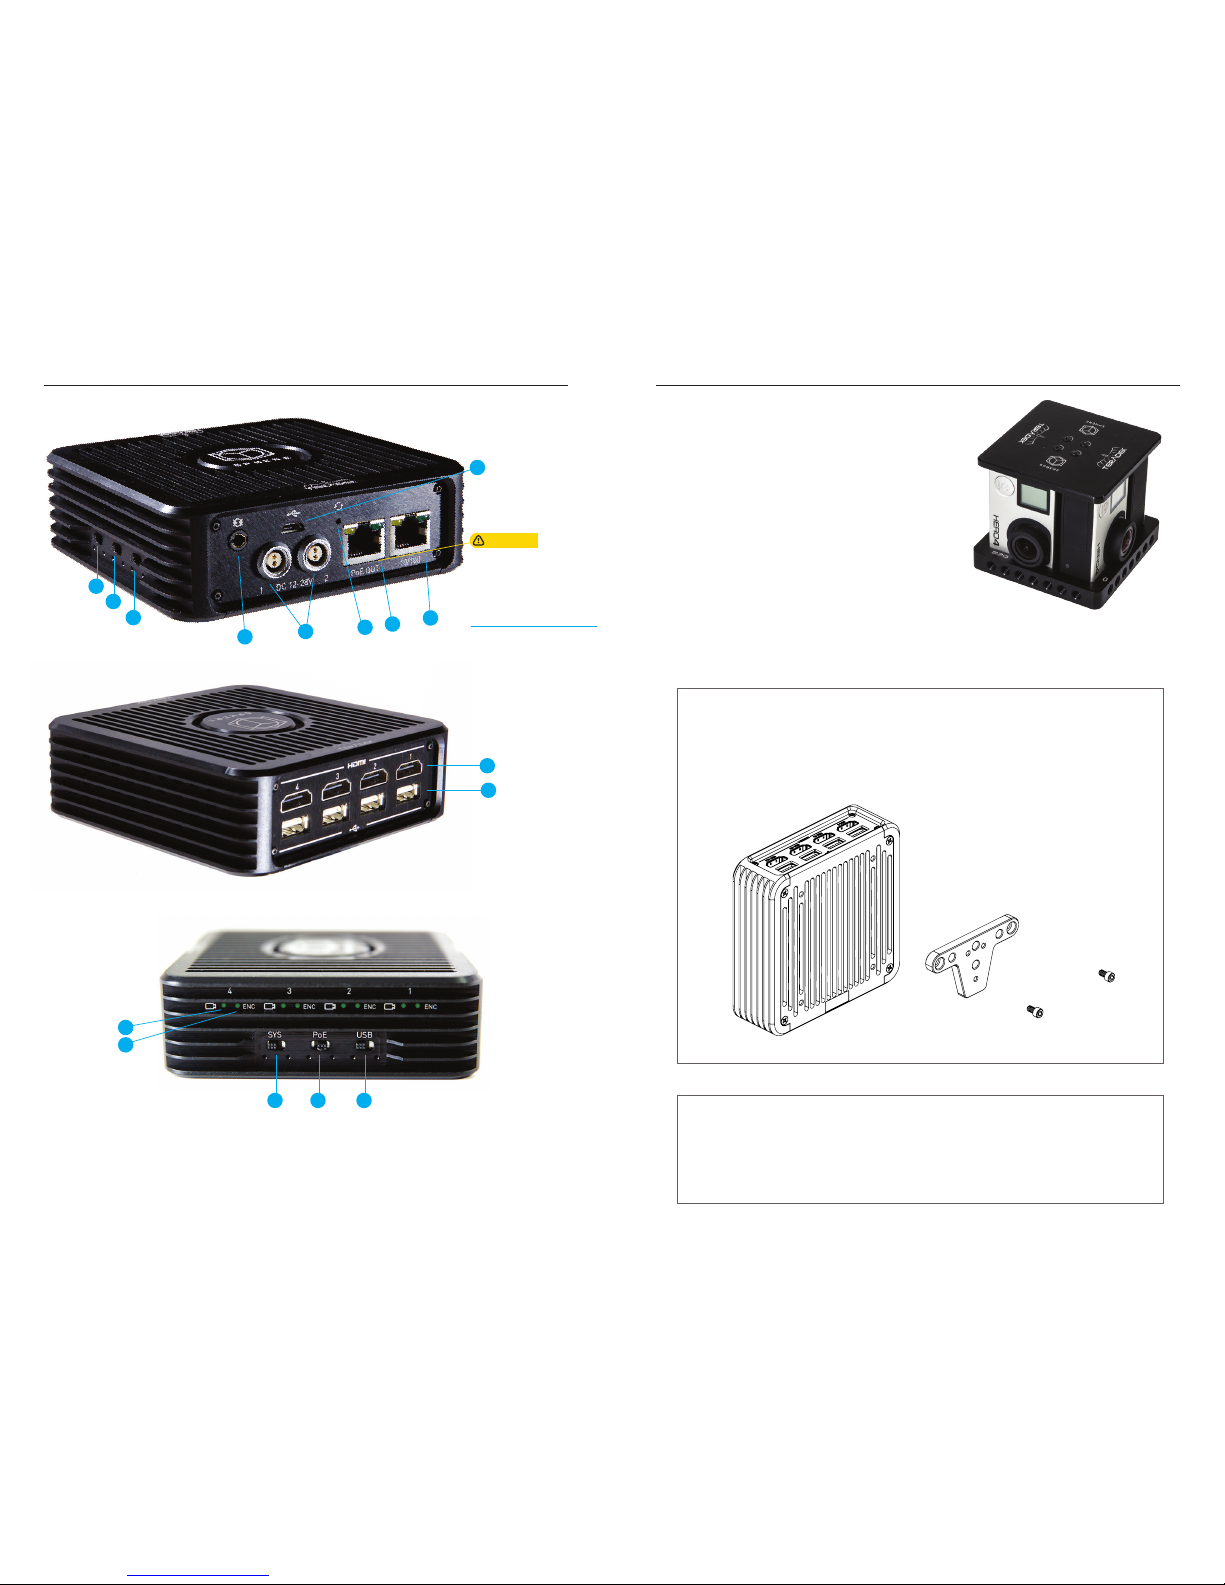
PHYSICAL CONNECTIONS
A: System on/off switch
B: PoE on/off switch
C: USB Power on/off switch
D: 1/8" Line Input
E: 12-28V DC Inputs
F: Reset Button
G: 10/100 Ethernet + PoE
H: 10/100 Ethernet
I: Micro USB
J: HDMI Inputs 1-4
K: USB Power Ports 1-4
L: Video Input Status LEDs
M: Encoder Status LEDs
ABC
L
M
www.teradek.com
POWER AND CONNECTIONS
1. Connect power to Sphere using the included
A/C adapter or one of the available accessory
power cables (see Teradek.com).
2. If using the Teradek Sphere GoPro rig, assemble
your cameras into the rig. Attach the center
support to the base using the provided screws,
place the cameras evenly into the base, and then
attach the top plate.
3. Connect HDMI cables between your rig’s cameras
and Sphere’s HDMI inputs (J). Turn each camera
on. If using the Sphere GoPro rig, press the mode
button until the camera is in photo mode. See
Teradek.com for additional camera set up tips.
4. If your camera can be charged via USB, connect
USB cables between Sphere (K) and the
camera, then turn the USB switch (C) to on.
5. MovetheSystemon/oswitch(A) to the on position.
If mounting Sphere on a tripod or articulating arm, attach the
T-bracket to the bottom of Sphere using the included screws.
The bracket has four 1/4”-20 threaded holes for use with
various mounting hardware.
WHAT’S IN THE BOX?
Sphere
Go Pro rig with screws
T-bracket with screws
4 Ultra thin HDMI cables (micro-full)
A/C adapter, 24V
Ethernet cable
SKB medium case
1 2
CAUTION:
Using sphere
with power over
ethernet / PoE
devices please
nd details at
sphere-poe.teradek.com

www.teradek.com www.teradek.comwww.teradek.com
DOWNLOAD THE APP
CONNECT TO SPHERE
Sphere has two 10/100 Ethernet ports for connecting to a network. In addition, one port (G)
is Power-over-Ethernet (PoE) enabled for connecting to and powering a PoE capable Wi-Fi
access point.
1. IfusingaPoEcapableaccesspoint,ipthePoEswitch(B) to on and connect an Ethernet
cable between the PoE port (G) and your Access Point. If connecting to a standard switch
ornetworkrouter,ensurethePoEswitchisoandconnectacablefromyournetwork
device to either port.
2. Connect your iPad Pro to the network and open the Sphere app.
WELCOME TO THE SPHERE APP
SPHERE
Connect your iPad Pro to the Internet
and download Teradek’s Sphere app
from the App Store.
TheSphereAppallowsdierentcameracongurations(rigs)tobesavedontheiPador
synced to any Sphere on the same network. Once a rig has been created, you’ll add cameras,
set their orientation and arrangement, and begin stitching the images. The main screen con-
tains the following menu options:
• TheLocal Rigs menu shows all rigs saved to the iPad, from here each rig can be opened
for editing (Select), copied, deleted, synced to a sphere, or renamed (tap the rig name to
edit). Additionally, a thumbnail image can be assigned to the rig.
•Sphere RigscontainsalistingofanyrigcongurationsstoredonavailableSphere
devices. From here, rigs can be synced to the iPad or deleted. A status indicator shows
whetherthecongurationissyncedornot.
www.teradek.com
• TheRecordings and Snapshots menus allow you to view panoramic videos and images
stored on the iPad.
• TheInfo menu displays information about Spheres on the network and allows you to
performrmwareupgrades.
ADDING CAMERAS
After connecting to Sphere and starting the app, you’ll need to create a rig and add cameras to it.
1. Tap New Rig! Enter a name for it,
tap Done, and then tap the rig listing
toopenthesourceconguration
screen.
2. Tap Add Device Streams and select
all of the cameras connected to
sphere, tap Done.
3. Drag and drop sources to arrange
them. If your rig has a top or bottom
camera, drag it up or down on the
screen to change its orientation. Drag
sources to the bottom of the screen
to remove them.
4. Rotate sources by tapping Rotation. Rotate buttons overlaid on the source icons rotate
just that camera, while the Rotate All buttons rotate all sources.
5. Video quality can be adjusted by tapping Resolution.Anaudiosourcecanbespecied
with the Audio button. Once the rig orientation is set, tap the play icon to save the
congurationandopenthecalibrationscreen.
STITCHING AND VIEWING YOUR VIDEO
Once all sources have been selected and arranged, it’s time to stitch the video. The calibration view
contains controls to adjust image position, shape, blending, and color. This view also allows you
to save snapshots, record video, and stream to the Internet. On initial load, the Sphere tutorial is
displayed. Follow it in the App to learn about the available functions and steps to stitch your image.
The tutorial can be dismissed by tapping Close or X, and displayed by tapping the ?button.
Views:
•Panoramicdisplaystheattened
panoramic image. This is how
the stitched video looks when
recorded or sent to the web.
The panoramic view is helpful
whenaligningdierentsources.
3 4

www.teradek.com www.teradek.comwww.teradek.com
• TheRectilinear view is the
standard view for previewing
your shot as a real-time,
360 degree image. The view
can be zoomed by pinching the
screen,pannedwithanger,
or panned by moving the iPad.
To disable motion-controlled
panning, tap the compass icon
in the top-right corner. This view
is helpful when adjusting the top
and bottom sources, if used.
• Little Planet view maps the
image to a sphere, making it
look like a little planet when
the bottom of the image
is centered (hence the name).
• Disable view allows you to turn
othelocalmonitoringwhenit
is not needed. Disabling the
view saves resources and battery
life, helpful when streaming or
recording over a longer period.
Picture Controls:
1. Lens Correction contains controls to adjust for any distortion caused by a particular
camera/lens combination.
www.teradek.com
2. The Stitching panel allows you to adjust each source’s position and edges relative to the
others. It has settings for pitch, roll, position, and edge adjustments.
3. The Manual and Auto color panels allow you to match source brightness, contrast, and
hue in situations where each camera cannot be exposed evenly. For cameras with
continuous auto-picture controls (like GoPro) the auto color settings help to keep cameras
looking similar even if the exposure changes.
OUTPUTS
After stitching your cameras and saving the changes, you can do a number of things. To simply
monitor the stitched image, tap the video to collapse the controls and choose your desired
view. The stitched video can also be saved as a snapshot or recording, or sent to a streaming
platform like YouTube.
Snapshots:
The Snapshots menu allows you to save a snapshot of the full panoramic view or an
undistorted device stream. After saving a snapshot they can be viewed from Sphere’s main
menu or copied to the camera roll.
5 6

www.teradek.com www.teradek.comwww.teradek.com
Recording:
The Recording panel allows you to start and stop recordings of the full panoramic view. After
recording, they can be viewed in app, or exported to the Camera roll for uploading to the Internet.
Streaming:
The Streaming panel allows you to start and stop a live stream to YouTube or any other plat-
form with support for live 360º video. Streaming live video from Sphere requires the streaming
license, which is available at teradek.com if it wasn’t purchased with the device.
1. Tocongureastreamingdestination,tapthegearicontoopentheSettingsmenuand
select Broadcast Destinations.
2. Tap Manage Destinations and then Add Destination.
www.teradek.com
3. Select either YouTube or Custom RTMP. If streaming to YouTube, follow the steps to
Authenticate and select an event. If streaming to an RTMP server, enter the RTMP
destination information. Tap done. NOTE: When streaming to YouTube, make sure your
eventisconguredfor360Streaming.
4. Return to the video calibration/preview screen, open the Streaming panel, and hit
Start Broadcast.
7 8
Table of contents
Other Teradek TV Tuner manuals


