TERMET MATADOR SUPER SECURIT 3000 User manual

IMP 011
NO_23011 - Edition du 01/12/23
MATADOR®
Instruction manual

MATADOR® - NO_23011 - Edition du 01/12/23
2
Table of contents
1. Introduction - Safety ...................................................3
2. Features...................................................................... 4
3. Installation and commissioning ...................................8
4. Use .............................................................................9
5. Maintenance............................................................. 13
6. Fault table ................................................................ 24
7. Maintenance booklet ................................................ 25
8. Declaration of conformity ......................................... 27
9. Appendix 1 - Matabox............................................... 28
10. Appendix 2 - SupersEcuritest ................................... 32
11. Appendix 3 - SSR3000.............................................. 36

MATADOR® - NO_23011 - Edition du 01/12/23
3
1. INTRODUCTION - SAFETY
1.1 INTRODUCTION - IMPORTANT SAFETY RECOMMENDATIONS
First of all, TERMET would like to thank you for putting your trust in our products. To help you get to
grips with your MATADOR®, we've put together a comprehensive set of visual, easy-to-read
instructions.
We recommend that you read this manual carefully in its entirety before working on the equipment. For
your own safety, it is important that you follow all the instructions in this manual. Keep these instructions
close to your MATADOR®or in a place accessible to users. Make sure that all personnel involved in its
use can access it easily. Persons authorized to commission, operate or maintain the MATADOR®must
be identified and trained.
1.2 PICTOGRAMS
Safety pictograms
Meaning of safety pictograms on the machine or in this manual - Keep them clean and replace them if
they become illegible or detached.
Eye protection must be worn
Safety helmets must be worn
Safety footwear must be worn
Protective gloves must be worn -
cat.3 according to EN388
Ear protection must be worn
Direct danger to personnel and machine,
read the instruction manual
Danger, burn hazard
Danger, risk of explosion
Pictograms in this instruction manual
Minimum headcount
required for certain
operations
Level 1 participant: user,
operator
Level 2 participant: set-
up operator
Level 3 participant:
maintenance agent
Electrical work must be carried
out by qualified personnel with
authorization to perform low-
voltage electrical work

MATADOR® - NO_23011 - Edition du 01/12/23
4
2. FEATURES
2.1 GENERAL DESCRIPTION OF THE TOOL
The MATADOR consists of:
-A handle part
oIncluding the arming cord
-A barrel part
oIncluding the bolt
-A coupling
oCreating the connection between barrel and handle
The MATADOR can be "locked" or "broken".
Coupling
Handle part
Arming
cord
Barrel part
Bolt
Matador locked
Matador broken

MATADOR® - NO_23011 - Edition du 01/12/23
5
2.2 NORMAL USE
MATADOR guns are used in slaughterhouses to anesthetize animals such as cattle, sheep, horses and
pigs.
2.3 RANGE DESCRIPTION
The MATADOR range includes:
•Perforating rod guns
oMATADOR HVL3000 - 10441
▪An elongated high-velocity matador
oMATADOR SS3000 standard - 10973
▪The classic matador
•Rounds
oYellow (x500)
oRed (x500)
oBlack (x500)
•Accessories
oSuperSecuriTest (or SST) - 5876
▪A speed tester to check gun conformity
oMatabox single without counter - 5883
▪A device for safely placing the MATADOR on the
workstation
oMatabox double without counter - 3832
oMatabox single with counter - 9582
▪A Matabox that also counts the number of times the
MATADOR has been used
oMatabox double with counter - 9395
Non-piercing bolt guns
oSSR3000 cow - 10971
▪A conventional pistol for cows
oSSR3000 calf/sheep - 10978
▪A conventional pistol for calves and sheep
Accessories and SSR3000 are detailed in the appendices.

MATADOR® - NO_23011 - Edition du 01/12/23
6
Gun/round combination depending on the animal:
MATADOR pistols must be used with 27-gauge explosive rounds supplied by TERMET. Below is a
table detailing which matador/round pairing is appropriate for slaughtering the animals:
Yellow round
Red round
Black round
MATADOR
HVL3000
NA
Cows
Young cattle
Horses
Bulls
Young cattle
Oversized
Bison
MATADOR
SS3000 standard
Sheep
Calves
Calves
Cows
Young cattle
Horses

MATADOR® - NO_23011 - Edition du 01/12/23
7
2.4 TECHNICAL SPECIFICATIONS
Weight
Weight
Matador HVL3000
2.76 kg
Matador SS3000 long
2.86 kg
Matador SS3000 standard
2.73 kg
Minimum bolt exit speed
m/s
MATADOR
SS3000 standard
MATADOR
HVL3000
Quantity of
powder (grains)
Yellow
round
37
50
3
Red
round
44
56
3.5
Black
round
48
60
4
Service life
The MATADOR has a service life of 3 years or 40,000 shots.
Rate
The maximum rate of a MATADOR is 30 shots/hour.
Noise
Information on airborne noise emissions is given below:
•Weighted sound pressure level at the workstation 103 dB ± 3 dB
•Maximum instantaneous sound pressure value 133 dB ± 3 dB
•Weighted sound power level emitted by the machine 107 dB ± 3 dB
Measurements were taken at a distance of 1m when firing red rounds at a 100 mm thick piece of
plastic with a hardness of 60 ± 5 Shore.
Vibration
The vibration generated by the matador during a shot is less than 2.5 m/s². However, the repeated
action of firing can entail risks in the same way as any repetitive activity. It is advisable to rotate staff
at this work post.

MATADOR® - NO_23011 - Edition du 01/12/23
8
3. INSTALLATION AND COMMISSIONING
3.1 INSTALLATION
The MATADOR must be laid "broken", in a stable position, with the barrel facing the user, so that the
MATADOR can be loaded easily. The user needs at least 2 MATADORS at the station. Please refer to
additional information on page 11 for further explanations.
We strongly recommend using a matabox designed to meet these conditions. Installation must then be
carried out in consultation with the user, to ensure an ergonomic workstation.
Stay with the user during initial use to make adjustments.
Boxes of rounds must be kept dry in a stable position. Mataboxes have a dedicated slot for rounds.
3.2 FIRST-TIME USE
Your MATADORS are tested and approved in our workshops before delivery. So there's no need to
check them on first use.
You are free to follow the "Checking the MATADOR" paragraph on page 18 before putting a new gun
on the line.

MATADOR® - NO_23011 - Edition du 01/12/23
9
4. USE
4.1 Safety instructions __________________________________________________________9
4.2 Getting started _____________________________________________________________9
4.3 MATADOR operating mode __________________________________________________10
4.4 Cartridge blockages ________________________________________________________12
4.4.1 –Lock blockage ____________________________________________________________________________12
4.4.2 –Firing pin holder blockage __________________________________________________________________12
4.5 End of shift _______________________________________________________________12
4.1 SAFETY INSTRUCTIONS
The MATADOR is a hazardous tool that can cause serious injury. You must have been trained
to use the MATADOR.
The use of MATADOR must be in a clean and ventilate atmosphere, without fog of dust.
Care must therefore be taken when handling the gun. Never put your hand near the matador
bolt.
An armed MATADOR can be triggered if it falls on the ground. The MATADOR must
therefore always be armed at the last moment, just before the animal is slaughtered. In addition,
the MATADOR must always be handled with the barrel facing downwards.
The MATADOR must always be broken when not in use.
4.2 GETTING STARTED
Before using your MATADOR, always perform the following checks:
Check that the MATADOR bolt is fully retracted into
the barrel.
Check that the gun is properly locked. You should hear
a click.

MATADOR® - NO_23011 - Edition du 01/12/23
10
4.3 MATADOR OPERATING MODE
Place the round in the lock housing.
Have an extra MATADOR ready for
use if needed.
At this point, your 2 MATADORS are
loaded and ready to use.
Lock the matador until the ball clicks.
Arm the matador by pulling the cord as far
as it will go.
Place the matador on the animal's head.
Attention: the gun must be at a right angle
when firing, otherwise the anaesthetic will
be less effective.
Loaded and
unlocked

MATADOR® - NO_23011 - Edition du 01/12/23
11
Press the trigger button to trigger the
explosion.
Hold the gun firmly against the head to
ensure good penetration.
Unlock and break the matador to eject the
round.
Further information
It is recommended that you have at least 2 MATADORS at the workstation. So, if the pistol shot doesn't
have the desired effect on the animal, or if the shot misses the cerebellum, you can use the 2nd matador
to do it again.
The maximum rate recommended for a MATADOR is 30 shots/hour. Adapt your number of
MATADORS on the station to stick to this rate.
If you have loaded and locked the MATADOR, the cartridge can still be ejected by breaking the gun
normally.

MATADOR® - NO_23011 - Edition du 01/12/23
12
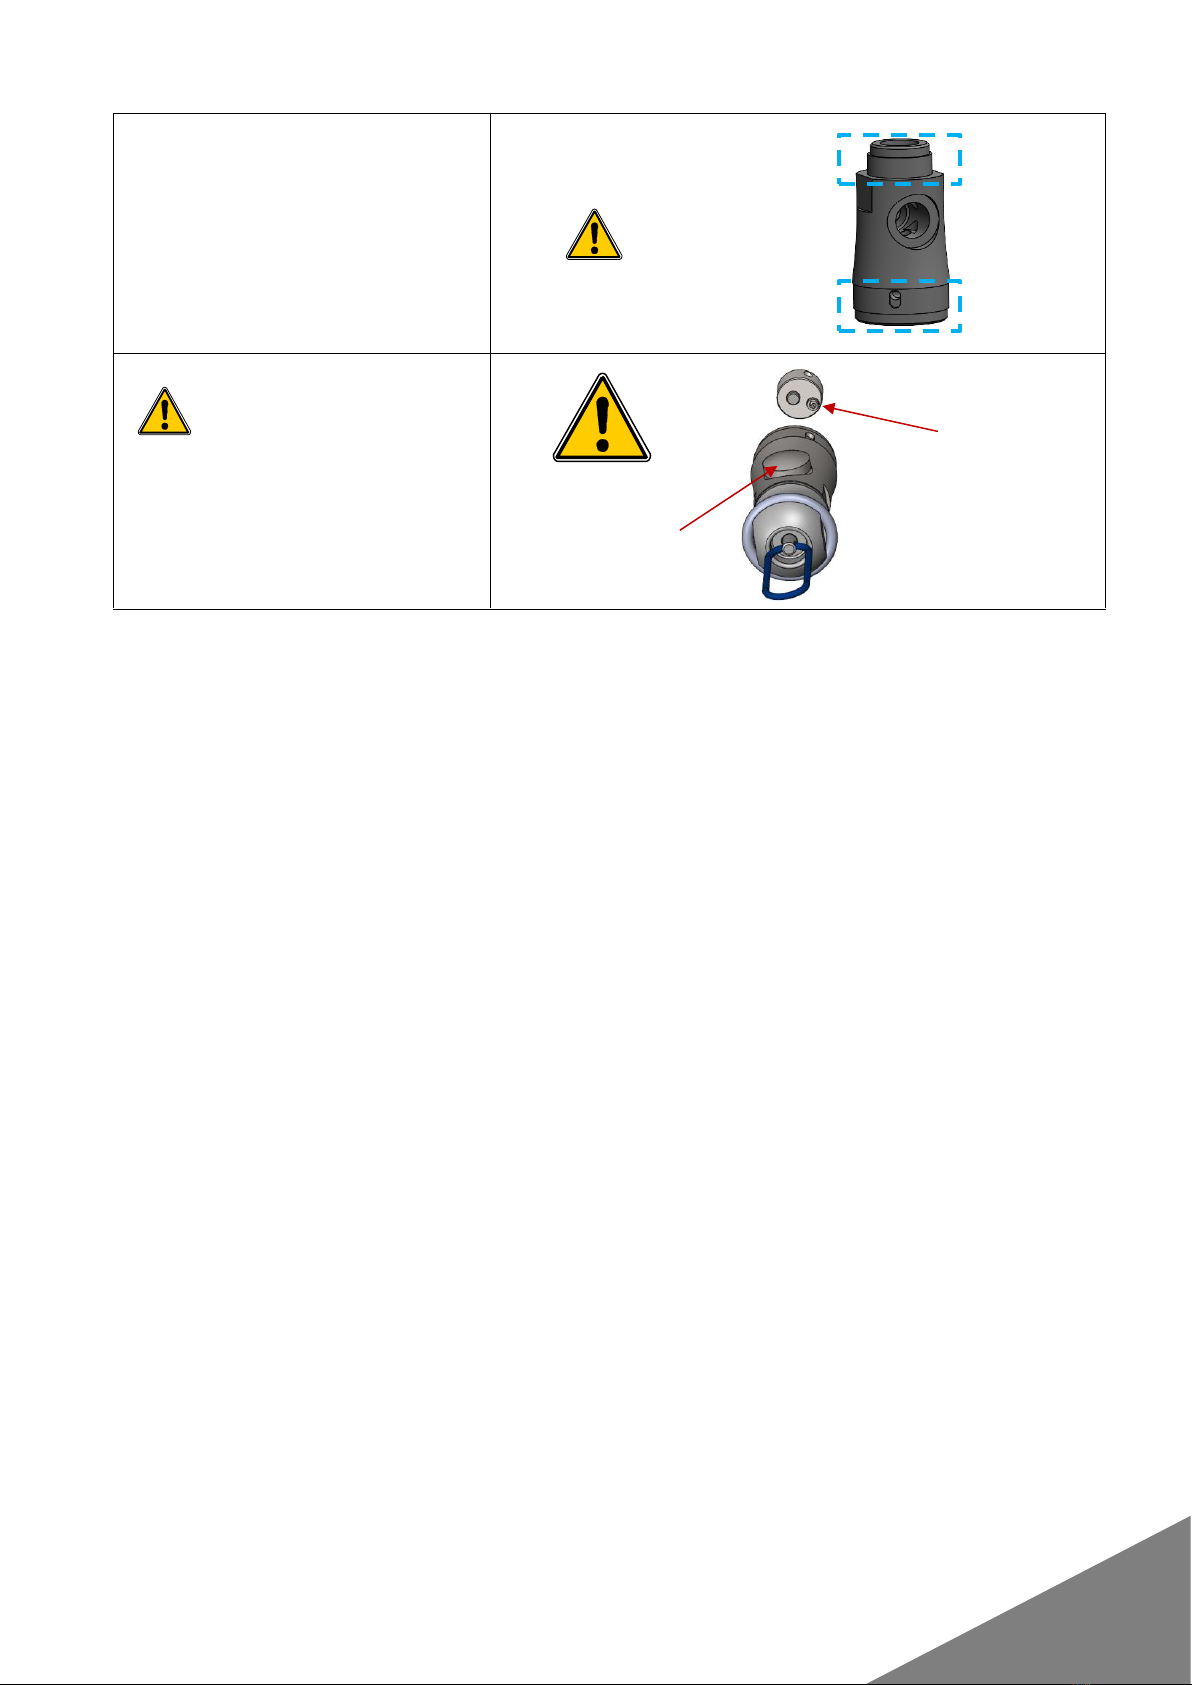
4.4 CARTRIDGE BLOCKAGES
Despite the care taken in the design of the MATADOR, it’s possible that cartridges may remain jammed
after firing, either in the lock or in the firing pin holder as shown below:
Cartridge jammed in lock
Cartridge jammed in firing pin holder
4.4.1 Lock blockage
In the case of a lock blockage, first try to relock your MATADOR and fire it empty one or more times.
If the round remains jammed after firing, take the gun in for maintenance.
4.4.2 Firing pin holder blockage
In the case of a blocked firing pin holder, you can first try to retrieve the cartridge by breaking the
MATADOR, keeping the barrel part close to the handle part.
If the round is not accessible, take the gun in for maintenance.
4.5 END OF SHIFT
At the end of each kill, remove the round from the barrel if there is one, then clean your MATADOR
with a damp cloth. Then store your pistols in a cupboard.

MATADOR® - NO_23011 - Edition du 01/12/23
13
5. MAINTENANCE
5.1 Safety instructions _________________________________________________________13
5.2 Maintenance operations ____________________________________________________13
Handle part: Lubrication/Replacement/Cleaning ______________________________________________________14
Barrel part: Cleaning/Replacement _________________________________________________________________17
Checking the MATADOR__________________________________________________________________________18
5.3 Cartridge blockages ________________________________________________________19
Lock blockage __________________________________________________________________________________19
Firing pin holder blockage ________________________________________________________________________19
5.4 Periodic maintenance schedule _______________________________________________20
5.5 Names of parts ____________________________________________________________21
SS3000, SSR3000 and HVL3000 pistols ______________________________________________________________21
5.6 Tools ____________________________________________________________________24
5.1 SAFETY INSTRUCTIONS
Always check that there are no explosive cartridges in the gun before carrying out any
maintenance operation.
The use of MATADOR must be in a clean and ventilate atmosphere, without fog of dust.
Care must therefore be taken when handling the gun. Never put your hand near the matador
bolt.
The MATADOR must always be broken when not in use.
5.2 MAINTENANCE OPERATIONS
You will find all the references for recommended greases and cleaning brushes in section 5.6 Tools.
All cleaning operations are carried out using a cloth and mechanical degreasing cleaner. Take care to
remove all impurities when cleaning.

MATADOR® - NO_23011 - Edition du 01/12/23
14
Handle part: Lubrication/Replacement/Cleaning
Remove the locking ring with a
screwdriver to uncouple the handle
part from the barrel part.
Remove the arming cord, the ring
from the end cap and unscrew it.
Press down on the firing button to
remove the hammer assembly and
gain access to the hammer spring.
At this stage, you can clean the
hammer and its spring.
You can then relubricate the
spring.
Remove the firing button to gain
access to the firing button spring.
At this stage, you can clean the
firing button and its spring.
You can then relubricate the
spring.
White edible
grease
The hammer
must be clean
White edible
grease
The firing button
must be clean

MATADOR® - NO_23011 - Edition du 01/12/23
15
Remove the pins and coupling ring
to gain access to the clevis.
Place the clevis in a vice. Then,
using a size 36 wrench, unscrew the
clevis handle.
Use a screwdriver to remove the 2
pins from the handle.
You can then access the firing pin
holder and locking spring.
At this stage, you can clean the
firing pin holder, firing pin and
locking spring.
You can then relubricate the
spring and ball.
Then, you can clean the handle. Be
careful to clean the inner threads to
avoid corrosion.
White edible
grease
The firing pin holder
and firing pin must be
clean
Risk of breakage
MATADOR® - NO_23011 - Edition du 01/12/23
16
When reassembling the handle,
apply grease to the threads, as
shown opposite.
Pay attention to the
mounting direction of the
firing pin holder. When you hold the
hammer handle towards you, with
the firing button up, the locking
spring should point to the right (as
shown in the image opposite).
Black thread
grease
Firing
button
upwards
Spring
on the
right

MATADOR® - NO_23011 - Edition du 01/12/23
17
Barrel part: Cleaning/Replacement
Remove the locking ring with a
screwdriver to uncouple the handle
part from the barrel part.
Unscrew the extension to expose the
bolt.
Access the locking joint and replace
if necessary.
Access the bolt.
Inspect:
1. Sealing disc
2. Front protection rings
3. Elastomer rings
4. Brown rear protection ring
5. Blue rear protection ring
Replace worn parts.
1
3
5
2
4
Order of
components

MATADOR® - NO_23011 - Edition du 01/12/23
18
Remove the bolt head snap ring
from the bolt and replace if
necessary.
You can also replace the bolt if it
has reached the end of its life.
Clean the inside of the barrel with a
bottle brush.
Then clean the external thread with a
cloth and cleaning product
You can follow the instructions in
reverse to reassemble your matador.
Put a little grease on the barrel
threads when reassembling.
Checking the MATADOR
Before sending the MATADOR back to the line, the following checks must be carried out:
Check that the MATADOR bolt is fully retracted into
the barrel.
Check the bolt exit speed with the SST. See table
section 2.4 page 7 for reference.
Check that the gun is properly locked. You should hear
a click.
Black thread
grease

MATADOR® - NO_23011 - Edition du 01/12/23
19
5.3 CARTRIDGE BLOCKAGES
Lock blockage
Use pliers to remove the cartridge. Damage to the chamber must be avoided at all costs, otherwise the
MATADOR will no longer work. Use pliers as shown below:
Firing pin holder blockage
To release the round, unscrew the clevis and remove the cartridge with pliers.

MATADOR® - NO_23011 - Edition du 01/12/23
20
5.4 PERIODIC MAINTENANCE TABLE
To be carried out every…
(first of the 2 time limits)
500 shots
2,000
shots
8,000
shots
10,000
shots
15,000
shots
Day
Week
Month
Inspect the rings
Barrel part
x
Change the rings
Barrel part
x
Lubricate the springs
Handle part
x
Clean the handle 3705
Handle part
x
Clean the barrel 10685
Barrel part
x
Replace the protective washers
Barrel part
x
Replace the locking seal 40
Barrel part
x
Replace the bolt head snap
ring 30
Barrel part
x
Replace the springs
Handle part
x
Replace the firing pin 24
Handle part
x
Replace the bolt 10442
Barrel part
x
Replace the bolt 8
Barrel part
x
Replace the firing pin
holder 10647
Handle part
x
Table of contents
Popular Farm Equipment manuals by other brands

Schaffert
Schaffert Rebounder Mounting instructions

Stocks AG
Stocks AG Fan Jet Pro Plus 65 Original Operating Manual and parts list

Cumberland
Cumberland Integra Feed-Link Installation and operation manual

BROWN
BROWN BDHP-1250 Owner's/operator's manual

Molon
Molon BCS operating instructions

Vaderstad
Vaderstad Rapid Series instructions


