Terragene BIONOVA IC10FRLCD User manual
Innovation in technologies for Infection Control
IC10/20FRLCD
Warning: this product contains dry natural rubber.
Rev.8 | May 2020
and Hygiene Monitoring systems
Auto-reader
for Rapid, Super Rapid,
Ultra Rapid Biological Indicators


IC10/20FRLCD Page 3
Composition....................................................................................................................................................................... 4
Product description................................................................................................................................................................................................4
Indications for Use.................................................................................................................................................................................................4
References...............................................................................................................................................................................................................5
Screen References.................................................................................................................................................................................................5
Safety information.............................................................................................................................................................. 5
Symbols....................................................................................................................................................................................................................5
Operating conditions .............................................................................................................................................................................................6
Power supply specications ......................................................................................................................................................................6
Environment operating conditions............................................................................................................................................................6
Device Safety Compliance....................................................................................................................................................................................6
Product Compatibility and Incubation programs ............................................................................................................................................7
Bionova®IC10/20FRLCD Incubation Programs ....................................................................................................................................7
Bionova®IC10/20FRLCD Auto-reader compatible indicators.............................................................................................................7
Serial/Batch Number .......................................................................................................................................................... 7
Instructions for use ............................................................................................................................................................ 7
Start-up.....................................................................................................................................................................................................................7
Positive control.......................................................................................................................................................................................................9
Interpretation of results ........................................................................................................................................................................................9
Disposal....................................................................................................................................................................................................................9
Results history visualization ...............................................................................................................................................................................9
Audible alarm ..........................................................................................................................................................................................................9
Cancelling a reading .............................................................................................................................................................................................10
Temperature monitoring......................................................................................................................................................................................10
Thermal paper specications .............................................................................................................................................................................10
Replacement of the paper roll ............................................................................................................................................................................10
Remaining incubation time | Congured programs.......................................................................................................................................10
Time setting mode................................................................................................................................................................................................10
Cleaning and maintenance..................................................................................................................................................................................11
Incubator internal website ................................................................................................................................................. 11
Local Network connection...................................................................................................................................................................................11
Internal website: Homepage...............................................................................................................................................................................11
Results history.......................................................................................................................................................................................................11
Settings ...................................................................................................................................................................................................................11
Additional features ............................................................................................................................................................ 12
Hygiene monitoring system................................................................................................................................................................................12
Firmware update ...................................................................................................................................................................................................14
Bionova®Traceability Software..........................................................................................................................................................................14
Bionova®Wilink connection ................................................................................................................................................................................14
Troubleshooting ................................................................................................................................................................ 15
Warranty............................................................................................................................................................................ 16
Limitation of liability..............................................................................................................................................................................................16
Technical assistance............................................................................................................................................................................................16
Index
IC10/20FRLCD Page 4
Bionova®IC10/20FRLCD Auto-reader has been designed for the
incubation and automatic readout of Terragene®Rapid, Super
Rapid and Ultra Rapid Self-contained biological indicators
(SCBIs) appropriate for a wide range of sterilization control
applications, and for the incubation and automatic readout
of Hygiene Monitoring System Indicators (Protein pens)
appropriate for surface cleaning and contamination control
applications.
Bionova®IC10/20FRLCD allows two different incubation
temperatures, 37°C or 60°C. Microorganisms contained within
the SCBIs vary depending on the sterilization process for which
they have been designed, therefore, incubation temperatures
and incubation times differ depending on the SCBI being used.
Bionova®IC10/20FRLCD allows the selection of independent
incubation times for each of its positions.
SCBIs for Ethylene Oxide (EO), should be incubated at 37 ºC,
while those used for the monitoring of the rest of the sterilization
processes should be incubated at 60 ºC.
Product description
Composition
8
9
10
5
6
2
1
4
7
3
Simultaneous incubation of SCBIs for monitoring
EO processes along with SCBIs for monitoring
other sterilization processes is not possible.
United States of America
Terragene®Bionova®Reader Incubators (IC10/20FRLCD)
incubate at 60°C and 37°C and read the Terragene®Bionova®
SCBI for fluorescent results at the times prescribed in the User
Manuals.
Outside the United States
Terragene®Bionova®Reader Incubator (IC10/20FRLCD)
incubate at 60°C and 37°C, and read the Terragene®Bionova®
SCBIs and the Terragene®Chemdye®Hygiene Monitoring
System Indicators at the times prescribed in the User Manuals.
Indications for Use
Please check the Product Compatibility and Incubation programs
section for more information about Incubation Programs and
new available Indicators for your Bionova®IC10/20FRLCD.
Bionova®IC10/20FRLCD Auto-reader allows easy and rapid
detection of positive and negative SCBIs using advanced
fluorescence techniques. A positive result can also be
evidenced by culture medium color change when performing
extended incubations. Read the instructions for use of each
SCBI for more information. The option to perform or not an
extended incubation depends on the internal protocols of each
laboratory or hospital.
Bionova®IC10/20FRLCD Auto-reader also provides a printed
ticket each time an incubation is completed for recording
the results. This allows for easy result management, for
documentation compliance and safe-keeping.
IC10/20FRLCD Page 5
Safety information
To avoid risks and/or damaging the device:
• For indoor use only.
•Do not place the Auto-reader in a room exposed to
direct sunlight or to high luminous intensity lamps.
•Do not place the Auto-reader near devices that
emit strong electromagnetic elds.
•Do not use the Auto-reader on leaned surfaces
or on surfaces that are subject to shocks,
vibrations,temperature or high relative humidity.
•Disconnect the power cord before cleaning.
•Do not use abrasive, corrosive cleaners or
disinfectants.
•Do not immerse into any liquid . Do not pour any
liquid inside.
•Make sure the Auto-reader is connected to an
appropriate electrical mains outlet socket.
•Use only the included power supply (AC power
adapter), power supply's AC plug, power supply
cords, and Ethernet cable. Verify that all the
included elements are in good condition on daily
basis. If any of them is damaged, discontinue their
use. The use of cables, adapters, cords, and/or
power supplies different from the ones included
may cause res, electrical shocks, or even physical
injuries.
•Do not plug any devices into the Auto-reader's
Ethernet port other than devices compliant with
IEC60950-1, IEC 62368-1 or comparable, with
safety extra-low voltages on its Ethernetports.
Screen References
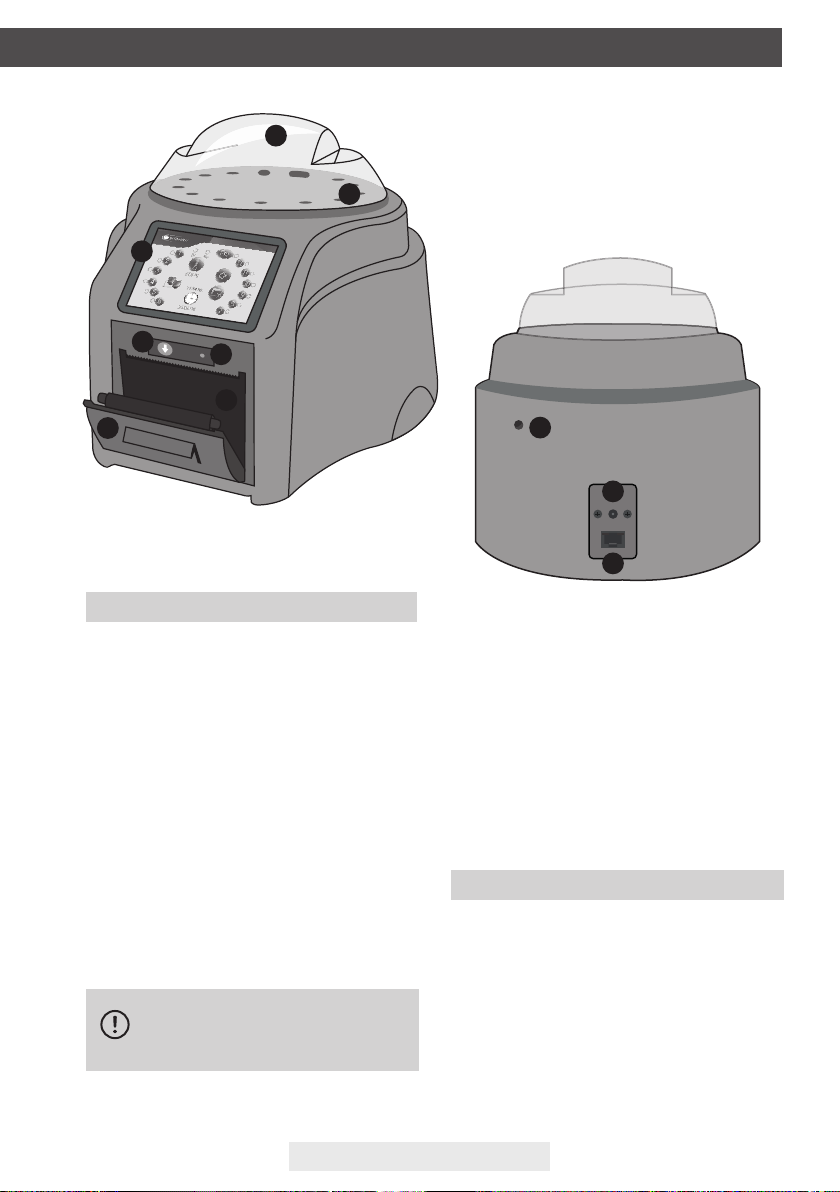
Temperature Stability Indicator.
Alarm Cancellation Button.
Incubation Temperature Selection Button.
Incubation Results History Button.
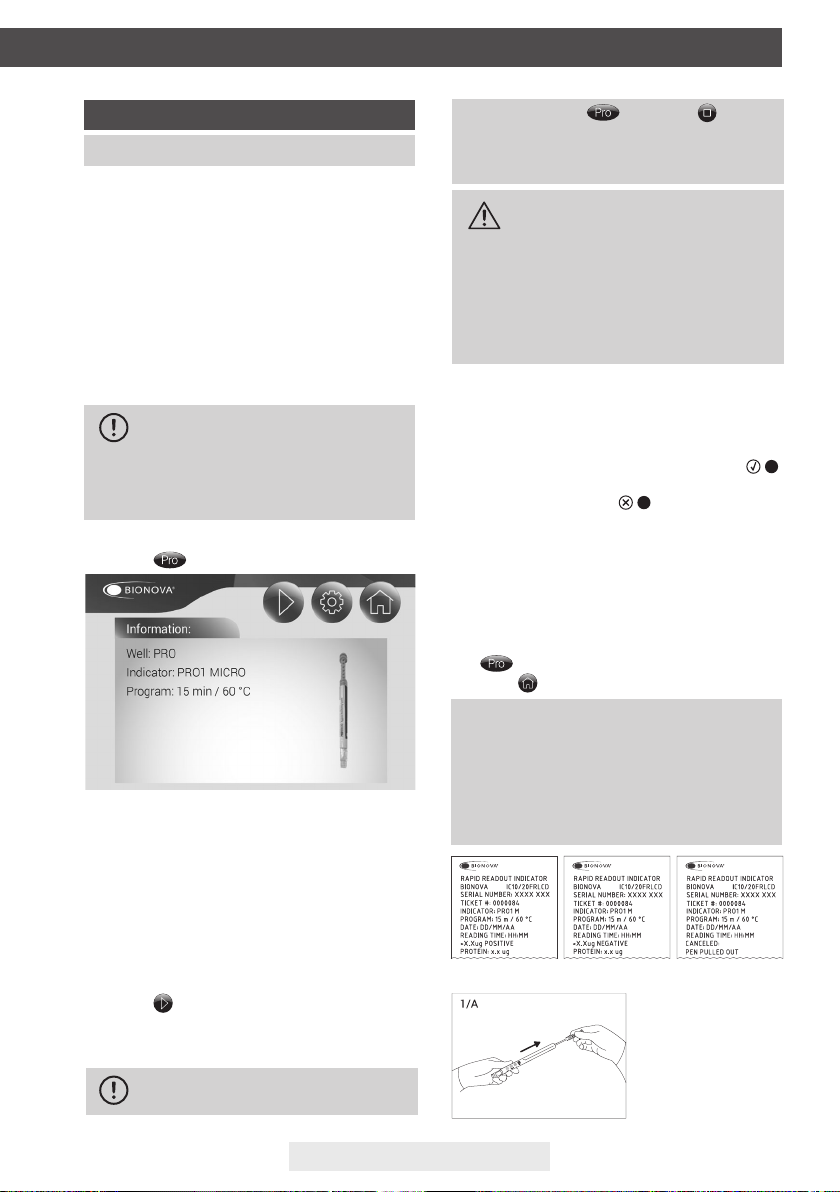
Bionova®Information Button.
Start PRO Button (PRO conguration screen).
Program Conguration Button (SCBI conguration screen)
Position status Indicator.
Date and Time Indicator.
13:34 hs.
25/02/16
PRO Conguration Button.
SCBI Position Conguration Button.
Remaining Incubation Button.
Network connection indicator / Bionova®
connection indicator.
Cancel PRO Button (PRO conguration screen).
Repeat Selection in all Positions Button (SCBI
conguration screen).
37 60
Protective Cover.
1
Incubation Area for 12 SCBIs and 1 Protein pen.
Ampoule Crusher.
2
3LCD Touch Screen Display.
4Thermal Printer.
7Cavity for paper.
5Printer's paper indicator light.
6Paper Traction Button.
9Hole for External Temperature Control.
8Input for power source plug (12Volts DC).
10 Ethernet port (RJ45).
References
Symbols
Operating relative humidity.
Operating temperature.
Caution, Warning, Attention - Refer to the
instructions for use
Caution: Hot surface.
Important.
Direct current.
For indoor use only.
Keep away from sunlight.
Batch code.
Manufacturer.
Separate collection for waste of electrical and
electronic equipment.
80 %
30 %
10 ºC
30 ºC
LOT
Safety information
IC10/20FRLCD Page 6
Safety information
Ask a qualied technician to verify device
compatibility. Attaching any other device to the
Ethernet port may damage the incubator and may
not be safe for the user.
•Do not attempt to repair the Auto-reader by
yourself, that could lead to major and irreversible
damages to the device. In case of device
malfunction, contact your local distributor for
further assistance.
To reduce the risk of using incompletely
sterilized loads:
•Please read, understand, and follow the
Instructions for Use of each SCBI before its
incubation.
•Do not remove the SCBI before the incubator
reports the nal readout result. Check a result
ticket is printed.
•Check that culture medium completely wets the
spore carrier.
To avoid the risk of injury, related to glass
fragments produced when crushing the glass
ampoule inside the SCBI tube:
•Cool the SCBI during the indicated time before
crushing the ampoule.
•Do not handle the SCBI excessively since this
might cause the glass ampoule to burst.
•Wear safety gloves and glasses when removing
the SCBI from the sterilizer, pressing the SCBI's
cap, and crushing the SCBI's ampoule.
•Do not use your nger for crushing SCBI. Use the
Ampoule Crusher instead.
To avoid a potentially hazardous situation:
•Avoid contact with the hot metal block inside
each incubation position.
•Do not insert your ngers, or any other element,
inside the incubation positions.
•Place only compatible indicators inside the
incubation positions.
To avoid SCBIs from absorbing uorescent
particles:
•Avoid direct contact between the SCBIs and
Chemical Indicators or Tapes before the SCBI
incubation.
Important
Do not use this product in a manner not specied
by Terragene®S.A., otherwise the protection
provided by the product might be affected.
Only Terragene®S.A. authorized personnel can
access or service the internal components of
the Incubator. Parts or components inside the
Incubator should not be manipulated by the user.
Power supply specications
Operating conditions
Environment operating conditions
* 1 Ampere in USA and Canada.
** 3 Amperes in USA and Canada.
Terragene®S.A. recommends the use of UPS instead of voltage
stabilizers, since they fulll two functions: to stabilize and
maintain the energy during a power outage.
Device Safety Compliance
Input
parameters
Voltage range
Frequency
*Current
Output parameters
Voltage
**Current
Operating
Condittion
(100-240)
50/60
0,2
Values
12
4
Units
Volts
Hertz
Ampers
Units
DC Volts
Amperes
Environmental
Conditions
Altitude
Operation temperature
Relative humidity
Installation/overvoltage
Degree of contamination
Storage temperature
Voltage
Operating
Conditions
3500 (máx.)
10-30
30-80
category II
2
10-30
12
Units.
Meters
Celsius
%
Celcius
DC volts
Bionova®IC10/20FRLCD Auto-reader complies with the
following standards and directives:
Electrical Safety.
Electromagnetic
Compatibility (EMC).
European Commission.
IEC 61010-1
IEC 61010-2-010
Low Voltage Directive
2014/35/EU.
EN 61326-1
EMC Directive 2014/30/EU
RoHS Directive 2011/65/EU.
WEEE Directive 2012/19/EU.
Bionova®IC10/20FRLCD Auto-reader do not represent
photobiological risk and do not generate dangerous optical
radiation in any of its normal operation conditions as per the
requirements of IEC 62471 Standard.
Designed under Quality Management System standards ISO
13485:2016/NS-EN ISO 13485:2016.
IC10/20FRLCD Page 7
All devices are manufactured with the
following settings:
- Time zone: UTC +0:00
- Printing language: English.
Select the appropriate incubation program before
the incubation of any Indicator.
Bionova®IC10/20FRLCD allows the selection of
different incubation programs for each one of the
readout positions.
It also allows to congure the same program for the
12 positions simultaneously. To do this, press the
icon .It will change its appearance to
when simultaneous conguration is possible. For
this, no position must have a readout in progress.
Instructions for use
Product Compatibility and
Incubation programs
To select the appropriate incubation program for the Indicator you
are planning to use, follow each Indicator's Instructions for use.
The following incubation programs are available for your Bionova®
IC10/20FRLCD. Verify which incubation programs are available for
your country checking the Indications for Use section.
Bionova®IC10/20FRLCD Incubation Programs
Temperature
selection
60 ºC
37 ºC 4 hs. 4 hours at 37°C
Time selection
20 min (Ultra)
30 min
1 hs.
2 hs.
3 hs.
PRO (15 min.)
Incubation Program
20 min. at 60°C
30 min. at 60°C
1 hour at 60°C
2 hours at 60°C
3 hours at 60°C
PRO at 60°C
We develop new Indicators for extending the features of our
incubators regularly. Please visit www.terragene.com.ar/
compatible or scan the QR code below to check the latest
compatible Indicators developed for your incubator.
Bionova®IC10/20FRLCD Auto-reader compatible indicators
Serial/Batch Number
For easy identication, each Bionova®IC10/20FRLCD Auto-reader
has a distinctive serial and batch numbers. The number can
be found printed on two labels, one placed at the bottom of the
Incubator, and one on its packaging. Please, register your serial and
batch numbers in this manual for future reference:
Serial Number:
Batch Number:
Start-up
1.Place the Bionova® IC10/20FRLCD Auto-reader on a rm
surface, free from vibrations, away from direct sunlight,
currents of hot or cold air, chemical and corrosive or flammable
substances. Do not place the Incubator in a way that
disconnection of the power supply's AC plug from mains could
be difcult. Leave a space of at least 10 cm from the Incubator
to the closest wall. Do not move the Incubator periodically or
during its use. Connect the Incubator to a secure and stable
electrical mains outlet socket.
2. Power on your Bionova®IC10/20FRLCD by connecting the
power supply's AC plug to mains and then connect the plug
at the other end of power supply to the rear of the Incubator.
The last incubation program used (time and temperature
combination) will be selected by default.
3.Access the Incubator's website to set language, local time zone,
and local date and time (see Settings from the Incubator Internal
Website section).
Before power on, verify that all incubation
positions are empty.
If the Printer's paper indicator light starts blinking
after powering on the Incubator, check that the
printer's door is tightly closed and that the printer
has paper, if not follow the instructions on the
Replacement of the paper roll section.
Do not wet or heat the device. If liquid is spilled on the
Incubator, disconnect it and follow the instructions on
the Cleaning and maintenance section.
4- Select incubation program and desired temperature for each
readout position.
The device will start by taking the last incubation program
and temperature settings used. To change the incubation
temperature, press icon for 3 seconds to select 37 ºC or
60 ºC as appropriate. A screen will be displayed informing that
temperature has changed.
Instructions for use

IC10/20FRLCD Page 8
The incubation temperature can be modied only
when there is no reading program in progress.
When a SCBI is removed from it's position during
incubation process, an audible alarm will sound
to indicate the tube should be returned to the
corresponding position.
If the indicator isn’t re-introduced into the reading
position after 10 seconds of being withdrawn, the
reading will be cancelled and the cancelation will
be informed through the printing of a ticket.
Make sure that the reading position you want to
use is congured with the incubation program
corresponding to the biological indicator you want
to analyze.
For a correct automatic check, the protective
cover of the auto-reader should be in its place and
all the positions empty.
Since there is only one incubation program for 37 °C
temperature, it will be automatically selected for all
positions when this temperature is selected. Once
selected the temperature of 60 °C again, the auto-
reader will remember the last incubation program
used in each position for that temperature.
A change of incubation program can be made only
in the empty positions.
The auto-reader will keep the selected temperature
(37 ºC or 60 ºC) during the reading process. The
system does not allow to modify the temperature
once the reading process has begun, unless the
reading is nished.
Instructions for use
To change it, press the icon . A screen will be displayed with
the incubation program options:
To select an incubation program for each of the positions you must
press the icon of the corresponding position, ex . A screen will
be displayed informing the current program of that position:
Select the desired option. This conguration will be stored for
that temperature until the user resets it.
5-Once the selected temperature has been reached and remains
stable, after turning on the equipment, a one-time automatic
check of the Biological Indicators and Protein Pen incubation
positions will be carried out. Indicating lights of each position will
turn on bringing the result, a green light will show a satisfactory
result while a red light will indicate error.
When the equipment detects an error in any position, a ticket
indicating the day, time and position involved will be printed.
These positions will be deactivated, thus preventing their use.
Read SCBIs instructions for use. Before placing the vials in the
auto-reader, press the top to seal the tube. Crush the ampoule
(using the ampoule crusher within the box of SCBIs or the one
located within the incubation area of the auto-reader) and make
sure that the liquid has completely wet the spore carrier placed at
the bottom of the biological indicator plastic tube.
Do not remove or change placement of SCBI once
the reading process has begun. If this occurs,
results may be invalidated.
Use a non-sterilized biological indicator as a
positive control every time a processed indicator
is incubated. For more information refer to the
Positive Control section of this user guide.
6-Place the rapid SCBI in a reading position and wait for the
result. Reading will start automatically. Immediately after
placing the SCBI in a position, the auto-reader IC10/20FRLCD
will emit an audible alarm to indicate that the readout started
and will show the information screen of the initiated position.
Status position light will turn violet and will blink until the result
is informed.
NOTE: If the auto-reader does not run automatically,
it might indicate that the auto-reader temperature is
not steady yet (check the temperature indicating light
to remain steady) or that the incubation position is
disabled due to an error in the initial autotest.
7-When a positive result is detected, the red light and the audible
alarm will turn on, this will indicate that the sterilization process
to which the SCBI was subject, has failed. 30 seconds after
removing the IB from the incubation position, the alarm and
the red light will turn off automatically and the position will be
available to start a new reading.
The negative SCBIs will be informed with a green light in the
corresponding position, this will indicate that the sterilization
process to which it was subject has been successful. The
green light will remain on for up to 30 seconds after the SCBI
is withdrawn from the reading position. The auto-reader will
inform results within 20 min. (60 °C), 30 min. (60 ºC), 1 h. (60
ºC), 2 hs. (60 °C), 3 hs. (60 ºC) or 4 hs. (37 ºC) , according to the
program selected.
These periods of incubation are the time-limits used by the
IC10/20FRLCD Page 9
IC10/20FRLCD Auto-reader automatically stores the last 208
reading results. You can access these results by pressing the icon
. After this, a screen will be displayed to show the results ordered
cronologically. The ticket of the desired result will be reprinted by
pressing on its corresponding line.
You can also access the visualization of the results by accessing the
website of the equipment (see Website of the equipment section).
The positive control should belong to the same
batch of the processed SCBI.
Use a non-sterilized biological indicator as a
positive control every time a processed indicator
is incubated.
Incubate the processed biological indicator and
the indicator used as positive control as long as
specied in the instructions.
The color of the growth media in the SCBI used
as positive control must turn to yellow during
the process of incubation for the results to be
valid. Record the positive ones and discard them
immediately as shown in the biological indicators
instructions for use.
Instructions for use
Positive control
Disposal
Interpretation of results
Dispose SCBls after use, according to your country's healthcare
and safety regulations (see SCBIs instructions for use). It is not
possible to reuse a SCBI.
Rapid Readout
The indicator used as positive control should show a positive
result (red light ). The processed SCBI results are not
valid until the biological indicator used as positive control
shows a positive result .
A processed SCBI with a positive result indicates a failure in the
sterilization process. A negative result (green light ) after
20 min. (60 °C), 30 min. (60 ºC), 1 h. (60 ºC), 2 hs. (60 °C), 3 hs.
(60ºC) 4 hs. (37 ºC) according to the used program, indicates
that the sterilization process was effective.
The presence of positive results indicates a sterilization
equipment to inform the fluorescence nal readout.
8-Every time a positive result is detected, it will be informed through
the printing of the corresponding ticket and with an audible alarm.
The alarm can be cancelled by pressing the button .
9-To register the tickets, press the button for paper traction, take
the paper and pull to cut it with the serrated edge of the printer.
NOTE: If the paper runs out, the light of paper
replacement will start blinking (see Replacement of the
paper roll in the printer).
Press the cap to seal the tube and crush the ampoule, make
sure the media completely wets the carrier. Write a C(for
control) and the date on the label. The positive control can be
placed in any well of the Bionova®IC10/20FRLCD Auto-reader.
It is a good practice to use a positive control, this helps ensuring:
•Correct temperature is reached.
•Viability of spores has not been altered due to improper storage
temperature, humidity, or proximity to chemicals.
•Capability of the media to promote rapid growth and the
generation of fluorescence.
•Proper functioning of Bionova®IC10/20FRLCD Auto-reader.
process failure may have occurred and implies that the load
must be reprocessed immediately. Facing these results, verify
good practices for load preparation and usage of biological
indicators. Check the volume of the load to be sterilized as well
as the SCBI’s position inside the load. In case the SCBI has been
correctly used, it should be interpreted that it is likely that the
sterilizer has failed and maintenance is recommended.
Visual Readout
The Rapid readout system allows the conrmation of results
by color change after 48 hours or 7 days incubation analysis (if
7-day incubation is performed, an humidied environment will be
required to avoid media dry out).
If the sterilization process was not successful, the culture
medium in the indicator will turn to yellow, as shown in the
SCBIs Instructions for Use. If the sterilization process was
successful, the indicator medium will remain unchanged.
Results history visualization
Audible alarm
The auto-reader is equipped with several alarm functions that
indicate different states after the incubation.
In the case of the biological indicators, an alarm will go off whenever
the Bionova
®
IC10/20FRLCD Auto-reader emits a positive result.
This will allow the user to immediately detect a positive result
without visually verifying the result on the equipment.
The alarm can be cancelled by pressing the button .
The hygiene monitoring system, is equipped with an alarm that the
auto-reader will set off 30 seconds before the program cycle ends
and will last until the reading is complete, notifying the operator that
the incubation time will be fullled. The color of the solution can be
used for a qualitative reading only if the pen is removed once the
program nalizes. If the pen is not removed at that time, the color of
the solution will continue to evolve.
POSITIVE CANCELEDNEGATIVE
IC10/20FRLCD Page 10
The printer uses thermal paper rolls.
Instructions for use
Cancelling a reading
Temperature monitoring
The Bionova®IC10/20FRLCD Auto-reader contains an internal
temperature control. If the temperature falls outside of the
specied range (37±2 or 60±2 ºC), the blue temperature led light
will start to twinkle.
Temperature can be externally monitored by using a Bionova®TB-
IC1020 thermometer or other similar. IC10/20FRLCD Auto-reader
has a special hole for placing the thermometer which is located at
the back of the device.
When a SCBI is removed from it’s position during incubation
process, an audible alarm will sound to indicate the tube should be
returned to its corresponding position.
If the indicator is not returned to the reading position within 10
seconds from its removal, the reading will be canceled and the auto-
reader will print out a ticket conrming the cancellation.
In the hygiene monitoring system, the user can cancel the reading
by pressing the button of the chosen position and the button
for three seconds. The device will cancel the reading and the
auto-reader will print out a ticket conrming the cancellation.
Replacement of the paper roll
Thermal paper specications
1. Pull the handle of the
printer’s door.
2. Open the printer’s cover
and remove the spent roll.
Recommended paper: JUJO AF50KSE3 or similar (order code
ICTP).
Paper width : 58 mm
Maximum paper thickness: 60 g/m2
Maximum diameter size: 50 mm
4. Close the printer cover
by pressing on the sides of
the lid.
3. Place the new paper roll
with the outer side up.
Remaining incubation time |
Congured programs
Bionova®IC10/20FRLCD Auto-reader allows to verify remaining
time of incubation and the congured programs of each reading
position in a very simple way. To do this, press on the icon . Then,
a new screen will open indicating the remaining readout time of
each position that is performing an incubation. In positions where
there is no readout initiated, the name of the selected program
will be displayed.
Press to return to the main screen or just wait one minute to
return automatically.
Time setting mode
Modication of the time using the Bioupdate®Software
Connect the auto-reader to the same network as your PC using
a specic Ethernet cable and start the program. Select the
Bionova®IC10/20FRLCD Auto-reader and press the Clock Sync
button, the auto-reader will be synchronized with the PC's clock.
Synchronization can only be done as long as there is not an
ongoing reading.
Change the time using the Bionova®Traceability Software
Connect the auto-reader to the same network as your PC using
a specic Ethernet cable and start the program. The Bionova®
IC10/20FRLCD Page 11
Incubator internal website
After successfully connecting the Incubator to your Local
Network, run a Web Browser on your PC (Firefox, Chrome, etc.)
and type-in the Incubator's IP on the Browser's address bar,
to access the Incubator Internal Website Homepage. On this
screen you will be able to check the status of each position and
the remaining incubation time of all ongoing readings. Also,
from this screen, you can access to the Incubator's Settings
screen, and to the Incubation Results History Screen.
You can access this page from the homepage or from any
other page, by clicking on the icon . On this page you will
nd the history of the last 208 results grouped by 10 per page.
By clicking on Previous or Next, you will be able to scroll all the
results that are stored in chronological order.
You can access this page from the homepage or from any other
page, by clicking on the icon . On this page you will nd
language conguration, time zone and time. These parameters
can be congured and synchronized immediately with the auto-
reader.
Internal website: Homepage
Local Network connection
Incubator internal website
Results history
Settings
Bionova®IC10/20FRLCD can be connected to a PC for
accessing the Incubator internal website, or for connecting
the Incubator to Bionova®Bioupdate or Bionova®Traceability
Software. Please follow the next instructions to connect the
Incubator to your Local Ethernet Network
1.Connect the Incubator to an Ethernet switch or router using
the provided Ethernet cable.
2.Connect your PC to the same Ethernet switch or router using
a suitable Ethernet cable.
3.Verify that the Network connection indicator on the LCD
screen changesfrom to . This indicates that the
Incubator has connected to your Local Network successfully.
4.Press on the LCD screen to check the Incubator's
IP Address.
Do not clean the internal parts of the device.
Do not pour or immerse the device into any liquid. Do
not allow any liquid to run inside the device during
its cleaning.
Maintenance
Bionova®IC10/20FRLCD does not require routine maintenance.
NOTE: The use of Cat. 5e UTP cable (or superior) with
RJ45 connectors is recommended.
NOTE: The device internal website can be accessed
using a Smartphone, Tablet, or any other device that can
run a Web Browser, given that the device is connected to
the same local network as the Incubator.
IC10/20FRLCD Auto-reader will be synchronized with the PC's
clock. Synchronization can only be done as long as there is not
an ongoing reading.
Disconnect the power supply cable and the Ethernet cable from
the incubator. If the device is hot, wait until it has cooled down
before handling it.
Clean the external surfaces of the device using a microber
cloth moistened with a solution of mild dish washing
detergent and water. Wring the cloth so it is damp but not
dripping before cleaning, and wipe the outer surfaces of
the incubator. Afterwards, moisten a clean microber cloth
with water only, and repeat the procedure until all traces of
detergent are removed from the external surfaces of the
device. After cleaning, allow the Incubator to air dry for at
least 1 hour before connecting the power supply cable or the
Ethernet cable again.
This cleaning procedure can be followed whenever considered
appropriate.
This cleaning procedure must be followed every time a spill occurs
on any of the external surfaces of the incubator.
If further cleaning is required, or if you have doubts about the
cleaning agents you may use, please contact your local distributor.
Cleaning and decontamination of external surfaces
Cleaning and maintenance
IC10/20FRLCD Page 12
Readings will be able to initiate once the incubation
temperature has been selected and is stable. The
lights corresponding to the selected temperature (37
ºC or 60 ºC) will blink until the temperature is reached,
and then stay stable. PRO1 MICRO readings must be
performed at 60 °C.
If for any reason the reading needs to be cancelled
before it ends, PRO position should be re-entered by
pressing icon . Then, press icon for 3
seconds. The reading will be cancelled and its
corresponding ticket will be printed. The equipment
will display the main screen automatically.
Do not move or remove the pen from its position
during the reading process, this can cause erroneous
readings or even cancellation of the same.
If the auto-reader detects that the protein pen has not
been placed properly in the reading position, a ticket
will be printed indicating: "Pen not detected. Check
result visually".
It is not possible to reuse an already incubated
protein pen.
Additional features
Hygiene monitoring system
Additional features
Chemdye®PRO1 MICRO reading system
Chemdye®PRO1 MICRO's incubation position allows the
quantitative analysis of products destined to the cleaning and
contamination control.
The IC10/20FRLCD can run a quantitative analysis of the PRO1
MICRO Hygiene Monitoring System, adjusted using a BSA
(Bovine Seric Albumin) standard curve. This analysis ensures
the traceability of the control of surface cleaning.
The method has a detection limit of 1 µg and a sensitivity of
0.3 μg. The result is indicated with a resolution of 0.1μg, and its
accuracy is ± 0.5μg (IC95%), in the range of 0 to 5μg, and ±0.7μg
(IC95%), in the range of 5 to 10 μg with a range of 10 μg.
Reading process
1-Press icon . Then, the following screen will be displayed:
2-Use PRO1 MICRO pen to collect the sample of the surface to be
analyzed. To do this, follow the instructions described in Figure 1
(Also explained in the instructions for use of PRO1 MICRO).
3-Once the solutions contained within the device have been
correctly mixed, proceed with incubation (remember that the
reading cone must not contain the swab). For this, insert the
pen on the incubation/reading position (Figure 2). Make sure to
place PRO1MICRO as it is indicated on the auto-reader label.
Insert the pencil making sure that it stops at the bottom of
the reading position, if it is in the correct position, check that it
cannot be rotated (Figure 2).
4-Press icon to start the incubation and reading process (15
minutes at 60 ºC). The equipment will return to the main screen
and the PRO status position light will remain blinking until the
reading ends.
5-Once the incubation process is complete, an audible alarm
indicates the end of the program. The sample is read and the
protein value is calculated based on a BSA (Bovine Seric
albumin) calibration/standard curve. Then, the auto-reader will
print a ticket conrming the calculated protein concentration. If
the value is below the selected threshold, a green light
will appear, indicating a negative result, if it is by above the
selected threshold, a red light will appear, indicating a
positive result. In both cases, one of the lights of the PRO panel
will indicate the approximated rank of concentration calculated
between 1 to 5 µg; if the value exceeds the 5 µg all the lights on
the panel will light up. The threshold to determine a positive or
negative result can be congured using the Bionova®traceability
software. The conguration process is outlined in the Bionova®
traceability software manual. The factory-set threshold is 1µg.
To visualize the displayed protein value on the screen, press the
icon .
Finally press to return to the main screen.
NOTE:
30 seconds before the end of the program, the
auto-reader will emit an alarm that will last until the
reading is complete, notifying the operator that the
incubation time will be fullled. The color of the solution
can be used for a qualitative reading only if the pen is
removed once the program nalizes. If the pen is not
removed at that time, the color of the solution will
continue to evolve.
Figure 1
Remove swab from the
device. Carefully apply 2
drops of moisturizer on
the swab.
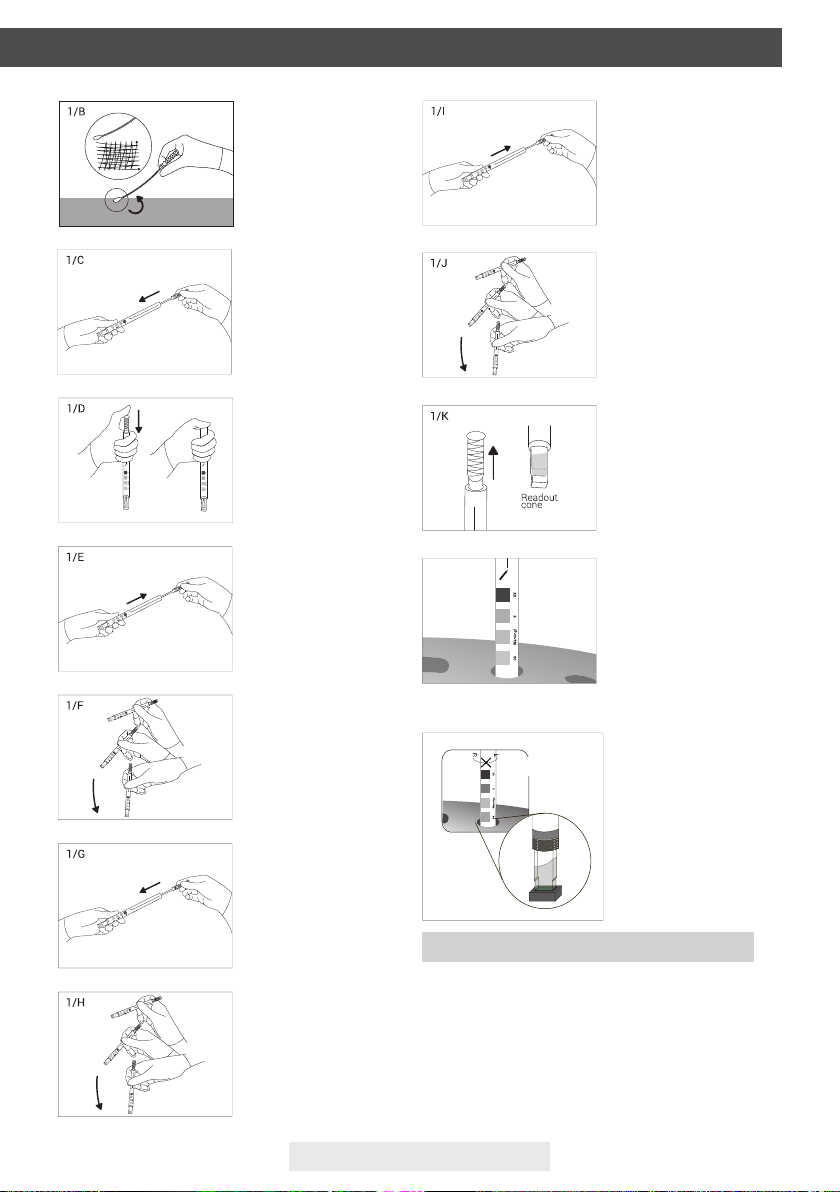
IC10/20FRLCD Page 13
Swab thorougly the
desired surface.
Place swab back into the
device.
Press the swab
downwards rmly to
activate.
Slide swab upwards.
Shake downwards
vigorously until the
solution turns to green.
Slide swab downwards.
Shake for 15 seconds.
Slide swab upwards.
Shake vigorously and
collect solution
in the readout cone.
Readout cone
without swab
Figure 2
Insert the pen in the
incubation/reading
position.
Impossible
to rotate
Impossible
to rotate
Incubate and read.
1/K
1/L
After reading, discard the hygiene indicators according to the
sanitary regulations of your country. The hygiene indicators
used cannot be reused (read the Instructions for use of
Chemdye®PRO1 MICRO Hygiene Monitoring System).
Disposal
Additional features

IC10/20FRLCD Page 14
Bionova®IC10/20FRLCD Auto-reader Incubator allows the
update of its rmware (program inside the Incubator that
controls and denes its different features) by using the rmware
update utility Bionova®Bioupdate. Bionova®Bioupdate connects
to the internet to verify, download, and install, the latest rmware
version available for your incubator. The update process only
lasts a few seconds and is carried out without the loss of any
Incubator's data. Please visit www.terragene.com.ar/software
to download Bionova®Bioupdate.
Update process
Before updating the device, make sure that the Bionova®
Traceability Software is closed. Power Off the Incubator for ve
seconds, afterwards Power On the Incubator and follow the
next steps:
1. Connect the Incubator to your Local Network following the
instructions on Local Network connection section. Make sure
your PC is connected to the same network, and that an active
internet connection is available.
2.Run Bionova®Bioupdate.
3. Select the Incubator you want to update, check that the IP is
correct. Press the Start button to update.
4.Wait until the software indicates that the update process has
been completed. The Incubator will print an update conrmation
ticket. If it was already up to date, the ticket will not be printed.
Bionova®Traceability Software is a proprietary software
designed by Terragene®to manage and store the results of Self-
contained biological indicators and Hygiene Monitoring System
Indicatorsin a secure and user-friendly way.
Bionova®Traceability Software allows matching the information
of an Indicator result with the sterilizer or washing machine used,
the operator, cycle characteristics, and all relevant information
for allowing each institution achieve reliable documentation
compliance and safe-keeping. All saved information is stored
in a password protected encrypted database to assure its
integrity. Furthermore, all previously saved information can be
reprinted at any time to generate a hard copy of the results.
Visit www.terragene.com.ar/software to download the latest
version of Bionova®Traceability Software, its User Manual, and
to check its newest features and capabilities.
Bionova®Traceability Software
Firmware update
NOTE: This process must be repeated every time that a
new rmware version is available, this will be informed in
the Terragene®S.A. website.
Managing results with Bionova®Traceability Software
To use Bionova®Traceability Software along with your incubator,
please download the software from our webpage and install it
in a compatible Personal Computer (PC). The PC minimum
requirments are listed in the Traceability Software User Manual.
After the installation is complete, connect your Bionova®
IC10/20FRLCD via its Ethernet port to a PC following the
instructions on Local Network connection section and run
Bionova®Traceability Software. When the Incubator is connected
to the Traceability Software succesfully, the Bionova®Connection
Indicator will change from to .
Please check the Traceability Software's User Manual for more
information about the connection and installation procedure.
Bionova®Wilink is a WI-Fi connectivity accessory for Bionova®
IC10/20FRLCD. Wilink can be used for connecting the Incubator
to a WI-Fi Network directly, so the incubator connects to your
Local Network by WI-Fi instead of using an Ethernet cable.
Please visit www.terragene.com.ar to learn more about
Bionova®Wilink.
Using Bionova®Traceability Software
Bionova®Wilink connection
Additional features
NOTE: When it is necessary to update the LCD Screen
graphical environment, the update process may take up
to 30 minutes. Plan accordingly.

IC10/20FRLCD Page 15
Fault Possible cause Action
Troubleshooting
The incubator does not start.
The Incubator informs an error in an
incubation position during “Autotest”
The Incubator informs an error in an
incubation position during “Autotest”
An incubation can not be run in
a SCBI or Protein Pen incubation
position (position's red light is on)
The Incubator does not run an
incubation in any position.
Is not possible to change temperature
and/or time setting.
The printer does not print (printer
blue light blinks quickly)
The printer releases unprinted paper.
The Incubator can not be updated.
Incubator is not detected by Bionova®
Traceability Software
Power supply is not connected.
A indicator is placed in the incubation
position during the Autotest.
Dust particles might be obstructing
the readout mechanism.
Position disabled. Error in that position
during “Autotest”
Incubation temperature not stable.
Ongoing reading.
The printer cover is not tightly closed.
Printer without paper.
Paper roll is not placed correctly.
Bionova®Traceability Software is
being run.
Incubator is turned off / incubator is
not connected to the PC.
Check that the power supply is connected to
a proper mains. Check that the DC plug of
the power supply is connected to the rear of
the Incubator.
Check that every incubation position is
empty during the Autotest.
Avoid using the Incubator in dusty
environments. Use air to dust-off inside a
position. Do not insert solid objects. Once
cleared, restart the Incubator.
Make sure that the position is empty when
starting the Incubator. Once cleared, restart
the Incubator.
Wait until temperature is stable before any
incubations.
Wait for any incubation to complete, and try
again.
Check that the cover is tightly closed.
Place a new paper roll in the right direction.
Place the paper according to the directions
on the Replacement of the paper roll section.
Close Bionova®Traceability Software and
restart the Incubator.
Follow the directions on the Start-up section
to set-up the device properly.

IC10/20FRLCD Page 16
Warranty
Terragene®S.A. guarantees both the quality of the product
material components and the quality of its manufacturing
process. Should any material or manufacturing faults be
detected within the warranty period (1 year from the time of
purchase), the only obligation of Terragene®S.A. will be product
repairing or substitution.
Limitation of liability
Technical assistance
Terragene®S.A. shall not be liable for any loss or damage
that may result from the unsuitable use of the equipment,
negligence or user’s full responsibility.
Terragene®S.A
Ruta Nacional Nº 9, Km 280 - CP 2130.
Parque Industrial Micropi- Alvear-Santa Fe-Argentina.
Innovación en tecnologías para el Control de Infecciones
y sistemas de Monitoreo de Higiene
A
uto-lector
a
para Indicadores Biológicos
Rápidos, Súper Rápidos, Ultra Rápidos
IC10/20FRLCD
Rev.8 | Mayo 2020
Advertencia: este producto contiene caucho natural seco.


IC10/20FRLCD Page 19
Indice
Composición ..................................................................................................................................................................... 20
Descripción del producto.....................................................................................................................................................................................20
Indicaciones de uso..............................................................................................................................................................................................20
Referencias.............................................................................................................................................................................................................21
Referencias de Pantalla .......................................................................................................................................................................................21
Información de seguridad .................................................................................................................................................. 21
Símbolos .................................................................................................................................................................................................................21
Condiciones de operación ..................................................................................................................................................................................22
Especicaciones de la fuente de alimentación.....................................................................................................................................22
Condiciones ambientales de operación..................................................................................................................................................22
Cumplimiento de normas y directivas..............................................................................................................................................................22
Compatibilidad de productos y programas de incubación...........................................................................................................................23
Programas de incubación para Auto-lectora IC10/20FRLCD............................................................................................................23
Indicadores compatibles con Auto-lectora Bionova®IC10/20FRLCD..............................................................................................23
Número de serie y lote....................................................................................................................................................... 23
Instrucciones de uso ......................................................................................................................................................... 23
Puesta en marcha.................................................................................................................................................................................................23
Control positivo......................................................................................................................................................................................................25
Interpretación de los resultados ........................................................................................................................................................................25
Descarte..................................................................................................................................................................................................................26
Visualización del historial de resultados ..........................................................................................................................................................26
Alarma sonora........................................................................................................................................................................................................26
Cancelación de una lectura.................................................................................................................................................................................26
Monitoreo de temperatura ..................................................................................................................................................................................26
Especicaciones del papel térmico...................................................................................................................................................................26
Reemplazo del rollo de papel..............................................................................................................................................................................26
Tiempo restante de incubación | Programas congurados.........................................................................................................................27
Modicación de hora............................................................................................................................................................................................27
Limpieza y mantenimiento..................................................................................................................................................................................27
Sitio web interno de la incubadora ..................................................................................................................................... 27
Conexión de Red Local.........................................................................................................................................................................................27
Sitio web interno: Página de inicio.....................................................................................................................................................................27
Historial de resultados .........................................................................................................................................................................................28
Conguración.........................................................................................................................................................................................................28
Características adicionales................................................................................................................................................ 28
Sistemas de monitoreo de higiene....................................................................................................................................................................28
Actualización del rmware..................................................................................................................................................................................30
Software de Trazabilidad Bionova®...................................................................................................................................................................30
Conexión mediante Bionova®Wilink .................................................................................................................................................................30
Tabla de solución de problemas......................................................................................................................................... 31
Garantía ............................................................................................................................................................................ 32
Limitaciones de responsabilidad .......................................................................................................................................................................32
Asistencia técnica.................................................................................................................................................................................................32
IC10/20FRLCD Pág. 20
Composición
8
9
10
5
6
2
1
4
7
3
La Auto-lectora Bionova®IC10/20FRLCD ha sido diseñada para
la incubación y lectura automática de Indicadores Biológicos
Autocontenidos Terragene® (SCBIs por sus siglas en inglés)
Rápidos, Súper Rápidos y Ultra Rápidos apropiados para el
control de una amplia gama de aplicaciones de esterilización,
y para la incubación y lectura automática de Indicadores
de Sistemas de Monitoreo de Higiene (Lápices de proteína)
apropiados para aplicaciones de control de limpieza y
desinfección de supercies.
La Auto-lectora IC10/20FRLCD permite dos temperaturas
diferentes de incubación, 37°C ó 60°C. Los microorganismos
contenidos en los SCBIs varían según el proceso de
esterilización para el que han sido diseñados, por lo tanto, las
temperaturas de incubación y los tiempos de incubación varían
según el SCBI que usted pretenda utilizar. La Auto-lectora
Bionova®IC10/20FRLCD permite la selección de tiempos de
incubación independientes para cada una de sus posiciones.
Los SCBIs para Óxido de Etileno (OE) deben incubarse a 37 ºC,
mientras que los utilizados para el monitoreo del resto de los
procesos de esterilización deben incubarse a 60 ºC.
Descripción del producto
No es posible la incubación simultánea de
SCBIs para el monitoreo de procesos de OE
conjuntamente con SCBIs para el monitoreo de
otros procesos de esterilización.
Estados Unidos de América
Las Incubadoras Auto-lectoras Terragene®Bionova®
(IC10/20FRLCD) incuban a 60°C y 37°C y leen los SCBIs
Terragene®Bionova®para obtener resultados de fluorescencia
a los tiempos prescriptos en los Manuales de Usuario.
Fuera de los Estados Unidos
Las Incubadoras Auto-lectoras Terragene®Bionova®
(IC10/20FRLCD) incuban a 60°C y 37°C, y leen los SCBIs
Terragene Bionova®y los Indicadores de Sistemas de Monitoreo
de Higiene Terragene®Chemdye®, en los tiempos prescriptos en
los Manuales de Usuario.
Indicaciones de uso
Consulte la sección Compatibilidad de productos y programas de
incubación para obtener más información sobre los programas
de incubación y los nuevos indicadores disponibles para su
Auto-lectora IC10/20FRLCD.
La Auto-lectora Bionova®IC10/20FRLCD permite la detección
fácil y rápida de SCBIs positivos y negativos utilizando técnicas
avanzadas de fluorescencia. Un resultado positivo también se
puede evidenciar por el cambio de color del medio de cultivo al
realizar incubaciones extendidas. Lea las instrucciones de uso
de cada SCBI para más información. La opción de realizar o no
una incubación extendida depende de los protocolos internos
de cada laboratorio u hospital.
La Auto-lectora Bionova® IC10/20FRLCD también proporciona
un ticket impreso cada vez que se completa una incubación
para registrar los resultados. Esto permite una sencilla gestión
de resultados, para facilitar el cumplimiento de requisitos de
documentación y de integridad de registros.
This manual suits for next models
1
Table of contents
Languages:
Popular Medical Equipment manuals by other brands


Getinge
Getinge Arjohuntleigh Nimbus 3 Professional Instructions for use

Mettler Electronics
Mettler Electronics Sonicator 730 Maintenance manual

Pressalit Care
Pressalit Care R1100 Mounting instruction

Denas MS
Denas MS DENAS-T operating manual

bort medical
bort medical ActiveColor quick guide

AccuVein
AccuVein AV400 user manual


