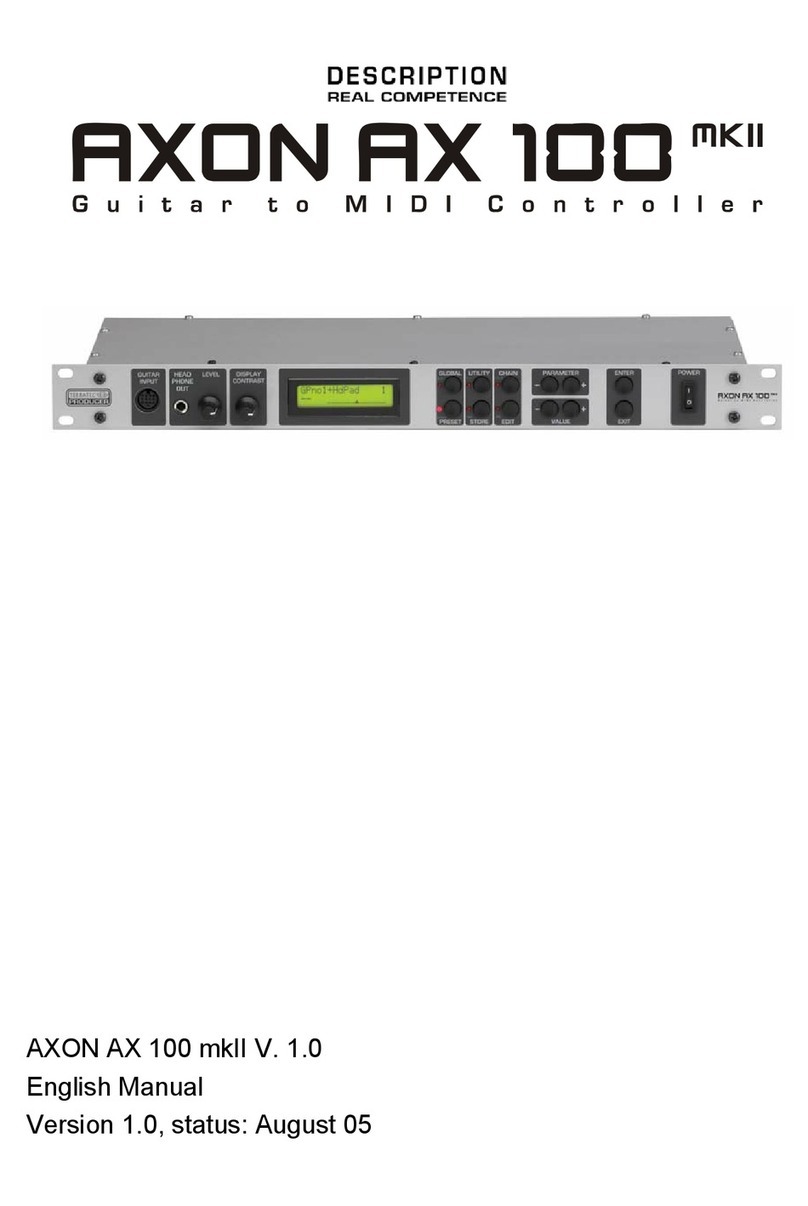
TerraTec AXON AX 100 MKII User manual

AXON AX 100 MKII
English Manual
Version 2.0 | January 2008

CE Declaration
We:
TerraTec Electronic GmbH, Herrenpfad 38, D-41334 Nettetal, Germany
hereby declare that the product:
AXON AX 100 MKII,
to which this declaration refers is in compliance with the following standards or standardising documents:
EN 55022, EN 55024
The following are the stipulated operating and environmental conditions for said compliance:
residential, business and commercial environments and small-company environments.
This declaration is based on:
Test report(s) of the EMC testing laboratory
The information in this document is subject to change without notice and shall not be deemed as a
warranty by the seller. No warranties, express or implied, are made with regard to the quality, suit-
ability or accuracy of this document. The manufacturer reserves the right to change the contents of
this document and/or the associated products at any time without the provision of prior notice to
specific persons or organisations. The manufacturer shall not be held liable for damages of any
kind arising from the use, or the inability to use this product or its documentation, even if the possi-
bility of such damage is known. The information in this document is subject to copyright. All rights
are reserved. No part of this manual may be reproduced or transmitted in any form or for any pur-
pose without the express written permission of the copyright holders. Product and brand names
contained in this document are used for identification purposes only. All registered trademarks,
product designations or brand names used in this document are the registered property of their
©TerraTec Electronic GmbH, 1994 – 2008. All rights reserved (01/01/2008).
respective owners.
2 AXON AX 100 MKII V. 2.0 (English)

Contents
Congratulations!...............................................................................................................................................6
Scope of delivery..............................................................................................................................................7
Optional accessories .......................................................................................................................................7
QuickStart guide — for those of you can't wait.............................................................................................8
Editing preset sounds.....................................................................................................................................9
Connectors and controls...............................................................................................................................11
Front panel:..................................................................................................................................................11
Rear panel....................................................................................................................................................13
The operating modes of the AXON AX 100 MKII..........................................................................................14
The Computer Editor......................................................................................................................................15
Installation in Windows.................................................................................................................................15
Installation in MAC OS X..............................................................................................................................15
Connection...................................................................................................................................................15
Global page - Load all settings / Save all settings....................................................................................16
Presets page – Get Preset / Store to.......................................................................................................16
Preset page – Load from Disk / Save to Disk ..........................................................................................16
Miscellaneous..........................................................................................................................................16
Firmware update ..........................................................................................................................................17
Global Mode....................................................................................................................................................18
Global Parameters.......................................................................................................................................18
Basic Channel..............................................................................................................................................18
Hold Channel ...............................................................................................................................................19
Sequencer Channel (SEQ CHANNEL).........................................................................................................19
Sequencer MIDI Ports (SEQPORTS)...........................................................................................................19
Pitchbend Range (PBEND RANGE) ............................................................................................................19
Resend Pitchbend Range (SND PBENDRG)...............................................................................................20
Local Mode...................................................................................................................................................20
Tune Base....................................................................................................................................................20
Guitar Number (GUITAR NO) ......................................................................................................................21
Instrument Type (INPUT TYP).................................................................................................................21
Pickup......................................................................................................................................................21
Note Off Limit...........................................................................................................................................22
Trigger Level............................................................................................................................................22
Instrument Tuning (INPUT GUIT.TUNE) .................................................................................................22
Sensitivity.................................................................................................................................................22
Wheel Controller (WHEELCNTRL)..........................................................................................................23
Pedal Sensitivity (PEDALSENS)..................................................................................................................23
CC Defaults..................................................................................................................................................24
MIDI Mapping...............................................................................................................................................25
Preset Mode....................................................................................................................................................26
Preset Parameters.......................................................................................................................................26
Selecting Presets.........................................................................................................................................26
Guitar Tuner and Instrument........................................................................................................................27
Preset Programming ....................................................................................................................................27
String Split ...............................................................................................................................................27
Fret Split ..................................................................................................................................................28
Pick Split..................................................................................................................................................28
Split Combinations...................................................................................................................................28
Selecting the Split Zones..............................................................................................................................28
Changing the Split Parameters ....................................................................................................................29
Setting Up Split Zones.............................................................................................................................29
AXON AX 100 MKII V. 2.0 (English) 3

Split in the Software Editor...................................................................................................................... 30
EDIT LAYER........................................................................................................................................... 31
Select Instrument.................................................................................................................................... 31
Program Change send (PROGRAM SEND) ........................................................................................... 32
MIDI Output Channel .............................................................................................................................. 32
MIDI Output Ports ................................................................................................................................... 32
Volume.................................................................................................................................................... 32
Transpose............................................................................................................................................... 33
Quantize.................................................................................................................................................. 33
Panorama (PAN POS) ............................................................................................................................ 33
Pan Spread............................................................................................................................................. 33
Reverb..................................................................................................................................................... 34
Chorus..................................................................................................................................................... 34
Attack Time............................................................................................................................................. 34
Velocity Sensitivity (VEL SENSE) ........................................................................................................... 34
Velocity Offset (VEL OFFSET)................................................................................................................ 35
Pick Control Value 1 (PICK VAL1) .......................................................................................................... 36
Pick Control Value 2 (PICK VAL2) .......................................................................................................... 36
String Split............................................................................................................................................... 37
Fret Split.................................................................................................................................................. 37
Pick Split 1 and 2 .................................................................................................................................... 37
Preset Name........................................................................................................................................... 38
Guitar No................................................................................................................................................. 38
String Mode............................................................................................................................................. 38
Hold Mode (HOLDMD)............................................................................................................................ 39
Common (COM)...................................................................................................................................... 39
Separate (SEP)....................................................................................................................................... 39
Layer....................................................................................................................................................... 41
Arpeggiator (ARPEG).............................................................................................................................. 41
Control (CNTRL) ..................................................................................................................................... 45
Stack....................................................................................................................................................... 46
Wheel Controller (WHEELCNTL)............................................................................................................ 46
Non Registered Parameter Number / Registered Parameter Number (NRPN/RPN) .............................. 47
Finger Pick.............................................................................................................................................. 48
MIDI Tuning............................................................................................................................................. 48
Chain Mode .................................................................................................................................................... 49
Setting Up Chain Presets........................................................................................................................ 49
Chain Preset Name................................................................................................................................. 49
Preset...................................................................................................................................................... 49
Step......................................................................................................................................................... 50
Storing Chain Presets ............................................................................................................................. 50
Utility Mode..................................................................................................................................................... 51
Display......................................................................................................................................................... 51
Sound names .............................................................................................................................................. 51
Doubleclick Response (DCLIC RESPNS) ................................................................................................... 52
Transmit SysEx (XMIT SYSEX)................................................................................................................... 52
TOTAL DUMP [Global: Save all Settings]............................................................................................... 52
PRESET... (ALL, 1 to 128) [Presets: Save to Disk]................................................................................. 52
CHAIN... (ALL, 1-32)............................................................................................................................... 52
ARP-PATTRN... (ALL, 1-16) ................................................................................................................... 52
SEQUENC... (ALL, PATTRN, TRACKS)................................................................................................. 53
Receive SysEx ............................................................................................................................................ 53
Edit Sequence............................................................................................................................................. 53
4 AXON AX 100 MKII V. 2.0 (English)
Tempo .....................................................................................................................................................54
Volume.....................................................................................................................................................54
Panorama................................................................................................................................................54
Reverb.....................................................................................................................................................54
Chorus.....................................................................................................................................................54
Mode........................................................................................................................................................55
Sequencer Pattern...................................................................................................................................55
Sequencer Track .....................................................................................................................................56
ADC Monitor (ADC MON) ............................................................................................................................56
Appendix.........................................................................................................................................................57
Factory Reset...............................................................................................................................................57
Factory Presets............................................................................................................................................57
Troubleshooting ...........................................................................................................................................57
Preset list .....................................................................................................................................................59
MIDI Implementation Chart v2.0...................................................................................................................61
Table of implemented NRPN controllers......................................................................................................64
MIDI SysEx Implementation.........................................................................................................................65
Table of AX 100 SysEx dumps.....................................................................................................................65
Format for GS Compatible SysEx commands..............................................................................................66
Table of GS Compatible SysEx commands .................................................................................................66
Patch list.......................................................................................................................................................68
Parameter Overview.....................................................................................................................................74
AXON AX 100 MKII V. 2.0 (English) 5
Safety information
Please ensure that analogue devices are turned off before plugging them
in. This will protect you from any possible—albeit weak—electrical
shocks, as well as protecting your speakers and your hearing from sud-
den peaks.
Congratulations!
You've purchased the AXON AX 100 MKII, the world's fastest and most powerful guitar-to-MIDI converter
available on the market. The AXON AX 100 MKII is an enhanced development of the NGC 77, which had set
standards for innovative technology and had become standard equipment for many professional guitarists,
including John McLaughlin. Thanks to its neural network, the AXON AX 100 MKII is able to determine the
precise pitch of a note the instant it is picked, whereas other devices require several oscillations of the string
for analysis. The early recognition of transients lets the AXON simultaneously determine pitch, amplitude, and
even the location at which the string was picked—an unparalleled ability to date. This is due to the AXON's
unusual splitting options. For example, you can use a string split to divide the strings of your guitar into two
zones, each with its own sound properties. Or use a fret split to divide the fingerboard of your guitar into two
separate playing zones. Pick splits let you divide the picking area of the guitar into up to three independent
sound zones that you can select instantly by changing your picking position. You can achieve impressive ef-
fects with the pick control function, which lets you control modulation effects and others with your picking posi-
tion. Special effects such as COMMON (bypass), SEPARATE (hold), LAYER (ensemble/doubling) and others
can be applied with the multi-programmable hold switch. The implementation of a full-featured arpeggiator
provides users further options to add expression to their playing with striking variations. Splits and effects can
be combined, stored in up to 128 complex presets and recalled as needed. Another unique feature of the
AXON AX 100 MKII is its unrestricted support for both acoustic guitars and basses with piezo hex pickups.
This opens the MIDI world to bass players and classical guitarists that are looking for new, contemporary
forms of expression. The internal soundboard upgrades the AXON AX 100 MKII to a professional guitar syn-
thesizer for live use supporting ambitious musicians with over 500 excellent sounds, including 10 drum kits.
The AXON AX 100 MKII system is fully MIDI compatible, and also features an editable drum sequencer.
6 AXON AX 100 MKII V. 2.0 (English)

Scope of delivery
Start by making sure that the contents of the package are complete.
The AXON AX 100 MKII package should contain the following items:
■1 AXON AX 100 MKII
■1 MIDI cable, 1.5m
■1 footswitch for hold and chain function
■1 network adapter
■CD with Editor software
■DVD with AXON workshop, interviews and installation instructions
■1 service request form
■1 registration card with the serial number
■This manual
Please fill out and return the registration card enclosed in the package to us at your earliest convenience or
register online at www.terratec.net/register.htm. This is important for support and hotline services.
Optional accessories
The following products are available separately:
■PU 100 interface (pickup) for guitars with steel strings (available in Spring 2008)
■AIX 103 interface (pickup) for 4, 5 and 6-string bass guitars with steel strings
■AXK 100 13-pin cable (5m) to connect the pickup to the AX 100 MKII
AXON AX 100 MKII V. 2.0 (English) 7

QuickStart guide — for those of you can't wait
Connect your guitar to the AXON AX 100 MKII. If your guitar is equipped with one of the optional interfaces
(PU 100, AIX 103), use the 13-pin cable (AXK 100) to do so. The socket at the left of the front panel labelled
GUITAR INPUT is the one you need.
If you are using an external MIDI instrument for audio output, connect the MIDI OUT of the AXON to the MIDI
IN of the instrument. You can skip this step if you intend to use the internal soundboard, of course.
Now connect the AXON AX 100 MKII to your mixer or amplifier using the SOUNDBOARD RIGHT / LEFT ports
on the rear panel. If you're using an external sound module, ensure that the optional sound module is con-
nected to the mixer or amplifier.
Switch the device on now—but first, set the volume of your amplifier to zero to prevent possible peaks from
damaging your speakers and eardrums.
You're almost finished now. You should check a few basic settings before getting started, however. Press the
GLOBAL button. BASIC CHANNEL will now appear on the display. It should have the value 1. If not, change it
using the VALUE + and VALUE - buttons.
Press the PARAMETER + button to navigate to the next menu item, the HOLD CHANNEL. It should have the
value 11. (At any rate, the value should not be lower than 7. Refer to page 19 for more information)
Press PARAMETER + again for the SEQ CHANNEL. Ensure that it is set to 10.
We will skip over the next three settings for Sequencer Port and Pitchbend—for more information on these,
refer to page 19. The next important one is LOCAL MODE, which you can access by pressing the
PARAMETER + button. It should be set to ON if you intend to address the internal soundboard of the AXON
AX 100 MKII directly, or if the generated MIDI data are to be sent to the MIDI OUT. You can disable local
mode if you would like to control the AXON using a sequencer or MIDI recording software. The AXON AX 100
MKII then behaves like any other external sound module.
The next item is the TUNE BASE. The AXON AX 100 MKII is preset to a reference pitch of 440 Hz, which is
indicated on the display by a "0". If you would like to play together with other, hard-to-tune instruments (such
as the piano), you can adjust your tuning in cent increments.
8 AXON AX 100 MKII V. 2.0 (English)

The next item to check is the type of instrument used. Press the PARAMETER + button again and GUITAR
NO will appear on the display. Up to 8 presets for different instruments can be stored here.
Press ENTER to open the submenu and select the instrument you will be using from the available instruments:
BASS, GUITAR, VIOLIN and CELLO.
Press PARAMETER + to open the selection menu for the pickup you will be using. MAGNETIC is selected by
default. If you are going to be using an instrument with a piezo pickup, change this setting to PIEZO.
Check the setting by playing the connected guitar. If you hear so-called double triggers (i.e. two notes hit in
rapid succession) even though you have only hit the string once, you should adjust the input sensitivity of the
AXON to your personal playing style and hardware. To do so, press the PARAMETER + button until you reach
the SENSE menu item.
Begin with the low E string and adjust the value at the bottom right of the display using the VALUE +/- buttons.
remaining 5 strings.
Finished! We can deal with the other parameters later—the AXON has been preconfigured at the factory to let
Ensure that the AXON is in Preset mode (Preset LED lit on the front panel). This is automatically the case
when you switch the device on and none of the other modes (GLOBAL, UTILITY or CHAIN) are selected.
Use PARAMETER + to move on to the
you get started with a minimum of hassle.
Editing preset sounds
The top half of the display shows the name of the currently active preset, with the number of the preset to the
right.
Use the VALUE +/- buttons or the UP/DOWN buttons of the guitar interface to step through the presets 1-256.
Presets 1-128 are reserved for the user and can be edited. 129-256 are fixed factory presets. By default, these
presets have been copied to the programmable user area (1-128) to ensure that it contains playable parame-
ter settings, but they can be overwritten as needed, of course.
AXON AX 100 MKII V. 2.0 (English) 9
Once you have familiarised yourself with them, you can try modifying one of the existing presets:
1. Use the VALUE +/- buttons to select preset 1, "Grand Piano" (same as factory preset 129). You can also
use the UP/DOWN buttons of the guitar interface to select the preset. Next, press the EDIT button.
2. Press ENTER to open the AXON's split zone area. Confirm the selected split zone with ENTER. Then,
confirm the selected layer, likewise using the ENTER button.
3. You can now use the VALUE +/- buttons to select any INSTRUMENT. The instruments are sorted logi-
cally according to groups. Using the PARAMETER button, you can move the cursor towards the left to the
group and navigate through it using the VALUE +/- buttons in order to reach the desired sound more
quickly.
Pressing the PARAMETER + button again4. takes you to additional settings for the preset; these are ex-
5. . This parameter results in a semitone shift of the note from its standard tuning. Press
6. ea. We now want to give our modified
preset a new name by pressing the PARAMETER + button five times, then the ENTER button. The cursor
is now located on the "G" of the old preset name, "Grand Piano".
plained in detail later on in the manual. For example, you can use the VALUE +/- buttons to set the
VOLUME parameter to the desired value.
You may also change the TRANSPOSE setting in the next parameter. This can be useful for a bass
sound, for example
the PARAMETER + button and set the value with the VALUE +/- buttons (+12 or -12 raises or lowers the
pitch one octave).
Press the EXIT button three times to access the global preset ar
Use the VALUE +/- buttons to change the letter at the cursor position. Think of a new name for your pre-
set and set the first letter. Use the PA
7. RAMETER +/- buttons to move the cursor one position to the left or
8. alf of the AXON display will now be
flashing. This indicates that you have changed the parameters and that you still need to confirm the
changes to store them permanently
right. Repeat the process for the other letters. If the new name is shorter than the old one, delete the re-
maining letters with the EDIT button.
Press the EXIT button twice to exit preset editing mode. The top h
. Now press the STORE button.
You can now select a slot in which to store the new preset. Either overwrite the preset or store it in any of
the slots within the user range (1-128). Now press the ENTER to copy the preset to the selected location
and store it there.
10 AXON AX 100 MKII V. 2.0 (English)

Connectors and controls
Front panel:
1. Socket for the 13-pin AXON AXK 100 cable (not included) to connect guitars with hexaphonic pickup
systems (e.g. AXON PU 100 or AIX 101/103)
2. HEADPHONE OUTPUT: Stereo output (1/4" jack). Connect stereo headphones here to monitor the inter-
nal soundboard.
3. HEADPHONE LEVEL: Adjust the volume of the headphone output (2) here.
4. DISPLAY CONTRAST: Contrast control for the LCD display
5. LCD display
6. GLOBAL: Button for opening the Global menu Use the GLOBAL button to access general system settings
such as the MIDI channel, guitar settings, and the default values of all available MIDI controllers.
When entering characters for preset names, use the GLOBAL button (A-Z) to change the current charac-
ter to uppercase.
7. PRESET: Button for direct access to the Preset menu. The selected sound is shown on the display when
in Preset mode. A guitar tuner can also be displayed.
Use this button to insert spaces when entering characters for preset names. An LED next to the button
signals the operating status of the device.
8. UTILITY: A variety of special functions are available while in Utility mode:
■Sending of MIDI System Exclusive data (SysEx) for sharing presets and archiving.
■Access to the pattern-oriented drum sequencer
■When entering characters for preset names, use the UTILITY button (A-Z) to change the current
character to lowercase.
9. STORE: Use the STORE button to copy and save preset data, arpeggiator patterns, drum patterns and
chains to memory.
When inserting characters for preset names or arpeggio patterns, all characters to the right of the current
cursor position will be moved to the right by one place.
10. Use the CHAIN button to activate Chain mode and step through a programmed sequence of presets.
When entering characters for preset names, use the CHAIN button (!...0...@) to change the current char-
acter to the first special character: '!'
11. The EDIT button...
■Provides access to the various preset parameters when in Preset mode.
■Adjusts the chain parameters in Chain mode.
■When entering characters for preset names or arpeggio patterns, the EDIT (Delete) button de-
letes the current character and moves all subsequent characters to the left by one place, insert-
ing a space at the end.
AXON AX 100 MKII V. 2.0 (English) 11

12. The PARAMETER buttons select...
■The individual submenus in UTILITY and GLOBAL mode.
■The individual parameters of the instrument in EDIT mode.
■The PARAMETER buttons have no function in PRESET and CHAIN mode.
13. The VALUE + and – buttons raise or lower the current value in the display.
■In Preset mode, they step through the presets.
■In Edit mode, they change the value of the displayed parameter.
■Alternatively, you can also use the UP / DOWN buttons of the optional guitar interface.
14. The ENTER button confirms store and copy actions and opens submenus. The presence of a submenu is
indicated by the presence of 2-3 dots in the parameter name. Use the EXIT button to close any submenu.
15. The EXIT button closes submenus. Pressing the button repeatedly will always return you to Preset mode.
Also use this button to cancel store or copy actions.
16. POWER ON/OFF switches the AC power of the AXON. The PRESET LED and the LCD are lit when the
power is turned on.
12 AXON AX 100 MKII V. 2.0 (English)

Rear panel
SOUNDBOARD RIGHT (MONO): The sound signal is output in mono via this socket. The right1. stereo
2. o jack.
em Exclusive and controller
soundboard with the
LOCAL OFF global setting. This is the typical application in conjunction with a sequencer.
4.
5.
6. T – EDIT- WHEEL CNTL – EXP1 menu. Volume, modulation and filter effects are especially
suitable for use with expression pedals. As your AXON also supports NRPN/RPN (non-registered pa-
controllers, you can assign these pedals to the MIDI con-
8. pre-programmed set of
10.
11. able at this socket. To prevent hum
when using the synthesiser and original guitar signal at the same time, you should always route the origi-
nal guitar signal through the 13-pin cable and pick it up at this socket on the rear panel. The PU 100 and
AIX101/103 interface has an input for the pickup signal of your guitar. Use the cable provided to connect
the pickup output of your guitar to the input of the hexaphonic pickup.
channel will be available from the socket next to it (2) when in use.
SOUNDBOARD LEFT (STEREO): The signal is available in stereo from this socket when using a stereo
jack for the output. The left channel of the stereo signal is available here when using a mon
3. MIDI IN: The AXON receives Program Change commands, as well as Syst
data via this input. Alternatively, all incoming MIDI data can be sent directly to the
MIDI THRU: All data arriving at MIDI IN is available in unchanged form here.
MIDI OUT: All MIDI data generated by your AXON AX100 MKII are available here.
EXP. PEDALS, EXP1: An expression pedal may be connected here and assigned to a MIDI controller in
the PRESE
rameter number / registered parameter number)
trollers #6 or #38 for an extremely versatile range of applications unparalleled in any other device of this
category.
7. EXP. PEDALS, EXP2: Same function as EXP1
SWITCH PEDALS, CHAIN: A footswitch connected here lets you step through a
presets while in Chain mode.
9. SWITCH PEDALS, HOLD: Connect the included footswitch here to activate one of the programmed hold
modes such as COMMON, SEPARATE, LAYER, ARPEGGIATOR or CONTROL.
POWER: Connect the mains power adapter provided with the unit here.
GUITAR OUTPUT: The unmodified pickup signal of your guitar is avail
AXON AX 100 MKII V. 2.0 (English) 13

The operating modes of the AXON AX 100 MKII
The many options of your AXON require a wide range of parameters that you can adjust to suit your require-
ments. The following explanation of the user interface will help you find your way around quickly.
For a clear overview, the operating functions of your AXON have been organised in four different modes or
sections that can be selected using the buttons on the front panel. Each of these modes (GLOBAL, PRESET,
UTILITY, CHAIN) contain a number of parameters that can be displayed using the PARAMETER +/- buttons
after pressing the appropriate mode button.
Press the PARAMETER + button to switch to the next parameter. PARAMETER - returns you to the previous
parameter. Change the values of the individual parameters using the VALUE +/- buttons, using VALUE + to
raise the value and VALUE - to lower it. The VALUE +/- buttons feature an acceleration function to help ensure
that you don't get a repetitive strain injury. You can accelerate the counting even more by pressing both but-
tons (+ and -) at the same time while counting up or down.
A number of parameters contain submenus with additional parameters. Dots at the end of the parameter name
indicate the presence of a submenu. To open a submenu, press the ENTER button. Press the PARAMETER
+/- buttons to access the various parameters within the submenu. The EXIT button will return the AXON to the
original parameter. The EXIT button will also return the AXON to its default Preset mode.
Global Mode
The global parameters contain all higher-level parameters related to the MIDI channels, the instrument used,
the reference tuning and input sensitivity of the individual strings. You should check a number of the global
parameters before using your AXON for the first time to ensure its best possible interaction with your instru-
ment.
Preset Mode
All of the parameters that your AXON needs for managing individual presets can be found here. Preset mode
is the most extensive mode, with a wide range of split and effect settings. This is the mode that is active by
default whenever you have not selected one of the other modes.
Utility Mode
This mode contains a wide range of settings for drum sequences. It also contains the functions for loading and
storing settings via MIDI (SysEx), letting you manage and save the parameter settings of your AXON on your
computer. It's easier using the included Editor, by the way. ;-)
Chain Mode
The Chain parameters let you define preset chains for easy access to presets sorted by style for live perform-
ances.
CAUTION: For greater ease of use, they are divided up a little differently in the Software Editor. The areas
there are: Global, Presets, Arpeggiator/Sequencer, Chains, CC Defaults, MIDI Mapping and About.
14 AXON AX 100 MKII V. 2.0 (English)

The Computer Editor
The included Editor offers direct on-screen access to all parameters of the AXON AX 100 MKII. All you need is
a computer (PC or Mac) that has a MIDI interface (generally an integral component of the soundcard) with an
input and output.
Installation in Windows
■Insert the included AXON CD in your drive and wait for the autorun application to launch. If the autorun
application on the CD does not launch automatically, start the application manually by double-clicking
"Autorun.exe" in the root folder of the CD.
■Select your language, then "AXON Editor" in the following menu. The setup wizard will now appear.
■The wizard will now display its welcome message.
■The default destination for the installation is specified in the following window. If you prefer a different
location, please click "Change".
■Click "Finish" to complete the installation.
■Launch the application at Start \ Programs \ TerraTec \ AXON AX 100 \ AX 100 Editor.
Installation in MAC OS X
On the CD, the image files are located at Editor\MAC:
■AXON_AX_100_MKII_Editor_PPC_Vx.x.x.dmg (G4/G5 OS 10.3)
■AXON_AX_100_MKII_Editor_Universal_Vx.x.x.dmg. (G4/G5/Intel OS 10.4 or higher)
Mount the correct image for your system by double-clicking and copy the program contained there to your
programs folder.
The Editor can be launched at System\Programs when the installation is complete.
Connection
To work with the Editor, you must have a bidirectional connection between the AXON AX 100 MKII and a MIDI
interface, i.e.:
■MIDI IN AXON to the MIDI OUT of your interface and
■MIDI OUT AXON to the MIDI IN of your interface.
Once you have set up the connection, select the MIDI port of your computer to which the AXON is connected
in the Editor under Global – "PC MIDI I/O devices" and click "Connect". A pop-up will appear and the box un-
der AXON Connection will say "Connected to AX 100 MKII Version x.xx". The Editor is now ready to use, let-
ting you remotely control all parameters of the AXON AX 100 MKII in real time and monitor the results.
AXON AX 100 MKII V. 2.0 (English) 15

General notes about operating the Editor
In most cases, the functions are identical to operation on the device. However, using a computer gives you
access to additional options.
Global page - Load all settings / Save all settings
Using these buttons, you can save all the device's settings to the hard drive as a SysEx file (Save all settings)
and restore them later (Load all settings). This is useful before a firmware update or can be used for general
backup purposes.
Presets page – Get Preset / Store to
"Get Preset" activates the preset selected in the drop-down menu. "Store to" permanently saves the preset to
one of the first 128 memory positions in the AXON AX 100 MKII. Select the number under which to save the
preset in the drop-down menu to the right of the "Store to" button.
Preset page – Load from Disk / Save to Disk
To save individual presets to the hard drive, use the "Save to Disk" button. This generates a file with the end-
ing .axp, which you can reload to the device using the "Load from Disk" button. This gives you a very conven-
ient way to exchange presets you have created with other AXON users, for example.
Miscellaneous
■Functions that are not available due to the current setting are greyed out.
■Labels can change according to the setting, e.g. Pickcontrol / DynControl.
16 AXON AX 100 MKII V. 2.0 (English)

Firmware update
To update the firmware of the AX 100 MKII, proceed as follows:
1. Install the latest version of the Editors and save all settings to your computer.
2. Press the "PRESET" + "UTILITY" + "EDIT" buttons while switching on the AX 100 MKII. The following
appears in the display:
3. The AX 100 MKII is now in update mode, and you can release the buttons. Wait until the following mes-
sage appears.
Start the AXON AX 100 Editor program on your computer.4.
r's "Global" page.
7. ever, if you have problems with the update, try it in SLOW Mode. In
somewhat slower rate. This applies only for the update
on a PC.
8. A progress bar appears in the AXON display.
5. Ensure that one of your computer's MIDI Out ports is connected to the AX 100 MKII. Select the corre-
sponding "PC MIDI out device" on the Edito
6. Click "Firmware Update". A dialogue window for selecting the file opens. Select the desired update file (a
file with the ending .axu) and click "Open".
A prompt appears asking if you want to update the firmware in "SLOW Mode". Normally, this is not neces-
sary and you can just click "No". How
this transmission mode, the data are sent at a
9. Wait until the loading process is finished. The following appears in the AXON display:
10. Wait until the erasing process is finished. The following now appears in the AXON display:
Finally, the AXON is automatically restarted with the new firmwar11. e.
12. CAUTION: If this does not happen, you have to restart the AXON manually. However, be absolutely cer-
tain to wait until the progress bar is complete, as otherwise the memory module may not have been writ-
ten correctly, which would result in total failure of the device. You can safely restart approximately 30 sec-
onds after all 16 segments of the progress bar have been filled.
AXON AX 100 MKII V. 2.0 (English) 17

Global Mode
Global Parameters
The global parameters contain all higher-level parameters such as information related to the MIDI channels,
the instrument used, the reference tuning and the input sensitivity of the individual strings. A number of set-
for each instrument that you will be using with the AXON. Check and adapt these
fore using it for the first time. This is essential to ensure that the AXON will work op-
timally with your instrument.
tings can be set individually
settings as necessary be
Global mode can be activated by pressing the GLOBAL button on the front panel of your AXON. The state is
signalled by a red LED next to the GLOBAL button.
Basic Channel
Basic MIDI channel (1 – 16) Various options are available for sending the MIDI information generated by the
AXON from the vibrations of your guitar strings to the sound module or MIDI instrument. Ideally, a MIDI chan-
nel is assigned to each string (see STRING MODE SEPARATE) This has the advantage of evaluating each
and the value '11' the channels from 11 to 16. '1' is the default value.
string separately. For example, bending a string affects only that string's channel. Otherwise, bending would
affect the pitches of the other strings being played at the same time, an effect that is generally undesirable.
Use BASIC CHANNEL to specify the first of six MIDI channels. All other channels follow automatically in as-
cending order. If you select "1", for example, MIDI channels 1 to 6 will be reserved by your AXON. The value
'5' would assign channels 5 to 10,
18 AXON AX 100 MKII V. 2.0 (English)

Hold Channel
Hold MIDI channel (1 – 16) While BASIC CHANNEL reserves six MIDI channels for normal playing, the
HOLD CHANNEL parameter reserves the first of six additional consecutive MIDI channels for Hold effects
nt to ensure that the Basic and Hold channels do
tween the Basic and Hold channels. The default
value for this parameter is 11, thus reserving the MIDI channels 11 to 16.
Sequencer Channel (SEQ CHANNEL)
such as SEPARATE, LAYER and ARPEGGIO. It's importa
not overlap. Ensure that at least six MIDI channels are be
MIDI channel for soundboard drum sequences (1 – 16) A separate MIDI channel is used for drum se-
quences. Use this parameter to select the channel. Please ensure that the SEQ CHANNEL does not conflict
with the BASIC or HOLD channels and that you reserve a free MIDI channel for the drum sequencer. MIDI
channel 10 is the default setting.
Sequencer MIDI Ports (SEQPORTS)
(MIDI OUT and/or Soundboard) Here, you can select the outputs to which to send the MIDI signal of the
internal drum sequencer. You can choose between the MIDI Out on the rear side of the AXON and/or the
internal soundboard.
Pitchbend Range (PBEND RANGE)
(OFF, 1 – 24) Bending and sliding are techniques frequently used by guitarists. Your AXON uses the MIDI
pitchbend command for these effects. As with a keyboard pitch wheel, the pitch of the last note picked is modi-
fied without picking a new note. The value ranges must be adjusted to ensure that the sound module or a
connected MIDI instrument reproduces the pitch changes accurately.
The displayed value indicates the maximum number of semitone steps that can be applied to a pitchbend. Set
this value to 12 (one octave). For bass, we recommend setting the value to 24.
The value OFF disables pitchbend, triggering chromatic semitones when bending or sliding.
AXON AX 100 MKII V. 2.0 (English) 19

Resend Pitchbend Range (SND PBENDRG)
(ON/OFF) If your MIDI instrument supports separate pitchbend settings for each preset, you must set this
parameter to ON. In this case, your AXON will send the required pitchbend settings to the MIDI instrument
after every Program Change command. If your MIDI instrument stores the pitchbend range globally, set this
value to OFF.
Local Mode
Local mode (ON/OFF)
be the case during live performances.
e to control the AXON using a sequencer or MIDI recording
ON will now act as a conventional MIDI expander. However,
it will no longer be possible to select AXON presets via MIDI IN. Naturally, you will still be able to select the
presets of your AXON using the operating buttons. All MIDI data generated by your AXON while playing is
available only via MIDI OUT. Connect the MI encer to the MIDI IN of your AXON and acti-
ON: This is the internal default operating mode of your AXON. The string vibrations received via the 13-pin
jack are converted to MIDI signals and sent to the built-in sound module and to the MIDI Out jack. Program
Change commands received via MIDI IN permit programmed AXON presets to be accessed. permitting addi-
tional MIDI instruments to be controlled. You should choose this setting if you are not using a sequencer to
control the AXON. That will usually
OFF: You can disable local mode if you would lik
software. The integrated sound module of your AX
DI OUT of the sequ
vate the echo or monitor function of the sequencer. The sequencer will loop the incoming MIDI data through to
MIDI OUT and send it to the internal sound module. Note that the sequencer is configured such that it trans-
mits all MIDI data on the same channels on which it receives them.
Local mode is always set to ON when switching the AXON on. If you set this parameter to OFF, this setting will
only be retained until you switch the device off.
Caution: This function is not available in the Software Editor, as the Editor functions in LOCAL ON mode only!
Tune Base
(-99 to +99) Unit: cent, corresponds to 1/100 semitone All MIDI notes generated by your AXON are based
on a reference tuning of 440 Hz, plus or minus a deviation determined by this parameter. If you are playing
with musicians using instruments that are difficult to tune, such as a piano, you can adjust your AXON to the
situation. We recommend the following procedure when using a reference frequency other than 440 Hz: start
by carefully tuning the open A string to the reference instrument by ear.
Next, press the ENTER button. "PICK THE OPEN A STRING" will now appear on the display.
20 AXON AX 100 MKII V. 2.0 (English)
Other manuals for AXON AX 100 MKII
2
Table of contents
Other TerraTec Media Converter manuals

TerraTec
TerraTec GRABSTER AV 150 MX User manual

TerraTec
TerraTec AXON PU 100 User manual

TerraTec
TerraTec AXON AX 50 USB User manual

TerraTec
TerraTec Cameo Grabster 200 Instruction manual

TerraTec
TerraTec Cameo Convert User manual

TerraTec
TerraTec Cameo Convert User manual

TerraTec
TerraTec ViceVersa User manual

TerraTec
TerraTec AXON AX 100 MKII Operating and installation instructions

TerraTec
TerraTec CAMEO 400AV MOBILE Installation guide

TerraTec
TerraTec AIR BEATS HD User manual