TERSO TS030 User manual

Large RFID Cabinet User Guide, REV01, 08/17/2023 1
TS030
Large RFID
Cabinet
User Guide

Large RFID Cabinet User Guide, REV01, 08/17/2023 2
TABLE OF CONTENTS
1. ABOUT THIS GUIDE……………………………………………………..
3
2. PRECAUTIONS FOR SAFE OPERATION…………………………….
4
2.1 Health and Safety Recommendations………………………………………...
5
2.2 Environmental Conditions………………………………………………………
7
3. COMPONENTS AND ACCESSORIES…………………………………
8
3.1 Components………………………………………………………………………..
8
4. GETTING STARTED……………………………………………………..
10
4.1 Unpacking the Device…………………………………………………………….
10
4.2 Transporting the Device…………………………………………………………
10
4.3 Installing the Device………………………………………………………………
11
5. OPERATING INSTRUCTIONS………………………………………….
12
5.1 Basic Access Process…………………………………………………………...
12
5.2 Device User Accessible Controls……………………………………………...
13
5.3 Emergency Access Process…………………………………………………….
13
5.4 Device Alarms……………………………………………………………………..
14
6. MAINTENANCE AND CLEANING……………………………………...
16
6.1 Maintenance………………………………………………………………………..
16
6.2 Cleaning…………………………………………………………………………….
16
7. TECHNICAL SUPPORT, SUPPORT PAGE AND DISPOSAL………
18
7.1 Terso Solutions Technical Support……………………………………………
18
7.2 Support Page and User Guide Location………………………………………
18
7.3 Device Disposal……………………………………………………………………
18
8. APPENDIX A: TECHNICAL SPECIFICATIONS………………………
19
9. APPENDIX B: GLOSSARY……………………………………………...
20
10. APPENDIX C: SAFETY CHECKLIST……………………………….
21

Large RFID Cabinet User Guide, REV01, 08/17/2023 3
1. ABOUT THIS GUIDE
Read this user guide carefully and follow the instructions herein for safe operation of the device.
Terso Solutions does not guarantee safe operation if the device is not used as intended and safety
precautions outlined in this guide are not followed.
Keep this guide in an easily accessible place for reference as necessary. The product and the contents of
this guide are subject to change without notice.
Contact Terso Solutions Technical Support for user guide replacement or additional assistance (reference
section 7.).

Large RFID Cabinet User Guide, REV01, 08/17/2023 4
2. PRECAUTIONS FOR SAFE OPERATION
It is imperative for users to comply with this guide as it contains important safety advice.
Items and procedures are described so this device may be used correctly and safely. Following advised
precautions could prevent injury to the user and any other person.
Precautions are illustrated with the following symbols:
Failure to observe WARNING signs could result in a hazard to user possibly leading to serious injury or
death. Only use the system as specified in these instructions.
Failure to observe CAUTION signs could result in
injury to user and damage to device and
associated property.
This symbol means an action is prohibited.
This symbol also means an instruction must be
followed.
Caution, read all accompanying documents before
operating the device.
This label is on the cover of enclosures in which
the electrical components of high voltage are
enclosed to prevent electrical shock.
This icon indicates the location of the protective earth conductor. Do not disconnect. Disconnection of
the protective earth conductor may impair the protection provided by the device.
Large RFID Cabinet User Guide, REV01, 08/17/2023 5
2.1 Health and Safety Recommendations
Never damage or break the power supply plug or cord. Do not use the supply plug if its
cord is loose. This may cause fire or electric shock.
Do not touch electrical parts such as power supply plug or any switches with a wet
hand. This may cause electric shock.
Never ground the device through a gas pipe, water main, telephone line, or lightening
rod. Such grounding may cause electric shock in the case of an incomplete circuit.
Do not insert metal into any outlet, vent, or gap for inner air circulation.This may cause
electric shock.
Never splash water directly onto the device as this may cause electric shock or short circuit.
Never disassemble, repair, or modify this device yourself. Any such work carried out by an
unauthorized person may result in fire or injury due to a malfunction.
Device top lid should be removed by qualified engineers or service personnel only. Risk
of shock is present inside the device.
Be sure to install the device on a sturdy floor. If the installation site is not adequate, injury
may result from the device falling or tipping over.
Use a power supply outlet with ground (earth) to prevent electric shock. If the power supply
outlet is not grounded, it will be necessary to have a qualified technician(s) install a ground.
When removing the plug from the power supply outlet, grip the power supply plug, not
the cord. Pulling the cord may result in electric shock or fire by short circuit.
Disconnect the power supply plug if there is something wrong with the device.
Continued abnormal operation may cause electric shock or fire.
Ensure children do not have access and doors cannot be completely closed if the device
will be stored in an unsupervised area for an extended period.
Prepare a safety check sheet when you request any repair or maintenance for the safety of
servicepersonnel.

Large RFID Cabinet User Guide, REV01, 08/17/2023 6
Do not disconnect the protective earth conductor. Disconnection may impair the
protection providedby the equipment.
Do not place any switches or disconnect device from the earth conductor.
Do not climb onto the device. This may cause injury by tipping or damage to the device.
Do not pull or hang on the top or upper part of the door when open. This may cause the
device to begin to tip, which could cause injury to the user or damage to the device.
Do not install on unstable floor. This may result in user injury from device tipping.
Never store corrosive materials, such as acid or alkali, unless the inventory container
is completely sealed. Corrosion may lead to failure of the device in time.
Always open and close the door gently. Rough operation may lead to shifting of inventory,
incomplete closing, or damage to door and auto closing mechanism.
Always disconnect the power supply plug before moving the device, when the device is
not used for long periods of time, and prior to performing any maintenance, to prevent electric
shock or injury.

Large RFID Cabinet User Guide, REV01, 08/17/2023 7
2.2 Environmental Conditions
This device is designed to be safe under the following conditions:
Never install the device in a flammable or volatile location. This may cause explosion or
fire.
Never install the device where acid or corrosive gases are present. Corrosion may result
in current leakage or electrical shock.
Do not install the device under water pipes or steam pipes. This may result in current
leakage or electric shock.
If this device is used for storing poisons, radioactive material, or other harmful
products, ensure that it is in a safe area. Failure to do so may lead to an adverse effect on
the health of personnel in the area and local environment.
Indoor use only. Water exposure may lead to current leakage or electric shock.

Large RFID Cabinet User Guide, REV01, 08/17/2023 8
3. COMPONENTS AND ACCESSORIES
3.1 Components
The device is comprised of the following components.
Device Front and Rear Components Figure 1
A. Pass Reader
B. Door Handle
C. LCD Display
D. Rear Panel
Figure 1: Device Front (Left Image) and Rear (Right Image) Views
Large RFID Cabinet User Guide, REV01, 08/17/2023 9
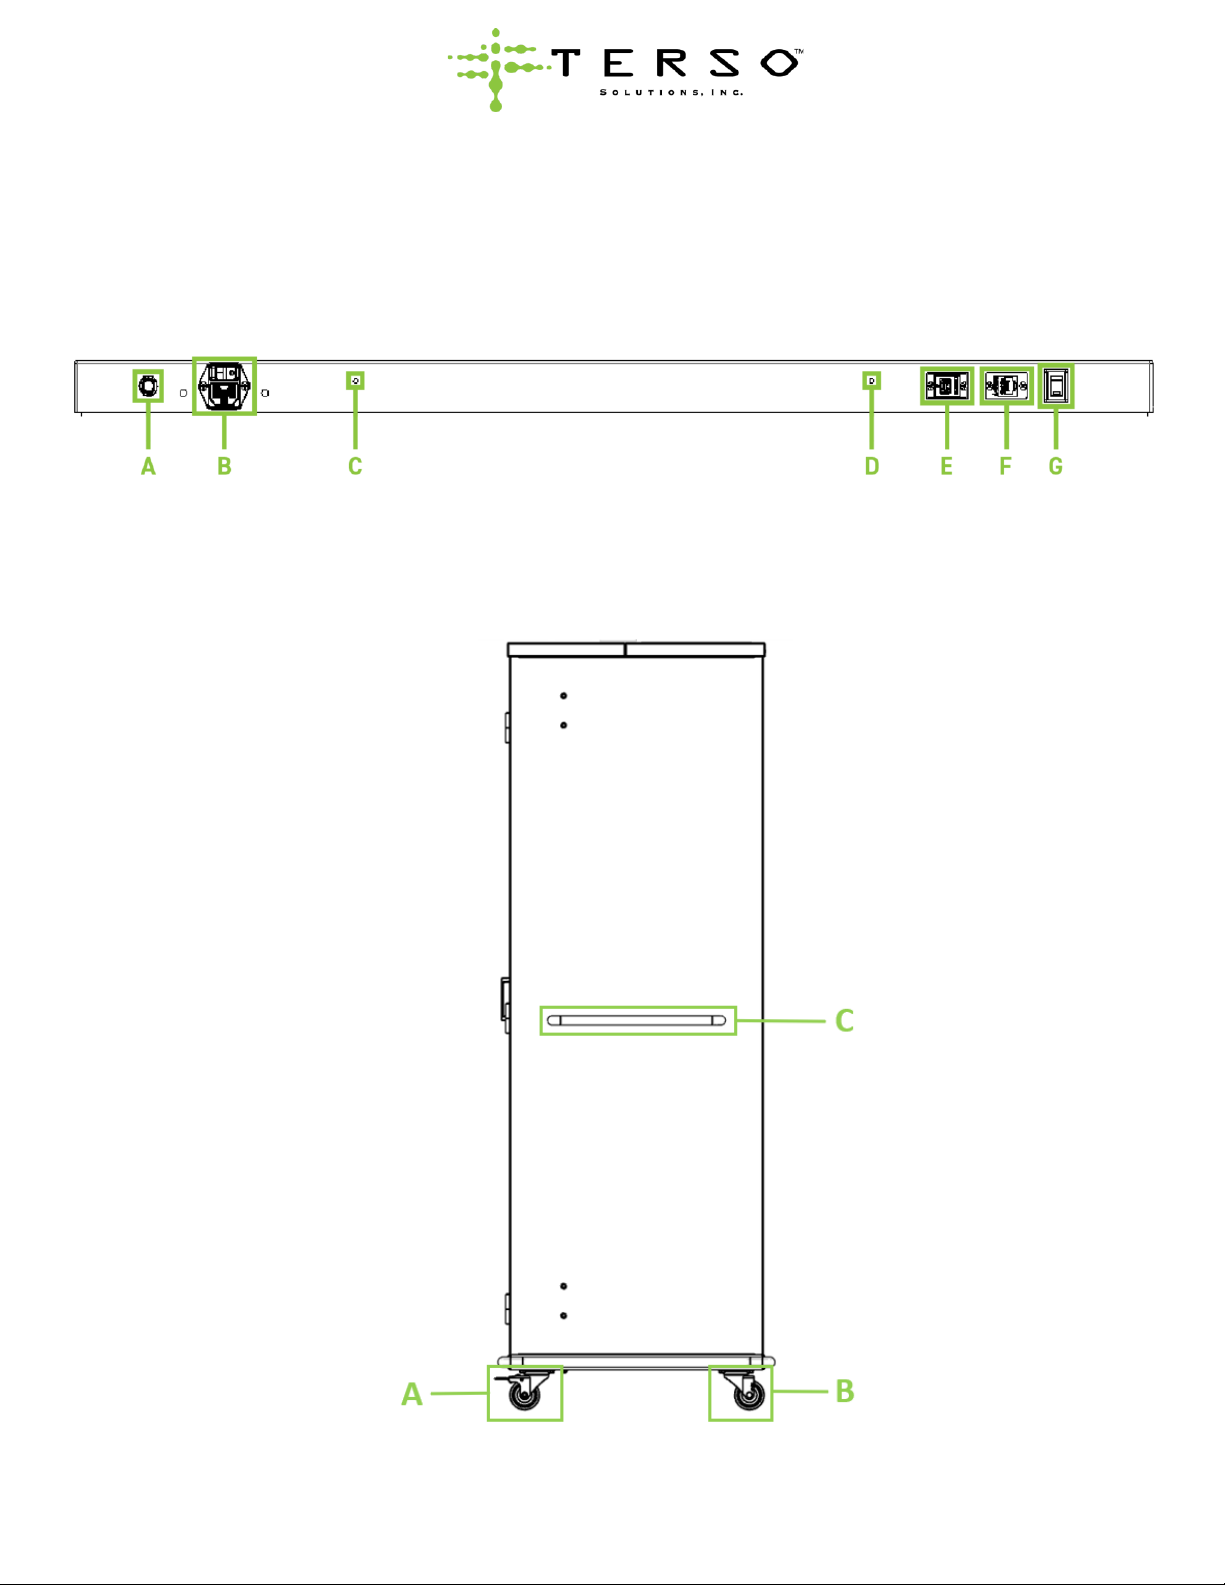
Device Rear Panel Components Figure 2
A. Circuit Breaker
B. Power Switch (top) and IEC C14 Power
Receptacle (bottom)
C. System Reset Button
D. Emergency Door Release Button
E. USB Connector
F. LAN Connector
G. Buzzer Mute Switch
Figure 2: Device Rear Panel View
Device Side Components Figure 3
A. Front Wheels (lockable)
B. Rear Wheels (not lockable)
C. Push Handle
Figure 3: Device Side View

Large RFID Cabinet User Guide, REV01, 08/17/2023 10
4. GETTING STARTED
4.1 Unpacking the Device
Before unpackaging the device, inspect for any damage that may have occurred during transit. If any
damage is present, please contact Terso Solutions Technical Support (reference section 7).
Please follow the guidelines below to successfully unpack your device:
•Ensure all wheels are in solid contact with the ground. Lock the front wheels by pushing the
wheel locks downward into locked position.
•Remove all packaging, including straps. Gently position the device in place on the ground.
•Remove accessories from inside the device. A power cable and Ethernet cable should be
included. Other items may also be included such as other cables and drawers, or other device
specific items.
4.2 Transporting the Device
When transporting the device to the designated installation location or relocating the device:
1. Unlock the two front wheels by pushing the wheel locks upwards into the unlocked position.
2. Carefully roll the cabinet forward by firmly pushing the handle on either side of the device.
3. Carefully roll the cabinet into position leaving at least a 3-inch (in.) gap between the cabinet and
the wall.
4. Relock the front wheels by pushing the wheel locks in the downward locked position.
Do not push or roll the device using anything other than the handles on either side of
the device. Failing to do this may cause the device to tip leading to injury to the user or
damage to the device.

Large RFID Cabinet User Guide, REV01, 08/17/2023 11
4.3 Installing the Device
Once the device has been transported to its designated location (following all safety precautions in section
2.) the installation process can begin.
Connecting to AC Power
•Plug the female end of the device power cord into the power inlet (reference Figure 2 for location).
Plug the male end of the device power cord into grounded 120 V 10 A NEMA 5-15 outlet.
Note: Do not connect device to a GFI (Ground Fault Interrupt) circuit or use an extension cord or any
multi-outlet strip or plug. The power outlet must be within 6 feet (ft) / 2 meters (m) of the device and
be easily accessible.
•Press the power switch to the on position to power the device on (reference Figure 2 for location).
Note: In an emergency the power cord can be unplugged to turn off the device.
Connecting Network Communications
Plug the Ethernet cable into LAN Connector (reference Figure 2 for location), followed by appropriate wall
RJ45 networking jack or optional cellular router.

Large RFID Cabinet User Guide, REV01, 08/17/2023 12
5. OPERATING INSTRUCTIONS
5.1 Basic Access Process
In order to successfully unlock and access the interior of the device, follow the steps below. Before access is
attempted, check the device LCD display, and make sure it reads, “Please Scan Pass to Unlock Doors”
(exact display message verbiage may vary).
1. Present a verified access pass
Present a verified access pass flat over the location of the pass reader (reference Figure 1 for pass
reader location).
Figure 4: Presenting a verified access pass
Do not remove the verified access pass from the pass reader location until the LCD display reads
“Welcome Doors Unlocked” (exact display message verbiage may vary).
2. Add or remove items from the device
The device is now unlocked, and the interior can be accessed. Pull the door open using the door
handle (reference Figure 1 for door handle location). Add or remove items from the interior of the
device. Close the door completely. Check that the door is locked by gently pulling on the door
handle.

Large RFID Cabinet User Guide, REV01, 08/17/2023 13
3. Trigger an inventory scan
Once the door is in the closed position it will automatically lock, and the device LCD display will read
“Please Wait System Scanning” (exact display message verbiage may vary), and an inventory scan
will be triggered.
Figure 5: Device Scanning LCD display message
Note: The device cannot be accessed while an inventory scan is occurring. Please wait until the
LCD display reads “Please Scan Pass to Unlock Doors” (exact display message verbiage may vary
and change without notice) to attempt to access the device again.
5.2 Device User Accessible Controls
The device has multiple buttons and switches that control various features. All controls are located on the
device’s rear panel (reference Figure 1).
Power Switch
This switch controls the electrical power to the device. When toggled in the off position, the device will go
into AC power failure and the battery backup system will be activated.
System Reset Button
This button controls the status of the device’s battery backup system. When device power is disconnected or
lost pressing this button will automatically deactivate the battery backup system. It will shut off the device
electronics.
Emergency Door Release Button
This button enables the emergency access process (reference section 5.3 for further details).
Buzzer Mute Switch
This switch controls the device’s audible alarm. When toggled in the off position none of the device’s audible
alarms will sound.
5.3 Emergency Access Process
In the case of an emergency, the device can be accessed without using a verified access pass to unlock it.
The emergency door release button can be used to bypass the device’s door locking mechanism.
Note: If the emergency door release button is used during an inventory scan, the scan will be stopped, and
all transaction data will be lost. A device alarm will be triggered when this button is used.
Process:
1. Retrieve a long thin object, such as a paper clip, to use for pressing the button.
2. Insert the long thin object into the opening where the emergency release button is located (reference
Figure 2 for location).
3. Hold down the button and open the door. The emergency release button must be actively held down
while opening the door - this may take 2 people.
Large RFID Cabinet User Guide, REV01, 08/17/2023 14
5.4 Device Alarms
All device alarms are automatically sent to Terso Solutions. Terso Solutions Technical Support may contact
on-site staff to assist in correcting a potential problem.
Note: Device alarms are preconfigured and controlled by device settings. Not all device alarms are activated
and behave the same on all devices.
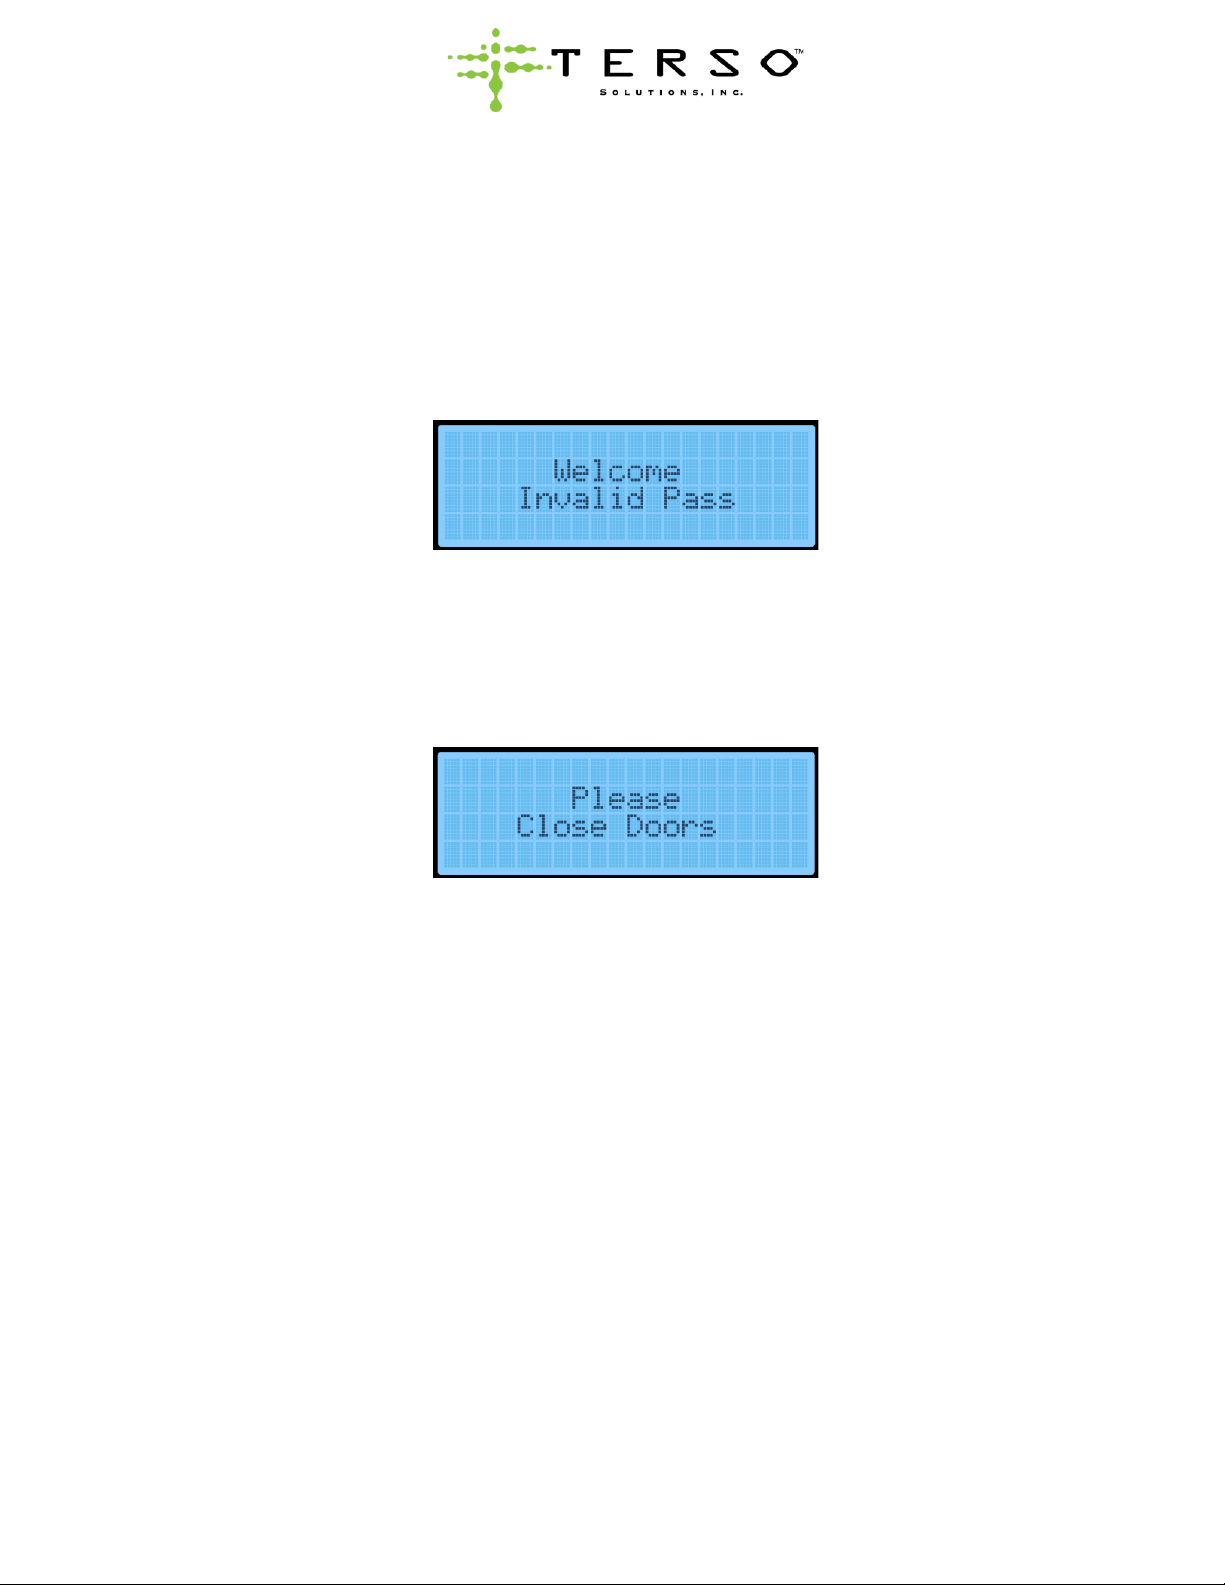
Invalid Pass
If an unverified access pass is used to enter the device an alarm will be triggered, a brief audible alarm will
sound, and the device LCD will display “Welcome Invalid Pass” (exact display message verbiage may vary).
Figure 6: Invalid Pass LCD Display Message
Door Open
When the device’s door is left open for longer than a preconfigured time (standard is 5 minutes, may vary per
device), an audible alarm will sound, and the LCD display will show “Please close doors”(exact display
message verbiage may vary) until the door is closed. If the door appears to be closed, but is still alarming,
verify that nothing is obstructing the door and attempt to re-close.
Figure 7: Door Open alarm LCD Display Message
Door Breach
If the device door is forced open or the Emergency Door Release Button is pressed an alarm will be
triggered. This alarm is communicated to Terso Solutions Technical Support as part of a specific event
where no access pass was used to access the inventory inside the device. Any products taken or removed
will be reported as an inventory scan but without access pass identification information.
Power Outage
In the event of a power outage an alarm will be triggered, and an audible alarm will sound. The alarm will
continue until AC power has been restored or the onboard battery backup runs out of power. The onboard
battery backup will maintain the device’s normal operation between 30 and 60 minutes. Once AC power has
been restored, the device will perform an inventory scan and resume normal operation.
Note: Depending on device preconfigured settings the device will also lock down and prevent access. Terso
Solutions Technical Support will be alerted and may contact on-site staff. The LCD display will read
“Unavailable A/C Power Failure”(exact display message verbiage may vary). Once this display message
changes then the device can be accessed again. If it is an emergency, please use the Emergency Access
Process (reference section 5.3).
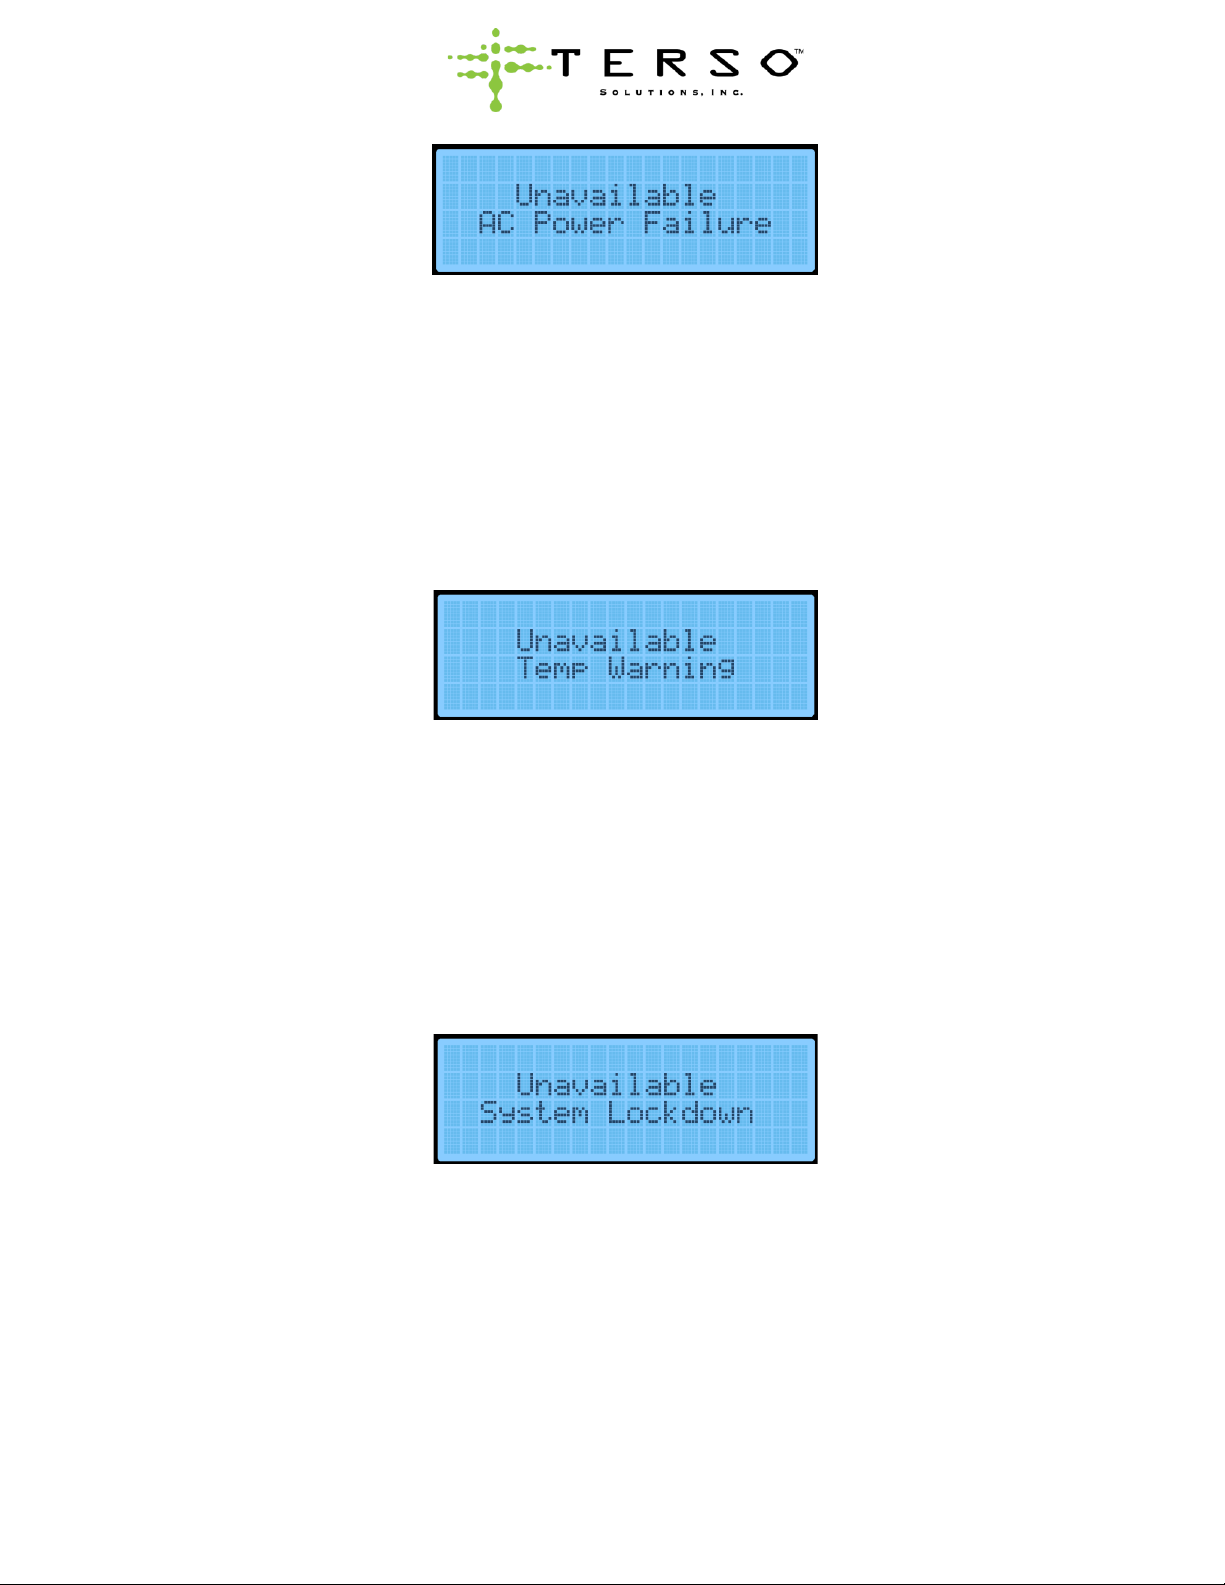
Large RFID Cabinet User Guide, REV01, 08/17/2023 15
Figure 7: AC Power Failure LCD display message
High/Low Temperature
The device continuously monitors internal temperature. If the device has a temperature alarm activated in its
preconfigured settings and the internal temperature is outside a specified range, an alarm is triggered. An
audible alarm will not sound but Terso Solutions Technical Support will contact on-site staff to inform them
and help troubleshoot.
Note: Depending on device preconfigured settings the device will also lock down and prevent access until
temperature stabilizes. The LCD display will read “Unavailable Temp Warning”(exact display message
verbiage may vary). Once this display message changes then the device can be accessed again. If it is an
emergency, please use the Emergency Access Process (reference section 5.3).
Figure 8: High/Low Temperature alarm LCD display message
Hardware Failure
The device will automatically attempt to correct any system errors preventing correct function. However, in
the event of a hardware component failure an alarm is triggered. Terso Solutions Technical Support will be
alerted and may contact onsite staff if needed.
Note: Depending on device preconfigured settings the device will also lock down and prevent access. Terso
Solutions Technical Support will be alerted and may contact on-site staff. The LCD display will read
“Unavailable System Lockdown”(exact display message verbiage may vary). Once this display message
changes then the device can be accessed again. If it is an emergency, please use the Emergency Access
Process (reference section 5.3).
Figure 9: Hardware Failure alarm LCD display message
Large RFID Cabinet User Guide, REV01, 08/17/2023 16
6. MAINTENANCE AND CLEANING
Always disconnect the power supply to the device prior to any cleaning or maintenance to prevent
shock or injury.
6.1 Maintenance
There are no user-serviceable parts in the device. Please contact Terso Solutions Technical Support
(reference section 7.) for any service-related inquiries.
6.2 Cleaning
Exterior Cleaning
Use a dry cloth to wipe off the outside and inside of device and all accessories. If device outside panels are
dirty, clean them with a diluted neutral dishwashing detergent (undiluted detergent can damage the plastic
components. For the dilution refer to the instruction of the detergent.) After cleaning with diluted detergent,
always wipe off the same areas with a wet cloth. Wipe off excess moisture on the device or accessories with
a dry cloth. Never pour water onto or into the device. Doing so can cause electric shock or a short circuit.
Do not clean the device with scrubbing brushes, acid, thinner, solvents, powdered soap, cleanser, or hot
water. These agents can scratch the paint or cause it to peel. Plastic and rubber parts can be easily
damaged by these materials. Especially never use any volatile solvent to clean the plastic or rubber parts.
When a neutral dish washing detergent is used to clean the device, wipe it up thoroughly with a cloth soaked
in clean water and sanitize with a 70% IPA solution.
Interior Cleaning
If the interior of the device requires cleaning, refer to in-house safety procedures to ensure any harmful
materials are handled and cleaned correctly.
Cleaning the Door Gasket
The door gasket should be cleaned monthly. Using a soft cloth, remove any dirt or residue build-up from the
gasket and door(s). The door gasket may need to be cleaned more frequently if dirt or excessive residue
build-up prevents the door from closing properly.
Cleaning Agents and Tips
ITEM
CLEANING AGENT
TIPS AND PRECAUTIONS
Interior
Soap and water
Baking soda and
water
Use 2 tablespoons of baking soda in 1 quart of warm
water.
Be sure to wring excess water out of sponge or cloth
before cleaning around controls, lights, or any electrical
parts or wiring.
Door gaskets
Soap and water
Wipe gaskets and their seating surfaces with a clean, soft
cloth.
Shelves and drawers
Soap and water
Do not wash removable shelves in dishwasher.

Large RFID Cabinet User Guide, REV01, 08/17/2023 17
Exterior and handles
Soap and water
Non-abrasive glass
cleaner
Do not use commercial household cleaners, ammonia, or
alcohol to clean handles.
Use a soft cloth to clean smooth handles.
Do not use a dry cloth to clean smooth handles.

Large RFID Cabinet User Guide, REV01, 08/17/2023 18
7. TECHNICAL SUPPORT, SUPPORT PAGE AND
DISPOSAL
7.1 Terso Solutions Technical Support
If further support is needed, contact Terso Technical Support at:
•US and Canada: +1.888.376.0257, support@tersosolutions.com, M-F 8AM-5PM CT
•Europe: +490 6227.789.3003, supporteu@tersosolutions.com, M-F, 8AM-5PM CET
7.2 Support Page and User Guide Location
This User Guide can be found by visiting User Guide Support Page
(https://docs.tersosolutions.com/support/user-guides-10420326.html).
7.3 Device Disposal
Terso Solutions will handle the disposal of the device and its components. Please contact Terso Solutions
Technical Support (reference section 7.1).
Note: Do not dispose of the device independently or without contacting Terso Solutions Technical Support.

Large RFID Cabinet User Guide, REV01, 08/17/2023 19
8. APPENDIX A: TECHNICAL
SPECIFICATIONS
FEATURES
SPECIFICATION*
ELECTRICAL REQUIREMENTS
Electrical power & frequency
US 120 VAC, 60 Hz, 2 A
EUR 240 VAC, 50 Hz, 1 A
Power consumption
84 W max
Power Backup
Battery 12 VDC, 1.3 A, SLA, qty 2
COMMUNICATION
Network Connection
Ethernet LAN standard, optional cellular
ENVIRONMENTAL
Operating temperature range
-20°C to 50°C (-4°F to 122°F)
Operating humidity
5% to 95% non-condensing
PHYSICAL ATTRIBUTES
External dimensions (H x W x D)
80.0 in. x 41.0 in. x 28.0 in.
2032 mm. x 1041 mm. x 712 mm.
Internal dimensions (H x W x D)
65.0 in. x 14.0 in. x 24.0 in. (each column)
1651 mm. x 356 mm. x 610 mm. (each column)
External clearance (H x W x D)
88.0 in x 41.0 in. x 49.0 in.
2235 mm x 1042 mm x 1245 mm
Allow for 8 in. (204 mm) of clearance on the top of the device, 3 in. (77 mm) on the
rear, and 21 in. (534 mm) on the front for door clearance.
Internal Volume
25.0 ft3
717 L
Weight
280 lbs.
120 kg
Display (H x W)
1.75 in. x 4.20 in.
45 mm x 102 mm
55.0 in. (1400 mm) height from the ground
Door
Glass
RFID PERFORMANCE
Frequency Range
US 902 –928 MHz
EUR 865 –868 MHz
Standards Supported
RAIN RFID: EPC global UHF RFID Class 1 Gen2v2 / ISO 18000-63
REGULATORY
Certifications
UL, FCC, cUL, SGS, CE, UKCA, RoHS, WEEE
Standards
FCC CFR 47 Part 15 subpart B, UL 61010-1, ICES-003, CSA 61010-1
*Specifications may change due to design improvements or changes.

Large RFID Cabinet User Guide, REV01, 08/17/2023 20
9. APPENDIX B: GLOSSARY
TERM
DESCRIPTION
DSN
Digital Serial Number is the unique identification number embedded in the
device.
ETHERNET
A wired computer networking technology used to connect to the internet. Also
known as a LAN (Local area Network) connection.
FIRMWARE
The permanent and embedded software programmed into the device.
INVENTORY SCAN
Device scans products and sends updated inventory to Terso’s open-API cloud
based platform for processing.
IEEE
The Institute of Electrical and Electronics Engineers Standards Association is an
Operating Device within IEEE that develops global standards in a broad range of
industries.
MHZ
Megahertz is used to measure the transmission speed of radiofrequency
products. Megahertz is equal to One million cycles per second.
RAIN RFID
RAIN RFID is a global alliance promoting the universal adoption of UHF RFID
technology. RAIN uses the GS1 UHF Gen2 protocol which ISO/IEC has
standardized as 18000-63.
RFID
An acronym for Radio Frequency IDentification.
RFID TAG (OR TAG)
A radio frequency tag, or label that communicates with the RFID Reader. RFID
tags consist of three major components –An RFID microchip, an RFID antenna,
and a physical label with our without adhesive.
SCAN OR SCANNING
Capturing data from products tagged with an RFID tag using the device.
VERIFIED ACCESS PASS
A badge used to unlock the device that has been verified for access.
Other manuals for TS030
1
Table of contents
Other TERSO RFID System manuals


