Tesla HV6410MX User manual

Product images are for illustrative purposes only and may differ from the actual product.
CERAMIC
HOB
User Manual
MK RO SRBENG BiH/
CG
HV6410MX


3
ENG
Congratulations on the purchase of your new Induction
Hob.
We recommend that you spend some time to read this
Instruction / Installation Manual in order to fully understand
how to install correctly and operate it.
For installation, please read the installation section.
Read all the safety instructions carefully before use and keep
this Instruction / Installation Manual for future reference.
SAFETY WARNINGS
Your safety is important to us. Please read this information
before using your cooktop.
INSTALLATION
Electrical Shock Hazard
• Disconnect the appliance from the mains electricity supply
before carrying out any work or maintenance on it.
• Connection to a good earth wiring system is essential and
mandatory.
• Alterations to the domestic wiring system must only be
made by a qualified electrician.
• Failure to follow this advice may result in electrical shock or
death.
Cut Hazard
• Take care - panel edges are sharp.
• Failure to use caution could result in injury or cuts.
Important safety instructions
• Read these instructions carefully before installing or using
this appliance.
• No combustible material or products should be placed on
this appliance at any time.
• Please make this information available to the person
responsible for installing the appliance as it could reduce
your installation costs.
• In order to avoid a hazard, this appliance must be installed
according to these instructions for installation.
• This appliance is to be properly installed and earthed only
by a suitably qualified person.
• This appliance should be connected to a circuit
which incorporates an isolating switch providing full
disconnection from the power supply.
• Failure to install the appliance correctly could invalidate any
warranty or liability claims.
• This appliance can be used by children aged from 8 years
and above and persons with reduced physical, sensory or
mental capabilities or lack of experience and knowledge if
they have been given supervision or instruction concerning
use of the appliance in a safe way and understand the
hazards involved.
• Children shall not play with the appliance. Cleaning and
user maintenance should not be made by children without
supervision.
• If the supply cord is damaged, it must be replaced by the
manufacturer, its service agent or similarly qualified persons
in order to avoid a hazard.
• Warning: If the surface is cracked, switch off the appliance
to avoid the possibility of electric shock, for hob surfaces of
glass-ceramic or similar material which protect live parts
• Metallic objects such as knives, forks, spoons and lids
should not be placed on the hob surface since they can get
hot
• A steam cleaner is not to be used.
• Do not use a steam cleaner to clean your cooktop.
• The appliance is not intended to be operated by means of
an external timer or separate remote-control system.
• WARNING: Danger of fire: do not store items on the
cooking surfaces.
• The cooking process has to be supervised. A short term
cooking process has to be supervised continuously.
• WARNING: Unattended cooking on a hob with fat or oil
can be dangerous and may result in fire. NEVER try to
extinguish a fire with water, but switch off the appliance and
then cover flame e.g. with a lid or a fire blanket.
OPERATION AND
MAINTENANCE
Electrical Shock Hazard
• Do not cook on a broken or cracked cooktop. If the
cooktop surface should break or crack, switch the
appliance off immediately at the mains power supply (wall
switch) and contact a qualified technician.
• Switch the cooktop off at the wall before cleaning or
maintenance.
• Failure to follow this advice may result in electrical shock or
death.
Health Hazard
• This appliance complies with electromagnetic safety
standards.
• However, persons with cardiac pacemakers or other
electrical implants (such as insulin pumps) must consult
with their doctor or implant manufacturer before using
this appliance to make sure that their implants will not be
affected by the electromagnetic field.
• Failure to follow this advice may result in death.
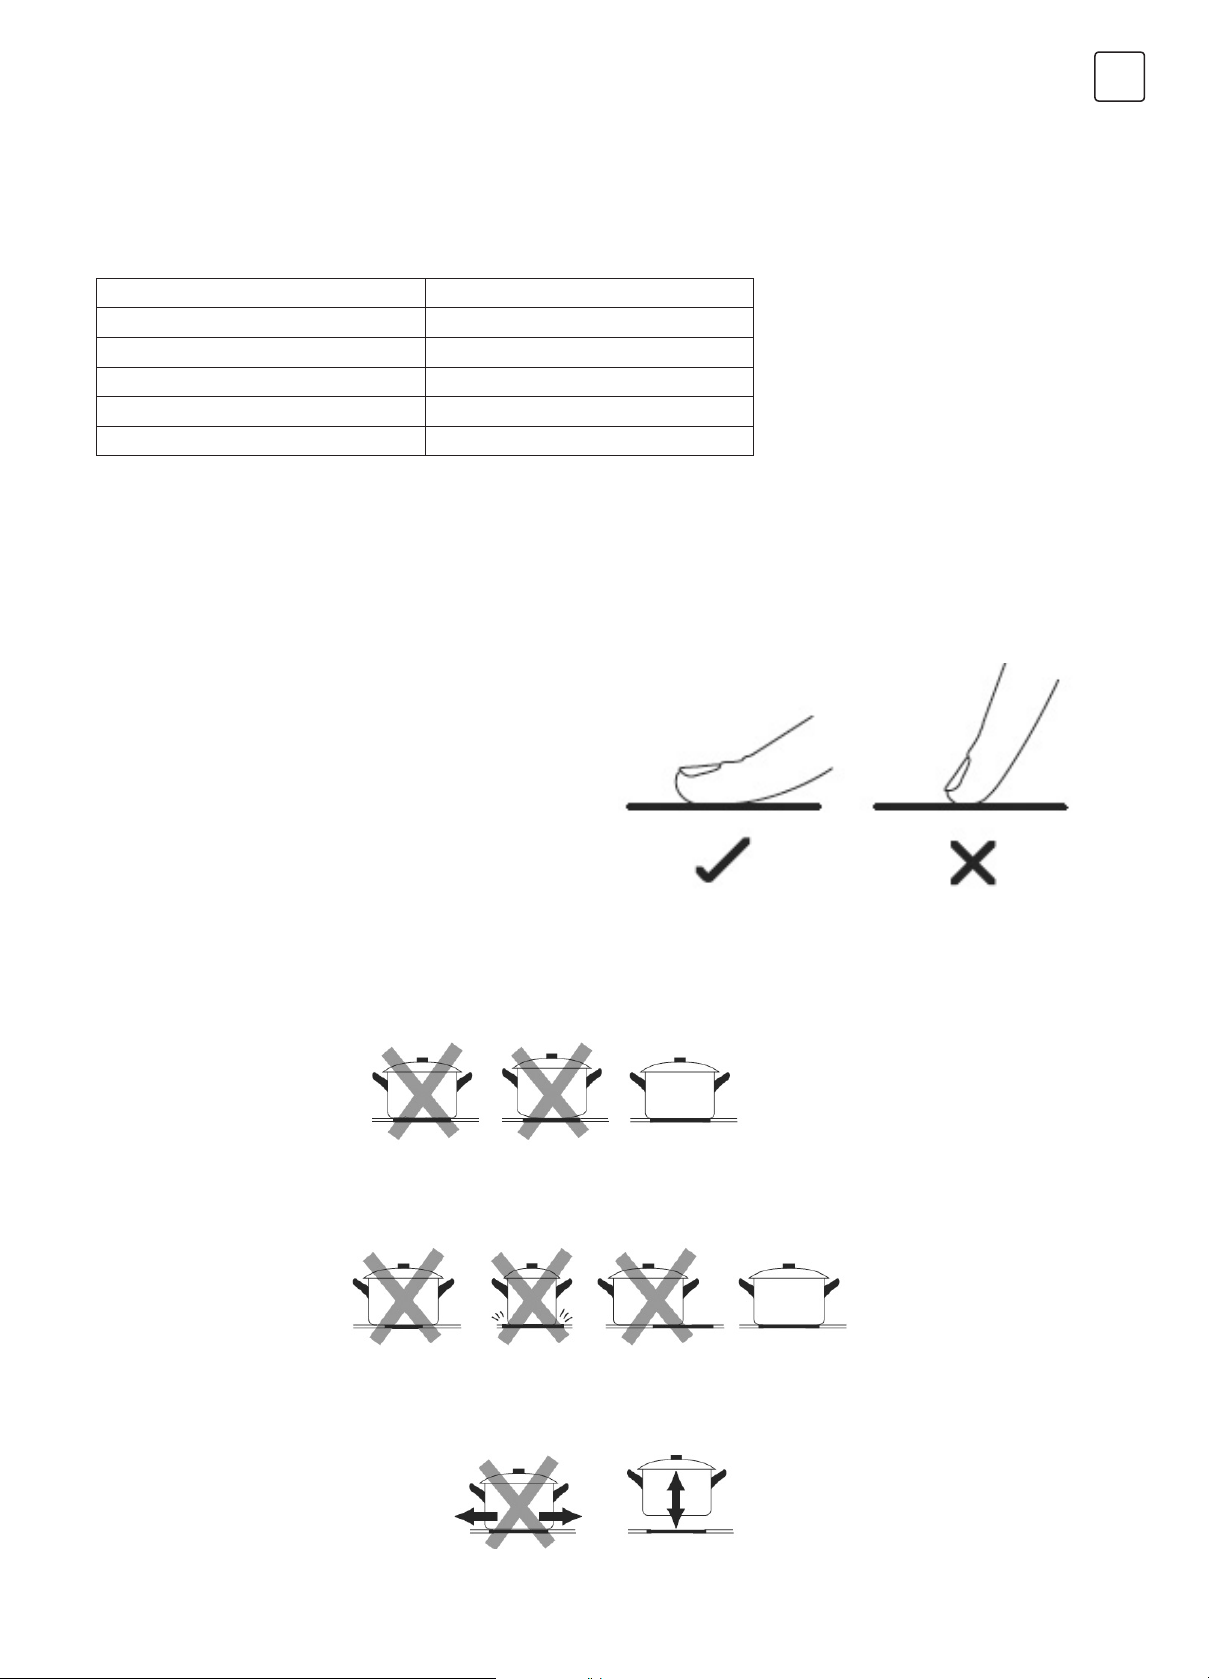
Hot Surface Hazard
• During use, accessible parts of this appliance will become
hot enough to cause burns.
• Do not let your body, clothing or any item other than
suitable cookware contact the Induction glass until the
surface is cool.
• Keep children away.
• Handles of saucepans may be hot to touch. Check
saucepan handles do not overhang other cooking zones
that are on. Keep handles out of reach of children.
• Failure to follow this advice could result in burns and scalds.
Cut Hazard
• The razor-sharp blade of a cooktop scraper is exposed
when the safety cover is retracted. Use with extreme care
and always store safely and out of reach of children.
• Failure to use caution could result in injury or cuts.

4
ENG
PRODUCT INTRODUCTION
Top View
Product Information
Working Principle
Control Panel
1. Max. 1000/2200 W zone
2. Max. 1200 W zone
3. Max. 1100/2000 W zone
4. Max. 1200 W zone
5. Glass plate
6. Control panel
1. Heating zone selection controls
2. Power slider touch control
3. Dual zone control
4. Keylock control
5. ON/OFF control
6. Timer control
7. Timer regulating controls
3 4
516
17 2
The microcomputer ceramic cooker hob can meet different kinds of cuisine demands because of resistance wire heating, micro-
computerized control and multi-power selection, really the optimal choice for modern families.
The ceramic cooker hob centres on customers and adopts personalized design. The hob has safe and reliable performances,
making your life comfortable and enabling you to fully enjoy the pleasure of life.
This ceramic cooker hob directly employs resistance wire heating, and adjust the output power by the power regulation with the
touch controls.
Important safety instructions
• Never leave the appliance unattended when in use. Boil
over causes smoking and greasy spill overs that may ignite.
• Never use your appliance as a work or storage surface.
• Never leave any objects or utensils on the appliance.
• Do not place or leave any magnetisable objects (e.g. credit
cards, memory cards) or electronic devices (e.g. computers,
MP3 players) near the appliance, as they may be affected
by its electromagnetic field.
• Never use your appliance for warming or heating the room.
• After use, always turn off the cooking zones and the
cooktop as described in this manual (i.e. by using the touch
controls). Do not rely on the pan detection feature to turn
off the cooking zones when you remove the pans.
• Do not allow children to play with the appliance or sit,
stand, or climb on it.
• Do not store items of interest to children in cabinets above
the appliance. Children climbing on the cooktop could be
seriously injured.
• Do not leave children alone or unattended in the area
where the appliance is in use.
• Children or persons with a disability which limits their
ability to use the appliance should have a responsible and
competent person to instruct them in its use. The instructor
must be sure that they can use the appliance without
danger to themselves or their surroundings.
• Do not repair or replace any part of the appliance unless
specifically recommended in the manual. All other servicing
should be done by a qualified technician.
• Do not place or drop heavy objects on your cooktop.
• Do not stand on your cooktop.
• Do not use pans with jagged edges or drag pans across
the Induction glass surface as this can scratch the glass.
• Do not use scourers or any other harsh abrasive cleaning
agents to clean your cooktop, as these can scratch the
Induction glass.
• This appliance is intended to be used in household and
similar applications such as: -staff kitchen areas in shops,
offices and other working environments; -farm houses;
-by clients in hotels, motels and other residential type
environments; -bed and breakfast type environments.
• WARNING: The appliance and its accessible parts become
hot during use.
• Care should be taken to avoid touching heating elements.
• Children less than 8 years of age shall be kept away unless
continuously supervised.

5
ENG
Before using your New Ceramic Hob
OPERATION OF PRODUCT
Touch Controls
Choosing the right Cookware
Technical Specification
• Read this guide, taking special note of the ‘Safety Warnings’ section.
• Remove any protective film that may still be on your ceramic hob.
Cooking Hob HV6410MX
Cooking Zones 4 Zones
Supply Voltage 220-240V~ 50Hz or 60Hz
Installed Electric Power 6000-7200W
Product Size D×W×H(mm) 590X520X55
Building-in Dimensions A×B (mm) 560X490
Weight and Dimensions are approximate. Because we continually strive to improve our products we may change specifications
and designs without prior notice.
• The controls respond to touch, so you don’t need to apply
any pressure.
• Use the ball of your finger, not its tip.
• You will hear a beep each time a touch is registered.
• Make sure the controls are always clean, dry, and that there
is no object (e.g. a utensil or a cloth) covering them. Even a
thin film of water may make the controls difficult to operate.
Do not use cookware with jagged edges or a curved base.
Make sure that the base of your pan is smooth, sits flat against the glass, and is the same size as the cooking zone. Always centre
your pan on the cooking zone.
Always lift pans off the ceramic hob – do not slide, or they may scratch the glass.

6
ENG
How to use
Start cooking
Finish cooking
After power on, the buzzer beeps once, all the indicators light
up for 1 second then go out, indicating that the ceramic hob
has entered standby mode.
Touch the ON/OFF
all the indicators show “-“
control.
Place a suitable pan on the
cooking zone that you wish
to use.
• Make sure the bottom of
the pan and the surface
of the cooking zone are
clean and dry.
Touching the heating zone
selection control, and an
indicator next to the key
will flash.
Adjust heat setting by
touching the slider control.
• If you don’t choose a
heat setting within 1
minute, the ceramic hob
will automatically switch
off. You will need to start
again at step 1.
• You can modify the heat
setting at any time during
cooking.
• You can modify the
power level from 0 to 9
By the slide control.
Activate the Double zone
Press the heating zone
selection control of the
double loop heating zone
(e.g. power level is 6)
When the power level
indicator flash, then press
“ ”
After 5 seconds, the
indicator stop flash, the
double loop function
is activated, and power
level shows “6” and “=”
alternately.
Touching the heating zone
selection control that you
wish to switch off.
POWER UP
POWER DOWN
Beware of hot surfaces
“H” will show which cooking zone is hot to touch. It will
disappear when the surface has cooled down to a safe
temperature. It can also be used as an energy saving function
if you want to heat further pans, use the hotplate that is still
hot.
• The function only work in 1# and 3# cooking zone
• The dual cooking zone has two cooking areas that you can
use a central section and an outer section. You can use the
central section (A) independently or both sections (B) at
once.
Using the Double zone function
Turn the cooking zone off by
touching the slider to “”.
Make sure the display
shows”0”
Turn the whole cooktop off
by touching the ON/OFF
control.
Zone 1# Zone 3#

7
ENG
Locking the Controls
Timer control
To lock the controls
Touch the lock control The timer indicator will show
“ Lo”
To unlock the controls
Make sure the ceramic hob is turned on.
Touch and hold the lock control for a while.
When the hob is in the lock mode, all the controls
are disable except the ON/OFF , you can
always turn the ceramic hob off with the ON/OFF
control in an emergency, but you will need to
unlock the hob first in the next operation.
• You can lock the controls to prevent unintended use (for
example children accidentally turning the cooking zones
on).
• When the controls are locked, all the controls except the
ON/OFF control are disabled.
You can use the timer in two different ways:
a. You can use it as a minute minder. In this case, the timer will
not turn any cooking zone off when the set time is up.
b. You can set it to turn one or more cooking zones off after
the set time is up.
• The maximum time of the timer is 99 minutes
Using the Timer as a Minute Minder
If you are not selecting any cooking zone
Make sure the cooktop is
turned on.
Note: you can use the
minute minder even if
you’re not selecting any
cooking zone.
Touch the timer control, the
timer indicator will show
“--” ;
Deactivate the Double zone
Press the heating zone selection control of the double loop
heating zone, the power level indicator flash, then press
“”, the double loop function will be cancelled, and power
level will return to “6” .
NOTE
1. The double loop is available only in the 1# and 3#
cooking zone.
2. You can select the function from level 1 to level 9.
3. You can active the Dual zone only when the 1#or 3#
cooking zone is selected.
Adjust the timer setting
by touch the “-“ or “+”
control. The minute minder
indicator will start flashing
and will show in the timer
display.
Touching the “-” and “+”
together, the timer is
cancelled, and the “--” will
show in the minute display.
When the time is set, it
will begin to count down
immediately. The display
will show the remaining
time and the timer
indicator will flash for 5
seconds
Buzzer will beep for 30
seconds and the timer
indicator shows “- -” when
the setting time finished.
Hint:
• Touch the “-” or “+” control of the timer once to decrease or
increase by 1 minute.
• Touch and hold the “-“or“+” control of the timer to decrease
or increase by 10 minutes.
• If the setting time exceeds 99 minutes, the timer will
automatically return to 0 minute.
Setting the timer to turn one or more cooking zones off
Set one zone
Touching the heating zone
selection control
Touch the timer control, the
timer indicator show “10
Adjust the timer setting by
touch the “-” or “+” control.
The minute minder indicator
will start flashing and will
show in the timer display.

8
ENG
Touching the “-” and “+”
together, the timer is
cancelled, and the “--” will
show in the minute display.
When the time is set, it
will begin to count down
immediately. The display will
show the remaining time
and the timer indicator will
flash for 5 seconds.
Setting the timer to turn more than one cooking zone off
a. If more than one heating zone use this function, the timer
indicator will show the lowest time.
(e.g. zone 1# setting time of 5 minutes, zone 2# setting time
of 15 minutes, the timer indicator shows “5”.)
NOTE: The red dot next to power level indicator will flash
(set to 15 minutes)
(set to 5 minutes)
b. Once the countdown timer expires, the corresponding
zone will switch off. Then it will show the new min. timer and
the dot of corresponding zone will flash.
c. When cooking timer expires, the
corresponding cooking zone will be
switch off automatically.
Power level Default working timer
(hour)
1 8
2 8
3 8
4 4
5 4
6 4
7 2
8 2
9 2
Note:
• The red dot next to power level
indicator will illuminate indicating
that zone is selected.
• If you want to change the time after the timer is set, you
have to start from step 1.
Over-Temperature Protection
A temperature sensor equipped can monitor the
temperature inside the ceramic hob. When an excessive
temperature is monitored, the ceramic hob will stop
operation automatically.
Residual Heat Warning
When the hob has been operating for some time, there will
be some residual heat. The letter “ H ”appears to warn you to
keep away from it.
Default working times
Another safety feature of the hob is automatic shutdown. This
occurs whenever you forget to switch off a cooking zone. The
default shutdown times are shown in the table below:

9
ENG
Heat setting Suitability
1 - 2
• delicate warming for small amounts of food
• melting chocolate, butter, and foods that burn quickly
• gentle simmering
• slow warming
3 - 4
• reheating
• rapid simmering
• cooking rice
5 - 6 • pancakes
7 - 8 • sautéing
• cooking pasta
9
• stir-frying
• searing
• bringing soup to the boil
• boiling water
COOKING GUIDELINES
HEAT SETTINGS
Take care when frying as the oil and fat heat up very quickly, particularly if you’re using PowerBoost. At extremely
high temperatures oil and fat will ignite spontaneously and this presents a serious fire risk.
The settings below are guidelines only. The exact setting will depend on several factors, including your cookware
and the amount you are cooking. Experiment with the Ceramic hob to find the settings that best suit you.
Cooking Tips
• When food comes to the boil, reduce the temperature
setting.
• Using a lid will reduce cooking times and save energy by
retaining the heat.
• Minimize the amount of liquid or fat to reduce cooking
times.
• Start cooking on a high setting and reduce the setting
when the food has heated through.
Simmering, cooking rice
• Simmering occurs below boiling point, at around 85˚C,
when bubbles are just rising occasionally to the surface
of the cooking liquid. It is the key to delicious soups
and tender stews because the flavours develop without
overcooking the food. You should also cook egg-based
and flour thickened sauces below boiling point.
• Some tasks, including cooking rice by the absorption
method, may require a setting higher than the lowest
setting to ensure the food is cooked properly in the time
recommended.
Searing steak
To cook juicy flavoursome steaks:
1. Stand the meat at room temperature for about 20 minutes
before cooking.
2. Heat up a heavy-based frying pan.
3. Brush both sides of the steak with oil. Drizzle a small
amount of oil into the hot pan and then lower the meat
onto the hot pan.
4. Turn the steak only once during cooking. The exact
cooking time will depend on the thickness of the steak and
how cooked you want it. Times may vary from about 2 – 8
minutes per side. Press the steak to gauge how cooked it
is – the firmer it feels the more ‘well done’ it will be.
5. Leave the steak to rest on a warm plate for a few minutes
to allow it to relax and become tender before serving.
For stir-frying
1. Choose a ceramic compatible flat-based wok or a large
frying pan.
2. Have all the ingredients and equipment ready. Stir-frying
should be quick. If cooking large quantities, cook the food
in several smaller batches.
3. Preheat the pan briefly and add two tablespoons of oil.
4. Cook any meat first, put it aside and keep warm.
5. Stir-fry the vegetables. When they are hot but still crisp,
turn the cooking zone to a lower setting, return the meat
to the pan and add your sauce.
6. Stir the ingredients gently to make sure they are heated
through.
7. Serve immediately.

10
ENG
What? How? Important!
Everyday soiling on
glass (fingerprints,
marks, stains left by
food or non-sugary
spill overs on the
glass)
1. Switch the power to the cooktop off.
2. Apply a cooktop cleaner while the glass is still
warm (but not hot!)
3. Rinse and wipe dry with a clean cloth or paper
towel.
4. Switch the power to the cooktop back on.
• When the power to the cooktop is
switched off, there will be no ‘hot surface’
indication but the cooking zone may still
be hot! Take extreme care.
• Heavy-duty scourers, some nylon scourers
and harsh/abrasive cleaning agents may
scratch the glass. Always read the label to
check if your cleaner or scourer is suitable.
• Never leave cleaning residue on the
cooktop: the glass may become stained.
Boil overs, melts, and
hot sugary spills on
the glass
Remove these immediately with a fish slice, palette
knife or razor blade scraper suitable for Ceramic glass
cooktops, but beware of hot cooking zone surfaces:
1. Switch the power to the cooktop off at the wall.
2. Hold the blade or utensil at a 30° angle and scrape
the soiling or spill to a cool area of the cooktop.
3. Clean the soiling or spill up with a dish cloth or
paper towel.
4. Follow steps 2 to 4 for ‘Everyday soiling on glass’
above.
• Remove stains left by melts and sugary
food or spill overs as soon as possible.
If left to cool on the glass, they may be
difficult to remove or even permanently
damage the glass surface.
• Cut hazard: when the safety cover is
retracted, the blade in a scraper is razor-
sharp. Use with extreme care and always
store safely and out of reach of children.
Spill overs on the
touch controls
1. Switch the power to the cooktop off.
2. Soak up the spill
3. Wipe the touch control area with a clean damp
sponge or cloth.
4. Wipe the area completely dry with a paper towel.
5. Switch the power to the cooktop back on.
• The cooktop may beep and turn
itself off, and the touch controls
may not function while there is
liquid on them. Make sure you wipe the
touch control area dry before turning the
cooktop back on.
Problem Possible causes What to do
The cooktop cannot
Be turned on.
No power. Make sure the ceramic hob is connected to
the power supply and that it is switched on.
Check whether there is a power outage
in your home or area. If you’ve checked
everything and the problem persists, call a
qualified technician.
The touch controls
are unresponsive.
The controls are locked. Unlock the controls. See section ‘Using your
ceramic cooktop’ for instructions.
The touch controls
are difficult to
operate.
There may be a slight film of water over the controls or
you may be using the tip of your finger when touching
the controls.
Make sure the touch control area is dry and
use the ball of your finger when touching the
controls.
The glass is being
scratched.
Rough-edged cookware.
Unsuitable, abrasive scourer or cleaning products
being used.
Use cookware with flat and smooth bases.
See ‘Choosing the right cookware’.
See ‘Care and cleaning’.
Some pans make
crackling or clicking
noises.
This may be caused by the construction of your
cookware (layers of different metals vibrating
differently).
This is normal for cookware and
does not indicate a fault.
CARE AND CLEANING
HINTS AND TIPS

11
ENG
L(mm) W(mm) H(mm) D(mm) A(mm) B(mm) X(mm) F(mm)
590 520 55 51 560+4 +1 490+4+1 50 mini 3 mini
A(mm) B(mm) C(mm) D E
760 50 mini 20 mini Air intake Air exit 5mm
INSTALLATION
Selection of installation equipment
Cut out the work surface according to the sizes shown in the drawing.
For the purpose of installation and use, a minimum of 5 cm space shall be preserved around the hole. Be sure the thickness of
the work surface is at least 30mm. Please select heat-resistant and insulated work surface material (Wood and similar fibrous or
hygroscopic material shall not be used as work surface material unless impregnated) to avoid the electrical shock and larger
deformation caused by the heat radiation from the hotplate. As shown below::
Under any circumstances, make sure the ceramic cooker hob is well ventilated and the air inlet and outlet are not blocked. Ensure
the ceramic cooker hob is in good work state. As shown below
The safety distance between the sides of the hob and the inner surfaces of the worktop should be at least 3mm.
The safety distance between the hotplate and the cupboard above the hotplate should be at least 760mm.
NOTE
NOTE
SEAL

12
ENG
WARNING! Ensuring Adequate Ventilation
Make sure the ceramic hob is well ventilated and that air inlet and outlet are not blocked. In order to avoid accidental touch with
the overheating bottom of the hob, or getting unexpected electric shock during working, it is necessary to put a wooden insert,
fixed by screws, at a minimum distance of 50mm from the bottom of the hob. Follow the requirements below.
There are ventilation holes around outside of the hob. YOU MUST ensure these holes are not blocked by the
worktop when you put the hob into position.
The unit should be placed on a stable, smooth surface (use the packaging). Do not apply force onto the controls protruding from
the hob.
Fix the hob on the work surface by screw four brackets on the bottom of hob (see picture) after installation.
Adjust the bracket position to suit for different work surface’s thickness.
• Be aware that the glue that joins the plastic or wooden material to the furniture, has to resist to temperature not
below 150ºC, to avoid the deforming.
• The rear wall, adjacent and surrounding surfaces must therefore be able to withstand a temperature of 90ºC.
Before locating the fixing brackets
A B C D
screw bracket Screw
hole
base
The brackets cannot touch with the inner surfaces of the worktop after installation under any circumstances (see
picture).
HOB
BRACKET BRACKET
HOB
TABLE TABLE

13
ENG
The bottom surface and the power cord of the hob are not accessible after installation.
Yellow / Green
Black
Brown
Blue
Yellow / Green
Black
Brown
Blue
1. If the cable is damaged or needs replacing, this should be done by an after-sales technician using the proper tools, so as to
avoid any accidents.
2. If the appliance is being connected directly to the mains supply, an Omni polar circuit breaker must be installed with a
minimum gap of 3mm between the contacts.
3. The installer must ensure that the correct electrical connection has been made and that it complies with safety regulations.
4. The cable must not be bent or compressed.
5. The cable must be checked regularly and only replaced by a properly qualified person.
1. The ceramic cooker hob must be installed by qualified personnel or technicians. We have professionals at your service.
Please never conduct the operation by yourself.
2. The ceramic cooker hob should not be mounted to cooling equipment, dishwashers and rotary dryers.
3. The ceramic cooker hob should be installed such that better heat radiation can be ensured to enhance its reliability.
4. The wall and induced heating zone above the work surface should withstand heat.
5. To avoid any damage, the sandwich layer and adhesive must be resistant to heat.
6. A steam cleaner is not to be used.
The power supply should be connected in compliance with the relevant standard, or a single-pole circuit breaker. The method of
connection is shown below.
Cautions
Connecting the hob to the mains power supply

14
ENG
DISPOSAL: Do not
dispose this product
as unsorted municipal
waste. Collection of
such waste separately
for special treatment is
necessary.
This appliance is labelled in compliance with European directive 2012/19/EU for Waste
Electrical and Electronic Equipment (WEEE). By ensuring that this appliance is disposed
of correctly, you will help prevent any possible damage to the environment and to
human health, which might otherwise be caused if it were disposed of in the
wrong way.
The symbol on the product indicates that it may not be treated as normal household
waste. It should be taken to a collection point for the recycling of electrical and electronic
goods.
This appliance requires specialist waste disposal. For further information regarding the
treatment, recovery and recycling of this product please contact your local council, your
household waste disposal service, or the shop where you purchased it.
For more detailed information about treatment, recovery and recycling of this product,
please contact your local city office, your household waste disposal service or the shop
where you purchased the product.

15
BiH/CG
Čestitamo Vam na kupovini Vaše nove indukcione ploče.
Predlažemo Vam da malo vremena posvetite čitanju Uputstva
za upotrebu/Uputstva za instalaciju, kako biste potpuno
razumijeli kako da ispravno instalirate i koristite uređaj.
Za instalaciju, molimo Vas da pročitate dio vezan za instalaciju
uređaja. Pročitajte sva bezbjedonosna uputstva pažljivo prije
upotrebe i čuvajte Uputstvo za upotrebu za slučaj da Vam
zatreba u budućnosti.
BEZBJEDONOSNA
UPOZORENJA
Vaša bezbjednost nam je važna. Molimo, pričitajte ove
informacije prije upotrebe ploče za kuhanje.
INSTALACIJA
Opasnost od strujnog udara
• Prekinite napajanje uređaja električnom energijom prije
bilo kakve popravke ili održavanja istog.
• Povezivanje na dobro uzemljenje je neophodno i
obavezno.
• Promijene u domaćem sistemu za napajanje mora da izvrši
kvalifikovani električar.
• Nepoštovanje ovog savjeta može dovesti do strujnog
udara ili smrti..
Opasnost od posjekotina
• Pazite se - ivice ploče su oštre.
• Neopreznost može dovesti do povreda ili posjekotina.
Važna bezbjedonosna uputstva
• Pažljivo pročitajte ova uputstva prije instalacije ili upotrebe
ovog uređaja.
• Nikakav zapaljiv materijal ili proizvod ne smije stajati na
ovom uređaju u bilo kom trenutku.
• Molimo vas, postarajte se da ove informacije budu
dostupne osobi odgovornoj za instalaciju uređaja, budući
da to može smanjiti troškove instalacije.
• Kako bi se izbjegli rizici, ovaj uređaj mora biti instaliran u
skladu s ovim informacijama za instalaciju.
• Ovaj uređaj bi trebalo da propisno instalira i uzemlji samo
odgovarajuće kvalifikovana osoba.
• Ovaj uređaj bi trebalo da bude povezan na strujno kolo
koje ima izolacijski prekidač, koji omogućuje potpuno
prekidanje napajanja električnom energijom.
• Neispravna instalacija uređaja može dovesti do
poništavanja bilo kakve garancije i odgovornosti.
• Ovaj uređaj mogu koristiti djeca starosti 8 ili više godina
i osobe sa smanjenim fizičkim, čulnim ili mentalnim
sposobnostima, ili manjkom iskustva i znanja ukoliko su
• pod nadzorom, ili su im data uputstva u vezi sa
bezbjednom upotrebom uređaja, i svesni su mogućeg
rizika.
• Djeca ne bi trebalo da se igraju uređajem. Uređaj ne smiju
čistiti djeca, osim ako to ne čine pod nadzorom.
• Ukoliko je kabl za napajanje oštećen, mora ga zamijeniti
proizvođač, njegov agent za servisiranje ili slična
kvalifikovana lica, kako bi se izbjegli mogući rizici.
• Upozorenje: Ukoliko je površina napukla, isključite aparat
kako biste izbijegli mogućnost strujnog udara, u slučaju
da je površina ploče izrađena od keramičkog stakla ili
sličnogmaterijala, koji štiti žive dijelove.
• Metalni predmeti, kao što su noževi, viljuške, kašike i
poklopci ne bi trebalo da stoje na površini ploče, s obzirom
na to da može doći do njihovog zagrijavanja.
• Ne bi trebalo koristiti paročistač.
• Ne koristite paročistač za čišćenje ploče za kuhanje.
• Uređaj nije namijenjen za upravljanje pomoću spoljnog
tajmera ili odvojenog sistema daljinskog upravljanja.
• UPOZORENJE: Opasnost od požara: ne odlažite
predmete na površinu za kuhanje.
• Proces termičke obrade hrane je potrebno nadgledati.
Kratkotrajni proces termičke obrade hrane treba da bude
konstantno nadgledan.
• UPOZORENJE: Pripremanje hrane uz pomoć masti ili ulja
bez nadzora može biti opasno i može prouzrokovati pojavu
otvorenog plamena. NIKAD ne pokušavajte da ugasite
plamen vodom, već isključite aparat i zatim pokrijte vatru,
poklopcem ili protivpožarnim ćebetom, na primjer.
RUKOVANJE I ODRŽAVANJE
Opasnost od strujnog udara
• Ne kuhajte na polomljenoj ili razbijenoj ploči za kuhanje.
Ukoliko postoji mogućnost od lomljenja ili pucanja
površine ploče za kuhanje, odmah prekinite napajanje
uređaja električnom energijom (na zidnom prekidaču) i
kontaktirajte kvalifikovanog tehničara.
• Isključite ploču za kuhanje sa napajanja iz zida prije čišćenja
ili popravke.
• Nepoštovanje ovog savjeta može dovesti do strujnog
udara ili smrti.
Opasnost po zdravlje
• Ovaj uređaj zadovoljava elektromagnetne bezbjedonosne
standarde.
• Međutim, osobe sa srčanim pejsmejkerima ili drugim
električnim implantima (kao što su insulinske pumpice)
moraju se konsultovati sa svojim ljekarom ili proizvođačem
implanta prije upotrebe uređaja, kako bi bili sigurni da
elektromagnetno polje neće uticati na njihove implante.
• Nepoštovanje ovog savjeta može dovesti do smrti.
Opasnost od vrele površine
• Tokom upotrebe, dostupni dijelovi uređaja će postati
dovoljno vrući da mogu prouzrokovati opekotine.
• Ne dozvolite da vaše tijelo, odjeća ili bilo koji drugi
predmet, osim onog koji je pogodan za kuhanje, dođe u
kontakt sa indukcionim staklom dok se površina ne ohladi.
• Djeca treba da budu udaljena od uređaja.
• Ručke posuda za kuhanje mogu biti vrele na dodir.
Provjerite da ručke posuda za kuhanje ne prelaze na druge
zone za kuhanje, sem one na kojoj se nalaze. Držite ručke
podalje od domašaja djece.
• Nepoštovanje ovog savjeta može dovesti do opekotina i
oparotina.
Opasnost od posjekotina
• Oštrica na strugaču za ploču za kuhanje je otkrivena kada
se ukloni sigurnosna maska. Koristite ga veoma pažljivo i
uvijek ga čuvajte van domašaja djece.
• Neopreznost može dovesti do povreda ili posjekotina.

16
BiH/CG
UPOZNAVANJE SA PROIZVODOM
Informacije o proizvodu
Princip rada
Mikropompjuterska keramička ploča za kuhanje može da ispuni različite kuhinjske zahtjeve zbog zagrijavanja pomoću električnog
otpora, mikrokompjuterizovane kontrole i mogućnosti izbora različitog napona, i zaista je najbolji izbor za moderne porodice.
Keramička ploča za kuhanje je fokusirana na potrošače i usvaja personalizovani dizajn. Ploča posjeduje sigurne i pouzdane
performanse, što čini vaš život komfornijim i omogućava Vam da u potpunosti uživate u zadovoljstvu života.
Keramička ploča za kuhanje direktno koristi električni otpor za zagrijavanje, a prilagođavanje energije se stvara regulacijom
napajanja dodirom na tastere.
Važna bezbjedonosna uputstva
• Nikad ne ostavljate uređaj bez nadzora kada ga koristite.
Kipljenje može da prouzrokuje dim i mastan izliveni sadržaj
koji se može zapaliti.
• Nikad ne upotrebljavajte svoj uređaj kao radnu površinu ili
površinu za odlaganje.
• Nikad ne ostavljajte bilo kakav predmet ili pribor na
uređaju.
• Nemojte stavljati ili odlagati nikakve magnetizovane
predmete (na primjer kreditne kartice ili memorijske kartice)
ili eketronske uređaje (na primjer kompjutere, MP3 plejere)
u blizini uređaja, budući da magnetno polje uređaja može
uticati na njih.
• Nikad ne koristite svoj uređaj za zagrijavanje ili grijanje
prostorije.
• Nakon upotrebe, uvijek isključite zonu za kuhanje i ploču za
kuhanje kako je opisano u ovom priručniku (tj.
• korišćenjem kontrola na dodir). Ne oslanjajte se na funkciju
prepoznavanja posude radi isključivanja zona za kuhanje
kada uklonite posudu za termičku obradu hrane.
• Ne dozvolite djeci da se igraju uređajem ili da sjede na
njemu, stoje ili se penju na njega.
• Predmete koji su zanimljivi za djecu ne čuvajte u ormarićima
iznad uređaja. Djeca koja se penju na ploču za kuhanje
mogu se ozbiljno povrijediti.
• Ne ostavljate djecu samu ili bez nadzora u prostoru gdje se
koristi uređaj.
• Djeca ili osobe sa invaliditetom koji ograničava njihovu
sposobnost da koriste uređaj treba da imaju odgovornu i
kompetentnu osobu koja će ih uputiti u to kako se koristi
uređaj. Instruktor treba da bude uvjeren da oni mogu da
koriste uređaj bez opasnosti po njih ili njihovu okolinu.
• Nemojte popravljati ili mijenjati bilo koji dio uređaja, osim
ako to nije posebno preporučeno u uputstvu. Svaku drugu
popravku treba da obavi kvalifikovani tehničar.
• Nemojte stavljati ili ispuštati teške predmete na svoju ploču
za kuhanje.
• Ne stajte na svoju ploču za kuhanje.
• Nemojte koristiti posude sa grubim ivicama ili ih vući po
površini indukcionog stakla budući da mogu izgrebati
staklo.
• Ne koristite žice ili bilo koje jako abrazivno sredstvo za
čišćenje kako biste očistili svoju ploču za kuhanje, budući
da mogu izgrebati indukciono staklo.
• Uređaj je namijenjen upotrebi u domaćinstvu i za
slične namijene, kao što su: - kuhinje za zaposlene u
prodavnicama, kancelarijama i drugim radnim okruženjima;
- seoska domaćinstva; - za goste hotela, motela i drugih
objekata za smeštaj; - objekte koji pružaju uslugu
prenoćišta sa doručkom.
• UPOZORENJE: Uređaj i njegovi pristupačni dijelovi postaju
vrući tokom upotrebe.
• Treba da se postarate da izbijegnete dodirivanje zagrijanih
elemenata.
• Uređaj treba da bude van domašaja djece mlađe od 8
godina starosti, osim ako nisu pod stalnim nadzorom.
Pogled odozgo Kontrolna tabla
1. Zona s Max. 1000/2200 W
2. Zona s Max. 1200 W
3. Zona s Max. 1100/2000 W
4. Zona s Max. 1200 W
5. Staklena ploča
6. Kontrolna tabla
1. Tasteri za izbor za zagrijavanje zone
2. Taster na dodir za uključivanje/isključivanje
3. Taster za odabir dve zone
4. Taster za zaključivanje
5. Taster za uključivanje/isključivanje
6. Kontrola vremena (tajmer)
7. Tasteri za regulisanje vremena
3 4
516
17 2

17
BiH/CG
Prije upotrebe nove keramičke ploče
Tehnička specifikacija
• Pročitajte ovaj vodič, posebno obraćajući pažnju na dio “Bezbjedonosna upozorenja”.
• Uklonite sve zaštitne prevlake koje se još uvijek mogu nalaziti na Vašoj keramičkoj ploči.
Ploča za kuhanje HV6410MX
Zone za kuhanje 4 Zones
Jačina napona električne energije 220-240V~ 50Hz or 60Hz
Instalirana električna energija 6000-7200W
Veličina proizvoda D×W×H(mm) 590X520X55
Ugradne dimenzije A×B (mm) 560X490
Težina i dimenzije su približne. Budući da konstantno težimo poboljšanju naših proizvoda, moguće su promjene specifikacija i
dizajna bez prethodnog obavještenja.
FUNKCIJE PROIZVODA
Tasteri na dodir
Biranje pravog posuđa za termičku obradu hrane
• Kontrole odgovaraju na dodir, dakle ne morate primenjivati
pritisak.
• Koristite jagodicu svoga prsta, ne vrh.
• Čućete zvučni signal svaki put kada dodir bude registrovan.
• Postarajte se da kontrolna dugmad budu uvijek čista, suha
i da na njima nema predmeta (kao što su pribor ili tkanina),
koji ih pokrivaju. Čak i tanak sloj vode može napraviti
poteškoće u radu kontrolnih dugmadi.
Ne koristite posuđe sa grubim ivicama ili zakrivljenom osnovom.
Postarajte se da osnova posude bude glatka, pravilno prijanja na staklo i da je iste veličine kao i zona za kuhanje. Posudu uvijek
postavite na centar zone za kuhanje.
Posude uvijek podignite sa keramičke ploče- ne vucite ih po njoj, budući da mogu ogrebati staklo.

18
BiH/CG
Završetak pripreme hrane
Nakon što se uređaj priključi na napajanje električnom
energijom, oglasiće se zvučni signal jedanput, svi indikatori će
zasvijetleti na jednu sekundu, a zatim se ugasiti, pokazujući na
taj način da je keramička ploča ušla u stanje čekanja.
Dodirnite taster
uključivanje/isključivanje
i svi indikatori će
pokazati “-”.
Postavite odgovarajuću
posudu na zonu za kuhanje
koju želite
da koristite.
• Pobrinite se da dno
posude i površina zone za
kuhanje budu čisti i suhi.
Dodirnite taster za izbor
zone za zagrevaje, indikator
pored tastera će zatreperiti.
Prilagodite postavljenu
temperaturu dodirom na
taster za kontrolu.
• Ukoliko ne izaberete
podešavanje temperature
u roku od 1 minuta,
keramička ploča će se
automatski isključiti.
Moraćete ponovo da
krenete od 1. koraka.
•Temperaturu možete
podešavati bilo kad tokom
procesa termičke obrade
hrane.
• Možete modifikovati nivo
temperature od 0 do 9
dodirivanjem tastera.
Aktiviranje duple zone
Pritisnite taster za zagrijavanje
zone za kuhanje oba prstena
zone za kuhanje (npr. jačina
je 6)
Kada indikator jačine
zatreperi, pritisnite “ ”
Nakon 5 sekundi indikator
će prestati da svijetli,
funkcija duplog prstena
je aktivirana i nivo toplote
pokazuje “6” i
“=” naizmjenično.
Dodirnite taster za odabir za
zonu koju želite da isključite.
UKLJUČIVANJE
ISKLJUČIVANJE
Čuvajte se vruće površine
“H” će pokazati koja zona za kuhanje je vruća na dodir.
Nestaće kada se površina ohladi do bezbjedne temperature.
Ovo se može koristiti i kao funkcija za uštedu energije, ukoliko
želite da zagrijete neku drugu posudu, koristite površinu koja
je i dalje vruća.
• Ova funkcija radi samo za zone za kuhanje 1# i 3#
• Dupla zona za kuhanje ima dvije površine za kuhanje, možete
koristiti centralni i spoljni dio. Možete koristiti centralni dio
(A) nezavisno ili oba dijela (B) istovremeno.
Korišćene funkcije duple zone
Isključite zonu za kuhanjem
pomijeranjem točkića do “0.
Postarajte se da ekran
pokazuje “0”
Isključite cijelu ploču za
kuhanje dodirom tastera za
uključivanje/isključivanje .
Zona 1# Zona 3#
Kako upotrebljavati
Početak prireme hrane

19
BiH/CG
Zaključavanje tastera
Kontrola vremena (tajmer)
Za zakljuvačanje tastera
Dodirnite taster za
zaključavanje
Indikator vremena će
pokazati “Lo”
Za otključavanje tastera
Pobrinite se da keramička ploča za kuhanje bude uključena.
Dodirnite i držite taster neko vrijeme.
Kada je ploča u zaključanom režimu, svi tasteri su
onemogućeni osim uključivanje/isključivanje ,
uvijek možete isključiti keramičku ploču dodirom
tastera uključivanje/isključivanje u slučaju
nužde, ali treba da prvo otključate ploču pri
sljedećem korišćenju.
• Možete zaključati tastere kako biste spriječili neželjenu
upotrebu (na primijer slučajno uključivanje zona za kuhanje
od strane djece).
• • Kada su tasteri zaključani, svi tasteri sem tastera za
uključivanje/isključivanje su onemogućeni.
Tajmer možete koristiti na dva različita načina:
a. Ovu funkciju možete koristiti kao “upozorenje o isteku
vremena”. U ovom slučaju, tajmer neće isključiti nijednu zonu
za kuhanje kada vrijeme istekne.
b. Možete ga podesiti da isključi jednu ili više zona za kuhanje
nakon što vrijeme istekne.
• Maksimalno vrijeme na koje se tajmer može podesiti je 99
minuta.
Upotreba tajmera za “upozorenje o isteku vremena”
Ukoliko niste izabrali nijednu zonu za kuhanje
Pobrinite se da ploča za
kuhanje bude uključena.
Napomena: možete
koristiti “upozorenje o
isteku vremena” čak iako
niste izabrali nijednu zonu
za kuhanje.
Dodirnite taster tajmera,
indikator će pokazati “--”;
Deaktiviranje duple zone za kuhanje
Pritisnite taster za zagrijavanje zone za kuhanje dvostrukog
prstena zone za kuhanje, indikator jačine će zatrepereti,
zatim pritisnite “ ”, funkcija duple zone će biti prekinuta, i
nivo jačine će se vratiti na “6”.
NAPOMENA
1. Funkcija duple zone za kuhanje je moguća samo na
zonama 1# i 3#.
2. Možete izabrati funkcije od nivoa 1 do 9.
3. Funkciju duple zone možete aktivirati samo kada su
izabrane zone 1# i 3#.
Podesite tajmer,
dodirivanjem tastera “-” ili
“+” Indikator “upozorenja
o isteku vremena” će
započeti da tratperi i
prikazaće se na ekranu
tajmera.
Dodirivanjem “-” i “+”
zajedno, tajmer će biti
prekinut, i “--” će se
prikazati na ekranu za
minute.
Kada je vrijeme podešeno,
odbrojavanje će odmah
početi. Ekran će prikazivati
preostalo vrijeme i
indikator vremena će
zatreperiti na 5 sekundi.
Oglasiće se zvučni signal
na 30 sekundi i indikator
vremena će pokazati “ - -”
kada podešeno vrijeme
istekne.
Savjet:
a). Dodirnite taster “-” ili “+” na tajmeru jedanput, kako biste
vrjeme smanjili ili povećali za 1 minut.
b. Dodirnite i držite taster “-” ili “+” na tajmeru za smanjivanje
ili povećavanje za 10 minuta.
c. Ukoliko podešeno vrijeme promašuje 99 minuta, tajmer će
se automatski prebaciti na 0 minuta.
Podešavanje tajmera za isključivanje jedne ili više zona za
kuhanje
Izaberite zonu
Dodirnite taster, da biste
izabrali zonu za zagrijavanje
Dodirnite taster tajmera,
indikator će pokazati “10”
Podesite tajmer,
dodirivanjem tastera “-” ili
“+” Indikator “upozorenja o
isteku vremena” će započeti
da tratperi i prikazaće se na
ekranu tajmera.

20
BiH/CG
Dodirivanjem “-” i “+”
zajedno, tajmer će biti
prekinut, i “--” će se prikazati
na ekranu za minute.
Kada je vrijeme podešeno,
odbrojavanje će odmah
početi. Ekran će prikazivati
preostalo vrijeme i indikator
vremena će zatreperiti na 5
sekundi.
Podešavanje tajmera za isključivanje jedne ili više zona za
kuhanje
a. Ukoliko ovu funkciju koristi više zona, indikator vremena
će prikazi ono koje je najkraće.
(npr. postavljeno vrijeme 1# zone je 5 minuta, zone 2# je 15,
tajmer će pokazivati “5”.)
NAPOMENA: Crvena tačka pored indikatora nivoa jačine
će zatrepereti
(postavljeno na 15
minuta)
(postavljeno na 5
minuta)
b. Kada odbrojavanje istekne, odgovarajuća zona će
se isključiti. Zatim će se pokazati novi tajmer i tačka za
odgovarajuću zonu će zatreperti.
c. Kada vrijeme pripreme hrane
istekne, odgovarajuća zona za
kuhanje će biti automatski isključena.
Nivo napajanja Podrazumijevano vrijeme
rada (sat)
1 8
2 8
3 8
4 4
5 4
6 4
7 2
8 2
9 2
Napomena:
• Crvena tačka pored indikatora za
nivo napajanja će biti osvjetljena
pokazujući da je izbarana zona.
• Ukoliko želite da promejnite vrijeme nakon što je tajmer
postavljen, morate početi od 1. koraka.
Zaštita od pregrijavanja
Senzor za kontrolu temperature koji je ugrađen u uređaj prati
temperaturu unutar keramičke ploče za kuhanje. Kada senzor
primijeti da je visina temperature veoma visoka, keramička
ploča će automatski prestati sa radom.
Upozorenje o preostaloj toploti
Ukoliko je ploča radila duže vremena, pojaviće se ostaci
toplote. Slovo “H” će se pojaviti, kako bi vas upozorilo da se
držite podalje od te zone.
Podrazumijevano vrijeme rada
Još jedna sigurnosna funkcija ploče je automatsko
isključivanje. Ona se aktivira svaki put kada zaboravite
da isključite zonu za kuhanje. Podrazumijevano vrijeme
isključivanja je prikazano u tabeli ispod:
Table of contents
Languages:
Other Tesla Hob manuals

Tesla
Tesla HV6401TB User manual

Tesla
Tesla HI6200TB User manual

Tesla
Tesla HI6400SB User manual

Tesla
Tesla HV3200TB User manual

Tesla
Tesla HI6400TB User manual

Tesla
Tesla HI3200SB User manual

Tesla
Tesla HM6220SX User manual

Tesla
Tesla HV6400TB User manual

Tesla
Tesla HI6400MB User manual

Tesla
Tesla HI3200TB User manual